


 Loading...
Take a Look at All HP Support Has to Offer
Along with your product, you receive a variety of support services from Hewlett-Packard and our support partners designed to give you the results you need, quickly and professionally.
Online Services: for 24-hour |
World Wide Web URL—Printer drivers, updated HP printer software, plus product and support |
|||
access to information over your |
information can be obtained from the following URLs: |
|
|
|
modem, we suggest these services. in the U.S.: |
http://www.hp.com |
in Europe: |
http://www2.hp.com |
|
|
Printer drivers can be obtained from the following sites: |
|
|
|
|
in Japan: |
ftp://www.jpn.hp.com/drivers/ |
in Korea: |
http://www.hp.co.kr |
|
in Taiwan: |
http://www.hp.com.tw or from a local driver website of http://www.dds.com.tw |
||
|
|
|||
|
HP Bulletin Board Service—Our electronic download service provides convenient access to HP |
|||
|
printer drivers, updated HP printer software, product information, and troubleshooting hints. Set your |
|||
|
communication software to N,8,1 and dial or use: |
|
|
|
|
in the U.S. and Canada: (1) (208) 344-1691 |
in Taiwan: |
(886) (2) 923-3233 |
|
|
in Korea: |
HITEL or CHOLIAN (Go HPK) |
in Australia: |
(61) (3) 9890-0276 |
|
in New Zealand: |
(64) (9) 356-3660 |
in China: |
(86) (10) 6261-4172 |
|
European Bulletin Board Service numbers are listed at http://www2.hp.com. |
|||
America OnLine—(America OnLine/Bertelsmann is available in France, Germany, and the UK)—Printer drivers, updated HP printer software, and support documentation are available to help
answer questions on HP products. Use Keyword HP to start your tour or call (1) (800) 827-6364 and ask for representative #1118 to subscribe.
CompuServe—Printer drivers, updated HP printer software, and interactive sharing of technical information with other members are available on CompuServe’s HP User’s forums (GO HP), or call (1) (800) 524-3388 and ask for representative #51 to subscribe. (CompuServe is also available in the UK, France, Belgium, Switzerland, Germany, and Austria.)
Obtaining Software: |
Phone: |
(1) (970) 339-7009 |
Mail: |
Hewlett-Packard Company |
For U.S. and Canada: |
Fax: |
(1) (970) 330-7655 |
|
P.O. Box 1754 |
|
|
|
|
Greeley, CO 80632 USA |
For Asia-Pacific Countries: |
Contact Fulfill Plus at (65) 740-4477 (Hong Kong, Indonesia, Malaysia, Philippines, or Singapore). For |
|||
For Australia, New Zealand, and |
Korea, call (82) (2) 3270-0805 or (82) (2) 3270-0893. |
|
|
|
|
|
|
|
|
India: |
For Australia and New Zealand, call (61) (2) 565-6099. For India, call (91) (11) 682-6035. |
|||
For European English: |
Call (44) (142) 986-5511. |
|
|
|
|
|
|
||
HP Direct Ordering for |
Call (1) (800) 538-8787 (U.S.) or (1) (800) 387-8164 (Canada). |
|
||
Accessories and Supplies |
|
|
|
|
|
|
|||
HP Support Assistant CD-ROM: |
This support tool offers a comprehensive online information system designed to provide technical and |
|||
|
product information on HP products. To subscribe to this quarterly service in the U.S. or Canada, call (1) |
|||
|
(800) 457-1762. In Hong Kong, Indonesia, Malaysia, or Singapore, call Fulfill Plus at (65) 740-4477. |
|||
|
|
|||
HP Service Information: |
To locate HP-authorized dealers, call (1) (800) 243-9816 (U.S.) or (1) (800) 387-3867 (Canada). |
|||
|
|
|
||
HP Service Agreements: |
Call (1) (800) 835-4747 (U.S.) or (1) (800) 268-1221 (Canada). |
|
||
HP FIRST: HP FIRST Fax will deliver detailed troubleshooting information on common software and troubleshooting tips for your HP product. Call from any touch-tone phone and request up to three documents per call. These documents will be sent to the fax of your choice.
Australia |
(61) |
(3) |
9272-2627 |
Korea |
(82) |
(2) |
769-0543 |
||
Austria |
(43) |
(1) |
0660-8128 |
Malaysia |
(60) |
(3) |
298-2478 |
||
Belgium (Dutch) |
(32) |
(2) |
0800-11906 |
Netherlands |
(31) |
(20) |
0800-222420 |
||
Belgium (French) |
(32) |
(2) |
0800-17043 |
New Zealand |
(64) |
(9) |
356-6642 |
||
Canada |
(1) (800) |
333-1917 |
Norway |
(47) |
800-11319 |
||||
China |
(86) |
(10) |
6505-5280 |
Philippines |
(65) |
291-7951 |
|||
Denmark |
(45) |
8001-0453 |
Portugal |
(351) (1) |
0505-313342 |
||||
English (outside of UK) |
(31) |
(20) |
681-5792 |
Singapore |
(65) |
275-7251 |
|||
Finland |
(358) (9) |
0800-13134 |
Spain |
(34) |
(90) |
099-3123 |
|||
France |
(33) |
(146) 0800-905900 |
Sweden |
(46) |
(2) |
079-5743 |
|||
Germany |
(49) |
(13) |
081-0061 |
Switzerland (French) |
(41) |
(1) |
0800-551526 |
||
Hong Kong |
(852) 2506-2422 |
Switzerland (German) |
(41) |
(1) |
0800-551527 |
||||
Hungary |
(36) |
(1) |
252-4647 |
Taiwan |
(886) (2) |
719-5589 |
|||
India |
(91) |
(11) |
682-6035 |
Thailand |
(66) |
(2) |
661-3511 |
||
Indonesia |
(62) |
(21) |
352-2044 |
United Kingdom |
(44) |
(134) 0800-960271 |
|||
Italy |
(39) |
(2) |
1678-59020 |
United States |
(1) (800) |
333-1917 |
|||
Japan |
(81) |
(3) |
3335-8622 |
|
|
|
|
|
|
|
|
|
|
|
|
|
|
|
|

Customer Support Options Worldwide
In addition to the phone numbers listed below, refer to the Administrator’s Guide for worldwide sales and service addresses and phone numbers for countries not listed here.
Customer Support & Product Repair Assistance for the U.S. and Canada:
Call (1) (208) 323-2551 Monday through Friday from 6 am to 6 pm (Mountain Time) free of charge during the Warranty Period. However, your standard long-distance phone charges still apply. Have your serial number ready when calling.
Post-warranty telephone assistance is available to answer your product questions. Call (1) (900) 555-1500 ($2.50* per minute, U.S. only) or call (1) (800) 999-1148 ($25* per call, Visa or MasterCard, U.S. and Canada). Charges begin only when you connect with a support technician. *Prices subject to change.
European Customer Support Center Language and In-Country Options Available
Open Monday through Friday 8:30 to 18:00 CET
HP provides a free telephone support service during the warranty period. By calling a telephone number listed below, you will be connected to a responsive team waiting to help you. If you require support after your warranty has expired, you can receive support for a fee through the same telephone number. The fee is charged on a per-incident basis. When calling HP, please have the following information ready: product name and serial number, date of purchase, and description of the problem.
Danish: |
Denmark |
(45) |
3929-4099 |
German: |
Austria |
(43) |
(1) 0660-6386 |
|
Dutch: |
Belgium |
(32) |
(2) 626-8806 |
Italian: |
Germany |
(49) |
(180) 525-8143 |
|
English: |
Netherlands |
(31) |
(20) |
606-8751 |
Italy |
(39) |
(2) 264-10350 |
|
Ireland |
(353) (1) |
662-5525 |
Norwegian: |
Norway |
(47) |
2211-6299 |
||
|
UK |
(44) |
(171) 512-5202 |
Portuguese: |
Portugal |
(351) (1) 441-7199 |
||
Finnish: |
International |
(44) |
(171) 512-5202 |
Spanish: |
Spain |
(34) |
(90) 232-1123 |
|
Finland |
(358) (9) |
0203-47288 |
Swedish: |
Sweden |
(46) |
(8) 619-2170 |
||
French: |
Belgium |
(32) |
(2) 626-8807 |
|
|
|
|
|
|
France |
(33) |
(45) |
043-9853 |
|
|
|
|
|
Switzerland |
(41) |
(84) |
880-1111 |
|
|
|
|
In-country Support Numbers
If you require support after your warranty has expired or additional product repair services, or if your country is not listed below, see “Worldwide HP Sales and Service Offices” in appendix E.
Argentina |
(54) |
(1) |
781-4059 |
Malaysia |
(60) |
(3) |
295-2566 |
|
||
|
(54) |
(1) |
781-4069 |
México D.F. |
(52) |
(5) |
326-4600 |
|
||
Australia |
(61) |
(3) |
272-8000 |
México Guadalajara |
(52) |
(3) |
669-9500 |
|
||
Brazil |
(55) |
(11) |
709-1444 |
México Monterey |
(52) |
(83) |
378-4240 |
|
||
Canada |
(1) (208) |
323-2551 |
Middle East/Africa |
(41) |
(22) |
780-7111 |
|
|||
China |
(86) |
(10) |
6261-4174 |
New Zealand |
(64) |
(9) |
356-6640 |
|
||
|
(86) |
(10) |
6261-4175 |
Philippines |
(63) |
(2) |
894-1451 |
|
||
|
(86) |
(10) |
6261-4176 |
Poland |
(48) |
(22) |
37-5065 |
|
||
|
(86) |
(10) |
6262-5666 |
Portugal |
(351) (1) |
301-7330 |
|
|||
Czech Republic |
(42) |
(2) |
471-7321 |
Russia |
(7) (95) |
923-5001 |
|
|||
Greece |
(30) |
(1) |
689-6411 |
Singapore |
(65) |
272-5300 |
|
|||
Hong Kong |
(852) 800-7729 |
Switzerland |
(41) |
(1) |
753-7111 |
|
||||
Hungary |
(36) |
(1) |
343-0310 |
Taiwan |
(886) (2) |
717-0055 |
|
|||
India |
(91) |
(11) |
682-6035 |
Thailand |
(66) |
(2) |
661-4011 |
|
||
|
(91) |
(11) |
682-6069 |
|
(66) |
(2) |
661-4012 |
|
||
Indonesia |
(62) |
(21) |
350-3408 |
Turkey |
(90) |
(1) |
224-5925 |
|
||
Japan |
(81) |
(3) |
3335-8333 |
|
|
|
|
|
|
|
Korea |
(82) |
(2) |
3270-0700; outside Seoul, |
|
|
|
|
|
|
|
|
call (82) (80) 999-0700 |
|
|
|
|
|
|
|||
|
|
|
|
|
|
|
|
|
|
|

HP Network ScanJet 5 Scanner
User’s Guide
Copyright Information
© 1997 Hewlett-Packard
Company
All Rights Reserved. Reproduction, adaptation, or translation without prior written permission is prohibited, except as allowed under the copyright laws.
Publication number:
C1306-90919
Second Edition: October 1997
Warranty
The information contained in this document is subject to change without notice.
Hewlett-Packard makes no warranty of any kind with regard to this material, including, but not limited to, the implied warranties of merchantability and fitness for a particular purpose.
Hewlett-Packard shall not be liable for errors contained herein or for incidental or consequential damages in connection with the furnishing, performance, or use of this material.
NOTE TO U.S. GOVERNMENT USERS: RESTRICTED RIGHTS COMMERCIAL COMPUTER SOFTWARE: “Use, duplication or disclosure by the Government is subject to restrictions as set forth in subparagraph (c) (1) (ii) of the Rights in Technical Data Clause at DFARS 52.227-7013.”
Material scanned by this product may be protected by governmental laws and other regulations, such as copyright laws. The customer is solely responsible for complying with all such laws and regulations.
Trademark Credits
PaperPort™ is a registered trademark of Visioneer, Inc. in the United States and other countries. Microsoft® and Windows® are U.S. registered trademarks of Microsoft Corporation. Lotus® and Lotus 1-2-3® are U.S. registered trademarks of Lotus Corporation. Adobe Photoshop™ is a registered trademark of Adobe Systems, Incorporated, which may be registered in certain jurisdictions. OmniPage Professional and OmniPage Lite are registered trademarks of the
Caere Corporation. All other products mentioned herein may be trademarks of their respective companies.

CONTENTS
1 Getting Started
Overview . . . . . . . . . . . . . . . . . . . . . . . . . . . . . . . . |
11 |
Installation Requirements . . . . . . . . . . . . . . . . . . . . . . . |
12 |
Software Installation . . . . . . . . . . . . . . . . . . . . . . . . |
12 |
Using the Scanner Control Panel . . . . . . . . . . . . . . . . . . . |
15 |
Scanner Users . . . . . . . . . . . . . . . . . . . . . . . . . . . . . |
16 |
Document Destinations . . . . . . . . . . . . . . . . . . . . . . . . |
18 |
Receiving Scanned Documents at Your Desktop . . . . . . . . . . |
18 |
Recipients of Your Scanned Documents . . . . . . . . . . . . . . |
19 |
2 Using the Scanner
What You Can Scan . . . . . . . . . . . . . . . . . . . . . . . . . . |
21 |
Loading a Document . . . . . . . . . . . . . . . . . . . . . . . . . |
22 |
Loading a Document on the Scanner Glass . . . . . . . . . . . . |
23 |
Selecting Your Settings at the Control Panel . . . . . . . . . . . . . |
24 |
During Scanning . . . . . . . . . . . . . . . . . . . . . . . . . . . . |
28 |
Scanning Double-Sided Documents . . . . . . . . . . . . . . . . . . |
29 |
Faxing to a Number Not Listed in Destination Lists . . . . . . . . . |
30 |
Scanning to a Printer . . . . . . . . . . . . . . . . . . . . . . . . . . |
31 |
3 Working at Your Computer
Using the HP Network ScanJet 5 Utility . . . . . . . . . . . . . . . |
33 |
Starting the HP Network ScanJet 5 Utility . . . . . . . . . . . . . |
33 |
Creating and Maintaining Your Private Destination List . . . . . . . |
34 |
Viewing Your Private Destination List . . . . . . . . . . . . . . . |
34 |
Automatic Workflows . . . . . . . . . . . . . . . . . . . . . . . . |
35 |
Distribution Lists . . . . . . . . . . . . . . . . . . . . . . . . . . |
37 |
Internet E-mail Destinations . . . . . . . . . . . . . . . . . . . . |
37 |
Fax Destinations . . . . . . . . . . . . . . . . . . . . . . . . . . |
40 |
Creating and Maintaining Your Inboxes . . . . . . . . . . . . . . . . |
41 |
Changing Your Current Inbox . . . . . . . . . . . . . . . . . . . |
41 |
Creating a New Inbox . . . . . . . . . . . . . . . . . . . . . . . . |
42 |
Configuring an Inbox . . . . . . . . . . . . . . . . . . . . . . . . |
43 |
Disabling the Current Inbox . . . . . . . . . . . . . . . . . . . . |
44 |
Configuring PaperPort Software to Open Automatically . . . . . |
44 |
Choosing the Notification Method and Time . . . . . . . . . . . . |
45 |
Creating or Changing Your Password . . . . . . . . . . . . . . . . . |
46 |
Viewing Your Transaction Log . . . . . . . . . . . . . . . . . . . . . |
46 |
EN |
Contents-7 |

4 Working in the PaperPort Software
General Features . . . . . . . . . . . . . . . . . . . . . . . . . . . . |
47 |
Page View and Desktop View . . . . . . . . . . . . . . . . . . . |
47 |
The Command Bar . . . . . . . . . . . . . . . . . . . . . . . . . |
49 |
Setting Preferences . . . . . . . . . . . . . . . . . . . . . . . . . |
50 |
Automatic Saving . . . . . . . . . . . . . . . . . . . . . . . . . |
51 |
Giving Titles to Items . . . . . . . . . . . . . . . . . . . . . . . |
51 |
Displaying and Hiding Elements . . . . . . . . . . . . . . . . . . |
52 |
Rotating or Flipping an Item . . . . . . . . . . . . . . . . . . . . |
52 |
Deleting Items . . . . . . . . . . . . . . . . . . . . . . . . . . . |
53 |
Undoing an Action . . . . . . . . . . . . . . . . . . . . . . . . . |
53 |
Working in Desktop View . . . . . . . . . . . . . . . . . . . . . . . |
54 |
Selecting and Deselecting Items . . . . . . . . . . . . . . . . . . |
54 |
Moving and Arranging Items . . . . . . . . . . . . . . . . . . . . |
55 |
Duplicating Items . . . . . . . . . . . . . . . . . . . . . . . . . . |
55 |
Working in Page View . . . . . . . . . . . . . . . . . . . . . . . . . |
56 |
Changing the Display Size of an Item . . . . . . . . . . . . . . . |
57 |
Panning an Item . . . . . . . . . . . . . . . . . . . . . . . . . . |
57 |
Inverting an Image . . . . . . . . . . . . . . . . . . . . . . . . . |
57 |
5 Managing Scanned Items
Working with Stacks . . . . . . . . . . . . . . . . . . . . . . . . . . |
59 |
Creating Stacks . . . . . . . . . . . . . . . . . . . . . . . . . . . |
59 |
Navigating within a Stack . . . . . . . . . . . . . . . . . . . . . |
60 |
Unstacking Pages . . . . . . . . . . . . . . . . . . . . . . . . . |
60 |
Reordering Pages in a Stack . . . . . . . . . . . . . . . . . . . . |
61 |
Inserting a Page in a Stack . . . . . . . . . . . . . . . . . . . . . |
62 |
Working with Folders . . . . . . . . . . . . . . . . . . . . . . . . . |
63 |
Filing Items in Folders . . . . . . . . . . . . . . . . . . . . . . . |
63 |
Displaying Items in Folders . . . . . . . . . . . . . . . . . . . . |
64 |
Creating, Renaming, and Deleting Folders . . . . . . . . . . . . |
65 |
6 Annotating Scanned Items
Using the Annotation Tools . . . . . . . . . . . . . . . . . . . . . . |
67 |
Copying, Cutting, and Pasting . . . . . . . . . . . . . . . . . . . |
68 |
Cropping an Item . . . . . . . . . . . . . . . . . . . . . . . . . . |
69 |
Working with Sticky Notes . . . . . . . . . . . . . . . . . . . . . |
70 |
Adding Markup Text . . . . . . . . . . . . . . . . . . . . . . . . |
71 |
Highlighting Information . . . . . . . . . . . . . . . . . . . . . . |
71 |
Adding Freehand Annotations . . . . . . . . . . . . . . . . . . . |
72 |
Drawing Lines and Arrows . . . . . . . . . . . . . . . . . . . . . |
72 |
Creating New Items . . . . . . . . . . . . . . . . . . . . . . . . |
73 |
Adding Graphics to Items . . . . . . . . . . . . . . . . . . . . . |
73 |
Fine-Tuning Annotations . . . . . . . . . . . . . . . . . . . . . . . |
74 |
Selecting the Font or Color . . . . . . . . . . . . . . . . . . . . . |
74 |
Editing Annotation Text . . . . . . . . . . . . . . . . . . . . . . |
75 |
Moving and Resizing Annotations . . . . . . . . . . . . . . . . . |
76 |
Contents-8
EN

Copying, Cutting, and Pasting Annotations . . . . . . . . . . . . |
77 |
Displaying and Hiding Annotations . . . . . . . . . . . . . . . . |
77 |
Undoing Annotations . . . . . . . . . . . . . . . . . . . . . . . . |
78 |
Deleting Annotations . . . . . . . . . . . . . . . . . . . . . . . . |
78 |
7 Importing and Exporting with the PaperPort Software
Using the Import and Export Feature . . . . . . . . . . . . . . . . . |
79 |
Exporting Items . . . . . . . . . . . . . . . . . . . . . . . . . . . |
80 |
Exporting Compressed Files . . . . . . . . . . . . . . . . . . . . |
81 |
Printing from Other Applications . . . . . . . . . . . . . . . . . . . |
82 |
Adding Summary Information to Items . . . . . . . . . . . . . . . . |
83 |
Finding Information . . . . . . . . . . . . . . . . . . . . . . . . . . |
84 |
Finding Files . . . . . . . . . . . . . . . . . . . . . . . . . . . . |
84 |
Finding Items . . . . . . . . . . . . . . . . . . . . . . . . . . . . |
84 |
Finding Annotations . . . . . . . . . . . . . . . . . . . . . . . . |
86 |
Using Object Linking and Embedding (OLE) . . . . . . . . . . . . . |
87 |
8 Linking to Other Applications
Using Link Icons . . . . . . . . . . . . . . . . . . . . . . . . . . . . |
89 |
Using Links . . . . . . . . . . . . . . . . . . . . . . . . . . . . |
90 |
Using Printer Links . . . . . . . . . . . . . . . . . . . . . . . . . . |
91 |
Using Fax Links . . . . . . . . . . . . . . . . . . . . . . . . . . . . |
92 |
Using Word Processor OCR Links . . . . . . . . . . . . . . . . . . |
93 |
Using E-Mail Links . . . . . . . . . . . . . . . . . . . . . . . . . . |
95 |
Receiving PaperPort Files in E-Mail . . . . . . . . . . . . . . . . |
95 |
Setting Preferences for Links . . . . . . . . . . . . . . . . . . . . . |
96 |
PaperPort Link Preferences . . . . . . . . . . . . . . . . . . . . . |
96 |
9 Troubleshooting and Error Messages
Overview . . . . . . . . . . . . . . . . . . . . |
. . . . . . . . . . . . 99 |
Scanner Troubleshooting . . . . . . . . . . . |
. . . . . . . . . . . . 100 |
Scanner is not Working . . . . . . . . . . . |
. . . . . . . . . . . . 100 |
Control Panel is not Working . . . . . . . . |
. . . . . . . . . . . . 100 |
Scanned Image Quality is Poor . . . . . . . |
. . . . . . . . . . . . 100 |
Scanner Overheats . . . . . . . . . . . . . |
. . . . . . . . . . . . 100 |
Clearing Paper Jams . . . . . . . . . . . . . . |
. . . . . . . . . . . . 101 |
Control Panel Error Messages . . . . . . . . . |
. . . . . . . . . . . . 105 |
Internal Errors . . . . . . . . . . . . . . . . |
. . . . . . . . . . . . 105 |
Network Errors . . . . . . . . . . . . . . . |
. . . . . . . . . . . . 105 |
Transaction Log Error Messages . . . . . . |
. . . . . . . . . . . . 106 |
HP Network ScanJet 5 Utility Error Messages |
. . . . . . . . . . . . 108 |
PaperPort Software Troubleshooting . . . . . |
. . . . . . . . . . . . 111 |
Installation Problems . . . . . . . . . . . . |
. . . . . . . . . . . . 111 |
Printing Problems . . . . . . . . . . . . . . |
. . . . . . . . . . . . 112 |
Fax Problems . . . . . . . . . . . . . . . . |
. . . . . . . . . . . . 112 |
OCR Problems . . . . . . . . . . . . . . . |
. . . . . . . . . . . . 112 |
Import and Export File Problems . . . . . . |
. . . . . . . . . . . . 113 |
EN |
Contents-9 |

Missing E-Mail Links . . . . . . |
. . |
. . |
. . |
. . |
. . |
. . |
. . |
. . |
. |
114 |
PaperPort Software Error Messages |
. . |
. . |
. . |
. . |
. . |
. . |
. . |
. . |
. |
116 |
A Installing the PaperPort Viewer
Overview . . . . . . . . . . . . . . . . . . . . . . . . . . . . . . . . 121 Obtaining Extra Copies of PaperPort Viewer . . . . . . . . . . . 121
Installing PaperPort Viewer for Windows . |
. . . . . . . . . . . . . . 122 |
|
Installing PaperPort Viewer for Macintosh |
. . . . . . . . . . . . . . |
123 |
Starting the PaperPort Viewers . . . . . . |
. . . . . . . . . . . . . . |
124 |
B Warranty and Support Information
Warranty and Service Statement . . . . . . . . |
. . . . . . . . . . . 125 |
|
Hardware Service During the Warranty Period |
. . . . . . . . . . 126 |
|
Hardware Service After the Warranty Period |
. . . . . . . . . . . |
126 |
Replacement Parts and Accessories . . . . . . . |
. . . . . . . . . . . |
127 |
Contents-10
EN
1
Getting Started
Overview
The HP Network ScanJet 5 scanner can scan items such as memos, letters, brochures, photographs, newspaper clippings, and advertisements and store and distribute them electronically.
Anyone can use the HP Network ScanJet 5 scanner to scan documents and send them to destinations listed in the scanner control panel (or fax numbers you enter at the scanner). However, if you want to create your own destination list or receive scanned documents at your computer, you’ll need to use the HP Network ScanJet 5 Utility.
In addition, PaperPort™ software for HP has been provided with the HP Network ScanJet 5 scanner and can be used as your inbox to receive scanned documents at your computer.
EN
Getting Started 11

Installation Requirements
To use the HP Network ScanJet 5 Utility, the PaperPort software, OCR software, and online documentation, you need the following:
∙A personal computer, 386 or above (486 recommended)
∙Microsoft Windows 3.1, Windows 3.11, Windows for Workgroups 3.11, Windows 95, or Windows NT 3.51 (and above)
∙4 megabytes (MB) or more of internal memory (RAM); 8 MB to use the OCR software included with the network scanner
∙15 MB of free hard disk space for stand-alone installation and 1 MB of free hard disk space for a shared installation
∙VGA or SVGA monitor (recommended settings for your monitor: 256 or more colors, and 640 x 480 resolution)
∙3 MB of free temporary memory for decompressing files and file comparisons
Software Installation
With the HP Network ScanJet 5 Installation program you can install the following software components:
∙HP Network ScanJet 5 Utility (required)
∙Adobe™ Acrobat™ Reader (required only for online documentation)
∙PaperPort software (optional)
∙Caere OmniPage Limited Edition OCR software (optional)
You need to install the HP Network ScanJet 5 Utility on your computer (unless your network administrator does this for you). The PaperPort software can be installed entirely on your computer (in the directory you choose), or the program files can be installed on your network and the data files on your computer, depending on what your network administrator has chosen.
You can install either from the network or from the installation CD.
Before you begin, you’ll need to know where the install program is located and where you want the programs and data files to reside. If you’re installing from the network, Windows 3.1 users must have a drive mapped to the network server volume where your network administrator placed the HP Network ScanJet 5 Utility install program. If you cannot find the install program, contact your network administrator.
The steps required to start the install program vary slightly depending on the platform you’re using, as described in the procedures that follow.
12 Getting Started
EN

To install on Windows 3.1, Window 3.11, or Windows for Workgroups 3.11
1Turn on your computer and log on to your network.
2Start Microsoft Windows.
3In Program Manager, from the File menu choose Run.
4Type the path your network administrator gave you.
5Press [Enter] or click OK. The HP Network ScanJet 5 Installation program starts and takes a few moments to initialize.
6Follow the instructions on the screen.
To install on Windows 95 or Windows NT 4.0
1Turn on your computer.
2Log on to your network.
3Click Start and then click Run.
4Type the path your network administrator gave you.
5Press [Enter] or click OK. The HP Network ScanJet 5 Installation program starts and takes a few moments to initialize.
6Follow the instructions on the screen.
To install on Windows NT 3.51
1Turn on your computer.
2Log on to your network.
3In Program Manager from the File menu, choose Run.
4Type the path your network administrator gave you.
5Press [Enter] or click OK. The HP Network ScanJet 5 Installation program starts and takes a few moments to initialize.
6Follow the instructions on the screen.
Started Getting 1
EN
Getting Started 13

During the installation process, you’ll need to specify the following:
∙The software components you want to install.
∙If you are using a stand-alone installation, you will need to specify where to install all files on your hard drive.
∙If you are using a workstation installation, you will need to specify where to install the data files on your hard drive. The program files will be installed on the network and will be shared with others in your workgroup.
After the installation is complete, restart Windows to use the PaperPort software.
That’s it. You have finished installing the user software. Watch the on-screen One-Minute Guide for a quick introduction to the PaperPort software.
To run the One-Minute Guide
1Double-click the PaperPort icon in the PaperPort program group.
2From the Help menu, choose One-Minute Guide.
14 Getting Started
EN
Using the Scanner Control Panel
Use the scanner control panel to identify yourself to the scanner if you have a private destination list you want to use and to select destinations for a scanned document.
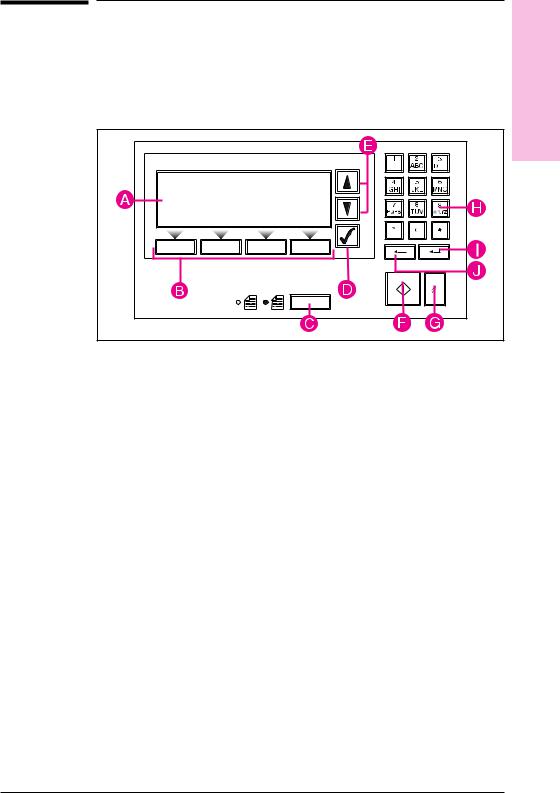
Figure 1
ADisplay—Displays user and destination lists, and status and error messages.
BSoft keys—Press to perform the function displayed above the key.
CSingle/double-sided key—Press to select single or double-sided original (indicated by the light next to the icon).
DSelect key—Press to select a user name or a destination.
EScroll arrows—Press to move up and down in the user and destination lists.
FGo key—Press to scan the document.
GAbort key—Press to stop the scanning and return to the main display screen.
HKeypad—Use to type your name, password, destinations, and fax numbers.
IEnter key—Press to send information to the scanner.
JBackspace key—Press to move the selection block to the left.
Started Getting 1
EN
Getting Started 15
Scanner Users
Two groups of users can scan and distribute documents with the HP Network ScanJet 5 scanner:
∙Registered users, who have been added to the public destination list by the network administrator and who have the HP Network ScanJet 5 Utility installed on their local computers. Registered users can create private destination lists by copying destinations from the public destination list and creating their own destinations. From the scanner control panel, registered users can access both their private destination list and the public destination list to build a temporary destination list to distribute the document they are currently scanning.
Figure 2
16 Getting Started
EN
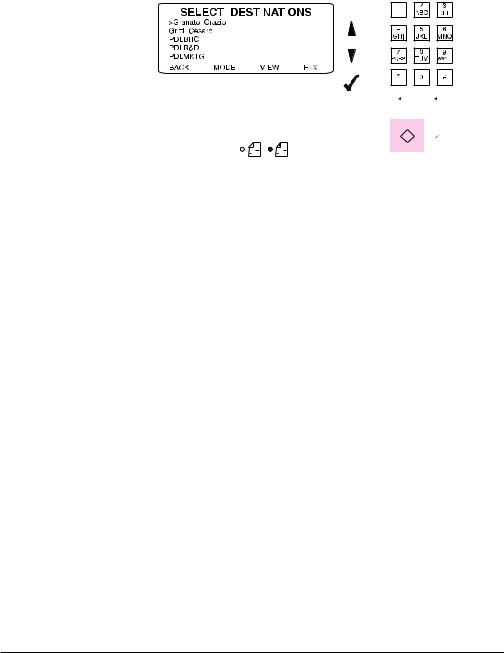
Figure 3
∙ General users, who have not been added to the public destination list |
|
1 |
||||||||||||||||||||||||||||||||||||||||
|
and who do not have the HP Network ScanJet 5 Utility installed on their |
|
||||||||||||||||||||||||||||||||||||||||
|
local computers. From the scanner control panel, they can access the |
|
||||||||||||||||||||||||||||||||||||||||
|
|
Getting |
||||||||||||||||||||||||||||||||||||||||
|
public destination list to build a temporary destination list for the |
|
||||||||||||||||||||||||||||||||||||||||
|
|
|
||||||||||||||||||||||||||||||||||||||||
|
document they are currently scanning, and they can scan to a printer. |
|
|
|||||||||||||||||||||||||||||||||||||||
|
(The network administrator has the option of preventing general users |
|
Started |
|||||||||||||||||||||||||||||||||||||||
|
from using the scanner.) |
|
||||||||||||||||||||||||||||||||||||||||
|
|
|
||||||||||||||||||||||||||||||||||||||||
|
|
|
|
|
|
|
|
|
|
|
|
|
|
|
|
|
|
|
|
|
|
|
|
|
|
|
|
|
|
|
|
|
|
|
|
|
|
|
|
|
|
|
|
|
|
|
|
|
|
|
|
|
|
|
|
|
|
|
|
|
|
|
|
|
|
|
|
|
|
|
|
|
|
|
|
|
|
|
|
|
|
|
|
|
|
|
|
|
|
|
|
|
|
|
|
|
|
|
|
|
|
|
|
|
|
|
|
|
|
|
|
|
|
|
|
|
|
|
|
|
|
|
|
|
|
|
|
|
|
|
|
|
|
|
|
|
|
|
|
|
|
|
|
|
|
|
|
|
|
|
|
|
|
|
|
|
|
|
|
|
|
|
|
|
|
|
|
|
|
|
|
|
|
|
|
|
|
|
|
|
|
|
|
|
|
|
|
|
|
|
|
|
|
|
|
|
|
|
|
|
|
|
|
|
|
|
|
|
|
|
|
|
|
|
|
|
|
|
|
|
|
|
|
|
|
|
|
|
|
|
|
|
|
|
|
|
|
|
|
|
|
|
|
|
|
|
|
|
|
|
|
|
|
|
|
|
|
|
|
|
|
|
|
|
|
|
|
|
|
|
|
|
|
|
|
|
|
|
|
|
|
|
|
|
|
|
|
|
|
|
|
|
|
|
|
|
|
|
|
|
|
|
|
|
|
|
|
|
|
|
|
|
|
|
|
|
|
|
|
|
|
|
|
|
|
|
|
|
|
|
|
|
|
|
|
|
|
|
|
|
|
|
|
|
|
|
|
|
|
|
|
|
|
|
|
|
|
|
|
|
|
|
|
|
|
|
|
|
|
|
|
|
|
|
|
|
|
|
|
|
|
|
|
|
|
|
|
|
|
|
|
|
|
|
|
|
|
|
|
|
|
|
|
|
|
|
|
|
|
|
|
|
|
|
|
|
|
|
|
|
|
|
|
|
|
|
|
|
|
|
|
|
|
|
|
|
|
|
|
|
|
|
|
|
|
|
|
|
|
|
|
|
|
|
|
|
|
|
|
|
|
|
|
|
|
|
|
|
|
|
|
|
|
|
|
|
|
|
|
|
|
|
|
|
|
|
|
|
|
|
|
|
|
|
|
|
|
|
|
|
|
|
|
|
|
|
|
|
|
|
|
|
|
|
|
|
|
|
|
|
|
|
|
|
|
|
|
|
|
|
|
|
|
|
|
|
|
|
|
|
|
|
|
|
|
|
|
|
|
|
|
|
|
|
|
|
|
|
|
|
|
|
|
|
|
|
|
|
|
|
|
|
|
|
|
|
|
|
|
|
|
|
|
|
|
|
|
|
|
|
|
|
|
|
|
|
|
|
|
|
|
|
|
|
|
|
|
|
|
|
|
|
|
|
|
|
|
|
|
|
|
|
|
|
|
|
|
|
|
|
|
|
|
|
|
|
|
|
|
|
|
|
|
|
|
|
|
|
|
|
|
|
|
|
|
|
|
|
|
|
|
|
|
|
|
|
|
|
|
|
|
|
|
|
|
|
|
|
|
|
|
|
|
|
|
|
|
|
|
|
|
|
|
|
|
|
|
|
|
|
|
|
|
|
|
|
|
|
|
|
|
|
|
|
|
|
|
|
|
|
|
|
|
|
|
|
|
|
|
|
|
|
|
|
|
|
|
|
|
|
|
|
|
|
|
|
|
|
|
|
|
|
|
|
|
|
|
|
|
|
|
|
|
|
|
|
|
|
|
|
|
|
|
|
|
|
|
|
|
|
|
|
|
|
|
|
|
|
|
|
|
|
|
|
|
|
|
|
|
|
|
|
|
|
|
|
|
|
|
|
|
|
|
|
|
|
|
|
|
|
|
|
|
|
|
|
|
|
|
|
|
|
|
|
|
|
|
|
|
|
|
|
|
|
|
|
|
|
|
|
|
|
|
|
|
|
|
|
|
|
|
|
|
|
|
|
|
|
|
|
|
|
|
|
|
|
|
|
|
|
|
|
|
|
|
|
|
|
|
|
|
|
|
|
|
|
|
|
|
|
|
|
|
|
|
|
|
|
|
|
|
|
|
|
|
|
|
|
|
|
|
|
|
|
|
|
|
|
|
|
|
|
|
|
|
|
|
|
|
|
|
|
|
|
|
Information the general users need to operate the scanner is included in the Quick Reference card. This user’s guide addresses the registered user.
EN
Getting Started 17

Document Destinations
Scanned documents are sent to the destinations you select at the scanner control panel using public and private destination lists. When you send a scanned document, it can arrive at one or more of the following destinations:
∙The application you have designated as your inbox in the HP Network ScanJet 5 Utility. From the inbox, it can be further distributed to other users via e-mail, and so forth, imported as a graphic into other applications or read into word processing applications using the OCR feature.
∙The inbox of another registered user or multiple registered users.
∙A fax machine.
∙An Internet e-mail address.
If you have the PaperPort software installed on your computer or on your network, you can send a scanned document directly to the application you have designated in your automatic workflow in the HP Network ScanJet 5 Utility. In addition, at the scanner control panel you can select the printer to which to copy a scanned document.
Receiving Scanned Documents at Your Desktop
Use the HP Network ScanJet 5 Utility to identify an application installed on your computer as an inbox. An inbox is a container where all the documents sent to your computer from the HP Network ScanJet 5 scanner are collected. An inbox can be a thumbnail desktop, a file system directory, or a printer, as described in Chapter 3, Working at Your Computer.
After a scanned document arrives at your computer, you can use a program such as the PaperPort software to organize and store your documents or annotate them before sending them to another computer program or distributing them to other people.
18 Getting Started
EN

Recipients of Your Scanned Documents
If you scan documents to an Internet e-mail address, you should make sure the recipients have a way to view the document which will arrive as either a .PDF or .TIF file.
Alternatively, you can export the scanned document into another file format, such as .TIF or .BMP, that the recipient can view, as described in Chapter 7, Importing and Exporting with the PaperPort Software.
Started Getting 1
EN
Getting Started 19

20 Getting Started
EN
2
Using the Scanner
What You Can Scan
Scanning a document can be as simple as loading the document in the scanner, selecting a destination from the list displayed at the scanner control panel, and pressing [Go].
Before scanning with the Automatic Document Feeder (ADF), you need to clear any paper from the scanner glass and eliminate conditions that may cause paper jams. Observe the following to minimize the possibility of paper jams:
∙Straighten any curls or wrinkles from documents before putting them on the document tray. If this is not possible, scan these documents using the scanner glass, or make photocopies of the documents and scan the photocopies.
∙Remove staples, paper clips, paper sticky notes, and any other materials from documents.
∙Avoid documents with tears, perforations, or punch holes.
If you would like to scan items made of unusual media, use the scanner glass rather than the ADF. Examples of unusual media include:
∙lightweight (onionskin) papers
∙transparencies
∙gum-backed paper
∙magazine pages
∙multiple-copy forms
Use one of the following paper sizes in the ADF:
∙Letter: 8.5 x 11 in (216 x 279 mm)
∙A4: 210 x 297 mm (8.3 x 11.7 in)
∙Legal: 8.5 x 14 in (216 x 356 mm)
Use paper within the following weight range in the ADF:
∙Minimum: 16 lb (60 g)
∙Maximum: 36 lb (135 g)
EN |
Using the Scanner 21 |
Loading a Document
Load your document in either the automatic document feeder or on the scanner glass, as described in the following procedures.
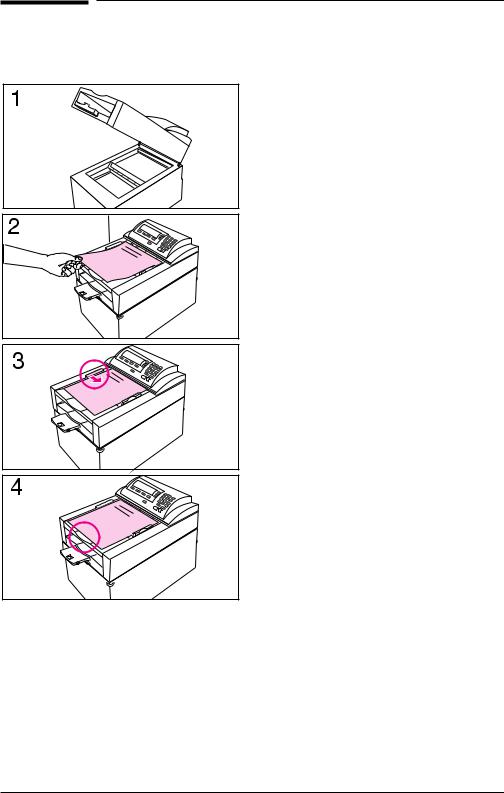
To load a document in the ADF
1 Make sure there isn’t any paper on the scanner glass.
2 Place the document (up to 50 pages) face up on the document tray with the top of the document near the feeder cover and the side of the document against the paper guide with the arrows.
3 Adjust the document guide to touch the left side of the paper stack.
4 Align the bottom edge of the paper stack with the correct paper size mark. Sliding the paper too far under the feeder cover can cause paper misfeeds.
22 Using the Scanner
EN
Loading a Document on the Scanner Glass
Use the scanner glass for regular or irregular sizes or types of paper. If the scanner doesn’t detect a document in the feeder, it will assume the job is from the scanner glass.
If you’re using a custom paper size, be sure to specify the exact size in the HP Network ScanJet 5 Utility, as described in Chapter 3, Working at Your Computer.
To load a document on the scanner glass
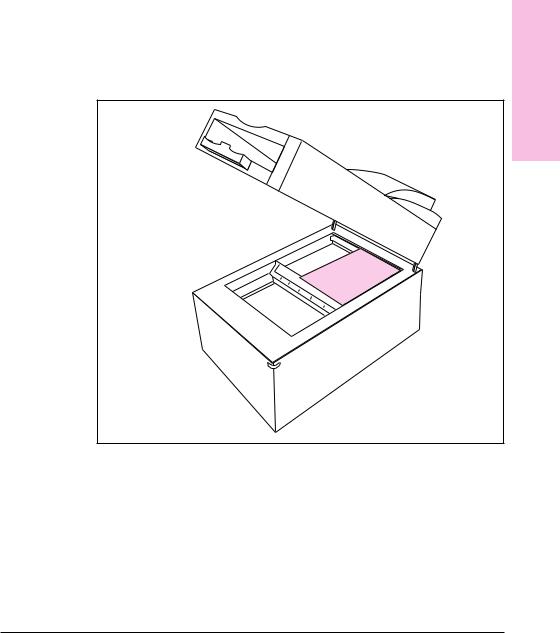
1Place the document face down on the scanner glass.
2Place small, custom-sized documents into the upper-left corner of the glass as shown in the following illustration.
Figure 4
the Using 2 Scanner
EN
Using the Scanner 23

|
Selecting Your Settings at the Control Panel |
|
Before scanning a document, at the control panel select the destination, |
|
type of image being scanned, and the paper size. |
|
At any point before you begin scanning, you can press the back arrow |
N o t e |
|
|
on the keypad to return to the previous menu or you can press [Abort] to |
|
return to the main menu and start over. |
|
|
To select the control panel settings
1At the opening screen display on the scanner control panel, type your user name on the keypad (this is the name the network administrator used to register you for the scanner). Figure 5 is the screen that appears when the printer is configured. Figure 6 is the screen that appears when no printer is configured.
Figure 5
Figure 6
24 Using the Scanner
EN
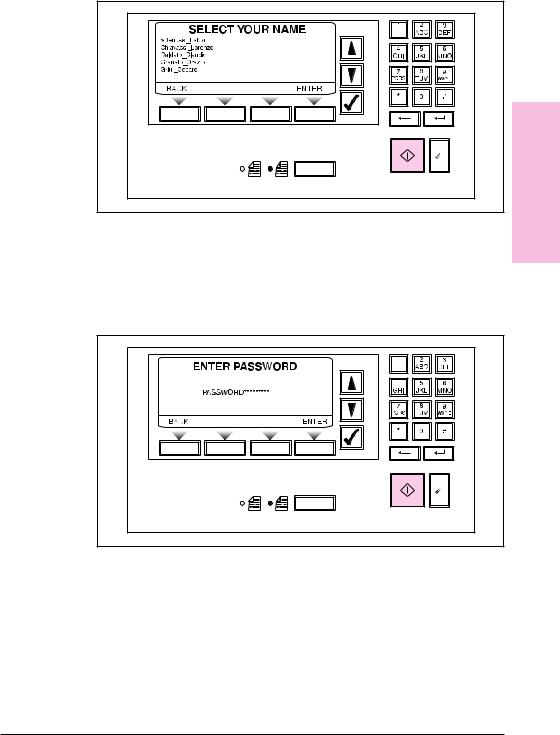
The Select Your Name screen appears, with the list of users automatically scrolled to the portion of the alphabet indicated by the first letters you typed.
Figure 7
UsingScanner 2
the
2Use the up-and-down arrow keys to scroll through the list (you can hold an arrow key down to move more quickly). When your name is highlighted, press [Select] (check mark key).
3If you have entered a password in the HP Network ScanJet 5 Utility (as described in Chapter 3, Working at Your Computer), the Enter Password screen appears. Type your password and press [Enter].
Figure 8
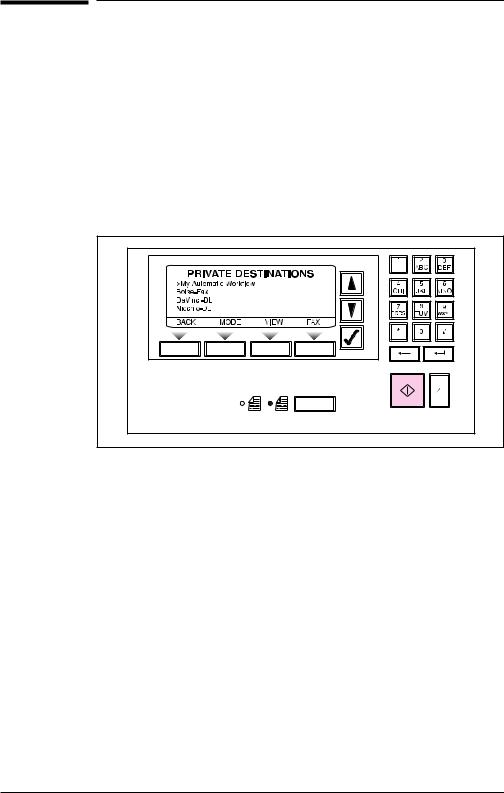
4On the Private Destinations screen, select one or more destinations from your private destination list by using the arrow keys to scroll to a destination and then pressing [Select] (check mark key).
You can scan to users, fax numbers, e-mail addresses, and distribution lists, or you can choose an automatic workflow. (See Chapter 3, Working at Your Computer, for more information about destinations.)
EN |
Using the Scanner 25 |

You can also add destinations from the public destination list by selecting the Public entry when you are viewing your private list. You can return to your private list by pressing the back arrow.
5Before you begin scanning, you can view the selected destinations or change a setting:
∙If you want to view the destinations you have selected before you begin scanning, press [View] to display the Selected Destinations screen.
Figure 9
You can deselect a destination from this list by scrolling to the destination and pressing [Select] (check mark key) again.
∙If you want to change a setting for the current document, press [Mode] to display the Select Mode screen.
Figure 10
6Select a mode appropriate for the content of the document to be scanned, and press [Enter].
∙If you want to change the paper size for the current document, on the Select Mode screen, press [Format] to display the Select Format screen.
26 Using the Scanner
EN

Figure 11 |
|
|
2 |
Select the paper size of the document to be scanned, and press [Enter]. |
theUsing Scanner |
|
|
(You can specify a custom paper size in the HP Network ScanJet 5 |
|
Utility, as described in Chapter 3, Working at Your Computer.) |
|
7 Press [Go] to scan the document.
EN
Using the Scanner 27

|
During Scanning |
|
While your document is being scanned, the scanner control panel |
|
displays messages indicating the page number being scanned. |
|
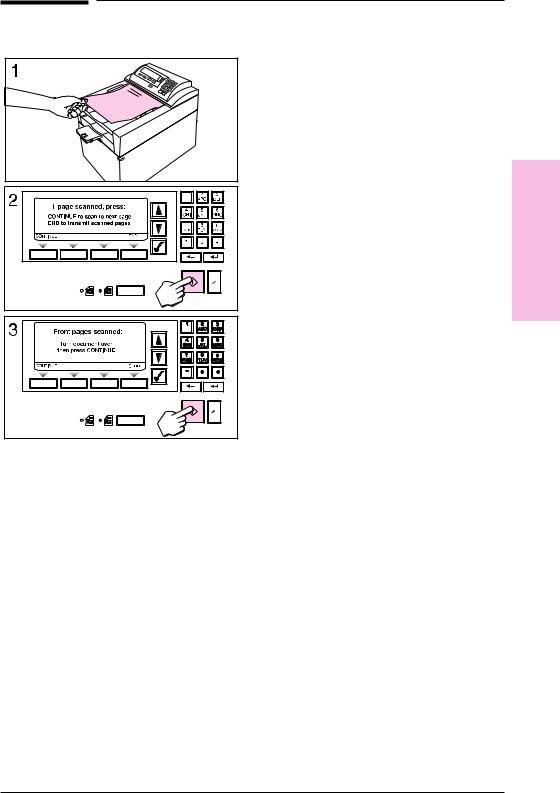
When you scan documents using the scanner glass, press the [Go] key to |
N o t e |
|
|
scan each page. When you have completed the job, press [Complete]. |
|
All pages scanned will be considered one document. |
|
At any point after you press [Go], you can press [Abort] to stop the |
|
|
|
scanning process. |
|
The control panel displays error messages if problems occur during |
|
scanning. See the troubleshooting information in Chapter 9, |
|
Troubleshooting and Error Messages, to resolve any problems that |
|
might occur. |
|
When your scanning job is successfully completed, the scanner control |
|
panel displays Done and the number of pages scanned. |
|
The control panel then displays the destination list again with the |
|
previous destinations selected. If you have another document to scan to |
|
the same destinations, you only need to press [Go]. |
|
To scan to different destinations, press [Abort] to select new |
|
destinations, or press [Backspace] to return to the previous screen. Or, |
|
wait for a short period and the opening control panel screen will once |
|
again be displayed. |
28 Using the Scanner
EN
Scanning Double-Sided Documents
You can scan double-sided documents by inserting the document to be scanned into the document feeder twice.
After you’ve selected your scanning destinations and changed settings (if appropriate), press [Single/Double-Sided] icons so that the double-sided light is on.
To scan a double-sided document
1 Place your document in the feeder with the first side face up and the top of the document going into the feeder first.
2 Press [Go] to begin scanning. As the document is being scanned, a message appears telling you that the scanner is scanning the front page.
3 When the scanner finishes the first side, the control panel prompts you to turn the document over. (The scanner does not automatically scan the other side; you must turn it over manually, placing the top of the document into the feeder first, as shown in the illustration.) Turn the document over and press [Continue].
As the document is being scanned, the message Scanner is scanning the back page appears.
The scanned document will appear as one multi-paged, correctly-paginated document on your desktop.
the Using 2 Scanner
EN
Using the Scanner 29
Faxing to a Number Not Listed in
Destination Lists
The fax server must be installed and running for you to scan a document to a fax machine.
To fax to a number not in a destination list
1Place the pages (up to 50) face up in the automatic document feeder, or place a single sheet face down on the scanner glass, as described previously under “Loading a Document.”
2Press [Enter].
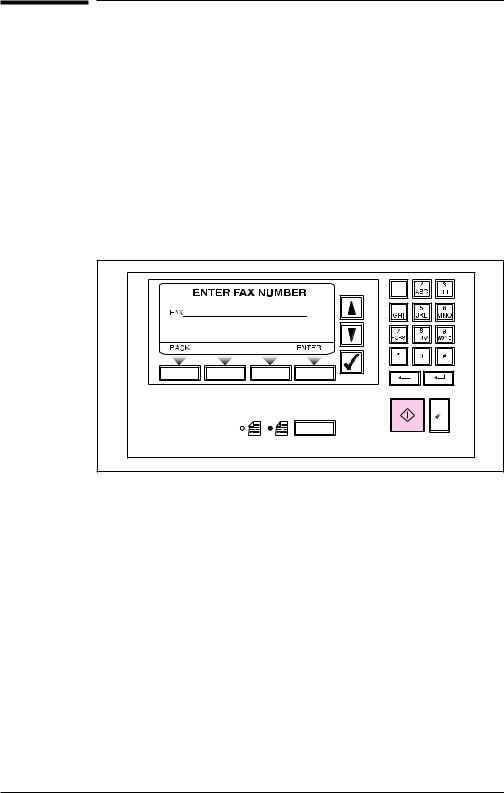
3Press [Fax]. The scanner control panel displays the Enter Fax Number screen.
Figure 12
4Using the keypad, type in the new fax numberand then press [Enter]. This temporarily adds the new fax number to the destination list.
5Press [Go].
30 Using the Scanner
EN
Loading...