


HP Netserver
Ultra3 SCSI Host Bus Adapter
Installation and Configuration
Guide
HP Part Number 5971-0821
Printed in November 2000

Notice
The information contained in this document is subject to change without notice.
Hewlett-Packard makes no warranty of any kind with regard to this material, including, but not limited to, the implied warranties of merchantability and fitness for a particular purpose. Hewlett-Packard shall not be liable for errors contained herein or for incidental or consequential damages in connection with the furnishing, performance, or use of this material.
Hewlett-Packard assumes no responsibility for the use or reliability of its software on equipment that is not furnished by Hewlett-Packard.
This document contains proprietary information that is protected by copyright. All rights are reserved. No part of this document may be photocopied, reproduced, or translated to another language without the prior written consent of Hewlett-Packard Company.
Novell NetWare® is a registered trademark of Novell, Inc. SCO®, SCO OpenServer®, and UnixWare® are registered trademarks of The Santa Cruz Operation, Inc. Windows® 95, Windows® 98, Windows® 2000 and Windows NT® are registered trademarks of Microsoft Corporation. SCSISelect® is a registered trademark of Adaptec. Linux is copyrighted under the GNU General Public License. Caldera Systems, the C-logo, and OpenLinux are either registered trademarks or trademarks of Caldera Systems, Inc. Debian® Linux is a registered trademark of Debian. Redhat® is a registered trademark of Redhat, Inc. SuSE® is a registered trademark of SuSE, Inc. TurboLinux Workstation® is a registered trademark of TurboLinux, Inc. Wangtek is a registered trademark of Wangtek.
Hewlett-Packard Company Network Server Division
Technical Communications/MS 45SLE 10955 Tantau Avenue
Cupertino, CA 95014 USA
© Copyright 2000, Hewlett-Packard Company.
Audience Assumptions
This Installation and Configuration Guide is for the person who installs, administers, and troubleshoots LAN servers. Hewlett-Packard Company assumes you are qualified in the servicing of computer equipment and trained in recognizing hazards in products with hazardous energy levels.
ii

Contents |
|
1 Installation and Setup ............................................................... |
1 |
Bus Segments on the HP Ultra3 SCSI Host Adapter ........................................... |
2 |
Installing the HP Ultra3 SCSI Host Bus Adapter .................................................. |
3 |
Setting Up SCSI Devices.................................................................................. |
5 |
Choosing SCSI Cables ..................................................................................... |
5 |
Connecting SCSI Devices ................................................................................ |
7 |
HP Ultra3 SCSI Host Adapter Driver Software ................................................... |
13 |
Preloaded Ultra3 Drivers ................................................................................ |
13 |
Embedded Ultra3 Drivers ............................................................................... |
13 |
Troubleshooting .................................................................................................. |
14 |
2 Configuration with SCSISelect .............................................. |
15 |
Starting SCSISelect ............................................................................................ |
16 |
Exiting SCSISelect ............................................................................................. |
17 |
Using SCSISelect Settings ................................................................................. |
17 |
SCSI Bus Interface Definitions ....................................................................... |
17 |
Boot Device Options ....................................................................................... |
18 |
SCSI Device Configuration ............................................................................. |
18 |
Advanced Configuration Options .................................................................... |
19 |
Using SCSI Disk Utilities .................................................................................... |
22 |
3 Microsoft Windows NT Installation ....................................... |
23 |
Installing the Driver When Installing Windows NT .............................................. |
23 |
Completing a Fresh Windows NT 4.0 Installation From Floppy Disk .............. |
23 |
Completing a Fresh Windows NT 4.0 Installation From CD-ROM .................. |
24 |
Installing the Driver When Windows NT is Already Installed .............................. |
24 |
Updating Windows NT 4.0 .............................................................................. |
25 |
Using Advanced Configuration Parameters ....................................................... |
25 |
Using Windows NT SCSI Parameters ............................................................ |
26 |
Using Driver-specific Parameters ................................................................... |
27 |
Hot-Plug PCI Feature ..................................................................................... |
29 |
Using Windows NT and the Host Adapter .......................................................... |
30 |
Removing a Host Adapter ............................................................................... |
30 |
iii

Removing a Host Adapter in Windows NT 4.0 ............................................... |
31 |
Troubleshooting ................................................................................................. |
31 |
Problems and Solutions .................................................................................. |
31 |
Error Messages .............................................................................................. |
32 |
adpu160m.sys Error Messages ...................................................................... |
33 |
4 Microsoft Windows 2000 Installation .................................... |
37 |
Installing the Driver When Installing Windows 2000 ........................................... |
37 |
Installing the Driver When Windows 2000 is Already Installed ........................... |
37 |
Upgrading an Existing Windows NT Version 4 Installation to Windows 2000 .... |
38 |
Using Advanced Configuration Parameters ....................................................... |
39 |
Using Windows 2000 SCSI Parameters ......................................................... |
39 |
Using Driver-specific Parameters ................................................................... |
41 |
Troubleshooting .................................................................................................. |
42 |
Problems and Solutions .................................................................................. |
43 |
Error Messages .............................................................................................. |
43 |
Driver Error Messages .................................................................................... |
44 |
5 Novell NetWare Installation .................................................... |
49 |
Installing the Driver When Installing NetWare .................................................... |
49 |
NetWare 3.12/3.2 ............................................................................................ |
49 |
NetWare 4.12/4.2 ............................................................................................ |
51 |
NetWare 5.0 .................................................................................................... |
52 |
DOS Drivers for CD-ROM Access ...................................................................... |
53 |
Install CD-ROM Drivers on a DOS Bootable Hard Disk ................................. |
53 |
Installing the Driver When NetWare is Already Installed .................................... |
54 |
Loading the Driver at Server Bootup .................................................................. |
55 |
Using the Load Command Line Options ............................................................. |
55 |
adpt160m.ham Command Line Options ......................................................... |
56 |
Bit Mask Options ............................................................................................. |
58 |
Sample Load Commands ............................................................................... |
59 |
Using NetWare and the Host Adapter ................................................................ |
59 |
Using Removable Media ................................................................................. |
59 |
Using the NetWare Tape Backup ................................................................... |
61 |
Using a CD-ROM with NetWare ..................................................................... |
61 |
Optimizing Performance ................................................................................. |
62 |
Troubleshooting .................................................................................................. |
63 |
Error Messages .............................................................................................. |
63 |
iv

6 SCO OpenServer Installation ................................................. |
67 |
Installing the Driver When Installing SCO OpenServer ...................................... |
67 |
Installing SCO OpenServer 5.0.x .................................................................... |
67 |
Installing the Driver When SCO OpenServer is Already Installed ...................... |
68 |
Using SCO OpenServer and the Host Adapter .................................................. |
73 |
Using Multiple Host Adapters ......................................................................... |
73 |
Changing the Boot Disk .................................................................................. |
74 |
Using Wide SCSI Host Adapters and Devices ............................................... |
74 |
Using Tunable Parameters for the ad160 Driver ............................................ |
74 |
Setting Parameters ............................................................................................. |
74 |
Changing the Maximum Number of LUNs Supported .................................... |
75 |
Enabling Scatter/Gather and Tagged Queuing ............................................... |
75 |
Troubleshooting .................................................................................................. |
76 |
Error Messages .............................................................................................. |
80 |
7 SCO UnixWare Installation ..................................................... |
83 |
Installing the Driver When Installing UnixWare .................................................. |
83 |
Installing the Driver When UnixWare |
|
is Already Installed ............................................................................................. |
84 |
Back Up the Computer ................................................................................... |
85 |
Load the Package ........................................................................................... |
85 |
Modify the New System File ........................................................................... |
86 |
Rebuild the UnixWare Kernel ......................................................................... |
86 |
Boot the New Kernel ....................................................................................... |
87 |
Using UnixWare and the Host Adapter ............................................................... |
87 |
Using Tunable Parameters ............................................................................. |
88 |
Using Multiple Host Adapters ......................................................................... |
88 |
Removing the Driver ....................................................................................... |
88 |
Troubleshooting .................................................................................................. |
90 |
Problems and Solutions .................................................................................. |
90 |
Error Messages .............................................................................................. |
90 |
8 Linux Support .......................................................................... |
95 |
A Product Specifications .......................................................... |
97 |
B Troubleshooting ................................................................... |
101 |
v

Troubleshooting Checklist ................................................................................ |
101 |
Common Error Messages ................................................................................. |
101 |
C Regulatory Information ........................................................ |
103 |
Regulatory Notices - Electromagnetic Compliance .......................................... |
103 |
Notice for United States |
|
(Federal Communications Commission) ....................................................... |
103 |
Notice for Canada (Industry Canada) ........................................................... |
105 |
Notice for Japan ............................................................................................ |
105 |
Notice for Korea ............................................................................................ |
106 |
Notice for Taiwan .......................................................................................... |
107 |
D Warranty and Support .......................................................... |
109 |
Hardware Accessories Limited Warranty ......................................................... |
109 |
Hewlett-Packard Hardware Accessories ...................................................... |
109 |
Third-Party Hardware Products .................................................................... |
110 |
HP Repair and Telephone Support .................................................................. |
110 |
U.S. and Canada .......................................................................................... |
110 |
Other Countries ............................................................................................ |
110 |
World Wide Web ............................................................................................... |
110 |
Index ........................................................................................... |
111 |
vi
1 Installation and Setup
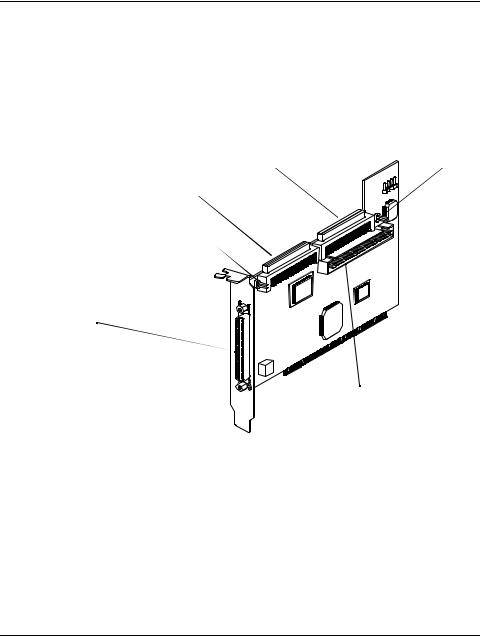
The HP Ultra3 Single Channel SCSI Host Bus Adapter enables you to connect up to 15 SCSI devices—such as hard disk drives, scanners, and CD-ROM drives—to HP Netservers with 32-bit or 64-bit PCI expansion slots. You can connect newer Ultra3 and Ultra2 SCSI devices to the two 68-pin Low Voltage Differential/Single-Ended (LVD/SE) connectors. You can also connect legacy SCSI devices to the 68-pin and 50-pin internal Single-Ended (SE) connectors.
68-pin Internal SE Connector |
J6 |
|
68-pin Internal LVD/SE Connector
J2
68-pin External LVD/SE Connector
50-pin Internal SCSI SE Controller
Figure 1-1. HP Ultra3 Single Channel SCSI Host Bus Adapter
Although the HP Ultra3 SCSI Host Bus Adapter is a 64-bit PCI host bus adapter, it also works in a 32-bit PCI slot. When installed in a 32-bit PCI slot, the host bus adapter automatically runs in the slower 32-bit mode. This installation guide explains how to:
•Install the HP Ultra3 SCSI host bus adapter
•Set up SCSI devices
•Connect SCSI devices
1
Bus Segments on the HP Ultra3 SCSI Host Adapter
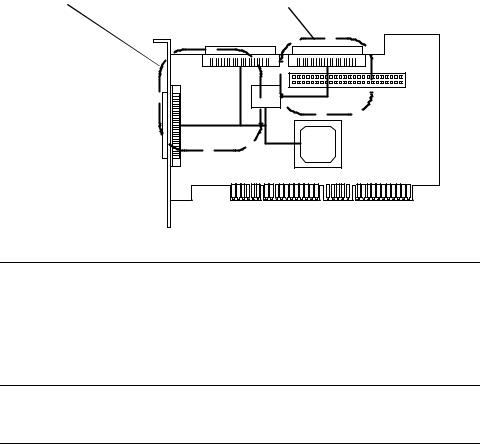
The HP Ultra3 SCSI host bus adapter features technology that ensures you get the best performance from your Ultra3 and Ultra2 SCSI devices by electronically isolating the primary LVD/SE segment from the secondary SE segment on the SCSI bus. This allows the HP Ultra3 SCSI host bus adapter to support newer Ultra3 and Ultra2 SCSI devices at speeds up to 160 MBytes/sec on the primary LVD/SE segment while at the same time supporting Ultra (legacy) devices at speeds up to 40 MBytes/sec on the secondary SE segment. The following figure shows the two SCSI segments.
Primary LVD/SE Segment |
Secondary LVD/SE Segment |
AIC-3860
AIC-7892
Figure 1-2. Primary and Secondary Bus Segments
NOTE If you attach Wide Ultra or Ultra SCSI devices to the LVD/SE connector(s), the data transfer rate for all attached Ultra3 and Ultra2 SCSI devices will drop to Ultra SCSI performance levels. However, if you attach only Ultra3 and Ultra2 SCSI devices to the LVD/SE connector(s), data will be transferred at the maximum possible rate (80 MBytes/sec for Ultra2 devices and 160 MBytes/sec for Ultra3 devices).
2

Installing the HP Ultra3 SCSI Host Bus Adapter
1.Discharge any static electricity build-up before handling the SCSI host bus adapter by touching a grounded metal object (like the exposed metal parts on the back of your HP Netserver).
WARNING Turn OFF power to the HP Netserver and disconnect the power cord.
2.After you turn off your HP Netserver and unplug the power cord, remove the cover from the Netserver.
32-bit PCI Slot
 64-bit PCI Slot
Figure 1-3. 32-bit and 64-bit Expansion Slots
3.Locate an unused 64-bit PCI expansion slot and remove the expansion slot cover. If the HP Netserver does not have a 64-bit slot, you can install the host adapter in a 32-bit PCI slot. (The expansion slot must be compliant with PCI Rev. 2.1 or higher and must support Bus Mastering.)
3
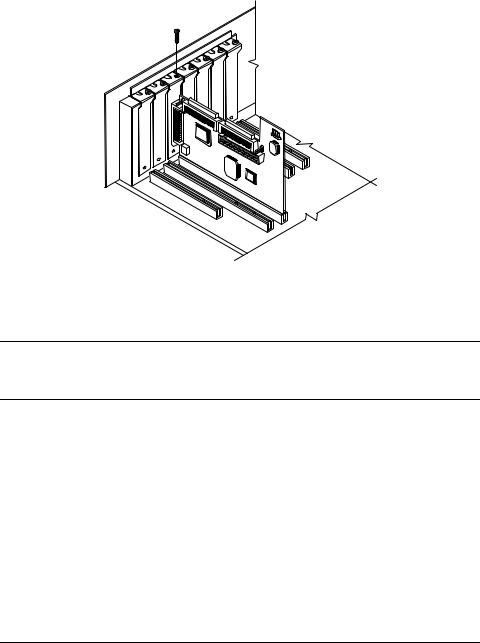
Figure 1-4. Host Bus Adapter Installed in 64-bit Slot
HP Netservers may have vertical or horizontal expansion slots. Refer to your HP Netserver manual to locate the PCI slots.
NOTE Be careful when inserting the HP Ultra3 SCSI host bus adapter in a PCI slot. Some 32-bit slots will not accommodate it, and the host adapter may break if you force it into the slot.
4.Insert the HP Ultra3 SCSI host bus adapter into the PCI expansion slot; press down firmly until the host adapter clicks into place, then replace the slot cover screw. When installed properly, the host adapter should appear level with the expansion slot, as shown above.
4
Setting Up SCSI Devices
There are several things you may need to do to your SCSI devices before you connect them to the HP Ultra3 SCSI host bus adapter:
•Check the SCSI IDs
•Set the termination
•Connect the power cables.
Since setup can vary from device to device, always refer to the device’s documentation for specific instructions.
Below are some guidelines for setting SCSI IDs and termination on your devices.
Check the SCSI IDs
The HP Ultra3 SCSI host bus adapter and each device you connect to it must have a unique SCSI ID number ranging from 0 to 15. No two devices can have the same ID number. The HP Ultra3 SCSI host bus adapter is preset to SCSI ID 7 and should not be changed. If your HP Netserver will boot from a SCSI hard disk, make sure the SCSI ID of that hard disk is set to 0. (Most SCSI hard disks are preset to SCSI ID 0 at the factory.) The SCSI IDs for internal devices are usually set with jumpers; SCSI IDs for external devices are usually set with a switch on the back of the device.
Terminate the Ends
To ensure reliable communication on the SCSI bus, the device at the end of each cable, or the end of the cable itself, must have a terminator installed (or enabled). Terminators must be removed, or termination must be disabled, on devices between the ends of each cable.
Choosing SCSI Cables
The Ultra3 SCSI Host Adapter kit does not include cables. Any Ultra3 drives attached to HP Ultra3 host bus adapters inside a HP Netserver require the use of a special Ultra3 twisted pair cable. The HP Ultra3 cable upgrade kit part number is P3469A. These cables can be purchased from an authorized Hewlett-Packard reseller, or on HP Order Assistant (available on the Internet at http://netserver.hp.com/netserver/)
See Table 1-1 that follows to determine the correct cable for your HP Netserver and SCSI configuration.
5

Table 1-1. Netserver SCSI Cables
HP Netserver |
SCSI Devices |
Interface |
Cable Product Number |
|
|
|
|
All Models |
HP Netserver Rack |
External |
D3636C - HDTS68 to |
|
Storage/12 (RS/12) |
|
HDTS68, 2.5m |
|
|
|
|
All Models |
HP SureStore H/A |
External |
D3637C - HDTS68 to |
|
TapeArray 5500 |
|
VHDC1, 2.5m |
|
|
|
|
All Models |
HP SureStore |
External |
C5666A – HDTS68 to |
|
DLT80e/80k & DAT |
|
HDTS68, 0.9m |
|
40e/40k |
|
C5667A – HDTS68 to |
|
|
|
HDTS68, 1.5m |
|
|
|
C5699A – HDTS68 to |
|
|
|
HDTS68, 2.5m |
|
|
|
|
E 800 |
LVD non-hot-swap |
Internal |
P3469A – 47.5” |
|
Device |
|
Terminated SCSI |
|
|
|
twisted-pair* |
|
|
|
|
LH 3000/6000 |
LVD non-hot-swap |
Internal |
P3469A – 47.5” |
|
Device |
|
Terminated SCSI |
|
|
|
twisted-pair* |
|
|
|
|
LH 3000/6000 |
LVD hot-swap Cage |
Internal |
P3469A – 45” Point to |
|
(right side) |
|
point SCSI twisted-pair* |
|
|
|
|
LH 3000/6000 |
LVD hot-swap Cage |
Internal |
Use existing twisted-pair |
|
(left side) |
|
cable in Netserver |
|
|
|
|
All Models |
LVD non-hot-swap |
Internal |
Use existing twisted-pair |
(except E 800, |
Device |
|
cable in Netserver |
LH 3000/6000) |
|
|
|
|
|
|
|
All Models |
LVD hot-swap Cage |
Internal |
Use existing twisted-pair |
(except E 800, |
|
|
cable in Netserver |
LH 3000/6000) |
|
|
|
|
|
|
|
* The P3469A Cable Kit contains both Terminated and Point-to-Point SCSI cables.
6
Connecting SCSI Devices
You can connect up to 15 SCSI devices to the HP Ultra3 SCSI host bus adapter. Before connecting devices, be sure to review Setting Up SCSI Devices on
page 5.
Connecting the SCSI Host Adapter to the Common Tray
Connect internal Ultra3 and Ultra2 SCSI devices to the internal LVD/SE connector on the HP Ultra3 SCSI host bus adapter. To do this, see Table 1-1 to determine the correct cable for your HP Netserver. Follow these steps to connect the devices:
NOTE We recommend that you keep your Ultra3 and Ultra2 SCSI devices separate from your Ultra SCSI devices. This allows the newer Ultra3 and Ultra2 SCSI devices to transfer data at their maximum speed. (See Bus Segments on the HP Ultra3 SCSI Host Adapter on page 2.)
1.Use a terminated twisted-pair SCSI cable.
2.Plug the non-terminated end of the twisted-pair cable to the internal LVD/SE connector.
 LVD SCSI Twisted-Pair Cable
Figure 1-5. LVD SCSI Twisted-Pair Cable
7
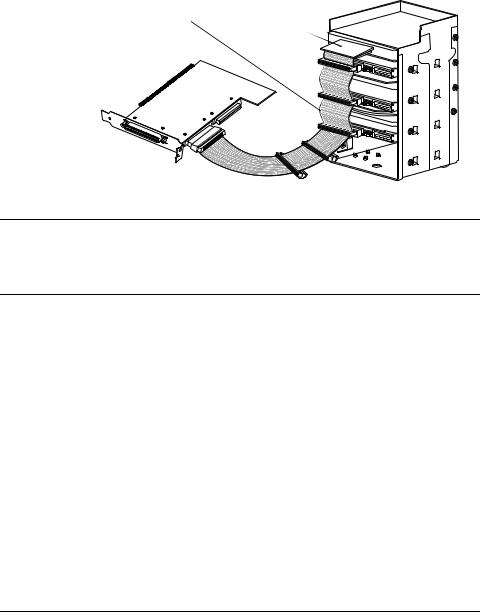
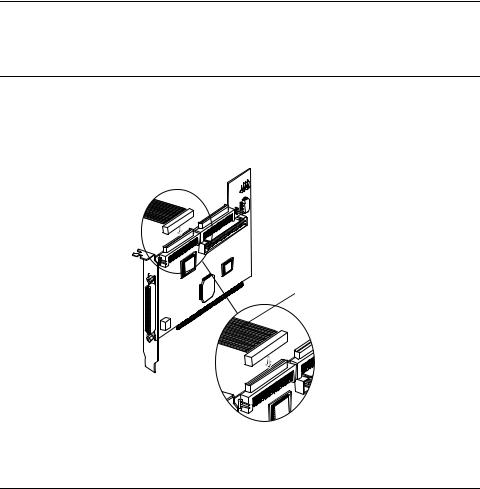
3.Plug the internal Ultra2 or Ultra3 SCSI devices to the other cable connectors, starting with the connector at the terminated end of the cable.
Terminated LVD SCSI Twisted-Pair Cable
Terminator
Figure 1-6. Common Tray Cable Connection
NOTE Internal Ultra2 and Ultra3 SCSI devices come from the factory with termination disabled and cannot be changed. Proper SCSI bus termination is provided by the terminator at the end of the LVD SCSI cable.
4.Connect a power cable from your HP Netserver’s internal power supply to each internal SCSI device.
Connecting the SCSI Host Adapter to a Hot-Plug Cage
1.Use the point-to-point twisted-pair cable.
2.Plug one end of the twisted-pair cable to the internal LVD/SE connector.
3.Plug the other end of the twisted-pair cable to the 68-pin connector on the hot-plug cage.
8
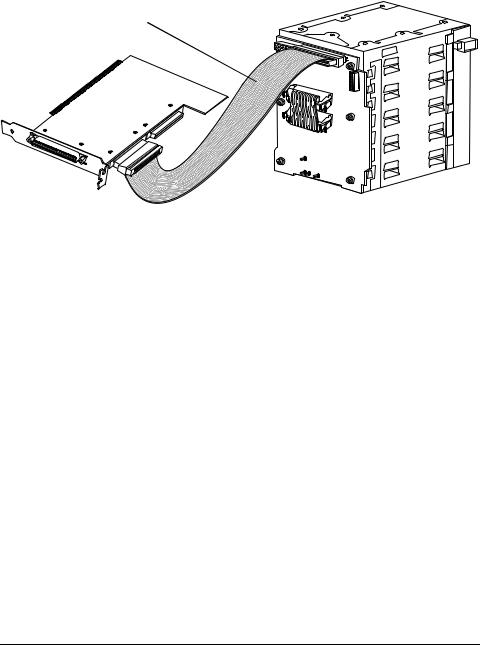
Point-to-Point LVD Twisted-Pair SCSI Cable
Figure 1-7. Hot-Plug Cage Cable Connections
Connecting Ultra/Fast Wide SCSI Devices
Connect internal Ultra/Fast Wide SCSI devices to the 68-pin internal SE Wide SCSI connector. To do this, use a flat 68-pin Wide SCSI cable. Follow these steps to connect the devices:
1.Plug one end of the cable to the Ultra/Fast Wide SCSI connector on the HP Ultra3 SCSI host bus adapter.
9
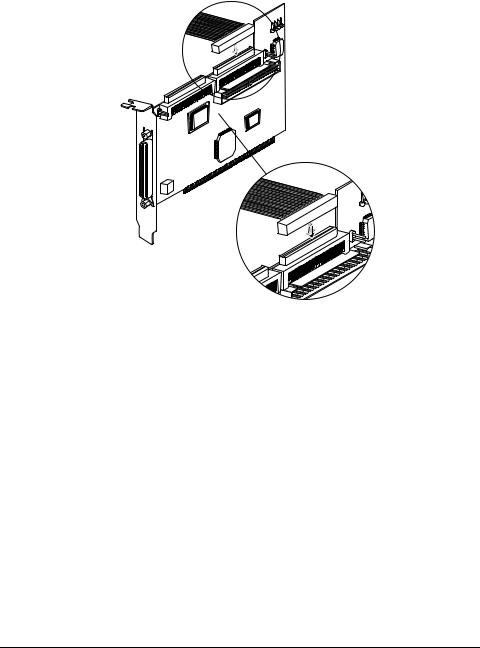
68-pin flat SCSI cable
Figure 1-8. Connecting Ultra/Fast Wide SCSI Devices
2.Plug the other end of the cable to a terminated Ultra/Fast Wide SCSI device.
3.If you have other Ultra/Fast Wide SCSI devices, attach them to the connectors between the two ends of the cable. Be sure these other devices are unterminated.
4.Connect a power cable from your HP Netserver’s internal power supply to each internal device.
Connecting Internal Ultra/Fast Narrow Devices
Connect internal Ultra/Fast Narrow SCSI devices that have standard 50-pin connectors to the 50-pin internal SE Narrow SCSI connector. To do this, use a 50-pin internal SCSI cable. Follow these steps to connect the devices:
1.Plug one end of the cable to the 50-pin internal SE Narrow SCSI connector on the HP Ultra3 SCSI host bus adapter.
10

50-pin SE Narrow SCSI cable
Figure 1-9. Connecting Ultra/Fast Narrow Devices
2.Plug the other end of the cable to a terminated Ultra/Fast Narrow SCSI device.
3.If you have other Ultra/Fast Narrow SCSI devices, attach them to the connectors between the two ends of the cable. Be sure these other devices are unterminated.
4.Connect a power cable from your HP Netserver’s internal power supply to each internal device.
Connecting External SCSI Devices
Connect external Ultra2 and Ultra3 SCSI devices to the 68-pin external LVD/ SE SCSI connector. Each external device will require a high density 68-pin external LVD SCSI cable.
11
NOTE We recommend that you connect only Ultra3 and Ultra2 SCSI devices to the external SCSI connector. If you also attach older Ultra SCSI devices, the data transfer speed of the Ultra3 and Ultra2 SCSI devices will drop to the speed of the older devices. (See Bus Segments on the HP Ultra3 SCSI Host Adapter on page 2.)
Follow these steps to connect the external devices:
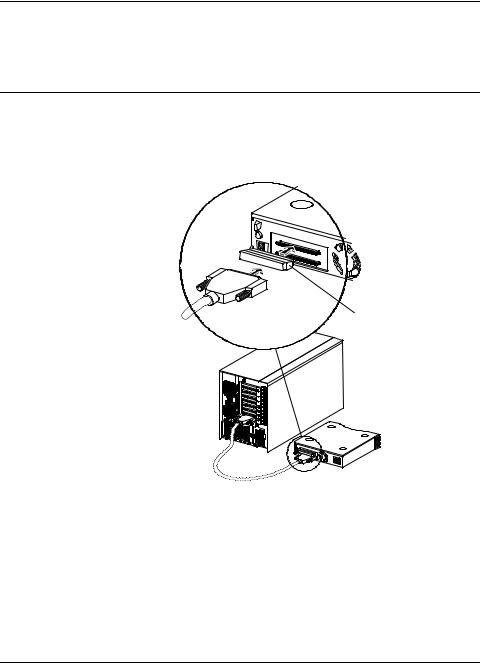
1.Connect one end of the external LVD SCSI cable to the external LVD/SE connector on the HP Ultra3 SCSI host bus adapter.
SCSI Terminator
SCSIminatorT er
Figure 1-10. Connecting External SCSI Devices
2.Connect the other end of the external SCSI cable to a SCSI connector on the back of an external SCSI device. If you are installing only one external device, terminate the device and skip to Step 4.
3.Connect other external devices by cabling each device to the previous one, as shown below.
12
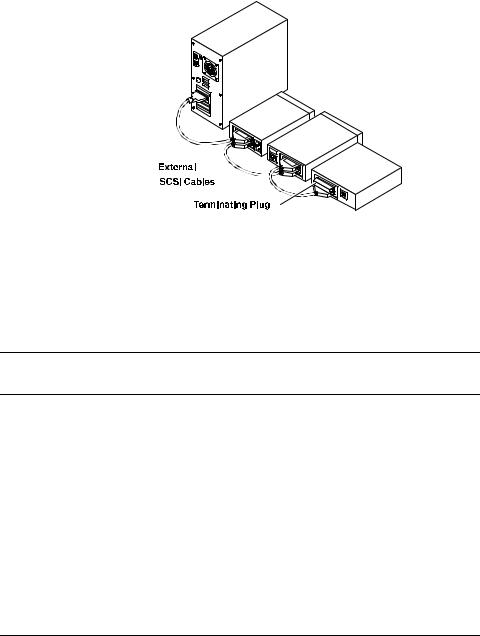
Figure 1-11. Terminating the Last External SCSI Device
4.Terminate only the device at the end of the chain. (Use of an external multi-mode SCSI terminator is required.)
5.Connect power cables to all external devices and to the HP Netserver.
HP Ultra3 SCSI Host Adapter Driver Software
NOTE To use the HP Ultra3 SCSI host bus adapter, driver software must be installed for your operating system.
Preloaded Ultra3 Drivers
If the HP Ultra3 SCSI host bus adapter was included as part of a HP Netserver you purchased, then the appropriate HP driver has already been pre-installed by HP and you do not need to install it.
Embedded Ultra3 Drivers
Some operating systems have embedded driver support for the HP Ultra3 SCSI host bus adapter. To determine if the host adapter is supported by the operating system you are using, read the operating system manual or contact the operating system vendor for information.
13

Troubleshooting
If you have any problems while installing the HP Ultra3 SCSI host bus adapter, check the following items first:
•Are all SCSI devices powered on?
•Are all SCSI cables and power cables properly connected?
•Does each device on the SCSI bus have a unique SCSI ID?
•Does the total SCSI cable length exceed the maximum allowable length? (The maximum cable length for the Ultra3 SCSI host adapter cannot exceed 12 meters.)
•Is the SCSI bus properly terminated?
If you are still unable to resolve a problem, contact HP Technical Support for help.
14
2 Configuration with SCSISelect
SCSISelect, included with the HP Ultra3 SCSI Host Bus Adapter, enables you to change SCSI settings without opening the computer or handling the host bus adapter. SCSISelect also enables you to low-level format or verify the disk media of your SCSI hard disk drives. The following table lists the available and default settings for each SCSISelect option.
NOTE The default settings are appropriate for most systems. Run SCSISelect if you need to change or view current settings, or if you would like to run the SCSI disk utilities. See the descriptions of each option starting on page 17.
SCSISelect Options |
Available |
Default |
|
Settings |
Setting |
|
|
|
SCSI Bus Interface Definitions: |
|
|
Host Adapter SCSI ID |
0-15 |
7 |
SCSI Parity Checking |
Enabled, Disabled |
Enabled |
Host Adapter SCSI Termination |
|
|
LVD/SE Connectors |
Automatic, Enabled, |
Automatic |
|
Disabled |
|
SE Connectors |
Automatic |
Automatic |
|
Low ON/High ON |
|
|
Low OFF/High OFF |
|
|
Low OFF/High ON |
|
Boot Device Options: |
|
|
Boot SCSI ID |
0-15 |
0 |
Boot LUN Number1 |
0-7 |
0 |
SCSI Device Configuration: |
|
|
Sync Transfer Rate (MBytes/sec) |
160, 80.0, 53.4, 40.0, |
160 |
|
32.0, 26.8, 20.0, |
|
|
16.0, 13.4, 10.0, |
|
|
ASYN |
|
|
|
|
15

SCSISelect Options |
Available |
Default |
|
Settings |
Setting |
Initiate Wide Negotiation
Enable Disconnection
Send Start Unit Command
Enable Write Back Cache1
BIOS Multiple LUN Support2
Include in BIOS Scan2
Advanced Configuration Options:
Reset SCSI Bus at IC Initialization
Display <Ctrl> <A> Messages during BIOS Initialization
Extended BIOS Translation for DOS Drives > 1 GByte
Verbose/Silent Mode
Host Adapter BIOS
Domain Validation2
Support Removable Disks Under BIOS
as Fixed Disks2
BIOS Support for Bootable CD-ROM2
BIOS Support for Int 13 Extensions2
Yes, No |
Yes (Enabled) |
Yes, No |
Yes (Enabled) |
Yes, No |
Yes (Enabled) |
N/C (No Change) |
N/C (No |
Yes, No |
Change) |
Yes, No |
No (Disabled) |
Yes, No |
Yes (Enabled) |
Enabled, Disabled |
Enabled |
Enabled, Disabled |
Enabled |
Enabled, Disabled |
Enabled |
Verbose, Silent |
Verbose |
Enabled |
Enabled |
Disabled: Not Scan |
|
Disabled: Scan Bus |
|
Enabled, Disabled |
Enabled |
Disabled, Boot Only, |
Disabled |
All Disks |
|
Enabled, Disabled |
Enabled |
Enabled, Disabled |
Enabled |
1Setting is valid only if Multiple LUN Support is enabled
2Settings are valid only if host adapter BIOS is enabled
Starting SCSISelect
Follow these steps to start SCSISelect: 1. Turn on or restart your system.
16

During the startup process, pay careful attention to the messages that appear on your screen.
2.When the following message appears on your screen, press the Ctrl-A keys simultaneously (this message appears for only a few seconds):
Press <Ctrl><A> for SCSISelect (TM) Utility!
3.From the menu that appears, use the arrow keys to move the cursor to the option you want to select, then press Enter.
NOTE If you have difficulty viewing the display, press F5 to toggle between color and monochrome modes. (This feature may not work on some monitors.)
Exiting SCSISelect
Follow these steps to exit SCSISelect:
1.Press Esc until a message prompts you to exit (if you changed any settings, you are prompted to save the changes before you exit).
2.At the prompt, select Yes to exit, then press any key to reboot the computer. Any changes made in SCSISelect will take effect the next time the computer is booted.
Using SCSISelect Settings
To select an option, use the arrow keys to move the cursor to the option, then press Enter.
In some cases, selecting an option displays another menu. You can return to the previous menu at any time by pressing Esc.
To restore the original SCSISelect default values, press F6 from the main SCSISelect screen.
SCSI Bus Interface Definitions
•Host Adapter SCSI ID—(Default: 7) Sets the SCSI ID for the SCSI host bus adapter. The Ultra3 SCSI Host Bus Adapter is set at 7, which
17

gives it the highest priority on the SCSI bus. We recommend that you do not change this setting.
•SCSI Parity Checking—(Default: Enabled) When set to Enabled, verifies the accuracy of data transfer on the SCSI bus. Leave this setting enabled unless any SCSI device connected to the Ultra3 SCSI Host Bus Adapter does not support SCSI parity.
•Host Adapter SCSI Termination—(Default: Automatic) Determines the termination setting for the SCSI host bus adapter. The default setting for both the LVD/SE and SE connectors is Automatic, which allows the SCSI host bus adapter to adjust the termination as needed depending on the configuration of the connected SCSI devices. We recommend that you do not change this setting.
Boot Device Options
•Boot SCSI ID—(Default: 0) Specifies the SCSI ID of your boot device. We recommend that you do not change the default setting.
•Boot LUN Number—(Default: 0) Specifies which LUN (Logical Unit Number) to boot from on your boot device. This setting is not valid unless Multiple LUN Support is Enabled (see “Advanced Configuration Options” on page 19).
SCSI Device Configuration
SCSI Device Configuration options can be set individually for each connected SCSI device.
NOTE To configure settings for a SCSI device, you must know its SCSI ID (see “Using SCSI Disk Utilities” on page 22).
•Sync Transfer Rate—(Default: 160) Determines the maximum synchronous data transfer rate that the SCSI host adapter supports. Use the maximum value of 160 MBytes/sec. If a device is not Ultra160, select the transfer rate of the device (80, 53, 40, ...).
•Initiate Wide Negotiation—(Default: Yes) When set to Yes, the SCSI host bus adapter attempts 16-bit data transfer (wide negotiation). When
18

set to No, the SCSI host bus adapter uses 8-bit data transfer unless the SCSI device requests wide negotiation.
NOTE Set Initiate Wide Negotiation to No if you are using an 8-bit SCSI device that hangs or exhibits other performance problems with 16-bit data transfer rate enabled.
•Enable Disconnection—(Default: Yes) When set to Yes, allows the SCSI device to disconnect from the SCSI bus. Leave the setting at Yes if two or more SCSI devices are connected to the SCSI host bus adapter. If only one SCSI device is connected, changing the setting to No results in slightly better performance.
•Send Start Unit Command—(Default: Yes) When set to Yes, the Start Unit Command is sent to the SCSI device at bootup.
The following three options have no effect when the SCSI host bus adapter BIOS is disabled. (The SCSI host bus adapter BIOS is normally enabled by default.)
•Enable Write Back Cache—(Default: N/C) Can be used to enable or disable the write-back cache on SCSI disk drives connected to the host adapter. Leave this option at its default setting of N/C (no change), which usually allows for optimum drive performance.
•BIOS Multiple LUN Support—(Default: No) Leave this setting at No if the device does not have multiple Logical Unit Numbers (LUNs). When set to Yes, the SCSI host bus adapter BIOS provides boot support for a SCSI device with multiple LUNs (for example, a CD “juke box” device in which multiple CDs can be accessed simultaneously).
•Include in BIOS Scan—(Default: Yes) When set to Yes, the SCSI host bus adapter BIOS includes the device as part of its BIOS scan at bootup.
Advanced Configuration Options
NOTE Do not change the Advanced Configuration Options unless absolutely necessary.
19

•Reset SCSI Bus at IC Initialization—(Default: Enabled) When set to
Enabled, the SCSI host bus adapter generates a SCSI bus reset during its power-on initialization and after a hard reset.
•Display <Ctrl> <A> Messages during BIOS Initialization—(Default:
Enabled) When set to Enabled, the SCSI host bus adapter BIOS displays the Press <Ctrl> <A> for SCSISelect (TM) Utility! message on your screen during system bootup. If this setting is disabled, you can still invoke the SCSISelect Utility by pressing <Ctrl> <A> after the SCSI host bus adapter BIOS banner appears.
•Extended BIOS Translation for DOS Drives > 1 GByte—(Default:
Enabled) When set to Enabled, provides an extended translation scheme for SCSI hard disks with capacities greater than 1 GByte. This setting is necessary only for MS-DOS 5.0 or above; it is not required for other operating systems, such as NetWare or UNIX.
CAUTION Changing the translation scheme destroys all data on the drive. Be sure to back up the data before changing the translation scheme.
Use the MS-DOS Fdisk command to partition a disk larger than 1 GByte controlled by the SCSI host bus adapter BIOS, when using DOS, Windows 3.1.x, or Windows 95/98.
•Verbose/Silent Mode—(Default: Verbose) When set Verbose, the SCSI host bus adapter BIOS displays the host adapter model on the screen during system bootup. When set to Silent, the message will not be displayed during bootup.
•Host Adapter BIOS (Configuration Utility Reserves BIOS Space)—
(Default: Enabled) Enables or disables the SCSI host bus adapter BIOS.
Leave at Enabled to allow the SCSI host bus adapter BIOS to scan and initialize all SCSI devices.
Set to Disabled: Not scan if the devices on the SCSI bus (for
example, CD-ROM drives) are controlled by software drivers and do not need the BIOS, and you do not want the BIOS to scan the SCSI bus.
Set to Disabled: Scan Bus if you do not need the BIOS, but you want it to scan the SCSI devices on the bus.
20

The following four options have no effect when the SCSI host bus adapter BIOS is disabled. (The SCSI host bus adapter BIOS is normally enabled by default.)
•Domain Validation—(Default: Enabled) Determines the kinds of SCSI devices connected and reduces data transfer speed when legacy SCSI devices are detected. Displays the resulting data transfer rate.
•Support Removable Disks Under BIOS as Fixed Disks—(Default:
Disabled) Determines which removable-media drives are supported by the SCSI host bus adapter BIOS. Choices are as follows:
Disabled— No removable-media drives are treated as hard disk drives. Software drivers are required because the drives are not controlled by the BIOS.
CAUTION You may lose data if you remove a removable-media cartridge from a SCSI drive controlled by the SCSI host bus adapter BIOS while the drive is on. If you want to be able to remove the media while the drive is on, install the removable-media software driver and set Support Removable Disks Under BIOS as Fixed Disks to
Disabled.
Boot Only—Only the removable-media drive designated as the boot device is treated as a hard disk drive.
All Disks—All removable-media drives supported by the BIOS are treated as hard disk drives.
•BIOS Support for Bootable CD-ROMs—(Default: Enabled) When set to Enabled, the SCSI host bus adapter BIOS allows the computer to boot from a CD-ROM drive.
•BIOS Support for Int 13 Extensions—(Default: Enabled) When set to
Enabled, the SCSI host bus adapter BIOS supports Int 13h extensions as required by Plug-and-Play. The setting can be either enabled or disabled if your system is not Plug-and-Play.
21

Using SCSI Disk Utilities
To access the SCSI disk utilities, follow these steps:
1.Select the SCSI Disk Utilities option from the menu that appears after starting SCSISelect. SCSISelect scans the SCSI bus (to determine the devices installed) and displays a list of all SCSI IDs and the devices assigned to each ID.
2.Use the arrow keys to move the cursor to a specific ID and device, then press
Enter.
3.A small menu appears, displaying the options Format Disk and Verify Disk Media.
Format Disk—Allows you to perform a low-level format on a hard disk drive. Most SCSI disk devices are preformatted at the factory and do not need to be formatted again.
CAUTION A low-level format destroys all data on the drive. Be sure to back up your data before performing this operation. You cannot abort a low-level format once it has started.
Verify Disk Media—Allows you to scan the media of a hard disk drive for defects. If the utility finds bad blocks on the media, it prompts you to reassign them; if you select yes, those blocks are no longer used. Pressing Esc at any time aborts the utility.
22

3Microsoft Windows NT Installation
This chapter explains how to install the HP Ultra3 Family Manager Set driver adpu160m.sys for Windows NT.
If you are performing a first time Windows NT installation, see “Installing the Driver When Installing Windows NT” in the next section. If Windows NT is already installed in your system, see “Installing the Driver When Windows NT is Already Installed” on page 24.
Installing the Driver When Installing
Windows NT
The adpu160m.sys driver is not embedded on the Windows NT 4.0 installation disks (or CD-ROM) and must be added during Windows NT installation.
Completing a Fresh Windows NT 4.0 Installation From Floppy
Disk
1.Start your system with the Windows NT Boot Disk in the floppy disk drive.
2.When prompted, insert disk #2 in your floppy disk drive. After a few moments you will see a blue screen. To setup Windows NT now, press Enter.
3.Press S to skip auto-detection of your SCSI host adapter.
4.Press S again to specify an additional device.
5.Press Enter to select Others; insert the HP Ultra3 Family Manager Set disk for Windows NT into your floppy disk drive.
6.Using the arrow keys, select the following driver and press Enter:
Adaptec Ultra3 PCI SCSI Controller (NT4.0)
7.To add other host adapters, press S and repeat from Step 5 for each additional adapter and insert the appropriate driver disk.
23

8.Press Enter to continue with the Windows NT operating system setup. Follow the instructions on-screen and in the Windows NT documentation to complete the installation.
Completing a Fresh Windows NT 4.0 Installation From CD-ROM
1.Insert the Windows NT 4.0 CD into the CD-ROM drive.
2.Start your system. Press the F6 key when you see the following message: “Setup is inspecting your computer’s hardware configuration...”
3.If you do not see this message, your system may not be setup to boot from a CD-ROM. You will need to install from floppy disks. See “Completing a Fresh Windows NT 4.0 Installation From Floppy Disk” on page 23.
4.When prompted, press S to specify an additional device.
5.Press Enter to select Others; insert the HP Ultra3 Family Manager Set disk for Windows NT into your floppy disk drive.
6.Using the arrow keys, select the following driver and press Enter:
Adaptec Ultra3 PCI SCSI Controller (NT4.0)
7.To add other host adapters, press S and repeat from Step 4 for each additional adapter and insert the appropriate driver disk.
8.Press Enter to continue with the Windows NT operating system setup. Follow the instructions on-screen and in the Windows NT documentation to complete the installation.
Installing the Driver When Windows NT is Already Installed
To update or install the adpu160m.sys driver if Windows NT 4.0 is already installed, follow the instructions below.
24
 Loading...