


LaserJet M129

1
Português ................ 15
Español .................... 10
English.........................1
Français .......................5
USB connection directly between the
printer and the computer
Use an A-to-B type USB cable.
Windows
1. Do not connect the USB cable before installing the software. The
installation process prompts to connect the cable at the appropriate
time. If the cable is already connected, restart the printer when
installation prompts to connect the cable.
2. Continue to “6. Download and install the software.”
OS X
1. Connect the USB cable between the computer and the printer before
installing the software.
2. Continue to “6. Download and install the software.”
Wireless network connection
(wireless models only)
Touchscreen control panels
1. To connect the printer to a wireless (Wi-Fi) network, on the printer control
panel, touch the Wireless button.
2. Touch Wireless Menu, and then touch Wireless Setup Wizard. Select the
network name from the SSID list, or enter the network name if it is not
listed.
3. Use the keyboard to enter the passphrase, and then touch the OK button.
4. Wait while the printer establishes a network connection.
5. On the printer control panel, touch the Network button. If an IP address
is listed, the network connection has been established. If not, wait a few
more minutes and try again. Note the IP address for use during software
installation. Example IP address: 192.168.0.1
2-line/LED control panels
1. To connect the printer to a wireless (Wi-Fi) network, make sure that the
printer, access point, and computer are turned on and that the computer is
connected to the wireless network.
2. A USB cable might be required during software installation.
3. To print from a computer, continue with “6. Download and install the
software.” To print from a phone or tablet only, continue with “7. Mobile
printing (optional).”
Wired (Ethernet) network connection
(optional)
Use a standard network cable.
1. Connect the network cable to the printer and to the network. Wait a few
minutes for the printer to acquire a network address.
2. Continue to “6. Download and install the software.”
www.hp.com/support/ljM129MFP www.register.hp.com
IMPORTANT:
Follow
Steps 1 - 3 on
the printer hardware setup
poster, then continue
with Step 4.
5.
Select a connection method
4.
Set up the control panel
At the printer control panel, check the display status before beginning software installation.
Manually congure the IP address
See the printer user guide for information on how to manually congure the
IPaddress www.hp.com/support/ljM129MFP.
LaserJet Pro MFP M129-M132,
LaserJet Ultra MFP M133-M134
Getting Started Guide
2
Readiris Pro for HP
Download this free software to enable extra scanning features, including Optical
Character Recognition (OCR).
To download the software from the web, go to:
www.hp.com/support/ljM129MFP
Select Drivers, select the appropriate operating system, and then click Next.
ClickApplication - 3rd Party, and then click the Download button.
Enable HP Web Services
2-line LCD control panel
1. Once the printer is connected to a network, enter the printer’s network
IP address into a web browser. Use one of the following options to nd the
printer IP:
• Go to “Find printer IP address,” in this getting started guide
• Refer to the user guide
2. On the web page that appears, click the HP Web Services tab.
3. Review and accept the terms of use, and then click the Enable button.
Touchscreen control panel
1. From the Home screen on the printer control panel, touch the Web Services
button.
2. Touch the Enable Web Services button. The printer enables Web Services, and
then prints an information page. The information page contains a printer code
necessary to register the HP printer at HP Connected.
3. Go to www.hpconnected.com to create an HP ePrint account and complete the
setup process.
Use HP ePrint via email to print documents by sending them as an email attachment to the printer’s email address from any email enabled device, even from devices that are not on
the same network.
7.1
Connect the device to the wireless network
To print from a phone or tablet, connect the device to the same wireless network
as the printer.
Apple iOS devices (AirPrint): Open the item to print, and select the Action icon.
Select Print, select the printer, and then select Print.
Android devices (4.4 or newer): Open the item to print, and select the
Menubutton. Select Print, select the printer, and select Print.
Some devices require downloading the HP Print Service plugin app from the
Google Play store.
Windows Phone: Download the HP AiO Remote app from the Windows Store.
Learn more about mobile printing
For further information on these and other operating
systems (Chrome/Google Cloud Print) go to
“www.hp.com/go/LaserJetMobilePrinting”
or scan the QR code below.
6.
Download and install the software
7.
Mobile printing (optional)
8.
Set up HP ePrint via email (optional)
Method 1: Download HP Easy Start (Windows and OS X)
1. Go to 123.hp.com/laserjet, and click Download.
2. Follow the on-screen instructions and prompts to save the le to the computer.
3. Launch the software le from the folder where the le was saved.
Method 2: Download from the printer support website
(Windows and OS X)
1. Go to www.hp.com/support/ljM129MFP.
2. Select Software and drivers.
3. Download the software for your printer model and operating system.
4. Launch the software le from the folder where the le was saved.
Method 3: Install from the printer CD
(Windows only)
1. Insert the printer CD into the computer.
2. Follow the on-screen instructions to install the software. For more information
see the Install Notes on the printer CD.
7.2
Wi-Fi Direct (wireless models only)
Wi-Fi Direct enables close-proximity printing from a wireless mobile device
directly to an Wi-Fi Direct-enabled printer without requiring a connection to a
network or the Internet.
Enable Wi-Fi Direct
To enable Wi-Fi Direct from the control panel, complete the following steps.
1. 2-line control panels: On the printer control panel, press the Setup
button, and then open the Network Setup menu.
Touchscreen control panels: From the Home screen on the printer
control panel, select the Connection Information button.
2. Open the following menus:
- Wi-Fi Direct
- Settings (touchscreen control panels only)
- On/O
3. Touch the On menu item. Touching the O button disables Wi-Fi Direct
printing.
For more information on wireless printing and wireless setup, go to
www.hp.com/go/wirelessprinting.
Discover the printer
1. From the mobile device, turn on the Wi-Fi, and search for wireless
networks.
2. Select the printer, which will show up as ‘Direct-model-name’ as shown
on the printer control panel.
Example printer name: “Direct-bb-HP M277 Laserjet”.
To use HP ePrint via email, the printer must meet these requirements:
• The printer must be connected to a wired or wireless network and have Internet access.
• HP Web Services must be enabled on the printer, and the printer must be registered with HP Connected.
3
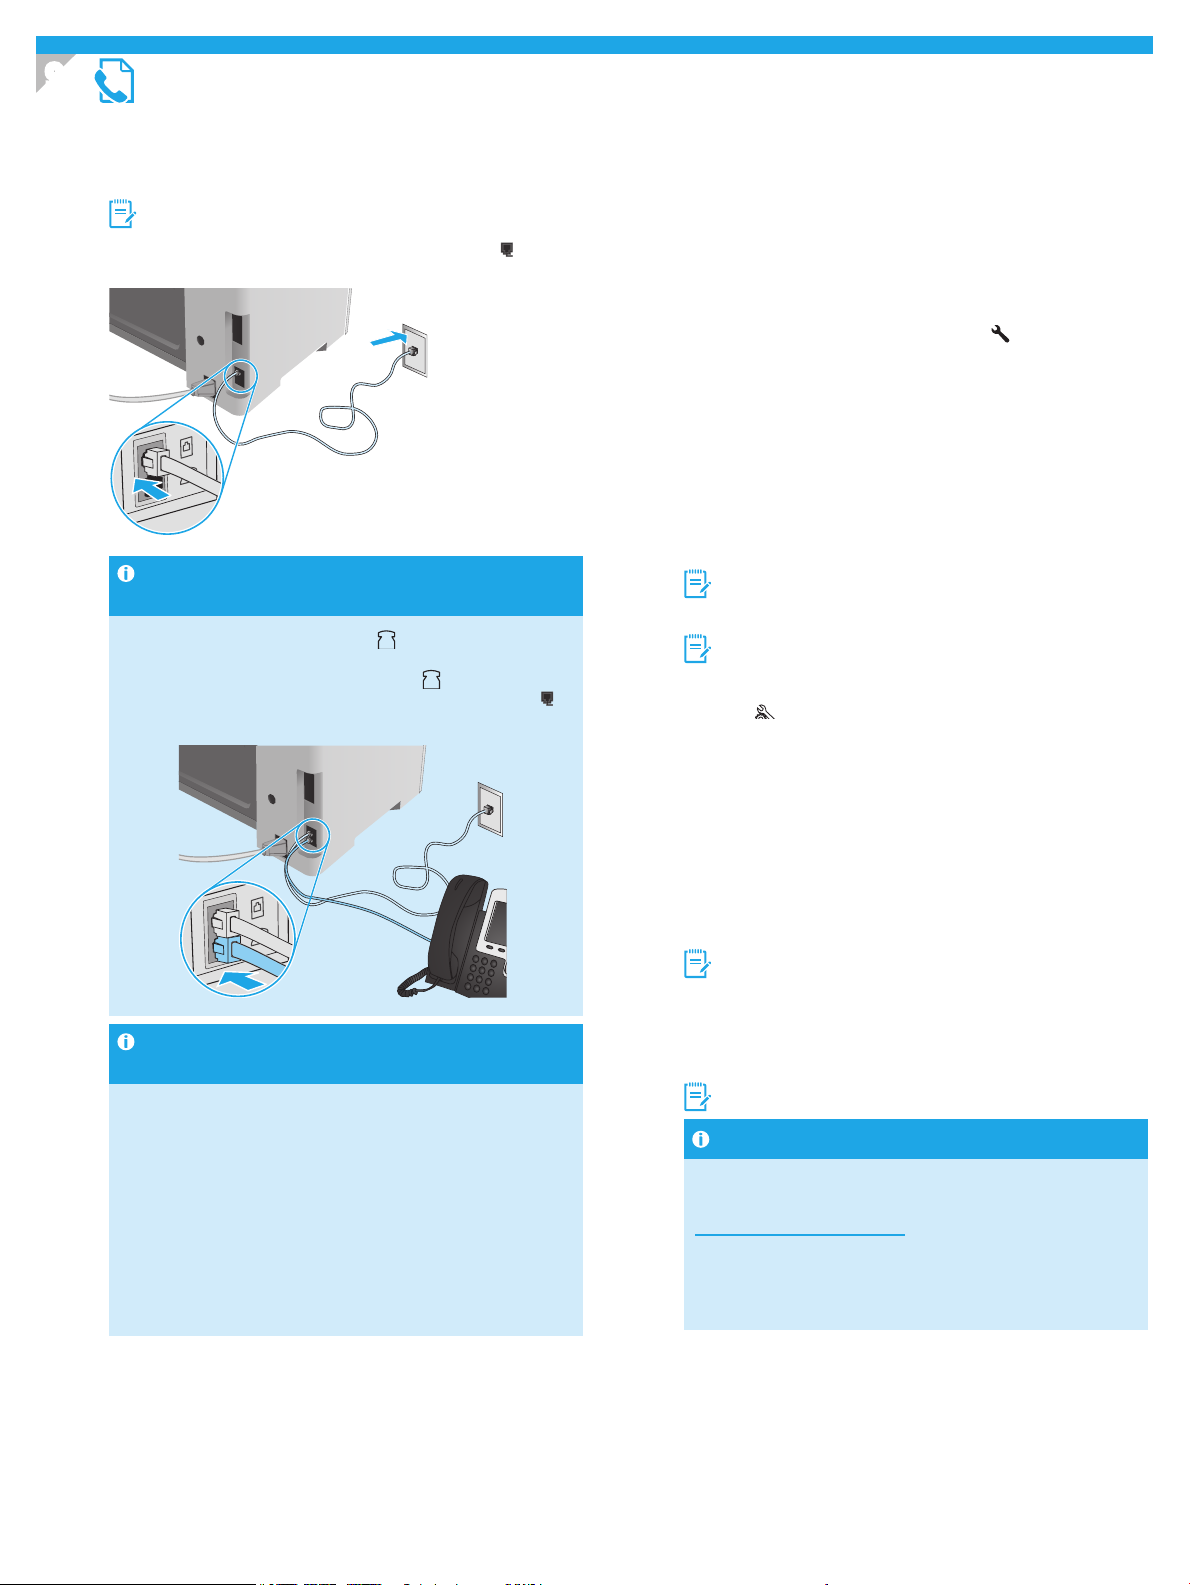
Connect the printer
The printer is an analog device. HP recommends using the printer on a
dedicated analog telephone line.
NOTE: Some countries/regions might require an adapter for the
phone cord that came with the printer.
Connect the phone cord that came with the printer to the Fax
port on
the printer and to the telephone jack on the wall.
How do I connect an answering machine or
extension phone?
1. Remove the plug from the phone port .
2. Disconnect the answering machine phone cord from the phone
jack, and then connect it to the phone port on the printer.
3. Connect the phone cord that came with the printer to the fax port on
the printer and to the telephone jack on the wall.
How do I set up HP printers in digital phone
environments?
HP printers are designed specically for use with traditional analog phone
services. For a digital phone environment (such as DSL/ADSL, PBX, ISDN,
orFoIP), digital-to-analog lters or converters might be necessary when
setting up the printer for fax.
Note: Depending on the phone company, the pr inter might not
be compatible with all digital service lines or providers, in all digital
environments, or with all digital-to-analog converters. Contact the phone
company to determine which setup options are best.
Note: When setting up ring pattern detection in a PBX phone system that
has dierent ring patterns for internal and external calls, make sure to dial
the printer fax number using an external number for recording the ring
pattern.
Congure the printer
Conguring the fax time, date, and header settings is required to use the
fax feature.
HP Fax Setup Wizard (Windows)
1. Click Start, and then click Programs.
2. Click HP, click the name of the printer, and then click Fax Setup
Wizard.
3. Follow the on-screen instructions to congure the fax settings.
2-line LCD control panel
1. On the printer control panel, press the Setup button.
2. Select System Setup, and then select Time/Date.
3. Select Time/Date.
4. Select the 12-hour or 24-hour.
5. Use the keypad to enter the current time, and then press the
OK button.
6. Select the date format.
7. Use the keypad to enter the current date, and then press the
OK button.
8. From the Setup menu, select Fax Setup, and then select Fax Header
9. Use the keypad to enter the fax number, and then press the
OK button.
NOTE: The maximum number of characters for the fax number is 20.
10. Use the keypad to enter your company name or header, and then
press the OK button.
NOTE: The maximum number of characters for the fax header is 40.
Touchscreen control panel
1. From the Home screen on the printer control panel, touch the
Setup
button.
2. Select Fax Setup, and then select Basic Setup.
3. Select Time/Date.
4. Select the 12-hour or 24-hour.
5. Use the keypad to enter the current time, and then touch the
OK button.
6. Select the date format.
7. Use the keypad to enter the current date, and then touch the
OK button.
8. Select Fax Header.
9. Use the keypad to enter the fax number, and then touch the
OK button.
NOTE: The maximum number of characters for the fax number
is 20.
10. Use the keypad to enter your company name or header, and then
touch the OK button.
To enter special characters that are not on the standard keypad,
touch the @#$ button to open a keypad that contains special
characters.
NOTE: The maximum number of characters for the fax header is 40.
Learn more!
For more information about other ways to send faxes, such as
scheduling a fax to be sent later or sending faxes from a computer,
seethe user guide on the printer CD, or go to:
www.hp.com/support/ljM129MFP
9.1 9.2
9.
Set up fax (fax models only - optional)

4
Wired (Ethernet) network connection (optional)
• Verify that the printer is attached to the correct network port using a cable of the
correct length.
• Verify that the lights next to the network port are lit.
• Verify that the print driver is installed on the computer.
• Test the network connection by pinging the network:
Windows
Click Start > Run. Type cmd, and press Enter. Type ping, type a space, type the
printer IP address, and then press E
nter. Example IP address: 192.168.0.1. To nd
the printer IP, see “Find the printer IP address.”
OS X
Open the Network Utility, and type the IP address in the ping pane. Press Enter.
Example IP address: 192.168.0.1. To nd the printer IP, see “Find the printer
IPaddress.”
• If the window displays round-trip times, the network is working.
• If the ping does not work, try restarting the printer and recheck all of the
connection steps.
Wireless network connection (wireless models)
• Verify that the network cable is not connected. The printer cannot connect to a
wireless network when a network cable is connected.
• Verify that the printer and wireless router are turned on and have power. Also
make sure the wireless switch is turned on.
• Verify that the printer is within the range of the wireless network. For most
networks, the printer must be within 30 m (100 ft) of the wireless access point
(wireless router).
• Verify that the print driver is installed on the computer.
• Verify that the computer and printer connect to the same wireless network.
• For Mac, verify that the wireless router supports Bonjour.
• Restart the wireless router.
Fax troubleshooting (fn, fp, and fw models only)
Verify the physical connection
• Verify that the phone cord is connected to the fax
port on the back of the
printer and to the wall jack.
• For an extension phone or other additional device, verify the phone cord is
connected to the telephone
port on the back of the printer and to the device.
• If outgoing phone calls fail because no dial tone is detected or the line is busy,
connect to a dierent phone line.
• For Fax over IP service, reduce the Fax Speed, and turn o Error Correction
Mode from the Fax Settings menu on the printer control panel.
Verify the printer fax settings
• To use a voice-mail service from the phone company or service provider, make
sure that the printer Rings to Answer setting is set to be fewer rings than the
telephone answering machine.
• If multiple phone numbers are assigned to the same physical phone line and
the line is shared by multiple devices, make sure that the printer is set to the
correct distinctive ring setting. Use a setting in which the printer answers faxes
and ignores other ring types.
• Conguring the Fax Speed setting to Medium (V.17) or Slow (V.29) can also
improve your ability to send a fax.
Troubleshooting
User guide
The user guide includes printer usage and troubleshooting information. It is available
on the printer CD and on the web:
1. Go to: www.hp.com/support/ljM129MFP
2. Select the appropriate language, and then select the printer if prompted to, and
then click User Guides.
Check for rmware updates
1. Go to: www.hp.com/support/ljM129MFP
2. Select a printer or category from the list, and then click Drivers.
3. Select the operating system, and click the Next button.
4. Select Firmware, and click the Download button.
Control panel help (touchscreen models only)
Touch the Help button on the printer control panel to access help topics.
Resolve error code messages
Lights Status Error code Action
The Attention Light Er/01 Load the paper into the tray
is blinking
Additional support resources
For HP’s all-inclusive help for the printer, go to: www.hp.com/support/ljM129MFP
• Solve problems
• Find advanced conguration instructions
• Download software updates
• Join support forums
• Find warranty and regulatory information
• Access mobile printing resources
Use the HP Scan software on your computer to start a scan job at the printer.
Windows
Open HP Printer Assistant, select Scan, and then select Scan a Document or Photo.
OS X
Click Applications, select HP, and then select HP Easy Scan.
10.
Use the scan feature
5
English.........................1
Français .......................5
Português ................ 15
Español .................... 10
IMPORTANT:
Suivez les
étapes1 à 3 sur
l’aiche de conguration
matérielle de l’imprimante
puis passez à l’étape4
.
4.
Congurer le panneau de commande
Sur le panneau de commande de l’imprimante, vériez l’état de l’écran avant de commencer
l’installation du logiciel.
Guide de démarrage
LaserJet Pro MFP M129-M132,
LaserJet Ultra MFP M133-M134
Connexion USB directement entre
l'imprimante et l'ordinateur
Utilisez un câble USB de type A-à-B.
Windows
1. Ne connectez pas le câble USB avant d'installer le logiciel. Le processus
d'installation vous invite à connecter le câble au moment opportun. Si le
câble est déjà connecté, redémarrez l'imprimante lorsque le processus
d'installation vous invite à connecter le câble.
2. Passez à la section «6. Télécharger et installer le logiciel.»
OS X
1. Pour Mac, branchez le câbleUSB entre l'ordinateur et l'imprimante avant
d'installer le logiciel.
2. Passez à la section «6. Télécharger et installer le logiciel.»
Connexion du réseau sans l
(modèles sans l uniquement)
Panneaux de commande à écran tactile
1. Pour connecter l'imprimante à un réseau sans l (Wi-Fi), sur le panneau
de commande de l'imprimante, appuyez sur le bouton Sans l .
2. Appuyez sur Menu sans l, puis sur Assistant d'installation sans l.
Sélectionnez le nom du réseau dans la liste SSID, ou entrez le nom du
réseau s'il n'y gure pas.
3. Entrez la phrase secrète à l'aide du clavier, puis appuyez sur OK.
4. Patientez pendant que l'imprimante établit une connexion réseau.
5. Sur le panneau de commande de l'imprimante, appuyez sur le bouton
Réseau. Si une adresse IP est indiquée, la connexion au réseau a été
établie. Si ce n'est pas le cas, patientez quelques minutes et réessayez.
Notez l'adresse IP à utiliser lors de l'installation du logiciel.
Exemple d'adresse IP: 192.168.0.1
Panneaux de commande à 2lignes/voyants
1. Pour connecter l'imprimante à un réseau sans l (Wi-Fi), assurez-vous
que le point d'accès de l'imprimante et l'ordinateur sont activés et que
l'ordinateur est connecté au réseau sans l.
2. Vous pourriez avoir besoin d'une câbleUSB lors de l'installation du
logiciel.
3. Pour imprimer à partir d'un ordinateur, passez à la section
«6. Télécharger et installer le logiciel.» Pour imprimer à partir
d'untéléphone ou d'une tablette uniquement, continuez avec
«7. Impression mobile (facultatif).»
Connexion à un réseau laire (Ethernet)
(facultatif)
Utilisez un câble réseau standard.
1. Branchez le câble réseau à l'imprimante et au réseau. Attendez quelques
minutes que l'imprimante acquière une adresse réseau.
2. Passez à la section «6. Télécharger et installer le logiciel.»
5.
Sélectionner une méthode de connexion
Congurer manuellement l'adresse IP
Consultez le manuel de l'utilisateur de l'imprimante pour obtenir des informations
sur la conguration manuelle de l'adresseIP www.hp.com/support/ljM129MFP.
www.hp.com/support/ljM129MFP www.register.hp.com

6
Readiris Pro pour HP
Téléchargez gratuitement ce logiciel pour activer des fonctions de
numérisation supplémentaires, notamment la reconnaissance optique
decaractères (OCR).
Pour télécharger le logiciel sur Internet, rendez-vous sur:
www.hp.com/support/ljM129MFP
Sélectionnez Pilotes, puis le système d'exploitation approprié et cliquez sur
Suivant. Cliquez sur Application - Tierce, puis sur le bouton Télécharger.
Activer les Services Web HP
Panneau de commande LCD à 2lignes
1. Une fois que l'imprimante est connectée à un réseau, entrez l'adresse IP du
réseau de l'imprimante dans un navigateur Web. Utilisez l'une des options
suivantes pour rechercher l'IP de l'imprimante:
• Accédez à «Rechercher l'adresse IP de l'imprimante» dans ce Guide de démarrage.
• Reportez-vous au manuel de l'utilisateur.
2. Sur la page Web qui s'aiche, cliquez sur l'onglet Services Web HP.
3. Lisez et acceptez les conditions d'utilisation, puis cliquez sur le bouton Activer.
Panneau de commande à écran tactile
1. Sur l'écran d'accueil du panneau de commande de l'imprimante, appuyez sur
le bouton ServicesWeb .
2. Appuyez sur le bouton Activer les services Web. L'imprimante active les
servicesWeb, puis imprime une page d'informations. Celle-ci contient le code
del'imprimante nécessaire pour enregistrer le produit HP sur HPConnected.
3. Rendez-vous sur www.hpconnected.com pour créer un compte HPePrint et
terminer le processus de conguration.
Utilisez HPePrint via messagerie électronique pour imprimer des documents en les envoyant en pièce jointe à l'adresse électronique de l'imprimante depuis n'importe quel
périphérique activé, même ceux qui ne sont pas sur le même réseau.
7.1
Connexion du produit à un réseau sans l
Pour imprimer depuis un téléphone ou une tablette, connectez le périphérique
au même réseau sans l que l'imprimante.
Périphériques Apple iOS (AirPrint): Ouvrez l'élément à imprimer et
sélectionnez l'icône Action. Sélectionnez Imprimer, puis l'imprimante et
appuyez sur Imprimer.
Périphériques Android (4.4 ou ultérieurs): Ouvrez l'élément à imprimer, puis
sélectionnez le bouton Menu. Sélectionnez Imprimer, puis l'imprimante et
appuyez sur Imprimer.
Pour certains périphériques, il est nécessaire de télécharger l'application du
module d'extension du service d'impressionHP sur Google Play.
WindowsPhone: téléchargez l'application HPAiO Remote dans le
WindowsStore.
En savoir plus sur l'impression mobile
Pour plus d'informations sur ces systèmes
d'exploitation et d'autres (Chrome/Google Cloud Print),
accédez à «www.hp.com/go/LaserJetMobilePrinting»
ou scannez le code QR ci-dessous.
6.
Télécharger et installer le logiciel
7.
Impression mobile (facultatif)
8.
Congurer HPePrint via messagerie électronique (facultatif)
Méthode 1: Téléchargement de HP Easy Start
(Windows et OS X)
1. Visitez la page 123.hp.com/laserjet et cliquez sur Télécharger.
2. Suivez les instructions et les invites à l'écran pour enregistrer le chier sur
l'ordinateur.
3. Lancez le chier du logiciel à partir du dossier dans lequel il a été enregistré.
Méthode 2: Téléchargement depuis le site Web
d'assistance de l'imprimante (Windows et OS X)
1. Accédez à www.hp.com/support/ljM129MFP.
2. Sélectionnez Pilotes et logiciels.
3. Téléchargez le logiciel adapté à votre modèle d'imprimante et à votre système
d'exploitation.
4. Lancez le chier du logiciel à partir du dossier dans lequel il a été enregistré.
Méthode 3: Installation avec le CD de l'imprimante
(Windows uniquement)
1. Insérez le CD de l'imprimante dans votre ordinateur.
2. Suivez les instructions à l'écran pour installer le logiciel. Pour plus d'informations,
consultez les notes d'installation sur le CD de l'imprimante.
7.2
Wi-Fi Direct (modèles sans l uniquement)
La fonctionnalité Wi-Fi Direct permet d'imprimer en proximité immédiate depuis
un périphérique mobile sans l directement sur une imprimante disposant de
cette même fonctionnalité sans vous connecter à un réseau ou Internet.
Activer Wi-Fi Direct
Pour activer Wi-Fi Direct depuis le panneau de commande, eectuez la
procédure suivante.
1. Panneau de commande à 2lignes: sur le panneau de commande de
l'imprimante, appuyez sur le bouton Conguration , puis ouvrez le
menu Conguration réseau.
Panneaux de commande à écran tactile: sur l'écran d'accueil du panneau
de commande de l'imprimante, sélectionnez le bouton Informations de
connexion .
2. Ouvrez les menus suivants:
- Wi-Fi Direct
- Paramètres (panneaux de commande à écran tactile uniquement)
- Actif/ Inactif
3. Appuyez sur l'élément de menu Activé. Appuyez sur le bouton Désactivé
pour désactiver l'impression Wi-Fi Direct.
Pour obtenir plus d'informations sur l'impression sans l et la conguration
sans l, accédez à www.hp.com/go/wirelessprinting.
Détecter l'imprimante
1. A partir du périphérique portable, activez la Wi-Fi puis recherchez des
réseaux sans l.
2. Sélectionnez l'imprimante, qui apparaîtra comme «Direct-nom-modèle»
commeindiqué sur le panneau de commande de l'imprimante.
Exemple de nom d'imprimante: «Direct-bb-HP M277 Laserjet».
Pour utiliser HPePrint via messagerie électronique, l’imprimante doit répondre aux exigences suivantes:
• L’imprimante doit être connectée à un réseau câblé ou sans l et avoir accès àInternet.
• Les services WebHP doivent être activés sur l’imprimante et celle-ci doit être enregistrée auprès de HPConnected.
 Loading...