


 Loading...
 420 User Manual")
HP Photosmart 420 series
GoGo Photo Studio
Printer User’s Manual |


Copyrights and Trademarks
© Copyright 2005 Hewlett-Packard Development Company, L.P.
The information contained herein is subject to change without notice. Reproduction, adaptation or translation without prior written permission is prohibited, except as allowed under the copyright laws.
Notice
The only warranties for HP products and services are set forth in the express warranty statements accompanying such products and services. Nothing herein should be construed as constituting an additional warranty. HP shall not be liable for technical or editorial errors or omissions contained herein.
The Hewlett-Packard Development Company, L.P. shall not be liable for incidental or consequential damages in connection with, or arising out of the furnishing, performance, or use of this document and the program material which it describes.
Trademarks
HP, the HP logo, and Photosmart are property of Hewlett-Packard Development Company, L.P.
The Secure Digital logo is a trademark of the SD Association.
Microsoft and Windows are registered trademarks of Microsoft Corporation.
Mac, the Mac logo, and Macintosh are registered trademarks of Apple Computer, Inc.
The Bluetooth word mark and logos are owned by the Bluetooth SIG, Inc. and any use of such marks by Hewlett-Packard Company is under license.
PictBridge and the PictBridge logo are trademarks of the Camera & Imaging Products Association (CIPA).
Other brands and their products are trademarks or registered trademarks of their respective holders.
The embedded software in the printer is based in part on the work of the Independent JPEG Group.
The copyrights to certain photos within this document are retained by the original owners.
Regulatory Model Identification Number VCVRA-0501
For regulatory identification purposes, your product is assigned a Regulatory Model Number. The Regulatory Model Number for your product is VCVRA-0501. This regulatory number should not be confused with the marketing name (HP Photosmart 420 series GoGo Photo Studio) or product number (Q6366A).
Safety Information
Always follow basic safety precautions when using this product to reduce risk of injury from fire or electric shock.
Warning To prevent fire or shock hazard, do not expose this product to rain or any type of moisture.
●Read and understand the setup instructions that came in the box with the printer.
●Use only a grounded electrical outlet when connecting the unit to a power source. If you do not know whether the outlet is grounded, check with a qualified electrician.
●Observe all warnings and instructions marked on the product.
●Unplug this product from wall outlets before cleaning.
●Do not install or use this product near water or when you are wet.
●Install the product securely on a stable surface.
●Use only the listed power adapter.
●Install the product in a protected location where no one can step on or trip over the power cord, and where the power cord will not be damaged.
●If the product does not operate normally, see the troubleshooting information in the onscreen Printer Help.
●There are no operator serviceable parts inside. Refer servicing to qualified service personnel.
●Use in a well-ventilated area.
Environmental Statements
Hewlett-Packard Company is committed to providing quality products in an environmentally sound manner.
Protecting the Environment
This printer has been designed with several attributes to minimize impact on our environment. For more information, go to HP's Commitment to the Environment website at www.hp.com/hpinfo/globalcitizenship/ environment/.
Ozone Production
This product generates no appreciable ozone gas (O3).
Paper Use
This product is suited for the use of recycled paper according to DIN 19309.
Plastics
Plastic parts over 24 grams
(0.88 ounces) are marked according to international standards that enhance the ability to identify plastics for recycling purposes at the end of the printer life.
Material Safety Data sheets
Material Safety Data Sheets (MSDS) can be obtained from the HP website at www.hp.com/go/msds. Customers without Internet access should contact Customer Care.
Recycling Program
HP offers an increasing number of product return and recycling programs in many countries, and partners with some of the largest electronics recycling centers throughout the world. HP conserves resources by reselling some of its most popular products.
This HP product contains lead in the solder, which may require special handling at the end of its life.
Disposal of Waste Equipment by Users in Private Households in the European Union

This symbol on the product or on its packaging indicates that this product must not be disposed of with your other household waste. Instead, it is your responsibility to dispose of your waste equipment by handing it over to a designated collection point for the recycling of waste electrical and electronic equipment. The separate collection and recycling of your waste equipment at the time of disposal will help to conserve natural resources and ensure that it is recycled in a manner that protects human health and the environment. For more information about where you can drop off your waste equipment for recycling, please contact your local city office, your household waste disposal service or the shop where you purchased the product.
For more information regarding return and recycling of HP products generally, please visit: www.hp.com/ hpinfo/globalcitizenship/environment/ recycle/index.html.
Contents
1 |
Welcome................................................................................................................ |
3 |
|
Finding More Information ....................................................................................... |
4 |
|
Printer Parts ........................................................................................................... |
5 |
|
Available Accessories .......................................................................................... |
11 |
|
Battery Information .............................................................................................. |
12 |
|
GoGo Photo Studio Menus .................................................................................. |
13 |
2 Getting Ready to Print........................................................................................ |
17 |
|
|
Loading Paper ..................................................................................................... |
17 |
|
Choosing the Best Paper for the Job ............................................................ |
17 |
|
Loading Your Paper ...................................................................................... |
18 |
|
Inserting Print Cartridges ..................................................................................... |
19 |
|
Connecting the Camera ....................................................................................... |
21 |
3 |
Printing Basics................................................................................................... |
23 |
|
Printing from the Docked Camera ....................................................................... |
23 |
|
Viewing Images to Print ................................................................................ |
23 |
|
Viewing images ..................................................................................... |
23 |
|
Viewing images on a TV ........................................................................ |
23 |
|
Improving the Quality of Your Images .......................................................... |
24 |
|
Printing Images ............................................................................................ |
24 |
|
Printing from Other Devices ................................................................................. |
25 |
|
Computer ...................................................................................................... |
26 |
|
About HP Image Zone and HP Instant Share ........................................ |
26 |
|
Transferring to a Computer ................................................................... |
26 |
|
PictBridge-certified Camera .......................................................................... |
27 |
|
Printing from a PictBridge-certified Camera .......................................... |
27 |
|
Bluetooth Wireless Devices .......................................................................... |
27 |
|
Making the Bluetooth Connection .......................................................... |
27 |
|
Printing from a Bluetooth Device ........................................................... |
27 |
4 Maintaining and transporting the printer.......................................................... |
29 |
|
|
Cleaning and Maintaining the Printer ................................................................... |
29 |
|
Cleaning the Outside of the Printer ............................................................... |
29 |
|
Cleaning the Print Cartridge ......................................................................... |
29 |
|
Cleaning the Print Cartridge Contacts .......................................................... |
30 |
|
Printing a Test Page ..................................................................................... |
30 |
|
Aligning the Print Cartridge ........................................................................... |
30 |
|
Updating the HP Photosmart Software ................................................................ |
31 |
|
Storing the HP Photosmart GoGo Photo Studio and Print Cartridges ................. |
32 |
|
Storing the HP Photosmart GoGo Photo Studio ........................................... |
32 |
|
Storing the Print Cartridges .......................................................................... |
32 |
|
Maintaining the Quality of Photo Paper ............................................................... |
33 |
|
Storing Photo Paper ..................................................................................... |
33 |
|
Handling Photo Paper .................................................................................. |
33 |
|
Transporting the HP Photosmart GoGo Photo Studio ......................................... |
33 |
5 |
Troubleshooting................................................................................................. |
35 |
|
Printer Hardware Problems ................................................................................. |
35 |
HP Photosmart 420 series GoGo Photo Studio Printer User's Manual |
1 |
|
Printing Problems ................................................................................................ |
40 |
|
Bluetooth Printing Problems ................................................................................ |
44 |
|
Error Messages ................................................................................................... |
44 |
6 |
Specifications .................................................................................................... |
47 |
|
System Requirements ......................................................................................... |
47 |
|
Printer Specifications ........................................................................................... |
47 |
7 |
HP Customer Care ............................................................................................. |
51 |
|
HP Customer Care by phone ............................................................................... |
51 |
|
Placing a call ................................................................................................ |
52 |
|
Return to HP Repair Service (North America Only) ............................................. |
52 |
|
Additional Warranty Options ................................................................................ |
52 |
Index........................................................................................................................... |
53 |
|
2 |
HP Photosmart 420 series GoGo Photo Studio |

1 Welcome
Thank you for purchasing an HP Photosmart 420 series GoGo Photo Studio! The HP Photosmart GoGo Photo Studio is an innovative pairing of camera and printer in one easy-to-use device. The HP Photosmart 420 series uses HP Real Life
technologies, such as red eye removal, to make it easy for you to get better prints with or without a computer.
Note In this manual references to the printer mean the part of the GoGo Photo Studio other than the camera.
This manual explains how to print from the HP Photosmart GoGo Photo Studio without connecting it to a computer. To learn how to print from your computer, install the HP Photosmart software and view the onscreen HP Photosmart Printer Help on your computer. For more information on installing the software, see the setup instructions that came in the box with the HP Photosmart GoGo Photo Studio.
Among other things, you'll learn how to:
Create beautiful borderless prints at the touch of a button. See Printing Images.
Improve the quality of your images with HP Real Life technologies such as automatic red-eye removal. See Improving the Quality of Your Images.
HP Photosmart 420 series GoGo Photo Studio Printer User's Manual |
3 |
Chapter 1
Finding More Information
Your new HP Photosmart 420 series GoGo Photo Studio comes with the following documentation:
●Quick Start or Setup Guide: The HP Photosmart 420 series GoGo Photo Studio comes with setup instructions that explain how to set up the HP Photosmart GoGo Photo Studio and install the HP Photosmart software. The Quick Start also includes basic camera operation. The name of the document varies by country/ region.
●HP Photosmart 420 series GoGo Photo Studio Printer User's Manual: The
Printer User's Manual is the book you are reading. This manual describes the basic features of the HP Photosmart GoGo Photo Studio, explains how to use it without connecting it to a computer, and contains hardware troubleshooting information. In some countries/regions the User's Manual is provided in online format on the HP Photosmart User's Manual CD.
●HP Photosmart Printer Help: The onscreen HP Photosmart Printer Help describes how to use the HP Photosmart GoGo Photo Studio with a computer and contains software troubleshooting information.
●HP Photosmart 420 series GoGo Photo Studio Camera User's Manual: This documentation explains how to use the HP Photosmart GoGo Photo Studio camera to take pictures and includes troubleshooting and maintenance information. In some countries/regions the camera documentation is provided only in online format on the HP Photosmart User's Manual CD. In those countries/ regions the Quick Start includes basic printed instructions for both the camera and the printer components.
After you have installed the HP Photosmart software on your computer, you can view the onscreen Printer Help on your computer:
●Windows PC: From the Start menu, select Programs (in Windows XP, select All Programs) > HP > HP Photosmart 420 series > Photosmart Help.
●Macintosh: Select Help > Mac Help in the Finder, then select Library >
HP Photosmart Printer Help for Macintosh.
4 |
HP Photosmart 420 series GoGo Photo Studio |
Printer Parts
This section contains information only on the printer component of the HP Photosmart 420 series GoGo Photo Studio. For information on the camera, see the Camera User's Manual.
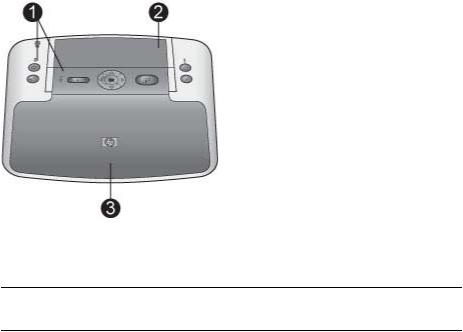
Front View (Closed)
1 Control panel: Control the basic functions of the printer from here.
2 Camera dock cover: Open this to dock the camera on the printer.
3Output tray: Open this to print or to connect a PictBridge-certified digital camera or the optional HP Bluetooth wireless printer adapter to the camera port on the front of the printer. It should also be open if you want to use the remote control with the printer.
HP Photosmart 420 series GoGo Photo Studio Printer User's Manual |
5 |
Chapter 1
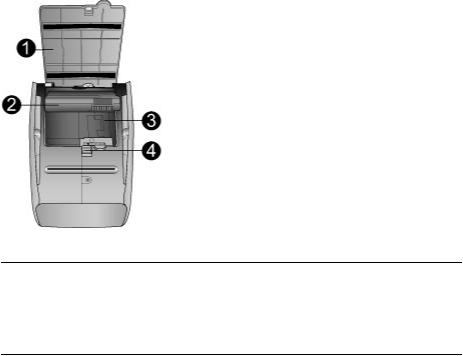
Front View (Open)
1 In tray: Load paper here.
2 In tray extender: Pull out to support paper.
3 Paper-width guide: Move to the width of the current paper to position the paper properly.
4 Print cartridge door: Open to insert or remove a print cartridge.
5 Output tray (open): The printer deposits prints here.
6Camera port: Connect either a PictBridge-certified digital camera to this port or the optional HP Bluetooth wireless printer adapter.
7 Handle: Extend to carry the printer.
Rear of Printer
1 USB port: Connect the printer to a computer using the supplied USB cable here.
2 Video port: Connect the video cable here to use the printer with a television to view images.
3 Power cord connection: Connect the power cord here.
6 |
HP Photosmart 420 series GoGo Photo Studio |

Indicator Lights
1Printer battery light: Solid green if the optional battery is installed and fully charged, flashing if the battery is charging.
2 On light: Solid green if the printer is on, flashing if the printer is turning on or off.
3Status light: Flashing red if there is an error or if some user action is required. An error message on the camera Image Display describes the problem.
4Print light: Solid green if the printer is ready to print, pulsing green if the printer is busy printing.
5 Video status light: Solid green if you are viewing images on a connected television monitor.
HP Photosmart 420 series GoGo Photo Studio Printer User's Manual |
7 |
Chapter 1
Control Panel
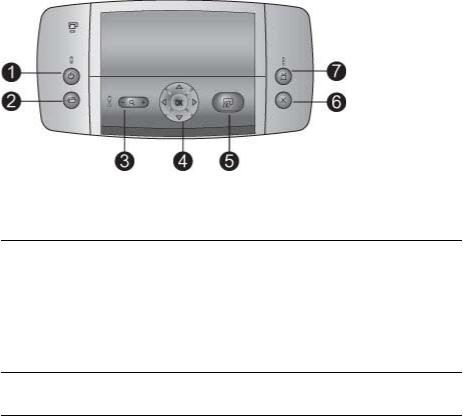
1 On: Press to turn the printer on or off.
2 Save: Press to transfer images from the docked camera to a connected computer.
3Zoom: Press Zoom + to enter Zoom mode. Each subsequent press increases the zoom level. Pressing Zoom + when viewing thumbnails displays the current image at full size. Pressing Zoom - when viewing a zoomed image decreases the zoom level. Pressing Zoom - when viewing a image at the full size lets you view several images at the same time as thumbnails.
4Navigation buttons: Use the arrows to scroll through images or navigate the menus. Press OK to open/close a menu or to select a menu option.
5 Print: Press to print the current image. Each additional press prints the same image again.
6 Cancel: Press to stop a print action.
7Video: Press to toggle between viewing images on an attached television monitor or on the camera Image Display. The printer must be connected to a television by using the supplied video cable.
8 |
HP Photosmart 420 series GoGo Photo Studio |

Total Images Summary Screen
1HP Instant Share status: Displays the number of images (if any) selected for distribution using HP Instant Share. For more information, see the Camera User's Manual.
2DPOF print status: Displays the number of images already selected on the camera for DPOF printing.
3Battery indicator: Displays the charge levels of the camera batteries (top) and optional HP Photosmart Internal Battery (bottom), if installed.
4 Messaging area: Displays printer messages.
5Navigation arrows: These arrows indicate there are other images you can browse through by pressing  or
or  on the printer control panel.
6 Ink-level indicator: Displays the ink level of the print cartridge.
Print Images Screen
1 Print box: Displays a check mark and number of copies of the current image being printed.
2Index number: Displays index number of current image and total number of images on the camera.
HP Photosmart 420 series GoGo Photo Studio Printer User's Manual |
9 |
Chapter 1
Internal Battery Compartment
1Cover of the battery compartment: Open this cover on the bottom of the printer to insert the optional HP Photosmart Internal Battery.
2HP Photosmart Internal Battery: A fully-charged battery has sufficient charge to print approximately 75 images. You must purchase the battery separately.
3 Internal battery compartment: Insert the optional HP Photosmart Internal Battery here.
4 Battery compartment button: Slide to release the compartment cover.
10 |
HP Photosmart 420 series GoGo Photo Studio |

Remote Control
1Video  : Press to toggle between viewing images on an attached television monitor or on the camera Image Display.
2 Play/Pause
  : Press to toggle between viewing images in a slide show or one at a time.
3Navigation buttons: Use the arrows to scroll through images or navigate the menus. Press OK to open/close a menu or to select a menu option.
4Zoom +  : Press to enter Zoom mode. Each subsequent press increases the zoom level. Pressing Zoom + when viewing thumbnails displays the current image at full size.
5Zoom -  : Press Zoom - when viewing a zoomed image to decrease the zoom level. Press Zoom - when viewing a image at the full size to view images as thumbnails.
6 Rotate
  : Press to rotate the current image. Disabled if the current image is a video clip.
7Print  : Press to print the current image. Each additional press prints the same image again.
8HP Instant Share  : Press to open up the Share Menu on the camera. For more information, see the Camera User's Manual.
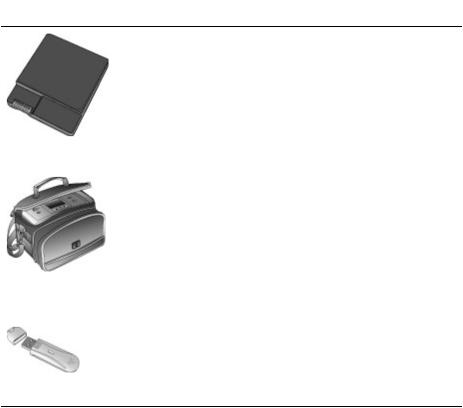
Available Accessories
There are several accessories available for the HP Photosmart 420 series that enhance its portability for printing anywhere, anytime. The appearance of the accessories may vary from what is shown.
For camera accessories, see the Camera User's Manual.
HP Photosmart 420 series GoGo Photo Studio Printer User's Manual |
11 |
Chapter 1
Accessory Name
HP Photosmart Internal Battery
HP Photosmart Carrying Case for
Compact Printers
HP Bluetooth wireless printer adapter
 Description
The HP Photosmart Internal Battery lets you take the printer with you wherever you go.
The lightweight, durable HP Photosmart Carrying Case for Compact Printers holds and protects everything needed for hassle-free printing on the go.
The HP Bluetooth wireless printer adapter plugs into the camera port on the front of the HP Photosmart GoGo Photo Studio and lets you use Bluetooth wireless technology for printing.
Battery Information
The HP Photosmart 420 series GoGo Photo Studio comes with batteries for the camera and for the remote control. The optional HP Photosmart Internal Battery is also available for the printer as a separate purchase. Both the printer battery light on the control panel and the camera Image Display indicate the status of an installed HP Photosmart Internal Battery, as follows:
GoGo Photo Studio connected to AC power
●The printer battery light is on if the battery is fully charged, flashing if the battery is charging
●The camera Image Display shows a battery icon with plug if the battery is fully charged and a battery animation if the battery is charging
GoGo Photo Studio running on battery
●The printer battery light is off.
●The camera Image Display shows nothing if the battery is fully charged.
●The camera Image Display shows icons for Low, Very Low, and Empty. Messages also appear on the camera Image Display.
12 |
HP Photosmart 420 series GoGo Photo Studio |

For information on the camera batteries, see the Camera User's Manual (in the box or in online format on the HP Photosmart User's Manual CD, depending on the country/ region).
The HP Photosmart GoGo Photo Studio remote control is intended primarily for operating the printer when you view images on a connected television. This remote uses a supplied CR2025 battery that you need to install.
To install the remote battery:
1.Remove the battery compartment cover from the back of the remote.
2.Insert the supplied battery as shown with the + side up.
3.Slide the cover back into place.
GoGo Photo Studio Menus
The GoGo Photo Studio menus contain many features for viewing and printing images, obtaining help, and more. The menus, when accessed, appear on the screen overlaying the current image. You can access the menus of the GoGo Photo Studio through the tabbed interface at the top of the camera Image Display. When the camera is not in the camera dock, the menus have different options. For more information, see the Camera User's Manual.
HP Photosmart 420 series GoGo Photo Studio Printer User's Manual |
13 |
Chapter 1
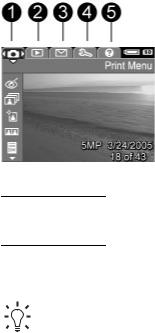
The GoGo Photo Studio Menu Tabs
1  Print Menu
2 Playback Menu
3  Share Menu
4 Setup Menu
5  Help Menu
Tip The GoGo Photo Studio menus contain many useful commands and options, but common functions, such as printing, are usually available with a single button press on the printer control panel.
To use the GoGo Photo Studio menus:
1.Insert the camera in the camera dock on top of the printer. For more information see Connecting the Camera.
2.Press OK on the printer control panel to access the menus. The Print Menu is displayed initially.
To Navigate the Menus:
●Press  or
or  on the printer to navigate through the menus (which appear as tabs across the top of the camera Image Display). Press
  or
or  to access the options under each menu. Menu options that are not accessible are dimmed.
●Press OK to select an option.
●To change to a different menu, press  until the current menu's tab is selected, then press
  or
or  to navigate through the menu tabs.
●To exit the menus, select EXIT in the current menu and then press OK. You can also press  until the current menu tab is selected and then press OK.
The Menus
●Print Menu
–Remove Red Eyes: Select to remove red eyes from the current image. If this menu option is disabled, the option is not possible with the current image.
–Print All: Select to display the Print All options. Select Full Size and press OK to print all the images in the camera, one borderless image per page. You can also select 2 Photos per Page, 4 Photos per Page, or Print Index
14 |
HP Photosmart 420 series GoGo Photo Studio |
Loading...