


3630
Table of contents
 Loading...
HP DeskJet 3630 All-in-One series
Get started
1. Follow the illustrations on the setup yer to set up your printer.
2. Visit 123.hp.com/dj3630 to install the mobile app or HP printer software and connect the printer to your
network.
Note: For Windows® users, If your computer is not connected to the Internet, insert the printer software CD
into your computer. If the installation program does not start, browse to Computer, double-click the CD/DVD
drive icon with the HP logo, and then double-click setup.exe.
Learn more
Electronic Help: Install the electronic Help by selecting it from the recommended software during software
installation. Learn about product features, printing, troubleshooting, and support. Find notices, environmental,
and regulatory information, including the European Union Regulatory Notice and compliance statements, in the
Technical Information section.
• Windows® 8.1: Click the down arrow in lower left corner of the Start screen, select the printer name, click
Help, and then select Search HP Help.
• Windows® 8: On the Start screen, right-click an empty area on the screen, click All Apps on the app bar,
click the icon with the printer’s name, and then click Help.
• Windows® 7, Windows Vista®, and Windows® XP: Click Start, select All Programs, select HP, and then
select the printer name.
• OS X: Click Help > Help Center. In the Help Viewer window, click Help for all your apps, and then click the
Help for your printer.
Readme: Contains HP support information, operating system requirements, and recent printer updates.
• Windows: Insert the software CD in your computer, and then browse to the ReadMe.chm le. Double-click
ReadMe.chm to open, and then select the ReadMe in your language.
• Mac: Open the Documents folder located at the top-level of the software installer. Double-click ReadMe,
and then select the ReadMe in your language.
On the Web: Additional help and information: www.hp.com/go/support. Printer registration:
www.register.hp.com. Declaration of Conformity: www.hp.eu/certicates. Ink usage:
www.hp.com/go/inkusage.
English
Scan to nd out more!
Standard data rates may apply. Might not be available in all languages.
FR IT ESEN DE
SV NO DAPT NL
LV LTFI ET
www.hp.com/eu/m/DJ3630
The information contained
herein is subject to change
without notice.
*F5S43-90058*
*F5S43-90058*
F5S43-90058
Printed in [English]
© 2014 Hewlett-Packard Development Company, L.P.

Control Panel
English
1
2
3
4
5
6
7
8
9
10
11
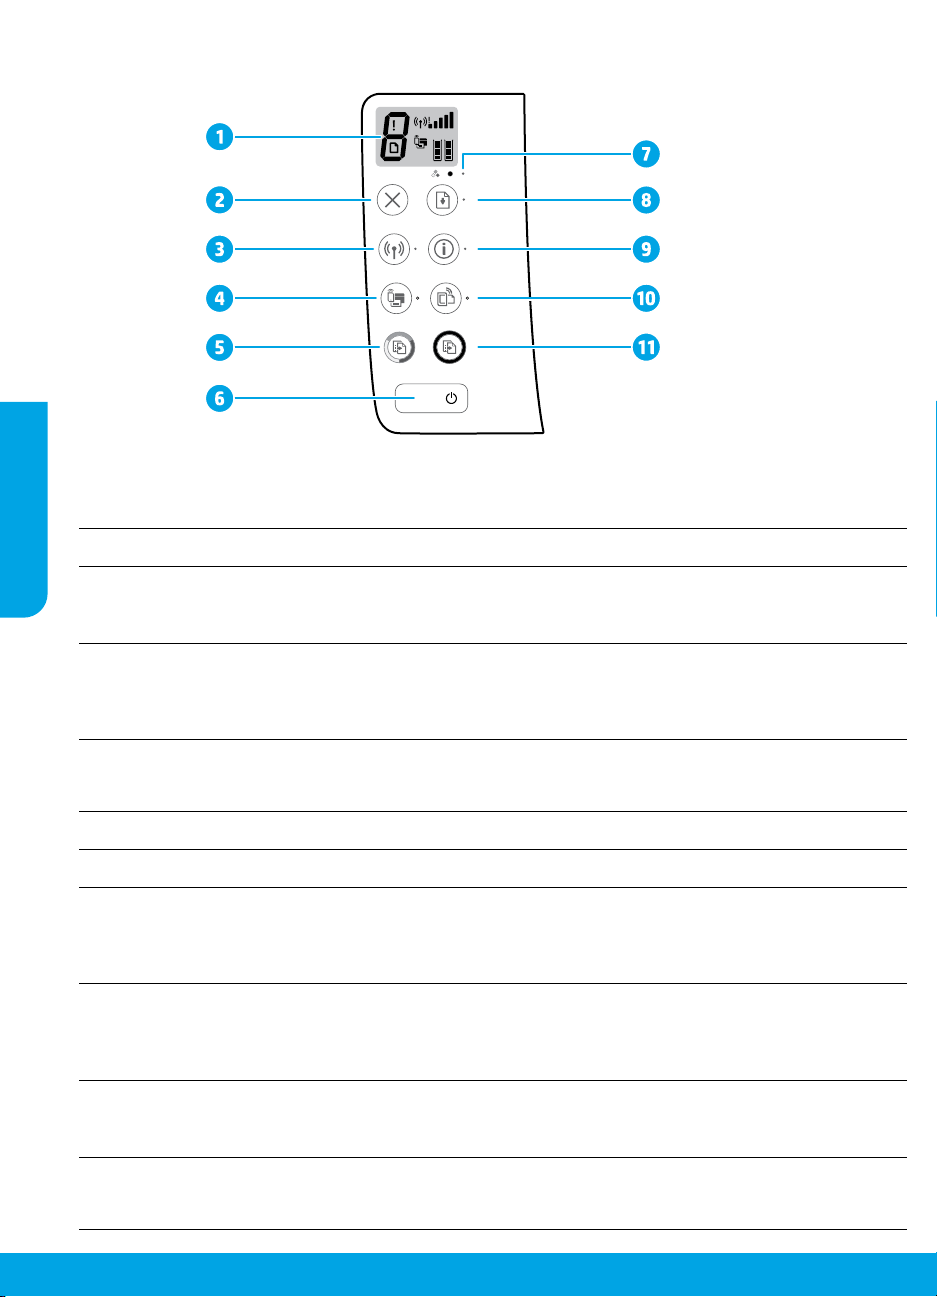
Control panel display: Indicates number of copies, media errors, wireless status and signal strength,
Wi-Fi Direct status, and ink levels.
Cancel button: Stops the current operation.
Wireless button: Turns on or o the printer wireless capabilities.
Wireless light: Indicates whether the printer is connected to a wireless network or not. A blinking
light indicates that wireless has not been setup or that the printer is attempting to connect.
Wi-Fi Direct button: Turns on or o Wi-Fi Direct.
Wi-Fi Direct light: Indicates the on or o status of Wi-Fi Direct. A blinking light indicates that the
printer is connecting to a mobile device in the Wi-Fi Protected Setup (WPS) push mode or there is a
problem of the Wi-Fi Direct connection.
Start Copy Color button: Starts a color copy job. To increase the number of color copies, press the
button multiple times. Copying will start two seconds after the last button press.
Power button: Turns the printer on or o.
Ink Alert light: Indicates low ink or ink cartridge problems.
Resume button: Resumes a job after a disruption (for example, after loading paper or clearing a
paper jam).
Resume light: Indicates that you can press the Resume button to assist in solving a problem.
Information button: Prints out a printer information page. Press the button in combination with the
Wireless button, the Wi-Fi Direct button, or the HP ePrint button to get more specic help pages
tied to each of those buttons.
Information light: Indicates that you can press the Information button to get help for a warning or
error.
HP ePrint button: Turns HP ePrint on or o.
HP ePrint light: Indicates the on or o status of HP ePrint. A blinking light indicates a problem with
the connection to Web Services.
Start Copy Black button: Starts a black-and-white copy job. To increase the number of black-and-
white copies, press the button multiple times. Copying will start two seconds after the last button
press.
2

Basic Troubleshooting
If you are unable to print:
1. Make sure the power cord connections are secure and the printer is powered on. The Power button will be lit.
2. If your computer is connected to the printer with a USB cable, make sure the USB connections are secure. If your
computer is connected to the printer with a wireless connection, conrm that the wireless connection is working.
3. Visit the HP Diagnostic Tools website at www.hp.com/go/tools to download free diagnostic utilities (tools)
that you can use to x common printer problems.
MacWindows
Make sure that the printer is set as your default
printing device:
• Windows 8.1 and Windows 8: Point to or tap
the upper-right corner of the screen to open the
Charms bar, click the Settings icon, click or tap
Control Panel, and then click or tap View devices
and printers.
• Windows 7: From the Windows Start menu, click
Devices and Printers.
• Windows Vista: On the Windows taskbar, click
Start, click Control Panel, and then click Printer.
• Windows XP: On the Windows taskbar, click Start,
click Control Panel, and then click Printers and
Faxes.
Make sure that your printer has a check mark in the
circle next to it. If your printer is not selected as the
default printer, right-click the printer icon and choose
Set as Default Printer from the menu.
If using a USB cable and you are still unable to print,
or the software installation fails:
1. Remove the CD from the CD/DVD drive, and then
disconnect the USB cable from the computer.
2. Restart the computer.
3. Insert the printer software CD in the CD/DVD drive,
and then follow the on-screen instructions to install
the printer software. Do not connect the USB cable
until you are told to do so.
4. After the installation nishes, restart the computer.
If you are using wireless and you are still unable to
print:
Go to the “Wireless Networking” section on the next
page for more information.
Check your print queue:
1. In System Preferences, click Printers & Scanners
(Print & Scan in OS X v10.8 Mountain Lion).
2. Click Open Print Queue.
3. Click a print job to select it.
4. Use the following buttons to manage the print job:
• Cancel icon: Cancel the selected print job.
• Resume: Continue a paused print job.
5. If you made any changes, try to print again.
Restart and reset:
1. Restart the computer.
2. Reset the printer.
a. Turn o the printer and unplug the power cord.
b. Wait a minute, then plug the power cord back in
and turn on the printer.
Reset the printing system:
1. In System Preferences, click Printers & Scanners
(Print & Scan in OS X v10.8 Mountain Lion).
2. Press and hold the Control key as you click the list
at the left, and then choose Reset printing system.
3. Add the printer you want to use.
Uninstall the software:
1. If the printer is connected to your computer through
USB, disconnect the printer from your computer.
2. Open the Applications/Hewlett-Packard folder.
3. Double-click HP Uninstaller, and then follow the
on-screen instructions.
English
Acknowledgements
Windows XP, Windows Vista, Windows 7, Windows 8, and Windows 8.1 are U.S. registered trademarks of Microsoft
Corporation.
Mac, OS X, and AirPrint are trademarks of Apple Inc., registered in the U.S. and other countries.
3
Wireless Networking
You can connect your printer to a wireless network during the printer software installation.
Note: During the software installation, a USB cable might be required for temporary connection between the
printer and the computer. Do not connect the USB cable until the printer software prompts to do so.
Tip: To print a wireless quick start guide, press the Information button (
Need networking help?
English
www.hp.com/go/wirelessprinting
The HP Wireless Printing Center at www.hp.com/go/wirelessprinting can help you prepare your wireless network,
set up or recongure your printer, and troubleshoot networking problems.
If connecting your printer to the network was unsuccessful
• Conrm that wireless is enabled on your printer.
From the printer control panel, if the Wireless light is o, press the Wireless button (
wireless capabilities.
• Conrm that your printer is connected to your network.
1. From your printer control panel, press the Wireless button (
same time to print the wireless network test report and network conguration page.
2. Check the top of the wireless network test report to see if something failed during the test.
– See the DIAGNOSTICS RESULTS section for all tests that were performed, to determine whether or not your
printer passed.
– From the CURRENT CONFIGURATION section, nd out the Network Name (SSID) to which your printer is
currently connected. Make sure that the printer is connected to the same network as your computer.
Note: If your computer is connected to a Virtual Private Network (VPN), temporarily disconnect from the VPN
before proceeding with the installation. After installation you will need to disconnect from the VPN to access
your printer over your home network.
• Make sure security software is not blocking communication over your network.
Security software, such as rewalls, can block communication between your computer and printer when
installing over a network. If your printer cannot be found, temporarily disable your rewall and check if the
problem goes away. For more help and tips on security software, go to: www.hp.com/go/wpc-rewall.
• Restart components of the wireless network.
Turn o the router and the printer, and then turn them back on in this order: router rst and then printer.
Sometimes, turning o devices and then turning them back on helps resolve network communication issues.
If you still cannot connect, turn o the router, the printer, and the computer, and then turn them back on in this
order: router rst, then printer, and then computer.
If you still have problems, visit the HP Wireless Printing Center (www.hp.com/go/wirelessprinting). This
website contains the most complete, up-to-date information about wireless printing, as well as information to
help you prepare your wireless network; solve problems when connecting the printer to the wireless network;
and resolve security software issues.
Note: If you are using a computer running Windows, you can use the Print and Scan Doctor tool, which can help
solve many problems you might have with the printer. To download this tool, visit www.hp.com/go/tools.
) for three seconds.
) to turn on the printer
) and the Information button ( ) at the
If you want to share your printer with multiple computers on your network
First install your printer on your home network. After you have successfully connected your printer to your home
network, you can share your printer with other computers on the same network. For each additional computer you
only need to install the HP printer software. During the software installation, select Wireless from the Connection
Options screen and then follow the on-screen instructions.
4

Wireless Networking (continued)
If you want to change from a USB connection to a wireless connection
First make sure that you have already successfully installed your printer software.
Windows
1. Double-click the printer icon on the desktop or do one of the following to open the printer software:
• Windows 8.1: Click the down arrow in lower left corner of the Start screen, and then select the printer name.
• Windows 8: Right-click an empty area on the Start screen, click All Apps on the app bar, and then select the
printer name.
• Windows 7, Windows Vista, and Windows XP: From the computer desktop, click Start, select All Programs
or Programs, click HP, click the folder for the printer, and then select the icon with the printer’s name.
2. In the printer software, click Utilities.
3. Select Printer Setup & Software.
4. Select Convert a USB connected printer to wireless. Follow the on-screen instructions.
Mac
Use HP Utility in Applications/Hewlett-Packard to change the software connection to wireless for this printer.
If you want to use the printer wirelessly without a router
Use Wi-Fi Direct to print wirelessly without a router, from your computer, smartphone, or other wireless enabled
device. To use Wi-Fi Direct from a computer, the printer software must be installed on the computer.
1. If the Wi-Fi Direct light on the printer is o, press the Wi-Fi Direct button (
The Wi-Fi Direct light is on when Wi-Fi Direct is turned on.
2. Press the Wi-Fi Direct button (
3. Follow the instruction on the Wi-Fi Direct guide to connect your computer or mobile device to the printer.
4. Print as you normally do from your computer or mobile device.
Note: Wi-Fi Direct connection does not provide Internet access.
Visit the HP Wireless Printing Center at www.hp.com/go/wirelessprinting for more information about Wi-Fi
Direct.
This product is designed for use in open environments (e.g., in homes and not connected to the public Internet) in
which anyone may access and use the printer. As a result, the Wi-Fi Direct setting is in “Automatic” mode by default,
without an administrator password; this allows anyone in wireless range to connect and access all functions and
settings of the printer. If higher security levels are desired, HP recommends changing the Wi-Fi Direct Connection
Method from “Automatic” to “Manual” and establishing an administrator password.
) and the Information button ( ) together to print a Wi-Fi Direct guide.
) to turn on Wi-Fi Direct.
English
If you want to print with AirPrint
This printer is Apple AirPrint™-enabled. You can print wirelessly from your iOS device or Mac.
• Your printer and iOS device or Mac must be on the same wireless network.
• With Apple AirPrint™, you cannot scan documents from the printer to your iOS device.
Note: Always make sure that the input tray is loaded with the desired paper.
Safety information
Use only with the power cord and power adapter (if provided) supplied by HP.
5

HP printer limited warranty statement
A.
B.
C.
D.
Complimentary Support
outside of the US where chat support is not available, phone support will be provided for 365 days. Support includes general
troubleshooting related to setup, installation, assembly and connectivity
(www
reseller or HP
The name and address of the HP
United Kingdom
Eire
Malta
Y
af
HP product Duration of limited warranty
Software Media 90 days
Printer 1 year hardware warranty
Print or Ink cartridges Until the HP ink is depleted or the “end of warranty” date
printed on the cartridge has been reached, whichever
occurs first. This warranty does not cover HP ink products
that have been refilled, remanufactured, refurbished,
misused, or tampered with.
English
Printheads (only applies to products with customer 1 year
replaceable printheads)
Accessories 1 year unless otherwise stated
Extent of limited warranty
1. Hewlett-Packard (HP) warrants to the end-user customer that the HP products specified above will be free from defects
in materials and workmanship for the duration specified above, which duration begins on the date of purchase by the
customer.
2. For software products, HP’s limited warranty applies only to a failure to execute programming instructions. HP does not
warrant that the operation of any product will be interrupted or error free.
3. HP's limited warranty covers only those defects that arise as a result of normal use of the product, and does not cover
any other problems, including those that arise as a result of:
a. Improper maintenance or modification;
b. Software, media, parts, or supplies not provided or supported by HP;
c. Operation outside the product's specifications;
d. Unauthorized modification or misuse.
4. For HP printer products, the use of a non-HP cartridge or a refilled cartridge does not affect either the warranty to the
customer or any HP support contract with the customer. However, if printer failure or damage is attributable to the use of
a non-HP or refilled cartridge or an expired ink cartridge, HP will charge its standard time and materials charges to
service the printer for the particular failure or damage.
5. If HP receives, during the applicable warranty period, notice of a defect in any product which is covered by HP's
warranty, HP shall either repair or replace the product, at HP's option.
6. If HP is unable to repair or replace, as applicable, a defective product which is covered by HP's warranty, HP shall,
within a reasonable time after being notified of the defect, refund the purchase price for the product.
7. HP shall have no obligation to repair, replace, or refund until the customer returns the defective product to HP.
8. Any replacement product may be either new or like-new, provided that it has functionality at least equal to that of the
product being replaced.
9. HP products may contain remanufactured parts, components, or materials equivalent to new in performance.
10. HP's Limited Warranty Statement is valid in any country where the covered HP product is distributed by HP. Contracts
for additional warranty services, such as on-site service, may be available from any authorized HP service facility in
countries where the product is distributed by HP or by an authorized importer.
Limitations of warranty
TO THE EXTENT ALLOWED BY LOCAL LAW, NEITHER HP NOR ITS THIRD PARTY SUPPLIERS MAKES ANY
OTHER WARRANTY OR CONDITION OF ANY KIND, WHETHER EXPRESS OR IMPLIED WARRANTIES OR
CONDITIONS OF MERCHANTABILITY, SATISFACTORY QUALITY, AND FITNESS FOR A PARTICULAR PURPOSE.
Limitations of liability
1. To the extent allowed by local law, the remedies provided in this Warranty Statement are the customer's sole and
exclusive remedies.
2. TO THE EXTENT ALLOWED BY LOCAL LAW, EXCEPT FOR THE OBLIGATIONS SPECIFICALLY SET FORTH IN
THIS WARRANTY STATEMENT, IN NO EVENT SHALL HP OR ITS THIRD PARTY SUPPLIERS BE LIABLE FOR
DIRECT, INDIRECT, SPECIAL, INCIDENTAL, OR CONSEQUENTIAL DAMAGES, WHETHER BASED ON
CONTRACT, TORT, OR ANY OTHER LEGAL THEORY AND WHETHER ADVISED OF THE POSSIBILITY OF
SUCH DAMAGES.
Local law
1. This Warranty Statement gives the customer specific legal rights. The customer may also have other rights which vary
from state to state in the United States, from province to province in Canada, and from country to country elsewhere in
the world.
2. To the extent that this Warranty Statement is inconsistent with local law, this Warranty Statement shall be deemed
modified to be consistent with such local law. Under such local law, certain disclaimers and limitations of this Warranty
Statement may not apply to the customer. For example, some states in the United States, as well as some governments
outside the United States (including provinces in Canada), may:
a. Preclude the disclaimers and limitations in this Warranty Statement from limiting the statutory rights of a consumer
(e.g., the United Kingdom);
b. Otherwise restrict the ability of a manufacturer to enforce such disclaimers or limitations; or
c. Grant the customer additional warranty rights, specify the duration of implied warranties which the manufacturer
cannot disclaim, or allow limitations on the duration of implied warranties.
3. THE TERMS IN THIS WARRANTY STATEMENT, EXCEPT TO THE EXTENT LAWFULLY PERMITTED, DO NOT
EXCLUDE, RESTRICT, OR MODIFY, AND ARE IN ADDITION TO, THE MANDATORY STATUTORY RIGHTS
APPLICABLE TO THE SALE OF THE HP PRODUCTS TO SUCH CUSTOMERS.
: 365 days of online chat support and 90 days of phone support (both from date of purchase). In regions
.hp.com/support) for additional information. During the term of HP’s limited warranty, you may contact your authorized HP
authorized service provided for additional information about support.
entity responsible for the performance of the HP Limited Warranty in your country is as follows:
: Hewlett-Packard Ireland Limited, 63-74 Sir John Rogerson's Quay, Dublin 2
ou may have additional statutory rights against the seller based on your purchase agreement. Those rights are not in any way
fected by this HP Limited Warranty.
: Hewlett-Packard Ltd Cain Road Bracknell GB-Berks RG12 1HN
: Hewlett-Packard International Trade B.V. Malta Branch, 48, Amery Street, Sliema SLM 1701, MALTA
HP Limited Warranty
. You may also refer to the HP Support Website
6

HP DeskJet 3630 All-in-One series
Erste Schritte
1. Befolgen Sie die Einrichtungsanweisungen, um den Drucker zu kongurieren.
2. Besuchen Sie 123.hp.com/dj3630, um die mobile App oder die HP Druckersoftware zu installieren und den Drucker mit
dem Netzwerk zu verbinden.
Hinweis: Für Benutzer von Windows®: Wenn der Computer nicht mit dem Internet verbunden ist, legen Sie die CD mit
der HP Druckersoftware in den Computer ein. Wenn das Installationsprogramm nicht automatisch gestartet wird,
doppelklicken Sie auf Computer, dann auf das Symbol der CD/DVD mit dem HP Logo und zuletzt auf die Datei setup.exe.
Weitere Informationen
Elektronische Hilfe: Installieren Sie die elektronische Hilfe, indem Sie diese beim Installieren der Software in der
empfohlenen Software auswählen. Über die Hilfe erhalten Sie weitere Informationen zu Leistungsmerkmalen des Produkts,
Druck, Fehlerbehebung und Support. Hinweise, Erklärungen zum Umweltschutz und rechtliche Hinweise einschließlich
rechtlichem Hinweis der Europäischen Union und Konformitätserklärung nden Sie im Abschnitt „Technische Daten“.
• Windows® 8.1: Klicken Sie in der Startanzeige links unten auf den Pfeil nach unten, wählen Sie den Druckernamen aus
und klicken Sie auf Hilfe. Wählen Sie dann HP Hilfe durchsuchen aus.
• Windows® 8: Klicken Sie mit der rechten Maustaste auf einen leeren Bereich der Startanzeige. Klicken Sie dann in der
App-Leiste auf Alle Apps und anschließend auf das Symbol mit dem Namen Ihres Druckers. Klicken Sie dann auf Hilfe.
• Windows® 7, Windows Vista® und Windows® XP: Klicken Sie auf Start und wählen Sie Alle Programme und HP aus.
Wählen Sie dann den Druckernamen aus.
• OS X: Klicken Sie auf Hilfe > Help Center. Klicken Sie im Fenster des Help Viewers auf Hilfe für alle Ihre Apps und dann
auf die Hilfe für Ihren Drucker.
Readme-Datei: Enthält HP Supportinformationen, Betriebssystemanforderungen und neueste Informationen zum Drucker.
• Windows: Legen Sie die Software-CD in den Computer ein und blättern Sie dann zur Datei ReadMe.chm. Doppelklicken
Sie zum Önen auf ReadMe.chm und wählen Sie dann die ReadMe in Ihrer Sprache aus.
• Mac: Önen Sie den Ordner Dokumente, der sich auf der obersten Ebene des Softwareinstallationsprogramms bendet.
Doppelklicken Sie auf ReadMe. Wählen Sie dann die ReadMe in Ihrer Sprache aus.
Im Internet: Weitere Hilfe und Informationen: www.hp.com/go/support. Druckerregistrierung: www.register.hp.com.
Konformitätserklärung: www.hp.eu/certicates. Tintenverbrauch: www.hp.com/go/inkusage.
Deutsch
Bitte scannen, um weitere Infos zu erhalten!
Es gelten Standarddatenraten. Ist ggf. nicht in allen Sprachen verfügbar.
www.hp.com/eu/m/DJ3630
Bedienfeld
Deutsch
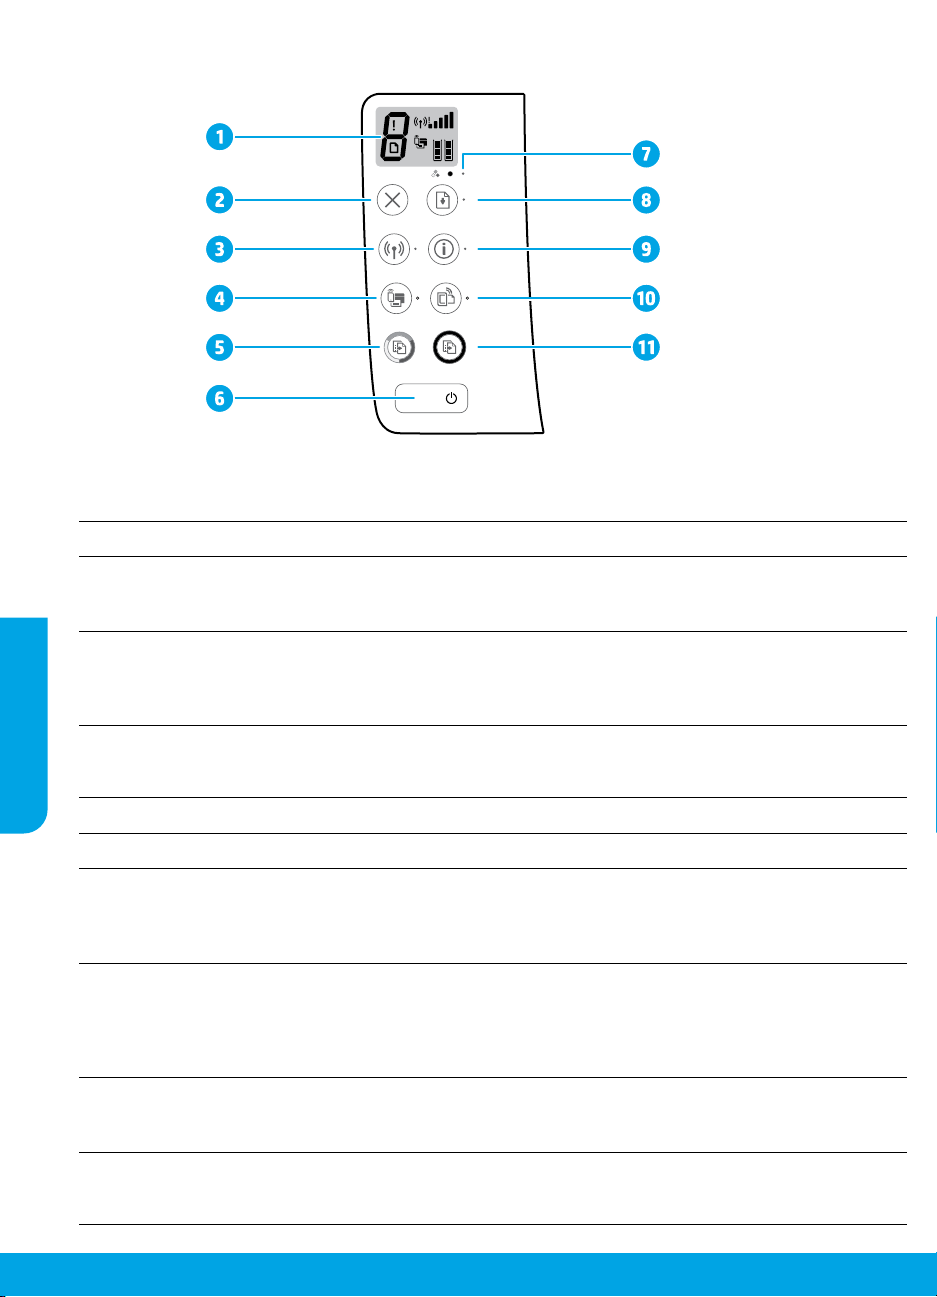
Bedienfelddisplay: Zeigt die Anzahl an Kopien, Medienfehler, Wireless-Status und Signalstärke sowie den Status
1
von Wi-Fi Direct und die Tintenfüllstände an.
Abbrechen (Taste): Stoppt die aktuelle Operation.
2
Wireless (Taste): Dient zum Ein- und Ausschalten der Wireless-Funktionen des Druckers.
3
Wireless (LED): Zeigt an, ob das Gerät mit einem Wireless-Netzwerk verbunden ist. Blinkt die LED, ist kein
Wireless-Modus eingerichtet oder der Drucker versucht, eine Verbindung herzustellen.
Wi-Fi Direct (Taste): Dient zum Ein- und Ausschalten von Wi-Fi Direct.
Wi-Fi Direct (LED): Zeigt an, ob Wi-Fi Direct ein- oder ausgeschaltet ist. Blinkt die LED, stellt der Drucker im
4
WPS-Modus (Wi-Fi Protected Setup) eine Verbindung zu einem mobilen Gerät her oder es besteht ein Problem
mit der Wi-Fi Direct-Verbindung.
Start Kopieren Farbe (Taste): Dient zum Starten einer Farbkopie. Drücken Sie diese Taste mehrmals, um die
Anzahl von Farbkopien zu erhöhen. Der Kopiervorgang beginnt zwei Sekunden, nachdem die Taste zuletzt
5
gedrückt wurde.
Netztaste: Dient zum Ein-/Ausschalten des Druckers.
6
Tintenwarnung (LED): Zeigt niedrigen Tintenfüllstand oder Patronenprobleme an.
7
Fortsetzen (Taste): Dient zum Wiederaufnehmen eines Auftrags nach einer Unterbrechung (z. B. nach dem
Einlegen von Papier oder Beheben eines Papierstaus).
8
Fortsetzen (LED): Zeigt an, dass Sie die Taste Fortsetzen drücken können, um Probleme einfacher lösen zu
können.
Info (Taste): Dient zum Drucken der Seite mit den Druckerinfos. Drücken Sie die Taste gleichzeitig mit der Taste
Wireless, Wi-Fi Direct oder HP ePrint, um speziellere Hilfeseiten zu den einzelnen Tasten anzuzeigen.
9
Info (LED): Zeigt an, dass Sie die Taste Info drücken können, um die Hilfe für eine Warnung oder einen Fehler
abzurufen.
HP ePrint (Taste): Dient zum Ein- und Ausschalten von HP ePrint.
10
11
8
HP ePrint (LED): Zeigt an, ob HP ePrint ein- oder ausgeschaltet ist. Blinkt die LED, besteht ein Problem mit der
Verbindung zu den Webdiensten.
Start Kopieren Schwarz (Taste): Dient zum Starten eines Kopierauftrags in Schwarzweiß. Drücken Sie diese
Taste mehrmals, um die Anzahl von Schwarzweißkopien zu erhöhen. Der Kopiervorgang beginnt zwei Sekunden,
nachdem die Taste zuletzt gedrückt wurde.

Grundlegende Fehlerbehebung
Wenn kein Drucken möglich ist:
1. Vergewissern Sie sich, dass das Netzkabel korrekt angeschlossen und der Drucker eingeschaltet ist. Die Netztaste Ein leuchtet.
2. Wenn der Computer über ein USB-Kabel mit dem Drucker verbunden ist, vergewissern Sie sich, dass die USB-Verbindungen
korrekt sind. Wenn der Computer über eine Wireless-Verbindung mit dem Drucker verbunden ist, vergewissern Sie sich, dass
die Wireless-Verbindung funktioniert.
3. Besuchen Sie die Website für die HP Diagnosetools unter www.hp.com/go/tools, um kostenlose Diagnoseprogramme (Tools)
herunterzuladen. Diese dienen zum Beheben allgemeiner Druckerprobleme.
MacWindows
Vergewissern Sie sich, dass der Drucker als
Standarddrucker festgelegt ist:
• Windows 8.1 und Windows 8: Zeigen oder tippen Sie auf
die obere rechte Ecke der Anzeige, um die Charms-Leiste
zu önen. Klicken Sie dann auf das Symbol Einstellungen.
Klicken oder tippen Sie auf Systemsteuerung und dann
auf Geräte und Drucker anzeigen.
• Windows 7: Klicken Sie im Windows-Menü Start auf
Geräte und Drucker.
• Windows Vista: Klicken Sie in der Windows-Taskleiste
auf Start. Klicken Sie dann auf Systemsteuerung und
Drucker.
• Windows XP: Klicken Sie in der Windows-Taskleiste auf
Start. Klicken Sie dann auf Systemsteuerung und Drucker
und Faxgeräte.
Vergewissern Sie sich, dass der Kreis neben dem Drucker
mit einem Häkchen markiert ist. Wenn Ihr Drucker nicht
als Standarddrucker ausgewählt ist, klicken Sie mit der
rechten Maustaste auf das Druckersymbol und wählen
Sie im daraufhin angezeigten Menü die Option Als
Standarddrucker festlegen aus.
Wenn Sie ein USB-Kabel verwenden und weiterhin kein
Druck möglich ist oder die Softwareinstallation scheitert:
1. Nehmen Sie die CD aus dem CD-/DVD-Laufwerk heraus
und lösen Sie das USB-Kabel vom Computer.
2. Führen Sie einen Neustart des Computers aus.
3. Legen Sie die CD mit der Druckersoftware in das CD/
DVD-Laufwerk ein und führen Sie die Installation
der Druckersoftware entsprechend den angezeigten
Anweisungen durch. Schließen Sie das USB-Kabel erst an,
wenn Sie dazu aufgefordert werden.
4. Starten Sie den Computer nach Abschluss der Installation
neu.
Wenn Sie die Wireless-Funktionen benutzen und weiterhin
kein Druck möglich ist:
Weitere Informationen erhalten Sie im Abschnitt „Wireless-
Netzwerke“ auf der nächsten Seite.
Überprüfen Sie die Druckwarteschlange:
1. Klicken Sie in den Systemeinstellungen auf Drucker &
Scanner (Drucken & Scan unter OS X 10.8 Mountain Lion).
2. Klicken Sie auf Druckwarteschlange önen.
3. Klicken Sie auf einen Druckauftrag, um ihn auszuwählen.
4. Verwenden Sie zum Verwalten des Druckauftrags die
folgenden Tasten:
• Abbrechen (Symbol): Ausgewählten Druckauftrag
abbrechen.
• Fortsetzen: Angehaltenen Druckauftrag fortsetzen.
5. Wenn Änderungen vorgenommen wurden, starten Sie
einen erneuten Druckversuch.
Starten Sie den Drucker neu und setzen Sie ihn zurück:
1. Führen Sie einen Neustart des Computers aus.
2. Setzen Sie den Drucker zurück.
a. Schalten Sie den Drucker aus und ziehen Sie das
Netzkabel ab.
b. Warten Sie eine Minute, schließen Sie das Netzkabel
wieder an und schalten Sie den Drucker ein.
Setzen Sie das Drucksystem zurück:
1. Klicken Sie in den Systemeinstellungen auf Drucker &
Scanner (Drucken & Scan unter OS X 10.8 Mountain Lion).
2. Halten Sie die Taste Strg gedrückt, während Sie auf
die Liste auf der linken Seite klicken. Wählen Sie dann
Drucksystem zurücksetzen aus.
3. Fügen Sie den Drucker hinzu, den Sie verwenden möchten.
Deinstallieren Sie die Software:
1. Ist der Drucker über ein USB-Kabel mit dem Computer
verbunden, trennen Sie den Drucker von Ihrem Computer.
2. Önen Sie den Ordner Programme/Hewlett-Packard.
3. Doppelklicken Sie auf das Symbol für das HP
Deinstallationsprogramm und befolgen Sie die
angezeigten Anweisungen.
Deutsch
Marken
Windows XP, Windows Vista, Windows 7 und Windows 8 und Windows 8.1 sind in den USA eingetragene Marken der Microsoft
Corporation.
Mac, OS X und AirPrint sind in den USA und/oder anderen Ländern eingetragene Marken von Apple Inc.
9

Wireless-Netzwerke
Sie können den Drucker beim Installieren der Druckersoftware mit einem Wireless-Netzwerk verbinden.
Hinweis: Während der Softwareinstallation wird ggf. ein USB-Kabel benötigt, um eine temporäre Verbindung zwischen dem
Drucker und dem Computer herzustellen. Schließen Sie das USB-Kabel erst an, wenn Sie durch die Druckersoftware dazu
aufgefordert werden.
Tipp: Drücken Sie zum Drucken einer Kurzanleitung zum Wireless-Druck die Taste „Info“ (
Benötigen Sie Hilfe zum Netzwerkbetrieb?
www.hp.com/go/wirelessprinting
Im HP Wireless-Druckcenter unter www.hp.com/go/wirelessprinting erhalten Sie Hilfe zum Vorbereiten Ihres Wireless-
Netzwerks, zum Einrichten und erneuten Kongurieren des Druckers und zum Beheben von Netzwerkproblemen.
Wenn keine Verbindung zum Netzwerk hergestellt werden konnte
• Vergewissern Sie sich, dass der Wireless-Betrieb auf dem Drucker aktiviert ist.
Leuchtet die LED Wireless nicht, drücken Sie auf dem Bedienfeld des Druckers die Taste Wireless ( ), um die Wireless-
Deutsch
Funktionen des Druckers einzuschalten.
• Vergewissern Sie sich, dass der Drucker mit dem Netzwerk verbunden ist.
1. Drücken Sie auf dem Bedienfeld des Druckers gleichzeitig die Taste Wireless ( ) und die Taste Info ( ), um den
Testbericht für das Wireless-Netzwerk und die Netzwerkkongurationsseite zu drucken.
2. Prüfen Sie am Anfang des Testberichts für das Wireless-Netzwerk, ob beim Test ein Fehler aufgetreten ist.
– Prüfen Sie anhand des Abschnitts DIAGNOSEERGEBNISSE, ob alle Tests ausgeführt und vom Drucker bestanden wurden.
– Unter AKTUELLE KONFIGURATION nden Sie den Namen (die SSID) des Netzwerks, mit dem der Drucker zurzeit verbunden
ist. Vergewissern Sie sich, dass der Drucker mit demselben Netzwerk verbunden ist wie der Computer.
Hinweis: Wenn Ihr Computer mit einem Virtual Private Network (VPN) verbunden ist, trennen Sie vorübergehend die
Verbindung zum VPN, bevor Sie mit der Installation fortfahren. Sie müssen nach der Installation die Verbindung zum VPN
trennen, um über das eigene Heimnetzwerk auf den Drucker zugreifen zu können.
• Vergewissern Sie sich, dass die Kommunikation über das Netzwerk nicht durch Sicherheitssoftware blockiert wird.
Sicherheitssoftware wie Firewalls kann die Kommunikation zwischen dem Computer und dem Drucker blockieren, wenn die
Software über ein Netzwerk installiert wird. Sollte der Drucker nicht gefunden werden, deaktivieren Sie vorübergehend die
Firewall und überprüfen Sie, ob das Problem dadurch behoben wurde. Weitere Hilfe und Tipps zu Sicherheitssoftware erhalten
Sie unter: www.hp.com/go/wpc-rewall.
• Komponenten des Wireless-Netzwerks neu starten.
Schalten Sie den Router und den Drucker aus und schalten Sie diese in der genannten Reihenfolge wieder ein: zuerst den
Router und dann den Drucker. Manchmal lassen sich Probleme mit der Netzwerkkommunikation durch Ausschalten und
erneutes Einschalten beheben. Falls Sie immer noch keine Verbindung herstellen können, schalten Sie Router, Drucker und
Computer aus und danach in dieser Reihenfolge wieder ein: zuerst den Router, dann den Drucker und anschließend den
Computer.
Sollten weiterhin Probleme auftreten, besuchen Sie das HP Wireless-Druckcenter (www.hp.com/go/wirelessprinting). Diese
Website enthält die umfassendsten und neuesten Informationen zum Wireless-Druck sowie Informationen zum Vorbereiten
Ihres Wireless-Netzwerks, Lösen von Problemen beim Verbinden des Druckers mit dem Wireless-Netzwerk und Lösen von
Problemen in Bezug auf die Sicherheitssoftware.
Hinweis: Auf einem Windows-Computer können Sie das Tool HP Print and Scan Doctor verwenden. Sollten Probleme mit
dem Drucker auftreten, unterstützt Sie dieses Tool bei der Lösung vielfältiger Probleme. Sie können dieses Tool unter
www.hp.com/go/tools herunterladen.
) drei Sekunden lang.
Wenn Sie den Drucker mit mehreren Computern im Netzwerk gemeinsam verwenden
möchten
Installieren Sie zuerst den Drucker in Ihrem Heimnetzwerk. Sobald der Drucker mit Ihrem Heimnetzwerk verbunden ist, können
Sie den Drucker gemeinsam mit anderen Computern im selben Netzwerk benutzen. Sie müssen bei jedem weiteren Computer nur
die HP Druckersoftware installieren. Wählen Sie beim Installieren der Software in der Anzeige Verbindungsoptionen die Option
Wireless aus und befolgen Sie die angezeigten Anweisungen.
10

Wireless-Netzwerke (Forts.)
So wechseln Sie von einer USB-Verbindung zu einer Wireless-Verbindung
Die Druckersoftware muss bereits korrekt installiert sein.
Windows
1. Doppelklicken Sie auf dem Desktop auf das Druckersymbol oder führen Sie einen der folgenden Schritte aus, um die
Druckersoftware zu önen:
• Windows 8.1: Klicken Sie auf der Startanzeige links unten auf den Pfeil nach unten und wählen Sie dann den
Druckernamen aus.
• Windows 8: Klicken Sie mit der rechten Maustaste auf einen leeren Bereich der Startanzeige. Klicken Sie dann auf der
App-Leiste auf Alle Apps und wählen Sie den Druckernamen aus.
• Windows 7, Windows Vista und Windows XP: Klicken Sie auf dem Computerdesktop auf Start und wählen Sie Alle
Programme oder Programme aus. Klicken Sie auf HP und den Ordner für den Drucker und wählen Sie dann das Symbol
mit dem Druckernamen aus.
2. Klicken Sie in der HP Druckersoftware auf Dienstprogramme.
3. Wählen Sie Druckereinrichtung und -software aus.
4. Wählen Sie Bei Druckerverbindung von USB zu Wireless wechseln aus. Befolgen Sie die angezeigten Anweisungen.
Mac
Verwenden Sie das HP Dienstprogramm unter Programme/Hewlett-Packard, um bei der Softwareverbindung für diesen Drucker
zu Wireless zu wechseln.
Wenn der Drucker ohne Router über eine Wireless-Verbindung verwendet werden soll
Verwenden Sie Wi-Fi Direct, um drahtlos (wireless) und ohne Router von Ihrem Computer, Ihrem Smartphone oder einem anderen
wireless-fähigen Gerät aus zu drucken. Die Druckersoftware muss auf einem Computer installiert sein, um Wi-Fi Direct vom
Computer aus verwenden zu können.
1. Wenn die LED Wi-Fi Direct am Drucker nicht leuchtet, drücken Sie die Taste Wi-Fi Direct ( ), um Wi-Fi Direct einzuschalten.
Die LED Wi-Fi Direct leuchtet, wenn Wi-Fi Direct eingeschaltet ist.
2. Drücken Sie gleichzeitig die Taste Wi-Fi Direct ( ) und die Taste Info ( ), um eine Anleitung für Wi-Fi Direct zu drucken.
3. Befolgen Sie die Anweisungen in der Anleitung für Wi-Fi Direct, um den Computer oder das mobile Gerät mit dem Drucker zu
verbinden.
4. Drucken Sie in derselben Weise wie mit dem Computer oder einem mobilen Gerät.
Hinweis: Über eine Verbindung für Wi-Fi Direct wird kein Zugri auf das Internet bereitgestellt.
Im HP Wireless-Druckcenter unter www.hp.com/go/wirelessprinting nden Sie weitere Informationen zu Wi-Fi Direct.
Dieses Produkt ist für die Verwendung in oenen Umgebungen (z. B. zu Hause ohne Verbindung mit dem öentlichen Internet)
gedacht, in denen jeder auf den Drucker zugreifen und diesen verwenden kann. Infolgedessen wird für Wi-Fi Direct standardmäßig
der automatische Modus ohne Administratorkennwort eingestellt. Dies ermöglicht es allen Benutzern in Wireless-Reichweite, eine
Verbindung herzustellen und auf alle Funktionen und Einstellungen des Druckers zuzugreifen. Wenn höhere Sicherheitsstufen
gewünscht sind, empehlt HP, die Verbindungsmethode für Wi-Fi Direct von „Automatisch“ in „Manuell“ zu ändern und ein
Administratorkennwort einzurichten.
Wenn Sie mit AirPrint drucken möchten
Dieser Drucker ist für Apple AirPrint™ aktiviert. Sie können drahtlos von Ihrem iOS-Gerät oder Mac drucken.
• Der Drucker und das iOS-Gerät bzw. der Mac müssen sich im selben Wireless-Netzwerk benden.
• Mit Apple AirPrint™ können Sie keine Dokumente von Ihrem Drucker zum iOS-Gerät scannen.
Hinweis: Vergewissern Sie sich stets, dass das gewünschte Papier im Papierfach eingelegt ist.
Deutsch
Sicherheitsinformationen
Verwenden Sie das Produkt ausschließlich mit dem Netzkabel und dem Netzteil (sofern im Lieferumfang enthalten), die von HP
geliefert wurden.
11

Erklärung zur beschränkten Gewährleistung für HP Drucker
A.
B.
C.
D.
Als
Deutschland
Österreich
Luxembur
Belgien
Deutschland und Österreich:
Über die Herstellergarantie hinaus haben Sie gegebenenfalls Mängelansprüche gegenüber Ihrem
Herstellergarantie nicht eingeschränkt werden.
Luxemburg:
Über die Herstellergarantie hinaus haben Sie gegebenenfalls gesetzliche
diese Herstellergarantie nicht eingeschränkt werden. Insbesondere werden für
Herstellergarantie nicht berührt: Gesetz vom 21.
des Zivilgesetzbuches bezüglich der Garantie. Die gesetzliche Garantie nach dem Gesetz vom 21.
Ve
Belgien:
Sie haben gegebenenfalls zusätzliche
eingeschränkt werden.
HP Produkt Dauer der beschränkten Gewährleistung
Softwaremedien 90 Tage
Drucker 1 Jahr
Druckpatronen Bis die HP Tinte verbraucht oder das auf der Druckpatrone
angegebene Enddatum für die Garantie erreicht ist, je
nachdem, welcher Fall zuerst eintritt. Diese Garantie gilt nicht
für nachgefüllte, nachgearbeitete, recycelte, zweckentfremdete
oder in anderer Weise manipulierte HP Tintenprodukte.
Druckköpfe (gilt nur für Produkte, deren Druckkopf vom 1 Jahr
Kunden ausgewechselt werden kann)
Zubehör 1 Jahr (wenn nicht anders angegeben)
Deutsch
Umfang der beschränkten Gewährleistung
1. Hewlett-Packard (HP) gewährleistet dem Endkunden, dass die oben genannten HP Produkte während des oben genannten
Gewährleistungs-zeitraums frei von Material- und Verarbeitungsfehlern sind. Der Gewährleistungszeitraum beginnt mit dem Kaufdatum.
2. Bei Softwareprodukten gilt die eingeschränkte Garantie von HP nur für die Nichtausführung von Programmieranweisungen. HP übernimmt
keine Garantie dafür, dass die Verwendung jeglicher Produkte unterbrechungsfrei bzw. ohne Fehler verläuft.
3. Die beschränkte Gewährleistung von HP gilt nur für Mängel, die sich bei normaler Benutzung des Produkts ergeben, und erstreckt sich nicht
auf Fehler, die durch Folgendes verursacht wurden:
a. Unsachgemäße Wartung oder Abänderung des Produkts;
b. Software, Druckmedien, Ersatzteile oder Verbrauchsmaterial, die nicht von HP geliefert oder unterstützt werden;
c. Betrieb des Produkts, der nicht den technischen Daten entspricht;
d. Unberechtigte Abänderung oder falsche Verwendung.
4. Bei HP Druckerprodukten wirkt sich die Verwendung einer nicht von HP hergestellten bzw. einer aufgefüllten Patrone nicht auf die Garantie
für den Kunden bzw. auf jegliche Unterstützungsverträge mit dem Kunden aus. Wenn der Ausfall bzw. die Beschädigung des Druckers jedoch
auf die Verwendung einer nicht von HP hergestellten bzw. einer aufgefüllten Patrone oder einer abgelaufenen Tintenpatrone zurückzuführen
ist, stellt HP für die Wartung des Druckers bei diesem Ausfall bzw. dieser Beschädigung die standardmäßigen Arbeits- und Materialkosten in
Rechnung.
5. Wenn HP während des jeweils zutreffenden Gewährleistungszeitraums von einem Schaden an einem unter die Gewährleistung von HP
fallenden Produkt in Kenntnis gesetzt wird, wird das betreffende Produkt nach Wahl von HP entweder repariert oder ersetzt.
6. Sollte HP nicht in der Lage sein, ein fehlerhaftes, unter die Gewährleistung fallendes Produkt zu reparieren oder zu ersetzen, erstattet HP
innerhalb eines angemessenen Zeitraums nach Benachrichtigung über den Schaden den vom Endkunden bezahlten Kaufpreis für das
Produkt zurück.
7. HP ist erst dann verpflichtet, das mangelhafte Produkt zu reparieren, zu ersetzen oder den Kaufpreis zurückzuerstatten, wenn der Endkunde
dieses an HP zurückgesandt hat.
8. Ersatzprodukte können entweder neu oder neuwertig sein, solange sie über mindestens denselben Funktionsumfang verfügen wie das zu
ersetzende Produkt.
9. HP Produkte können aufgearbeitete Teile, Komponenten oder Materialien enthalten, die in der Leistung neuen Te ilen entsprechen.
10. Die Erklärung zur beschränkten Gewährleistung von HP gilt in jedem Land, in dem die aufgeführten Produkte von HP vertrieben werden.
Weitergehende auf der Gewährleistung beruhende Dienstleistungen (z.B. Vor-Ort-Service) können mit jeder autorisierten HP
Serviceeinrichtung in den Ländern vereinbart werden, in denen das Produkt durch HP oder einen autorisierten Importeur vertrieben wird.
Einschränkungen der Gewährleistung
WEDER HP NOCH DESSEN ZULIEFERER ÜBERNEHMEN ÜBER DAS NACH GELTENDEM RECHT ZULÄSSIGE AUSMASS HINAUS
ANDERE AUSDRÜCKLICHE ODER STILLSCHWEIGENDE GEWÄHRLEISTUNGEN ODER ZUSICHERUNGEN HINSICHTLICH DER
MARKTGÄNGIGKEIT, ZUFRIEDEN STELLENDEN QUALITÄT UND EIGNUNG FÜR EINEN BESTIMMTEN ZWECK.
Haftungsbeschränkung
1. Sofern durch die geltende Gesetzgebung keine anderen Bestimmungen festgelegt sind, stehen dem Endkunden über die in dieser
Gewährleistungsvereinbarung genannten Leistungen hinaus keine weiteren Ansprüche zu.
2. IN DEM NACH GELTENDEM RECHT ZULÄSSIGEN MASS UND MIT AUSNAHME DER IN DIESER
GEWÄHRLEISTUNGSVEREINBARUNG AUSDRÜCKLICH ANGEGEBENEN VERPFLICHTUNGEN SIND WEDER HP NOCH DESSEN
ZULIEFERER ERSATZPFLICHTIG FÜR DIREKTE, INDIREKTE, BESONDERE, ZUFÄLLIGE ODER FOLGESCHÄDEN, UNABHÄNGIG
DAVON, OB DIESE AUF DER GRUNDLAGE VON VERTRÄGEN, UNERLAUBTEN HANDLUNGEN ODER ANDEREN RECHTSTHEORIEN
GELTEND GEMACHT WERDEN UND OB HP ODER DESSEN ZULIEFERER VON DER MÖGLICHKEIT EINES SOLCHEN SCHADENS
UNTERRICHTET WORDEN SIND.
Geltendes Recht
1. Diese Gewährleistungsvereinbarung stattet den Endkunden mit bestimmten Rechten aus. Der Endkunde hat unter Umständen noch weitere
Rechte, die in den Vereinigten Staaten von Bundesstaat zu Bundesstaat, in Kanada von Provinz zu Provinz, und allgemein von Land zu Land
verschieden sein können.
2. Soweit diese Gewährleistungsvereinbarung nicht dem geltenden Recht entspricht, soll sie als dahingehend abgeändert gelten, dass die hierin
enthaltenen Bestimmungen dem geltenden Recht entsprechen. Unter dem geltenden Recht treffen bestimmte Erklärungen und
Einschränkungen dieser Gewährleistungsvereinbarung möglicherweise nicht auf den Endkunden zu. In einigen US-Bundesstaaten und in
einigen anderen Ländern (sowie in einigen kanadischen Provinzen):
a. werden die Rechte des Verbrauchers nicht durch die Erklärungen und Einschränkungen dieser Gewährleistungsvereinbarung beschränkt
(z.B. in Großbritannien);
b. ist ein Hersteller nicht berechtigt, solche Erklärungen und Einschränkungen durchzusetzen;
c. verfügt ein Endkunde über weitere Gewährleistungsansprüche; insbesondere kann die Dauer stillschweigender Gewährleistungen durch
das geltende Recht geregelt sein und darf vom Hersteller nicht eingeschränkt werden, oder eine zeitliche Einschränkung der
stillschweigenden Gewährleistung ist zulässig.
3. DURCH DIESE GEWÄHRLEISTUNGSVEREINBARUNG WERDEN DIE ANSPRÜCHE DES ENDKUNDEN, DIE DURCH DAS IN DIESEN
LÄNDERN GELTENDE RECHT IM ZUSAMMENHANG MIT DEM KAUF VON HP PRODUKTEN GEWÄHRT WERDEN, NUR IM
GESETZLICH ZULÄSSIGEN RAHMEN AUSGESCHLOSSEN, EINGESCHRÄNKT ODER GEÄNDERT. DIE BEDINGUNGEN DIESER
GEWÄHRLEISTUNGS-VEREINBARUNG GELTEN ZUSÄTZLICH ZU DEN GESETZLICHEN ENDKUNDENRECHTEN.
HP Herstellergarantie
Anlage finden Sie die Namen und Adressen der jeweiligen HP Gesellschaft, die in Ihrem Land die HP Herstellergarantie gewährt.
: Hewlett-Packard GmbH, Herrenberger Straße 140, D-71034 Böblingen
: Hewlett-Packard Ges.m.b.H., Wienerbergstrasse 41, A-1120 Wien
g: Hewlett-Packard Luxembourg SCA, Vegacenter 75, Parc d'Activités Capellen, L-8308 Capellen
: Hewlett-Packard Belgium BVBA/SPRL, Hermeslaan 1A, B-1831 Brüssel
Verkäufer aus dem Kaufvertrag, die durch diese
Ansprüche gegenüber Ihrem Verkäufer aus dem Kaufvertrag, die durch
April 2004 bezüglich der Vertragsmäßigkeit von Verbrauchsgütern und gesetzliche Bestimmungen
rbrauchgutes befristet.
Ansprüche gegenüber Ihrem Verkäufer aus dem Kaufvertrag, die durch diese HP Herstellergarantie nicht
Verbraucher folgende gesetzliche Bestimmungen von der
April 2004 ist auf zwei Jahre ab der Lieferung des
12

HP DeskJet série 3630 tout-en-un
Démarrage
1. Suivez les illustrations gurant sur le prospectus pour congurer votre imprimante.
2. Visitez 123.hp.com/dj3630 pour installer l'application mobile ou le logiciel de l'imprimante HP ou connectez
l'imprimante à votre réseau.
Remarque: pour les utilisateurs Windows®, si votre ordinateur n'est pas connecté à Internet, insérez le CD
du logiciel de l'imprimante HP dans le lecteur de votre ordinateur. Si le programme d'installation ne démarre
pas, accédez à Ordinateur, double-cliquez sur l'icône du lecteur CD/DVD ayant le logo HP, puis sur setup.exe.
En savoir plus
Aide électronique: installez l'Aide électronique en sélectionnant cette option parmi les logiciels recommandés
pendant l'installation du logiciel. Découvrez les fonctionnalités du produit, comment imprimer, résoudre des
problèmes et obtenir une assistance. Obtenez des avis, des informations environnementales et réglementaires,
y compris les déclarations de conformité et les avis d'application de la réglementation de l'Union européenne,
dans la section Informations techniques.
• Windows®8.1: cliquez sur la èche pointant vers le bas située dans la partie inférieure gauche de l'écran
d'accueil, sélectionnez le nom de l'imprimante, cliquez sur Aide, puis sur Rechercher dans l'aide HP.
• Windows®8: sur l'écran Démarrer, cliquez avec le bouton droit de la souris sur une zone vide. Dans la barre
d'applications, choisissez Toutes les applications, puis cliquez sur l'icône portant le nom de l'imprimante
et sélectionnez Aide.
• Windows® 7, Windows Vista® et Windows® XP: cliquez sur Démarrer, sélectionnez Tous les programmes,
puis HP et le nom de l'imprimante.
• OS X: cliquez sur Aide > Centre d'aide. Dans la fenêtre de la Visionneuse de l'aide, cliquez sur Aide sur
toutes vos applications, puis sur l'Aide correspondant à votre imprimante.
Fichier LisezMoi: contient des informations sur le supportHP, la conguration requise du système
d'exploitation et les mises à jour récentes de l'imprimante.
• Windows: insérez le CD du logiciel dans votre ordinateur, puis recherchez le chier ReadMe.chm. Double-
cliquez sur le chier ReadMe.chm pour l'ouvrir, puis sélectionnez le chier ReadMe dans votre langue.
• Mac: ouvrez le dossier Documents situé au niveau supérieur de l'installateur du logiciel. Double-cliquez
sur ReadMe, puis sélectionnez le chier ReadMe dans votre langue.
Sur le Web: Aide et informations supplémentaires: www.hp.com/go/support. Enregistrement de
l'imprimante: www.register.hp.com. Déclaration de conformité: www.hp.eu/certicates. Utilisation de
l'encre: www.hp.com/go/inkusage.
Français
Numérisation du code pour plus d'informations!
Des tarifs de données standard peuvent s'appliquer. La disponibilité n'est pas assurée dans toutes les langues.
www.hp.com/eu/m/DJ3630
Panneau de commande
Écran du panneau de commande: Indique le nombre de copies, les erreurs de supports, l'état du
1
réseau sans l et la puissance du signal; l'état de Wi-Fi Direct, et les niveaux d'encre.
Bouton Annuler: interrompt l'opération en cours.
2
Bouton Sans l: il permet d'activer ou de désactiver la fonction sans l de l'imprimante.
Voyant Sans l: indique si l'imprimante est connectée ou non à un réseau sans l. Un voyant
3
clignotant indique que le réseau sans l n'a pas été conguré ou l'imprimante tente de se connecter.
Bouton Wi-Fi Direct: active ou désactive Wi-Fi Direct.
Français
10
11
Voyant Wi-Fi Direct: indique l'état activé ou désactivé de Wi-Fi Direct. Un voyant clignotant indique
4
que l'imprimante est en train de se connecter à un périphérique mobile dans le mode push de WPS
(Wi-Fi Protected Setup) ou il y a un problème de connexion à Wi-Fi Direct.
Bouton Copier, Couleur: permet de lancer une copie en couleur. Pour augmenter le nombre de
copies couleur, appuyez à plusieurs reprises sur ce bouton. La copie démarrera deux secondes
5
après le dernier appui sur le bouton.
Bouton Marche/Arrêt: permet d'allumer ou d'éteindre l'imprimante.
6
Voyant Alerte pb encre: indique des problèmes de faible niveau d'encre ou de cartouche d'impression.
7
Bouton Reprendre: reprend une tâche après une interruption (par exemple, après le chargement
du papier ou le débourrage papier).
8
Voyant de reprise: indique que vous pouvez appuyer sur le bouton Reprendre pour vous aider à
résoudre un problème.
Bouton Informations: imprime une page d'informations sur l'imprimante. Appuyez simultanément
sur le bouton Sans l, le bouton Wi-Fi Direct, ou le bouton HP ePrint pour obtenir des pages d'aide
plus spéciques reliées à chacun de ces boutons.
9
Voyant Informations: indique que vous pouvez appuyer sur le bouton Informations pour obtenir
de l'aide pour un avertissement ou une erreur.
Bouton HP ePrint: active ou désactive HP ePrint.
Voyant HP ePrint: indique l'état activé ou désactivé de HP ePrint. Un voyant clignotant indique un
problème avec la connexion aux Services Web.
Bouton Copier, Noir: permet de lancer une copie en noir et blanc. Pour augmenter le nombre de
copies noir et blanc, appuyez à plusieurs reprises sur ce bouton. La copie démarrera deux secondes
après le dernier appui sur le bouton.
14

Résolution des problèmes de base
En cas d'incapacité à imprimer:
1. Assurez-vous que les cordons d'alimentation sont correctement branchés et l'imprimante est sous tension. Le
bouton Marche/Arrêt s'allumera.
2. Si votre imprimante est connectée à l'imprimante via un câbleUSB, assurez-vous que le câble est bien branché.
Si votre ordinateur est connecté à l'imprimante via une connexion sans l, conrmez que celle-ci fonctionne.
3. Consultez le site Web Outils de diagnostic HP sur www.hp.com/go/tools pour télécharger des utilitaires de
diagnostic gratuits (outils) que vous pouvez utiliser pour résoudre les problèmes les plus courants.
MacWindows
Assurez-vous que l'imprimante est dénie en tant
que périphérique d'impression par défaut:
• Windows 8.1 et Windows 8: allez dans le coin
supérieur droit de l'écran pour ouvrir la barre des
applications, cliquez sur l'icône Paramètres, puis
sur Panneau de commande et enn sur Aicher les
périphériques et les imprimantes.
• Windows 7 : dans le menu Démarrer de Windows,
cliquez sur Périphériques et imprimantes.
• Windows Vista: dans la barre des tâches de
Windows, cliquez sur Démarrer, Panneau de
conguration, puis Imprimante.
• Windows XP: dans la barre des tâches de Windows,
cliquez sur Démarrer, Panneau de conguration,
puis Imprimantes et télécopieurs.
Assurez-vous que le cercle jouxtant le nom de votre
imprimante comporte une marque de sélection. Si
votre imprimante n'est pas sélectionnée en tant
qu'imprimante par défaut, cliquez avec le bouton droit
sur l'icône de l'imprimante et sélectionnez Dénir
comme imprimante par défaut dans le menu.
Si vous utilisez un câble USB et vous ne pouvez
toujours pas imprimer, ou l'installation du logiciel
échoue:
1. Retirez le CD du lecteur de CD/DVD de votre
ordinateur, puis débranchez le câbleUSB de
l'ordinateur.
2. Redémarrez l’ordinateur.
3. Insérez le CD du logiciel d'impression dans le
lecteur de CD/DVD de l'ordinateur, puis suivez les
instructions à l'écran pour installer le logiciel. Ne
branchez le câble USB que lorsque vous y êtes invité.
4. Une fois l'installation terminée, redémarrez
l'ordinateur.
Si vous utilisez le sans l et vous ne parvenez
toujours pas à imprimer:
Consultez la section Réseaux sans l à la page suivante
pour en savoir plus.
Contrôlez la le d'attente d'impression:
1. Dans Préférences système, cliquez sur
Imprimantes et scanners (Impression et télécopie
dans OS X v10.8 Mountain Lion).
2. Cliquez sur Ouvrir la liste d'attente d'impression.
3. Cliquez sur une tâche d'impression pour la
sélectionner.
4. Utilisez les boutons suivants de gestion de la tâche
d'impression:
• Icône Annuler : annule la tâche d'impression
sélectionnée.
• Reprise: reprend la tâche d'impression suspendue.
5. Si vous avez eectué des modications, lancez une
nouvelle impression.
Redémarrez et réinitialisez:
1. Redémarrez l’ordinateur.
2. Réinitialisez l'imprimante.
a. Mettez l'imprimante hors tension, puis
débranchez le cordon d'alimentation.
b. Patientez une minute avant de le rebrancher et
de mettre l'imprimante sous tension.
Réinitialisation du système d'impression :
1. Dans Préférences système, cliquez sur
Imprimantes et scanners (Impression et télécopie
dans OS X v10.8 Mountain Lion).
2. Appuyez sur la touche Contrôle et maintenez-la
enfoncée tout en cliquant sur la liste à gauche, puis
sélectionnez Réinitialiser le système d'impression.
3. Ajoutez l'imprimante que vous souhaitez utiliser.
Désinstallation du logiciel:
1. Si l'imprimante est connectée à votre ordinateur par
câble USB, débranchez-la de votre ordinateur.
2. Ouvrez le dossier Applications/Hewlett-Packard.
3. Double-cliquez sur Programme d'installation HP,
puis suivez les instructions à l'écran.
Français
Remerciements
WindowsXP, Windows Vista, Windows7, Windows8 et Windows 8.1 sont des marques déposées de Microsoft
Corporation aux États-Unis.
Mac, OS X et AirPrint sont des marques déposées d'Apple, Inc. aux États-Unis et dans d'autres pays.
15

Réseaux sans l
Vous pouvez connecter votre imprimante à un réseau sans l lors de l'installation du logiciel de l'imprimante.
Remarque: lors de l'installation du logiciel, un câble USB peut être requis pour une connexion temporaire entre
l'imprimante et l'ordinateur. Ne branchez pas le câble USB avant que le logiciel de l'imprimante ne vous y invite.
Conseil: pour imprimer un guide de mise en route rapide, appuyez sur le bouton Informations (
secondes.
Besoin d’aide supplémentairepour vous connecter?
www.hp.com/go/wirelessprinting
Le Centre d'impression sans lHP sur www.hp.com/go/wirelessprinting peut vous aider à préparer votre réseau sans l,
installer ou recongurer votre imprimante et résoudre les problèmes de connexion.
Échec de la connexion de votre imprimante au réseau
• Vériez si la fonction Sans l est activée sur votre imprimante.
Sur le panneau de commande de l'imprimante, si le voyant Sans l est éteint, appuyez sur le bouton
Sans l ( ) pour activer les fonctionnalités sans l de l'imprimante.
• Vériez que votre imprimante est connectée à votre réseau.
1. Sur le panneau de commande de l'imprimante, appuyez simultanément sur le bouton Sans l ( ) et le
bouton Informations ( ) pour imprimer le rapport de test réseau sans l et la page de conguration réseau.
2. Vériez le haut du rapport de test réseau sans l pour vérier s'il y a eu des défaillances lors du test.
– Consultez la section RÉSULTATS DE DIAGNOSTICS pour vérier si tous les tests ont été eectués et si, oui ou
non, votre imprimante les a réussis.
– Dans la section CONFIGURATION ACTUELLE, découvrez le nom du réseau (SSID) auquel l'imprimante est
actuellement connectée. Vériez que l'imprimante est connectée au même réseau que votre ordinateur.
Remarque: si votre imprimante est connectée à un réseau privé virtuel (VPN), déconnectez-vous
Français
temporairement duVPN avant de procéder à l'installation. Une fois l'installation terminée, vous devrez être
déconnecté duVPN pour accéder à l'imprimante sur le réseau domestique.
• Assurez-vous que les logiciels de protection ne bloquent pas la connexion à votre réseau.
Les logiciels de protection tels que les pare-feu peuvent bloquer la connexion entre votre ordinateur et votre
imprimante lorsque le logiciel est installé sur un réseau. Si votre imprimante est introuvable, désactivez
temporairement votre pare-feu et vériez si le problème est résolu. Pour plus d'aide et d'astuces sur les logiciels
de sécurité, allez sur: www.hp.com/go/wpc-rewall.
• Redémarrage des composants du réseau sans l.
Mettez le routeur et l'imprimante hors tension, puis rallumez-les dans l'ordre suivant: d'abord le routeur, puis
l'imprimante. Pour résoudre les problèmes de communication réseau, il suit parfois de mettre les appareils hors
tension et de les rallumer. Si vous ne parvenez toujours pas à établir de connexion, éteignez le routeur, l'imprimante
et l'ordinateur en respectant l'ordre suivant: d'abord le routeur, ensuite l'imprimante et enn l'ordinateur.
Si vous rencontrez toujours des problèmes, consultez le Centre d'impression sans l HP
(www.hp.com/go/wirelessprinting). Ce site Web contient des informations exhaustives et mises à jour sur
l'impression sans l, ainsi que des informations pour vous aider à préparer votre réseau sans l, résoudre les
problèmes lors de la connexion de l'imprimante au réseau sans l, et résoudre les problèmes de logiciels de
sécurité.
Remarque: Si vous utilisez un ordinateur exécutant Windows, vous pouvez utiliser l'outil Print and Scan Doctor,
qui peut vous aider à résoudre de nombreux problèmes avec l'imprimante. Pour télécharger cet outil, consultez
le site www.hp.com/go/tools.
Partage de votre imprimante avec d’autres ordinateurs connectés à votre réseau
Installez d'abord votre imprimante sur votre réseau domestique. Après avoir connecté votre imprimante à votre
réseau domestique, vous pouvez la partager avec d'autres ordinateurs connectés au même réseau. Il vous suit
d'installer le logiciel de l'imprimanteHP pour chaque ordinateur supplémentaire. Lors de l'installation du logiciel,
sélectionnez Sans l dans l'écran Options de connexion puis suivez les instructions aichées à l'écran.
) pendant trois
16

Réseaux sans l (suite)
Passer d'une connexion USB à une connexion sans l
Vous devez d'abord avoir installé le logiciel de votre imprimante avec succès.
Windows
1. Double-cliquez sur l'icône de l'imprimante sur le bureau ou procédez ainsi pour ouvrir le logiciel de l'imprimante:
• Windows 8.1 : cliquez sur la èche située en bas à gauche de l'écran Démarrer, puis sélectionnez le nom de
l'imprimante.
• Windows 8 : sur l'écran Démarrer, cliquez avec le bouton droit de la souris sur une zone vide, cliquez sur
Toutes les applications sur la barre des applications, puis cliquez sur l'icône portant le nom de l'imprimante.
• Windows 7, Windows Vista et Windows XP: Sur le bureau de l'ordinateur, cliquez sur Démarrer, sélectionnez
Tous les programmes or Programmes, cliquez sur HP, sur le dossier de l'imprimante, puis sélectionnez
l'icône portant le nom de votre imprimante.
2. Dans le logiciel de l'imprimante, cliquez sur Utilitaires.
3. Sélectionnez Conguration et logiciel d'imprimante.
4. Sélectionnez Convertir une imprimanteUSB en imprimante sans l. Suivez les instructions à l'écran.
Mac
Utilisez Utilitaire HP dans Applications/Hewlett-Packard pour changer la connexion logicielle en une connexion
sans l pour cette imprimante.
Utilisation de l'imprimante sans l sans routeur
Utilisez la fonction Wi-Fi Direct pour imprimer sans routeur depuis votre ordinateur, votre smartphone ou tout autre
périphérique équipé d'une fonction Wi-Fi. Pour utiliser la fonctionnalité Wi-Fi Direct, le logiciel d'impression doit
être installé sur l'ordinateur.
1. Si le voyant Wi-Fi Direct sur l'imprimante est éteint, appuyez sur le bouton Wi-Fi Direct (
Direct. Le voyant Wi-Fi Direct est allumé lorsque Wi-Fi Direct est activé.
2. Appuyez simultanément sur le bouton Wi-Fi Direct (
guide Wi-Fi Direct.
3. Suivez les instructions sur le guide Wi-Fi Direct pour connecter votre ordinateur ou périphérique mobile
à l'imprimante.
4. Imprimez comme vous le faites habituellement à partir de votre ordinateur ou de votre périphérique mobile.
Remarque: une connexion Wi-Fi Direct ne donne toutefois pas accès à Internet.
Rendez-vous dans le Centre d'impression sans l HP sur www.hp.com/go/wirelessprinting pour en savoir plus
sur l'option sans l Wi-Fi Direct.
Ce produit est conçu pour une utilisation en environnements ouverts (par exemple, à domicile et sans connexion
à un réseau Internet public), dans lesquels toute personne peut accéder à l'imprimante et l'utiliser. Le paramètre
Wi-Fi Direct est donc en mode "Automatique" par défaut, sans mot de passe administrateur. Cette conguration
permet à toute personne située à portée du réseau sans l de se connecter et d'accéder à toutes les fonctions et
tous les paramètres de l'imprimante. Si vous souhaitez un niveau de sécurité plus élevé, HP conseille de modier la
méthode de connexion Wi-Fi Direct de "Automatique" à "Manuel" et de dénir un mot de passe administrateur.
) et le bouton Informations ( ) pour imprimer un
Impression avec AirPrint
L'imprimante est compatible avec Apple AirPrint™. Vous pouvez imprimer sans l depuis votre périphérique iOS ou
votre Mac.
• Votre imprimante et votre périphérique iOS ou Mac doivent être connectés au même réseau sans l.
• Avec Apple AirPrint™, vous ne pouvez pas numériser des documents à l'aide de votre imprimante sur votre
périphérique iOS.
Remarque: pensez toujours à vérier que le bac d'alimentation contient le type de papier souhaité.
) pour activer Wi-Fi
Français
Informations de sécurité
Utilisez uniquement le cordon d'alimentation et l'adaptateur secteur éventuellement fournis parHP.
17

Déclaration de garantie limitée de l'imprimante HP
de matériaux et malfaçons
/SPRL, Hermeslaan 1A, B-1831
Produit HP Durée de la garantie limitée
Supports logiciels 90 jours
Imprimante 1 an
Français
Cartouches d'encre Jusqu'à épuisement de l'encre HP ou jusqu'à expiration de la date de garantie
Têtes d'impression (ne s'applique qu'aux produits avec 1 an
des têtes d'impression pouvant être remplacées par le client)
Accessoires 1 an, sauf indication contraire
A. Extension de garantie limitée
1. Hewlett-Packard (HP) garantit au client utilisateur final que les produits HP décrits précédemment sont exempts de défauts
pendant la durée indiquée ci-dessus, à compter de la date d'achat par le client.
2. Pour les logiciels, la garantie limitée HP est valable uniquement en cas d'impossibilité d'exécuter les instructions de programmation. HP ne garantit
pas que le fonctionnement du logiciel ne connaîtra pas d'interruptions ni d'erreurs.
3. La garantie limitée HP ne couvre que les défauts qui apparaissent dans le cadre de l'utilisation normale du produit et ne couvre aucun autre
problème, y compris ceux qui surviennent du fait :
a. d'une mauvaise maintenance ou d'une modification ;
b. de logiciels, de supports, de pièces ou de consommables non fournis ou non pris en charge par HP ;
c. du fonctionnement du produit hors de ses caractéristiques ; ou
d. d'une modification non autorisée ou d'une mauvaise utilisation.
4. Pour les imprimantes HP, l'utilisation d'une cartouche d'un autre fournisseur ou d'une cartouche rechargée n'entraîne pas la résiliation de la garantie
ni d'un contrat de support HP. Toutefois, si la panne ou les dégâts peuvent être attribués à l'utilisation d'une cartouche d'un autre fournisseur, d'une
cartouche rechargée ou d'une cartouche périmée, HP facturera les montants correspondant au temps et au matériel nécessaires à la réparation de
l'imprimante.
5. Si, pendant la période de garantie applicable, HP est informé d'une défaillance concernant un produit couvert par la garantie HP, HP choisira de
réparer ou de remplacer le produit défectueux.
6. Si HP est dans l'incapacité de réparer ou de remplacer, selon le cas, un produit défectueux couvert par la garantie HP, HP devra, dans un délai
raisonnable après avoir été informé du défaut, rembourser le prix d'achat du produit.
7. HP ne sera tenu à aucune obligation de réparation, de remplacement ou de remboursement tant que le client n'aura pas retourné le produit
défectueux à HP.
8. Tout produit de remplacement peut être neuf ou comme neuf, pourvu que ses fonctionnalités soient au moins équivalentes à celles du produit
remplacé.
9. Les produits HP peuvent contenir des pièces, des composants ou des matériels reconditionnés équivalents à des neufs en termes de performances.
10. La garantie limitée HP est valable dans tout pays dans lequel le produit HP couvert est distribué par HP. Des contrats apportant des services de
garantie supplémentaires, tels que la réparation sur site, sont disponibles auprès des services de maintenance agréés par HP dans les pays dans
lequel le produit est distribué par HP ou par un importateur agréé.
B. Restrictions de garantie
DANS LA MESURE OÙ LES LOIS LOCALES L'AUTORISENT, HP OU SES FOURNISSEURS TIERS NE FONT AUCUNE AUTRE GARANTIE OU
CONDITION, EXPRESSE OU IMPLICITE, EN CE QUI CONCERNE LES PRODUITS HP ET NIENT TOUTE GARANTIE IMPLICITE DE
COMMERCIALISATION, DE QUALITÉ SATISFAISANTE OU D'ADAPTATION À UN BUT PARTICULIER.
C. Restrictions de responsabilité
1. Dans la mesure où les lois locales l'autorisent, les recours énoncés dans cette déclaration de garantie constituent les recours exclusifs du client.
2. DANS LA MESURE OÙ LES LOIS LOCALES L'AUTORISENT, EXCEPTION FAITE DES OBLIGATIONS SPÉCIFIQUEMENT ÉNONCÉES DANS LA
PRÉSENTE DÉCLARATION DE GARANTIE, HP OU SES FOURNISSEURS TIERS NE POURRONT ÊTRE TENUS POUR RESPONSABLES DE
DOMMAGES DIRECTS, INDIRECTS, SPÉCIAUX OU ACCIDENTELS, QU'ILS SOIENT BASÉS SUR UN CONTRAT, UN PRÉJUDICE OU TOUTE
AUTRE THÉORIE LÉGALE, QUE CES DOMMAGES SOIENT RÉPUTÉS POSSIBLES OU NON.
D. Lois locales
1. Cette déclaration de garantie donne au client des droits juridiques spécifiques. Le client peut également posséder d'autres droits selon les états des
Etats-Unis, les provinces du Canada, et les autres pays ou régions du monde.
2. Si cette déclaration de garantie est incompatible avec les lois locales, elle sera considérée comme étant modifiée pour être conforme à la loi locale.
Selon ces lois locales, certaines renonciations et limitations de cette déclaration de garantie peuvent ne pas s'appliquer au client.
Par exemple, certains états des Etats-Unis, ainsi que certains gouvernements hors des Etats-Unis (y compris certaines provinces du Canada),
peuvent :
a. exclure les renonciations et limitations de cette déclaration de garantie des droits statutaires d'un client (par exemple au Royaume-Uni) ;
b. restreindre d'une autre manière la possibilité pour un fabricant d'imposer ces renonciations et limitations ; ou
c. accorder au client des droits de garantie supplémentaires, spécifier la durée des garanties implicites que le fabricant ne peut nier, ou ne pas
autoriser les limitations portant sur la durée des garanties implicites.
3. EXCEPTÉ DANS LA MESURE AUTORISÉE PAR LA LÉGISLATION, LES TERMES DE LA PRÉSENTE DÉCLARATION DE GARANTIE
N'EXCLUENT, NE LIMITENT NI NE MODIFIENT LES DROITS STATUTAIRES OBLIGATOIRES APPLICABLES À LA VENTE DES PRODUITS HP
AUXDITS CLIENTS, MAIS VIENNENT S'Y AJOUTER.
Vous trouverez, ci-après, les coordonnées de l’entité HP responsable de l'exécution de la garantie fabricant relative à votre matériel HP dans votre pays.
France :
En vertu de votre contrat d’achat, il se peut que vous disposiez de droits légaux supplémentaires à l’encontre de votre vendeur. Ceux-ci ne sont aucunement
affectés par la présente garantie du fabricant HP.
En particulier, si vous êtes un consommateur domicilié en France (départements et territoires d’outre-mer (DOM-TOM) inclus dans la limite des textes qui leur
sont applicables), le vendeur reste tenu à votre égard des défauts de conformité du bien au contrat et des vices rédhibitoires dans les conditions prévues aux
articles 1641 à 1649 du Code civil.
Code de la consommation:
" Art. L. 211-4. - Le vendeur est tenu de livrer un bien conforme au contrat et répond des défauts de conformité existant lors de la délivrance.
- Il répond également des défauts de conformité résultant de l'emballage, des instructions de montage ou de l'installation lorsque celle-ci a été mise à sa
charge par le contrat ou a été réalisée sous sa responsabilité. "
" Art. L. 211-5. - Pour être conforme au contrat, le bien doit :
1° Etre propre à l'usage habituellement attendu d'un bien semblable et, le cas échéant correspondre à la description donnée par le vendeur et posséder les
qualités que celui-ci a présentées à l'acheteur sous forme d'échantillon ou de modèle ;
- présenter les qualités qu'un acheteur peut légitimement attendre eu égard aux déclarations publiques faites par le vendeur, par le producteur ou par son
représentant, notamment dans la publicité ou l'étiquetage ;
2° Ou présenter les caractéristiques définies d'un commun accord par les parties ou être propre à tout usage spécial recherché par l'acheteur, porté à la
connaissance du vendeur et que ce dernier a accepté. "
" Art. L.211-12. – L’action résultant du défaut de conformité se prescrit par deux ans à compter de la délivrance du bien. "
Code civil:
" Code civil Article 1641 : Le vendeur est tenu de la garantie à raison des défauts cachés de la chose vendue qui la rendent impropre à l’usage auquel on la
destine, ou qui diminuent tellement cet usage, que l’acheteur ne l’aurait pas acquise, ou n’en aurait donné qu’un moindre prix, s’il les avait connus. "
" Code civil Article 1648 : L’action résultant des vices rédhibitoires doit être intentée par l’acquéreur dans un délai de deux ans à compter de la découverte du
vice. "
L’entité HP responsable de l'exécution de la garantie fabricant relative à votre matériel HP est : Hewlett-Packard France SAS, 1 Avenue du Canada 91947 LES
ULIS
Belgique :
En vertu de votre contrat d’achat, il se peut que vous disposiez de droits légaux supplémentaires à l’encontre de votre vendeur. Ceux-ci ne sont aucunement
affectés par la présente garantie du fabricant HP.
L’entité HP responsable de l'exécution de la garantie fabricant relative à votre matériel HP est : Hewlett-Packard Belgium BVBA
Belgique.
Luxembourg:
En vertu de votre contrat d’achat, il se peut que vous disposiez de droits légaux supplémentaires à l’encontre de votre vendeur. Ceux-ci ne sont aucunement
affectés par la présente garantie du fabricant HP. En particulier, si vous êtes un consommateur la présente garantie fabricant HP ne fait pas obstacle à
l’application des dispositions de la loi du 21 avril 2004 relative à la garantie de conformité et des dispositions du Code civil relatives à la garantie. La durée de
la garantie légale en vertu de la loi du 21 avril 2004 est de deux ans à compter de la délivrance du bien.
L’entité HP responsable de l'exécution de la garantie fabricant relative à votre matériel HP est : Hewlett-Packard Luxembourg SCA, Vegacenter 75,
Parc d'Activités Capellen, L-8308 Capellen
imprimée sur la cartouche (selon le cas qui se produira en premier). Cette
garantie ne couvre pas les produits utilisant de l'encre HP qui ont été
reconditionnés, mal utilisés ou altérés.
Garantie du fabricant HP
18
HP DeskJet 3630 All-in-One series
Informazioni preliminari
1. Attenersi alle istruzioni riportate nel pieghevole di installazione per congurare la stampante.
2. Visitare il sito 123.hp.com/dj3630 per installare l'applicazione mobile o il software della stampante HP e collegare
la stampante alla propria rete.
Nota: per gli utenti Windows®, se il computer non è connesso a Internet, inserire il CD del software della stampante nel
computer. Se il programma di installazione non viene avviato, selezionare Computer, fare doppio clic sull'icona dell'unità
CD/DVD con il logo HP, quindi fare doppio clic su setup.exe.
Ulteriori informazioni
Guida in formato elettronico: installare la guida in formato elettronico selezionandola dal software consigliato durante la
procedura di installazione. È possibile trovare informazioni sulle funzionalità dei prodotti, sulla stampa, sulla risoluzione dei
problemi e sul supporto. Avvisi, requisiti ambientali e informazioni sulle normative, inclusi l’Avviso normativo per l’Unione
Europea e le dichiarazioni di conformità, sono disponibili nella sezione Informazioni tecniche.
• Windows® 8.1: fare clic sul pulsante freccia giù nell'angolo inferiore sinistro della schermata Start, selezionare il nome
della stampante, fare clic su Guida, quindi su Cerca nella guida di HP.
• Windows® 8: nella schermata Start, fare clic con il pulsante destro del mouse su un’area vuota dello schermo, fare clic
su Tutte le app sulla barra delle app, quindi sull’icona con il nome della stampante e selezionare Guida.
• Windows® 7, Windows Vista® e Windows® XP: fare clic su Start, selezionare Programmi o Tutti i programmi,
selezionare HP, quindi il nome della stampante.
• OS X: fare clic su Aiuto > Centro assistenza. Nella nestra Visore Aiuto, fare clic su Aiuto per tutte le app, quindi
scegliere il tipo di Aiuto per il dispositivo.
Leggimi: contiene informazioni sul supporto HP, sui requisiti del sistema operativo e sui recenti aggiornamenti della
stampante.
• In Windows: inserire il CD del software nel computer, quindi individuare il le ReadMe.chm. Fare doppio clic sul le
ReadMe.chm per aprirlo, quindi selezionare il le ReadMe nella propria lingua.
• In Mac: aprire la cartella Documenti nel livello superiore del programma di installazione del software. Fare doppio clic
sul le ReadMe, quindi selezionare il le ReadMe nella propria lingua.
Sul Web: per ulteriori informazioni e assistenza, visitare il sito www.hp.com/go/support. Per la registrazione
della stampante, visitare il sito www.register.hp.com. Per leggere la dichiarazione di conformità, visitare il sito
www.hp.eu/certicates. Utilizzo dell'inchiostro: www.hp.com/go/inkusage.
Scopri di più con la scansione!
Potrebbero essere in vigore le tarie dati standard. Potrebbe non essere disponibile in tutte le lingue.
www.hp.com/eu/m/DJ3630
Italiano
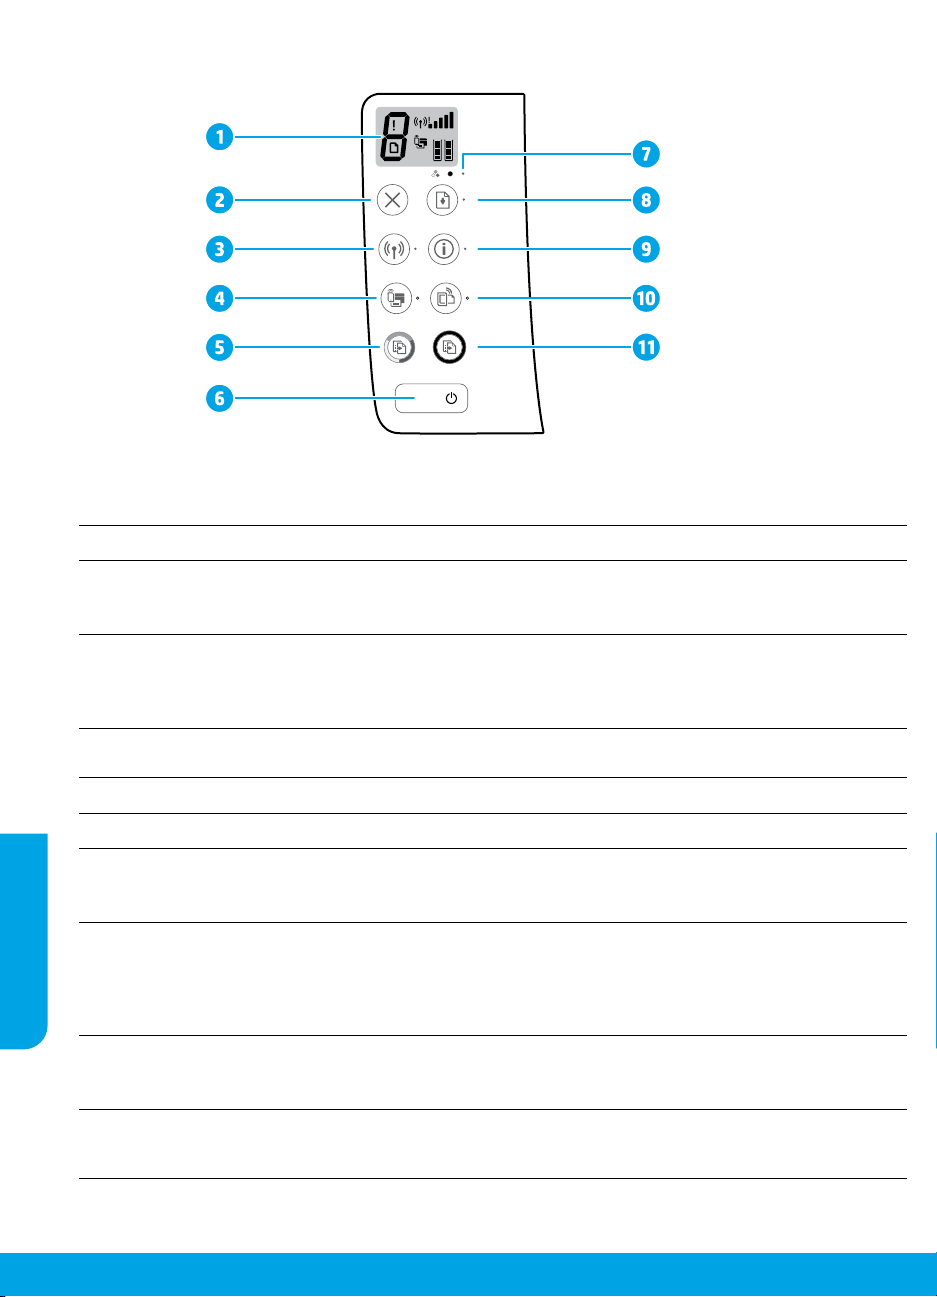
Pannello di controllo
Display del pannello di controllo: indica il numero di copie, gli errori dei supporti, lo stato della connessione e la
1
potenza del segnale, lo stato di Wi-Fi Direct e i livelli di inchiostro.
Pulsante Annulla: interrompe l'operazione corrente.
2
Pulsante Wireless: consente di attivare o disattivare le funzionalità wireless della stampante.
3
Spia Wireless: indica se la stampante è collegata o meno a una rete wireless. La spia lampeggiante indica che la
connessione wireless non è stata congurata o che la stampante sta tentando di stabilire una connessione.
Pulsante Wi-Fi Direct: consente di attivare o disattivare la funzione Wi-Fi Direct.
Spia Wi-Fi Direct: indica lo stato, attivato o disattivato, di Wi-Fi Direct. La spia lampeggiante indica che la
4
stampante sta tentando di stabilire una connessione a un dispositivo mobile in modalità push Wi-Fi Protected
Setup (WPS) o che si è vericato un problema con la connessione Wi-Fi Direct.
Pulsante Avvio copia Colore: consente di avviare una copia a colori. Per aumentare il numero di copie a colori,
5
premere il pulsante ripetutamente. La copia inizierà due secondi dopo l'ultima pressione del pulsante.
Pulsante di Accensione: consente di accendere o spegnere la stampante.
6
Spia Avviso inchiostro: segnala un basso livello d'inchiostro o problemi con le cartucce di stampa.
7
Pulsante Riprendi: consente di riprendere la stampa dopo un'interruzione (ad esempio, dopo aver caricato la
carta o eliminato un inceppamento).
10
11
8
Spia Riprendi: indica che è possibile premere il pulsante Riprendi per cercare di risolvere un problema.
Pulsante Informazioni: consente di stampare una pagina di informazioni. Premere il pulsante in combinazione
con il pulsante Wireless, il pulsante Wi-Fi Direct o il pulsante HP ePrint per visualizzare pagine della Guida più
speciche relative a ciascuno dei pulsanti indicati.
9
Spia Informazioni: indica che è possibile premere il pulsante Informazioni per ottenere assistenza in seguito a
un avviso o a un errore.
Pulsante HP ePrint: consente di attivare e disattivare HP ePrint.
Spia HP ePrint: indica lo stato, attivato o disattivato, di HP ePrint. La spia lampeggiante segnala un problema
con la connessione a Web Services.
Pulsante Avvio copia Nero: consente di avviare un lavoro di copia in bianco e nero. Per aumentare il numero di
copie in bianco e nero, premere il pulsante ripetutamente. La copia inizierà due secondi dopo l'ultima pressione
del pulsante.
Italiano
20

Risoluzione dei problemi di base
Se non è possibile stampare:
1. Accertarsi che il cavo di alimentazione sia connesso saldamente e la stampante sia accesa. Il pulsante di accensione
deve essere illuminato.
2. Se il computer è collegato alla stampante con un cavo USB, vericare che i collegamenti siano ben saldi. Se il computer
è collegato alla stampante con una connessione wireless, vericare l'eettivo funzionamento della connessione wireless.
3. Visitare il sito Web www.hp.com/go/tools dedicato agli strumenti di diagnostica HP per scaricare i programmi di utilità
(strumenti) di diagnostica gratuiti utilizzabili per risolvere i problemi più comuni delle stampanti.
MacWindows
Assicurarsi che la stampante sia impostata come unità di
stampa predenita:
• Windows 8.1 e Windows 8: selezionare o toccare l'angolo
superiore destro della schermata per aprire la barra degli
accessi, fare clic sull'icona Impostazioni, fare clic o toccare
Pannello di controllo, quindi fare clic o toccare Visualizza
dispositivi e stampanti.
• Windows 7: dal menu Start di Windows, fare clic su
Dispositivi e stampanti.
• Windows Vista: sulla barra delle applicazioni di Windows,
fare clic su Start, Pannello di controllo, Stampanti.
• Windows XP: sulla barra delle applicazioni di Windows,
fare clic su Start, Pannello di controllo, Stampanti e fax.
Assicurarsi che la stampante sia selezionata con un segno
di spunta all'interno di un cerchio. Se la stampante non è
selezionata come predenita, fare clic con il pulsante destro
del mouse sull'icona della stampante e scegliere Imposta
come stampante predenita dal menu.
Se si utilizza un cavo USB e non si riesce ancora a stampare
o se non è stato possibile completare l'installazione del
software:
1. Estrarre il CD dall’unità CD/DVD del computer e scollegare
il cavo USB dal computer.
2. Riavviare il computer.
3. Inserire il CD del software della stampante nell’unità
CD/DVD e seguire le istruzioni visualizzate sullo schermo
per installare il software della stampante. Non collegare
il cavo USB nché non verrà espressamente richiesto.
4. Al termine dell'installazione, riavviare il computer.
Se si utilizza una connessione wireless e non si riesce
ancora a stampare:
Accedere alla sezione "Connettività wireless" nella pagina
successiva per ulteriori informazioni.
Controllare la coda di stampa:
1. In Preferenze di Sistema, fare clic su Stampanti e scanner
(Stampa e Scansione in OS X v10.8 Mountain Lion).
2. Fare clic su Apri coda di stampa.
3. Fare clic su un processo di stampa per selezionarlo.
4. Utilizzare i pulsanti seguenti per gestire il processo di
stampa:
• Icona Annulla: annulla il processo di stampa selezionato.
• Riprendi: continua un processo di stampa messo in
pausa.
5. Qualora siano state apportate delle modiche, provare a
stampare di nuovo.
Riavviare e ricongurare:
1. Riavviare il computer.
2. Reimpostare la stampante.
a. Spegnere la stampante e scollegare il cavo di
alimentazione.
b. Attendere un minuto, quindi ricollegare il cavo di
alimentazione e accendere la stampante.
Ripristinare il sistema di stampa:
1. In Preferenze di Sistema, fare clic su Stampanti e scanner
(Stampa e Scansione in OS X v10.8 Mountain Lion).
2. Tenere premuto il tasto CTRL e contemporaneamente
fare clic sull'elenco a sinistra, quindi scegliere Ripristina
sistema di stampa.
3. Aggiungere la stampante da utilizzare.
Disinstallare il software:
1. Se la stampante è collegata al computer tramite cavo USB,
scollegare la stampante dal computer.
2. Aprire la cartella Applicazioni/Hewlett-Packard.
3. Fare doppio clic su HP Uninstaller e seguire le istruzioni
visualizzate sullo schermo.
Italiano
Riconoscimenti
Windows XP, Windows Vista, Windows 7, Windows 8 e Windows 8.1 sono marchi registrati di Microsoft Corporation negli Stati
Uniti.
Mac, OS X e AirPrint sono marchi di Apple Inc. registrati negli Stati Uniti e in altri paesi.
21

Connettività wireless
È possibile connettere la stampante a una rete wireless durante l'installazione del software della stampante.
Nota: durante l'installazione del software, potrebbe essere necessario un cavo USB per il collegamento temporaneo tra
stampante e computer. Non collegare il cavo USB no a quando non viene espressamente richiesto dal software della stampante.
Suggerimento: per stampare una guida introduttiva per la connessione wireless, premere il pulsante Informazioni (
secondi.
Serve aiuto con la rete?
www.hp.com/go/wirelessprinting
Centro stampa wireless di HP, all’indirizzo www.hp.com/go/wirelessprinting, può aiutarvi a preparare la rete wireless,
congurare o ricongurare la stampante e risolvere i problemi di rete.
In caso di mancata connessione della stampante alla rete
• Vericare che la modalità wireless sia abilitata sulla stampante.
Dal pannello di controllo della stampante, se la spia Wireless è spenta, premere il pulsante Wireless (
funzionalità wireless della stampante.
• Confermare che la stampante è connessa alla rete.
1. Dal pannello di controllo della stampante, premere contemporaneamente i pulsanti Wireless (
per stampare il report di test sulla rete wireless e la pagina di congurazione della rete.
2. Nella parte iniziale del report di test sulla rete wireless, controllare se si sono vericati eventuali errori durante il test.
– Fare riferimento alla sezione RISULTATI DIAGNOSTICA di tutti i test eseguiti per stabilire se la stampante ha superato o
meno i test.
– Nella sezione CONFIGURAZIONE CORRENTE, individuare il nome della rete (SSID) a cui la stampante è attualmente
connessa. Vericare che la stampante sia connessa alla stessa rete del computer.
Nota: se il computer è connesso a una rete privata virtuale (VPN), disconnetterlo temporaneamente dalla rete VPN prima di
proseguire con l’installazione. Dopo l’installazione sarà necessario disconnettersi dalla VPN per accedere alla stampante sulla
rete domestica.
• Assicurarsi che il software di protezione non ostacoli la comunicazione sulla rete.
Il software di protezione, ad esempio un rewall, può bloccare la comunicazione tra il computer e la stampante durante
l’installazione in rete. Se non è possibile individuare la stampante, disabilitare temporaneamente il rewall e vericare
se il problema è risolto. Per ulteriore assistenza e suggerimenti sul software di protezione, visitare il sito:
www.hp.com/go/wpc-rewall.
• Riavviare i componenti della rete wireless.
Spegnere il router e la stampante, quindi riaccenderli nel seguente ordine: prima il router, quindi la stampante. Talvolta, la
Italiano
disattivazione e la successiva riattivazione dei dispositivi consentono di risolvere problemi di comunicazione di rete. Se non
è ancora possibile eseguire la connessione, disattivare il router, la stampante e il computer, quindi riattivarli nel seguente
ordine: prima il router, quindi la stampante e inne il computer.
Se i problemi persistono, visitare HP Wireless Printing Center (www.hp.com/go/wirelessprinting). Questo sito Web contiene
informazioni complete e aggiornate sulla stampa wireless, nonché informazioni sulla preparazione della rete wireless, per
la risoluzione dei problemi di connessione tra stampante e rete wireless e per la risoluzione di problemi di protezione del
software.
Nota: se si utilizza un computer con sistema operativo Windows, è possibile utilizzare lo strumento Print and Scan Doctor,
che consente di risolvere diversi problemi della stampante. Per scaricare lo strumento, visitare il sito www.hp.com/go/tools.
) per attivare le
) e Informazioni ( )
) per tre
Per condividere la stampante con più computer sulla rete
In primo luogo, installare la stampante nella rete domestica. Una volta collegata la stampante alla rete domestica, è possibile
condividerla con altri computer sulla stessa rete. Per ogni computer aggiuntivo è suiciente installare una sola volta il software
della stampante HP. Durante l'installazione del software, selezionare Wireless nella schermata Opzioni di connessione e seguire
le istruzioni visualizzate sullo schermo.
22

Connettività wireless (continua)
Passaggio da una connessione USB a una connessione wireless
In primo luogo, è necessario avere già provveduto a installare correttamente il software della stampante.
Windows
1. Fare doppio clic sull'icona della stampante sul desktop o eettuare una delle seguenti operazioni per aprire il software della
stampante:
• Windows 8.1: fare clic sul pulsante freccia giù nell'angolo inferiore sinistro della schermata Start e selezionare il nome
della stampante.
• Windows 8: nella schermata Start, fare clic con il tasto destro del mouse su un'area vuota dello schermo, fare clic su Tutte
le app sulla barra delle applicazioni, quindi selezionare il nome della stampante.
• Windows 7, Windows Vista e Windows XP: sul desktop del computer, fare clic su Start, selezionare Tutti i programmi o
Programmi, fare clic su HP, fare clic sulla cartella della stampante, quindi selezionare l'icona con
il nome della stampante.
2. Nel software della stampante, fare clic su Programmi di utilità.
3. Selezionare Software e congurazione stampante.
4. Selezionare Converti una stampante con collegamento USB in wireless. Seguire le istruzioni visualizzate sullo schermo.
Mac
Utilizzare HP Utility in Applicazioni/Hewlett-Packard per impostare la connessione del software sulla modalità wireless per la
stampante.
Per utilizzare la stampante in modalità wireless senza router
Utilizzare la connessione Wi-Fi Direct per stampare in modalità wireless, senza router, dal computer, dallo smartphone o da un
altro dispositivo wireless. Per utilizzare la connessione Wi-Fi Direct da un computer, è necessario che il software della stampante
sia installato nel computer in uso.
1. Se la spia Wi-Fi Direct della stampante è spenta, premere il pulsante Wi-Fi Direct (
Wi-Fi Direct si accende quando Wi-Fi Direct è attivato.
2. Premere contemporaneamente i pulsanti Wi-Fi Direct (
3. Seguire le istruzioni indicate nella guida di Wi-Fi Direct per collegare il computer o il dispositivo mobile alla stampante.
4. Stampare normalmente dal computer o dal dispositivo mobile.
Nota: la connessione Wi-Fi Direct non consente l'accesso a Internet.
Visitare Centro stampa wireless HP all’indirizzo www.hp.com/go/wirelessprinting per ulteriori informazioni sulla connessione
Wi-Fi Direct.
Questo prodotto è destinato all'utilizzo in ambienti aperti (ad esempio, in abitazioni non connesse a una rete Internet pubblica) in
cui a tutti è consentito accedere alla stampante e utilizzarla. Di conseguenza, Wi-Fi Direct è congurato in modalità "Automatico"
per impostazione predenita, senza alcuna password di amministratore; ciò consente a chiunque si trovi entro la portata della
connessione wireless di connettersi e accedere a tutte le funzioni e impostazioni della stampante. Per livelli di sicurezza più
elevati, HP consiglia di modicare il metodo di connessione di Wi-Fi Direct da "Automatico" a "Manuale" e di creare e impostare una
password di amministratore.
) e Informazioni ( ) per stampare la guida di Wi-Fi Direct.
) per attivare Wi-Fi Direct. La spia
Per stampare con AirPrint
Questa stampante è abilitata per Apple AirPrint™. È possibile stampare in modalità wireless dal dispositivo iOS o Mac utilizzato.
• La stampante e il dispositivo iOS o Mac devono utilizzare la stessa rete wireless.
• Con Apple AirPrint™, non è possibile eseguire la scansione di documenti dalla stampante al dispositivo iOS in uso.
Nota: assicurarsi sempre che nel vassoio di alimentazione sia caricato il tipo di carta desiderato.
Informazioni sulla sicurezza
Utilizzare solo con il cavo di alimentazione e l'adattatore forniti da HP (se inclusi).
Italiano
23

Dichiarazione di garanzia limitata della stampante HP
A
B.
C.
D.
Pridedami HP
Lietuva:
Pagal taikytinus vartojimo prekių pardavimą reglamentuojančius nacionalinius teisės aktus, jūs taip pat turite įstatymų
galios teises. Gamintojo garantija jūsų įstatymų galią turinčių teisių jokiu būdu neapriboja ir joms poveikio netur
HP produktas Ribotos garantijos galiojimo trukmė
Italiano
Programinės įrangos laikmenos 90 dienų
Spausdintuvas 1 metai
Spausdintuvo arba rašalo kasetės Tol, kol pasibaigia HP rašalas arba iki galiojimo pabaigos
Spausdintuvo galvutės (taikoma tik produktams su 1 metai
naudotojo keičiamomis spausdintuvo galvutėmis)
Priedai 1 metai, jeigu nenurodyta kitaip
. Ribotos garantijos galiojimo apimtis
1. Bendrovė „Hewlett-Packard“ (HP) galutiniam naudotojui garantuoja, kad aukščiau minėtas HP produktas yra
pagamintas kvalifikuotų darbininkų ir be medžiagų defektų, ir užtikrina jo veikimą visu aukščiau nurodytu
laikotarpiu nuo produkto įsigijimo dienos.
2. Programinės įrangos produktams HP ribota garantija taikoma tik tuo atveju, jeigu neįmanoma vykdyti
programavimo instrukcijų. HP negarantuoja, kad visi jos produktai veiks netrikdomai ir be klaidų.
3. HP ribota garantija apima tik tuos defektus, kurie yra tinkamo produkto naudojimo rezultatas. Ji netaikoma:
a. Jeigu produktas buvo netinkamai prižiūrimas arba buvo modifikuotas;
b. Programinei įrangai; laikmenoms, dalims bei priedams, kurių netiekia arba nepalaiko HP; arba
c. Operacijoms, kurios netelpa į specifikacijomis apibrėžtus produkto veikimo rėmus;
d. Jei produktas neleistinai modifikuojamas arba netinkamai naudojamas.
4. HP spausdintuvų produktams naudojamos ne HP pagamintos arba pakartotinai užpildytos kasetės neturi
įtakos nei naudotojo garantijai, nei jokiai su naudotoju sudarytai HP paramos sutarčiai. Tačiau jeigu
spausdintuvo veikimas sutrinka arba jis sugenda dėl naudojamos ne HP pagamintos, pakartotinai užpildytos
kasetės arba rašalo kasetės, kurios galiojimo terminas pasibaigęs, bendrovė HP pareikalaus įprasto mokesčio
už tokiai trikčiai ar gedimui pašalinti sunaudotas medžiagas ir sugaištą laiką.
5. Jeigu garantijos galiojimo metu HP bus informuota apie kokį nors produkto, kurį HP garantija apima, defektą,
bendrovė HP savo nuožiūra pataisys arba pakeis naudotojo produktą su defektais kitu.
6. Jeigu HP negali pataisyti ar pakeisti defektų turinčios dalies, kurią apima HP garantija, kaip tai joje numatyta,
bendrovė HP netrukus po to, kai jai bus pranešta apie defektą, grąžins pirkėjui už produktą sumokėtus pinigus.
7. HP neprivalės pataisyti, pakeisti arba atlyginti nuostolių tol, kol naudotojas negrąžins defektų turinčio produkto
bendrovei HP.
8. Visi pakaitiniai produktai gali būti nauji arba beveik nauji, tačiau savo funkcionalumu visada prilygs arba net
pralenks pakeičiamą produktą.
9. HP produktuose gali būti perdirbtų dalių, komponentų arba medžiagų, kurios savo veikimu prilygsta naujoms.
10. HP ribotos garantijos pareiškimas galioja bet kurioje šalyje bei vietovėje, kurioje HP platina šį produktą.
Atskiras papildomas paslaugų sutartis, pvz., atvykimo pas naudotoją, gali būti įmanoma sudaryti bet kurioje
HP įgaliotoje paslaugų teikimo įmonėje bet kurioje šalyje, kurioje šis HP produktas yra platinamas bendrovės
HP arba jos įgaliotųjų importuotojų.
Garantijos apribojimai
TIEK, KIEK LEIDŽIA VIETOS ĮSTATYMAI, NEI HP, NEI TREČIOSIOSŠALIES TIEKĖJAI NETEIKIA JOKIŲ
KITŲ GARANTIJŲ AR SĄLYGŲ, NEI AIŠKIAI IŠREIKŠTŲ, NEI NUMANOMŲ – KOMERCINĖS NAUDOS,
TINKAMOS KOKYBĖS BEI TIKIMO KONKREČIAM TIKSLUI GARANTIJŲ.
Atsakomybės apribojimai
1. Šiame Garantijos pareiškime nurodytos priemonės yra išskirtinės ir išimtinės naudotojui skirtos priemonės iki
ribų, galimų pagal vietinius įstatymus.
2. NEI HP, NEI TREČIOSIOS ŠALIES TIEKĖJAI NEATSAKO NEI UŽ SUTARTIMI, NEI CIVILINĖS TEISĖS
IEŠKINIU, NEI KOKIU NORS KITU TEISINIU BŪDU PAREMTUS IEŠKINIUS AR PRETENZIJAS DĖL
TIESIOGINIŲ, NETIESIOGINIŲ, TYČINIŲ, NETYČINIŲ AR PASEKMINIŲ NUOSTOLIŲ, NESVARBU, AR
APIE JUOS BUVO INFORMUOTA, AR NE, IŠSKYRUS ĮSIPAREIGOJIMUS, SPECIALIAI NURODYTUS
ŠIAME GARANTIJOS PAREIŠKIME, IKI RIBŲ, GALIMŲ PA GAL ATSKIROS VALSTYBĖS ĮSTATYMUS.
Vietiniai įstatymai
1. Šis garantijos pareiškimas suteikia naudotojui tam tikras juridines teises. Naudotojas taip pat gali turėti kitų
teisių, kurios gali skirtis priklausomai nuo valstijos (JAV), provincijos (Kanadoje) bei nuo šalies (likusioje
pasaulio dalyje).
2. Jeigu šis garantijos pareiškimas yra nesuderintas su vietiniais įstatymais, jis privalės būti su jais suderintas.
Tokiomis aplinkybėmis kai kurie pareiškimai ir apribojimai, nurodyti šiame garantijos pareiškime, naudotojui
gali negalioti. Pvz., kai kuriose JAV valstijose bei jos valdomose teritorijose už jos ribų (įskaitant Kanados
provincijas), gali būti:
a. Užkirstas kelias šio garantijos pareiškimo apribojimų ir teiginių galiojimui dėl įstatymuose nurodytų
naudotojo teisių (pvz., Jungtinėje Karalystėje);
b. Kitaip suvaržytos gamintojo teisės nurodyti tokius pareiškimus arba apribojimus; arba
c. Naudotojui užtikrinamos papildomos garantinės teisės, patikslintas išreikštų garantijų, kurių gamintojas
negali atsisakyti, galiojimo laikas arba galimi taikyti išreikštų garantijų galiojimo laiko apribojimai.
3. ŠIO GARANTIJOS PAREIŠKIMO SALYGOS, IŠSKYRUS IKI PAGAL ĮSTATYMUS GALIMOS RIBOS, YRA
TAIKOMOS PAPILDOMAI PRIE ĮSTATYMAIS NURODYTŲ TEISIŲ, TAIKOMŲ „HP“ PRODUKTŲ
PARDAVIMUI TOKIEMS PIRKĖJAMS, IR JŲ NEATŠAUKIA, NEPAKEIČIA BEI NĖRA IŠIMTINĖS.
Informacija apie HP garantiją
datos, išspausdintos ant kasetės, atsižvelgiant į tai, kas
įvyksta pirma. Ši garantija netaikoma HP produktams, kurie
buvo pakartotinai užpildyti, perdirbti, atnaujinti, netinkamai
naudojami arba sugadinti.
bendrovių, teikiančių HP garantiją (gamintojo garantiją) Jūsų šalyje, pavadinimai ir adresai.
UAB „Hewlett-Packard“, V. Gerulaičio g. 1, LT-08200 Vilnius
24
i
HP DeskJet 3630 All-in-One series
Introducción
1. Siga las ilustraciones del folleto para congurar la impresora.
2. Visite 123.hp.com/dj3630 para instalar la aplicación móvil o el software de la impresora HP y conectar la
impresora a su red.
Nota: Para los usuarios de Windows®, si el equipo no está conectado a Internet, inserte el CD de software de
la impresora HP en el equipo. Si el programa de instalación no se inicia, vaya a Equipo, haga doble clic en el
icono de la unidad CD/DVD con el logotipo de HP y haga doble clic en setup.exe.
Más información
Ayuda electrónica: Instale la Ayuda electrónica seleccionándola en el software recomendado durante la
instalación del software. Obtenga información sobre las funciones del producto, la impresión, la resolución de
problemas y el soporte. En la sección Información técnica, encontrará información sobre avisos, medio ambiente
y normativa, incluidos los avisos reglamentarios de la Unión Europea y las declaraciones de cumplimiento.
• Windows® 8.1: Haga clic en la echa hacia abajo en la esquina inferior izquierda de la pantalla Inicio,
seleccione el nombre de la impresora, haga clic en Ayuda y luego seleccione Buscar ayuda de HP.
• Windows® 8: En la pantalla Inicio, haga clic con el botón derecho del ratón en una parte vacía de la
pantalla. A continuación, en la barra de aplicaciones, haga clic en Todas las aplicaciones. Haga clic en el
icono con el nombre de la impresora y, por último, haga clic en Ayuda.
• Windows® 7, Windows Vista® y Windows® XP: Haga clic en Inicio, seleccione Todos los programas y,
luego, HP. Por último, seleccione el nombre de la impresora.
• OS X: Haga clic en Ayuda > Centro de ayuda. En la ventana del Visor de ayuda, haga clic en Ayuda para
todas las aplicaciones y, luego, en Ayuda para su impresora.
Léame: Contiene información de soporte de HP, los requisitos del sistema operativo y las actualizaciones
recientes de la impresora.
• Windows: Inserte el CD de software en el equipo y vaya al archivo ReadMe.chm. Haga doble clic en
ReadMe.chm para abrirlo y elija Léame en su idioma.
• Mac: Abra la carpeta Documentos que se encuentra en el nivel superior del instalador de software. Haga
doble clic en Léame y seleccione Léame en su idioma.
En la Web: Información y ayuda adicionales: www.hp.com/go/support. Registro de la impresora:
www.register.hp.com. Declaración de conformidad: www.hp.eu/certicates. Uso de la tinta:
www.hp.com/go/inkusage.
Español
¡Escanee para descubrir más!
Puede que tenga que pagar las tarifas estándar para datos. Puede que no esté disponible en todos los idiomas.
www.hp.com/eu/m/DJ3630
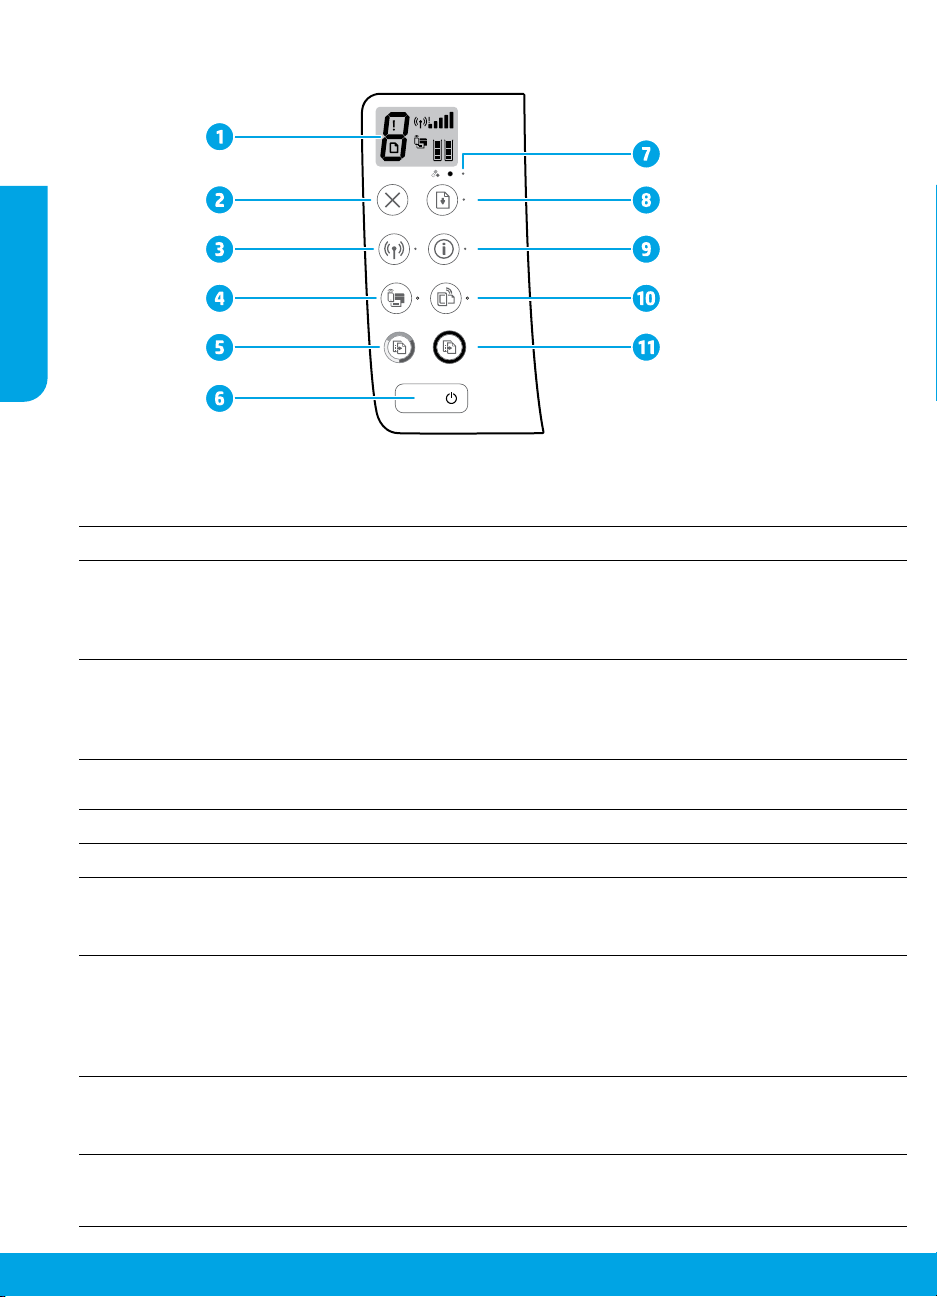
Panel de control
Español
Pantalla del panel de control: Indica el número de copias, errores de medios, estado e intensidad de
1
señal de la red inalámbrica, estado Wi-Fi Direct y niveles de tinta.
Botón Cancelar: Detiene la operación en curso.
2
Botón Conexiones inalámbricas: Activa y desactiva las funciones inalámbricas de la impresora.
Indicador luminoso Conexiones inalámbricas: Indica si la impresora está conectada a una red
3
inalámbrica o no. Si la luz parpadea signica que la conexión inalámbrica no está congurada
o que la impresora intenta conectarse.
Botón Wi-Fi Direct: Activa o desactiva Wi-Fi Direct.
Indicador luminoso Wi-Fi Direct: Indica si el estado de Wi-Fi Direct está activo o inactivo. Si la
4
luz parpadea signica que la impresora se está conectando a un dispositivo móvil en modo Wi-Fi
Protected Setup (WPS) o hay un problema con la conexión Wi-Fi Direct.
Botón Iniciar copia a color: Inicia un trabajo de copia a color. Para aumentar el número de copias
5
a color, pulse el botón varias veces. Se empezará a copiar dos segundos después de pulsar el botón.
Botón Encendido: Enciende o apaga la impresora.
6
Indicador luminoso Alerta de tinta: Indica poca tinta o un problema del cartucho de tinta.
7
Botón Reanudar: Reanuda un trabajo después de una interrupción (por ejemplo, después de cargar
papel o de eliminar un atasco de papel).
8
Indicador luminoso Reanudar: Indica que puede pulsar el botón Reanudar para solucionar un problema.
Botón información: Imprime la página de información de la impresora. Pulse este botón junto al
botón Conexiones inalámbricas, el botón Wi-Fi Direct o el botón HP ePrint para obtener páginas
de ayuda más especíca sobre dichos botones.
9
Indicador luminoso información: Indica que puede pulsar el botón Información para obtener ayuda
sobre una advertencia o error.
Botón HP ePrint: Activa o desactiva HP ePrint.
10
11
Indicador luminoso HP ePrint: Indica si el estado de HP ePrint está activo o inactivo. Si la luz
parpadea signica que hay un problema con la conexión a Servicios Web.
Botón Iniciar copia en negro: Inicia un trabajo de copia en blanco y negro. Para aumentar el número
de copias en blanco y negro, pulse el botón varias veces. Se empezará a copiar dos segundos después
de pulsar el botón.
26
Loading...