


 Loading...
HP Ink Tank Wireless 410 series

Table of contents
1 HP Ink Tank Wireless 410 series Help ............................................................................................................... |
1 |
2 Get started .................................................................................................................................................... |
2 |
Printer parts ........................................................................................................................................................... |
3 |
Get to know the ink tank system ........................................................................................................................... |
5 |
Control panel features ........................................................................................................................................... |
6 |
Control panel lights and display icons status ....................................................................................................... |
8 |
Load media .......................................................................................................................................................... |
18 |
Change the default paper size detected by printer ............................................................................................. |
22 |
Load an original on the scanner glass ................................................................................................................. |
23 |
Paper basics ......................................................................................................................................................... |
24 |
Open the HP printer software (Windows) ............................................................................................................ |
26 |
Use the HP Smart app to print, scan, and troubleshoot from an iOS, Android, or Windows 10 device ............. |
27 |
Sleep mode .......................................................................................................................................................... |
28 |
Quiet Mode ........................................................................................................................................................... |
29 |
utoff ............................................................................................................................................................... |
30 |
3 Print ........................................................................................................................................................... |
31 |
Print using the HP Smart app .............................................................................................................................. |
32 |
Print from your computer .................................................................................................................................... |
33 |
Print with mobile devices .................................................................................................................................... |
38 |
Tips for print success ........................................................................................................................................... |
39 |
4 Use Web Services ......................................................................................................................................... |
42 |
What are Web Services? ....................................................................................................................................... |
43 |
Set up Web Services ............................................................................................................................................. |
44 |
Print with HP ePrint ............................................................................................................................................. |
45 |
Use the HP Connected website ............................................................................................................................ |
46 |
Remove Web Services .......................................................................................................................................... |
47 |
ENWW |
iii |
5 Copy and scan .............................................................................................................................................. |
48 |
Copy documents .................................................................................................................................................. |
49 |
Scan using the HP Smart app .............................................................................................................................. |
50 |
Scan using the HP printer software ..................................................................................................................... |
52 |
Scan using Webscan ............................................................................................................................................ |
56 |
Tips for copy and scan success ............................................................................................................................ |
57 |
6 Manage ink and printhead ............................................................................................................................ |
58 |
Ink levels .............................................................................................................................................................. |
59 |
Refill ink tanks ..................................................................................................................................................... |
60 |
Order ink supplies ................................................................................................................................................ |
63 |
Print with black ink only ...................................................................................................................................... |
64 |
Tips for working with ink and printhead ............................................................................................................. |
65 |
Move printer ......................................................................................................................................................... |
66 |
7 Connect your printer .................................................................................................................................... |
67 |
Connect your printer to a wireless network with a router .................................................................................. |
68 |
Connect wirelessly to the printer without a router ............................................................................................. |
71 |
Connect your printer by using the HP Smart app ................................................................................................ |
74 |
Wireless settings ................................................................................................................................................. |
75 |
Connect your printer to your computer with a USB cable (non-network connection) ....................................... |
76 |
Change from a USB connection to a wireless network ....................................................................................... |
77 |
Advanced printer management tools (for networked printers) ......................................................................... |
78 |
Tips for setting up and using a networked printer ............................................................................................. |
80 |
8 Solve a problem ........................................................................................................................................... |
81 |
Jams and paper-feed issues ................................................................................................................................ |
82 |
Printhead issues .................................................................................................................................................. |
89 |
Printing issues ..................................................................................................................................................... |
95 |
Copy issues ........................................................................................................................................................ |
104 |
Scan issues ........................................................................................................................................................ |
105 |
Network and connection issues ........................................................................................................................ |
106 |
Get help from the HP Smart app ....................................................................................................................... |
108 |
Printer hardware issues ..................................................................................................................................... |
109 |
Control panel error codes .................................................................................................................................. |
110 |
HP support ......................................................................................................................................................... |
111 |
Appendix A Technical information ................................................................................................................. |
113 |
HP Company notices .......................................................................................................................................... |
114 |
Specifications ..................................................................................................................................................... |
115 |
iv |
ENWW |
Regulatory notices ............................................................................................................................................. |
117 |
Environmental product stewardship program .................................................................................................. |
124 |
Index ........................................................................................................................................................... |
131 |
ENWW |
v |
vi |
ENWW |

1HP Ink Tank Wireless 410 series Help
Learn how to use your printer.
●Get started on page 2
●Print on page 31
●Use Web Services on page 42
●Copy and scan on page 48
●Manage ink and printhead on page 58
●Connect your printer on page 67
●Solve a problem on page 81
●Technical information on page 113
ENWW |
1 |

2Get started
●Printer parts
●Get to know the ink tank system
●Control panel features
●Control panel lights and display icons status
●Load media
●Change the default paper size detected by printer
●Load an original on the scanner glass
●Paper basics
●Open the HP printer software (Windows)
●Use the HP Smart app to print, scan, and troubleshoot from an iOS, Android, or Windows 10 device
●Sleep mode
●Quiet Mode
●utoff
2 Chapter 2 Get started |
ENWW |

Printer parts
1 |
Paper-width guide |
|
|
2 |
Input tray |
|
|
3 |
Input tray shield |
|
|
4 |
Scanner lid |
|
|
5 |
Scanner glass |
|
|
6 |
Output tray extender (also referred to as the tray extender) |
|
|
7 |
Output tray |
|
|
8 |
Front door |
|
|
9 |
Ink tank |
|
|
10 |
Ink tank caps |
|
|
11 |
Ink tank lid |
|
|
12 |
Control panel |
|
|
13 |
Printhead access door |
|
|
14 |
Printheads |
|
|
15 |
Printhead latch |
|
|
ENWW |
Printer parts 3 |
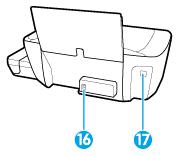
16 |
Power connection |
|
|
17 |
USB port |
|
|
4 Chapter 2 Get started |
ENWW |
Get to know the ink tank system
Term |
Defin t on |
|
|
Printheads |
The printheads are the components in the print mechanism that apply ink to the paper. There are two |
|
printheads: a black ink printhead and a tri-color ink printhead. |
|
CAUTION: After the printheads are installed and primed with ink, do not open the printhead latch unless |
|
you are installing new printheads or moving the printer outside your home or office. |
Printhead latch |
The printhead latch on the carriage secures the printheads in the carriage. Make sure the printhead latch is |
|
properly closed to avoid problems such as carriage jams. |
|
CAUTION: After the printheads are installed and primed with ink, do not open the printhead latch unless |
|
you are installing new printheads or moving the printer outside your home or office. |
Ink tanks |
Ink tanks are external ink reservoirs located at the right side of the printer. There are four ink tanks. Each |
|
ink tank corresponds to an individual color: black, cyan, magenta, and yellow. |
Ink tank caps |
Ink tank caps are rubber plugs that seal each ink tank. |
|
|
Priming |
Priming is the process of filling the ink supply tubes that run between the ink tanks and the printheads. |
|
This process occurs when you install new printheads and start the priming process from the control panel. |
|
For more information about priming, see Printhead priming and alignment icons on page 12. |
|
|
Alignment |
Alignment is a process of aligning the printheads to improve print quality. For more information about |
|
alignment, see Printhead priming and alignment icons on page 12. |
|
|
ENWW |
Get to know the ink tank system 5 |

Control panel features
Overview of buttons and lights
Feature |
Description |
|
|
1 |
Control Panel Display : Indicates number of copies, printhead priming status, media errors, wireless status |
|
and signal strength, Wi-Fi Direct status, and printhead problems. |
|
|
2 |
Cancel button: Stops the current operation. |
|
|
3 |
Wireless button: Turns on or off the printer wireless capabilities. |
|
Wireless light: Indicates whether the printer is connected to a wireless network. |
|
|
4 |
Wi-Fi Direct button: Turns on or off Wi-Fi Direct. |
|
Wi-Fi Direct light: Indicates the on or off status of Wi-Fi Direct. |
|
|
5 |
Color Copy button: Starts a color copy job. To increase the number of color copies, press the button |
|
multiple times. Copying will start two seconds after the last button press. |
|
NOTE: You can generate a print quality diagnostics report by pressing and holding the Color Copy button |
|
for three seconds. |
|
|
6 |
Power button: Turns the printer on or off. |
|
|
7 |
Printhead Alert light: Indicates printhead problems. |
|
|
8 |
Resume button: Resumes a job after a disruption (for example, after loading paper or clearing a paper jam). |
|
Resume light: Indicates the printer is in a warning or error state. |
|
|
6 Chapter 2 Get started |
ENWW |

Feature |
Description |
|
|
9 |
Information button: Prints out a printer information page. Press the button in combination with the |
|
Wireless button, the Wi-Fi Direct button, or the HP ePrint button to get more specific help pages tied to |
|
each of those buttons. |
|
|
10 |
HP ePrint button: Turns HP ePrint on or off. |
|
HP ePrint light: Indicates the on or off status of HP ePrint. A blinking light indicates a problem with the |
|
connection to Web Services. |
|
|
11 |
Black Copy button: Starts a black-and-white copy job. To increase the number of black-and-white copies, |
|
press the button multiple times. Copying will start two seconds after the last button press. |
|
|
Control panel display icons
Icon |
Description |
|
|
|
Number of copies icon: Shows the number of copies when you are copying documents, changes to the |
|
letter P when the printer needs priming, and alternates between the letter E and a number when the |
|
printer is in an error state. |
Error icon: Indicates an error.
Paper Error icon: Indicates a paper-related error.
Wireless status icons: Show the status of a wireless connection.
The wireless status icons consist of three icons, the Wireless icon ( ), the Wireless Attention icon (
 ), and the Signal Bars icon (
 ).
).
Wi-Fi Direct icon: Indicates Wi-Fi Direct is on or is in the process of being connected.
Printhead icons: The left printhead icon ashing shows an error related to the tri-color printhead, and the right icon ashing shows an error related to the black printhead.
ENWW |
Control panel features 7 |

Control panel lights and display icons status
●Power button light
●Wireless light and icons
●Wi-Fi Direct light and icon
●HP ePrint light
●Printhead icons and Printhead Alert light
●Printhead priming and alignment icons
●Error icon, Paper Error icon, and Resume light
●Number of copies icon
●Ink system maintenance icon
Power button light
Status |
Description |
|
|
|
|
On |
The printer is on. |
|
|
|
|
ff |
The printer is powered off. |
|
|
|
|
Dimmed |
Indicates the printer is in Sleep mode. The printer automatically enters Sleep mode after 5 minutes |
|
|
of inactivity. After 2 hours of inactivity, the printer automatically turns off if not connected to a |
|
|
wireless network or computer. |
|
|
|
|
Blinking |
The printer is processing a job. To cancel the job, press the Cancel button ( |
). |
|
||
|
|
|
Fast blinking |
If the printhead access door is open, close it. If the printhead access door is closed and the light is |
|
|
blinking fast, the printer is in an error state that you can resolve by following the on-screen |
|
|
messages from the computer. If you do not see any on-screen messages, try printing a document to |
|
|
generate an on-screen message. |
|
|
|
|
Wireless light and icons
The Wireless light next to the Wireless button ( ) and the wireless status icons on the control panel display work together to indicate the status of a wireless connection.
The Wireless light and Wireless status icons will only light up after alignment is completed during initial setup.
8 Chapter 2 Get started |
ENWW |
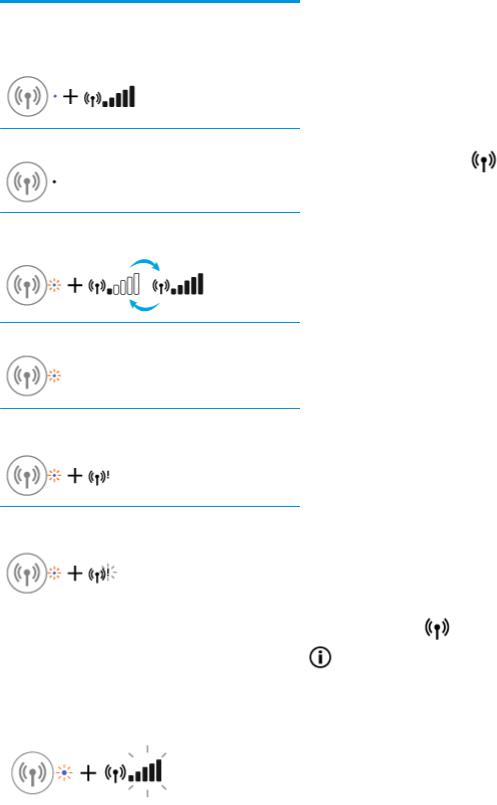
Status |
Description |
|
|
The Wireless light, the Wireless icon, and the Signal Bars icon are |
The printer is connected to a wireless network. |
on. |
|
The Wireless light is off. |
The wireless capability of the printer is off. To turn on the wireless |
|
|
capability, press the Wireless button ( |
). |
The Wireless light is blinking, the Wireless icon is on, and the Signal Bars icon are cycling.
The printer is in Auto-wireless connect (AWC) mode.
The Wireless light blinks for three seconds and then turns off. |
The wireless capability of the printer is disabled. |
|
Change the wireless settings. For more information, see Wireless |
|
settings on page 75. |
The Wireless light is blinking, and the Wireless icon and Wireless Attention icon are on.
There is no wireless signal.
●Make sure your wireless router or access point is powered on.
●Move the printer closer to the wireless router.
The Wireless light is blinking, the Wireless icon is on, and the
Wireless Attention icon is blinking.
One of the following might have occurred.
●The printer has a problem connecting to the wireless network.
●An error occurs or an overlap session is detected when using WPS.
|
Press the Wireless button ( |
) and the Information button |
|
|
( |
) together to run the wireless test, and then review the test |
|
|
report for information on how to solve the problem. |
||
|
|
||
The Wireless light is blinking, the Wireless icon is on, and the |
The printer is in the Wi-Fi Protected Setup (WPS) push mode. |
||
Signal Bars are blinking together. |
|
|
|
|
|
|
|
ENWW |
Control panel lights and display icons status |
9 |
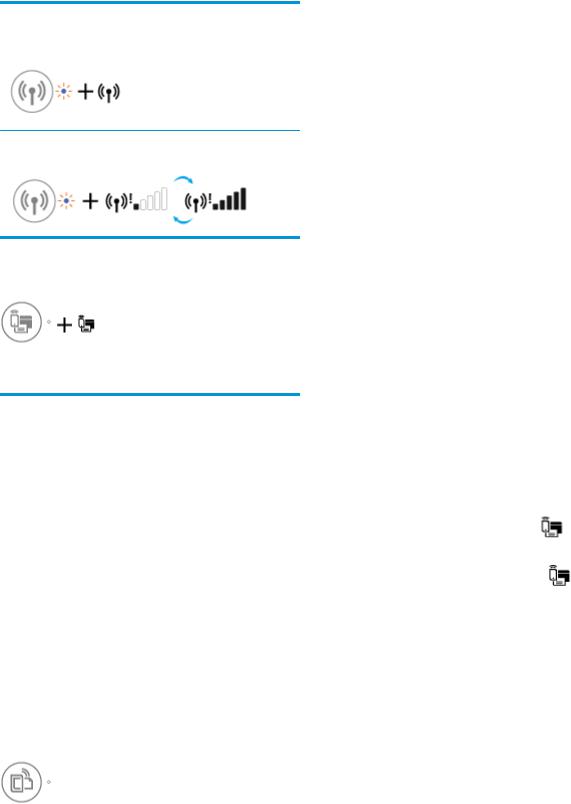
Status |
Description |
|
|
The Wireless light is blinking, and the Wireless icon is on. |
The wireless capability of the printer is on, but has not been |
|
configured. |
The Wireless light is blinking, the Wireless icon is on, the Signal Bars are cycling, and the Wireless Attention light is on.
The wireless capability of the printer is on and has been configured before, and the printer is trying to connect to the network.
Wi-Fi Direct light and icon
The Wi-Fi Direct light and Wi-Fi Direct status icon will only light up after alignment is completed during initial setup.
Status |
Description |
|
|
|
|
The Wi-Fi Direct light and icon are on. |
Wi-Fi Direct is turned on and ready to use. |
|
|
To learn how to connect to your printer using Wi-Fi Direct, see |
|
|
Connect wirelessly to the printer without a router on page 71. |
|
|
|
|
The Wi-Fi Direct light and icon are off. |
Wi-Fi Direct is off. |
|
|
To turn on Wi-Fi Direct, press the Wi-Fi Direct button ( |
). |
|
|
|
The Wi-Fi Direct light is blinking. |
The printer is connecting to a mobile device in the Wi-Fi Protected |
|
|
Setup (WPS) push mode. Press the Wi-Fi Direct button ( |
) to |
|
finish connecting. |
|
|
|
|
The Wi-Fi Direct light blinks fast for three seconds, and then |
The printer already has the maximum number of Wi-Fi Direct |
|
stays on. |
connection and another device is trying to connect to the printer |
|
|
with Wi-Fi Direct. |
|
|
|
|
The Wi-Fi Direct light blinks fast for three seconds, and then |
Wi-Fi Direct is disabled. For more information, contact the person |
|
turns off. |
who set up the printer. |
|
|
|
|
HP ePrint light
10 Chapter 2 Get started |
ENWW |
Status |
Description |
|
|
The HP ePrint light is on. |
The HP ePrint feature is on and ready to use. |
|
For more information, see Print with HP ePrint on page 45. |
|
|
The HP ePrint light is off. |
The HP ePrint feature is off. |
To turn on HP ePrint, press the HP ePrint button ( ).
).
The HP ePrint light blinks for three seconds, and then turns off. |
One of the following might have occurred. |
||
|
● |
The Web Services have not been setup up. |
|
|
● |
A mandatory update for the printer is available but has not |
|
|
|
been installed. |
|
|
● |
The HP ePrint feature has been disabled. |
|
|
Press the HP ePrint button ( |
) and the Information button |
|
|
( |
) at the same time to print a diagnostic page, and then |
|
|
follow the instructions on the page. |
||
|
|
||
The HP ePrint light keeps blinking. |
The HP ePrint feature is turned on, but the printer is not |
||
|
connected to the Web Services server. |
||
|
Press the HP ePrint button ( |
) and the Information button |
|
|
( |
) at the same time to print a diagnostic page, and then |
|
|
follow the instructions on the page. |
||
|
|
|
|
Printhead icons and Printhead Alert light
●The Error icon, one of the Printhead icons, and the Printhead Alert light are blinking.
Cause |
Solution |
One of the following might have occurred.
—The corresponding printhead is missing.
—The corresponding printhead is installed incorrectly.
—The corresponding printhead still has orange plastic tape or the plug on it.
—If one of the printheads is missing, insert the corresponding printhead.
—If both printheads are installed in the printer, remove the corresponding printhead, make sure there is no plug or plastic tape on it, and then reinsert the printhead securely.
CAUTION: These instructions are only applicable when you install printheads during initial printer setup. If printheads have been primed with ink, do not open the printhead latch unless installing new printheads or moving the printer outside your home or office.
For more information, see Fix printhead problems on page 89.
●The Error icon, both Printhead icons, and the Printhead Alert light are blinking.
ENWW |
Control panel lights and display icons status 11 |
Cause |
Solution |
One of the following might have occurred.
—Both printheads are missing.
—Both printheads are installed incorrectly.
—Both printheads still have orange plastic tapes or plugs on them.
—Both printheads are incompatible or damaged.
—If there are no printheads installed in the printer, install the printheads.
—If both printheads are installed in the printer, remove the printheads, make sure there is no plug or plastic tape on them, and then reinsert the printheads securely.
CAUTION: These instructions are only applicable when you install printheads during initial printer setup. If printheads have been primed with ink, do not open the printhead latch unless installing new printheads or moving the printer outside your home or office.
—Make sure that you are using the correct HP printheads for your printer.
—If the error persists, contact HP Support for help.
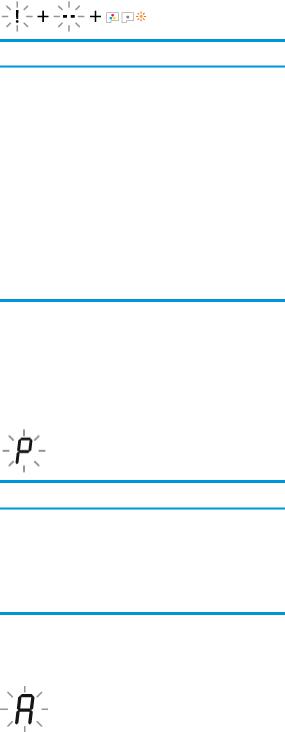
Printhead priming and alignment icons
Printheads ready for priming
●The Number of copies icon changes to a blinking P during initial printer setup. At the same time all other icons on the control panel display are turned off.
Cause |
Solution |
During initial setup, the printer detects that the new printheads are installed and the ink system is ready for priming.
Make sure all ink tanks are filled above the minimum line, and the printhead latch is closed firmly. Press and hold the
Resume button ( ) for three seconds to start ink priming.
NOTE: Priming will occur in the background and will not block printing, copying, or scanning.
Alignment status icon
●The Number of copies icon becomes a blinking A.
12 Chapter 2 Get started |
ENWW |
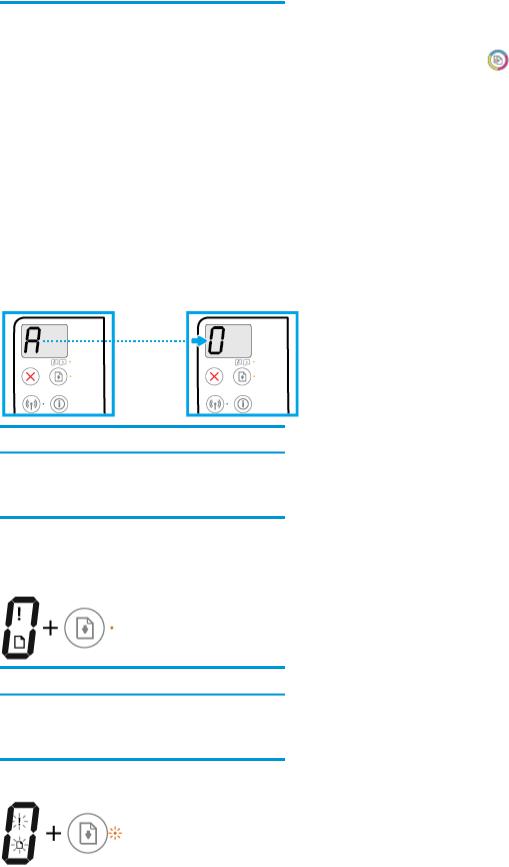
Cause |
Solution |
|
|
|
|
||
The alignment page is printing and waiting to scan. |
Place the alignment page print side down on the scanner |
||
|
glass, and then press the Color Copy button ( |
) on the |
|
|
control panel to align. |
|
|
|
NOTE: When scan starts, blinking "A" changes to solid "A". |
||
|
Alignment is complete after the scan. |
|
|
|
— |
If alignment event occurs as part of the priming process |
|
|
|
during initial printer setup, the solid "A" changes to "0" |
|
|
|
once alignment is complete. |
|
|
— |
If alignment event occurs after initial printer setup, the |
|
|
|
control panel display returns to normal state once |
|
|
|
alignment is complete. |
|
|
|
|
|
Priming in progress
●Printhead priming is in progress.
Cause |
Solution |
Printhead priming is in progress.
Priming can take place in the background when the printer is idle. Priming is complete when the display shows "0".
When priming is in progress, you can still print, scan, or copy.
Error icon, Paper Error icon, and Resume light
●The Error icon, the Paper Error icon, and the Resume light are on.
Cause |
Solution |
There is no paper in the input tray.
Load paper in the input tray.
For information about how to load paper, see Load media on page 18.
●The Error icon, the Paper Error icon, and the Resume light are blinking.
ENWW |
Control panel lights and display icons status 13 |
Cause |
Solution |
|
|
|
|
The printer receives a printing job, and detects that there is no |
Load paper, and then press the Resume button ( |
) to |
paper in the input tray.
continue printing.
For information about how to load paper, see Load media on page 18.
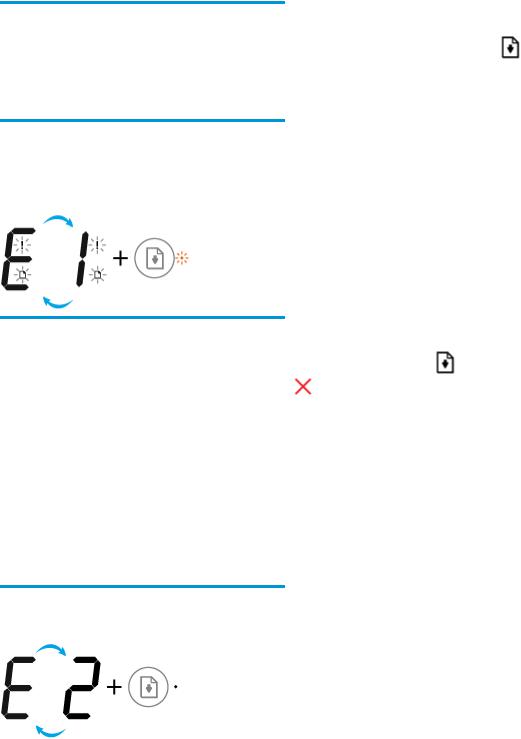
Number of copies icon
●The Number of copies icon is alternating between the letter E and the number 1. At the same time, the Error icon, the Paper Error icon, and the Resume light are blinking.
Cause |
Solution |
|
||
|
|
|
|
|
The printer receives a printing job, starts feeding paper, and |
Press either the Resume button ( |
) or the Cancel button |
||
detects that the paper width for the printing job is bigger than |
||||
|
|
|
||
the width of the loaded paper. |
( |
) to cancel the printing job and eject paper. |
||
|
||||
|
To avoid the paper size mismatch problem, do one of the |
|||
|
following before printing. |
|
||
|
— |
Change the paper size setting for the printing job to |
||
|
|
match the paper loaded. |
|
|
|
— |
Remove all paper from the input tray, and then load |
||
|
|
paper that matches the paper size setting for the |
||
|
|
printing job. |
|
|
TIP: You can change the default paper size automatically detected by the printer. For more information, see Change the default paper size detected by printer on page 22.
●The Number of copies icon is alternating between the letter E and the number 2. The Resume light is off.
14 Chapter 2 Get started |
ENWW |
Cause |
Solution |
The printer receives a single-page printing job, detects that the paper length for the printing job does not match the length of the loaded paper, and then prints out the page with errors.
To clear the error, press any button on the control panel or wait for two minutes.
To avoid the paper length mismatch problem, do one of the following before printing.
—Change the paper size setting for the printing job to match the paper loaded.
—Remove all paper from the input tray, and then load paper that matches the paper size setting for the printing job.
TIP: You can change the default paper size automatically detected by the printer. For more information, see Change the default paper size detected by printer on page 22.
●The Number of copies icon is alternating between the letter E and the number 2. At the same time, the Error icon, the Paper Error icon, and the Resume light are blinking.
Cause |
Solution |
|
|
|
|
|
|
|
|
The printer receives a multi-page printing job, detects that the |
— |
To cancel the printing job, press the Cancel button ( |
). |
|
paper length for the printing job does not match the length of |
|
|||
|
|
|
|
|
the loaded paper, and then prints out the first page of the job |
— To continue printing the remaining pages, press the |
|
||
with errors. |
|
|||
|
Resume button ( |
). The remaining pages will have |
|
|
|
|
|
||
the same errors as the first page.
TIP: You can change the default paper size automatically detected by the printer. For more information, see Change the default paper size detected by printer on page 22.
●The Number of copies icon is alternating between the letter E and the number 3. At the same time, the Resume light is blinking, and the Power button light is on.
ENWW |
Control panel lights and display icons status 15 |
Cause |
Solution |
The carriage inside the printer has stalled.
Open the printhead access door, make sure the printhead latch is properly closed and the print carriage is not obstructed. Move the carriage to the right, close the printhead access door,
and then press the Resume button ( ) to continue printing.
See Jams and paper-feed issues on page 82 for more information.
CAUTION: Do not open the printhead latch unless you are installing new printheads or moving the printer outside your home or office.
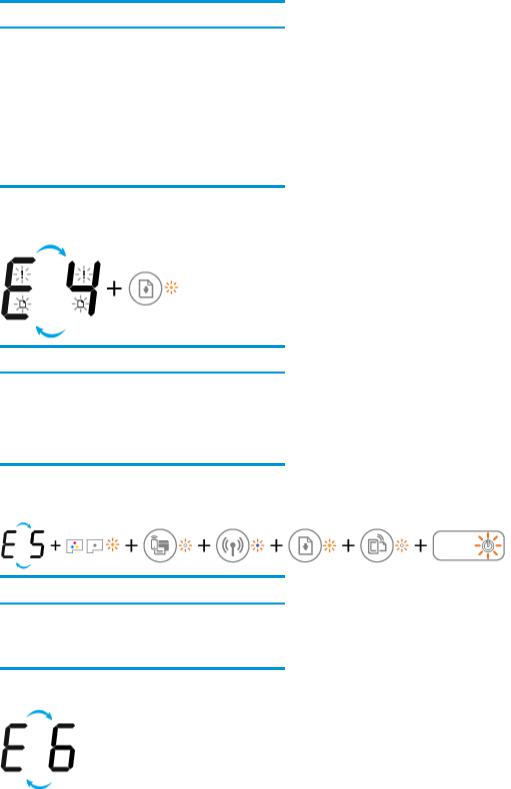
●The Number of copies icon is alternating between the letter E and the number 4. At the same time, the Error icon, the Paper Error icon, and the Resume light are blinking.
Cause
There is a paper jam.
Solution
Clear the jam, and then press the Resume button ( ) to continue printing.
For more information, see Jams and paper-feed issues on page 82.
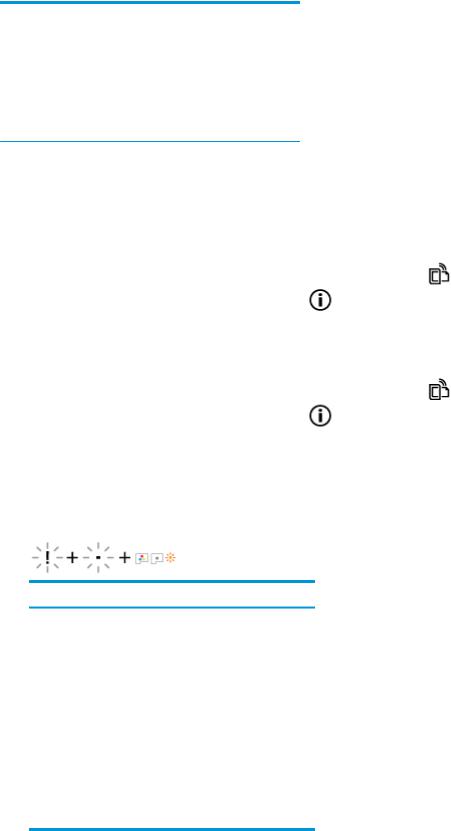
●The Number of copies icon is alternating between the letter E and the number 5. At the same time, all lights on the control panel are blinking.
Cause |
Solution |
The scanner is not working.
Turn off and turn on the printer.
If the problem persists, contact HP. The printer still prints even if the scanner is not working.
●The Number of copies icon is alternating between the letter E and the number 6.
16 Chapter 2 Get started |
ENWW |

Cause |
Solution |
The printer is in an error state.
Reset the printer.
1.Turn off the printer.
2.Unplug the power cord.
3.Wait a minute, and then plug the power cord back in.
4.Turn on the printer.
If the problem persists, contact HP.
Ink system maintenance icon
The Number of copies icon is alternating between the letter E and the number 9.
Cause |
Solution |
The printer detects that ink system maintenance is required.
Open the printhead access door completely, and then close it immediately. This process helps remove ink buildup and maintains the best print quality throughout the life of the printer.
CAUTION: Do not open the printhead latch during this process unless you are installing new printheads or moving the printer outside your home or office.
ENWW |
Control panel lights and display icons status 17 |

Load media
Select a paper size to continue.
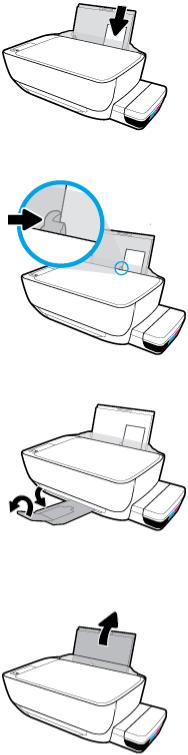
To load full-size paper
1.Raise the input tray.
2.Slide the paper-width guide to the left.
3.Insert a stack of paper into the input tray with the short edge down and the print side up, and slide the stack of paper down until it stops.
18 Chapter 2 Get started |
ENWW |

4.Slide the paper-width guide to the right until it stops at the edge of the paper.
5.Pull out the output tray and the tray extender.
To load small-size paper
1.Raise the input tray.
2.Slide the paper-width guide to the left.
ENWW |
Load media 19 |
3.Insert a stack of small-size paper (like photo paper) into the far-right side of the input tray with the short edge down and the print side up, and slide the stack of paper down until it stops.
4.Slide the paper-width guide to the right until it stops at the edge of the paper.
5.Pull out the output tray and the tray extender.
To load envelopes
1.Raise the input tray.
20 Chapter 2 Get started |
ENWW |

2.Slide the paper-width guide to the left.
3.Insert one or more envelopes into the far-right side of the input tray and slide the stack of envelopes down until it stops.
The side to be printed on should face up. For envelope with ap on the long edge, insert the envelope vertically with the ap on the left side and facing down. For envelope with the ap on the short edge, insert the envelope vertically with the ap on the top and facing down.
4.Slide the paper-width guide to the right against the stack of envelopes until it stops.
5.Pull out the output tray and the tray extender.
ENWW |
Load media 21 |
Change the default paper size detected by printer
The printer can automatically detect whether the input tray is loaded with paper and also detect whether the loaded paper width is large, small, or medium. You can change the default large, medium, or small paper size detected by the printer.
To change the default paper size detected by the printer
1.Open the embedded web server (EWS). For more information, see Open the embedded web server on page 78.
2.Click the Settings tab.
3.In the Preferences section, click Tray and Paper Management, and then select the desired option.
4.Click Apply.
22 Chapter 2 Get started |
ENWW |
Load an original on the scanner glass
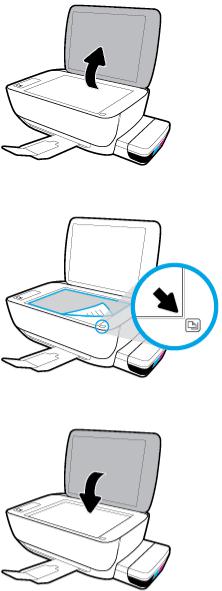
To load an original on the scanner glass
1.Lift the scanner lid.
2.Load the original print-side down on the right corner of the scanner glass.
3.Close the scanner lid.
ENWW |
Load an original on the scanner glass 23 |

Paper basics
The printer is designed to work well with most types of office paper. It is best to test a variety of print paper types before buying large quantities. Use HP paper for optimum print quality. Visit the HP website at www.hp.com for more information about HP paper.
HP recommends plain papers with the ColorLok logo for printing everyday documents. All papers with the ColorLok logo are independently tested to meet high standards of reliability and print quality, and produce documents with crisp, vivid color, bolder blacks, and that dry faster than ordinary plain papers. Look for papers with the ColorLok logo in a variety of weights and sizes from major paper manufacturers.
This section contains the following topics:
●Recommended papers for printing
●Order HP paper supplies
Recommended papers for printing
If you want the best print quality, HP recommends using HP papers that are specifically designed for the type of project you are printing.
Depending on your country/region, some of these papers might not be available.
Photo printing
●HP Premium Plus Photo Paper
HP Premium Plus Photo Paper is HP’s highest-quality photo paper for your best photos. With HP Premium Plus Photo Paper, you can print beautiful photos that are instant-dry so you can share them right off the printer. It is available in several sizes, including A4, 8.5 x 11 inches, 4 x 6 inches (10 x 15 cm), 5 x 7 inches (13 x 18 cm), and in two finishes - glossy or soft gloss (semi-gloss). Ideal for framing, displaying, or gifting your best photos and special photo projects. HP Premium Plus Photo Paper delivers exceptional results with professional quality and durability.
●HP Advanced Photo Paper
This glossy photo paper features an instant-dry finish for easy handling without smudging. It resists water, smears, fingerprints, and humidity. Your prints have a look and feel comparable to a storeprocessed photo. It is available in several sizes, including A4, 8.5 x 11 inches, 10 x 15 cm (4 x 6 inches), 13 x 18 cm (5 x 7 inches). It is acid-free for longer lasting documents.
●HP Everyday Photo Paper
Print colorful, everyday snapshots at a low cost, using paper designed for casual photo printing. This affordable photo paper dries quickly for easy handling. Get sharp, crisp images when you use this paper with any inkjet printer. It is available in glossy finish in several sizes, including A4, 8.5 x 11 inches, 5 x 7 inches, and 4 x 6 inches (10 x 15 cm). It is acid-free for longer lasting documents.
●HP Photo Value Packs
HP Photo Value Packs conveniently package original HP ink cartridges and HP Advanced Photo Paper to save you time and take the guesswork out of printing affordable, lab-quality photos with your HP
24 Chapter 2 Get started |
ENWW |
Loading...