


 Loading...
Navigation Manual
2020 CIVIC
Hatchback

The information and specifications included in this publication were in effect at the time of approval for printing. Honda Motor Co., Ltd., reserves the right, however, to discontinue or change specifications or design at any time without notice and without incurring any obligation.
Accessories Precautions
The GPS antenna is located in the dashboard. Metallic front or side window tinting can seriously degrade or obstruct GPS reception.
Signal noise from devices such as radar detectors, vehicle tracking devices, remote starters, and additional amplifiers can disrupt the navigation system. If you install any such item, install it away from the navigation display and antenna.
Important Safety Information
3 WARNING
Using the navigation system while driving can take your attention away from the road, causing a crash in which you could be seriously injured or killed.
Only operate system controls when the conditions permit you to safely do so.
Avoid focusing on the screen or manually operating the system controls while driving.
Certain on-screen controls are disabled when driving, however most of the voice commands continue to function. Pull to the side of the road if you need to devote more attention and time to look at the screen or access additional menus.
Route guidance may conflict with street closures, road construction, detours, and out-of-date map data.
The system itself may also have limitations. Verify route information by carefully observing roads, signs, and signals. Always use your own judgment and obey traffic laws.
2 System Limitations P. 128
NOTICE
This vehicle’s navigation display, if so equipped, includes mercury-containing components. Upon removal, please reuse, recycle, or dispose of as hazardous waste.
Clean the screen with a soft, damp cloth. You may use a mild cleaner intended for use on navigation screens.
00X31-TGG-8300 |
2020 Civic Hatchback Navigation Manual |
NM-10389 |

2 System Setup P. 15
Start-up 16 |
Voice Control System 17 |
Map & Vehicle 28 |
Navigation 36 |
Data Reset 51 |
|
2 Navigation P. 53
Entering a Destination 54 |
Calculating the Route 74 |
Changing Your Route 91 |
Changing Your Destination 94 |
2 Other Features P. 107
About Apps Menu 108 ecoRouteTM 109
2 Troubleshooting P. 121
Troubleshooting 122
2 Reference Information P. 127
System Limitations 128 Customer Assistance 130
2 Voice Commands P. 135
Voice Commands 136 List of Categories 138
Personal Information 18 |
Display Mode Settings 26 |
Traffic 44 |
Other Settings 45 |
Driving to Your Destination 77 |
Map Operation 81 |
Information Functions 117 |
|
Legal Information 132
Contents
Quick Reference Guide P. 2
System Setup P. 15
Navigation P. 53
Other Features P. 107
Troubleshooting P. 121
Reference Information P. 127
Voice Commands P. 135
Index P. 139
Guide Reference Quick
Overview—Functions at a Glance
Navigation |
You can select any place/landmark as a destination by using the touchscreen. The navigation system gives you |
|
turn-by-turn driving directions to your destination. |
|
Store home address (P18) |
|
Register 1 home address. |
|
Store contacts (P19) |
|
Store locations to use as the destination. |
|
Enter destination (P54) |
|
Select your destination using several methods. |
|
Select route (P75) |
|
Set route preferences and select one of the available routes. |
Track route (P77)
Follow your route in real-time with voice guidance.
Traffic Information* (P86)
View and avoid congestion and traffic incidents.
*: Available only in certain areas.
Avoid certain areas (P39)
Set streets and areas to detour around.
Add waypoints (P93)
Add “pit stops” along your route.
2
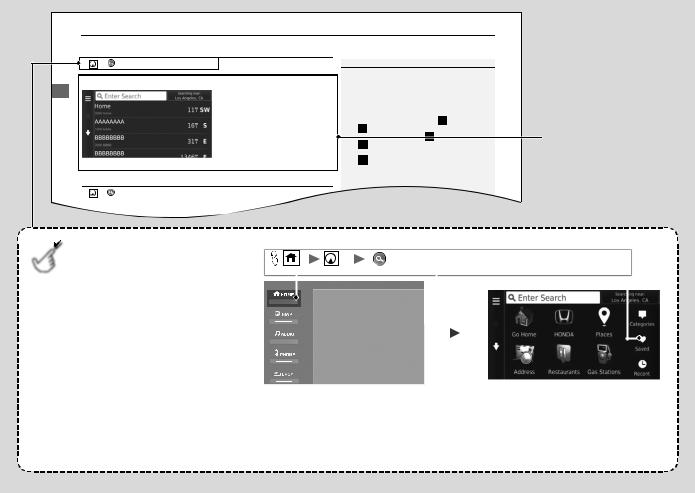
HOME Screen
The system displays various functions from the HOME screen. Press the 

 button at any time to return to the main HOME screen.
Navigation Top Screen
Display the map screen and operate the navigation features. From the HOME screen, press the navigation top screen is displayed.
GPS signal strength (P120)
Display the satellites’ status.
Where To? (P54)
Select search methods to enter a destination for route guidance.
Apps (P108)
Display the useful functions incorporated into the navigation system.
 button and then press the
  button. The
View Map (P6)
Display the map screen.
Settings (P15)
Change the settings for the navigation functions.
Guide Reference Quick
3

Guide Reference Quick
4
Touchscreen Operation
You can operate the system using your finger on the touchscreen.
The touchscreen can be operated if you are wearing thin gloves, but it may be more difficult for the system to respond.
Tap |
Slide |
|||||||||
|
|
|
|
|
|
|
|
|
|
|
Touch the screen lightly with your finger to select an option on the |
Move your finger slowly across the screen to scroll the map. |
|||||||||
screen. |
|
|
|
|
|
|
|
|
|
|
|
|
|
|
|
|
|
|
|
||
|
|
|
|
|
|
|
|
|
|
|
|
|
|
|
|
|
|
|
|
|
|
|
|
|
|
|
|
|
|
|
|
|
|
|
|
|
|
|
|
|
|
|
|
|
|
|
|
|
|
|
|
|
|
|
|
|
|
|
|
|
|
|
|
|
|
Swipe
Lightly sweep your finger side to side or up and down to scroll a list or map.
Pinch In/Out
Open or close your fingers on the screen in a pinching motion to zoom in or out of the map.
You can change the touchscreen sensitivity setting.
2 Refer to the Owners Manual.
How to Enter Information
You can enter information (e.g., city names, street names, numbers, and symbols) when prompted on the input screen.
Using Voice Commands
When you see  in this manual, voice commands are available for that feature.
The system recognizes only certain commands.Available navigation voice commands (P136)
Press the  button, and say the letter, number, or symbol (e.g., say
  “1”).
“1”).
If a voice command is not recognized, a list is displayed with possible options.
On list screens:
Say the number of the list item (e.g., say  “Three” to select item 3).
Say  “Main menu” to return to the voice command menu screen.
Say  “Back” to return to the previous screen.
Say  “Page Up” to scroll up one page.
Say  “Page Down” to scroll down one page.
Say  “Exit” to end the voice command function.
Using the Touchscreen
Select a character or icon on the screen to select it.
Select  to remove the last entered character.
Select  to remove all entered characters.
Select  to display upper/lower case characters.
Select  to enter a space character.
Select  to display other types of characters.
Select  to change the keypad language.
On input search screens, the suggested search terms are displayed. Select  to display a list of possible entries.
Guide Reference Quick
5

Guide Reference Quick
Map Screen Legend
The color of the map is different depending on the selected Map Theme.
Map scale (P81) |
|
|
|
Searching specific category (P73) |
|
|
|
|
|
|
|
|
|
|
|
|
|
|
|
Map operation icons |
|
|
|
|
|
|
|
|
|
|
|
|
|
|
|
|
|
Landmark icons |
|||
|
|
|
|
|
|
|
|||||||||||||||
|
|
|
|
|
|
|
|
|
|
|
|
|
|
|
|
|
|||||
|
|
|
|
|
|
|
|
|
|
|
|
|
|
|
|
|
|
||||
|
|
|
|
|
|
|
|
|
|
|
|
|
|
|
|
|
|||||
(P81) |
|
|
|
|
|
|
|
|
|
|
|
|
|
|
|
||||||
Traffic incident icons |
|
|
|
|
|
|
|
|
|
|
|
|
|
|
|
|
|
|
Map buttons (P33) |
||
|
|
|
|
|
|
|
|
|
|
|
|
|
|
|
|
|
|
Traffic flow indicator |
|||
|
|
|
|
|
|
|
|
|
|
|
|
|
|
|
|
|
|
||||
|
|
|
|
|
|
|
|
|
|
|
|
|
|
|
|
|
|
|
|
|
|
Streets |
|
|
|
|
|
|
|
|
|
|
|
|
|
|
|
|
|
|
|
|
Traffic is flowing |
|
|
|
|
|
|
|
|
|
|
|
|
|
|
|
|
normally. |
|||||
|
|
|
|
|
|
|
|
|
|
|
|
|
|
|
|
||||||
|
|
|
|
|
|
|
|
|
|
|
|
|
|
|
|
|
|
|
|
|
|
Current vehicle position |
|
|
|
|
|
|
|
|
|
|
|
|
|
|
|
|
Traffic is slightly |
||||
|
|
|
|
|
|
|
|
|
|
|
|
|
|
|
congested. |
||||||
|
|
|
|
|
|
|
|
|
|
|
|
|
|
|
|||||||
|
|
|
|
|
|
|
|
|
|
|
|
|
|
|
|
|
|
|
|
|
|
|
|
|
|
|
|
|
|
|
|
|
|
|
|
|
|
|
|
|
|
|
Traffic is heavily |
|
|
|
|
|
|
|
|
|
|
|
|
|
|
|
|
|
|
|
|
|
|
Feature areas |
|
|
|
|
|
|
|
|
|
|
|
|
|
|
|
|
|
|
|
congested or stopped. |
|
|
|
|
|
|
|
|
|
|
|
|
|
|
|
|
Traffic has not |
||||||
|
|
|
|
|
|
|
|
|
|
|
|
|
|
|
|||||||
|
|
|
|
|
|
|
|
|
|
|
|
|
|
|
|
|
|
|
|
|
updated. |
|
|
|
|
|
|
|
|
|
|
|
Map menu (P82) |
|
|
|
|
||||||
|
|
|
|
|
|
|
|
|
|
|
|
|
|
|
|||||||
6
During Route Guidance
During route guidance, route information is displayed on the map screen. You can see the detailed information on the turn information screen.
Map Screen
Waypoint
Speed limit
Guidance Screen
Street name of next  guidance point
Scrolls key
Select this key to scroll the display.
Estimated time to next guidance point
Next guidance indicator (P77)
Distance to the next guidance point and street name of next guidance point.
 Where To? (P54)
 Cancel route
Calculated route
Dashboards (P77)
 Distance to next guidance point
|
|
|
|
|
|
|
|
|
|
|
Quick |
Day or Night Mode |
Reference |
||||
|
|||||
Press the |
button to manually |
|
|||
switch between Day and Night modes. |
Guide |
||||
|
|
|
|
|
|
|
|
|
|
|
|
|
Day Mode |
Night Mode |
|
||
Turn-by-Turn Directions
The next guidance point appears on the Driver Information Interface (DII).
Remaining |
|
Street name of next |
|||
distance |
|
guidance point |
|||
|
|
|
|
|
|
|
|
|
|
|
|
|
|
|
|
|
|
|
|
|
|
|
|
Next driving maneuver is approaching.
7

Guide Reference Quick
8
Navigation—Home Addresses and Going Home
The “Home” feature automatically routes you to your home address from any location simply by selecting Go Home. You can store one home address. (P18)
The order of the steps may change depending on the map data loaded on your system.
Storing Your Home Address
aPress the 

 button.
bSelect  .
.
cSelect  and then select Set Home Location.
d Select Enter My Address.
e Select Search All.
fEnter a house number and then select
Done.
gEnter a street and then select Done.
hSelect a street from the list.
If the select city screen is displayed, select a city.
iSelect an address from the list.
jSelect Select.
Going Home
aPress the 

 button.
bSelect  .
.
cSelect Go Home.
Alternatively, you can say  “Navigation” and then
  “Go Home” from any screen.

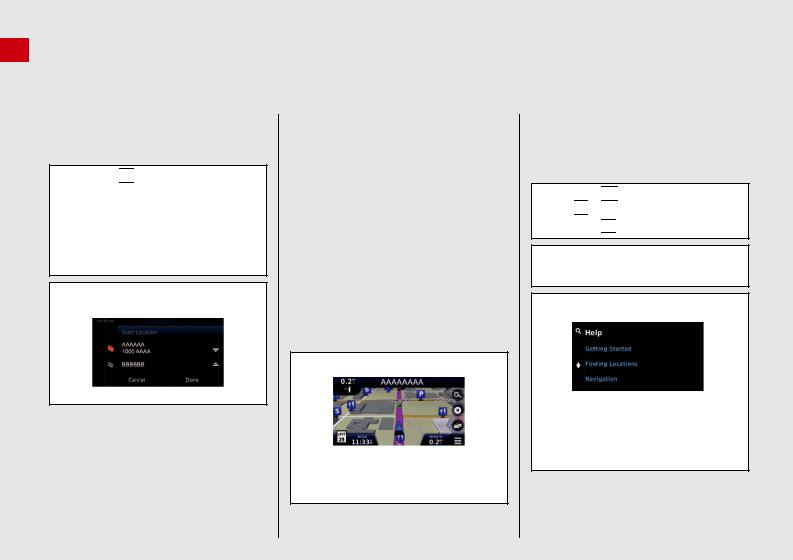
Navigation—Entering a Destination
Enter your destination using one of several methods, then follow route guidance on the map to your destination.
The order of the steps may change depending on the map data loaded on your system.
aPress the 

 button.
bSelect  .
.
cSelect Address.
d Select Search All.
eEnter the house number and select Done if necessary.
fEnter the name of your destination street and select Done.
gSelect your destination street from the list.
If the select city screen is displayed, select a city.
h Select an address from the list.
iSelect Go!.
Route guidance to the destination begins.
Routes: Choose one of multiple routes.
 : Display your destination map and save a place.
Guide Reference Quick
9
Guide Reference Quick
10
Navigation—Changing Route or Destination
You can alter your route by adding waypoints to visit, or changing your destination during route guidance.
Adding a Waypoint (“Pit Stop”)
You can add waypoints along your route.
(P93)
aPress the 

 button.
bSelect  .
.
cSelect a search method.
dSelect the location to add to the destination list and select Go!.
eSelect Add to Active Route.
fIf necessary, edit the order of the destinations and select Done.
Changing Your Destination
There are several methods you can use to specify a new destination during route guidance.
Searching nearby hospitals, police stations, or gas stations (P95)
Select the vehicle icon and select an option.
Selecting an icon on the map (P94) Select a place/landmark icon or a new area on the map twice.
Entering a new destination (P97) Select Where To? and then enter a new destination.
Canceling Your Route
a Select  .
.
Alternatively, you can say  “Navigation” and then
  “Stop route” from any screen.
Help
This navigation system comes with help
information, which tells you how to use this navigation. (P117)
aPress the 

 button and then press the
  button.
bPress the 
 button.
cSelect Apps.
dSelect Help.
eSelect a help topic.
Select  to search help topics by keyword.
You can also display a help topic to select  on each menu screen.
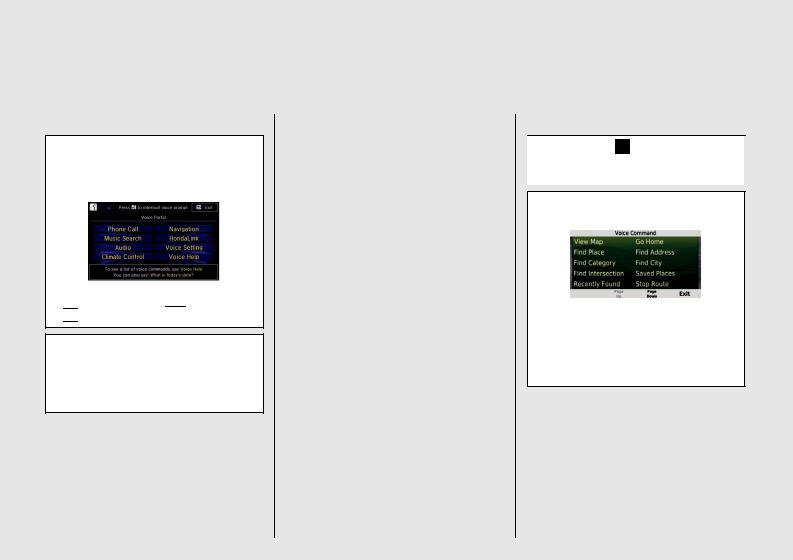
Voice Control Operation
Voice Portal Screen
aPress and release the  button.
The system prompts you to say a voice
command. Press and release the  button again to bypass this prompt.
The system beeps when ready for a
command. Press the  button or the

 button to cancel.
bSay  “Navigation.”
The Voice Command screen is displayed.
After that, follow the voice prompt and say a voice command.
The audio system is muted during voice control mode.
You can use other voice commands on the Voice Portal screen.
Disable Voice Prompts to bypass the voice prompt.
See the Owner's Manual.
Carefully read the usage note for the voice control.
Voice Control System (P17)
The system recognizes only certain commands.
Available navigation commands
(P136)
|
|
|
|
|
|
|
|
|
Quick |
Voice Command Screen |
Reference |
|||
|
||||
|
a After saying |
“Navigation” from |
|
Guide |
|
|
|||
|
the Voice Portal screen, the below |
|
||
|
screen appears. |
|
|
|
|
|
|
|
|
|
b Listen for the voice prompt, then say a |
|
|
|
|
voice command. |
|
|
|
You do not need to press the  button again in the Voice Command screen.
Available voice commands are highlighted on the screen.
11
|
|
Troubleshooting |
|
||
Quick |
|
|
Reference |
|
|
|
slightly off my actual position, especially at intersections? |
|
|
|
Why does the vehicle position icon on the map appear |
Guide |
|
This is normal. The navigation system is unaware of the |
|
|
|
|
|
width of intersections. Large differences in vehicle position |
|
|
can indicate a temporary loss of the GPS signal. |
|
|
|
|
|
Why does the “Arrival time” display sometimes increase |
|
|
even though I am getting closer to my destination? |
|
|
The “Arrival time” is based on the speed limit on each |
|
|
road. Depending on the traffic conditions, the “Arrival |
|
|
time” may be calculated to be earlier or later. |
|
|
|
|
|
Why does my clock frequently change the time forward |
|
|
and backward by one hour? |
The clock setting is automatically updated based on your GPS location. If you are driving near a time zone border, the automatic update likely is the reason.
12
For more Information (P121)
How do I turn on the navigation system voice guidance?
1.Press the  button and then press the
  button. Select Settings > Navigation and enable Voice Prompts.
2.Press the 

 button.
Select Settings > System > Sound/Beep tab. Turn up Guidance Volume, if volume level is low. For more details, see the Owner’s Manual.
How do I specify a destination when an entered city or street could not be found?
Try selecting the destination directly from the map.
How to Use This Manual
This section explains different methods on how you can easily find information in this manual.
Searching the Table of Contents
(P1)
Two types of Tables of Contents help you find your desired information.
Searching the Index (P139)
Menu items displayed on the navigation screen (e.g., Saved) can be found individually in the Index.
More Detailed |
|
Contents |
|
Table of Contents |
Chapter Contents |
First, find the general chapter related to what you are looking for (e.g., entering a destination from the Saved Places).
Then, go to that chapter to view a more specific table of contents.
This more detailed table of contents shows you exactly what information is listed by section and title.

 The Index consists of
main terms and subentries. The sub-entries help you get to the
desired page depending
on what you are looking for.
Navigation Screen |
|
|
|
|
|
|
|
|
|
|
|
|
|
|
|
|
|
Go to the |
|
|
|
|
|
|
|
|
|
|
|
|
|
|
|
|
|
||
|
|
|
|
|
|
|
Index |
|
|
|
|
|
Next Page |
|||||
|
|
|
|
|
|
|
|
|
|
|
|
|
|
|||||
13
 Menu Tree
The menu tree helps guide you through the system’s menu options. To get to your desired function, follow the menu tree in order of the steps shown.
After following the menu tree, step-by-step instructions explain how to achieve the desired result.
 Saved
Saved
|
|
|
|
|
|
|
|
|
|
|
|
|
|
|
|
|
|
|
|
|
|
|
|
|
|
|
|
|
|
|
|
|
|
|
|
|
|
|
|
|
|
|
|
|
|
|
|
|
|
|
|
|
|
|
|
|
|
|
|
|
|
|
|
|
|
|
|
|
|
Select the item on the system |
|
|
Select the menu option. |
|
|||||
control panel. |
|
|
Select Saved. |
|
|||||
|
|
|
|
|
|
|
|
|
|
* Sample pages and images in this section may differ from the actual ones.
14

System Setup
This section describes the start-up procedure and the navigation and setup functions.
Start-up .................................................... |
16 |
Map Layers ............................................ |
34 |
Voice Control System .............................. |
17 |
Dashboards............................................ |
34 |
Voice Recognition ................................... |
17 |
myMaps................................................. |
35 |
Personal Information............................... |
18 |
Navigation............................................... |
36 |
Setting Home Location............................ |
18 |
Calculation Mode................................... |
37 |
Saved Locations ...................................... |
19 |
Avoidances ............................................ |
38 |
Display Mode Settings ............................ |
26 |
Custom Avoidances ............................... |
39 |
Switching Display Mode Manually........... |
26 |
Traffic....................................................... |
44 |
Map & Vehicle.......................................... |
28 |
Other Settings......................................... |
45 |
Vehicle.................................................... |
29 |
Units ...................................................... |
45 |
Driving Map View (Map Orientation)....... |
30 |
Language & Keyboard............................ |
46 |
Map Detail.............................................. |
31 |
Device.................................................... |
49 |
Map Theme ............................................ |
32 |
Data Reset ............................................... |
51 |
Map Buttons........................................... |
33 |
Reset Factory Default Settings ................ |
51 |
15
Start-up
Setup System
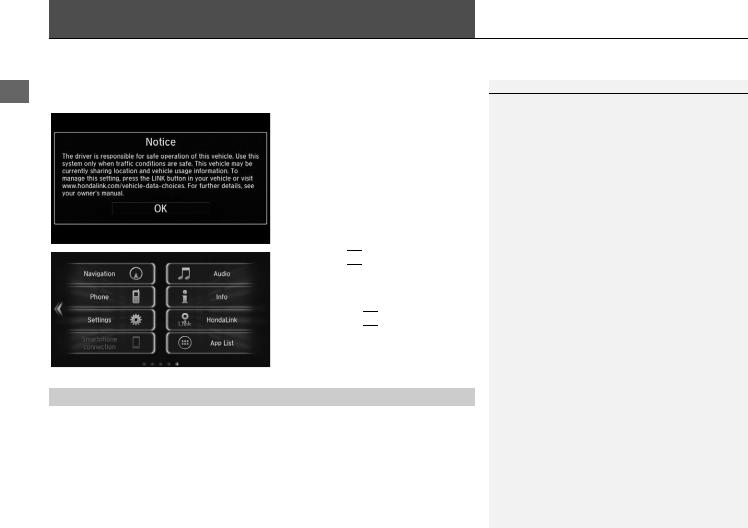
The navigation system starts automatically when you set the power mode to ACCESSORY or ON. At start-up, the following confirmation screen is displayed.
1. Select OK.
u The HOME screen is displayed. u If you do not select OK, the
system will automatically select OK after a certain period of time.
u The system will automatically start up the feature that was used the last time.
2. Press the  button.
u The map screen is displayed. u When you want to display the navigation top screen, you
press the 
 button.
■Limitations for Manual Operation
Certain manual functions are disabled or inoperable while the vehicle is in motion. You cannot select a grayed-out option until the vehicle is stopped.
Voice commands are still operable while the vehicle is in motion.
1 Start-up
Avoid focusing on the screen and drive safely.
When you use the navigation system, the system may close other apps.
When you select Navigation, the system displays the navigation feature that was used the last time. At start-up, the navigation top screen is displayed.
16

Voice Control System
Your vehicle has a voice control system that allows hands-free operation of the navigation system functions.
The voice control system uses the  and
and 

 buttons on the steering wheel and a microphone near the map lights on the ceiling.
For details of the  button,
  button and microphone position, see the Owner's Manual.
Voice Recognition
To achieve optimum voice recognition when using the navigation voice control system:
•Make sure the correct screen is displayed for the voice command that you are using. The system recognizes only certain commands.
Available navigation commands:
2 Navigation Commands P. 136
•Close the windows and moonroof*.
•Adjust the dashboard and side vents so air does not blow onto the microphone on the ceiling.
•Speak in a clear, natural speaking voice without pausing between words.
•Reduce any background noise if possible. The system may misinterpret your command if more than one person is speaking at the same time.
1 Voice Control System
When you press the  button, the system prompts you to say a voice command. Press and release the
  button again to bypass this prompt and give a command.
1 Voice Recognition
The voice control system can only be used from the driver’s seat because the microphone unit removes noises from the passenger’s side.
Setup System
* Not available on all models |
17 |
|
Setup System
Personal Information
Setting Home Location
H 

 u
u  u
u 
Use the personal information menu to set your home location.
1. Select Set Home Location.
2. Select an option.
u Select Use Current Location to set home location.
u If selecting Enter My Address or Recently Found, proceed to steps 3 and 4.
3. Select the home location.
4. Select Select.
The following options are available:
•Enter My Address: Sets the home location by entering the address.
2 Storing Your Home Address P. 8
•Use Current Location: Sets your current location as your home location.
•Recently Found: Sets the home location from a recently found location.
1 Personal Information
You can also display the same screen by selecting  on the Where To? screen.
If you want to delete a shortcut(s), select Remove Shortcut(s).
2 Deleting Shortcuts P. 59
The home location can be overwritten.
18
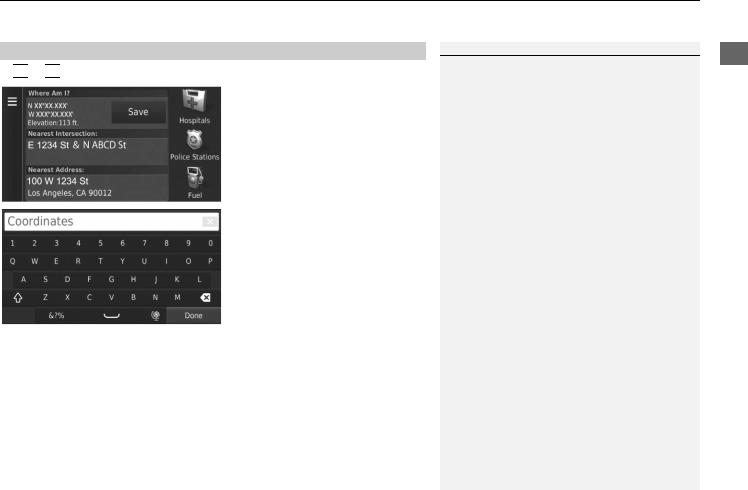
Saved Locations
You can save locations so you can quickly find them and create routes to them.
■Saving a Saved Location
H  u
u 
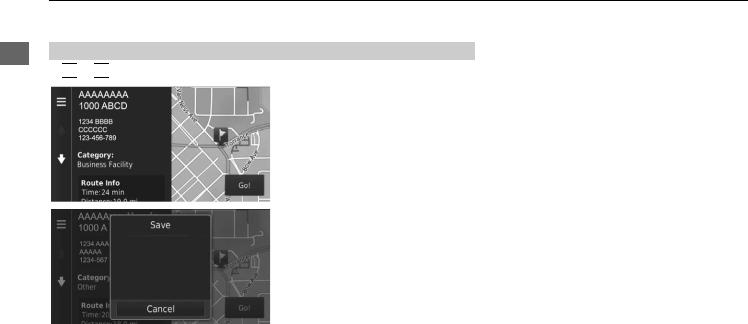
1. Select a search method.
u Find a location that you want to save.
2 Entering a Destination P. 54
2. Select  .
.
3. Select  or select
  .
.
4. Select Save.
u If necessary, enter a name and select Done.
5. Select OK.
uuPersonal InformationuSaved Locations
Setup System
Continued |
19 |
Setup System
uuPersonal InformationuSaved Locations
■Saving a Saved Location Manually
H 

 u
u 
 u View Map
1. Select a destination from the map.
2 Map Input P. 73
2. Select the destination name at the bottom of the map.
3. Select  or select
  .
.
4. Select Save.
u On some places other than POI, you can edit the place name.
5. Select OK.
20
uuPersonal InformationuSaved Locations
■Saving Your Current Location
H  u
u  u View Map
1. Select the vehicle icon.
2. Select Save.
1 Saving Your Current Location
Vehicle position may not be displayed when:
•The vehicle is traveling off-road.
•The vehicle position data cannot be updated.
3.Enter a name of the location.
4.Select Done.
5.Select OK.
Setup System
Continued |
21 |
Setup System
uuPersonal InformationuSaved Locations
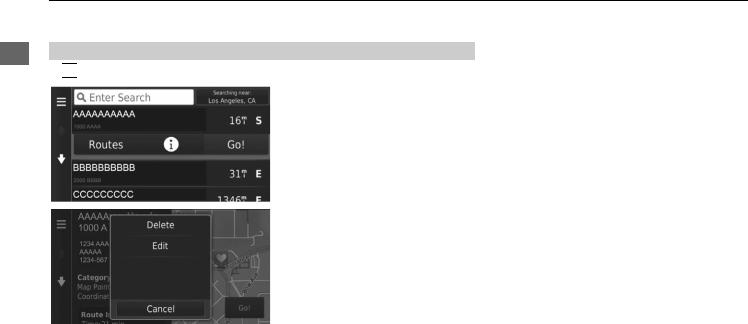
■Editing a Saved Location
H 

 u
u  u Saved
1.Select a saved location you want to edit.
2.Select  .
.
3.Select  or select
  .
.
4.Select Edit.
22
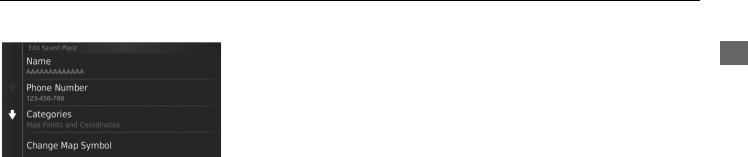
uuPersonal InformationuSaved Locations
5. Select an option.
Setup System
The following options are available:
•Name: Enters a new name for the location.
•Phone Number: Enters a phone number.
•Categories: Creates or changes the category in which this location is saved.
•Change Map Symbol: Select a new symbol.
Continued |
23 |
Setup System
uuPersonal InformationuSaved Locations
■Deleting a Saved Location
H 

 u
u  u Saved
1.Select a saved location you want to delete.
2.Select  .
.
3.Select  or select
  .
.
4.Select Delete.
5.Select Yes.
24
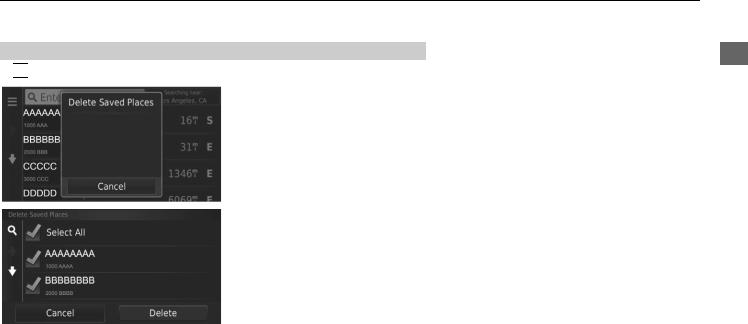
■Deleting Saved Locations
H  u
u  u Saved
1. Select  or select
  .
.
2. Select Delete Saved Places.
3. Select a saved location you want to delete.
u Select Select All to delete all saved locations.
4. Select Delete.
5. Select Yes.
uuPersonal InformationuSaved Locations
Setup System
25

Setup System
Display Mode Settings
Switching Display Mode Manually
Set the screen brightness separately for Day and Night modes. Press the  button to cycle through the display modes (Day to Night to Off).
Press the  button.
u The Brightness bar is displayed for a few seconds.
u Select  or
or  to adjust the brightness.
1 Switching Display Mode Manually
You can also adjust the display brightness by sliding or swiping on the Brightness bar.
You can change the touchscreen sensitivity setting.
2 Refer to the Owners Manual.
26

Illumination |
Operation |
|
|
control |
|
||
|
|
|
|
|
|
||
button |
Selects Day or Night display mode when the user |
||
|
wants to change the brightness of the display |
||
|
temporarily. |
|
|
|
Remember: This button overrides all other display |
||
|
brightness adjustments either set automatically by |
||
|
the sunlight sensor or manually from the System |
||
|
settings screen. |
|
|
Sunlight sensor* |
If the sunlight sensor detects daylight and the |
||
(see your Owner’s |
headlights are turned on, the system automatically |
||
Manual for |
overrides the Night display and displays the Day |
||
location) |
display mode. |
|
|
|
Remember: If desired, use the |
button to |
|
|
override this automatic choice. |
|
|
|
|
||
Dash illumination |
When the headlights are turned on, and you wish to |
||
adjustment knob |
have the Day display mode, adjust the illumination |
||
(see your Owner’s |
to the full brightness (beeps). |
|
|
Manual for |
Remember: Adjust the dash brightness back to |
||
location) |
midrange to allow auto switching by sensing the |
||
|
headlights are on or off. |
|
|
Headlights |
When turned on, the display changes to Night |
||
(Auto*/On/Off) |
display mode. |
|
|
|
The previous three controls listed above can |
||
|
“cancel” this function. |
|
|
|
Remember: Use the |
button to adjust the |
|
|
brightness of the display. |
|
|
|
|
|
|
uuDisplay Mode SettingsuSwitching Display Mode Manually
Setup System
* Not available on all models |
27 |
|
Setup System
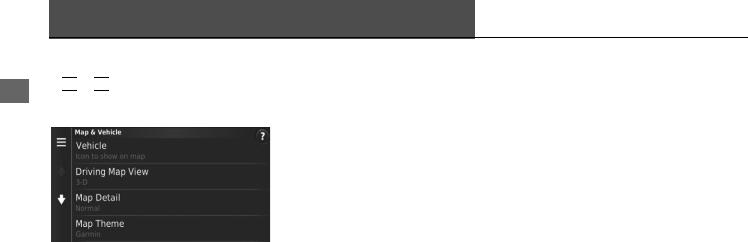
Map & Vehicle
H 

 u
u 
 u Settings u Map & Vehicle
Change the map settings.
Select an option.
The following options are available:
• Vehicle: Changes the icon to represent your position on the map.
2Vehicle P. 29
•Driving Map View: Sets the perspective on the map.
2Driving Map View (Map Orientation) P. 30
•Map Detail: Sets the level of detail on the map. More detail may cause the map to draw slower.
2Map Detail P. 31
•Map Theme: Changes the color of the map data.
2Map Theme P. 32
•Map Buttons: Sets which icons are included on the map. Up to three icons can be included on the map.
2Map Buttons P. 33
•Map Layers: Sets the data that appears on the map.
2Map Layers P. 34
•Dashboards: Sets the map dashboard layout.
2Dashboards P. 34
•myMaps: Sets which installed maps the system uses.
2myMaps P. 35
28
Loading...