


 Loading...
 13 CBR500R-32MGZB000.book 1
This manual should be considered a permanent part of the motorcycle and should remain with the motorcycle when it is resold.
This publication includes the latest production information available before printing. Honda Motor Co., Ltd. reserves the right to make changes at any time without notice and without incurring any obligation.
No part of this publication may be reproduced without written permission.
The vehicle pictured in this owner’s manual may not match your actual vehicle.
© 2012 Honda Motor Co., Ltd.

 13 CBR500R-32MGZB000.book 2
Welcome
Congratulations on your purchase of a new Honda motorcycle. Your selection of a Honda makes you part of a worldwide family of satisfied customers who appreciate Honda’s reputation for building quality into every product.
To ensure your safety and riding pleasure:
●Read this owner’s manual carefully.
●Follow all recommendations and procedures contained in this manual.
●Pay close attention to safety messages contained in this manual and on the motorcycle.
●The following codes in this manual indicate each country.
●The illustrations here in are based on the CBR500RA ED type.
Country Codes
Code |
Country |
CBR500R |
|
E, II E |
UK |
F, II F |
France, Belgium |
ED, III ED |
European direct sales |
U, II U |
Australia, New Zealand |
KO, II KO |
Korea |
CBR500RA |
|
E, II E |
UK |
F, II F |
France, Belgium |
ED, III ED |
European direct sales |
U, II U |
Australia, New Zealand |
KO, II KO |
Korea |
*The specifications may vary with each locale.

 13 CBR500R-32MGZB000.book 3
A Few Words About Safety
Your safety, and the safety of others, is very important. Operating this motorcycle safely is an important responsibility.
To help you make informed decisions about safety, we have provided operating procedures and other information on safety labels and in this manual. This information alerts you to potential hazards that could hurt you or others.
Of course, it is not practical or possible to warn you about all hazards associated with operating or maintaining a motorcycle. You must use your own good judgement.
You will find important safety information in a variety of forms, including:
●Safety labels on the motorcycle
●Safety Messages preceded by a safety alert symbol and one of three signal words: DANGER, WARNING, or CAUTION.
These signal words mean:
3DANGER
You WILL be KILLED or SERIOUSLY HURT if you don’t follow instructions.
3WARNING
You CAN be KILLED or SERIOUSLY HURT if you don’t follow instructions.
3CAUTION
You CAN be HURT if you don’t follow instructions.
Other important information is provided under the following titles:
NOTICE Information to help you avoid damage to your motorcycle, other property, or the environment.
 13 CBR500R-32MGZB000.book 4
Contents
Motorcycle Safety |
P. 2 |
|
Operation Guide |
P. 16 |
|
|
||
Maintenance |
P. 39 |
|
|
||
Troubleshooting |
P. 81 |
|
|
||
Information |
P. 101 |
|
|
||
Specifications |
P. 113 |
|
|
||
Index |
P. 116 |
|
|

 13 CBR500R-32MGZB000.book 2
Motorcycle Safety
This section contains important information for safe riding of your motorcycle. Please read this section carefully.
Safety Guidelines ......................................... |
P. 3 |
Safety Precautions ..................................... |
P. 10 |
Riding Precautions ..................................... |
P. 11 |
Accessories & Modifications...................... |
P. 14 |
Loading ....................................................... |
P. 15 |

 13 CBR500R-32MGZB000.book 3
Safety Guidelines
Follow these guidelines to enhance your safety:
●Perform all routine and regular inspections specified in this manual.
●Stop the engine and keep sparks and flame away before filling the fuel tank.
●Do not run the engine in enclosed or partly enclosed areas. Carbon monoxide in exhaust gases is toxic and can kill you.
Always Wear a Helmet
It’s a proven fact: helmets and protective apparel significantly reduce the number and severity of head and other injuries. So always wear an approved motorcycle helmet and protective apparel. 2 P. 10
Before Riding
Make sure that you are physically fit, mentally focused and free of alcohol and drugs. Check
Safety Guidelines
that you and your passenger are both wearing |
|
|
an approved motorcycle helmet and protective |
|
|
Motorcycle |
||
apparel. Instruct your passenger on holding |
||
|
||
onto the grab rails or your waist, leaning with |
|
|
you in turns, and keeping their feet on the |
|
|
footpegs, even when the motorcycle is stopped. |
Safety |
|
|
Take Time to Learn & Practice
Even if you have ridden other motorcycles, practice riding in a safe area to become familiar with how this motorcycle works and handles, and to become accustomed to the motorcycle’s size and weight.
Ride Defensively
Always pay attention to other vehicles around you, and do not assume that other drivers see you. Be prepared to stop quickly or perform an evasive maneuver.
continued 3

 13 CBR500R-32MGZB000.book 4
Safety Guidelines
Make Yourself Easy to See
Motorcycle |
Make yourself more visible, especially at night, |
|
|
||
|
by wearing bright reflective clothing, |
|
|
positioning yourself so other drivers can see |
|
Safety |
you, signaling before turning or changing lanes, |
|
and using your horn when necessary. |
||
|
Ride within Your Limits
Never ride beyond your personal abilities or faster than conditions warrant. Fatigue and inattention can impair your ability to use good judgement and ride safely.
Don’t Drink and Ride
Alcohol and riding don’t mix. Even one alcoholic drink can reduce your ability to respond to changing conditions, and your reaction time gets worse with every additional drink. Don’t drink and ride, and don’t let your friends drink and ride either.
4
Keep Your Honda in Safe Condition
It’s important to keep your motorcycle properly maintained and in safe riding condition. Inspect your motorcycle before every ride and perform all recommended maintenance. Never exceed load limits (2 P. 15), and do not modify your motorcycle or install accessories that would make your motorcycle unsafe (2 P. 14).
If You are Involved in a Crash
Personal safety is your first priority. If you or anyone else has been injured, take time to assess the severity of the injuries and whether it is safe to continue riding. Call for emergency assistance if needed. Also follow applicable laws and regulations if another person or vehicle is involved in the crash.
If you decide to continue riding, first evaluate the condition of your motorcycle. If the engine is still running, turn it off. Inspect for fluid leaks,
 13 CBR500R-32MGZB000.book 5
check the tightness of critical nuts and bolts, and check the handlebar, control levers, brakes, and wheels. Ride slowly and cautiously.
Your motorcycle may have suffered damage that is not immediately apparent. Have your motorcycle thoroughly checked at a qualified service facility as soon as possible.
Carbon Monoxide Hazard
Exhaust contains poisonous carbon monoxide, a colourless, odorless gas. Breathing carbon monoxide can cause loss of consciousness and may lead to death.
If you run the engine in confined or even partly enclosed area, the air you breathe could contain a dangerous amount of carbon monoxide.
Never run your motorcycle inside a garage or other enclosure.
Safety Guidelines
3WARNING
Carbon monoxide gas is toxic. Breathing it can cause unconsciousness and even kill you.
Avoid any areas or activities that expose you to carbon monoxide.
Safety Motorcycle
5
 13 CBR500R-32MGZB000.book 6
Safety Motorcycle
Image Labels
Image Labels
Except KO, II KO type
The following pages describe the label meanings. Some labels warn you of potential hazards that could cause serious injury. Others provide important safety information. Read this information carefully and don’t remove the labels.
If a label comes off or becomes hard to read, contact your dealer for a replacement.
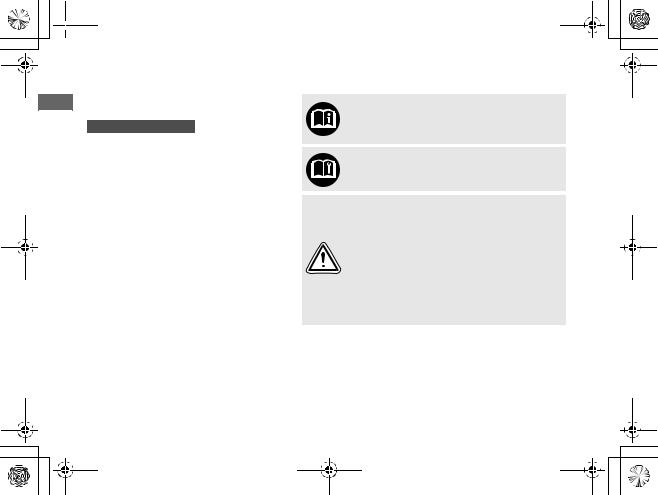
There is a specific symbol on each label. The meanings of each symbol and label are as follows.
Read instructions contained in Owner’s Manual carefully.
Read instructions contained in Shop Manual carefully. In the interest of safety, take the motorcycle to be serviced only by your dealer.
DANGER (with RED background)
You WILL be KILLED or SERIOUSLY HURT if you don’t follow instructions.
WARNING (with ORANGE background)
You CAN be KILLED or SERIOUSLY HURT if you don’t follow instructions.
CAUTION (with YELLOW background)
You CAN be HURT if you don’t follow instructions.
6
 13 CBR500R-32MGZB000.book 7
Image Labels
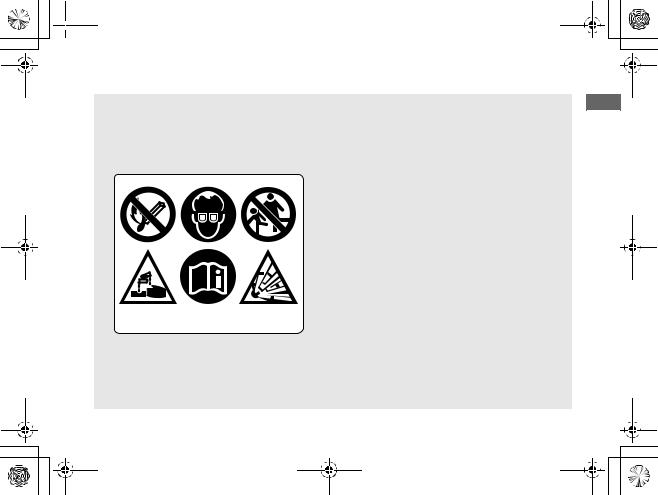
BATTERY LABEL
DANGER
•Keep flame and spark away from the battery. Battery produce explosive gas that can cause explosion.
•Wear the eye protection and rubber gloves when handling the battery, or you can get burned or lose your eyesight by the battery electrolyte.
•Do not allow children and other people to touch a battery unless they understand proper handling and hazards of the battery very well.
•Handle the battery electrolyte with extreme care as it contains dilute sulfuric acid. Contact with your skin or eyes can burn you or cause loss of your eyesight.
•Read this manual carefully and understand it before handling the battery. Neglect of the instructions can cause personal injury and damage to the motorcycle.
•Do not use a battery with the electrolyte at or below the lower level mark. It can explode causing serious injury.
continued
Safety Motorcycle
7
 13 CBR500R-32MGZB000.book 8
Image Labels
Safety Motorcycle
8
RADIATOR CAP LABEL
Except U, II U type
DANGER
NEVER OPEN WHEN HOT. Hot coolant will scald you.
Relief pressure valve begins to open at 1.1 kgf/cm2.
ACCESSORIES AND LOADING WARNING LABEL
Except U, II U type
WARNING
ACCESSORIES AND LOADING
•The safety stability and handling of this motorcycle may be affected by the addition of accessories and luggage.
•Read carefully the instructions contained in user’s manual and installation guide before installing any accessory.
•The total weight of accessories and luggage added to rider’s and passenger’s weight should not exceed 182 kg (401 lb), which is the maximum weight capacity.
•The luggage weight must not exceed 11 kg (24 lb) under any circumstances.
•The fitting of large fork-mounted or large handlebar mounted fairing is not recommended.

 13 CBR500R-32MGZB000.book 9
Image Labels
TYRE INFORMATION LABEL
Cold tyre pressure: [Driver only]
Front 250 kPa (2.50 kgf/cm2, 36 psi)
Rear 290 kPa (2.90 kgf/cm2, 42 psi)
[Driver and passenger]
Front 250 kPa (2.50 kgf/cm2, 36 psi)
Rear 290 kPa (2.90 kgf/cm2, 42 psi)
|
Tyre size: |
|
|
|
Front |
120/70ZR17M/C (58W) |
|
|
Rear |
160/60ZR17M/C (69W) |
|
|
Tyre brand: |
DUNLOP |
METZELER |
|
Front |
D222F |
ROADTEC Z8 INTERACT E |
|
Rear |
D222 |
ROADTEC Z8 INTERACT |
|
|
|
|
SAFETY REMINDER LABEL
For your protection, always wear helmet, protective apparel.
FUEL LABEL
Unleaded petrol only
DRIVE CHAIN LABEL
Keep chain adjusted and lubricated.
35 to 45 mm (1.0 to 1.2 in) Freeplay
Safety Motorcycle
9

 13 CBR500R-32MGZB000.book 10
Safety Precautions
Safety Precautions
Motorcycle |
● Ride cautiously and keep your hands on the |
|
|
||
|
handlebars and feet on the footpegs. |
|
|
● Keep passenger’s hands onto the grab rails, |
|
Safety |
passenger’s feet on the footpegs while |
|
riding. |
||
|
||
|
● Always consider the safety of your passenger, |
|
|
as well as other drivers and riders. |
Protective Apparel
Make sure that you and any passenger are wearing an approved motorcycle helmet, eye protection, and high-visibility protective clothing. Ride defensively in response to weather and road conditions.
Helmet
Safety-standard certified, high-visibility, correct size for your head
● Must fit comfortably but securely, with the chin strap fastened
10
●Face shield with unobstructed field of vision or other approved eye protection
3WARNING
Not wearing a helmet increases the chance of serious injury or death in a crash.
Make sure that you and any passenger always wear an approved helmet and protective apparel.
Gloves
Full-finger leather gloves with high abrasion resistance
Boots or Riding Shoes
Sturdy boots with non-slip soles and ankle protection
Jacket and Trousers
Protective, highly visible, long-sleeved jacket and durable trousers for riding (or a protective suit).
 13 CBR500R-32MGZB000.book 11
Riding Precautions
Running-in Period
During the first 500 km (300 miles) of running, follow these guidelines to ensure your motorcycle’s future reliability and performance.
●Avoid full-throttle starts and rapid acceleration.
●Avoid hard braking.
●Ride conservatively.
Riding Precautions
Brakes
Observe the following guidelines: |
Motorcycle |
|
|
● Avoid excessively hard braking and sudden |
|
shifting to a lower gear. |
|
uSudden braking can reduce the |
Safety |
uWhere possible, reduce speed before |
|
motorcycle’s stability. |
|
turning; otherwise you risk wheel slippage. |
|
● Exercise caution on low traction surfaces. |
|
uThe wheels lock more easily on such |
|
surfaces, and braking distances are longer. |
|
● Avoid continuous braking. |
|
uRepeated braking can overheat the brakes, |
|
reducing their effectiveness. |
|
continued 11

 13 CBR500R-32MGZB000.book 12
Safety Motorcycle
12
Riding Precautions
Anti-lock Brake System (ABS)
CBR500RA only
This model is equipped with an Anti-lock Brake System (ABS) designed to help prevent the brakes from locking up during hard braking.
●ABS does not reduce braking distance. In certain circumstances, ABS may result in a longer stopping distance.
●ABS does not function at speeds below 10 km/h (6 mph).
●The brake lever and pedal may recoil slightly when applying the brakes. This is normal.
●Always use the recommended tyres to ensure correct ABS operation.
Engine Braking
Engine braking helps slow your motorcycle down when you release the throttle. For further slowing action, downshift to a lower gear. Use engine braking with intermittent use of the brakes to reduce speed when descending long, steep slopes.
Wet or Rainy Conditions
Road surfaces are slippery when wet, and wet brakes further reduce braking efficiency. Exercise extra caution when braking in wet conditions.
If the brakes get wet, apply the brakes while riding at low speed to help them dry.

 13 CBR500R-32MGZB000.book 13
Parking
●Park on a firm, level paved surface.
●If you must park on a slight incline or loose surface, park so that the motorcycle cannot move or fall over.
●Make sure that high-temperature parts cannot come into contact with flammable materials.
●Do not touch the engine, muffler, brakes and other high-temperature parts until they cool down.
●To reduce the likelihood of theft, always lock the handlebars and remove the key when leaving the motorcycle unattended.
Use of an anti-theft device is also recommended.
Parking with the Side Stand
1.Stop the engine.
2.Push the side stand down.
|
Riding Precautions |
|
|
3. |
Slowly lean the motorcycle to the left until its |
|
|
|
|||
|
weight rests on the side stand. |
|
|
4. |
Motorcycle |
||
Turn the handlebars fully to the left. |
|||
|
|||
|
uTurning the handlebars to the right |
|
|
|
reduces stability and may cause the |
|
|
|
motorcycle to fall. |
Safety |
|
5. |
Turn the ignition switch to the LOCK position |
||
|
and remove the key. 2 P. 33
Refuelling and Fuel Guidelines
Follow these guidelines to protect the engine and catalytic converter:
●Use only unleaded petrol.
●Use recommended octane number. Using lower octane petrol will result in decreased engine performance.
●Do not use fuels containing a high concentration of alcohol. 2 P. 105
●Do not use stale or contaminated petrol or an oil/petrol mixture.
●Avoid getting dirt or water in the fuel tank.
13

 13 CBR500R-32MGZB000.book 14
Safety Motorcycle
14
Accessories & Modifications
Accessories &
Modifications
We strongly advise that you do not add any accessories that were not specifically designed for your motorcycle by Honda or make modifications to your motorcycle from its original design. Doing so can make it unsafe. Modifying your motorcycle may also void your warranty and make your motorcycle illegal to operate on public roads and highways. Before deciding to install accessories on your motorcycle be certain the modification is safe and legal.
3WARNING
Improper accessories or modifications can cause a crash in which you can be seriously hurt or killed.
Follow all instructions in this owner’s manual regarding accessories and modifications.
Do not pull a trailer with, or attach a sidecar to, your motorcycle. Your motorcycle was not designed for these attachments, and their use can seriously impair your motorcycle’s handling.
 13 CBR500R-32MGZB000.book 15
Loading
●Carrying extra weight affects your motorcycle’s handling, braking and stability. Always ride at a safe speed for the load you are carrying.
●Avoid carrying an excessive load and keep within specified load limits.
2 Maximum weight capacity / Maximum luggage weight P. 113
●Tie all luggage securely, evenly balanced and close to the centre of the motorcycle.
●Do not place objects near the lights or the muffler.
Loading |
|
||
|
|
|
|
3WARNING |
|
|
|
Motorcycle |
|||
hurt or killed. |
|
||
Overloading or improper loading can |
|
|
|
cause a crash and you can be seriously |
|
|
|
Follow all load limits and other |
|
Safety |
|
loading guidelines in this manual. |
|
|
|
|
|
|
|
15

 13 CBR500R-32MGZB000.book 16
Guide Operation
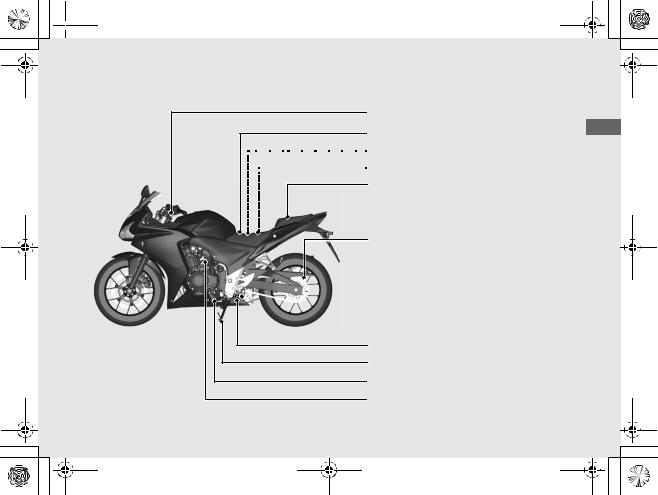
Parts Location
Tool kit (P38)
Document bag (P37)
Side cover (P58)
Fuel fill cap (P36)
 Front brake fluid reservoir (P67)
Front brake lever
Throttle grip (P77)
Engine oil fill cap (P61)
Engine oil level inspection window (P61)


 Engine oil filter (P64) Engine oil drain bolt (P63)
Rear brake pedal
Main fuse (P99)
Rear brake fluid reservoir (P67)
16
 13 CBR500R-32MGZB000.book 17
Clutch lever (P74)
Front Seat (P57)


 Battery (P60)


 Fuse box (P99)
Rear Seat (P56)
Drive chain (P70)

 Rear suspension spring preload adjuster (P79)
Coolant reserve tank (P65)
Side stand (P69)
Shift lever (P35)
Crankcase breather (P78)
Guide Operation
17
 13 CBR500R-32MGZB000.book 18
Instruments
Guide Operation
SEL button |
SET button |
Display Check
When the ignition switch is turned on, all the mode and digital segments will show, and the tachometer segment progress to maximum scale and then disappear.
If any part of these displays does not come on when it should, have your dealer check for problems.
18

 13 CBR500R-32MGZB000.book 19
Speedometer |
|
|
|
Tachometer |
|
|
NOTICE
Do not operate the engine in the tachometer red zone. Excessive engine speed can adversely affect engine life.
Tachometer red zone
(excessive engine rpm range)
Clock (12-hour display)
To set the clock: (P25)
Fuel gauge
Remaining fuel when only 1st (E) segment starts flashing: approximately 2.8 litres (0.74 US gal, 0.62 Imp gal)
If the fuel gauge indicators repeat flashing or turned off: (P86)
Guide Operation
continued 19

 13 CBR500R-32MGZB000.book 20
Instruments (Continued)
Guide Operation
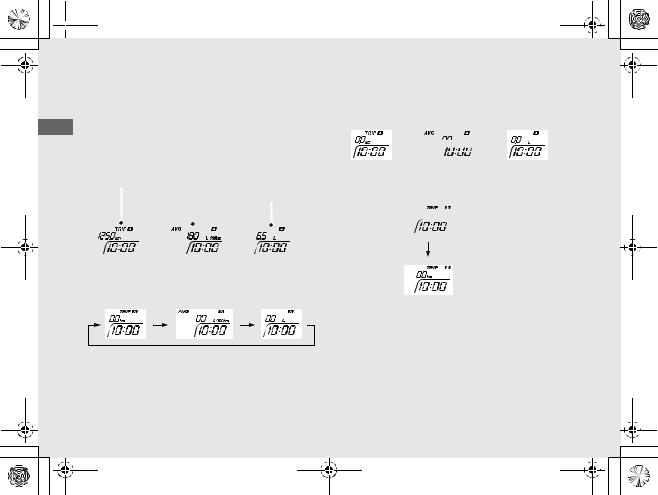
Odometer [TOTAL] & Tripmeter [TRIP A/B] & Fuel mileage meter & Fuel consumption meter
SEL button selects the odometer, tripmeter A, tripmeter B, current fuel mileage, average fuel mileage and fuel consumption.
uTo reset the tripmeter: (P22)
Odometer Tripmeter A Tripmeter B Current fuel |
Average fuel |
Fuel |
||||||||
|
|
|
|
|
mileage |
mileage |
consumption |
|||
|
|
|
|
|
|
|
|
|
|
|
|
|
|
|
|
|
|
|
|
|
|
|
|
|
|
|
|
|
|
|
|
|
|
|
|
|
|
|
|
|
|
|
|
Reserve fuel consumption (P23)
20
 13 CBR500R-32MGZB000.book 21
The average fuel mileage and fuel consumption will be based on tripmeter A.
•Current fuel mileage:
Current instant fuel mileage. If your speed is less than 7 km/h (5 mph), “
 ” is displayed. When “
 ” is displayed at speeds above 7 km/h (5 mph), go to your dealer for service.
•Average fuel mileage:
Average fuel mileage since tripmeter A was reset. When “
 ” is displayed, go to your dealer for service.
•Fuel consumption:
Total fuel consumption since tripmeter A was reset. When “
 ” displayed, go to your
dealer for service.
uTo reset the average fuel mileage and fuel consumption: (P22)
continued
Guide Operation
21
 13 CBR500R-32MGZB000.book 22
Guide Operation
Instruments (Continued)
To reset the tripmeter, average fuel mileage and fuel consumption
!a To reset tripmeter A, average fuel mileage, and fuel consumption together, press and
|
hold SET button. |
|
|
|
|
||||
Tripmeter A Average |
Fuel |
||||||||
|
|
|
|
fuel |
consumption |
||||
|
|
|
|
mileage |
|
|
|
|
|
|
|
|
|
|
|
|
|
||
|
|
|
|
|
|
|
|
|
|
|
|
|
|
|
|
|
|
|
|
|
|
|
or |
|
|
or |
|
|
|
|
|
|
|
|
|
|
|
|
|
!b When they are reset, “0.0” is displayed at each indication.
!c Then, the display returns to the last selected indication.
or  or
or
!d To reset tripmeter B, press and hold SET button with tripmeter B displayed.
 Tripmeter B
Also, the tripmeter A, average fuel mileage, and fuel consumption will automatically reset by refuelling more than the reserve amount and riding your motorcycle for 0.1 km (0.06 mile).
You can activate or deactivate the automatic reset mode by refuelling. (P27)
22

 13 CBR500R-32MGZB000.book 23
Reserve fuel consumption display
When the 1st (E) segment of the fuel gauge starts flashing, the odometer & tripmeter & fuel mileage meter & fuel consumption meter switches to the reserve fuel consumption. You should refill the tank as soon as possible.
Reserve fuel consumption display
•Flashes from “0.0” L (litre) or gal (US gal). uWhen the amount of consumed fuel is
more than 1.0 litre (0.26 US gal, 0.22 Imp gal) the display blinks faster.
uIf you change the display to odometer, tripmeter, fuel mileage meter and fuel consumption meter and so on (P20), it will automatically return to the reserve fuel consumption display if the buttons are not pressed after for about 10 seconds.
After refuelling more than the reserve amount, the display returns to normal when your motorcycle travel 0.1 km (0.06 mile).
continued
Guide Operation
23
 13 CBR500R-32MGZB000.book 24
Guide Operation
Instruments (Continued)
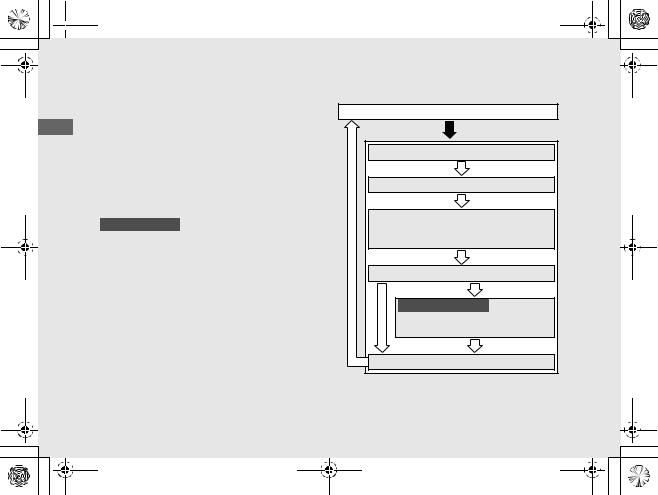
Display Setting
Following items to change sequentially.
•Clock setting
•Backlight brightness adjustment
•Activating/deactivating of tripmeter A, average fuel mileage and fuel consumption automatic reset mode
•Setting of HISS indicator
•E, II E type only Changing of speed and mileage unit
•Changing of fuel mileage meter unit
Ordinary display
Clock setting
Backlight brightness adjustment
Activating/deactivating of tripmeter A, average fuel mileage and fuel consumption automatic reset mode
Setting of HISS indicator
E, II E type only
Changing of speed and mileage unit
Changing of fuel mileage meter unit
 Press and hold SEL button and SET button
  Press SET button
24
 13 CBR500R-32MGZB000.book 25
In addition, to move the ordinary display at display setting.
•The button is not pressed for about 30 seconds
•Turn the ignition switch off and then on
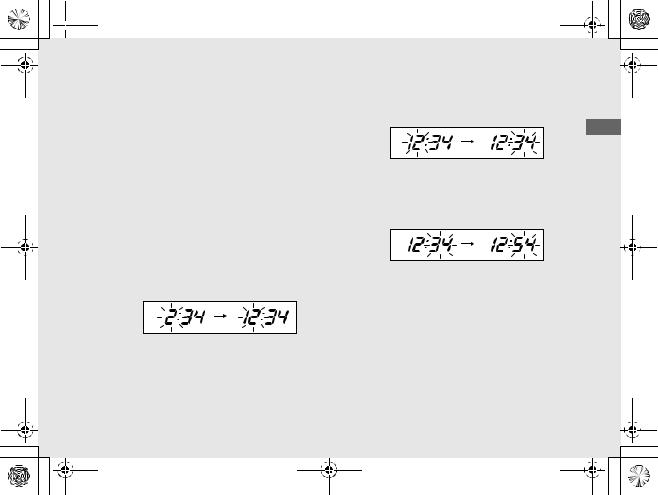
1 To set the clock:
!a Turn the ignition switch to ON.
!b Press and hold SEL button and SET button, the hour digits start flashing.
!c Press SEL button until the desired hour is displayed.
u Press and hold to advance the hour fast.
!d Press SET button. The minute digits start flashing.
!e Press SEL button until the desired minute is displayed.
uPress and hold to advance the minute fast.
!f Press SET button. The clock is set, and then the display moves to the backlight brightness adjustment.
continued
Guide Operation
25

 13 CBR500R-32MGZB000.book 26
Guide Operation
Instruments (Continued)
2 Backlight brightness adjustment:
You can adjust the brightness to five levels.
!a Press SEL button. The brightness is switched.
!b Press SET button. The backlight is set, and then the display moves to activating/ deactivating of tripmeter A, average fuel mileage and fuel consumption automatic reset mode.
26

 13 CBR500R-32MGZB000.book 27
3 To activate/deactivate of tripmeter A, average fuel mileage and fuel consumption automatic reset mode:
You can also activate or deactivate the automatic reset mode by refuelling after 1st
(E) segment of the fuel gauge starts flashing. Deactivation is initially set.
!a Press SEL button to select “ 

 ” (activate) or “

 ” (deactivate) in the automatic reset mode.
!b To end the selection, press SET button. The activation/deactivation of automatic reset mode is set, and then the display moves to the on/off of blinks of HISS indicator (HISS indicator comes on).
continued
Guide Operation
27
Loading...