


10/11/05 11:18:54 32KYJE00_001
Honda CBR250R/RA
OWNER’S MANUAL
 Honda Motor Co., Ltd. 2010

10/11/05 11:18:58 32KYJE00_002
IMPORTANT INFORMATION
 OPERATOR AND PASSENGER
This motorcycle is designed to carry the operator and one passenger. Never exceed the maximum weight capacity.
 ON-ROAD USE
This motorcycle is designed to be used only on the road.
 READ THIS OWNER’S MANUAL CAREFULLY
Pay special attention to the safety messages that appear throughout the manual. These messages are fully explained in the ‘‘A Few Words About Safety’’ section which appears before the Contents page.
This manual should be considered a permanent part of the motorcycle and should remain with the motorcycle when resold.

10/11/05 11:19:01 32KYJE00_003
Honda CBR250R/RA
OWNER’S MANUAL
All information in this publication is based on the latest production information available at the time of approval for printing. Honda Motor Co.,Ltd. reserves the right to make changes at any time without notice and without incurring any obligation.
No part of this publication may be reproduced without written permission.

10/11/05 11:19:07 32KYJE00_004
WELCOME
The motorcycle presents you a challenge to master the machine, a challenge to adventure. You ride through the wind, linked to the road by a vehicle that responds to your commands as no other does. Unlike an automobile, there is no metal cage around you. Like an airplane, a pre-ride inspection and regular maintenance are essential to your safety. Your reward is freedom.
To meet the challenges safely, and to enjoy the adventure fully, you should become thoroughly familiar with this owner’s manual BEFORE YOU RIDE THE MOTORCYCLE.
As you read this manual, you will find information that is preceded by a 


 symbol. This information is intended to help you avoid damage to your motorcycle, other property, or the environment.
When service is required, remember that your Honda dealer knows your motorcycle best. If you have the required mechanical ‘‘know-how’’ and tools, your dealer can supply you with an official Honda Shop Manual to help you perform many maintenance and repair tasks.
Pleasant riding, and thank you for choosing a Honda !
10/11/05 11:19:10 32KYJE00_005
 The following code in this manual indicates the country.
  The illustrations herein are based on the CBR250RA type.
MA Malaysia
 The specifications may vary with each locale.

10/11/05 11:19:14 32KYJE00_006
A FEW WORDS ABOUT SAFETY
Your safety, and the safety of others, is very important. And operating this motorcycle safely is an important responsibility.
To help you make informed decisions about safety, we have provided operating procedures and other information on labels and in this manual. This information alerts you to potential hazards that could hurt you or others.
Of course, it is not practical or possible to warn you about all hazards associated with operating or maintaining a motorcycle. You must use your own good judgment.
You will find important safety information in a variety of forms, including:
 Safety Labels –– on the motorcycle.
 Safety Messages –– preceded by a safety alert symbol
  and one of three signal words:
DANGER, WARNING, or CAUTION.
These signal words mean:
10/11/05 11:19:18 32KYJE00_007
You WILL be KILLED or SERIOUSLY HURT if you don’t follow instructions.
You CAN be KILLED or SERIOUSLY HURT if you don’t follow instructions.
You CAN be HURT if you don’t follow instructions.
 Safety Headings –– such as Important Safety Reminders or Important Safety Precautions.
 Safety Section –– such as Motorcycle Safety.
 Instructions –– how to use this motorcycle correctly and safely.
This entire manual is filled with important safety information –– please read it carefully.

10/11/05 11:19:31 32KYJE00_008
OPERATION
page |
page |
||
1 |
MOTORCYCLE SAFETY |
43 |
ESSENTIAL INDIVIDUAL |
1 |
IMPORTANT SAFETY |
43 |
COMPONENTS |
|
INFORMATION |
IGNITION SWITCH |
|
2 |
PROTECTIVE APPAREL |
44 |
RIGHT HANDLEBAR CONTROLS |
4 |
LOAD LIMITS AND GUIDELINES |
45 |
LEFT HANDLEBAR CONTROLS |
8 |
IMAGE LABELS |
|
|
10 PARTS LOCATION
13INSTRUMENTS AND INDICATORS
26MAJOR COMPONENTS
(Information you need to operate this motorcycle)
26SUSPENSION
27BRAKES
29 |
CLUTCH |
31 |
COOLANT |
33 |
FUEL |
36ENGINE OIL
37TUBELESS TYRES

10/11/05 11:19:42 32KYJE00_009
page |
page |
||
46 |
FEATURES |
55 |
OPERATION |
46 |
(Not required for operation) |
55 |
PRE-RIDE INSPECTION |
STEERING LOCK |
56 |
STARTING THE ENGINE |
|
47 |
SEAT |
59 |
RUNNING-IN |
49 |
HELMET HOLDER |
60 |
RIDING |
50 |
DOCUMENT BAG |
62 |
BRAKING |
51 |
STORAGE COMPARTMENT FOR |
65 |
PARKING |
52 |
U-SHAPED ANTI-THEFT LOCK |
66 |
ANTI-THEFT TIPS |
RIGHT UNDER COWL |
|
|
|
54HEADLIGHT AIM VERTICAL ADJUSTMENT

10/11/05 11:19:59 32KYJE00_010
MAINTENANCE
page |
|
page |
||
67 |
MAINTENANCE |
102 |
BATTERY |
|
67 |
|
THE IMPORTANCE OF |
104 |
FUSE REPLACEMENT |
|
|
MAINTENANCE |
108 |
BRAKELIGHT SWITCH |
68 |
|
MAINTENANCE SAFETY |
|
ADJUSTMENT |
69 |
|
SAFETY PRECAUTIONS |
109 |
BULB REPLACEMENT |
70 |
|
MAINTENANCE SCHEDULE |
115 |
CLEANING |
73 |
|
TOOL KIT |
||
74 |
|
SERIAL NUMBERS |
119 |
STORAGE GUIDE |
76 |
|
AIR CLEANER |
||
78 |
|
CRANKCASE BREATHER |
119 |
STORAGE |
79 |
|
ENGINE OIL |
121 |
REMOVAL FROM STORAGE |
84 |
|
THROTTLE OPERATION |
122 |
TAKING CARE OF THE |
85 |
|
COOLANT |
||
86 |
|
DRIVE CHAIN |
|
UNEXPECTED |
92 |
|
DRIVE CHAIN SLIDER |
123 |
SPECIFICATIONS |
93 |
|
FRONT AND REAR SUSPENSION |
||
94 |
|
INSPECTION |
127 |
CATALYTIC CONVERTER |
|
SIDE STAND |
|||
95 |
|
WHEEL REMOVAL |
|
|
100 |
|
BRAKE PAD WEAR |
|
|
10/11/05 11:20:07 32KYJE00_011
MOTORCYCLE SAFETY
IMPORTANT SAFETY INFORMATION
Your motorcycle can provide many years of service and pleasure if you take responsibility for your own safety and understand the challenges that you can meet on the road.
There is much that you can do to protect yourself when you ride. You’ll find many helpful recommendations throughout this manual. Following are a few that we consider to be most important.
Always Wear a Helmet
It’s a proven fact: helmets significantly reduce the number and severity of head injuries. So always wear an approved motorcycle helmet and make sure your passenger does the same. We also recommend that you wear eye protection, sturdy boots, gloves, and other protective gear (page 2 ).
Make Yourself Easy to See
Some drivers do not see motorcycles because they are not looking for them. To make yourself more visible, wear bright reflective clothing, position yourself so other drivers can see you, signal before turning or changing lanes, and use your horn when it will help others notice you.
Ride Within Your Limits
Pushing the limits is another major cause of motorcycle crashes. Never ride beyond your personal abilities or faster than conditions warrant. Remember that alcohol, drugs, f atigue and inattention can significantly reduce your ability to make good judgements and ride safely.
1
10/11/05 11:20:12 32KYJE00_012
Don’t Drink and Ride
Alcohol and riding don’t mix. Even one drink can reduce your ability to respond to changing conditions, and your reaction time gets worse with every additional drink. So don’t drink and ride, and don’t let your friends drink and ride either.
Keep Your Bike in Safe Condition
For safe riding, it’s important to inspect your motorcycle before every ride and perform all recommended maintenance. Never exceed load limits, and only use accessories that have been approved by Honda for this motorcycle. See page 4 for more details.
2
PROTECTIVE APPAREL
For your safety, we strongly recommend that you always wear an approved motorcycle helmet, eye protection, boots, gloves, trousers, and a long-sleeved shirt or jacket whenever you ride. Although complete protection is not possible, wearing proper gear can reduce the chance of injury when you ride.
Following are suggestions to help you choose proper gear.
Not wearing a helmet increases the chance of serious injury or death in a crash.
Be sure you and your passenger always wear a helmet, eye protection and other protective apparel when you ride.
10/11/05 11:20:17 32KYJE00_013
Helmets and Eye Protection
Your helmet is your most important piece of riding gear because it offers the best protection against head injuries. A helmet should fit your head comfortably and securely. A bright-coloured helmet can make you more noticeable in traffic, as can reflective strips.
An open-face helmet offers some protection, but a full-face helmet offers more. Always wear a face shield or goggles to protect your eyes and help your vision.
Additional Riding Gear
In addition to a helmet and eye protection, we also recommend:
 Sturdy boots with non-slip soles to help protect your feet and ankles.
 Leather gloves to keep your hands warm and help prevent blisters, cuts, burns and bruises.
 A motorcycle riding suit or jacket for comfort as well as protection. Brightcoloured and reflective clothing can help make you more noticeable in traffic. Be sure to avoid loose clothes that could get caught on any part of your motorcycle.
3

10/11/05 11:20:22 32KYJE00_014
LOAD LIMITS AND GUIDELINES
Your motorcycle has been designed to carry you and one passenger. When you carry a passenger, you may feel some difference during acceleration and braking. But so long as you keep your motorcycle wellmaintained, with good tyres and brakes, you can safely carry loads within the given limits and guidelines.
However, exceeding the weight limit or carrying an unbalanced load can seriously affect your motorcycle’s handling, braking and stability. Non-Honda accessories, impr oper modif ica t ions, a nd poor maintenance can also reduce your safety margin.
The following pages give more specific information on loading, accessories and modifications.
4
Loading
How much weight you put on your motorcycle, and how you load it, are important to your safety. Anytime you ride with a passenger or cargo you should be aware of the following information.
Overloading or improper loading can cause a crash and you can be seriously hurt or killed.
Follow all load limits and other loading guidelines in this manual.

10/11/05 11:20:28 32KYJE00_015
Load Limits |
Loading Guidelines |
Following are the load limits for your |
Your motorcycle is primarily intended for |
motorcycle: |
transporting you and a passenger. You may |
Maximum weight capacity: |
wish to secure a jacket or other small items |
140 kg (309 lb) |
to the seat when you are not riding with a |
Includes the weight of the rider, |
passenger. |
|
|
passenger, all cargo and all accessories |
If you wish to carry more cargo, check with |
|
your dealer for advice, and be sure to read |
|
the information regarding accessories on |
|
page 6 . |
|
Improperly loading your motorcycle can |
|
affect its stability and handling. Even if your |
|
motorcycle is properly loaded, you should |
|
ride at reduced speeds whenever carrying |
|
cargo. |
5
10/11/05 11:20:33 32KYJE00_016
Follow these guidelines whenever you carry a passenger or cargo:
 Check that both tyres are properly inflated (page 37 ).
 To prevent loose items from creating a hazard, make sure that all cargo is securely tied down before you ride away.
 Place cargo weight as close to the center of the motorcycle as possible.
 Balance cargo weight evenly on both sides.
6
Accessories and Modifications
Modifying your motorcycle or using nonHonda accessories can make your motorcycle unsafe. Before you consider making any modifications or adding an accessory, be sure to read the following information.
Improper accessories or modifications can cause a crash in which you can be seriously hurt or killed.
Follow all instructions in this owner’s manual regarding accessories and modifications.

10/11/05 11:20:39 32KYJE00_017
Accessories
We strongly recommend that you use only Honda Genuine Accessories that have been specifically designed and tested for your motorcycle. Because Honda cannot test all other accessories, you must be personally responsible for proper selection, installation and use of non-Honda accessories. Check with your dealer for assistance and always follow these guidelines:
 Make sure the accessory does not obscure any lights, reduce ground clearance and banking angle, limit suspension travel or steering travel, alter your riding position or interfere with operating any controls.
 Be sure electrical equipment does not exceed the motorcycle’s electrical system capacity (page 126 ). A blown fuse can cause a loss of lights or engine power.
 Do not pull a trailer or sidecar with your motorcycle. This motorcycle was not designed for these attachments, and their use can seriously impair your motorcycle’s handling.
Modifications
We strongly advise you not to remove any original equipment or modif y your motorcycle in any way that would change its design or operation. Such changes could seriously impair your motorcycle’s handling, stability and braking, making it unsafe to ride.
Removing or modifying your lights, mufflers, emission control system or other equipment can also make your motorcycle illegal.
7

10/11/05 11:20:42 32KYJE00_018
IMAGE LABELS
The following pages describe the label meanings. Some labels warn you of potential hazards that could cause serious injury. Others provide important safety information. Read this information carefully and don’t remove the labels.
If a label comes off or becomes hard to read, contact your dealer for a replacement.
8
There is a specific symbol on each label. The meanings of each symbol and label are as follows.
10/11/05 11:20:53 32KYJE00_019
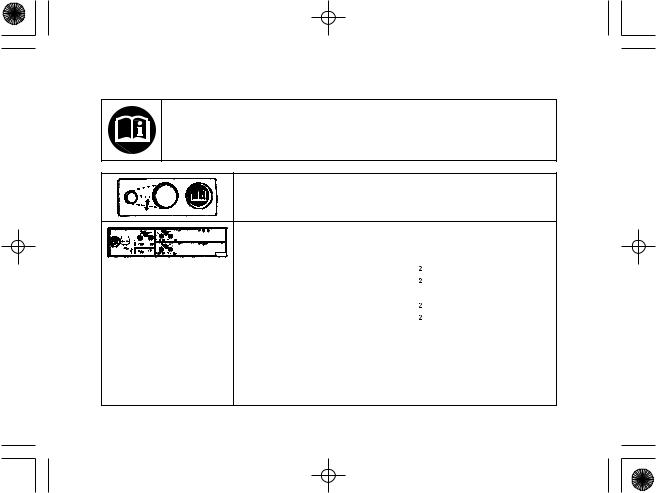
Read instructions contained in Owner’s Manual carefully.
DRIVE CHAIN LABEL
Keep chain adjusted and lubricated.
20 30 mm ( 0.8 1.2 in) Freeplay
TYRE INFORMATION LABEL |
|
|
Cold tyre pressure: |
|
|
[Driver only] |
|
|
Front |
200 kPa (2.00 kgf/cm |
, 29 psi) |
Rear |
200 kPa (2.00 kgf/cm |
, 29 psi) |
[Driver and passenger] |
|
|
Front |
200 kPa (2.00 kgf/cm |
, 29 psi) |
Rear |
225 kPa (2.25 kgf/cm |
, 33 psi) |
Tyre size: |
|
|
Front |
110/70 17M/C 54S |
|
Rear |
140/70 17M/C 66S |
|
Tyre brand: IRC |
|
|
Front |
RX 01FD |
|
Rear |
RX 01RZ |
|
9
10/11/05 11:20:58 32KYJE00_020
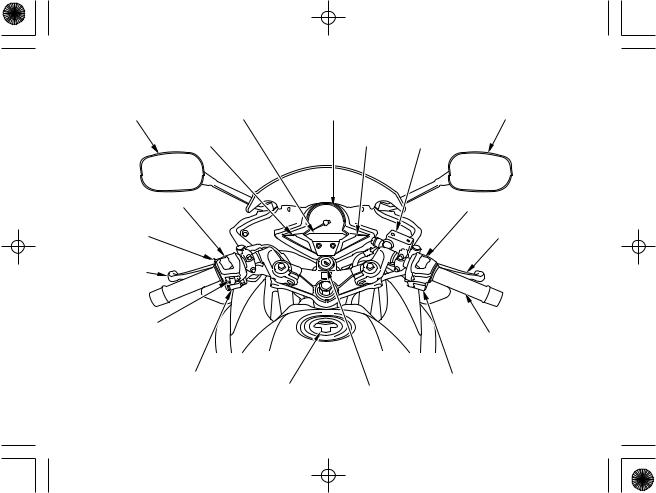
PARTS LOCATION
Rearview mirror |
Multi-function display |
Tachometer |
Rearview mirror |
|
Indicators |
Indicators |
Front brake |
|
fluid reservoir |
Headlight dimmer |
Engine stop switch |
switch |
|
Passing light |
Front brake lever |
|
|
control switch |
|
Clutch lever |
|
Turn signal switch
Throttle grip
Horn button |
Start button |
Fuel fill cap |
Ignition switch |
10

10/11/05 11:21:01 32KYJE00_021
Document compartment |
Battery |
Rear brake fluid reservoir |
Tool kit |
|
|
Main fuse
ABS motor fuseCBR250RA
|
Footpeg |
Coolant reserve tank |
|
|
|
|
Engine oil |
Passenger footpeg |
Rear brake pedal |
inspection window Engine oil fill cap |
|
|
|
|
11 |

10/11/05 11:21:04 32KYJE00_022
Fuse box |
Helmet holder |
Shift lever |
Side stand |
Footpeg |
Passenger footpeg |
Seat lock |
12
10/11/05 11:21:09 32KYJE00_023
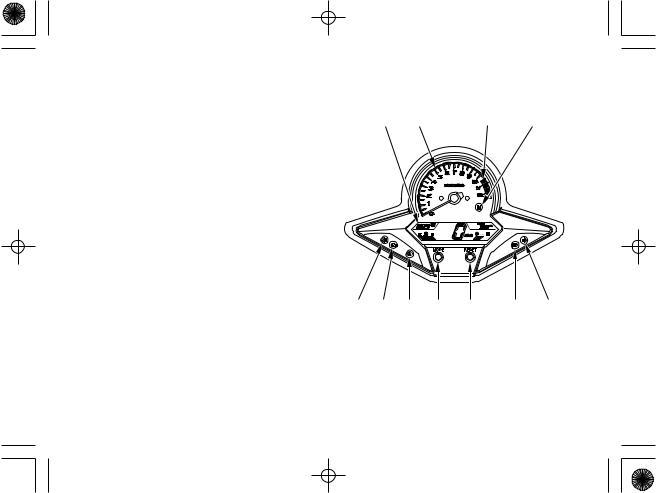
INSTRUMENTS AND INDICATORS
The indicators are contained in the instrument panel. Their functions are described in the tables on the following pages.
(1)Multi-function display
(2)Tachometer
(3)Tachometer red zone
(4)Neutral indicator
(5)Right turn signal indicator
(6)High beam indicator
(7)RESET button
(8)MODE button
(9)PGM-FI malfunction indicator lamp (MIL)
(10)Left turn signal indicator
(11)Anti-lock Brake System (ABS) indicator (CBR250RA)
(1) |
(2) |
(3) |
(4) |
(10) |
(9) |
(11) |
(8) |
(7) |
(6) |
(5) |
13

10/11/05 11:21:22 32KYJE00_024
|
(Ref.No.) Description |
Function |
|
(1) |
|
Multi-function display |
The display includes the following functions; |
|
|
|
This display shows the initial display (page 17 ). |
|
|
|
|
|
|
Speedometer |
Shows riding speed (page 19 ). |
|
|
|
|
|
|
Odometer |
Shows accumulated mileage (page 19 ). |
|
|
|
|
|
|
Tripmeter |
Shows mileage per trip (page 19 ). |
|
|
|
|
|
|
Coolant temperature |
Shows coolant temperature (page 20 ). |
|
|
gauge |
|
|
|
|
|
|
|
Fuel gauge |
Shows approximate fuel supply available (page 22 ). |
|
|
|
|
|
|
Digital clock |
Shows hour and minute (page 24 ). |
|
|
|
|
(2) |
|
Tachometer |
Shows engine revolutions per minute. |
|
|
|
The tachometer needle will swing to the maximum |
|
|
|
scale on the dial once when the ignition switch is |
|
|
|
turned ON. |
|
|
|
|
14
10/11/05 11:21:31 32KYJE00_025
(Ref.No.) Description |
|
|
|
|
|
|
|
|
|
|
|
Function |
|
(3) |
Tachometer red zone |
|
Never allow the tachometer needle to enter the red |
||||||||||
|
|
|
zone, even after the engine has been broken in. |
||||||||||
|
|
|
|
|
|
|
|
|
|
|
|
||
|
|
|
Running the engine beyond recommended maximum |
||||||||||
|
|
|
engine speed (the beginning of the tachometer red |
||||||||||
|
|
|
zone) can damage the engine. |
||||||||||
|
|
|
|
|
|
|
|
|
|
|
|
|
|
(4) |
Neutral indicator |
|
Lights when the transmission is in neutral. |
||||||||||
|
(green) |
|
|
|
|
|
|
|
|
|
|
|
|
|
|
|
|
|
|
|
|
|
|
|
|
|
|
(5) |
Right turn signal indicator |
|
Flashes when the right turn signal operates. |
||||||||||
|
(green) |
|
|
|
|
|
|
|
|
|
|
|
|
|
|
|
|
|
|
|
|
|
|
|
|
|
|
(6) |
High beam indicator |
|
Lights when the headlight is on high beam. |
||||||||||
|
(blue) |
|
|
|
|
|
|
|
|
|
|
|
|
|
|
|
|
|
|
|
|
|
|
|
|
|
|
(7) |
RESET button |
|
This button is used to reset the tripmeter (page 19 ) |
||||||||||
|
|
|
or to set the digital clock (page 24 ). |
||||||||||
|
|
|
|
|
|
|
|
|
|
|
|
|
|
15

10/11/05 11:21:39 32KYJE00_026
|
(Ref.No.) Description |
Function |
(8) |
MODE button |
This button is used to select the odometer and |
|
|
tripmeter (page 19 ) or to set the digital clock (page |
|
|
24 ). |
|
|
|
(9) |
PGM-FI malf unction |
Lights when there is any abnormality in the PGM-FI |
|
indicator lamp (MIL) |
(Programmed Fuel Injection) system. Should also |
|
(amber) |
light for a few seconds and then go off when the |
|
|
ignition switch is turned ON. |
|
|
If it comes on at any other time, reduce speed and |
|
|
take the motorcycle to your dealer as soon as |
|
|
possible. |
|
|
|
(10) |
Left turn signal indicator |
Flashes when the left turn signal operates. |
|
(green) |
|
|
|
|
(11) |
Anti-lock Brake |
This indicator normally comes on when the ignition |
|
System |
switch is turned ON, and goes off after you ride the |
|
(ABS) indicator |
motorcycle at speed above 10 km/h (6 mph). If there |
|
(amber) |
is a problem with the Anti-lock Brake System, this |
|
(CBR250RA) |
indicator flashes and remains on (page 64 ). |
|
|
|
16
10/11/05 11:21:44 32KYJE00_027
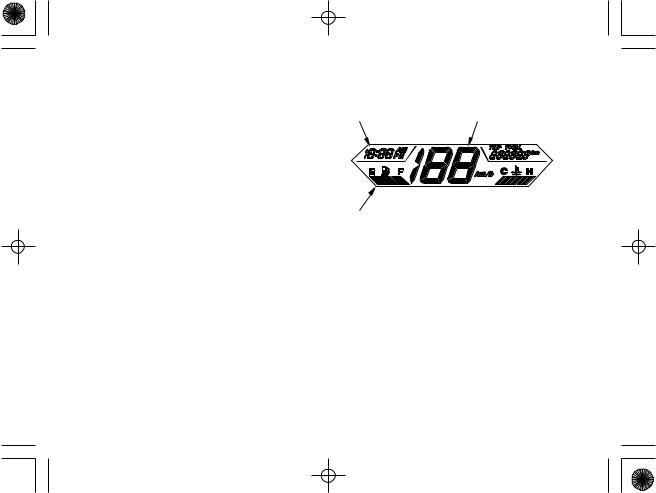
Initial Display |
|
(2) |
When the ignition switch is turned ON, the |
(3) |
|
multi-function display ( 1 ) will temporarily |
|
|
show all the modes and digital segments. |
|
|
Thereafter, the speedometer ( 2 ) starts a |
|
|
countdown to 0 km/h so that you can make |
|
|
sure the liquid crystal display is functioning |
|
|
properly. |
|
|
Digital clock ( 3 ) will reset if the battery is |
(1) |
|
disconnected. |
|
|
(1) Multi-function display
(2) Speedometer
(3) Digital clock
17
10/11/05 11:21:51 32KYJE00_028
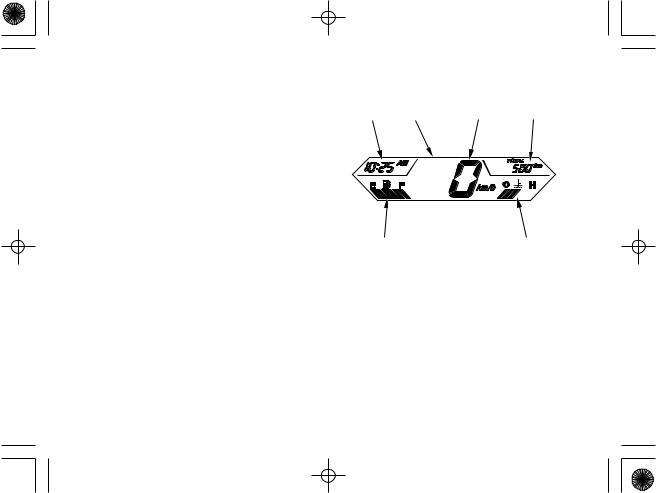
Multi-function Display |
|
|
|
|
Multi-function display ( 1 ) includes the |
(6) |
(1) |
(2) |
(3) |
following functions: |
|
|
|
|
Speedometer |
|
|
|
|
Odometer/Tripmeter |
|
|
|
|
Coolant temperature gauge |
|
|
|
|
Fuel gauge |
|
|
|
|
Digital clock |
|
|
|
|
|
(5) |
|
|
(4) |
|
(1) Multi-function display |
|
|
|
|
(2) Speedometer |
|
|
|
|
(3) Odometer/Tripmeter |
|
|
|
|
(4) Coolant temperature gauge |
|
||
|
(5) Fuel gauge |
|
|
|
|
(6) Digital clock |
|
|
|
18

10/11/05 11:21:58 32KYJE00_029
Speedometer |
(1) |
(2) |
Shows riding speed. |
|
|
Odometer/Tripmeter |
|
|
The odometer ( 2 ) shows accumulated |
|
|
mileage. |
|
|
The tripmeter ( 3 ) shows mileage per trip. |
|
|
Push the MODE button (4 ) to select the |
|
|
odometer and tripmeter. |
|
|
To reset the tripmeter, push and hold the |
|
|
RESET button ( 5 ) for more than 2 seconds |
|
|
when the display is in the tripmeter. |
|
|
|
(4) |
(3) |
(5)
(1) Speedometer
(2) Odometer
(3) Tripmeter
(4) MODE button
(5) RESET button
19

10/11/05 11:22:05 32KYJE00_030
Coolant Temperature Gauge |
Overheating Message: |
|
The coolant temperature gauge ( 1 ) shows |
When the coolant is over specif ied |
|
coolant temperature. |
temperature, the segment H flashes. |
|
|
If this occurs, stop the engine and check the |
|
The normal operating temperature range is |
reserve tank coolant level. Read pages 31 |
|
within the section between the segment C |
32 and do not ride the motorcycle until the |
|
( 2 ) and segment H ( 3 ). |
problem has been corrected. |
|
(1) |
Exceeding maximum running temperature |
|
may cause serious engine damage. |
||
|
(2) |
(3) |
(1)Coolant temperature gauge
(2)Segment C
(3)Segment H
20
 Loading...