


BC-79, BC-112 BEVERAGE CENTER INSTRUCTION MANUAL
CONTENTS
APPLIANCE SAFETY |
3 |
DISPOSAL |
4 |
PRODUCT FEATURES |
5 |
INSTALLATION |
5 |
OPERATING YOUR APPLIANCE |
9 |
CARE AND MAINTENANCE |
12 |
TROUBLESHOOTING GUIDE |
14 |
FRANÇAIS |
16 |
Please read this manual carefully before installing and starting up. Store it in a safe place. If you give this product to another person, be sure to also give them this instruction manual along with it.
2
APPLIANCE SAFETY
Your safety and the safety of others is very important. We have provided important safety information in this manual. Always read and obey all safety information and warnings.
Safety Alert Symbols
This symbol alerts you to potential hazards that may harm you and/or others. All safety messages will follow the Safety Alert Symbol and either the words "DANGER" or "WARNING".
Danger means that failure to follow this safety information may result in severe personal injury or death.
Warning means that failure to follow this safety information may result in extensive product damage, serious personal injury or death.
General Safety
Before the appliance is used, it must be properly positioned and installed as described in this manual. To reduce the risk of fire, electric shock or injury when using the appliance, follow basic precautions, including the following:
•Plug into a grounded 3-prong outlet, do not remove grounding prong, do not use an adapter, and do not use an extension cord.
•A separate circuit serving only your appliance must be provided. Use an outlet that cannot be turned off by a light switch or pull chain.
•Never clean appliance parts with flammable fluids. These fumes can create a fire hazard or explosion. Do not store or use gasoline or other flammable vapors and liquids in the vicinity of this or any other appliance. The fumes can create a fire hazard or explosion.
•Before proceeding with cleaning and maintenance operations, make sure the power line of the unit is disconnected.
•Do not connect or disconnect the electric plug when your hands are wet.
•Unplug the appliance or disconnect power
3
before cleaning or servicing. Failure to do so can result in electric shock or death.
•Do not attempt to repair or replace any part of your appliance unless it is specifically recommended in this manual. All other servicing should be performed by a qualified technician.
•Be sure that all components are in their proper place before operating.
•This appliance is CFC and HFC-free and contains small quantities of Isobutane (R600a) which is environmentally friendly, but flammable. It does not damage the ozone layer, nor does it contribute to greenhouse gases. Care must be taken during transportation and set up of the appliance. Make sure to check that no parts of the cooling system are damaged. Leaking coolant can ignite and may cause personal injury. In the event of any damage:
-Avoid open flames and anything that creates a spark.
-Disconnect from the mains.
-Air the room in which the appliance is located for several minutes.
-Contact the Service Department for advice.
•The more coolant there is in an appliance, the larger the room it should be installed in. In the event of a leak, if the appliance is in a small room, there is the danger of combustible gases building up. For every ounce of coolant at least 325 cubic feet of room space is required. The amount of coolant in the appliance is stated on the data plate inside the appliance. It is hazardous for anyone other than an Authorised Service Person to carry out servicing or repairs to this appliance.
•Take serious care when handling, moving, and using the appliance to avoid either damaging the refrigerant tubing, or increasing the risk of a leak.
•Replacing component parts and servicing must be done by manufacturer authorized service personnel, so as to minimize the risk of possible ignition due to incorrect parts or improper service.

•Use two or more people to move and install appliance. Failure to do so can result in back or other injury.
•Do not store or install the appliance outdoors.
•To ensure proper ventilation for your appliance, the front of the unit must be completely unobstructed. Choose a well-ventilated area with temperatures above 60°F (16°C) and below 95°F (35°C). This unit must be installed in an area protected from the elements, such as wind, rain, water spray or drips.
•The appliance should not be located next to ovens, grills or other sources of high heat.
•The appliance must be installed with all electrical, water and drain connections in accordance with state and local codes. A standard electrical supply (115 V AC only, 60 Hz), properly grounded in accordance with the National Electrical Code and local codes and ordinances is required.
•Do not bend, crush or pinch the power supply cord of the appliance.
•The size of the fuse (or circuit breaker) should be 15 amps.
•Never allow children to operate, play with or crawl inside the appliance.
•Do not use solvent-based cleaning agents or abrasive cleaners on the interior. These cleaners may damage or discolor the interior.
•Use this appliance only for its intended purpose as described in this manual.
•Keep fingers out of the “pinch point” areas. Clearances between the doors and cabinet are fairly small. Be careful closing doors when children are present.
•If your model requires defrosting, never use an ice pick or other sharp instrument to help speed up defrosting. These instruments can puncture the inner lining and damage the cooling component.
4
DISPOSAL
Dispose of your appliance packaging properly. Ensure that any plastic wrappings, bags etc. are disposed of safely and kept out of reach of babies and young children. Failure to do so may result in suffocation!
Refrigeration equipment must be properly disposed of in a professional and appropriate way, in accordance with the current local regulations and laws which protect the environment. This applies to your old appliance and to your new unit once it has reached the end of its service life.
WARNING: Please ensure that old, worn appliances are unusable before disposal by removing the plug, cutting the network cable, and removing or destroying any snap fastenings or bolts. You will thus prevent children from locking themselves in the appliance during play (risk of suffocation) or endangering their lives in any other way.
Risk of child entrapment!
Junked or abandoned appliances are still dangerous, even if they will “just sit in the garage a few days”.
Before discarding your old appliance:
•Take off the doors.
•Leave the shelves in place so that children cannot easily crawl into the unit.
-SAVE THESE INSTRUCTIONS -
PRODUCT FEATURES
•Built-in or free-standing installation.
•Temperature can be set from 36°F to 43°F (2°C to 6°C) and can be displayed in either Fahrenheit or Celsius.
•Dynamic compressor type cooling to ensure interior air circulation with even distribution of temperature.
•Soft White LED Interior Light with ON/OFF switch making it easier to view your content without opening the door.
•Open-door and malfunction warning system.
•Sabbath mode will allow the lights to remain off during certain religious observances.
•Temperature memory function - If power is interrupted (power surge, breaker switch, etc.) and then powered up again, the unit will operate at the last temperature set-point.
•Automatic defrosting with defrost water evaporation.
•Reversible tempered double pane light gray glass door creates an attractive display with little condensation and minimal noise.
•Black coated matte steel outer frame and black plastic interior liner.
•Stainless steel-framed glass door with stainless steel handle.
•Roll-out and adjustable shelves allow for maximum convenience and flexibility to accommodate various sized bottles.
•Refrigerant and foaming insulation glass are all CFC, HCFC and HFC free, making them environmentally friendly.
INSTALLATION
BEFORE USING YOUR APPLIANCE
•Remove all exterior and interior packing. Clean the interior surface with lukewarm water using a soft cloth. The unit may have residual odors at first; they will disappear as the unit cools.
•IMPORTANT: Before connecting the unit to the power source, let it stand upright for approximately 24 hours. This will reduce the possibility of a malfunction in the cooling system caused by handling during transportation.
•The door on this appliance can be opened from either the left or the right side. The unit is delivered with the door opening on the right side. Should you wish to open the door from the left, follow the instructions in the section titled
5
Reversing the door Hinge.
•Install the handle on the door.
INSTALLATION OF YOUR APPLIANCE
•The appliances are designed to be built-in or free standing.
•CAUTION: This appliance is designed for storing and cooling beverages. Do not store perishable food, medicine or other medical products in this unit.
•Place your appliance on a floor that is strong enough to support it when it is fully loaded. To level your unit, adjust the front adjustable legs at the bottom of the unit.
•For free-standing installation, 5 inches (127mm) of space between the back and sides of the unit are suggested, which allows the proper air circulation to cool the compressor and condenser for energy saving. Even for built-in installation, you must keep ¼” (5mm) space on each side and at the top to ensure proper service access and ventilation. The air vent at the front of the appliance must never be covered or blocked in any way!
•Install the unit away from direct sunlight and sources of heat (stove, heater, radiator, etc.). Direct sunlight may affect the acrylic coating and heat sources may increase electrical consumption. Extreme cold ambient temperatures may also cause the unit not to perform properly.
•Avoid installing the unit in damp areas such as garages and damp basements.
•Plug the unit into its own, easily accessible and properly grounded wall outlet. Do not under any circumstances cut or remove the third (ground) prong from the power cord. Any questions concerning power and/or grounding should be directed towards a qualified electrician or an authorized products service center.
•The appliance must be installed to all electrical, plumbing, water and drain connections in accordance with state and local codes.
•IMPORTANT: HIGH HUMID CLIMATE. During periods of high humidity, some condensation may appear on the outside surfaces of the glass

door. This condensation will disappear when humidity levels drop. For prevention, we recommend installing the appliance with sufficient ventilation in a dry and/or an air conditioned place.
NOTE: Make sure that the outlet and ON/OFF switch are easily accessible after the appliance has been installed.
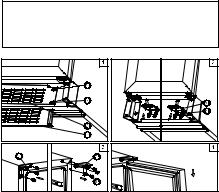
BUILT-IN INSTALLATION INSTRUCTIONS
Make sure your installation does not block the front ventilation grille.
NOTE: When pushing the appliance into the installation area, make sure that the mains cable does not get trapped.
Model BC-79
Top View
Model BC-112
Top View
If the BC-112 is installed for fitting kitchen plinth, make sure that the ventilation gaps in the plinth are at least 2 23⁄64” x 19 11⁄16” (60 x 500 mm) and remove the ventilation grilles, so that warm air can disperse unhindered. Otherwise the appliance has to work harder, resulting in an increase in electricity consumption.
6
ELECTRICAL CONNECTION
Check that the voltage marked on the product corresponds with your supply voltage.
Improper use of the grounded plug can result in the risk of electric shock. If the power cord is damaged, have it replaced by a qualified electrician or an authorized service center.
This appliance should be properly grounded for your safety. The power cord of this appliance is equipped with a three-prong plug which is compatible with standard three-prong wall outlets to minimize the possibility of electric shock.
Do not under any circumstances cut or remove the third (ground) prong from the power cord supplied. For personal safety, this appliance must be properly grounded.
This appliance requires a standard 115/120 Volt AC ~ 60Hz three-prong grounded electrical outlet. Have the wall outlet and circuit checked by a qualified electrician to make sure the outlet is properly grounded. When a standard 2-prong wall outlet is encountered, it is your responsibility and obligation to have it replaced with a properly grounded 3-prong wall outlet.
To prevent accidental injury, the cord should be secured behind the appliance and not left exposed or dangling.
The appliance should always be plugged into its own individual electrical outlet that has a voltage rating that matches the rating label on the appliance. This provides the best performance and also prevents overloading house wiring circuits that could cause a fire hazard from overheating. Never unplug the appliance by pulling on the power cord. Always grip the plug firmly and pull straight out from the outlet. Immediately repair or replace all power cords that have become frayed or otherwise damaged. Do not use a cord that shows cracks or abrasion damage along its length or at either end. When moving the appliance, be careful not to damage the power cord.
EXTENSION CORD
Because of potential safety hazards under certain conditions, it is strongly recommended that you do not use an extension cord with this appliance. However, if you must use an extension cord it is absolutely necessary that it be a UL/CUL-Listed, 3- wire grounding type appliance extension cord having a grounding type plug and outlet and that the electrical rating of the cord be 115 volts and at least 10 amps.
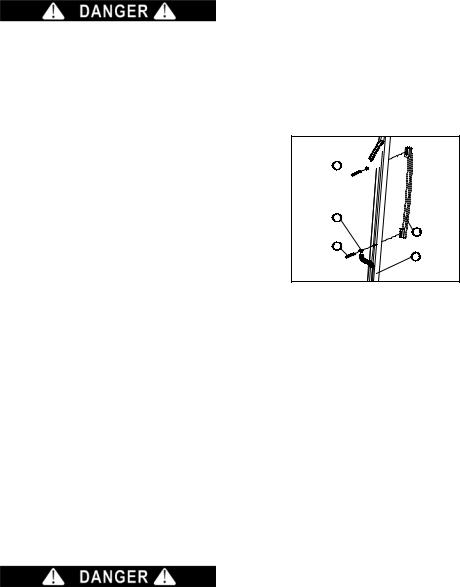
INSTALLING THE HANDLE
IMPORTANT: Do not over tighten the screws and do not use power tools to install the handle.
1 


2
4
3
5
1.Remove the door gasket ○1E A on the side you
wish to install the handle - you can see two designated holes for handle installation.
2.Install the handle A○4E A tightly as shown above
with two screws A○3E A and flat washers A ○2E A provided.
3.Replace the door gasket.
THIS APPLIANCE MUST BE EARTHED.
7
REVERSING THE DOOR HINGE
It is possible to reverse the door on this appliance, if required.
To do so, follow the steps below:
Note: All parts removed must be saved to do the reinstallation of door.
8.Reassembly the ventilation grilles.
NOTE: For model BC-79, the step of reassembling the ventilation grille is not needed.
ATTENTION!
•Do not overload the cabinet.
•Do not open the door unless necessary.
•Do not cover shelves with aluminum foil or any other material which may prevent air circulation.
•Should the beverage center be left empty for a long period of time, we recommend you unplug the appliance and after careful cleaning, leave the door ajar to allow air to circulate inside the cabinet in order to prevent possible condensation, mold or odors from forming.
1.Remove the front ventilation grille A○2E A and the adjustable ventilation grille A○1E A by unscrewing
the screws ○A 3E A & ○A 4E .A (Fig. 1)
NOTE: For model BC-79, the step of removing the ventilation grille is not needed.
2.Remove the bottom hinge plate A ○5E A by
unscrewing the four lock screws ○A 6E .A Make sure
to hold the glass door firmly after removing the screws. (Fig. 2)
3.Gently pull down to remove the glass door from the right top hinge and place it on a padded surface to avoid the risk of damage. Then remove the right top hinge ○A 7E .A (Fig. 3 & 4)
4.Unscrew and transfer the hinge pin of the bottom hinge plate ○A 5E A to the opposite side.
5.Pop out the cover caps on the left side of cabinet and use them to cover the screw holes on the right hand side.
6.Screw the alternative left top hinge ○A 9E ,A included
in the fittings, on the left hand side of cabinet. (Fig. 4)
7.Rotate the door 180° and then relocate the door to the designated position. Then screw the bottom hinge assembly on the left designated position and tighten it after the door is leveled. (Fig. 2)
8
OPERATING YOUR
APPLIANCE
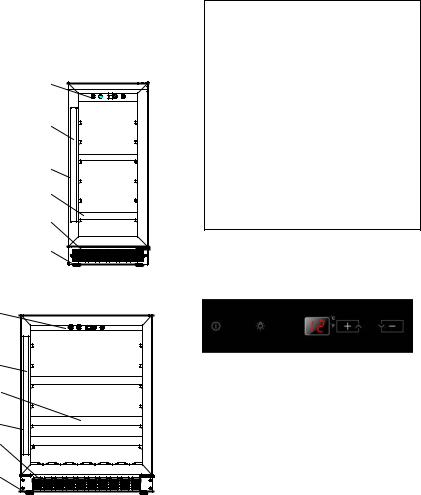
Model BC-79
Digital Control Panel
Handle
Door
Full Shelves(2)
Ventilation Grille
Adjustable Legs
Model BC-112
Digital Control |
Panel |
Handle |
Full Shelves (3) |
Door |
Ventilation |
Grille |
Adjustable |
Legs |
The unit should be placed in a position where the ambient temperature is between 60ºF and 95ºF (16°C and 35°C). If the ambient temperature is above or below this range, the performance of the unit may be affected. For example, placing your unit in extreme cold or hot conditions may cause interior temperatures to fluctuate and the temperature range may not be reached.
9
Note:
•When you use the unit for the first time or restart the unit after having been shut off for a long time, there could be a few degrees variance between the temperature you select and the one indicated on the LED readout. This is normal and it is due to the length of the activation time. Once the unit is running for a few hours everything will be back to normal.
•If the unit is unplugged, has lost power, or has been turned off, you must wait 3 to 5 minutes before restarting the unit. If you attempt to restart before this time delay, the unit will not start.
USE AND CONTROL
The Controls of Your Appliance
POWER 
To turn the appliance on or off, press and hold the
 button for 1 second.
NOTE: Pressing the  button once can switch off the audible alarm when the alarm is on.
UP 

Used to increase (warm) the set temperature by 1°C/1ºF.
DOWN 

Used to decrease (cool) the set temperature by 1°C/1ºF.
LIGHT 
Used to turn the inner light on andoff.
Display
Displays the temperature and service indicators.
ºF/ºC Selector
Program the temperature display in either Fahrenheit or Celsius. To change the temperature from Fahrenheit to Celsius or from Celsius to Fahrenheit, press and hold the LIGHT button for 5 seconds
 Loading...