


Installation Use & Care Instructions
Instructions d’installation, d’utilisation & d’entretien
24” DROP DOWN CONVECTION OVEN
FOUR DE 24 PO À CONVECTION
6HA-196BX

OVENS
 CONTENTS
THANK YOU . . . . . . . . . . . . . . . . . . . . . . . . . . . . . . . . . . . . . . . . . . . . . . . . . . . . . . 5
1. IMPORTANT SAFEGUARDS . . . . . . . . . . . . . . . . . . . . . . . . . . . . . . . . . . . . . . 6
2. INSTALLATION AND ELECTRICAL CONNECTION . . . . . . . . . . . . . . . . . . . . 10
2.1. Before Installation . . . . . . . . . . . . . . . . . . . . . . . . . . . . . . . . . . . . . . . . . . . . 10
2.2. Installation Dimensions . . . . . . . . . . . . . . . . . . . . . . . . . . . . . . . . . . . . . . . . 10
2.3. Electrical Connection. . . . . . . . . . . . . . . . . . . . . . . . . . . . . . . . . . . . . . . . . . 12
2.4. Finishing Your Installation. . . . . . . . . . . . . . . . . . . . . . . . . . . . . . . . . . . . . . . 14
3. USING THE OVEN AND PRACTICAL TIPS . . . . . . . . . . . . . . . . . . . . . . . . . . . 15
3.1. Before Using the Oven for the First Time . . . . . . . . . . . . . . . . . . . . . . . . . . . 15 3.2. Control Panel . . . . . . . . . . . . . . . . . . . . . . . . . . . . . . . . . . . . . . . . . . . . . . . 16 3.3. Operating the Oven . . . . . . . . . . . . . . . . . . . . . . . . . . . . . . . . . . . . . . . . . . 17 3.4. Practical Advice and Cooking Table . . . . . . . . . . . . . . . . . . . . . . . . . . . . . . 18
4. OVEN CLEANING AND MAINTENANCE . . . . . . . . . . . . . . . . . . . . . . . . . . . . . 20
4.1. Cleaning . . . . . . . . . . . . . . . . . . . . . . . . . . . . . . . . . . . . . . . . . . . . . . . . . . . 20
4.1.1. Oven Exterior . . . . . . . . . . . . . . . . . . . . . . . . . . . . . . . . . . . . . . . . . . 20
4.1.2. Oven Interior . . . . . . . . . . . . . . . . . . . . . . . . . . . . . . . . . . . . . . . . . . 20
4.1.3. Accessories . . . . . . . . . . . . . . . . . . . . . . . . . . . . . . . . . . . . . . . . . . . 23
4.2. Replacing the Interior Light Bulb . . . . . . . . . . . . . . . . . . . . . . . . . . . . . . . . . 23
5. ENERGY-SAVING TIPS . . . . . . . . . . . . . . . . . . . . . . . . . . . . . . . . . . . . . . . . . . 24
6. STOP/START DIGITAL TIMER . . . . . . . . . . . . . . . . . . . . . . . . . . . . . . . . . . . . 25
6.1. Clock . . . . . . . . . . . . . . . . . . . . . . . . . . . . . . . . . . . . . . . . . . . . . . . . . . . . . 25
6.2. Timer Functions . . . . . . . . . . . . . . . . . . . . . . . . . . . . . . . . . . . . . . . . . . . . . 26

 THANK YOU
Congratulations!
You are now the proud owner of a Fagor oven and we would like to thank you for the confidence you have placed in our company and our products.
Fagor offers a wide variety of high quality and eco-friendly products that are designed to work efficiently while consuming less energy.
Our goal is to bring energy efficiency to the forefront of the market with products that consistently work and deliver on our promise.
Fagor’s complete appliance selection offers a wide variety of cooktops, hoods, dishwashers, ranges, and refrigerators that you can combine with your new oven.
Before using your oven for the first time, we recommend that you read the entire user’s manual carefully. You will find information that you will need to make the most of your new Fagor oven. Please pay special attention to the safety advice, as well as use & care guidelines contained in this manual.
At the same time, we recommend you save this manual for future reference. If you should pass the appliance on to another person, please be sure to enclose the manual.
Thank you,
Fagor America Inc.
5

1. IMPORTANT SAFEGUARDS
We recommend that you read the instructions in this user’s manual carefully before use for optimum performance and to extend the life of your appliance. The user’s manual will provide you with all the instructions you need to ensure your oven’s safe installation, use and maintenance. Always keep this user’s manual close at hand since you may need to refer to it in the future.
Safety Instructions
Installation of this oven must be performed only by a licensed electrician. The installer is responsible for connecting the appliance to the home power supply in accordance with the relevant safety recommendations.
Electrical Safety
If the oven has been damaged in transport, do not connect it.
•Appliance must be connected to the home power supply only by a licensed electrician.
•In the event of a defect or physical damage to the appliance, do not attempt to operate it.
•Repairs should be performed by a licensed technician only. Improper repair may result in considerable danger to you and others. If your oven needs repair, contact the Fagor Service Department.
•If the supply cord is damaged, it must be replaced by the manufacturer, a service agent or similarly qualified persons in order to avoid potential hazards.
•Electrical leads and cables should not to touch the oven.
•The oven should be connected to the home power supply by means of an approved circuit breaker or fuse. Never use multiple plug adapters or extension cords.
•The rating plate is located on the right side of the door.
•The power supply of the appliance should be turned off when it is being repaired or cleaned.
•Use caution when connecting electrical appliances to sockets near the oven.
6

WARNING
The appliance should be powered down before replacing the lights to avoid the possibility of electric shock. During oven operation, the interior surfaces become very hot.
Safety During Operation
•This oven has been designed for residential use only.
•During use, the oven interior surfaces become hot enough to cause burns. Do not touch heating elements or interior surfaces of the oven until they have had time to cool.
•Never store flammable materials in the oven.
•Be cautious as the oven surfaces become hot when the appliance is operated at a high temperature for an extended period of time.
•When cooking, use caution when opening the oven door as hot air and steam can escape rapidly.
•When cooking dishes that contain alcohol, the alcohol may evaporate due to the high temperatures and the vapor can catch fire if it comes into contact with a hot part of the oven.
•For your safety, do not use high-pressure water cleaners or steam jet cleaners on your oven.
•Frozen foods, such as pizza, should be cooked on the wire grill. If the baking tray is used, it may become warped due to the rapid change in temperature.
•Do not pour water into the oven when it is hot. This could cause damage to the interior enamel surface.
•The oven door must be closed while cooking.
•Do not line the oven bottom with aluminum foil, nor should you place any baking trays or tins on it. The aluminum foil blocks the heat, which may result in damage to the enamel surfaces and cause poor cooking results.
•Do not rest bakeware on the open oven door.
•This appliance is not intended to for use by persons (including children) with reduced physical, sensory or mental capabilities, or lack of experience and knowledge, unless they are carefully supervised or instructed by a person responsible for their safety.
•Ensure that the appliance is switched off before replacing the lamp to avoid the possibility of electric shock.
•If a cooking time is not entered, the oven will shut itself off.
•Always place oven racks in desired location while oven is cool. If a rack must be moved while oven is hot, do not let potholder contact the heating elements.
•Always use dry potholders. Moist or damp potholders on hot surfaces may result in burns from steam. Do not use a towel or other bulky cloth.
•Secure all loose garments such as ties, scarves, jewelry, sleeves, etc. before beginning. Tie long hair so that it does not hang loose.
7

Child Safety
•WARNING: Accessible parts may become hot during use. Young children should be kept away.
•Do not allow anyone to climb, stand, lean, sit, or hang on any part of this appliance, especially the door, warming drawer or storage drawer. This can damage the appliance, and the unit may tip over, potentially causing severe injury.
CAUTION:
Children’s items should not be stored inside an appliance, in cabinets above an appliance or on the backsplash. Children climbing on an appliance to reach items could be seriously injured.
Cleaning Safety
Do not clean the appliance while it is still hot. Some cleaners produce noxious fumes when applied to a hot surface. Wet cloths or sponges can cause burns from steam.
Oven Exterior
•For cleaning both the interior and exterior of the oven, use a cloth and a mild cleaning agent or warm soapy water.
•Dry with paper towels or a dry cloth.
•Do not use scourers, caustic cleaners or abrasive products.
Stainless Steel Oven Front
•Do not use steel wool, scouring pads or abrasive products as they may damage the finish.
WARNING
Make sure the oven is cool before cleaning.
Oven Interior
•Do not clean the door seal by hand.
•Do not use coarse scouring pads or cleaning sponges.
•To avoid damaging the enameled oven surfaces, use commercially available oven cleaners.
•To remove stubborn stains, use a special oven cleaner.
•Do not use harsh, abrasive cleaners or sharp metal scrapers to clean the oven door glass as they can scratch the surface, which may result in shattering of the glass.
•When the door is mounted, removing some of the parts from the door, such as the glass or handles, may result in injury.
Attention
The glass on the oven door may break if you use excessive force when opening or closing, especially at the edges of the front sheet.
8

Accessories
Wash all bakeware and accessories after each use and dry with a kitchen towel. To clean easily, soak bakeware and accessories in warm soapy water for about 30 minutes.
WARNING
The manufacturer may not be held responsible for any damage due to incorrect installation, improper, incorrect or irrational use.
Disposing of the Packaging Material
•The material used to package this appliance is recyclable.
•Dispose of the packaging materials in the appropriate container at your local waste disposal facility.
Disposing of Old Appliances
WARNING
Before disposing of old appliances, make them inoperable so that they cannot be a source of danger.
To do this, disconnect the appliance from the power supply and remove the cord.
To protect the environment, it is important that old appliances are disposed of in the correct manner.
•The appliance must not be disposed of with household trash.
•You can obtain information about collection dates and public refuse disposal sites from your local refuse department or council.
9

2. INSTALLATION AND ELECTRICAL CONNECTION
2.1 BEFORE INSTALLATION
This appliance should only be installed according to the manufacturer’s instructions. Installation should only be attempted by an authorized professional. The manufacturer declines all responsibility for improper installation, which may harm persons and animals and damage property.
This appliance must be installed in accordance with the norms and standards of the country where it is being installed. The installation of this appliance must conform to local codes and ordinances.
The appliance, when installed, must be electrically grounded in accordance with local codes or, in the absence of local codes, with the National Electrical Code, ANSI/NFPA 70. In CANADA: Electric installation must be in accordance with the current CSA C22.1 Canadian Electrical Codes Part 1 and/or local codes.
WARNING! Do not use aerosol sprays in the vicinity of this appliance while the oven is in operation.
2.2 INSTALLATION DIMENSIONS
The measurements of the unit in which the oven is to be installed must coincide |
|
||
with those indicated in the diagrams, depending on whether the unit is wall- |
|
||
mounted or installed below a counter top. |
1 |
49 |
” |
|
64 |
||
|
|
|
|
|
|
|
|
|
|
|
|
|
|
|
|
22 |
1 |
” |
|
|
|
|
|
|
22 |
4 |
|
|
|
|
|
|
|
|
|
|
4 |
||
|
|
|
|
|
|
1 |
|
” |
|
|
|
|
|
|
|
|
|
|
|
|
|
|
|
|
|
|
|
|
|
|
|
|
|
|
|
|
|
|
|
|
|
|
|
|
11 32 ” |
|
|
|
|
min |
|
|
|
|
11 32 ” |
|
|
|
|
|
|
|
|
|
77 8”min |
|
” |
|
|
|
|
|
77 8” min |
||||||
|
|
|
|
|
|
|
|
|
64 |
” |
|
|
|
|
|
|
|
|
64” |
|
|
|
|
” |
|
|
|
|
15 |
64 |
|
|
|
|
|
|
|
|
15 |
|
|
|
|
|
|
|
|
|
23 |
|
|
|
|
|
|
|
|
|
|
|
|
|
3”16 |
11 32 |
1 |
64 |
” min |
49 |
|
|
|
|
” |
|
|
|
23 |
||
|
|
|
1 |
|
|
|
|
|
|
|
|||||||||
|
|
|
|
|
49 |
|
|
|
|
|
|
|
|
|
|
|
|
|
|
|
|
|
23 |
22 |
23 |
27 |
64 |
” |
|
|
|
3”16 |
|
11 32 |
|
|
|
|
|
|
|
|
|
|
|
|
|
|
|
|
23 |
|
|
22 |
23 |
27 |
|
||
|
|
|
|
|
|
|
|
|
|
|
|
|
|
|
|||||
23 |
25 |
|
3 |
8” |
|
|
|
|
|
|
|
|
|
|
|
|
|
64 |
” |
” |
|
|
|
|
|
|
|
|
|
|
|
|
|
|
|||||
|
64 |
21 |
|
|
|
|
|
|
23 |
25 |
|
3 |
8” |
|
|
|
|
||
11 32 ” |
|
|
|
|
|
|
|
|
|
64 |
” |
21 |
|
|
|
|
|
|
|
|
|
|
|
|
|
|
|
|
|
11 32 ” |
|
|
|
|
|
|
|
|
|
10
min
”min
64 49 1
”min
64 49 1
In order to ensure adequate ventilation, the back panel of the cabinet unit must be removed. Installing the oven so that it rests on two strips of wood is preferable. If the oven rests on a continuous, flat surface, there must be an opening of at least 1 49/64” x 22 23/64” (45×568mm).
The panels of the adjacent cabinets must be made of heat-resistant materials. In particular, cabinets with a veneer exterior must be assembled with glues that can withstand temperatures of up to 215°F.
In compliance with current safety standards, the electrical parts of the oven must be completely out of reach once it has been installed.
All parts, which ensure the safe operation of the appliance, must only be removed with the aid of a tool.
To fasten the oven to the cabinet, open the door of the oven and attach it by inserting the 4 wooden screws into the 4 holes located on the perimeter of the frame.
11

2.3 ELECTRICAL CONNECTION
WARNING! ELECTRICAL SHOCK HAZARD
Disconnect electrical power at the breaker box or fuse box before installing this appliance. Please make sure the unit is properly grounded for safety. Use copper conductors only. Failure to follow these indications could result in serious injury or death.
CAUTION
Label all wires prior to disconnecting when servicing controls. Wiring errors can cause improper and dangerous operation. Always verify proper operation after servicing.
The appliance is fitted with an approved 15 Amp flexible cord which must be connected to a correctly grounded power line. The manufacturer is not liable for any direct or indirect damage caused by faulty installation or connection. It is therefore necessary that all installation and connection operations are carried out by qualified personnel complying with the applicable local and general regulations.
The wire section on the cable must not be less than1.5mm (3×1.5cable). Use only the special cables available at our service centers.
CONNECTING THE FEEDING CABLE TO THE MAINS
Connect the feeding cable to a plug suitable for the load indicated on the rating plate of the product. In case of a direct connection to the mains (cable without plug), it is necessary to insert a suitable omnipolar switch before the appliance, with minimum opening between contacts of 3 mm (the grounding wire should not be interrupted by the switch).
Before connecting to the main electrical wiring, make sure:
•The electrical system of your home and socket are able to withstand the maximum load required to run the oven (see rating plate).
•The supply system is regularly grounded, according to the local regulation codes.
•The socket or the omnipolar switch can easily be reached after the installation of the oven.
•If the socket and appliance plug are not compatible, have the socket replaced with a suitable model by a qualified technician. The technician will also have to ensure that the cross section of the socket cables are adequate for the maximum load required by the oven.
•After carrying out the connection to the main electrical wiring, make sure the supplying cable does not come into contact with parts subject to heating. The cord should be positioned so that it does not reach a temperature of more than 125°F with respect to the room temperature anywhere along its length.
12

•Never use reductions, shunts, or adaptors as they can cause overheating or burning. If their use cannot be avoided, remember to use only single or multiple adapters and extensions which comply with current safety regulations. In these cases, never exceed the maximum current capacity indicated on the single adapter or extension and the maximum power indicated on the multiple adapter.
The manufacturer is not liable for any direct or indirect damage caused by faulty installation or connection. We recommend that all installation and connection operations be completed by qualified personnel complying with the local and local regulation codes.
CAUTION
Connect the black wire to the N (neutral) tab; connect the red wire to the L (live) tab and the green or green/yellow wire to the ground tab. Do not swap connections.
ELECTRICAL SPECIFICATIONS
Model |
Volts |
Watts |
Amps |
|
|
|
|
6HA-196 BX |
240 |
2.3 KW |
15 |
|
|
|
|
13

2.4 FINISHING YOUR INSTALLATION
FINAL PREPARATION
All exterior steel body parts should be cleaned with warm, soapy water and with a liquid stainless steel cleaner.
If any staining or grease build-up occurs, do not use abrasive cleaners, powder cleaners, steel wool or other abrasive cloths. When removing hard stains from the stainless steel unit, we recommend that you soak the area with hot, wet cloths to loosen the substance on the unit. After the stain has been sufficiently soaked, use a normal wood or nylon scraper to remove the stain. Never use a metal knife, spatula, or any other metal tool to scrape stains off of the stainless steel unit. Scratches are impossible to remove.
Before using the oven for the first time, wash the oven cavity thoroughly with a warm soap and water solution to remove any impurities left over from the installation process, then wipe dry.
14
3. USING THE OVEN AND PRACTICAL TIPS
3.1 BEFORE USING THE OVEN FOR THE FIRST TIME
Adjusting the Clock
We recommend that you set the correct time after full oven installation is complete.
Getting Started
Before using your new oven for the first time, make sure you have removed all packing materials and protective plastic. Heat the oven empty for about 30 minutes with the door closed at MAX temperature.
During this process, you may detect some odor and possible smoke, both of which are normal. When you heat your oven for the first time in this way, you will effectively remove any traces of oil residue inside the oven that may exist as a result of the manufacturing process. Once the oven has cooled down, be sure to follow the cleaning procedures outlined in “Section 4. Oven Cleaning and Maintenance”.
Before using any of the interior trays for the first time, clean with a mild detergent and a sponge or soft cloth.
15
3.2 CONTROL PANEL
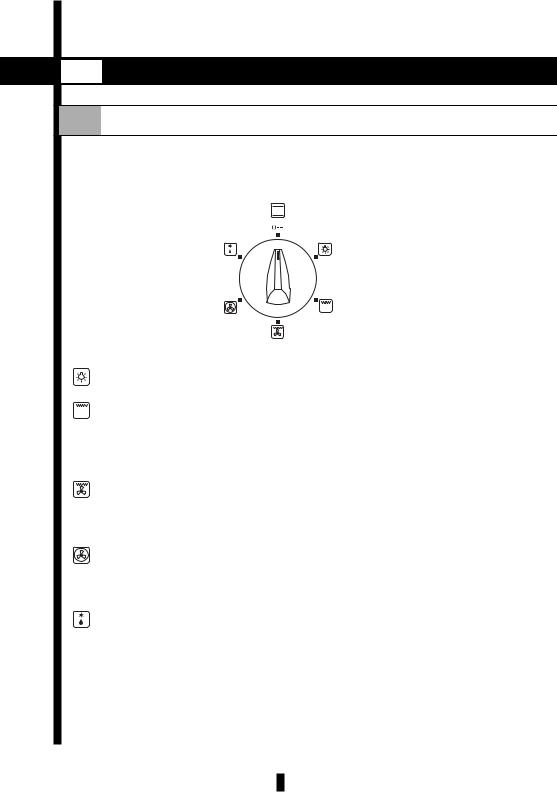
aCooking Program Selector
Your oven offers three (3) different cooking programs and one convection defrost program. With the cooking program knob, you will be able to select the most suitable cooking program for the type of food you wish to cook.
Below is a description of the functions on the oven.
Light: Lamp of the oven is on, with no heating elements operated. During oven operation the lamp will always remain on.
Broil: Recommended for all types of broiling: pasta, soufflé and béchamel sauce. Broiling is highly recommended for dishes that require a high temperature on the surface: beef steaks, veal, ribs, hamburgers, etc. Broil with the oven door ajar, placing the food under the center of the broiler on the 3rd or 4th rack from the bottom.
Convection Broil: Special program for cooking large roasts and also ideal for cooking and broiling at the same time: red meats, pot roast, poultry, etc. Preheat oven, place food on grill rack in baking tray and place in the middle of the oven.
Turbo Plus: The oven is heated up by the central round heating element. The fan distributes the heat evenly within the oven. Turbo Plus mode provides optimum results with cakes (soft and thick), large quantities of foods and cooking various dishes simultaneously.
Defrosting: The defrosting function can be used to thaw any type of frozen foods such as meat, fish, or vegetables, in minimal time. It speeds up normal defrosting times.
16

NOTE:
When broiling or convection broiling, to prevent fat and grease from dripping onto the bottom of the oven, which could cause smoke to form, place a dripping-pan on the 1st rack from the bottom.
bTemperature Selector
With the temperature knob, you can adjust the cooking temperature at any time to prepare your meal. The temperature controls range from a Low 150°F to MAX 500°F.
The thermostat indicator light will turn off when the selected temperature is reached. The indicator will turn on and off while cooking as the oven works to maintain the desired temperature.
3.3 OPERATING THE OVEN
Below are the steps for turning on your oven. |
|
5 |
|
||
|
4 |
|
1. Place food in the oven, on the |
|
|
|
3 |
|
|
||
recommended tray and level. |
|
2 |
|
|
|
|
|
1 |
|
|
2.Select the cooking program using the cooking program knob.
3.Set temperature by turning the temperature knob or following the instructions given in the timer operating section.
4.Once your meal is finished, do not forget to turn both the cooking program knob and the temperature knob to the OFF position.
17
 Loading...