


 Loading...
®
9-pin Dot Matrix Printer
No part of this publication may be reproduced, stored in a retrieval system, or transmitted in any form or by any means, electronic, mechanical, photocopying, recording, or otherwise, without the prior written permission of Seiko Epson Corporation. The information contained herein is designed only for use with this Epson printer. Epson is not responsible for any use of this information as applied to other printers.
Neither Seiko Epson Corporation nor its affiliates shall be liable to the purchaser of this product or third parties for damages, losses, costs, or expenses incurred by the purchaser or third parties as a result of: accident, misuse, or abuse of this product or unauthorized modifications, repairs, or alterations to this product, or (excluding the U.S.) failure to strictly comply with Seiko Epson Corporation’s operating and maintenance instructions.
Seiko Epson Corporation shall not be liable for any damages or problems arising from the use of any options or any consumable products other than those designated as Original Epson Products or Epson Approved Products by Seiko Epson Corporation.
EPSON and EPSON ESC/P are registered trademarks of Seiko Epson Corporation.
Microsoft®, Windows®, and Windows NT® are registered trademarks of Microsoft Corporation.
IBM is a registered trademark of International Business Machines Corporation.
General Notice: Other product names used herein are for identification purposes only and may be trademarks of their respective owners. Epson disclaims any and all rights in those marks.
Copyright © 2004 Seiko Epson Corporation. All rights reserved.
Reference Guide

Contents
Chapter 1 Safety Instructions
Warnings, Cautions, and Notes . . . . . . . . . . . . . . . . . . . . . . . . . . . . . . 6
Hot Parts Caution Symbol . . . . . . . . . . . . . . . . . . . . . . . . . . . . . . . . . . 6
Important Safety Instructions. . . . . . . . . . . . . . . . . . . . . . . . . . . . . . . . 6
Chapter 2 Paper Handling
Using the Two-Tractor System. . . . . . . . . . . . . . . . . . . . . . . . . . . . . . 11 Positioning the paper supply. . . . . . . . . . . . . . . . . . . . . . . . . . . 12 What paper types you can use . . . . . . . . . . . . . . . . . . . . . . . . . 13 Loading Paper onto the Front Tractor. . . . . . . . . . . . . . . . . . . . . . . . 13 Loading Paper onto the Rear Tractor . . . . . . . . . . . . . . . . . . . . . . . . 20 Adjusting the Paper Position . . . . . . . . . . . . . . . . . . . . . . . . . . . . . . . 26 Adjusting the top-of-form position. . . . . . . . . . . . . . . . . . . . . . 27 Adjusting the printing position. . . . . . . . . . . . . . . . . . . . . . . . . 29 Adjusting the label position. . . . . . . . . . . . . . . . . . . . . . . . . . . . 30 Tearing Off the Printed Pages. . . . . . . . . . . . . . . . . . . . . . . . . . . . . . . 31 Using the Tear Off button . . . . . . . . . . . . . . . . . . . . . . . . . . . . . 32 Adjusting the tear-off position . . . . . . . . . . . . . . . . . . . . . . . . . 32 Switching Between Front and Rear Tractors . . . . . . . . . . . . . . . . . . 35 Changing the Paper . . . . . . . . . . . . . . . . . . . . . . . . . . . . . . . . . . . . . . . 37 Printing on Multi-Part Forms and Labels . . . . . . . . . . . . . . . . . . . . . 39 Using multi-part forms. . . . . . . . . . . . . . . . . . . . . . . . . . . . . . . . 40 Using labels . . . . . . . . . . . . . . . . . . . . . . . . . . . . . . . . . . . . . . . . . 42
Chapter 3 Printer Software
About Your Printer Software . . . . . . . . . . . . . . . . . . . . . . . . . . . . . . . 43 Using the Printer Driver with Windows Me, 98, and 95 . . . . . . . . 44 Accessing the printer driver from Windows applications . . 44 Accessing the printer driver from the Start menu . . . . . . . . . 46
2

Changing the printer driver settings . . . . . . . . . . . . . . . . . . . . .47 Using the Printer Driver with Windows XP, 2000, and
Windows NT 4.0 . . . . . . . . . . . . . . . . . . . . . . . . . . . . . . . . . . . . . . . .48 Accessing the printer driver from Windows applications . . .49 Accessing the printer driver from the Start menu. . . . . . . . . .51 Changing the printer driver settings . . . . . . . . . . . . . . . . . . . . .53 Printer Driver Settings Overview . . . . . . . . . . . . . . . . . . . . . . . . . . . .54 Using EPSON Status Monitor 3. . . . . . . . . . . . . . . . . . . . . . . . . . . . . .58 Setting up EPSON Status Monitor 3 . . . . . . . . . . . . . . . . . . . . .59 Accessing EPSON Status Monitor 3. . . . . . . . . . . . . . . . . . . . . .60 Installing EPSON Status Monitor 3 . . . . . . . . . . . . . . . . . . . . . .61 Setting Up Your Printer on a Network. . . . . . . . . . . . . . . . . . . . . . . .62 Sharing the printer . . . . . . . . . . . . . . . . . . . . . . . . . . . . . . . . . . . .62 Setting up your printer as a shared printer . . . . . . . . . . . . . . .63 Setting for the clients . . . . . . . . . . . . . . . . . . . . . . . . . . . . . . . . . .67 Installing the printer driver from the CD-ROM . . . . . . . . . . .75 Canceling Printing. . . . . . . . . . . . . . . . . . . . . . . . . . . . . . . . . . . . . . . . .76 Uninstalling the Printer Software . . . . . . . . . . . . . . . . . . . . . . . . . . . .77
Uninstalling the printer driver and
EPSON Status Monitor 3. . . . . . . . . . . . . . . . . . . . . . . . . . . . .77
Chapter 4 Control Panel
Buttons and Lights . . . . . . . . . . . . . . . . . . . . . . . . . . . . . . . . . . . . . . . .82
Selecting a Font and Pitch . . . . . . . . . . . . . . . . . . . . . . . . . . . . . . . . . .86
About Your Printer’s Settings . . . . . . . . . . . . . . . . . . . . . . . . . . . . . . .87
Understanding the printer’s settings. . . . . . . . . . . . . . . . . . . . .87
Changing the printer’s settings . . . . . . . . . . . . . . . . . . . . . . . . .98
Lock-Out Mode . . . . . . . . . . . . . . . . . . . . . . . . . . . . . . . . . . . . . . . . . .103
Turning on or off the lock-out mode . . . . . . . . . . . . . . . . . . . .103
Chapter 5 Problem Solver
Diagnosing the Problem . . . . . . . . . . . . . . . . . . . . . . . . . . . . . . . . . . .104
Using the error indicators . . . . . . . . . . . . . . . . . . . . . . . . . . . . .105
EPSON Status Monitor 3 . . . . . . . . . . . . . . . . . . . . . . . . . . . . . .106
Printing a Self Test . . . . . . . . . . . . . . . . . . . . . . . . . . . . . . . . . . .107
3

Printing Hex Dump. . . . . . . . . . . . . . . . . . . . . . . . . . . . . . . . . . 108
Problems and Solutions. . . . . . . . . . . . . . . . . . . . . . . . . . . . . . . . . . . 109
Power supply problems . . . . . . . . . . . . . . . . . . . . . . . . . . . . . . 110
Paper loading or feeding problems . . . . . . . . . . . . . . . . . . . . 111
Printing position problems . . . . . . . . . . . . . . . . . . . . . . . . . . . 113
Printing or printout quality problems . . . . . . . . . . . . . . . . . . 115
Option using problems. . . . . . . . . . . . . . . . . . . . . . . . . . . . . . . 120
Network problems . . . . . . . . . . . . . . . . . . . . . . . . . . . . . . . . . . 121
Correcting USB Problems . . . . . . . . . . . . . . . . . . . . . . . . . . . . . . . . . 121
Clearing Paper Jams. . . . . . . . . . . . . . . . . . . . . . . . . . . . . . . . . . . . . . 125
Aligning Vertical Lines in Your Printout . . . . . . . . . . . . . . . . . . . . 126
Canceling Printing . . . . . . . . . . . . . . . . . . . . . . . . . . . . . . . . . . . . . . . 127
Contacting Customer Support . . . . . . . . . . . . . . . . . . . . . . . . . . . . . 128
Technical Support Web Site . . . . . . . . . . . . . . . . . . . . . . . . . . . . . . . 129
Chapter 6 Options and Consumables
Ribbon Cartridge . . . . . . . . . . . . . . . . . . . . . . . . . . . . . . . . . . . . . . . . 130 Genuine Epson ribbon cartridge . . . . . . . . . . . . . . . . . . . . . . . 130 Replacing the Ribbon Cartridge. . . . . . . . . . . . . . . . . . . . . . . . . . . . 130 Using the Pull Tractor . . . . . . . . . . . . . . . . . . . . . . . . . . . . . . . . . . . . 135 Installing the pull tractor . . . . . . . . . . . . . . . . . . . . . . . . . . . . . 135 Using the pull tractor with the front tractor . . . . . . . . . . . . . 138 Using the pull tractor with the rear tractor . . . . . . . . . . . . . . 142 Removing the pull tractor . . . . . . . . . . . . . . . . . . . . . . . . . . . . 144 Using the Perforation Cutter. . . . . . . . . . . . . . . . . . . . . . . . . . . . . . . 145 Installing the perforation cutter . . . . . . . . . . . . . . . . . . . . . . . 146
Attaching the perforated paper output attachment and output tray . . . . . . . . . . . . . . . . . . . . . . . . . . . . . . . . . . . . . . . 149
Paper handling. . . . . . . . . . . . . . . . . . . . . . . . . . . . . . . . . . . . . . 152 Removing the perforation cutter. . . . . . . . . . . . . . . . . . . . . . . 154 Interface Cards . . . . . . . . . . . . . . . . . . . . . . . . . . . . . . . . . . . . . . . . . . 157 Installing an interface card. . . . . . . . . . . . . . . . . . . . . . . . . . . . 158 Using a serial interface card. . . . . . . . . . . . . . . . . . . . . . . . . . . 160 Print Server . . . . . . . . . . . . . . . . . . . . . . . . . . . . . . . . . . . . . . . . . . . . . 161 Setting the IP address from the control panel. . . . . . . . . . . . 161
4

Appendix A Product Information
Printer Parts . . . . . . . . . . . . . . . . . . . . . . . . . . . . . . . . . . . . . . . . . . . . .163 Printer Specifications . . . . . . . . . . . . . . . . . . . . . . . . . . . . . . . . . . . . .166 Mechanical. . . . . . . . . . . . . . . . . . . . . . . . . . . . . . . . . . . . . . . . . .166 Electronic . . . . . . . . . . . . . . . . . . . . . . . . . . . . . . . . . . . . . . . . . . .168 Electrical. . . . . . . . . . . . . . . . . . . . . . . . . . . . . . . . . . . . . . . . . . . .170 Environmental . . . . . . . . . . . . . . . . . . . . . . . . . . . . . . . . . . . . . .171 Paper. . . . . . . . . . . . . . . . . . . . . . . . . . . . . . . . . . . . . . . . . . . . . . .171 Printable area . . . . . . . . . . . . . . . . . . . . . . . . . . . . . . . . . . . . . . .181 Command Lists . . . . . . . . . . . . . . . . . . . . . . . . . . . . . . . . . . . . . . . . . .183 EPSON ESC/P control codes . . . . . . . . . . . . . . . . . . . . . . . . . .183 IBM PPDS emulation control codes. . . . . . . . . . . . . . . . . . . . .185 Standards and Approvals. . . . . . . . . . . . . . . . . . . . . . . . . . . . . . . . . .186 Cleaning the Printer . . . . . . . . . . . . . . . . . . . . . . . . . . . . . . . . . . . . . .186 Transporting the Printer . . . . . . . . . . . . . . . . . . . . . . . . . . . . . . . . . . .187
Glossary
Index
5

Chapter 1
Safety Instructions
Warnings, Cautions, and Notes
wWarnings
must be followed carefully to avoid bodily injury.
cCautions
must be observed to avoid damage to your equipment.
Notes
contain important information and useful tips on the operation of your printer.
Hot Parts Caution Symbol
KThis symbol is placed on the print head to indicate that it may be hot. Never touch this part just after the printer has been used. Let it cool for a few minutes before touching it.
Important Safety Instructions
Read all of these safety instructions before using the printer. In addition, follow all warnings and instructions marked on the printer itself.
6 Safety Instructions

When setting up the printer
Because the printer weights approximately 34 kg, you should not lift or carry it alone. Two people should carry it by the bottom.
Do not place the printer on an unstable surface or near a radiator or heat source.
Place the printer on a flat surface. The printer will not operate properly if it is tilted or placed at an angle.
Do not place this product on a soft, unstable surface like a bed or a sofa, or a small, enclosed area, as this restricts ventilation.
Do not block or cover the slots and openings in the printer’s cabinet, and do not insert objects through the slots.
Use only the type of power source indicated on the printer’s label. If you are not sure of the power supply specifications in your area, contact your local power company or consult your dealer.
Connect all equipment to properly grounded electrical outlets. Avoid using outlets on the same circuit as photocopiers or air control systems that regularly switch on and off.
Do not use a damaged or frayed power cord.
The power cord should be placed to avoid abrasions, cuts, fraying, crimping, kinking, and other damage.
If you use an extension cord with the printer, make sure the total ampere rating of all devices plugged into the extension cord does not exceed the cord’s ampere rating. Also, make sure the total ampere of all devices plugged into the electrical outlet does not exceed the electrical outlet’s ampere rating.
1
1
1
1
1
1
1
1
1
1
1
1
Safety Instructions |
7 |

Use only the power cord that comes with this product. Use of another cord may result in fire or electric shock.
This product’s power cord is for use with this product only. Use with other equipment may result in fire or electric shock.
When maintaining the printer
Unplug the printer before cleaning it, and always clean it with a piece of damp cloth only.
Do not spill liquid onto the printer.
Except as specifically explained in this guide, do not attempt to service the printer yourself.
Unplug the printer and refer servicing to qualified service personnel under the following conditions:
i.If the power cord or plug is damaged.
ii.If liquid has entered the printer.
iii.If the printer has been dropped or the cabinet damaged.
iv.If the printer does not operate normally or exhibits a distinct change in performance.
Adjust only those controls that are covered by the operating instructions.
If you plan to use the printer in Germany, observe the following:
To provide adequate short-circuit protection and over-current protection for this printer, the building installation must be protected by a 16-amp circuit breaker.
8 Safety Instructions

Bei Anschluss des Druckers an die Stromversorgung muss sichergestellt werden, dass die Gebaudeinstallation mit einer 16 A-Sicherung abgesichert ist.
When Handling the paper
Never feed labels backward using the Micro Feedd button. When fed backward, labels can easily peel off the backing
sheet and cause a paper jam.
Because labels are sensitive to temperature and humidity, use them only under normal operating conditions described below:
Temperature |
15 to 25°C (59 to 77°F) |
Humidity |
30 to 60% RH |
Do not leave labels loaded in the printer between jobs; they may curl around the platen and jam when you resume printing.
Do not load paper that is curled or has been folded.
When operating the printer
Adjust only those controls that are covered in the user documentation. Improper adjustment of other controls may result in damage requiring extensive repair by a qualified technician.
Whenever you turn off the printer, wait at least five seconds before turning it back on; otherwise, you may damage the printer.
Do not turn off the printer while it is printing the self test. Always press the Pause button to stop printing and then turn off the printer.
1
1
1
1
1
1
1
1
1
1
1
1
Safety Instructions |
9 |

Do not turn off the printer while it is printing the hex dump. Always press the Pause button to stop printing and then turn off the printer.
Do not reconnect the power cord to an electrical outlet that has the wrong voltage for your printer.
Never replace the print head yourself; you may damage the printer. Also, other parts of the printer must be checked when the print head is replaced.
You need to move the print head by hand to replace the ribbon cartridge. If you have just used the printer, the print head may be hot; let it cool for a few minutes before touching it.
ENERGY STAR® Compliance
As an ENERGY STAR® Partner, Epson has determined that this product meets the ENERGY STAR® guidelines for energy efficiency.
The International ENERGY STAR® Office Equipment Program is a voluntary partnership with the computer and office equipment industry to promote the introduction of energy-efficient personal computers, monitors, printers, fax machines, copiers, scanners, and multifunction devices in an effort to reduce air pollution caused by power generation. Their standards and logos are uniform among participating nations.
10 Safety Instructions
Chapter 2
Paper Handling
Using the Two-Tractor System
Your printer’s paper handling system consists of a front push tractor and a rear push tractor. Both tractors are easy to load and operate, and both accommodate a wide variety of paper types, including labels and multi-part forms.
The printer automatically adjusts to the thickness of the paper loaded when the Platen gap setting is set to Auto in the SelecType mode. See “SelecType mode” on page 88 for details.
You can print on continuous paper from 3 inches (76.2 mm) to 16.5 inches (419.1 mm) wide. Your printer senses the paper width automatically.
When using more than two types of paper, load the paper you use most often onto the front tractor. The front tractor, which is easier to reach, will be available for the paper you change more frequently.
Note:
Before using your paper, check that it matches the specifications described in this manual. See “Paper” on page 171 for details. Also
make sure your paper has a straight edge.
If continuous paper is fed past the sprocket (on the last page, for example), the paper may not feed properly.
When the optional perforation cutter (#C81507X) is installed, the printable width is from 4 inches (101.6 mm) to 16 inches (406.4 mm).
2
2
2
2
2
2
2
2
2
2
2
2
Paper Handling |
11 |

Positioning the paper supply
You can load continuous paper from both the front and the rear, so be sure to leave enough room around the printer for the two stacks of fresh paper and for the printed stack. Make sure you align your paper supply with the paper loaded in the tractor so the paper feeds smoothly into the printer.
The following illustration shows three ways to position your printer and paper: with the front tractor loaded, with the rear tractor loaded, and with both tractors loaded.
Note:
When loading paper from the front, be sure to put the paper someplace that is lower than the stand where the printer is placed. Placing the paper on the same level as the printer or higher may cause a paper jam.
Make sure that your stack of printed pages does not interfere with the rear tractor’s paper supply.
12 Paper Handling

What paper types you can use
You can use the continuous paper types listed below.
Continuous Paper Types |
Front Tractor |
Rear Tractor |
|
|
|
Single-sheet |
available |
available |
|
|
|
Multi-part |
available |
available |
|
|
|
Labels |
available |
available |
|
|
|
Continuous forms with labels |
available |
available |
|
|
|
Overlapping multi-part forms |
available |
available |
|
|
|
Loading Paper onto the Front Tractor
Follow these steps to load paper onto the front tractor:
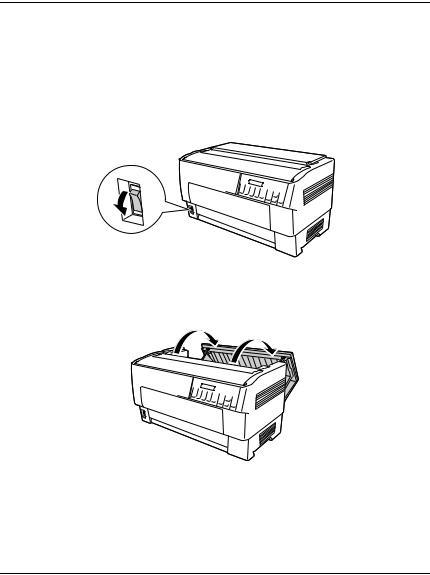
1. Turn off the printer.
2
2
2
2
2
2
2
2
2
2
2
2
Paper Handling |
13 |
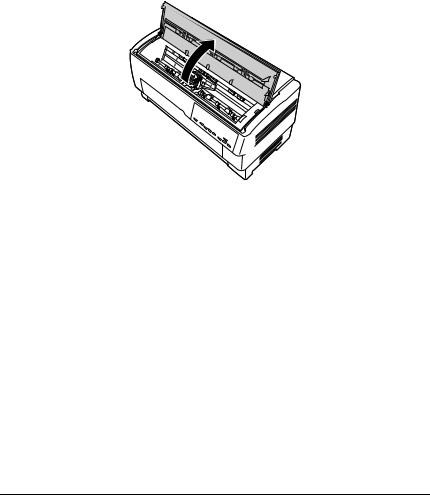
2.Open the printer’s front cover by lifting up the middle of its bottom edge until it locks in place, as shown below.
front cover
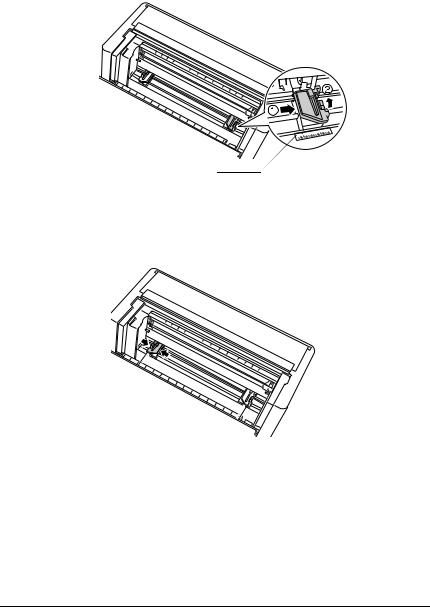
3.Release the sprocket lock levers on both the right and left sprockets by pulling each lever down.
sprocket lock lever
cCaution:
Do not try to pull on or remove the elastic cord from the tractor.
14 Paper Handling
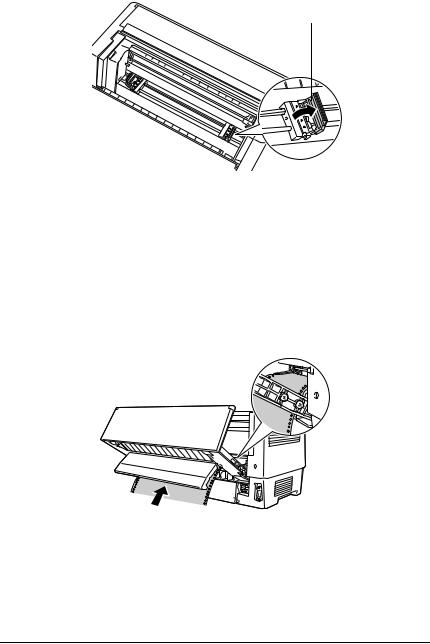
4.Position the left sprocket so that the sprocket pins are to the left of the arrow mark on the scale. Lock it into place by pushing up the sprocket lock lever.
arrow mark on the scale
5.Now slide the right sprocket to approximately match the width of your paper. (Do not lock it in place yet.)
2
2
2
2
2
2
2
2
2
2
2
2
Paper Handling |
15 |
6.Slide the two paper supports so that they are spaced evenly between the two sprockets.
paper supports
Note:
To use the paper that is less than four inches wide, remove the paper supports.
7. Open both sprocket covers.
sprocket cover
16 Paper Handling
8.Be sure your paper has a clean, straight edge, and then fit the first few holes in the paper over the sprocket pins as shown below. The side of the paper that you want to print on should be facing you. Now close the sprocket covers.
Note:
When loading paper from the front, be sure to put the paper someplace that is lower than the stand where the printer is placed. Placing the paper on the same level as the printer or higher may cause a paper jam.
9.Slide the right sprocket so that the paper is straight and has no wrinkles. Lock the sprocket in place by pushing up the sprocket lock lever. After you lock the right sprocket, it may still move slightly; this is normal.
sprocket lock lever
2
2
2
2
2
2
2
2
2
2
2
2
Paper Handling |
17 |

Note:
Be careful not to pull the paper too tightly when adjusting the right sprocket.
10.Pull the printer’s front cover out slightly and lower it until it is closed.
cCaution:
Do not push the front cover directly down; always pull it out slightly before closing.
Before turning on the printer, be absolutely sure you have removed all protective materials. (See the Unpacking instructions that are provided with the printer for more details.) Turning on the printer while the print head cannot move may seriously damage the mechanism.
18 Paper Handling
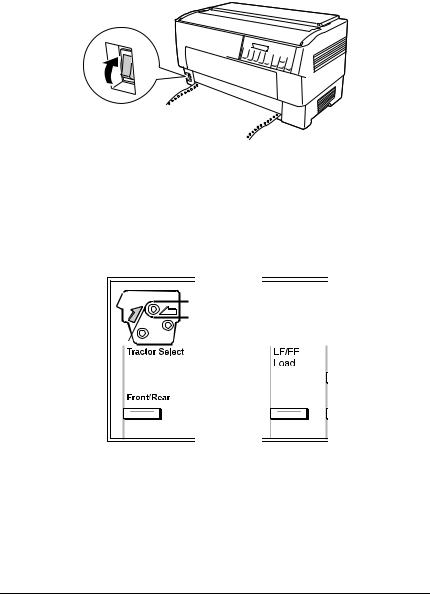
11.Turn on the printer. The print head moves to the left and the LCD turns on. Also, either the front or rear tractor arrow on the Tractor Select indicator lights up, depending on which tractor was selected when the printer was turned off last.
12.Check the Tractor Select indicator to see which tractor is selected:
If the front tractor arrow light is red, press the LF/FF Load button to load the paper.
If the rear tractor arrow light is red, press the Front/Rear button to switch to the front tractor. When the printer switches tractors, it also loads the paper automatically.
2
2
2
2
2
2
2
2
2
2
2
2
Paper Handling |
19 |
The Tractor Select indicator changes to green. The paper is now loaded to the top-of-form position. If it looks like the printing will start too high or low on the page, adjust the paper position. See “Adjusting the Paper Position” on page 26 for instructions.
Loading Paper onto the Rear Tractor
Follow the steps below to load paper onto the rear tractor. (You do not need to remove the paper from the front tractor first.)
1. Turn off the printer.
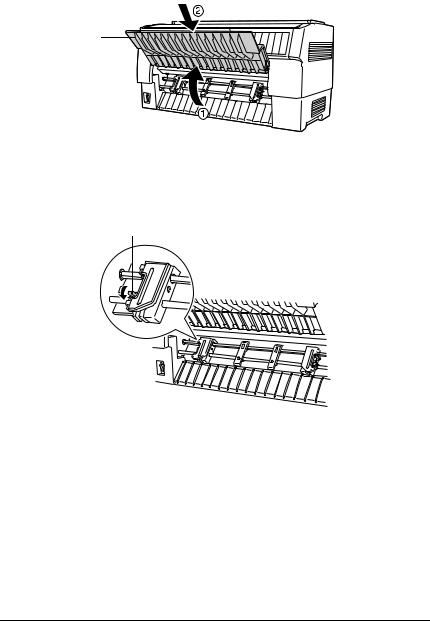
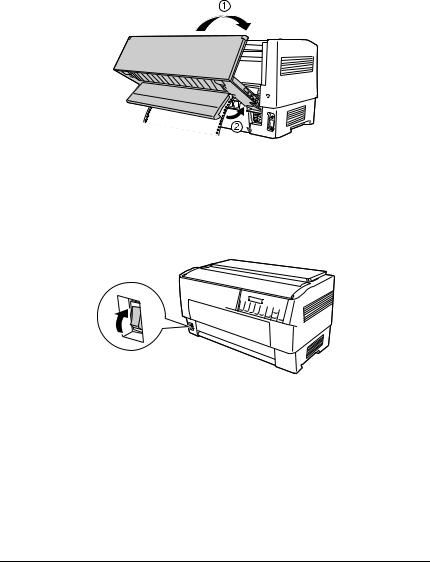
2. Open the printer’s top cover as shown below.
20 Paper Handling
3. Open the rear flap at the back of the top cover.
rear flap
4.Release the sprocket lock levers on the rear tractor’s right and left sprockets by pulling each lever forward.
sprocket lock lever
cCaution:
Do not try to pull on or remove the elastic cord from the tractor.
2
2
2
2
2
2
2
2
2
2
2
2
Paper Handling |
21 |
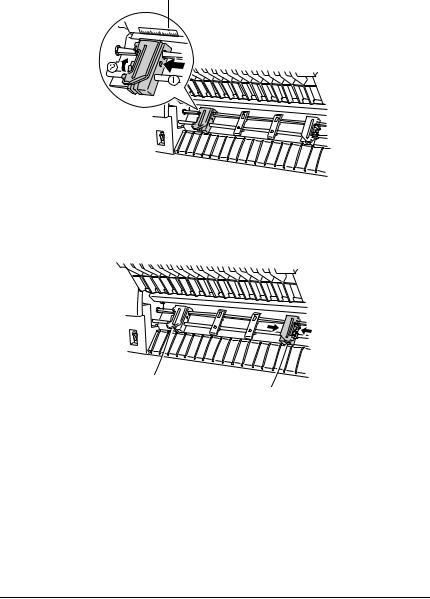
5.Position the right sprocket so that the sprocket pins are to the right of the arrow mark on the scale. Lock it in place by pushing the sprocket lock lever back.
arrow mark on the scale
6.Now slide the left sprocket to approximately match the width of your paper. (Do not lock it in place yet.)
22 Paper Handling
7. Open both sprocket covers.
sprocket cover
8.Make sure your paper has a clean, straight edge. With the side of the paper you want to print on facing down, insert your paper through the opening at the rear of the printer.
Note:
You may find it easier to load the paper by standing to the side. That way you can feed the paper with one hand and pull it through with the other.
2
2
2
2
2
2
2
2
2
2
2
2
Paper Handling |
23 |

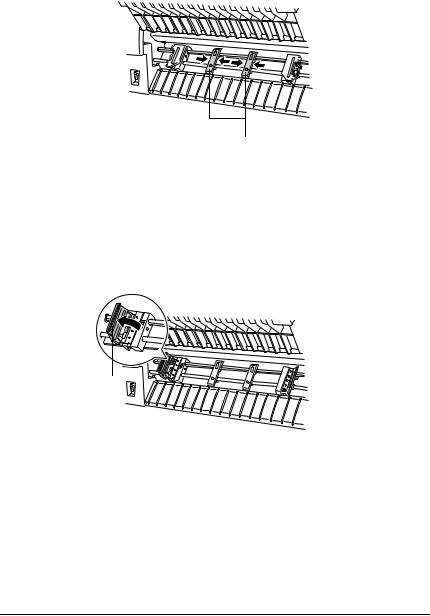
9.Fit the first few holes in the paper over the sprocket pins as shown below. Now close the sprocket covers.
10.Slide the left sprocket to remove any slack in the paper. Make sure the paper is straight and has no wrinkles. Push the sprocket lock lever back to lock the sprocket in place. After you lock the left sprocket, it may still move slightly; this is normal.
sprocket lock lever
24 Paper Handling
Note:
Be careful not to pull the paper too tightly when adjusting the left sprocket.
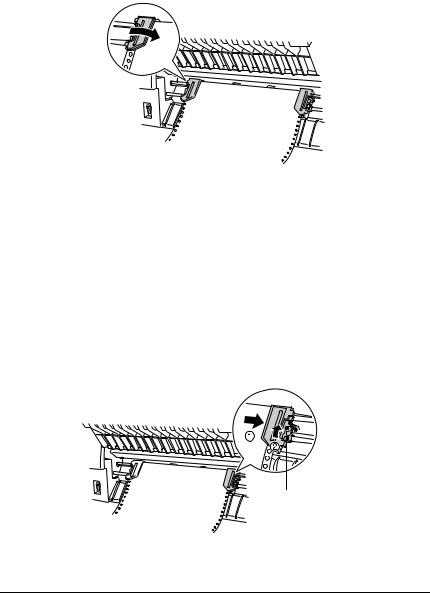
11.Close the top cover and the rear flap. The paper is now loaded in the standby position.
12.Turn on the printer. The print head moves to the left and the LCD turns on. Also, either the front or rear tractor arrow on the Tractor Select indicator lights up, depending on which tractor was selected when the printer was turned off last.
13.Check the Tractor Select indicator to see which tractor is selected:
2
2
2
2
2
2
2
2
2
2
2
2
Paper Handling |
25 |

If the rear tractor arrow light is red, press the LF/FF Load button to load the paper.
If the front tractor arrow light is red, press the Front/Rear button to switch to the rear tractor. When the printer switches tractors, it also loads the paper automatically.
The Tractor Select indicator changes to green. The paper is now loaded to the top-of-form position. If it looks like the printing will start too high or low on the page, adjust the paper position. See “Adjusting the Paper Position” on page 26 for instructions.
Adjusting the Paper Position
You can adjust the top-of-form position as well as the printing position at any point on the page by using the Micro Feed, and Top of Form buttons. The printer then remembers the new top-of-form position. When you use the optional pull tractor, you can adjust the paper position as described below.
26 Paper Handling

Note:
The printing position (based on the top-of-form position) is controlled by your software. To change the print position, adjust your software’s print settings. Use the following procedure only if your software does not allow print position adjustment.
Adjusting the top-of-form position
The top-of-form position is the position to which the printer feeds the paper when it loads it or performs a form feed. This position is important because it determines where the printing begins on each page. If the printing is too high or low on the page, you can adjust the top-of-form position either permanently or temporarily depending on how you use the Top of Form button.
When you want to permanently change the top-of-form position, you enter the top-of-form mode using the Top of Form control panel button. The printer remembers the new top-of-form position even after the printer is turned off, reset, or initialized. (The printer remembers separate top-of-form positions for the front and rear tractors.)
When you want to temporarily change the top-of-form position, you adjust the position using the Micro Feed buttons during pause status without entering top-of-form mode. The printer remembers the temporary top-of-form position until the next time you load paper, switch tractors, or turn off the printer.
You can set the top-of-form position from 4.2 mm (0.17 inch) to 33.9 mm (1.33 inch) below the top edge of the paper. The factory setting is 8.5 mm (0.33 inch).
Follow the steps below to reset (permanently change) the top-of-form position.
2
2
2
2
2
2
2
2
2
2
2
2
Paper Handling |
27 |
cCaution:
To adjust the top-of-form position when you are printing on labels, continuous forms with labels, or overlapping multi-part forms, use the Micro Feedu button only; do not enter the top-of-form mode. Never feed labels backward through the printer.
1.Make sure the printer is turned on and the desired tractor is selected (the corresponding tractor arrow should be lit).
2.Open the upper cover.
3.Press the Top of Form button to enter top-of-form mode. The printer beeps once, and the Top of Form light turns on.
28 Paper Handling
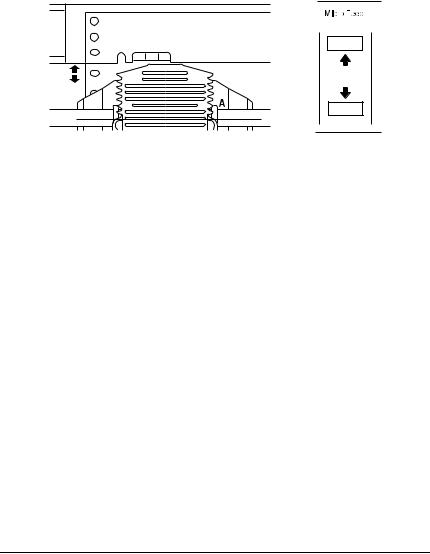
4.Use the Micro Feed buttons to feed the paper to the desired top-of-form position. The letter “A” on the ribbon protector shows you where the bottom edge of your first line of text will print. This position is based on the first printable line of text. If your software inserts a top margin of five lines, your text will actually print five lines below the top-of-form position.
5.Press the Top of Form button again to exit and save your new top-of-form position. Then close the top cover.
Note:
If you enter top-of-form mode right after loading paper, you can set the loading and top-of-form positions at the same time. (When you use the optional pull tractor, you cannot adjust the loading position.)
Adjusting the printing position
You may need to adjust the printing position in the middle of a page, or to adjust the top-of-form position when using labels.
2
2
2
2
2
2
2
2
2
2
2
2
Paper Handling |
29 |

When you move the printing position, you temporarily change the top-of-form position by the same amount. For example, if you adjust the printing in the middle of the page so that it falls a half-inch lower, the next page will begin printing a half-inch lower as well. The printer remembers this temporary top-of-form position until the next time you load paper, switch tractors, or turn off the printer. To adjust the printing position or top-of-form position, follow these steps:
1.Start printing your document. When you reach the text that you want to align at a particular spot on the page, press the Pause button to stop printing.
2.Use the Micro Feed buttons to adjust the position where you want your next line of text to fall. Press the button once to feed the paper forward or backward in 1/216-inch increments, or hold it down to move the paper continuously.
cCaution:
To adjust the printing position when you are printing on labels, continuous forms with labels, or overlapping multi-part forms, use the Micro Feedu button only. Never feed labels backward through the printer. When fed backward, labels may easily peel off the backing sheet and cause a paper jam.
3.When you are finished, press the Pause button to resume printing your document.
Adjusting the label position
Follow the steps below to adjust the label position:
Note:
See “Changing the settings in the SelecType mode” on page 98 to find how to make settings in the SelecType mode and see “Changing the settings in the default-setting mode” on page 101 to find how to make settings in the default-setting mode.
30 Paper Handling
Loading...