


User's Guide

Contents |
|
2 |
|
|
|
Notations Used in This Guide
Introduction to Your Projector
Projector Features . . . . . . . . . . . . . . . . . . . . . . . . . . . . . . . . . . . . . . . . . . 9
Quick and Easy Setup . . . . . . . . . . . . . . . . . . . . . . . . . . . . . . . . . . . . . . . . . . . . 9 Flexible Connectivity . . . . . . . . . . . . . . . . . . . . . . . . . . . . . . . . . . . . . . . . . . . . 9 Connect with Computer . . . . . . . . . . . . . . . . . . . . . . . . . . . . . . . . . . . . . . . 10 Connect with Mobile Devices . . . . . . . . . . . . . . . . . . . . . . . . . . . . . . . . . . . 11
Projector Parts and Functions . . . . . . . . . . . . . . . . . . . . . . . . . . . . . . . 12
Projector Parts - Front . . . . . . . . . . . . . . . . . . . . . . . . . . . . . . . . . . . . . . . . . . 12
Projector Parts - Rear . . . . . . . . . . . . . . . . . . . . . . . . . . . . . . . . . . . . . . . . . . . 13
Projector Parts - Base . . . . . . . . . . . . . . . . . . . . . . . . . . . . . . . . . . . . . . . . . . . 14
Projector Parts - Control Panel . . . . . . . . . . . . . . . . . . . . . . . . . . . . . . . . . . . . . 15
Projector Parts - Remote Control . . . . . . . . . . . . . . . . . . . . . . . . . . . . . . . . . . . 16
Setting Up the Projector
Projector Placement . . . . . . . . . . . . . . . . . . . . . . . . . . . . . . . . . . . . . . . 19
Projector Setup and Installation Options . . . . . . . . . . . . . . . . . . . . . . . . . . . . . . 20 Projection Distance . . . . . . . . . . . . . . . . . . . . . . . . . . . . . . . . . . . . . . . . . . . . 20
Projector Connections . . . . . . . . . . . . . . . . . . . . . . . . . . . . . . . . . . . . . 22
Connecting to a Computer . . . . . . . . . . . . . . . . . . . . . . . . . . . . . . . . . . . . . . . 22 Connecting to a Computer for USB Video and Audio . . . . . . . . . . . . . . . . . . . . 22 Connecting to a Computer for VGA Video and Audio . . . . . . . . . . . . . . . . . . . 22 Connecting to a Computer for HDMI Video and Audio . . . . . . . . . . . . . . . . . . 23 Connecting to Smartphones or Tablets . . . . . . . . . . . . . . . . . . . . . . . . . . . . . . . 24 Connecting to Video Sources . . . . . . . . . . . . . . . . . . . . . . . . . . . . . . . . . . . . . 25 Connecting to an HDMI Video Source . . . . . . . . . . . . . . . . . . . . . . . . . . . . . . 25 Connecting to a Component-to-VGA Video Source . . . . . . . . . . . . . . . . . . . . . 25 Connecting to a Composite Video Source . . . . . . . . . . . . . . . . . . . . . . . . . . . 26 Connecting to External USB Devices . . . . . . . . . . . . . . . . . . . . . . . . . . . . . . . . . 27 USB Device Projection . . . . . . . . . . . . . . . . . . . . . . . . . . . . . . . . . . . . . . . . 27
Connecting to a USB Device or Camera . . . . . . . . . . . . . . . . . . . . . . . . . . . . . 28 Disconnecting a USB Device or Camera . . . . . . . . . . . . . . . . . . . . . . . . . . . . . 28 Connecting to a Document Camera . . . . . . . . . . . . . . . . . . . . . . . . . . . . . . . . . 28 Connecting to External Output Devices . . . . . . . . . . . . . . . . . . . . . . . . . . . . . . 28 Connecting to an External Computer Monitor . . . . . . . . . . . . . . . . . . . . . . . . 29 Connecting to External Speakers . . . . . . . . . . . . . . . . . . . . . . . . . . . . . . . . . 29
Installing Batteries in the Remote Control . . . . . . . . . . . . . . . . . . . 31
Remote Control Operation . . . . . . . . . . . . . . . . . . . . . . . . . . . . . . . . . . . . . . . 31
Opening the Lens Cover . . . . . . . . . . . . . . . . . . . . . . . . . . . . . . . . . . . . 33
Using Basic Projector Features
Turning On the Projector . . . . . . . . . . . . . . . . . . . . . . . . . . . . . . . . . . . 35 Turning Off the Projector . . . . . . . . . . . . . . . . . . . . . . . . . . . . . . . . . . . 37 Setting the Date and Time . . . . . . . . . . . . . . . . . . . . . . . . . . . . . . . . . . 38 Selecting the Language for the Projector Menus . . . . . . . . . . . . . . 40 Projection Modes . . . . . . . . . . . . . . . . . . . . . . . . . . . . . . . . . . . . . . . . . . 41
Changing the Projection Mode Using the Remote Control . . . . . . . . . . . . . . . . . . 41 Changing the Projection Mode Using the Menus . . . . . . . . . . . . . . . . . . . . . . . . 41
Adjusting the Image Height . . . . . . . . . . . . . . . . . . . . . . . . . . . . . . . . 43
Image Shape . . . . . . . . . . . . . . . . . . . . . . . . . . . . . . . . . . . . . . . . . . . . . . 44
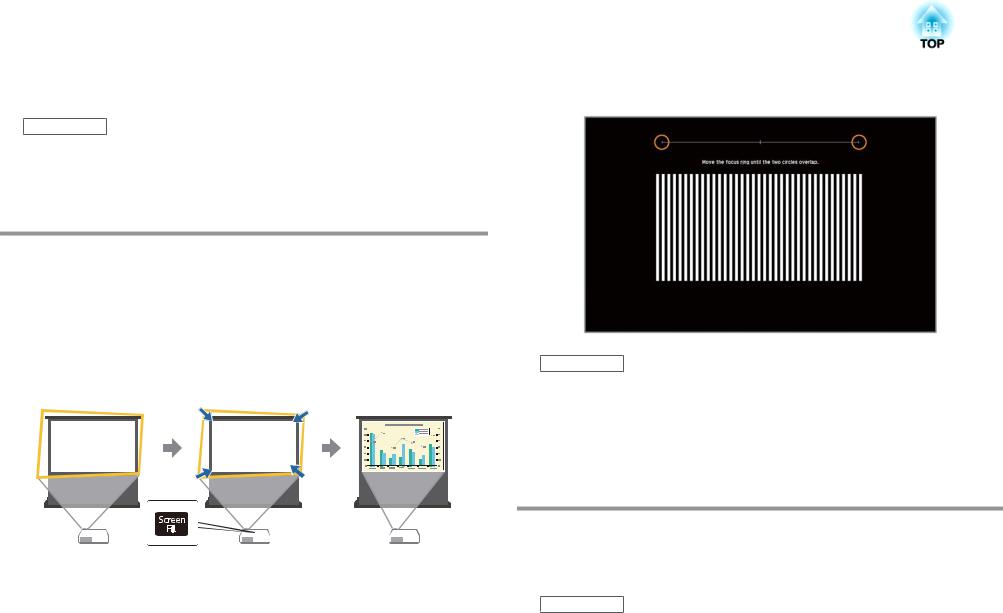
Auto H/V-Keystone . . . . . . . . . . . . . . . . . . . . . . . . . . . . . . . . . . . . . . . . . . . . 44 Automatically Correcting the Image Shape with Screen Fit . . . . . . . . . . . . . . . . . 44 Correcting the Image Shape with the Keystone Buttons . . . . . . . . . . . . . . . . . . . 46 Correcting the Image Shape with Quick Corner . . . . . . . . . . . . . . . . . . . . . . . . . 47
Resizing the Image with the Zoom Ring . . . . . . . . . . . . . . . . . . . . . . 50 Focusing the Image Using the Focus Ring . . . . . . . . . . . . . . . . . . . . 51 Projecting with USB Display . . . . . . . . . . . . . . . . . . . . . . . . . . . . . . . . 53
USB Display System Requirements . . . . . . . . . . . . . . . . . . . . . . . . . . . . . . . . . . 53

Contents |
|
3 |
|
|
|
Installing the USB Display Software . . . . . . . . . . . . . . . . . . . . . . . . . . . . . . . . . 54 Uninstalling the USB Display Software . . . . . . . . . . . . . . . . . . . . . . . . . . . . . . . 55 Uninstalling USB Display (Windows 2000) . . . . . . . . . . . . . . . . . . . . . . . . . . . 55 Uninstalling USB Display (Windows XP/Windows Vista/Windows 7) . . . . . . . . . 55 Uninstalling USB Display (Windows 8/Windows 8.1) . . . . . . . . . . . . . . . . . . . . 56 Uninstalling USB Display (OS X) . . . . . . . . . . . . . . . . . . . . . . . . . . . . . . . . . . 56
Selecting an Image Source . . . . . . . . . . . . . . . . . . . . . . . . . . . . . . . . . . 57
Image Aspect Ratio . . . . . . . . . . . . . . . . . . . . . . . . . . . . . . . . . . . . . . . . 59
Changing the Image Aspect Ratio . . . . . . . . . . . . . . . . . . . . . . . . . . . . . . . . . . 59 Available Image Aspect Ratios . . . . . . . . . . . . . . . . . . . . . . . . . . . . . . . . . . . . . 59 Projected Image Appearance with Each Aspect Mode . . . . . . . . . . . . . . . . . . . . . 60
Color Mode . . . . . . . . . . . . . . . . . . . . . . . . . . . . . . . . . . . . . . . . . . . . . . . 61
Changing the Color Mode . . . . . . . . . . . . . . . . . . . . . . . . . . . . . . . . . . . . . . . . 61 Available Color Modes . . . . . . . . . . . . . . . . . . . . . . . . . . . . . . . . . . . . . . . . . . 61 Setting Auto Iris . . . . . . . . . . . . . . . . . . . . . . . . . . . . . . . . . . . . . . . . . . . . . . 62
Adjusting the Image Color . . . . . . . . . . . . . . . . . . . . . . . . . . . . . . . . . . 64
Adjusting the Hue, Saturation, and Brightness . . . . . . . . . . . . . . . . . . . . . . . . . . 64 Adjusting the Gamma . . . . . . . . . . . . . . . . . . . . . . . . . . . . . . . . . . . . . . . . . . 65
Controlling the Volume with the Volume Buttons . . . . . . . . . . . . 68
Adjusting Projector Features
Projecting Two Images Simultaneously . . . . . . . . . . . . . . . . . . . . . . 70
Split Screen Projection Input Source Combinations . . . . . . . . . . . . . . . . . . . . . . 71 Split Screen Projection Restrictions . . . . . . . . . . . . . . . . . . . . . . . . . . . . . . . . . 71
Projecting a PC Free Presentation . . . . . . . . . . . . . . . . . . . . . . . . . . . 73
Supported PC Free File Types . . . . . . . . . . . . . . . . . . . . . . . . . . . . . . . . . . . . . 73 Precautions on PC Free Projection . . . . . . . . . . . . . . . . . . . . . . . . . . . . . . . . . . 73 Starting a PC Free Slide Show . . . . . . . . . . . . . . . . . . . . . . . . . . . . . . . . . . . . . 74 Starting a PC Free PDF File Presentation . . . . . . . . . . . . . . . . . . . . . . . . . . . . . . 75 Starting a PC Free Movie Presentation . . . . . . . . . . . . . . . . . . . . . . . . . . . . . . . 77 Playing a Scenario . . . . . . . . . . . . . . . . . . . . . . . . . . . . . . . . . . . . . . . . . . . . . 78
PC Free Display Options . . . . . . . . . . . . . . . . . . . . . . . . . . . . . . . . . . . . . . . . . |
79 |
Shutting Off the Image and Sound Temporarily . . . . . . . . . . . . . . 81 Stopping Video Action Temporarily . . . . . . . . . . . . . . . . . . . . . . . . . 82 Zooming Images . . . . . . . . . . . . . . . . . . . . . . . . . . . . . . . . . . . . . . . . . . . 83 Using the Remote Control as a Wireless Mouse . . . . . . . . . . . . . . . 84 Using the Remote Control as a Pointer . . . . . . . . . . . . . . . . . . . . . . . 86 Saving a User's Logo Image . . . . . . . . . . . . . . . . . . . . . . . . . . . . . . . . . 87
Color Difference Correction when Projecting from Multiple Projectors . . . . . . . . . . . . . . . . . . . . . . . . . . . . . . . . . . . . . . . . . . . . . . . . . 90
Setting the Projector ID . . . . . . . . . . . . . . . . . . . . . . . . . . . . . . . . . . . . . . . . . 90 Selecting the Projector You want to Operate . . . . . . . . . . . . . . . . . . . . . . . . . . . 90 Matching Multiple-Projector Display Quality . . . . . . . . . . . . . . . . . . . . . . . . . . . 91
Projector Security Features . . . . . . . . . . . . . . . . . . . . . . . . . . . . . . . . . 93
Password Security Types . . . . . . . . . . . . . . . . . . . . . . . . . . . . . . . . . . . . . . . . . 93 Setting a Password . . . . . . . . . . . . . . . . . . . . . . . . . . . . . . . . . . . . . . . . . . 93 Selecting Password Security Types . . . . . . . . . . . . . . . . . . . . . . . . . . . . . . . . 94 Entering a Password to Use the Projector . . . . . . . . . . . . . . . . . . . . . . . . . . . 95 Locking the Projector's Buttons . . . . . . . . . . . . . . . . . . . . . . . . . . . . . . . . . . . . 96 Unlocking the Projector's Buttons . . . . . . . . . . . . . . . . . . . . . . . . . . . . . . . . 97 Installing a Security Cable . . . . . . . . . . . . . . . . . . . . . . . . . . . . . . . . . . . . . . . . 97
Using the Projector on a Network
Wired Network Projection . . . . . . . . . . . . . . . . . . . . . . . . . . . . . . . . . . 99
Connecting to a Wired Network . . . . . . . . . . . . . . . . . . . . . . . . . . . . . . . . . . . . 99 Selecting Wired Network Settings . . . . . . . . . . . . . . . . . . . . . . . . . . . . . . . . . . 99
Wireless Network Projection . . . . . . . . . . . . . . . . . . . . . . . . . . . . . . . 102
Installing the Wireless LAN Module . . . . . . . . . . . . . . . . . . . . . . . . . . . . . . . . . 102 Using Quick Wireless Connection (Windows Only) . . . . . . . . . . . . . . . . . . . . . . 103 Selecting Wireless Network Settings Manually . . . . . . . . . . . . . . . . . . . . . . . . . 104

Contents |
|
4 |
|
|
|
Searching for a Wireless Network . . . . . . . . . . . . . . . . . . . . . . . . . . . . . . . . . . 106 Selecting Wireless Network Settings in Windows . . . . . . . . . . . . . . . . . . . . . . . 107 Selecting Wireless Network Settings in OS X . . . . . . . . . . . . . . . . . . . . . . . . . . 108 Setting Up Wireless Network Security . . . . . . . . . . . . . . . . . . . . . . . . . . . . . . . 108
Wireless Network Projection from a Mobile Device (Screen Mirroring) . . . . . . . . . . . . . . . . . . . . . . . . . . . . . . . . . . . . . . . . . . . . . . . 110
Selecting Screen Mirroring Settings . . . . . . . . . . . . . . . . . . . . . . . . . . . . . . . . 110 Connecting Using Screen Mirroring in Windows 8.1 . . . . . . . . . . . . . . . . . . . . . 112 Connecting Using Screen Mirroring with the Intel WiDi Software . . . . . . . . . . . . 113 Connecting Using Screen Mirroring with the Miracast Function . . . . . . . . . . . . . 114
Monitoring and Controlling the Projector
EasyMP Monitor . . . . . . . . . . . . . . . . . . . . . . . . . . . . . . . . . . . . . . . . . . 116 Controlling a Networked Projector Using a Web Browser . . . . . 117 Setting Up Projector Network E-Mail Alerts . . . . . . . . . . . . . . . . . 119
Network Projector E-mail Alert Messages . . . . . . . . . . . . . . . . . . . . . . . . . . . . |
. 119 |
Setting Up Monitoring Using SNMP . . . . . . . . . . . . . . . . . . . . . . . . |
121 |
Using ESC/VP21 Commands . . . . . . . . . . . . . . . . . . . . . . . . . . . . . . . |
122 |
ESC/VP21 Command List . . . . . . . . . . . . . . . . . . . . . . . . . . . . . . . . . . . . . . . . |
122 |
Cable Layouts . . . . . . . . . . . . . . . . . . . . . . . . . . . . . . . . . . . . . . . . . . . . . . . |
122 |
PJLink Support . . . . . . . . . . . . . . . . . . . . . . . . . . . . . . . . . . . . . . . . . . . |
124 |
Crestron RoomView Support . . . . . . . . . . . . . . . . . . . . . . . . . . . . . . |
125 |
Setting Up Crestron RoomView Support . . . . . . . . . . . . . . . . . . . . . . . . . . . . . |
125 |
Controlling a Networked Projector Using Crestron RoomView . . . . . . . . . . . . . . |
126 |
Crestron RoomView Operation Window . . . . . . . . . . . . . . . . . . . . . . . . . . . |
126 |
Crestron RoomView Tools Window . . . . . . . . . . . . . . . . . . . . . . . . . . . . . . . |
127 |
Adjusting the Menu Settings
Using the Projector's Menus . . . . . . . . . . . . . . . . . . . . . . . . . . . . . . . 132
Using the On-screen Keyboard . . . . . . . . . . . . . . . . . . . . . . . . . . . . . 133
Image Quality Settings - Image Menu . . . . . . . . . . . . . . . . . . . . . . 134
Input Signal Settings - Signal Menu . . . . . . . . . . . . . . . . . . . . . . . . 135
Projector Feature Settings - Settings Menu . . . . . . . . . . . . . . . . . 137
Projector Setup Settings - Extended Menu . . . . . . . . . . . . . . . . . . 139
Extended Menu - Date & Time Settings . . . . . . . . . . . . . . . . . . . . . . . . . . . . . . |
140 |
Projector Network Settings - Network Menu . . . . . . . . . . . . . . . . 142
Network Menu - Screen Mirroring Settings . . . . . . . . . . . . . . . . . . . . . . . . . . . 143 Network Menu - Basic Menu . . . . . . . . . . . . . . . . . . . . . . . . . . . . . . . . . . . . . 143 Network Menu - Wireless LAN Menu . . . . . . . . . . . . . . . . . . . . . . . . . . . . . . . . 144 Network Menu - Security Menu . . . . . . . . . . . . . . . . . . . . . . . . . . . . . . . . . . . 145 Network Menu - Wired LAN Menu . . . . . . . . . . . . . . . . . . . . . . . . . . . . . . . . . 146 Network Menu - Mail Menu . . . . . . . . . . . . . . . . . . . . . . . . . . . . . . . . . . . . . . 147 Network Menu - Others Menu . . . . . . . . . . . . . . . . . . . . . . . . . . . . . . . . . . . . 148 Network Menu - Reset Menu . . . . . . . . . . . . . . . . . . . . . . . . . . . . . . . . . . . . . 148
Projector Setup Settings - ECO Menu . . . . . . . . . . . . . . . . . . . . . . . 150
Projector Information Display - Info Menu . . . . . . . . . . . . . . . . . . 151
Info Menu - Projector Info Menu . . . . . . . . . . . . . . . . . . . . . . . . . . . . . . . . . . . |
151 |
Event ID Code List . . . . . . . . . . . . . . . . . . . . . . . . . . . . . . . . . . . . . . . . . . |
152 |
Projector Reset Options - Reset Menu . . . . . . . . . . . . . . . . . . . . . . 153 Copy Menu Settings to Another Projector (Batch Setup) . . . . . 154
Performing Batch Setup Using a USB Flash Drive . . . . . . . . . . . . . . . . . . . . . . . 154 Performing Batch Setup Using a USB Cable . . . . . . . . . . . . . . . . . . . . . . . . . . . 155
Setting Projector Event Schedules . . . . . . . . . . . . . . . . . . . . . . . . . 129

Contents |
|
5 |
|
|
|
Maintaining the Projector
Cleaning the Lens . . . . . . . . . . . . . . . . . . . . . . . . . . . . . . . . . . . . . . . . 158
Cleaning the Projector Case . . . . . . . . . . . . . . . . . . . . . . . . . . . . . . . 159
Air Filter and Vent Maintenance . . . . . . . . . . . . . . . . . . . . . . . . . . . 160
Cleaning the Air Filter and Vents . . . . . . . . . . . . . . . . . . . . . . . . . . . . . . . . . . 160 Replacing the Air Filter . . . . . . . . . . . . . . . . . . . . . . . . . . . . . . . . . . . . . . . . . 160
Projector Lamp Maintenance . . . . . . . . . . . . . . . . . . . . . . . . . . . . . . 162
Replacing the Lamp . . . . . . . . . . . . . . . . . . . . . . . . . . . . . . . . . . . . . . . . . . . 162 Resetting the Lamp Timer . . . . . . . . . . . . . . . . . . . . . . . . . . . . . . . . . . . . . . . 165
Replacing the Remote Control Batteries . . . . . . . . . . . . . . . . . . . . 167
Solving Problems
Projection Problems . . . . . . . . . . . . . . . . . . . . . . . . . . . . . . . . . . . . . . 169 Projector Light Status . . . . . . . . . . . . . . . . . . . . . . . . . . . . . . . . . . . . . 170 Using the Projector Help Displays . . . . . . . . . . . . . . . . . . . . . . . . . . 173 Solving Image or Sound Problems . . . . . . . . . . . . . . . . . . . . . . . . . 174
Solutions When No Image Appears . . . . . . . . . . . . . . . . . . . . . . . . . . . . . . . . . 174 Solutions When Image is Incorrect Using the USB Display Function . . . . . . . . . . . 174 Solutions When "No Signal" Message Appears . . . . . . . . . . . . . . . . . . . . . . . . . 175 Displaying From a Laptop . . . . . . . . . . . . . . . . . . . . . . . . . . . . . . . . . . . . . 175 Displaying From a Mac Laptop . . . . . . . . . . . . . . . . . . . . . . . . . . . . . . . . . . 175 Solutions When "Not Supported" Message Appears . . . . . . . . . . . . . . . . . . . . . 176 Solutions When Only a Partial Image Appears . . . . . . . . . . . . . . . . . . . . . . . . . 176 Solutions When the Image is not Rectangular . . . . . . . . . . . . . . . . . . . . . . . . . 176 Solutions When the Image Contains Noise or Static . . . . . . . . . . . . . . . . . . . . . 177 Solutions When the Image is Fuzzy or Blurry . . . . . . . . . . . . . . . . . . . . . . . . . . 177 Solutions When the Image Brightness or Colors are Incorrect . . . . . . . . . . . . . . . 178 Solutions to Sound Problems . . . . . . . . . . . . . . . . . . . . . . . . . . . . . . . . . . . . . 179 Solutions When Image File Names are not Displayed Correctly in PC Free . . . . . . . 179
Solving Projector or Remote Control Operation Problems . . . . 180
Solutions to Projector Power or Shut-Off Problems . . . . . . . . . . . . . . . . . . . . . . 180 Solutions to Problems with the Remote Control . . . . . . . . . . . . . . . . . . . . . . . . 180 Solutions to Password Problems . . . . . . . . . . . . . . . . . . . . . . . . . . . . . . . . . . 181
Solution When "The Battery that Saves Your Clock Settings is Running Low" Message Appears . . . . . . . . . . . . . . . . . . . . . . . . . . . . . . . . . . . . . . . . . . . . . . . . . . . 181
Solving Network Problems . . . . . . . . . . . . . . . . . . . . . . . . . . . . . . . . 182
Solutions When You Cannot Access the Projector Through the Web . . . . . . . . . . 182 Solutions When Network Alert E-Mails are not Received . . . . . . . . . . . . . . . . . . 182 Solutions When the Image Contains Static During Network Projection . . . . . . . . . 182 Solutions When You Cannot Connect Using Screen Mirroring . . . . . . . . . . . . . . . 183
Solutions When the Image Contains Static During Screen Mirroring Connection
. . . . . . . . . . . . . . . . . . . . . . . . . . . . . . . . . . . . . . . . . . . . . . . . . . . . . . . . . . 183
Appendix
Optional Accessories and Replacement Parts . . . . . . . . . . . . . . . 186
Optional Accessories . . . . . . . . . . . . . . . . . . . . . . . . . . . . . . . . . . . . . . . . . . 186
Replacement Parts . . . . . . . . . . . . . . . . . . . . . . . . . . . . . . . . . . . . . . . . . . . . 187
Screen Size and Projection Distance . . . . . . . . . . . . . . . . . . . . . . . . 188
Supported Monitor Display Resolutions . . . . . . . . . . . . . . . . . . . . 190
Projector Specifications . . . . . . . . . . . . . . . . . . . . . . . . . . . . . . . . . . . 192
Connector Specifications . . . . . . . . . . . . . . . . . . . . . . . . . . . . . . . . . . . . . . . 193
External Dimensions . . . . . . . . . . . . . . . . . . . . . . . . . . . . . . . . . . . . . . 194
Glossary . . . . . . . . . . . . . . . . . . . . . . . . . . . . . . . . . . . . . . . . . . . . . . . . . 195
Notices . . . . . . . . . . . . . . . . . . . . . . . . . . . . . . . . . . . . . . . . . . . . . . . . . . 197
FCC Compliance Statement . . . . . . . . . . . . . . . . . . . . . . . . . . . . . . . . . . . . . . |
197 |
Indication of the manufacturer and the importer in accordance with requirements of |
|
directive 2011/65/EU (RoHS) . . . . . . . . . . . . . . . . . . . . . . . . . . . . . . . . . . . . . |
198 |
Wireless Telegraphy Act Regulations . . . . . . . . . . . . . . . . . . . . . . . . . . . . . . . |
198 |
Restriction of Use . . . . . . . . . . . . . . . . . . . . . . . . . . . . . . . . . . . . . . . . . . . . . |
198 |
Operating System References . . . . . . . . . . . . . . . . . . . . . . . . . . . . . . . . . . . . |
198 |

Contents |
|
6 |
|
|
|
Trademarks . . . . . . . . . . . . . . . . . . . . . . . . . . . . . . . . . . . . . . . . . . . . . . . . . 199
Copyright Notice . . . . . . . . . . . . . . . . . . . . . . . . . . . . . . . . . . . . . . . . . . . . . 199
Copyright Attribution . . . . . . . . . . . . . . . . . . . . . . . . . . . . . . . . . . . . . . . . . . 200

Notations Used in This Guide
Safety Symbols
The projector and its manuals use graphical symbols and labels to indicate content that tells you how to use the projector safely.
Read and carefully follow the instructions that are marked with these symbols and labels to avoid injury to persons or damage to property.
Warning |
|
This symbol indicates information that, if ignored, could possibly result in personal injury or even death. |
|
|
|
Caution |
|
This symbol indicates information that, if ignored, could possibly result in personal injury or physical damage due to incorrect handling. |
|
|
|
General Information Notations |
|
|
|
|
|
Attention |
|
This label indicates procedures that may result in damage or injury if sufficient care is not taken. |
|
|
|
a |
|
This label indicates additional information that may be useful to know. |
|
|
|
|
|
|
[Button name] |
|
Indicates the name of the buttons on the remote control or the control panel. |
|
|
Example: [Esc] button |
|
|
|
Menu/Setting name |
|
Indicates projector menu and setting names. |
|
|
Example: |
|
|
Select the Image menu |
|
|
s Image > Advanced |
|
|
|

Introduction to Your Projector
Refer to these sections to learn more about your projector's features and part names.
Related Links
•"Projector Features" p.9
•"Projector Parts and Functions" p.12
Projector Features |
|
9 |
|
|
|
This projector has a quick and easy setup, and flexible connectivity features.
Related Links
•"Introduction to Your Projector" p.8
•"Quick and Easy Setup" p.9
•"Flexible Connectivity" p.9
Quick and Easy Setup
•Direct Power On feature to turn on the projector as soon as you plug it in.
•Auto Power On feature to turn on the projector when the projector detects the image signal from the Computer1 port.
•Real-time, automatic vertical and horizontal keystone correction always displays a rectangular screen (Auto H/V-Keystone).
•Screen Fit feature to automatically resize projected images.
• Focus Help feature to guide you to the optimum focus adjustment.
Related Links
•"Projector Features" p.9
•"Turning On the Projector" p.35
•"Auto H/V-Keystone" p.44
• "Automatically |
Correcting the Image Shape with Screen Fit" p.44 |
• "Correcting the |
Image Shape with Quick Corner" p.47 |
Flexible Connectivity
This projector supports a wide variety of easy-to-use connectivity options as shown below.
Related Links
•"Projector Features" p.9
•"Connect with Computer" p.10
•"Connect with Mobile Devices" p.11
Projector Features
Connect with Computer
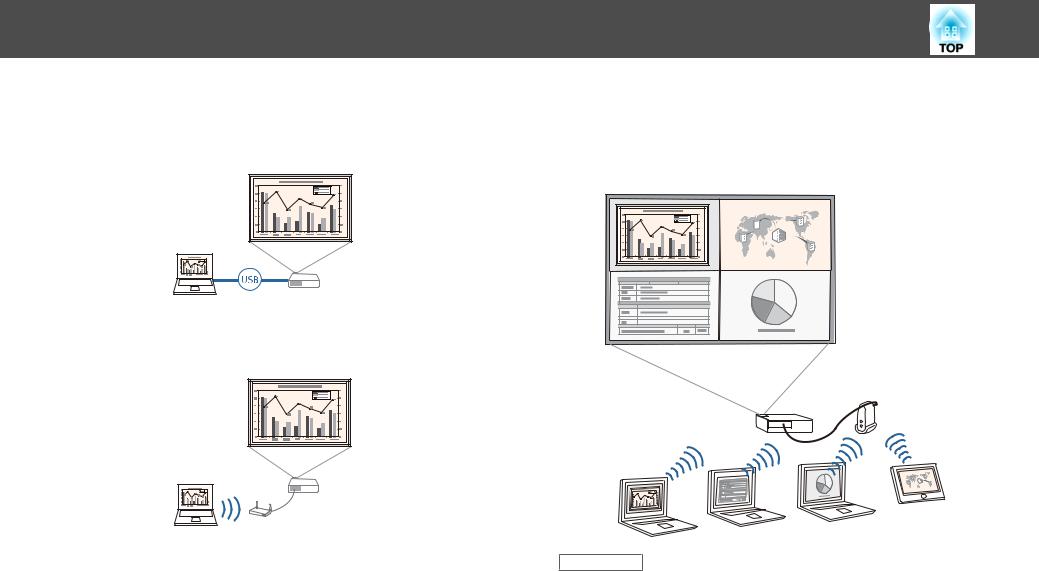
•Connect with one USB cable to project images and output audio (USB Display).
•EasyMP Network Projection to share the projector over the network and project images from any of the computers on the network.
See the EasyMP Network Projection Operation Guide for details
10
•EasyMP Multi PC Projection to project up to four images at the same time by splitting the projected screen. You can project images from computer on the network or smartphones or tablet devices on which Epson iProjection is installed.
See the EasyMP Multi PC Projection Operation Guide for details.
Related Links
•"Flexible Connectivity" p.9
•"Projecting with USB Display" p.53
•"Using the Projector on a Network" p.98
Projector Features |
|
11 |
|
|
|
Connect with Mobile Devices
•HDMI1/MHL port to connect MHL cable to the mobile device and to the projector.
•Screen Mirroring to connect your projector and mobile device wirelessly using Intel® WiDi or Miracast technology (EB-1985WU/EB-1975W).
•Epson iProjection to connect your projector and mobile device wirelessly using the app available on App Store or Google play (EB-1985WU/EB-1975W/EB-1970W).
aAny fees incurred when communicating with the App Store or Google play are the responsibility of the customer.
Related Links
•"Flexible Connectivity" p.9
•"Connecting to Smartphones or Tablets" p.24
•"Wireless Network Projection from a Mobile Device (Screen Mirroring)"
p.110
Projector Parts and Functions
The following sections explain the projector parts and their functions.
Related Links
•"Introduction to Your Projector" p.8
•"Projector Parts - Front" p.12
•"Projector Parts - Rear" p.13
•"Projector Parts - Base" p.14
•"Projector Parts - Control Panel" p.15
•"Projector Parts - Remote Control" p.16
Projector Parts - Front
12
Name |
Function |
A Air exhaust vent |
Exhaust vent for air used to cool the projector |
|
internally. |
|
|
|
|
|
Caution |
|
|
|
|
|
While projecting, do not put your face or |
||
|
|
|
|
hands near the air exhaust vent, and do not |
||
|
|
|
|
place objects that may become warped or |
||
|
|
|
|
damaged by heat near the vent. Hot air from |
||
|
|
|
|
the air exhaust vent could cause burns, |
||
|
|
|
|
warping, or accidents to occur. |
||
|
|
|||||
B A/V Mute slide lev |
Slide the lever to open and close the A/V mute |
|||||
er |
|
|
slide. |
|
|
|
|
|
|
||||
C Foot |
release lever |
Press the foot release lever to extend and retract the |
||||
|
|
|
front |
adjustable foot. |
|
|
|
|
|
||||
D Front |
adjustable |
When setup on a surface such as a desk, extend the |
||||
foot |
|
|
foot to adjust the position of the image. |
|||
|
|
|||||
E A/V Mute slide |
Close when not using the projector to protect the |
|||||
|
|
|
lens. By closing during projection you can hide the |
|||
|
|
|
image and the sound. |
|||
|
|
|
||||
F Remote |
receiver |
Receives signals from the remote control. |
||||
|
|
|
||||
G Sensor |
|
Sensor for detecting the projected images. |
||||
|
|
|
||||
H Wireless |
LAN light |
Indicates the access status of the supplied or op |
||||
|
|
|
tional |
wireless LAN |
module. |
|
|
|
|
|
|
||
I Air intake vent (air |
Takes |
in |
air to cool |
the projector internally. |
||
filter) |
|
|
|
|
|
|
|
|
|||||
J Air filter cover latch |
Use this latch to open the air filter cover. |
|||||
|
|
|||||
K Illumination sensor |
Detects the brightness of the surroundings to opti |
|||||
|
|
|
mize |
the |
lamp brightness. |
|
|
|
|
|
|||
L Control |
panel |
Operates |
the projector. |
|||
|
|
|||||
M [Focus Help] button |
Projects the Focus Help screen to fine-tune your |
|||||
|
|
|
focus |
adjustments. |
|
|
Projector Parts and Functions
Name |
|
Function |
||
N |
Zoom |
ring |
Adjusts |
the image size. |
|
|
|
||
O |
[Screen Fit] button |
Performs Screen Fit feature to automatically correct |
||
|
|
|
the shape and position of images to fit on your |
|
|
|
|
screen. |
|
|
|
|
This button is disabled when the projector is sus |
|
|
|
|
pended |
from a ceiling. |
|
|
|
|
|
P |
Focus |
ring |
Adjusts |
the image focus. |
|
|
|
|
|
Q |
Lamp |
cover |
Open when replacing the projector's lamp. |
|
|
|
|
|
|
R |
Lights |
|
Indicates the projector's status. |
|
|
|
|
|
|
Related Links
•"Projector Parts and Functions" p.12
•"Resizing the Image with the Zoom Ring" p.50
•"Focusing the Image Using the Focus Ring" p.51
• "Automatically Correcting the Image Shape with Screen Fit" p.44
• "Projector Light Status" p.170
Projector Parts - Rear
13
Name |
|
Function |
|
A |
LAN port |
Connects a LAN cable to connect to a network. |
|
|
|
|
|
B |
Monitor Out port |
Outputs analog RGB signals input from the Com |
|
|
|
|
puter1 port to an external monitor. |
|
|
|
|
C |
RS-232C |
port |
Connects an RS-232C cable to control the projector |
|
|
|
from a computer. (You do not need to use this port |
|
|
|
normally.) |
|
|
|
|
D |
Audio Out port |
Outputs audio from the current input source to an |
|
|
|
|
external speaker. |
|
|
|
|
E |
Computer2 port |
Inputs image signals from a computer and compo |
|
|
|
|
nent video signals from other video sources. |
|
|
|
|
F |
Audio1 port |
Inputs audio from equipment connected to the |
|
|
|
|
Computer1 port. |
|
|
|
|
G |
Audio2 port |
Inputs audio from equipment connected to the |
|
|
|
|
Computer2 port. |
|
|
|
|
H |
Power inlet |
Connects the power cord to the projector. |
|
|
|
|
|
I |
L-Audio-R ports |
Inputs audio from equipment connected to the |
|
|
|
|
Video port. |
|
|
|
|
J |
Security |
slot |
The security slot is compatible with the Microsaver |
|
|
|
Security System manufactured by Kensington. |
|
|
|
|
K |
Remote |
receiver |
Receives signals from the remote control. |
|
|
|
|
L |
HDMI2 port |
Inputs video signals from HDMI compatible video |
|
|
|
|
equipment and computers. |
|
|
|
|
M |
HDMI1/MHL port |
Inputs video signals from HDMI compatible video |
|
|
|
|
equipment and computers, or MHL (Mobile High- |
|
|
|
Definition) compatible mobile devices. |
|
|
|
|
N |
Video port |
Inputs composite video signals from video sources. |
|
|
|
|
|
O |
Computer1 port |
Inputs image signals from a computer and compo |
|
|
|
|
nent video signals from other video sources. |
|
|
|
|
P |
USB-B port |
Connects a commercially available USB cable to the |
|
|
|
|
computer to project computer images or to use the |
|
|
|
Wireless Mouse function. |
|
|
|
|
Projector Parts and Functions |
|
14 |
|
|
|
Name |
Function |
|
Q |
USB-A port |
Connects a USB memory device or a digital camera |
|
|
and projects PDFs, movies, or images using PC |
|
|
Free. |
|
|
|
Related Links
•"Projector Parts and Functions" p.12
•"Using the Remote Control as a Wireless Mouse" p.84
•"Projecting a PC Free Presentation" p.73
•"Installing a Security Cable" p.97
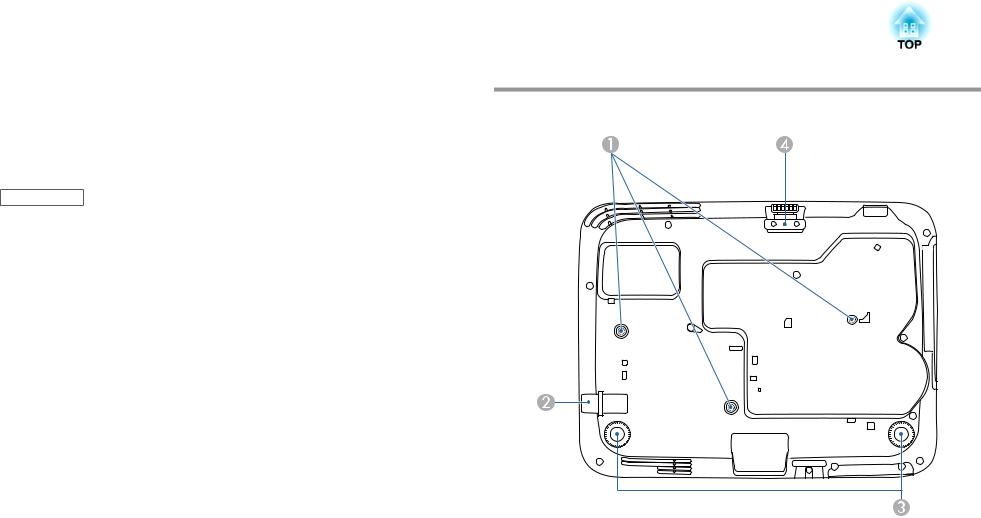
Projector Parts - Base
Name |
|
|
Function |
|
A |
Ceiling mount fix |
Attach the optional ceiling mount here when sus |
||
|
ing points |
(three |
pending the projector from a ceiling. |
|
|
points) |
|
|
|
|
|
|
||
B |
Security cable at |
Pass a commercially available wire lock through here |
||
|
tachment |
point |
and lock it in place. |
|
|
|
|
|
|
C |
Rear |
feet |
|
When setup on a surface such as a desk, turn to |
|
|
|
|
extend and retract to adjust the horizontal tilt. |
|
|
|
|
|
D |
Front |
adjustable |
When setup on a surface such as a desk, extend the |
|
|
foot |
|
|
foot to adjust the position of the image. |
|
|
|
|
|
Projector Parts and Functions
Related Links
•"Projector Parts and Functions" p.12
•"Installing a Security Cable" p.97
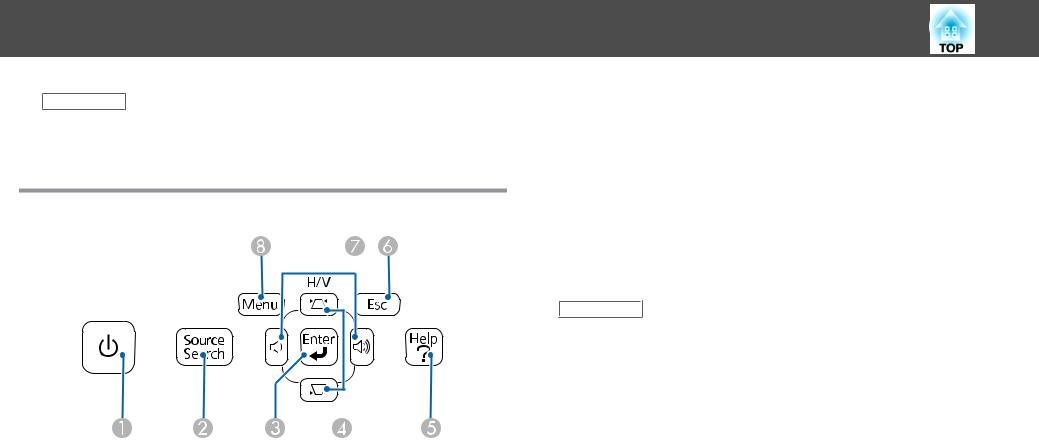
Projector Parts - Control Panel
Name |
|
Function |
|
A |
Power |
button |
Turns the projector on or off. |
|
|
|
|
B |
[Source Search] but |
Changes to the next input source. |
|
|
ton |
|
|
|
|
|
|
C |
[Enter] button |
Enters the current selection and moves to the next |
|
|
|
|
level while displaying the projector's menu or help. |
|
|
|
Optimizes Tracking, Sync., and Position in the |
|
|
|
projector's Signal menu while projecting an analog |
|
|
|
RGB signal from the Computer1 or Computer2 port. |
|
|
|
|
D |
Keystone adjust |
Displays the Keystone screen allowing you to correct |
|
|
ment |
buttons and |
keystone distortion in vertical and horizontal direc |
|
arrow |
buttons |
tions. |
|
|
|
Selects menu items while displaying the projector's |
|
|
|
menu or help. |
|
|
|
|
15
Name |
Function |
||
E |
[Help] button |
Displays and closes the Help screen. |
|
|
|
|
|
F |
[Esc] button |
Stops the current function. |
|
|
|
Moves back to the previous menu level while dis |
|
|
|
playing |
the projector's menu. |
|
|
|
|
G |
Volume buttons and |
Adjusts |
the speaker volume. |
|
arrow buttons |
Selects menu items while displaying the projector's |
|
|
|
menu or help. |
|
|
|
|
|
H |
[Menu] button |
Displays |
and closes the projector's menu. |
|
|
|
|
Related Links
•"Projector Parts and Functions" p.12
•"Input Signal Settings - Signal Menu" p.135
•"Correcting the Image Shape with the Keystone Buttons" p.46

Projector Parts and Functions
Projector Parts - Remote Control
16
Name |
|
Function |
|
A |
Power button |
Turns the projector on or off. |
|
|
|
|
|
B |
[Computer] button |
Changes the image source between the Computer1 |
|
|
|
|
and Computer2 ports. |
|
|
|
|
C |
[Video] |
button |
Changes the image source between the Video input |
|
|
|
port and HDMI input port. |
|
|
|
|
D |
[Screen |
Fit] button |
Performs Screen Fit feature to automatically correct |
|
|
|
the shape and position of images to fit on your |
|
|
|
screen. |
|
|
|
This button is disabled when the projector is sus |
|
|
|
pended from a ceiling. |
|
|
|
|
E |
Numeric buttons |
Enters numbers in the projector's menu while hold |
|
|
|
|
ing down the [Num] button. |
|
|
|
|
F |
[Auto] |
button |
Optimizes Tracking, Sync., and Position in the |
|
|
|
projector's Signal menu while projecting an analog |
|
|
|
RGB signal from the Computer1 or Computer2 port. |
|
|
|
|
G |
[Aspect] button |
Changes the aspect mode. |
|
|
|
|
|
H |
[Num] button |
Hold down this button to enter numbers using the |
|
|
|
|
numeric buttons. |
|
|
|
|
I |
[Menu] |
button |
Displays and closes the projector's menu. |
|
|
|
|
J |
Arrow |
buttons |
Selects menu items while displaying the projector's |
|
|
|
menu or help. |
|
|
|
|
K |
[Enter] |
button |
Enters the current selection and moves to the next |
|
|
|
level while displaying the projector's menu or help. |
|
|
|
Acts as a mouse's left button when using the Wire |
|
|
|
less Mouse function. |
|
|
|
|
L |
[User] button |
Performs settings assigned to this button in the User |
|
|
|
|
Button setting in the projector's Settings menu. |
M |
[Page] up/down |
Controls page up and down on your computer when |
|
|
buttons |
|
you connect a projector and computer using a USB |
|
|
|
cable or over the network. |
|
|
|
Displays the previous or next screen while using the |
|
|
|
PC Free feature. |
|
|
|
|

Projector Parts and Functions
Name |
|
|
|
Function |
|
||
N |
[E-Zoom +/–] but |
Zooms in or zooms out the image area. |
|||||
|
tons |
|
|
|
|
|
|
|
|
|
|
||||
O |
[A/V |
Mute] button |
Turns the video and audio on or off temporarily. |
||||
|
|
|
|
||||
P |
[Split] |
button |
Projects two images from different image sources |
||||
|
|
|
|
|
simultaneously by splitting the projected screen. |
||
|
|
|
|
||||
Q |
[Help] |
button |
Displays and closes the Help screen. |
||||
|
|
|
|||||
R |
[Freeze] button |
Pauses or resumes images. |
|||||
|
|
|
|
||||
S |
[Volume] |
up/down |
Adjusts the speaker volume. |
||||
|
buttons |
|
|
|
|
||
|
|
|
|
||||
T |
[Pointer] |
button |
Displays the on-screen pointer. |
||||
|
|
|
|
||||
U |
[Esc] |
button |
Stops the current function. |
||||
|
|
|
|
|
Moves back to the previous menu level while dis |
||
|
|
|
|
|
playing |
the projector's menu. |
|
|
|
|
|
|
Acts as a mouse's right button when using the |
||
|
|
|
|
|
Wireless |
Mouse |
function. |
|
|
|
|
||||
V |
[ID] |
button |
Hold down this button and press the numeric but |
||||
|
|
|
|
|
tons to select the ID for the projector you want to |
||
|
|
|
|
|
operate using the remote control. |
||
|
|
|
|||||
W |
[Color Mode] but |
Changes the color mode. |
|||||
|
ton |
|
|
|
|
|
|
|
|
|
|||||
X |
[MHL Menu] but |
Displays the settings menu for the device linked to |
|||||
|
ton |
|
|
|
the projector's HDMI1/MHL port. |
||
|
|
|
|||||
Y |
[LAN] button |
Changes the image source between the network |
|||||
|
|
|
|
|
connected devices. |
||
|
|
|
|||||
Z |
[USB] button |
Changes the image source between the USB Display |
|||||
|
|
|
|
|
and USB-A port. |
||
|
|
|
|
|
|||
a |
[Source Search] but |
Changes |
to the |
next input source. |
|||
|
ton |
|
|
|
|
|
|
|
|
|
|
|
|||
b |
Remote control light |
Outputs |
remote |
control signals. |
|||
|
emitting area |
|
|
|
|||
|
|
|
|
|
|
|
|
17
Related Links
• "Projector Parts and Functions" p.12
• "Automatically Correcting the Image Shape with Screen Fit" p.44
•"Input Signal Settings - Signal Menu" p.135
•"Image Aspect Ratio" p.59
•"Using the Remote Control as a Wireless Mouse" p.84
•"Projector Setup Settings - Extended Menu" p.139
•"Projecting a PC Free Presentation" p.73
•"Projecting Two Images Simultaneously" p.70
•"Using the Remote Control as a Pointer" p.86
•"Color Mode" p.61
•"Using the Projector on a Network" p.98
•"Projecting with USB Display" p.53

Setting Up the Projector
Follow the instructions in these sections to set up your projector.
Related Links
•"Projector Placement" p.19
•"Projector Connections" p.22
•"Installing Batteries in the Remote Control" p.31
•"Opening the Lens Cover" p.33
Projector Placement |
|
19 |
|
|
|
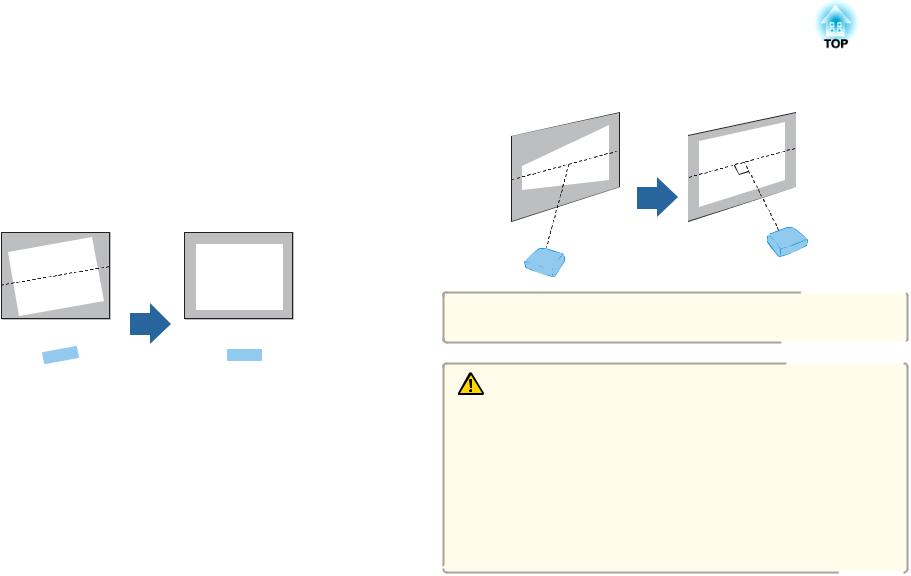
You can place the projector on almost any flat surface to project an image.
You can also install the projector in a ceiling mount if you want to use it in a fixed location. An optional ceiling mount is required when suspending the projector from a ceiling.
Note the following points when selecting a projector location:
•Place the projector on a sturdy, level surface or install it using a compatible mount.
• Place the projector parallel to the screen.
aIf you cannot install the projector parallel to the screen, correct keystone distortion using the projector controls.
•Leave plenty of space around and under the projector for ventilation, and do not place it on top of or next to anything that could block the vents.
•Position the projector within reach of a grounded electrical outlet or extension cord.
Warning
•You must install a ceiling mount when suspending the projector from a ceiling. If you do not install the projector correctly, it could fall and cause damage or injury.
•Do not use adhesives on the ceiling mount fixing points to prevent the screws from loosening, or use lubricants, oils, or similar substances on the projector; the projector case may crack causing it to fall from its ceiling mount. This could cause serious injury to anyone under the ceiling mount and could damage the projector.
•Do not cover the projector's air intake or air exhaust vents. If the vents are covered, the internal temperature could rise and cause a fire.
Projector Placement |
|
20 |
|
|
|
Attention
•Do not operate the projector on its side. This may cause the projector to malfunction.
•If you are using the projector at altitudes above 1500 m, set the High Altitude Mode setting to On in the projector's Extended menu to ensure the projector's internal temperature is regulated properly.
s Extended > Operation > High Altitude Mode
Related Links
•"Setting Up the Projector" p.18
•"Projector Setup and Installation Options" p.20
•"Projection Distance" p.20
•"Image Shape" p.44
•"Projector Setup Settings - Extended Menu" p.139
Projector Setup and Installation Options
You can set up or install your projector in the following ways:
Front/Rear
When projecting from the ceiling or from the rear, make sure you select the correct Projection option in the projector's Extended menu.
Related Links
•"Projector Placement" p.19
•"Projection Modes" p.41
Projection Distance
The distance at which you place the projector from the screen determines the approximate size of the image. The image size increases the farther the projector is from the screen, but can vary depending on the zoom factor, aspect ratio, and other settings.
Use the illustration here to determine approximately how far to place the projector from the screen based on the size of the projected image.
aWhen correcting keystone distortion, your image is slightly smaller.
Front Ceiling/Rear Ceiling
Projector Placement |
|
21 |
|
|
|
A |
B |
Screen size (inch) |
Approximate distance (m) |
|
|
50 |
1.5 |
|
|
150 |
4.5 |
|
|
Related Links
•"Projector Placement" p.19
•"Screen Size and Projection Distance" p.188
Projector Connections |
22 |
You can connect the projector to a variety of computer, video, and audio sources to display presentations, movies, or other images, with or without sound.
•Connect a computer that has a USB port, standard video output (monitor) port, or HDMI port.
•For video projection, connect devices such as DVD players, gaming consoles, digital cameras, and smartphones with compatible video output ports.
•If your presentation or video includes sound, you can connect audio input cables.
•For slide shows or presentations without a computer, you can connect USB devices (such as a flash drive or camera) or the optional Epson document camera.
Related Links
•"Setting Up the Projector" p.18
•"Connecting to a Computer" p.22
•"Connecting to Smartphones or Tablets" p.24
•"Connecting to Video Sources" p.25
•"Connecting to External USB Devices" p.27
•"Connecting to a Document Camera" p.28
•"Connecting to External Output Devices" p.28
Connecting to a Computer
Follow the instructions in these sections to connect a computer to the projector.
Related Links
•"Projector Connections" p.22
•"Connecting to a Computer for USB Video and Audio" p.22
•"Connecting to a Computer for VGA Video and Audio" p.22
•"Connecting to a Computer for HDMI Video and Audio" p.23
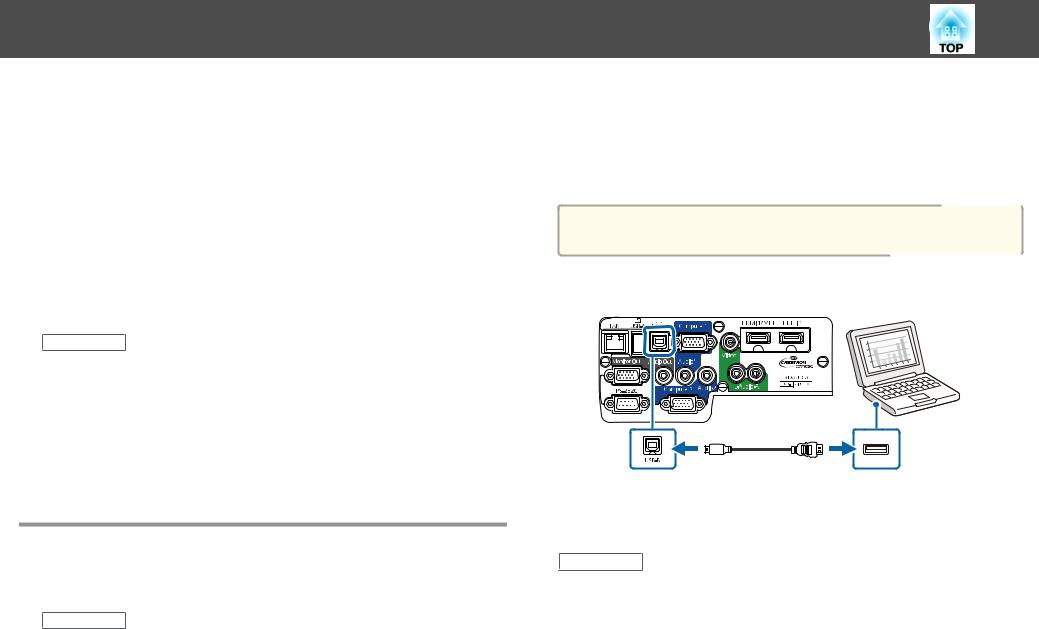
Connecting to a Computer for USB Video and Audio
If your computer meets the system requirements, you can send video and audio output to the projector through the computer's USB port (preferably USB 2.0). This function is called USB Display. Connect the projector to your computer using a commercially available USB cable.
aIf you use a USB hub, the connection may not operate correctly. Connect the USB cable directly to the projector.
a Connect the cable to your projector's USB-B port.
b Connect the other end to any available USB port on your computer.
Related Links
•"Connecting to a Computer" p.22
•"Projecting with USB Display" p.53
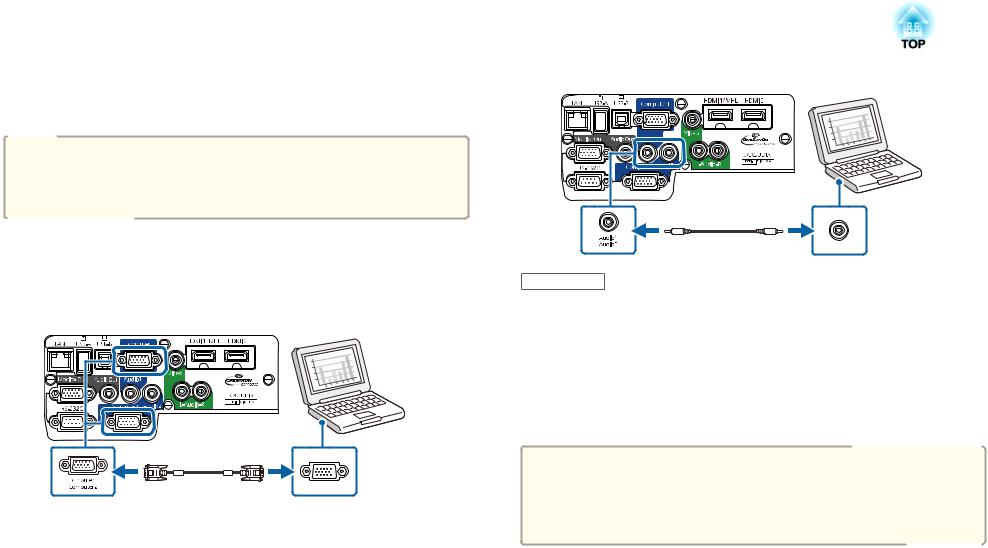
Connecting to a Computer for VGA Video and Audio
You can connect the projector to your computer using the supplied VGA computer cable. You can play sound through the projector's speaker system
Projector Connections |
|
23 |
|
|
|
by connecting a commercially available 3.5 mm stereo mini-jack audio cable.
aTo connect a Mac that includes only a Mini DisplayPort, Thunderbolt port, or Mini-DVI port for video output, you need to obtain an adapter that allows you to connect to the projector's VGA video port. Contact Apple for compatible adapter options.
a Connect the VGA computer cable to your computer's monitor port.
b Connect the other end to a Computer port on the projector.
c |
Tighten the screws on the VGA connector. |
|
|
|
Connect the audio cable to your laptop's headphone or audio-out |
d jack, or your desktop's speaker or audio-out port. |
|
e |
Connect the other end to the Audio port that corresponds to the |
Computer port you are using. |
|
Related Links
• "Connecting to a Computer" p.22
Connecting to a Computer for HDMI Video and Audio
If your computer has an HDMI port, you can connect it to the projector using a commercially available HDMI cable and send the computer's audio with the projected image.
aTo connect a Mac that includes only a Mini DisplayPort, Thunderbolt port, or Mini-DVI port for video output, you need to obtain an adapter that allows you to connect to the projector's HDMI port. Contact Apple for compatible adapter options. Older Mac computers (2009 and earlier) may not support audio through the HDMI port.
a Connect the HDMI cable to your computer's HDMI output port.
b Connect the other end to the projector's HDMI1/MHL or HDMI2 port.
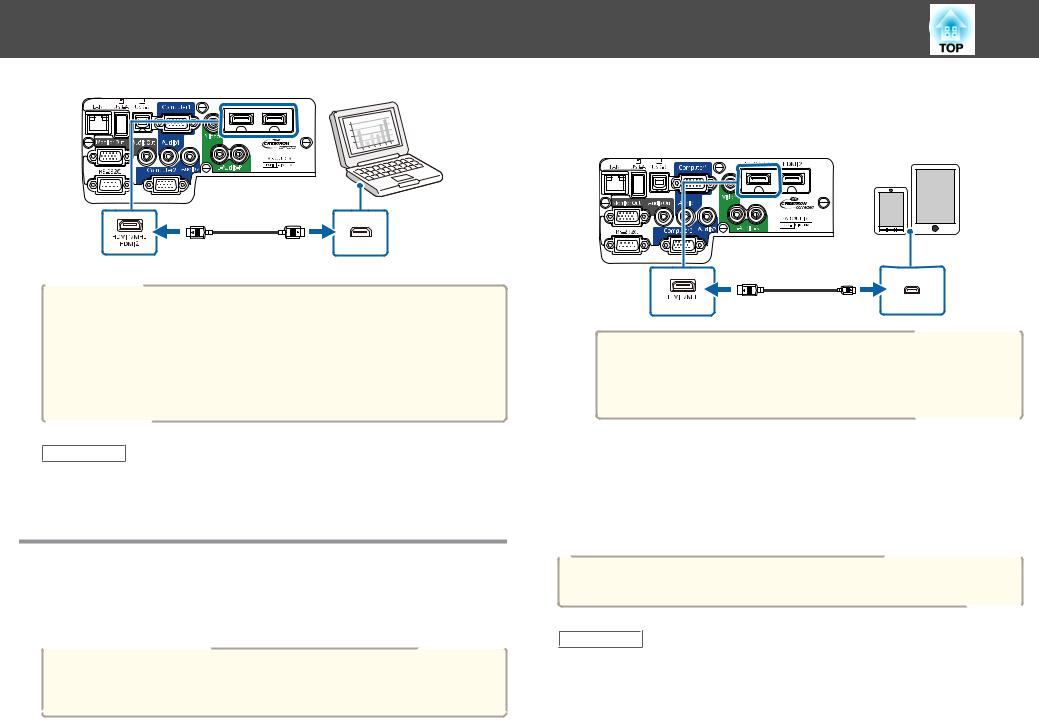
Projector Connections
aIf you have problems hearing audio through the HDMI connection, connect one end of a commercially available 3.5 mm stereo mini-jack audio cable to the projector's Audio port and the other end to your computer's audio out port. Select the input port you connected to from the HDMI1 Audio Output or HDMI2 Audio Output setting in the projector's Extended menu.
s Extended > A/V Settings
Related Links
•"Connecting to a Computer" p.22
•"Projector Setup Settings - Extended Menu" p.139
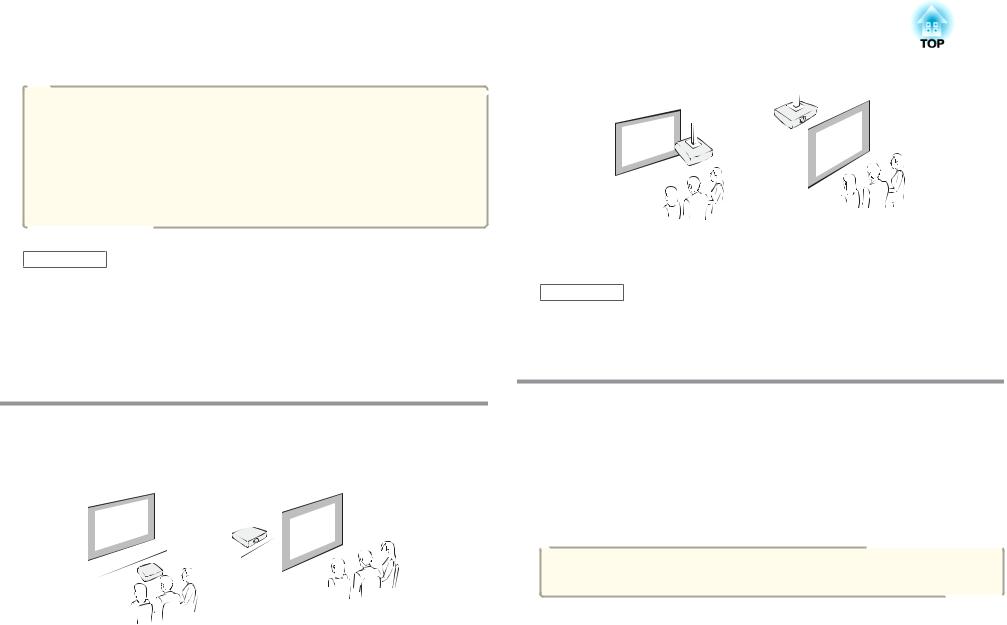
Connecting to Smartphones or Tablets
You can connect the projector to smartphones and tablets using a commercially available MHL cable and send the audio with the projected image.
• You may not be able to connect an MHL cable to all devices. a• You may not be able to project correctly, depending on the model
and settings of the smartphone or tablet.
24
a Connect the MHL cable to your device's MHL port.
b Connect the other end to the projector's HDMI1/MHL port.
Attention
If you connect an MHL cable that does not support the MHL standards, the smartphone or tablet device may become hot, leak, or explode.
The connected smartphone or tablet begins charging when images are projected. If you connect using a commercially available MHLHDMI conversion adapter, charging the smartphone or tablet device may not work or you may not be able to perform operations using the projector's remote control.
aIf images are not projected correctly, disconnect and then reconnect the MHL cable.
Related Links
• "Projector Connections" p.22
Projector Connections |
|
25 |
|
|
|
Connecting to Video Sources
Follow the instructions in these sections to connect video devices to the projector.
Attention
Check the shape and orientation of the connectors on any cable you plan to connect. Do not force a connector into a port if it does not fit. The device or your projector could be damaged or could malfunction.
aIf the port on the device you connect has an unusual shape, use the cable supplied with the device or an optional cable to connect to the projector.
Related Links
•"Projector Connections" p.22
•"Connecting to an HDMI Video Source" p.25
•"Connecting to a Component-to-VGA Video Source" p.25
•"Connecting to a Composite Video Source" p.26
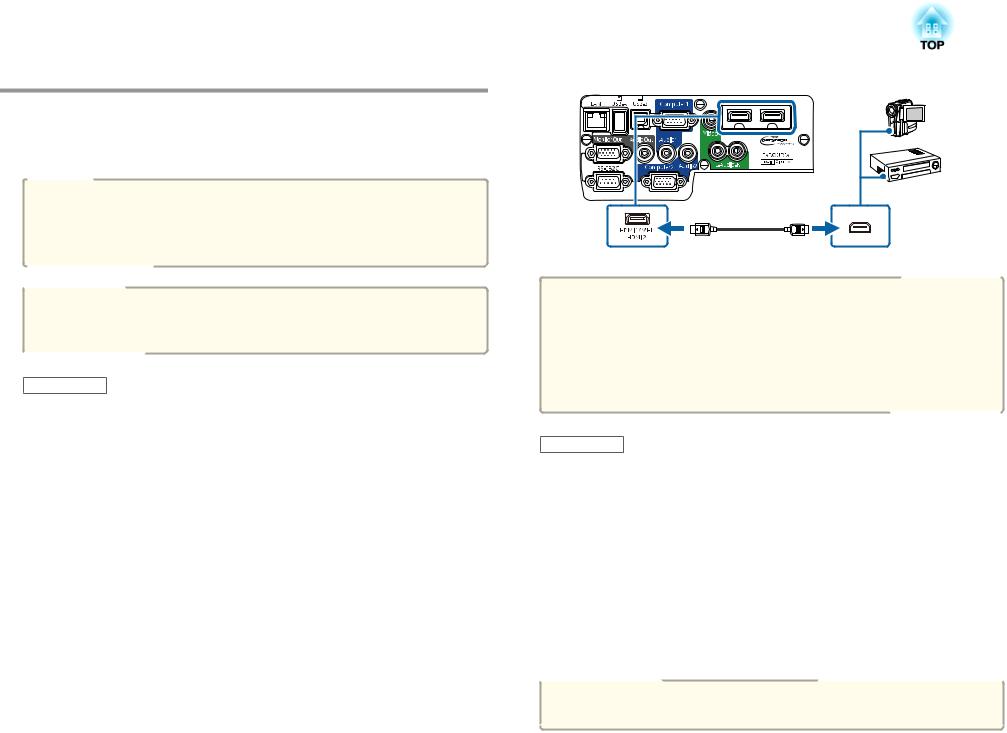
Connecting to an HDMI Video Source
If your video source has an HDMI port, you can connect it to the projector using a commercially available HDMI cable and send the image source's audio with the projected image.
a Connect the HDMI cable to your video source's HDMI output port.
b Connect the other end to the projector's HDMI1/MHL or HDMI2 port.
aIf you have problems hearing audio through the HDMI connection, connect one end of a commercially available 3.5 mm stereo mini-jack audio cable to the projector's Audio port and the other end to your computer's audio out port. Select the input port you connected to from the HDMI1 Audio Output or HDMI2 Audio Output setting in the projector's Extended menu.
s Extended > A/V Settings
Related Links
•"Connecting to Video Sources" p.25
•"Projector Setup Settings - Extended Menu" p.139
Connecting to a Component-to-VGA Video Source
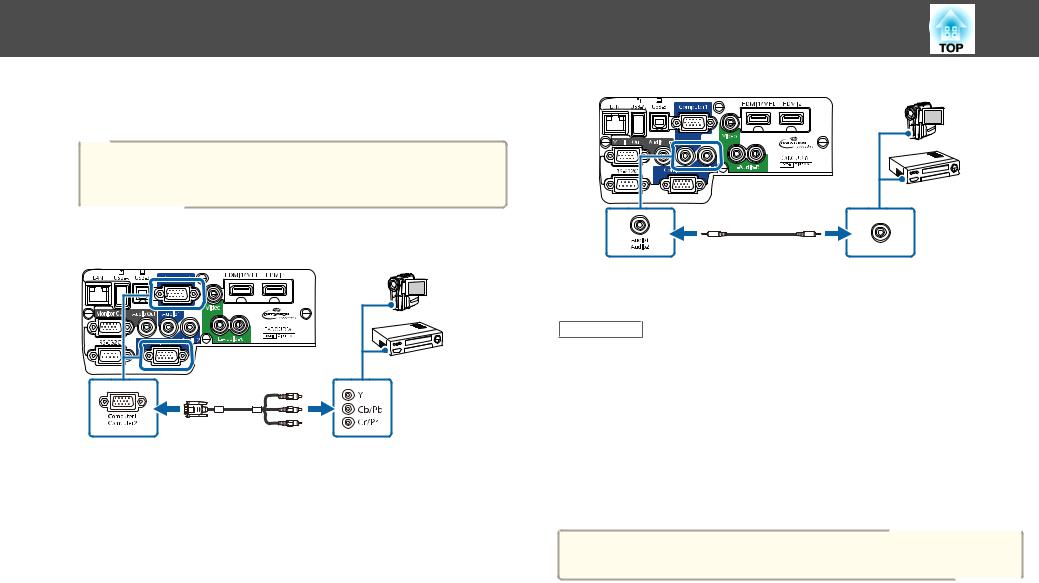
If your video source has component video ports, you can connect it to the projector using an optional component-to-VGA video cable. Depending on your component ports, you may need to use an adapter cable along with a component video cable. You can play sound through the projector's speaker system by connecting a commercially available stereo mini-jack audio cable or an RCA audio cable.
aMake sure the audio cable is labeled "No resistance".
Projector Connections |
26 |
a Connect the component connectors to your video source's colorcoded component video output ports.
aThe ports usually labeled Y, Pb, Pr or Y, Cb, Cr. If you are using an adapter, connect these connectors to your component video cable.
b Connect the VGA connector to a Computer port on the projector.
c Tighten the screws on the VGA connector.
d Connect the audio cable to your video source's audio-out ports.
e Connect the other end of the cable to the projector's Audio port that corresponds to the Computer port you are using for video.
If your image colors appear incorrect, you may need to change the Input Signal setting in the projector's Signal menu.
Related Links
•"Connecting to Video Sources" p.25
•"Input Signal Settings - Signal Menu" p.135
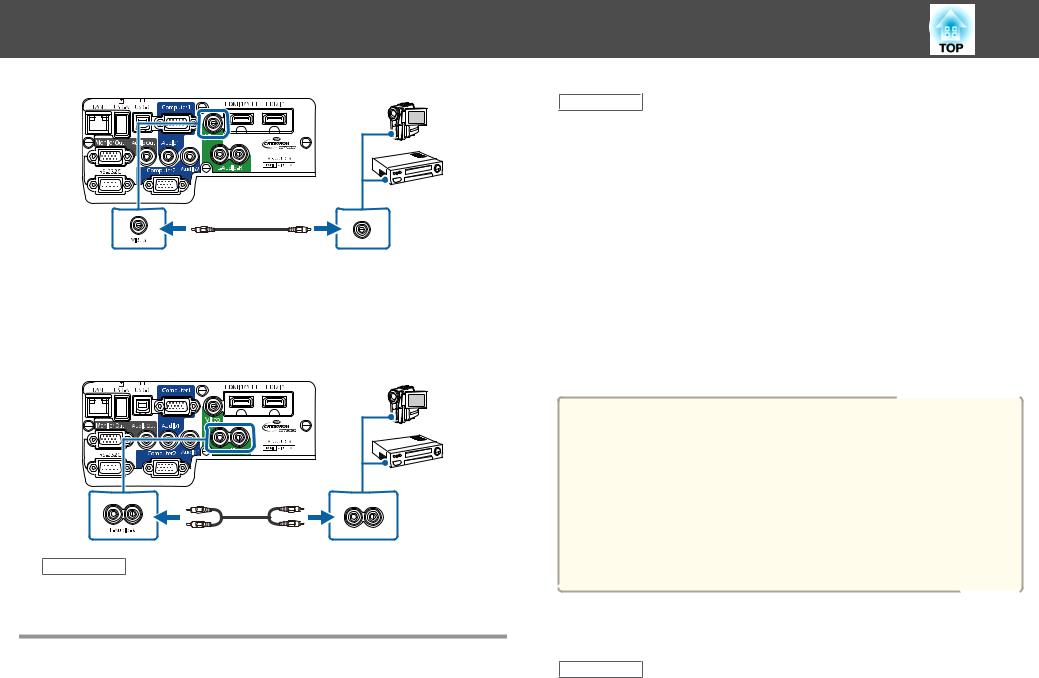
Connecting to a Composite Video Source
If your video source has a composite video port, you can connect it to the projector using a commercially available RCA-style video or A/V cable. You can play sound through the projector's speaker system by connecting a commercially available RCA audio cable.
aMake sure the audio cable is labeled "No resistance".
a Connect the cable with the yellow connector to your video source's yellow video output port.
b Connect the other end to the projector's Video port.
Projector Connections |
27 |
c Connect the red and white connectors on the A/V cable, to your video source's audio-out ports.
d Connect the red and white connectors on the other end of the cable to the projector's L-Audio-R ports.
Related Links
• "Connecting to Video Sources" p.25
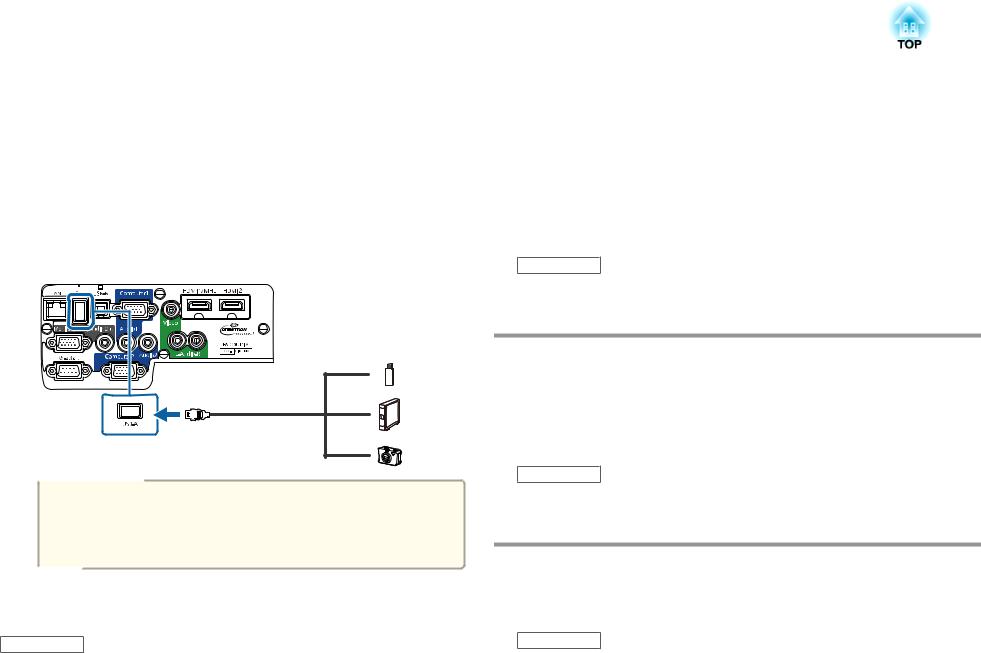
Connecting to External USB Devices
Related Links
•"Projector Connections" p.22
•"USB Device Projection" p.27
•"Connecting to a USB Device or Camera" p.28
•"Disconnecting a USB Device or Camera" p.28
USB Device Projection
You can project images and other content without using a computer or video device by connecting any of these devices to your projector:
•USB flash drive
•Digital camera or smartphone
•USB hard drive
•Multimedia storage viewer
•USB memory card reader
a• Digital cameras or smartphones must be USB-mounted devices, not TWAIN-compliant devices, and must be USB Mass Storage Classcompliant.
•USB hard drives must meet these requirements:
-USB Mass Storage Class-compliant (not all USB Mass Storage Class devices are supported)
-Formatted in FAT or FAT32
-Self-powered by their own AC power supplies (bus-powered hard drives are not recommended)
-Avoid using hard drives with multiple partitions
You can project image files on a connected USB device or memory card reader using PC Free.
Related Links
Follow the instructions in these sections to connect external USB devices to |
• "Connecting to External USB Devices" p.27 |
|
the projector. |
||
• "Projecting a PC Free Presentation" p.73 |
||
|
Projector Connections |
|
28 |
|
|
|
Connecting to a USB Device or Camera
You can connect your USB device or camera to the projector's USB-A port and use it to project images and other content.
a If your USB device came with a power adapter, plug the device into an electrical outlet.
b Connect the USB cable (or USB flash drive or USB memory card reader) to the projector's USB-A port shown here.
Attention
•Use the USB cable supplied with or specified for use with the device.
•Do not connect a USB hub or a USB cable longer than 3 meters, or the device may not operate correctly.
c Connect the other end of the cable to your device.
Related Links
Disconnecting a USB Device or Camera
When you have finished presenting with a connected USB device or camera, disconnect the device from the projector.
a Turn off and unplug the device.
b Disconnect the USB device or camera from the projector.
Related Links
• "Connecting to External USB Devices" p.27
Connecting to a Document Camera
You can connect a document camera to your projector to project images viewed by the camera.
The connection method varies depending on your Epson document camera model. See the document camera manual for details.
Related Links
• "Projector Connections" p.22
Connecting to External Output Devices
Follow the instructions in these sections to connect external devices to the projector.
Related Links
• "Connecting to External USB Devices" p.27 |
• "Projector Connections" |
p.22 |
||
|
• "Connecting |
to |
an External Computer Monitor" p.29 |
|
|
• "Connecting |
to |
External |
Speakers" p.29 |
Projector Connections |
|
29 |
|
|
|
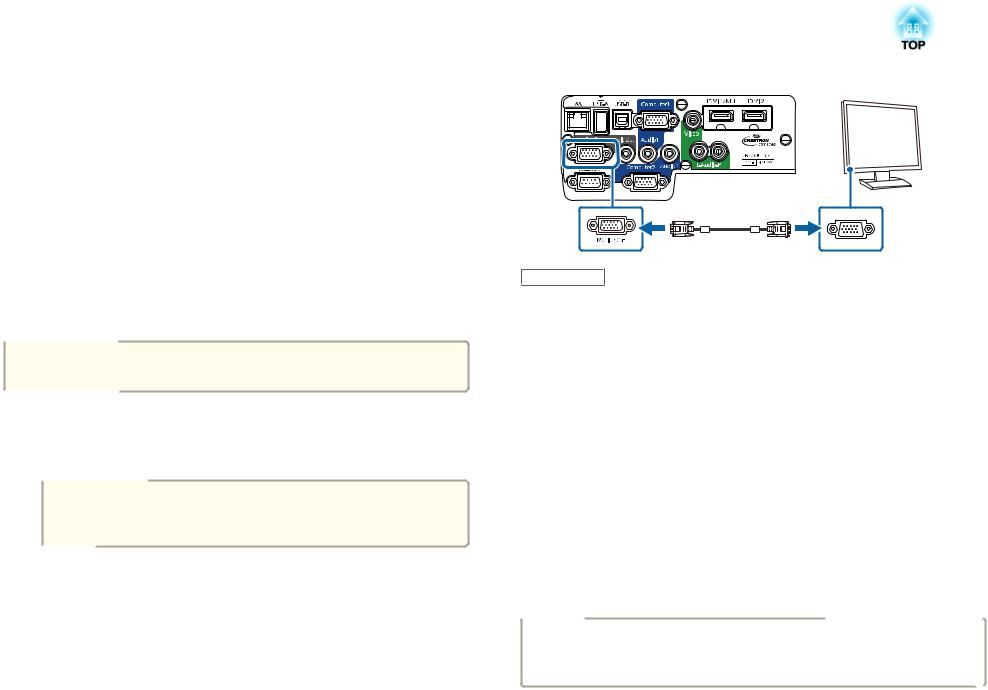
Connecting to an External Computer Monitor
If you connected the projector to a computer using a Computer port, you can also connect an external monitor to the projector. This lets you see your presentation on the external monitor even when the projected image is not visible.
If you want to output images to an external monitor when the projector is turned off, you need to do the following:
•Select Communication On as the Standby Mode setting in the projector's ECO menu.
•Select Always On as the A/V Output setting in the projector's
Extended menu.
s Extended > A/V Settings > A/V Output
aMonitors that use a refresh rate of less than 60 Hz may not be able to display images correctly.
a Make sure your computer is connected to the projector's Computer port. If there are two computer ports, make sure you use the Computer1 port.
aOnly analog RGB signals from the Computer1 port can be output to an external monitor. You cannot output signals input from other ports or component video signals.
b Connect the external monitor's cable to your projector's Monitor Out port.
Related Links
•"Connecting to External Output Devices" p.28
•"Projector Setup Settings - ECO Menu" p.150
•"Projector Setup Settings - Extended Menu" p.139
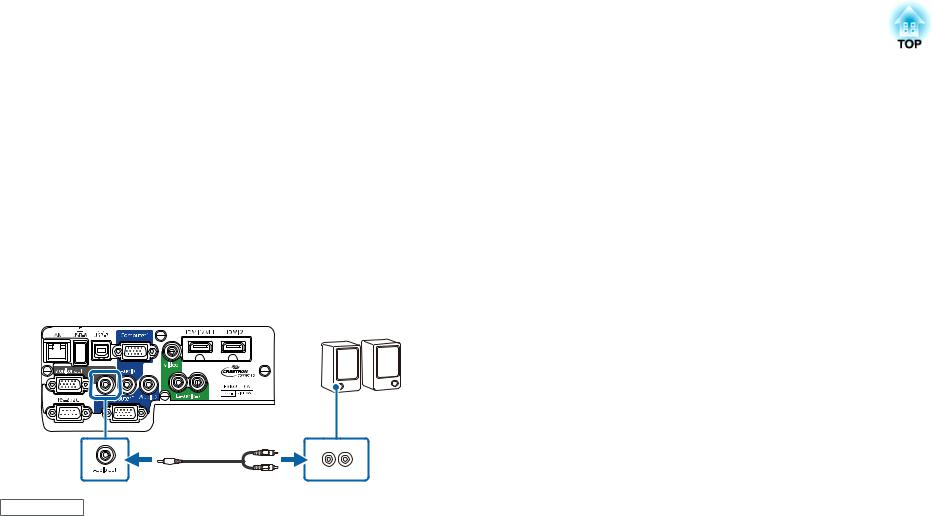
Connecting to External Speakers
To enhance the sound from your presentation, you can connect the projector to external self-powered speakers. You can control the volume using the projector's remote control.
If you want to output audio from the external speakers when the projector is turned off, you need to do the following:
•Select Communication On as the Standby Mode setting in the projector's ECO menu.
•Select Always On as the A/V Output setting in the projector's
Extended menu.
s Extended > A/V Settings > A/V Output
a |
• |
You can |
also connect the projector to an amplifier with speakers. |
• The projector's built-in speaker system is disabled when you connect |
|||
|
|
external |
speakers. |
|
|
|
|
Projector Connections |
|
30 |
|
|
|
a b
Make sure your computer or video source is connected to the projector with both audio and video cables as necessary.
Locate the appropriate cable to connect your external speakers, such as a stereo mini-jack-to-pin-jack cable, or another type of cable or adapter.
c d
Connect one end of the cable to your external speakers as necessary.
Connect the stereo mini-jack end of the cable to your projector's Audio Out port.
Related Links
•"Connecting to External Output Devices" p.28
•"Projector Setup Settings - ECO Menu" p.150
•"Projector Setup Settings - Extended Menu" p.139
 Loading...