


 Loading...
Installation Guide

Using the Product Safely
 Safety Instructions
For your safety, read all the instructions in this guide before using this product. Incorrect handling that ignores instructions in this guide could damage this product or could result in personal injury or property damage. Keep this installation guide at hand for future reference.
Read the User's Guide and SafetyInstructions for your projector and follow the instructions in these documents.
Safety indications
The documentation and this product use graphical symbols to show how to use this product safely.
The indications and their meaning are as follows. Make sure you understand them properly before reading the guide.
Symbol |
Explanation |
Warning |
This symbol indicates information that, if ignored, could possibly result in personal injury or |
|
even death due to incorrect handling. |
Caution |
This symbol indicates information that, if ignored, could possibly result in personal injury or |
|
physical damage due to incorrect handling. |
|
|
Explanation of Symbols
Symbols |
Explanation |
|
|
Symbol indicating an action that must not be done
Symbol indicating an action that should be done
c Symbol indicating related or useful information
Safety Precautions for Installation
 Warning
The setting plate is exclusively for mounting the projector on a wall. If anything other than a projector is mounted, the weight may result in damage.
If this product falls, it could cause death or personal injury.
The installation work (wall mounting) should be performed by specialists who have technical knowledge and ability. Incomplete or incorrect installation could cause the product to fall and cause personal injury or property damage.
Follow the instructions in this guide when installing this product.
If the instructions are not followed, this product may fall, resulting in personal injury or an accident.
1

Using the Product Safely
 Warning
Handle the power cord carefully.
Incorrect handling may cause fire or electric shock. Observe the following precautions when handling:
•Do not handle the power plug with wet hands.
•Do not use a power cord that is damaged or modified.
•Do not pull the power cord with too much force when routing the cable through the setting plate.
Do not install the setting plate in a place where it might be subjected to vibration or shock.
This could cause damage to the projector or mounting surface. If this product falls, it could cause death or personal injury.
Install the setting plate so that it can sufficiently support the mass of the projector and setting plate, and resist any horizontal vibration. Use M10 nuts and bolts.
Nuts and bolts smaller than M10 could cause the setting plate to fall. Epson accepts no responsibility for any damage or injury caused by lack of wall strength or inadequate installation.
The installation work should be performed by at least two qualified service personnel. If you need to loosen any screws during installation, be careful not to drop this product.
If this product falls, it could cause death or personal injury.
When mounting this product on a wall, the wall requires enough strength to hold the projector and the setting plate.
This product should be installed on a concrete wall. The maximum combined weight of the projector and the setting plate is approximately 16 kg (not including cables). Ensure the strength of the wall before mounting this product on the wall. If the wall is not strong enough, reinforce the wall before installation.
Inspect the setting plate on a regular basis to ensure there are no broken parts or loose screws.
If any parts are damaged, stop using the setting plate immediately. If this product falls, it could cause death or personal injury.
Do not disassemble or remodel this product.
There are numerous high-voltage sections inside the product that could cause a fire, electric shock, or an accident.
Do not hang on this product or hang a heavy object on this product.
If this product falls, it could cause death or personal injury.
Do not use adhesives, lubricants, or oils to install or adjust the setting plate.
If you use adhesives to prevent the screws from loosening or things such as lubricants or oils on the slide plate fixing part of the projector, the case may crack and cause the projector to fall, resulting in personal injury or property damage.
Tighten all screws firmly after adjustment.
Otherwise, the product may fall and cause personal injury or property damage.
Never loosen the bolts and nuts after installation.
Confirm that the screws have not become loose on a regular basis. If you find any loose screws, tighten them firmly. Otherwise, the product may fall and cause personal injury or property damage.
Route the cables so that they are not interfered with the nuts and bolts.
Incorrect handling of the cables may cause fire or electric shock.
2
Using the Product Safely
 Warning
When turning on the projector, do not look into the projection window.
This could cause damage to eyesight due to the powerful light emitted. Take particular care when there are children present. When turning on the projector at a distance using the remote control, make sure there is no one looking into the projection window.
When using the projector, do not place any objects or put your hand near the projection window.
This area is dangerous as it reaches a high temperature due to the concentrated projection light.
Do not cover the projector's air intake vent or air exhaust vent. If either of the vents are covered, the internal temperature could rise and cause a fire.
Avoid locations subject to high temperatures, such as close to heaters, and leave a gap of at least 50 cm between the wall and the air exhaust vent.
Do not use the projector in a location subject to combustible or explosive gas.
The projector may catch fire because of the high temperature of the lamp inside the projector.
If any abnormalities occur with this product, immediately disconnect the cables from the product, and then contact your local dealer or the nearest Epson service call center.
Continuing to use the product in an abnormal condition could cause a fire, electric shock, or visual impairment.
 Caution
Do not install this product in a location where the operating temperature for your projector model may be exceeded.
Such an environment may damage the projector.
Install this product in a place free from excessive dust and humidity to prevent the lens or optical components from becoming dirty.
Do not use excessive force when adjusting this product.
This product may break, resulting in personal injury.
Notes on handling the Touch Unit (EB-1460Ui/EB-1450Ui only)
 Warning
Do not disassemble or remodel the Touch Unit.
The Touch Unit contains a high power laser product that could cause a fire, electric shock, or an accident.
Only connect the Touch Unit to the EB-1460Ui/EB-1450Ui. Do not connect it to any other projectors or devices.
The device could malfunction, or laser light that is higher than normal intensity could be emitted.
Do not go near the Touch Unit if you are using medical equipment such as a pace maker. Furthermore, when using the Touch Unit, make sure there is no one using medical equipment such as a pace maker, in the surrounding area.
A powerful magnet within the unit generates electromagnetic interference which may cause medical equipment to malfunction.
3
Using the Product Safely
 Caution
Do not go near the Touch Unit with magnetic storage media such as magnetic cards, or precision electronic devices such as computers, digital watches, or mobile phones.
A powerful magnet within the unit could corrupt data or cause a malfunction.
About This Installation Guide
This guide describes how to mount the ultra short-throw projector EB-1460Ui/EB-1450Ui/EB-1440Ui on a wall.
It also describes how to install the Touch Unit (EB-1460Ui/EB-1450Ui only), Control Pad, and Pen Stand after mounting on a wall.
4

Using the Product Safely
 Choosing an Installation Location
Projector installation location
•Carry out power supply wiring work for the installation location of the setting plate in advance.
•Install the projector away from other electric devices such as fluorescent lights or air conditioners. Some kinds of fluorescent lights could interfere with the remote control of the projector.
•When installing the projector, make sure there is a gap of at least 50 cm from the wall to the projector's air exhaust and intake vents on the left and right.
•When installing two or more projectors in parallel, make sure the temperature of the surrounding environment is less than 35°C.
If the environment is too hot, the projector may overheat and the power may turn off without warning. When using the projector in an environment of 35°C or more, install a partition to block the heat vented from the projector's air exhaust vent. Make sure the partition is slightly larger than the exhaust vent (approx. 2 cm wider and taller), and then install the partition 10 to 30 cm from the exhaust vent.
•It is recommended to keep connection cable length less than 20 meters to reduce external noise.
•We recommend using stick-on screens or board screens.
•Install the projector so that it is tilted at an angle of no more than ±3° vertically and horizontally in relation to the screen.
•When using the interactive function (Easy Interactive Function), install so that the projected image is within reach.
•Do not install the projector or the screen in a location subject to direct sunlight. If the projector or the screen are subject to direct sunlight, the interactive function may not operate correctly.
5

Using the Product Safely
Touch Unit installation location (EB-1460Ui/EB-1450Ui only)
•When using the Touch Unit, install the projector using one of the following methods. The Touch Unit cannot be used if another installation method is used.
•Mount the projector on a wall or suspend it from a ceiling and project images from in front of the screen.
•Install vertically on a table and project from the front of the desk. (When installing vertically on a table, you need the optional Interactive Table Mount (ELPMB29).)
•Before installing the Touch Unit, make sure that the installation surface is not warped or distorted, and that any unevenness on the screen surface is less than 5 mm.
• When installing the Touch Unit on a whiteboard, secure the Touch Unit with magnets or screws.
• When installing the Touch Unit outside the whiteboard, you need the supplied Touch Unit Bracket.
6
Using the Product Safely
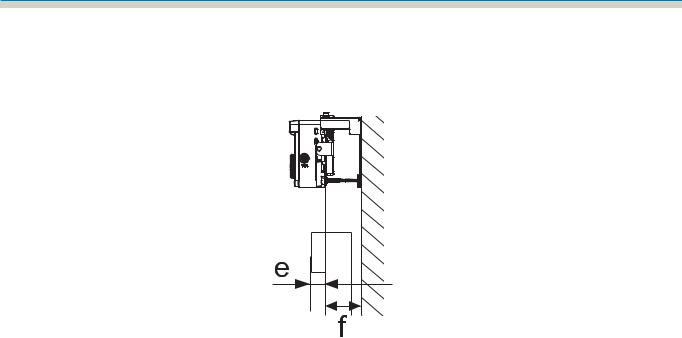
•If the distance from the wall to the surface of the screen (f) is more than 51 mm, you cannot install the Touch Unit outside the whiteboard.
•If there is a frame around the screen, make sure that the thickness of the top of the frame (e) is less than 3 mm. If the thickness of the top of the screen exceeds 3 mm, the Touch Unit will not operate correctly.
7

Contents
Using the Product Safely
Safety Instructions . . . . . . . . . . . . . . . . . . . . 1
Safety indications . . . . . . . . . . . . . . . . . . . . . . . 1 Explanation of Symbols . . . . . . . . . . . . . . . . . . . 1 Safety Precautions for Installation . . . . . . . . . . . . 1
Notes on handling the Touch Unit (EB-1460Ui/ EB-1450Ui only) . . . . . . . . . . . . . . . . . . . . . . . . . 3
About This Installation Guide . . . . . . . . . . . . . . . 4
Choosing an Installation Location . . . . . . 5
Projector installation location . . . . . . . . . . . . . . . 5
Touch Unit installation location (EB-1460Ui/ EB-1450Ui only) . . . . . . . . . . . . . . . . . . . . . . . . . 6
Installation Guide
Installation Work Flow . . . . . . . . . . . . . . . 10
Installing one projector . . . . . . . . . . . . . . . . . . 10
When two or more projectors are installed in
parallel . . . . . . . . . . . . . . . . . . . . . . . . . . . . . . 11
Package Contents . . . . . . . . . . . . . . . . . . . . 12
Setting plate . . . . . . . . . . . . . . . . . . . . . . . . . . 12 Control Pad . . . . . . . . . . . . . . . . . . . . . . . . . . . 13 Touch Unit (EB-1460Ui/EB-1450Ui only) . . . . . . . 13 Touch Unit Bracket . . . . . . . . . . . . . . . . . . . . 14
Specifications . . . . . . . . . . . . . . . . . . . . . . . 15
Setting plate . . . . . . . . . . . . . . . . . . . . . . . . . . 15 Wall plate cover . . . . . . . . . . . . . . . . . . . . . . 15 Wall plate . . . . . . . . . . . . . . . . . . . . . . . . . . 16 Vertical slide adjustment range . . . . . . . . . . . 16 Horizontal slide adjustment range . . . . . . . . . 17 Forward/backward slide adjustment range . . 17 Position for installing accessories . . . . . . . . . 18
Control Pad/Pen Stand . . . . . . . . . . . . . . . . . . . 18 Control Pad (external dimensions/weight) . . . 18 Cable routing holes . . . . . . . . . . . . . . . . . . . 19 Pen Stand (external dimensions/weight) . . . . 19 Touch Unit (EB-1460Ui/EB-1450Ui only) . . . . . . . 19 Touch Unit (external dimensions/weight) . . . 19
Touch Unit Bracket (external dimensions/ adjustment range/weight) . . . . . . . . . . . . . . 20
Attached labels . . . . . . . . . . . . . . . . . . . . . . 21
Laser diffusion port . . . . . . . . . . . . . . . . . . . |
21 |
Projection Distance Table . . . . . . . . . . . . 23
Figures of Installation Dimensions . . . . . . . . . . . 23
When installing the Touch Unit (EB-1460Ui/ EB-1450Ui only) . . . . . . . . . . . . . . . . . . . . . . 24
When installing the Control Pad and the Pen Stand . . . . . . . . . . . . . . . . . . . . . . . . . . . . . 27
When Projected Image is Smaller than 85 Inches 28 16:10 projected image . . . . . . . . . . . . . . . . . 29 When Projected Image is 85 inches or more . . . . 30 16:10 projected image . . . . . . . . . . . . . . . . . 31
Installing the Setting Plate . . . . . . . . . . . 32
Connecting Devices . . . . . . . . . . . . . . . . . . . . . 32 Necessary cables . . . . . . . . . . . . . . . . . . . . . 32 Installation Procedure . . . . . . . . . . . . . . . . . . . 36 Assemble the parts . . . . . . . . . . . . . . . . . . . 36 Install the wall plate on the wall . . . . . . . . . . 38
Determine the projection distance, and then
pass the cables through the setting plate . . . . 40 Attaching the setting plate to the wall plate . . 42 Securing the projector to the setting plate . . . 44 Adjusting the Position of the Projector . . . . . . . 46
Sticking the infrared deflectors (EB-1460Ui/ EB-1450Ui only) . . . . . . . . . . . . . . . . . . . . . . 52
Arc Correction . . . . . . . . . . . . . . . . . . . . . . . 53 Calibrating the pen . . . . . . . . . . . . . . . . . . . . . 54 Attaching the Covers . . . . . . . . . . . . . . . . . . . . 58
Installing the Control Pad and the Pen
Stand . . . . . . . . . . . . . . . . . . . . . . . . . . . . . . . 61
Installing the Control Pad . . . . . . . . . . . . . . . . . 61 Installing the Pen Stand . . . . . . . . . . . . . . . . . . 62
Installing the Touch Unit (EB-1460Ui/ EB-1450Ui only) . . . . . . . . . . . . . . . . . . . . . 64
When installing the Touch Unit outside the whiteboard (using the Touch Unit Bracket) . . . . 64
Installation Procedure . . . . . . . . . . . . . . . . . 64
Angle Adjustment . . . . . . . . . . . . . . . . . . . . 69
Touch Calibration . . . . . . . . . . . . . . . . . . . . 84
When installing the Touch Unit on the whiteboard (without using the Touch Unit
Bracket) . . . . . . . . . . . . . . . . . . . . . . . . . . . . . . 87 Installation Procedure . . . . . . . . . . . . . . . . . 87
8

Contents
Angle Adjustment . . . . . . . . . . . . . . . . . . . . 91
Appendix
Installing Multiple Projectors in
Parallel (Multi-Projection) . . . . . . . . . . . . 95
Multi-Projection settings . . . . . . . . . . . . . . . . . 95 Setting the Projector ID . . . . . . . . . . . . . . . . 95 Adjusting the Image in Multi-Projection . . . . . 98
When two projectors are installed in parallel
and you are using the interactive function . . . . . 99 Setting the projectors in sync . . . . . . . . . . . 100 Setting Multi-Projection Interactive . . . . . . . 101
Batch Setup Function . . . . . . . . . . . . . . . 108
Setup Using a USB flash drive . . . . . . . . . . . . . 109 Saving settings to the USB flash drive . . . . . 109 Copying saved settings to other projectors . 111 When Setup Fails . . . . . . . . . . . . . . . . . . . . . . 112
Attaching a Security Cable . . . . . . . . . . . 113
General Notice . . . . . . . . . . . . . . . . . . . . . 114
9
Installation Guide
 Installation Work Flow
Installing one projector
Follow the procedures below to mount the projector on a wall.
aInstalling the Setting Plate and the Projector (s p.32)
bAdjusting the Position of the Projector (sp.46)
cCalibrating the Interactive Pen (s p.54)
dInstalling the Control Pad and the Pen Stand (sp.61)
When installing the Touch Unit, finish installing the projector first, and then follow the procedures below. (EB-1460Ui/EB-1450Ui only)
The procedure differs depending on where the Touch Unit is to be installed.
When installing the Touch Unit outside the whiteboard (using the Touch Unit Bracket)
aInstalling the Touch Unit (s p.64)
bAdjusting the Angle of Laser Diffusion (s p.69)
cPerforming Touch Calibration (s p.84)
When installing the Touch Unit on the whiteboard (without using the Touch Unit Bracket)
10

Installation Guide
aInstalling the Touch Unit (s p.87)
bAdjusting the Angle of Laser Diffusion (s p.91)
cPerforming Touch Calibration (s p.84)
When two or more projectors are installed in parallel
When using the multi-projection function (when multiple projectors are installed in parallel to project one, large screen), follow the steps below.
aInstalling the Setting Plate and the Projector (s p.32)
bAdjusting the Position of the Projector (sp.46)
cSetting the Projector ID (sp.95)
dAdjusting the Image in Multi-Projection (sp.98)
When two projectors are installed in parallel and you want to use the interactive function, make the following settings. Make the settings for each projector.
aSetting Projector Synchronization (sp.100)
bSetting Multi-Projection Interactive (sp.101)
11

Installation Guide
 Package Contents
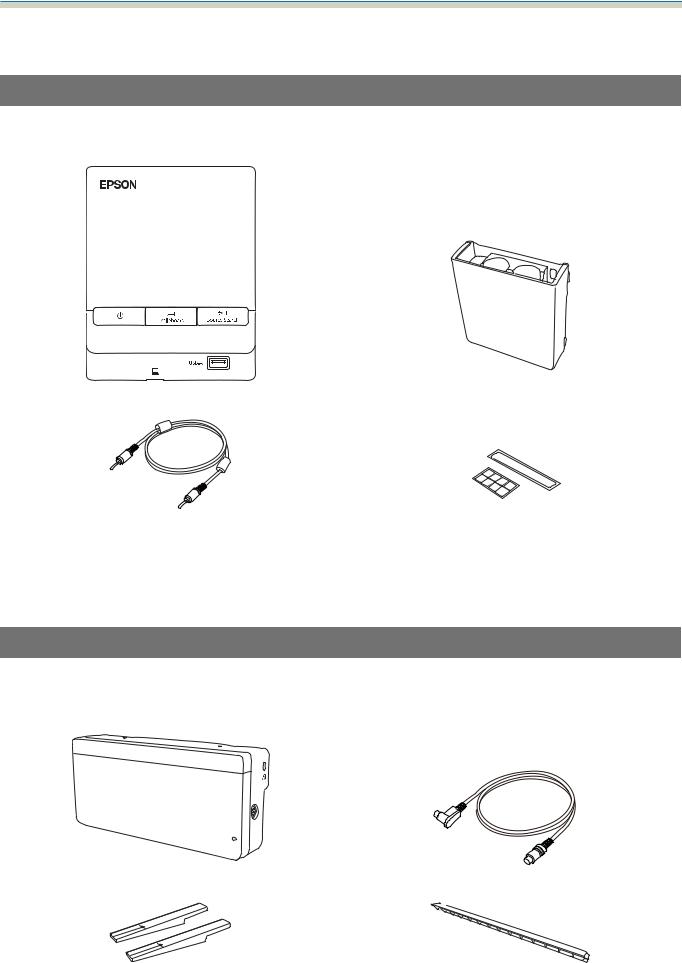
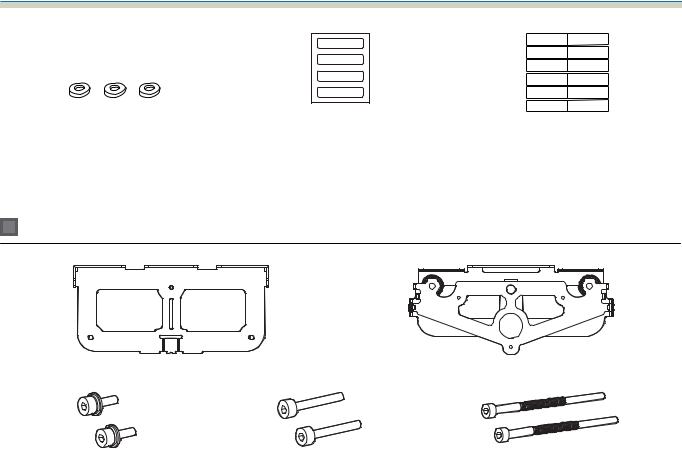
Setting plate
The following supplied items are necessary to mount the projector on a wall. Confirm that you have all items before beginning. Depending on the area in which you purchased the product, the Setting Plate is not supplied. In this situation, purchase the optional Setting Plate (ELPMB46).
Setting plate |
|
|
Hexagonal axis |
|
Wall plate |
|||||||||||||||||||
|
|
|
|
|
|
|
|
|
|
|
|
|
|
|
|
|
|
|
|
|
|
|
|
|
|
|
|
|
|
|
|
|
|
|
|
|
|
|
|
|
|
|
|
|
|
|
|
|
|
|
|
|
|
|
|
|
|
|
|
|
|
|
|
|
|
|
|
|
|
|
|
|
|
|
|
|
|
|
|
|
|
|
|
|
|
|
|
|
|
|
|
|
|
|
|
|
|
|
|
|
|
|
|
|
|
|
|
|
|
|
|
|
|
|
|
|
|
|
|
|
|
|
|
|
|
|
|
|
|
|
|
|
|
|
|
|
|
|
|
|
|
|
|
|
|
|
|
|
|
|
|
|
|
|
|
|
|
|
|
|
|
|
|
|
|
|
|
|
|
|
|
|
|
|
|
|
|
|
|
|
|
|
|
|
|
|
|
|
|
|
|
|
|
|
|
|
|
|
|
|
|
|
|
|
|
|
|
|
|
|
|
|
|
|
|
|
|
|
|
|
|
|
|
|
|
|
|
|
|
|
|
|
|
|
|
|
|
|
|
|
|
|
|
|
|
|
|
|
|
|
|
|
|
|
|
|
|
|
|
|
|
|
|
|
|
|
|
|
|
|
|
|
|
|
Wall plate cover |
3-axis adjustment unit |
Template sheet |
|
|
*The slide plate ( |
) is secured dur- |
(for installing the wall plate) |
|
ing shipping. |
|
|
End cap Masking sticker Hexagon wrench (for M4) Open-ended spanner 13 mm (for M8 and M6), 6 mm (for hexagonal axis)
Shape |
Name |
Quan- |
Application |
|
|
tity |
|
|
M4 x 12 mm hexagon socket head cap bolt |
5 |
For wall plate assembly |
|
with washer/spring washer |
4 |
For 3-axis adjustment unit/arm installation |
|
|
||
|
|
4 |
For slide plate/projector installation |
|
M6 x 20 mm hexagon shoulder head bolt |
1 |
For setting plate/wall plate installation |
|
with washer/spring washer |
|
|
|
M6 x 20 mm cross recessed head shoulder |
3 |
|
|
screws with plastic washers |
|
|
•Use the bolts or screws supplied with this product to install it as directed in this guide. Do not substitute these bolts with any other types.
•You need to use commercially available M10 x 60 mm anchors (at least 4) and one M10 screw to attach the wall plate to the wall.
12
Installation Guide
• Gather the tools and parts you need before you begin installation.
Control Pad
The following supplied products are necessary when attaching the Control Pad. Confirm that you have all items before beginning.
Control Pad |
Pen Stand |
Stereo mini cable |
Port protection stickers |
(for connecting the Control Pad (approx. 5m)) |
|
When installing the Control Pad on a wall and so on, prepare commercially available M4 screws (20 mm x4).
When installing the Pen Stand on a wall and so on, prepare commercially available M4 screws (20 mm x2).
Touch Unit (EB-1460Ui/EB-1450Ui only)
The following supplied products are necessary when attaching the Touch Unit. Confirm that you have all items before beginning. When installing the Touch Unit outside the whiteboard, use the supplied Touch Unit Bracket.
Touch Unit |
Touch Unit connection cable (approx. 2.8 m) |
Markers x2 |
Infrared deflectors |
|
(approx. 28.5 cm) x8 |
13
Installation Guide
Spacer for screw hole x3 |
Label x4 |
Tape for securing the markers |
|
|
(approx. 6 cm) x12 |
When installing the Touch Unit on a non-magnetic whiteboard, prepare three commercially available M4 screws.
Touch Unit Bracket
Installation plate |
Securing plate |
M4 x 12 mm hexagon socket head cap bolts x2
M4 x 25 mm hexagon socket head cap bolts x2
M4 x 55 mm hexagon socket head cap bolt x1
M4 x 70 mm hexagon socket head cap bolt x1
For the installation plate, you also need three commercially available 4 mm diameter wood screws, or three M4 anchor bolts.
14

Installation Guide
 Specifications
Setting plate
Item |
Specification |
Remark |
Reference |
|
|
|
Page |
Setting plate weight |
Approx. 7.2 kg |
Setting plate (2.9 kg), 3-axis adjustment |
|
|
|
unit (1.0 kg), slide plate (0.6 kg), wall plate |
|
|
|
(2.0 kg), wall plate cover and end cap (0.7 |
|
|
|
kg) |
|
|
|
|
|
Maximum load capacity |
9.5 kg |
|
|
|
|
|
|
Forward/backward slide ad- |
13 to 350 mm |
Arm slide adjustment range: 0 to 263 mm |
See the fig- |
justment range |
|
Adjustment for 3-axis adjustment unit in- |
ure below |
|
|
stallation position: 87 mm |
|
|
|
|
|
Vertical slide adjustment range |
±38 mm |
|
See the fig- |
|
|
|
ure below |
|
|
|
|
Horizontal roll adjustment |
±3° |
Fine adjustments possible with adjust- |
sp.46 |
range |
|
ment dial |
|
|
|
|
|
Horizontal rotation adjustment |
±8° |
Fine adjustments possible with adjust- |
sp.46 |
range |
|
ment dial |
|
|
|
|
|
Vertical tilt adjustment range |
±3° |
Fine adjustments possible with adjust- |
sp.46 |
|
|
ment dial |
|
|
|
|
|
Horizontal slide adjustment |
±45 mm |
|
See the fig- |
range |
|
|
ure below |
|
|
|
|
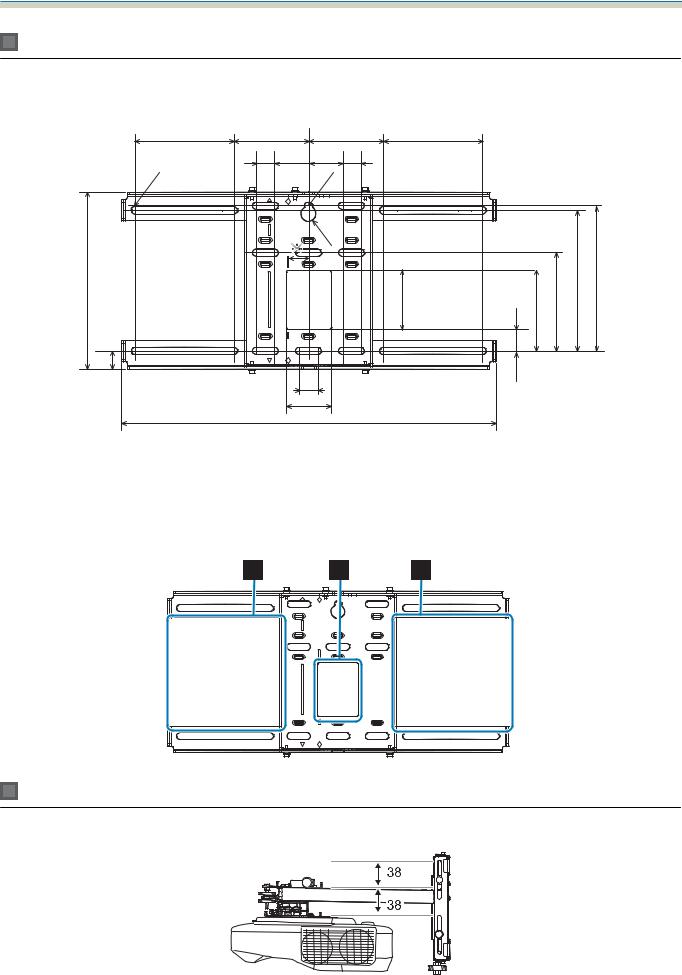
Wall plate cover
The following dimensions apply when attaching the wall plate cover.
[Unit: mm]
|
505.7 |
277.1 |
255.7 |
When installing the wall plate cover, you need a space of approximately 263 mm from the center of the wall plate to the left side, and approximately 253 mm to the right side.
15
Installation Guide
Wall plate
The following figure shows two frames connected to one plate (separate when shipped).
[Unit: mm]
131 |
99 |
|
|
99 |
131 |
|
|
|
|
24 |
45 |
45 |
24 |
|
|
|
|
.1 |
|
|
.1 |
|
|
|
|
|
5 |
|
|
5 |
|
|
|
|
|
|
|
|
R10 |
|
|
|
|
|
234.4 |
|
|
|
79 |
107.3 |
130.2 |
186.4 |
192.3 |
24 |
|
|
24 |
|
28.3 |
|
|
|
|
|
|
|
|
|
|
|
|
|
|
|
60 |
|
|
|
|
|
|
|
496 |
|
|
|
|
|
|
* The offset value for the position of the center of the projected image and the center of the wall plate is 27 mm.
Cable routing holes
When routing cables to connect to the projector through a wall, use positions (  ) and (
  ) in the following figure as the cable routing holes.
Vertical slide adjustment range
[Unit: mm]
16

Installation Guide
Horizontal slide adjustment range
[Unit: mm]
Forward/backward slide adjustment range
Arm slide adjustment range
[Unit: mm]
263 |
Adjustment range for 3-axis adjustment unit installation position
[Unit: mm]
17
Installation Guide
Position for installing accessories
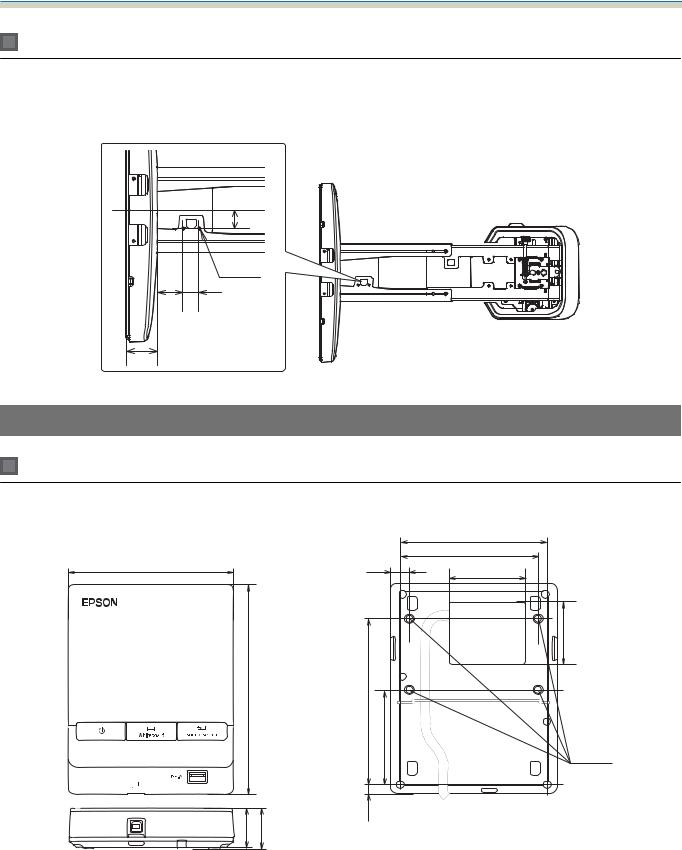
These screw holes allow you to secure peripheral devices and accessories such as external tuners. Use commercially available M4 screws.
[Unit: mm]
|
35 |
|
2 x M4 |
49.7 |
30.5 |
60.8 |
Control Pad/Pen Stand
Control Pad (external dimensions/weight)
[Unit: mm]
135.9 |
153.5 |
29 |
30.9 |
•Weight: approx. 262 g
•Operating temperature: 0 to +50°C (no condensation)
•Operating temperature: -20 to +60°C (no condensation)
|
|
111 |
|
|
109.5 |
11.5 |
3.5 |
63.3 |
|
|
|
|
|
5.51 |
107 |
|
|
47 |
|
|
|
|
4 x M4 |
15.47 |
|
|
18

Installation Guide
Cable routing holes
When routing cables through a wall, use the position (  ) shown in the followingfigure as the cable routing hole. Otherwise, remove the cable cover (
  ) and route the cables from there. Route the printer cable along the groove at the back of the Control Pad.
Pen Stand (external dimensions/weight)
[Unit: mm]
101.9 |
28.8 |
44.4 |
28.8 |
99.9 |
70.0 |
|
2 x M4 |
|
|
|
35.5 |
36.0 |
The Pen Stand weighs approximately 93 g.
Touch Unit (EB-1460Ui/EB-1450Ui only)
Touch Unit (external dimensions/weight)
[Unit: mm]
19
Installation Guide
The Touch Unit weighs approximately 450 g.
Touch Unit Bracket (external dimensions/adjustment range/weight)
Top
[Unit: mm]
229.8 |
228 |
57 62 |
Front
104.8 |
Installation plate (front)
[Unit: mm]
101 |
[Unit: mm]
Ø4.2
74 |
56 |
2-4.5 |
|
90 |
2-5.7 |
|
90 |
20

Installation Guide
When the Touch Unit is installed (side)
[Unit: mm]
100.8 |
30 |
Touch Unit Bracket weights approximately 750 g.
Attached labels
The Touch Unit is a Class 1 laser product that conforms to the IEC/EN60825-1:2007 standard. There are warning labels affixed to the Touch Unit to indicate that it is a Class 1 laser product.
The labels contain the following information.
•Class 1 laser product
•Warning: Do not open the case. The device contains a high power laser product.
•Warning:
•Caution: If this section is opened, class 3B invisible laser radiation will be emitted.
•Avoid exposure to the radiation beams.
Laser diffusion port
The laser beam is diffused from the laser diffusion ports at the back of the Touch Unit.
21

Installation Guide
22

Installation Guide
 Projection Distance Table
Figures of Installation Dimensions
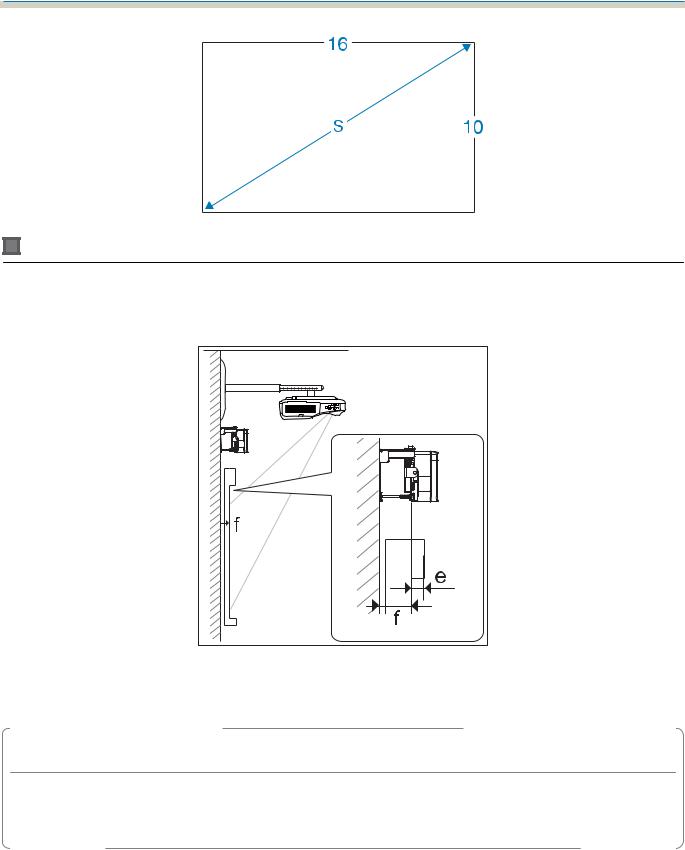
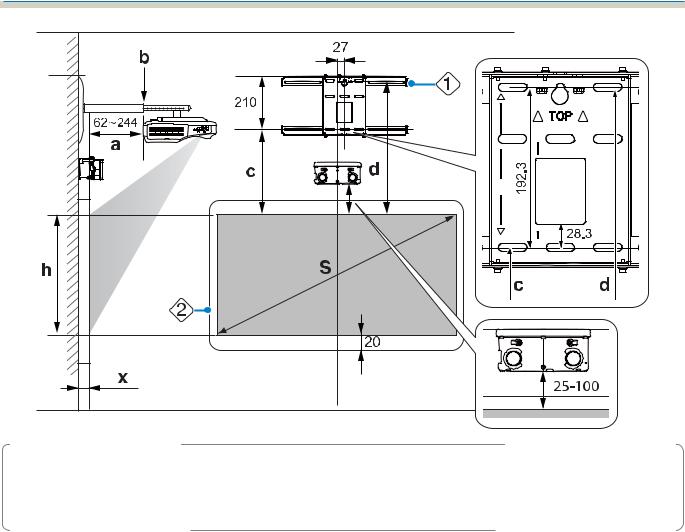
To find the appropriate projection distance, see the following figures when installing. The values are only rough estimates.
The recommended range for the projection distance (a) is 62 to 244 mm.
The offset value for the position of the center of the projected image and the center of the wall plate is 27 mm. [Unit: mm]
: Projected image size
: Minimum projection distance (Wide: maximum zoom)
to maximum (Tele: minimum zoom)
: Numbers on the arm slide scale
: Distance from the top of the projected image to the bottom wall plate installation screw hole
: Distance from the top of the projected image to the wall plate temporary securing screw hole
: Height of projected image
: Distance from surface of screen to wall (100 mm or less)
Aspect ratio for standard projected image
 : Wall plate
  : Screen
23
Installation Guide
When installing the Touch Unit (EB-1460Ui/EB-1450Ui only)
By using the supplied Touch Unit Bracket, you can install the Touch Unit outside the whiteboard.
When installing the Touch Unit outside the whiteboard, measure the length from the surface where the Touch Unit is installed to the whiteboard surface ((f) in the following figure).
•When (f) is 20 to 50 mm, you can install the Touch Unit outside the whiteboard using the bracket.
•When (f) is less than 20 mm or more than 50 mm install the Touch Unit on the whiteboard.
•When the thickness of the top of the frame (e) is 3 mm or more, install the Touch Unit on the whiteboard.
 Caution
Install the bottom edge of the Touch Unit so that it is 25 to 100 mm from the top edge of the projected image.
If there are obstacles between the projected image and the Touch Unit such as cables, whiteboard trays, or holders, the Touch Unit will not operate correctly.
When the Touch Unit is installed outside the whiteboard (using the Touch Unit Bracket)
[Unit: mm]
24
Installation Guide
cIf there are any obstacles such as a frame or tray at the bottom of the screen, touch operations will not operate correctly. Stick the supplied infrared deflectors along the locations of the obstacles (sp.52). Make sure there is a space of approximately 20 mm between the place where the infrared deflector is stuck and the bottom of the projected image.
When installing the Touch Unit on the whiteboard (without using the Touch Unit Bracket)
You need to leave at least 120 mm distance between the top edge of the projected image and the top edge of the actual screen.
[Unit: mm]
25

Installation Guide
c• If there are any obstacles such as a frame or tray at the bottom of the screen, touch operations will not operate correctly. Stick the supplied infrared deflectors over the locations of the obstacles (sp.52). Make sure there is a space of at least 20 mm between the place where the infrared deflector is stuck and the bottom of the projected image.
•If there are obstacles in the shaded areas in the following figure, such as cables, whiteboard trays, holders, or a thick frame, touch operations will not operate correctly.
26

Installation Guide
When installing the Control Pad and the Pen Stand
When installing the Control Pad, leave enough space around it to install/remove the cover or to connect/ disconnect cables easily as shown in the following figure.
[Unit: mm]
|
|
When installing the Pen Stand next to the Control Pad, do not install it so that it covers the groove in the front cover as shown in the following figure.
cWhen installing the Touch Unit, do not install the Control Pad on the projection screen and the surrouding area (shaded area in the following figure). Otherwise The Touch Unit will not operate correctly.
[Unit: mm]
27

Installation Guide
When Projected Image is Smaller than 85 Inches
Mount the 3-axis adjustment unit at the position marked with a  stamp (
  ).
).
The projection distance table provides the figures when mounting the 3-axis adjustment unit at the position marked with a  stamp (
  ).
).
The distance from the top of the projected image to the bottom wall plate installation screw hole (c) is the number given when the vertical slide is set to the standard position (  ).
).
Match the notch on the setting plate to the position of the stamp on the wall plate.
28

Installation Guide
16:10 projected image
|
|
|
|
|
|
[Unit: cm] |
|
|
|
|
|
|
|
|
|
|
S |
a |
b |
c |
d |
h |
|
Projected image size |
Projection Dis- |
Numbers on |
Distance to |
Distance from |
Height of |
|
|
|
|
tance |
the arm slide |
the bottom |
the top of the |
projected |
|
|
|
Minimum |
scale |
wall plate in- |
projected im- |
image |
|
|
|
(Wide) to Maxi- |
|
stallation |
age to the wall |
|
|
|
|
mum (Tele) |
|
screw hole |
plate tempora- |
|
|
|
|
|
|
|
ry securing |
|
|
|
|
|
|
|
screw hole |
|
|
70" |
150.8x94.2 |
6.2 to 20.8 |
17.1 to 31.7 |
21.4 |
40.6 |
94.3 |
|
|
|
|
|
|
|
|
|
71" |
152.9x95.6 |
6.6 to 21.6 |
17.5 to 32.5 |
21.7 |
40.9 |
95.6 |
|
|
|
|
|
|
|
|
|
72" |
155.1x96.9 |
7.2 to 22.4 |
18.1 to 33.3 |
22.0 |
41.2 |
96.9 |
|
|
|
|
|
|
|
|
|
73" |
157.2x98.3 |
7.8 to 23.2 |
18.7 to 34.1 |
22.3 |
41.5 |
98.3 |
|
|
|
|
|
|
|
|
|
74" |
159.4x99.6 |
8.4 to 24.1 |
19.3 to 35.0 |
22.6 |
41.8 |
99.6 |
|
|
|
|
|
|
|
|
|
75" |
161.5x101.0 |
9.0 to 24.9 |
19.9 to 35.8 |
22.8 |
42.0 |
101.0 |
|
|
|
|
|
|
|
|
|
76" |
163.7x102.3 |
9.6 to 25.7 |
20.5 to 36.6 |
23.1 |
42.3 |
102.3 |
|
|
|
|
|
|
|
|
|
77" |
165.9x103.7 |
10.2 to 26.5 |
21.1 to 37.4 |
23.4 |
42.6 |
103.7 |
|
|
|
|
|
|
|
|
|
78" |
168.0x105.0 |
10.8 to 27.3 |
21.7 to 38.2 |
23.7 |
42.9 |
105.0 |
|
|
|
|
|
|
|
|
|
79" |
170.2x106.3 |
11.4 to 28.1 |
22.3 to 39.0 |
24.0 |
43.2 |
106.3 |
|
|
|
|
|
|
|
|
|
80" |
172.3x107.7 |
12.0 to 29.0 |
22.9 to 39.9 |
24.2 |
43.4 |
107.7 |
|
|
|
|
|
|
|
|
|
81" |
174.5x109.0 |
12.6 to 29.8 |
23.5 to 40.7 |
24.5 |
43.7 |
109.1 |
|
|
|
|
|
|
|
|
|
82" |
176.6x110.4 |
13.2 to 30.6 |
24.1 to 41.5 |
24.8 |
44.0 |
110.4 |
|
|
|
|
|
|
|
|
|
83" |
178.8x111.7 |
13.8 to 31.0 |
24.7 to 41.9 |
25.1 |
44.3 |
111.7 |
|
|
|
|
|
|
|
|
|
84" |
180.9x113.1 |
14.4 to 31.0 |
25.3 to 41.9 |
25.4 |
44.6 |
113.0 |
|
|
|
|
|
|
|
|
|
Images smaller than 70 inches are not projected correctly.
c• The values are only rough estimates. The value may differ depending on the location where you place the projector.
• When projecting in Tele, the quality of the projected images may decrease.
29
Loading...