


User’s Guide
NPD5658-00 EN

AL-M320DN/AL-M310DN/AL-M220DN User's Guide
Contents
Contents
Introduction
Where to Find Information. . . . . . . . . . . . . . . . . . . 5
Warning, Caution, Important and Note. . . . . . . . . . 5
Prerequisites of Description in This Manual. . . . . . . 5
Abbreviations of Operating Systems. . . . . . . . . . . . 5
Note For This Publication. . . . . . . . . . . . . . . . . . . . 6
Important Instructions
Important Safety Instructions. . . . . . . . . . . . . . . . . 7
Setting up the printer. . . . . . . . . . . . . . . . . . . . . 7 Finding the place for the printer. . . . . . . . . . . . . 8 Using the printer. . . . . . . . . . . . . . . . . . . . . . . . 8 Handling the consumable products and maintenance parts. . . . . . . . . . . . . . . . . . . . . . . . 9
Safety Information. . . . . . . . . . . . . . . . . . . . . . . . 10
Laser safety labels. . . . . . . . . . . . . . . . . . . . . . . 10 Internal laser radiation. . . . . . . . . . . . . . . . . . . 10 Ozone safety. . . . . . . . . . . . . . . . . . . . . . . . . . . 10
Restrictions on Making Copies. . . . . . . . . . . . . . . 10
Making copies of the following items is
prohibited by law. . . . . . . . . . . . . . . . . . . . . . . 11 Exercise caution when making copies of the following items. . . . . . . . . . . . . . . . . . . . . . . . . 11 Responsible use of copyrighted materials. . . . . . 11
Getting to Know Your Printer
Printer Parts. . . . . . . . . . . . . . . . . . . . . . . . . . . . . 12
Front and right side view. . . . . . . . . . . . . . . . . . 12 Inside the printer. . . . . . . . . . . . . . . . . . . . . . . 12 Rear view. . . . . . . . . . . . . . . . . . . . . . . . . . . . . 12 Control Panel for AL-M320DN/AL-M310DN
. . . . . . . . . . . . . . . . . . . . . . . . . . . . . . . . . . . . 14 Control Panel for AL-M220DN. . . . . . . . . . . . . 15
Using the Control Panel. . . . . . . . . . . . . . . . . . . . 17
When to make control panel settings. . . . . . . . . 17 How to access the control panel menus (AL- M320DN/AL-M310DN). . . . . . . . . . . . . . . . . . 17 How to access the control panel menus (ALM220DN). . . . . . . . . . . . . . . . . . . . . . . . . . . . . 17 Language. . . . . . . . . . . . . . . . . . . . . . . . . . . . . 19 System Information. . . . . . . . . . . . . . . . . . . . . 19 Quick Print JobMenu (AL-M320DN/AL- M310DN only). . . . . . . . . . . . . . . . . . . . . . . . . 20
ConfidentialJobMenu (AL-M320DN/AL- M310DN only). . . . . . . . . . . . . . . . . . . . . . . . . 20 Common Settings. . . . . . . . . . . . . . . . . . . . . . . 21 Printer Settings. . . . . . . . . . . . . . . . . . . . . . . . . 28 Admin Settings. . . . . . . . . . . . . . . . . . . . . . . . . 38 Bookmark Menu (For AL-M320DN/AL- M310DN). . . . . . . . . . . . . . . . . . . . . . . . . . . . . 39
Loading Paper
Available Paper and Capacities. . . . . . . . . . . . . . . 40
Available paper types and weights. . . . . . . . . . . 42
Loading Paper. . . . . . . . . . . . . . . . . . . . . . . . . . . . 44
Paper cassette. . . . . . . . . . . . . . . . . . . . . . . . . . 44 MP tray. . . . . . . . . . . . . . . . . . . . . . . . . . . . . . 45
Paper Output Settings. . . . . . . . . . . . . . . . . . . . . . 46
Orientation to eject paper. . . . . . . . . . . . . . . . . 46
Selecting and Using Print Media. . . . . . . . . . . . . . 46
Envelopes. . . . . . . . . . . . . . . . . . . . . . . . . . . . . 46 Other paper. . . . . . . . . . . . . . . . . . . . . . . . . . . 47 Custom paper size. . . . . . . . . . . . . . . . . . . . . . . 47
Printing Tasks
Basics of Printing. . . . . . . . . . . . . . . . . . . . . . . . . 49
Setting the Main Screen. . . . . . . . . . . . . . . . . . . 50
Setting the More Options Screen. . . . . . . . . . . . 51
Setting the Maintenance Screen. . . . . . . . . . . . . 53
Setting Advanced Features. . . . . . . . . . . . . . . . . . . 54
Printing multiple print jobs at one time. . . . . . . 54 Printing a booklet. . . . . . . . . . . . . . . . . . . . . . . 54 Printing data for a single page across multiple sheets (poster printing). . . . . . . . . . . . . . . . . . . 55 Using the Reserve Job function (AL-M320DN/ AL-M310DN). . . . . . . . . . . . . . . . . . . . . . . . . . 57 Printing with an overlay. . . . . . . . . . . . . . . . . . 58 Improving the clarity of color documents. . . . . . 59
Making Printer Settings (AL-M220DN only). . . . . 59
Using Sleep Mode to Save Energy. . . . . . . . . . . . . 59
Entering the sleep mode manually (For AL- M320DN/AL-M310DN). . . . . . . . . . . . . . . . . . 60 Entering the sleep mode automatically. . . . . . . . 60
Changing the Printer Driver’s Default Settings
(for Administrators). . . . . . . . . . . . . . . . . . . . . . . 61
Changing the default settings. . . . . . . . . . . . . . . 61 Locking the default settings. . . . . . . . . . . . . . . . 61
Using EPSON Status Monitor. . . . . . . . . . . . . . . . 61
2

AL-M320DN/AL-M310DN/AL-M220DN User's Guide
Contents
Accessing EPSON Status Monitor. . . . . . . . . . . 61
Notice Settings. . . . . . . . . . . . . . . . . . . . . . . . . 62
Tray Icon Settings. . . . . . . . . . . . . . . . . . . . . . . 62
Cancelling a Print Job. . . . . . . . . . . . . . . . . . . . . . 62
From the printer. . . . . . . . . . . . . . . . . . . . . . . . 62 From the computer. . . . . . . . . . . . . . . . . . . . . . 63
Uninstalling and Installing Software
Uninstalling Software. . . . . . . . . . . . . . . . . . . . . . 64
Installing Software. . . . . . . . . . . . . . . . . . . . . . . . 64
Installing the PostScript printer driver with Windows. . . . . . . . . . . . . . . . . . . . . . . . . . . . . 65 Installing the PostScript printer driver with
Mac OS. . . . . . . . . . . . . . . . . . . . . . . . . . . . . . 66 Installing the PCL printer driver (For
Windows only). . . . . . . . . . . . . . . . . . . . . . . . . 67
Maintaining the Printer
Replacing Consumable Products/Maintenance
Parts. . . . . . . . . . . . . . . . . . . . . . . . . . . . . . . . . . . 68
Precautions during replacement. . . . . . . . . . . . . 68 Replacement Messages/Lights. . . . . . . . . . . . . . 68
Cleaning the Printer. . . . . . . . . . . . . . . . . . . . . . . 70
Cleaning the inner roller. . . . . . . . . . . . . . . . . . 70
Troubleshooting
Status and Error Messages on the Control Panel
(for AL-M320DN/AL-M310DN). . . . . . . . . . . . . . 72
Status and Error Lights (for AL-M220DN). . . . . . . 78
Printing a Status Sheet. . . . . . . . . . . . . . . . . . . . . . 84
Printing from the control panel (For ALM320DN/310DN). . . . . . . . . . . . . . . . . . . . . . . 84 Printing from the control panel (For ALM220DN). . . . . . . . . . . . . . . . . . . . . . . . . . . . . 84
Clearing Jammed Paper. . . . . . . . . . . . . . . . . . . . . 84
F (Cover F). . . . . . . . . . . . . . . . . . . . . . . . . . . . 85 E (Cover E). . . . . . . . . . . . . . . . . . . . . . . . . . . . 87 C1 DM (Cassette1/DM knob). . . . . . . . . . . . . . 88 MP (MP tray). . . . . . . . . . . . . . . . . . . . . . . . . . 88 C1 - C3 (Cassette 1 - 3). . . . . . . . . . . . . . . . . . . 89
Paper Does Not Feed Properly. . . . . . . . . . . . . . . . 90
Power and Control Panel Problems. . . . . . . . . . . . 90
The ready light does not turn on. . . . . . . . . . . . 90 The printer turns off automatically. . . . . . . . . . 91 The Printer does not turn off. . . . . . . . . . . . . . . 91
The Printer Does Not Print. . . . . . . . . . . . . . . . . . 92
Ready light is off. . . . . . . . . . . . . . . . . . . . . . . . 92
The ready light is on. . . . . . . . . . . . . . . . . . . . . 92
Printout Problems. . . . . . . . . . . . . . . . . . . . . . . . . 93
Print quality is poor. . . . . . . . . . . . . . . . . . . . . 93 The printout is not what you expected. . . . . . . . 94
Printing in the PS3 Mode Problems. . . . . . . . . . . . 95
The printer does not print correctly in the PostScript mode. . . . . . . . . . . . . . . . . . . . . . . . 96 The printer does not print. . . . . . . . . . . . . . . . . 96 The printer or its driver does not appear in
utilities in the printer configuration (Mac OS only). . . . . . . . . . . . . . . . . . . . . . . . . . . . . . . . 96 The font on the printout is different from that
on the screen. . . . . . . . . . . . . . . . . . . . . . . . . . 96 The edges of texts and/or images are not
smooth. . . . . . . . . . . . . . . . . . . . . . . . . . . . . . . 97 The printer does not print normally via the
USB interface. . . . . . . . . . . . . . . . . . . . . . . . . . 97 The printer does not print normally via the network interface. . . . . . . . . . . . . . . . . . . . . . . 97 An undefined error occurs (Mac OS only). . . . . 97
Other Problems. . . . . . . . . . . . . . . . . . . . . . . . . . 98
The optional product is not available. . . . . . . . . 98 Correcting USB problems. . . . . . . . . . . . . . . . . 98 Cannot access the shared printer. . . . . . . . . . . . 99
Transporting the Printer. . . . . . . . . . . . . . . . . . . 100
For short distances. . . . . . . . . . . . . . . . . . . . . 100 For long distances. . . . . . . . . . . . . . . . . . . . . . 100
Installing Options (AL-M320DN/AL-M310DN)
. . . . . . . . . . . . . . . . . . . . . . . . . . . . . . . . . . . . . 101
Optional paper cassette unit. . . . . . . . . . . . . . . 101
Appendix
Technical Specifications. . . . . . . . . . . . . . . . . . . . 103
General. . . . . . . . . . . . . . . . . . . . . . . . . . . . . . 103 Electrical. . . . . . . . . . . . . . . . . . . . . . . . . . . . . 105 Supported operating systems. . . . . . . . . . . . . . 105 Support Mode Settings using the control panel
. . . . . . . . . . . . . . . . . . . . . . . . . . . . . . . . . . . 105
Consumable Products and Options. . . . . . . . . . . 109
Consumable products. . . . . . . . . . . . . . . . . . . 109 Options. . . . . . . . . . . . . . . . . . . . . . . . . . . . . 109
Copyrights, Trademarks, and Licenses. . . . . . . . . 110
SOFTWARE LICENSE. . . . . . . . . . . . . . . . . . 110
Standard and Approvals. . . . . . . . . . . . . . . . . . . 110
Where To Get Help
Contacting Epson Support. . . . . . . . . . . . . . . . . . 111
Before Contacting Epson. . . . . . . . . . . . . . . . . 111
3

AL-M320DN/AL-M310DN/AL-M220DN User's Guide
Contents
Help for Users in Europe. . . . . . . . . . . . . . . . . 111 Help for Users in Taiwan. . . . . . . . . . . . . . . . . 111 Help for Users in Singapore. . . . . . . . . . . . . . . 112 Help for Users in Thailand. . . . . . . . . . . . . . . . 112 Help for Users in Vietnam. . . . . . . . . . . . . . . . 113 Help for Users in Indonesia. . . . . . . . . . . . . . . 113 Help for Users in Hong Kong. . . . . . . . . . . . . . 115 Help for Users in Malaysia. . . . . . . . . . . . . . . . 115 Help for Users in the Philippines. . . . . . . . . . . 116
4
AL-M320DN/AL-M310DN/AL-M220DN User's Guide
Introduction
Introduction
Where to Find
Information
Setup Guide
Provides you with information on assembling the printer and installing the printer software.
Password Setup Sheet (for AL-M320DN/ AL-M310DN)
Provides you with information on how to set a password for the printer. When using it as a network printer, an administrator password must be set for the printer.
IP Address and Password Setup Sheet (for AL-M220DN)
Provides you with information on how to set an IP Address and password. When using it as a network printer, an administrator password must be set for the printer. This sheet provides you with information on how to set a password for the printer.
User’s Guide (this manual)
Provides you with detailed information on the printer’s functions, optional products, maintenance, troubleshooting, and technical specifications.
Network Guide
Provides network administrators with information on both the printer driver and network settings.
Font Guide
Provides you with information on fonts used on the printer. There are two font guides for the printer. Confirm the printer’s internal fonts by printing the font list from System Report, and see the appropriate font guide.
Online Help for printer software
Click Help for detailed information and instructions on the printer software that controls
your printer. Online help is automatically installed when you install the printer software.
Warning, Caution,
Important and Note
!Warning
must be followed carefully to avoid serious bodily injury.
!Caution
must be observed to avoid bodily injury.
cImportant
must be observed to avoid damage to your equipment.
Note
contains important information and useful tips on the operation of your printer.
Prerequisites of
Description in This
Manual
The following illustrations and screenshots are used in this guide unless otherwise indicated.
AL-M320DN
Windows 7
The PostScript used on this printer is compatible with PostScript Level 3.
Abbreviations of
Operating Systems
In this manual, the following abbreviations are used.
Windows 10 MicrosoftSystem ®Windows®10 Operating
5

AL-M320DN/AL-M310DN/AL-M220DN User's Guide
Introduction
Windows 8.1 |
MicrosoftSystem ®Windows®8.1 Operating |
||||
Windows 8 |
MicrosoftSystem ®Windows®8 Operating |
||||
Windows 7 |
MicrosoftSystem ®Windows®7 Operating |
||||
Windows |
Microsoft |
® |
Windows Vista |
® |
Operating |
Vista |
System |
|
|
||
|
|
||||
Windows XP |
SystemMicrosoft®Windows®XP Operating |
||||
Windows |
Microsoft®WIndows Server®2016 |
||||
Server 2016 |
Operating System |
|
|
||
Windows |
Microsoft®Windows Server®2012 R2 |
||||
Server 2012 |
Operating System |
|
|
||
R2 |
|
|
|
|
|
|
|
||||
Windows |
Microsoft®Windows Server®2012 |
||||
Server 2012 |
Operating System |
|
|
||
Windows |
Microsoft®Windows Server®2008 R2 |
||||
Server 2008 |
Operating System |
|
|
||
R2 |
|
|
|
|
|
|
|
||||
Server 2008 |
Microsoft®Windows Server®2008 |
||||
|
Operating System |
|
|
||
Server 2003 |
Microsoft®Windows Server®2003 |
||||
|
Operating System |
|
|
||
Windows |
Generic name of operating systems |
||||
|
above |
|
|
|
|
|
|
|
|
||
|
|
|
|
||
Mac OS X |
macOS Sierra |
|
|
||
v10.12.x |
|
|
|
|
|
|
|
|
|
||
Mac OS X |
OS X El Capitan |
|
|
||
v10.11.x |
|
|
|
|
|
|
|
|
|
||
Mac OS X |
OS X Yosemite |
|
|
||
v10.10.x |
|
|
|
|
|
|
|
|
|
||
Mac OS X |
OS X Mavericks |
|
|
||
v10.9.x |
|
|
|
|
|
|
|
|
|
||
Mac OS X |
OS X Mountain Lion |
|
|
||
v10.8.x |
|
|
|
|
|
|
|
|
|
|
|
Mac OS X |
OS X Lion |
|
|
|
|
v10.7.x |
|
|
|
|
|
|
|
|
|
||
Mac OS X |
OS X Snow Leopard |
|
|
||
v10.6.8 |
|
|
|
|
|
|
|
||||
Mac OS |
Generic name of operating systems |
||||
|
above |
|
|
|
|
|
|
|
|
|
|
Note For This Publication
No part of this publication may be reproduced, stored in a retrieval system, or transmitted in any form or by any means, mechanical, photocopying, recording, or otherwise, without the prior written permission of Seiko Epson Corporation. No patent liability is assumed with respect to the use of the information contained herein. Neither is any liability assumed for damages resulting from the use of the information contained herein.
Neither Seiko Epson Corporation nor its affiliates shall be liable to the purchaser of this product or third parties for damages, losses, costs, or expenses incurred by purchaser or third parties as a result of: accident, misuse, or abuse of this product or unauthorized modifications, repairs, or alterations to this product, or (excluding the U.S.) failure to strictly comply with Seiko Epson Corporation’s operating and maintenance instructions.
Seiko Epson Corporation and its affiliates shall not be liable against any damages or problems arising from the use of any options or any consumable products other than those designated as Original Epson Products or Epson Approved Products by Seiko Epson Corporation.
6

AL-M320DN/AL-M310DN/AL-M220DN User's Guide
Important Instructions
Important Instructions
Important Safety
Instructions
Setting up the printer
Be sure to lift the printer by the correct positions as shown below.
When moving the printer, always keep it horizontal.
If you are unable to insert the AC plug into the electrical outlet, contact an electrician.
Do not connect to an uninterruptible power source. If you connect to one, it may cause malfunctions or damage.
Be sure the AC power cord meets the relevant local safety standards. Use only the power cord that comes with this product. Use of another cord may result in fire or electric shock. This product’s power cord is for use with this product only. Use with other equipment may result in fire or electric shock.
If damage occurs to the plug, replace the cord set or consult a qualified electrician. If there are fuses in the plug, make sure you replace them with fuses of the correct size and rating.
Use a grounded outlet that matches the printer’s power plug. Do not use an adapter plug.
Avoid using an electrical outlet that is controlled by wall switches or automatic timers. Accidental disruption of power can erase valuable information in your computer’s and printer’s memory.
Make sure that there is no dust on the socket.
Be sure to insert the plug completely into the electrical outlet.
Do not handle the plug with wet hands.
Unplug this printer from the wall outlet and refer servicing to a qualified service representative under the following conditions:
A. |
When the power cord or plug is damaged or |
|
frayed. |
|
|
B. |
If liquid has been spilled into it. |
|
|
C. |
If it has been exposed to rain or water. |
|
|
D. |
If it does not operate normally when the |
|
operating instructions are followed. Adjust |
|
only those controls that are covered by the |
|
operating instructions since improper |
|
adjustment of other controls may result in |
|
damage and will often require extensive |
|
work by a qualified technician to restore the |
|
product to normal operation. |
|
|
E. |
If it has been dropped or the cabinet has |
|
been damaged. |
|
|
F. |
If it exhibits a distinct change in |
|
performance, indicating a need for service. |
|
|
Avoid sharing outlets with other appliances.
Connect all equipment to properly grounded power outlets. Avoid using outlets on the same circuit as photocopiers or air control systems that regularly switch on and off.
Connect your printer to an electrical outlet that meets the power requirements of this printer. Your printer’s power requirements are indicated on a label attached to the printer. If you are not sure of the power supply specifications in your area, contact your local power company or consult your dealer.
If you use an extension cord, make sure that the total of the ampere ratings on the products plugged into the extension cord does not exceed the extension cord ampere rating.
7

AL-M320DN/AL-M310DN/AL-M220DN User's Guide
Important Instructions
When connecting this product to a computer or other device with a cable, ensure the correct orientation of the connectors. Each connector has only one correct orientation. Inserting a connector in the wrong orientation may damage both devices connected by the cable.
Use only optional products, such as the paper cassette units and the printer stand, produced specifically for this product. Using options produced for other products may cause the product to fall over and injure someone.
Finding the place for the printer
When relocating the printer, always choose a location that has adequate space for easy operation and maintenance. Use the following illustration as a guide for the amount of space required around the printer to ensure smooth operation.
Note:
Figures are rounded off to the nearest whole number.
a |
20 cm |
d |
50 cm |
|
|
|
|
b |
30 cm |
e |
30 cm |
|
|
|
|
c |
30 cm |
|
|
|
|
|
|
In addition to space considerations, always heed the following precautions when finding a place to locate the printer:
Place the printer near an electrical outlet where you can easily plug in and unplug the power cord.
Do not put your printer where the cord will be stepped on.
Do not use printer in a damp environment.
Avoid locations that are subject to direct sunlight, excessive heat, moisture, oil vapor, or dust.
Avoid locations that are subject to the air coming directly from an air conditioner.
Do not place the printer on an unstable surface.
Slots and openings in the cabinet and the back or bottom are provided for ventilation. Do not block or cover them. Do not put the printer on a bed, sofa, rug, or other similar surface or in a built-in installation unless proper ventilation is provided.
Keep the entire computer and printer system away from potential sources of interference, such as loudspeakers or the base units of cordless telephones.
Leave adequate room around the printer to allow for sufficient ventilation.
Using the printer
Some of the symbols used on your printer are to ensure safety and proper use of the printer. Visit the following web site to learn the meaning of the symbols:
http://support.epson.net/symbols/
Be careful not to touch the fuser, which is marked with a caution label, or the surrounding areas. If the printer has been in use, the fuser and the surrounding areas may be very hot. If you must touch one of these areas, wait 40 minutes to allow the heat to subside before doing so.
* caution label
8

AL-M320DN/AL-M310DN/AL-M220DN User's Guide
Important Instructions
Do not insert your hand deep into the fuser unit as some components are sharp and may cause injury.
Never push objects of any kind through cabinet slots as they may touch dangerous voltage points or short out parts that could result in a risk of fire or electric shock.
Do not sit or lean on the printer. Do not put heavy objects on the printer.
Do not use any kind of combustible gases in or around the printer.
Never force the printer’s components into place. Although the printer is designed to be sturdy, rough handling can damage it.
Do not leave jammed paper inside the printer. This can cause the printer to overheat.
Never spill liquid of any kind on the printer.
Adjust only those controls that are covered by the operating instructions. Improper adjustment of other controls may result in damage and may require repair by a qualified service representative.
Do not turn off the printer:
-After turning on the printer, wait until Ready appears on the LCD panel (AL-M320DN/ AL-M310DN), or the Ready light turns on (AL-M220DN).
-While the Data light is on or flashing. -While printing.
Avoid touching the components inside the printer unless instructed to do so in this guide.
Follow all warnings and instructions marked on the printer.
Except as specifically explained in the printer’s documentation, do not attempt to service this product yourself.
Periodically disconnect the plug from the electrical outlet and clean the blades.
Do not disconnect the plug while the printer is on.
If the printer will not be used for a long time, disconnect the plug from the electrical outlet.
Unplug this printer from the wall outlet before cleaning.
Use a well-wrung cloth for cleaning and do not use liquid or aerosol cleaners.
Handling the consumable products and maintenance parts
Do not burn used consumable products and maintenance parts because they might explode and injure someone. Dispose of them according to local regulations.
Be sure to keep consumable products and maintenance parts out of the reach of children.
When handling a toner cartridge, always place it on a clean, smooth surface.
Do not attempt to modify or take it apart consumable products and maintenance parts.
Do not touch the toner. Always keep toner away from your eyes. If toner gets on your skin or clothes, wash it off with soap and water immediately.
If toner is spilled, use a broom and dustpan or a damp cloth with soap and water to clean it up. Because the fine particles can cause a fire or explosion if they come into contact with a spark, do not use a vacuum cleaner.
Wait at least one hour before using a toner cartridge or photoconductor after moving it from a cool to a warm environment to prevent damage from condensation.
To get the best print quality, do not store the toner cartridge in an area subject to direct sunlight, dust, salty air, or corrosive gases (such as ammonia).
Avoid locations subject to extreme or rapid changes in temperature or humidity.
When removing the photoconductor unit, do not expose it to sunlight at all and avoid exposing it to room light for more than three minutes. The photoconductor unit contains a light-sensitive drum. Exposure to light can damage the drum, causing dark or light areas to appear on the printed page and reducing the service life of the drum. If you need to keep the photoconductor unit out of the printer for long periods, cover it with an opaque cloth.
9
AL-M320DN/AL-M310DN/AL-M220DN User's Guide
Important Instructions
Be careful not to scratch the surface of the drum. When you remove the photoconductor unit from the printer, always place it on a clean, smooth surface. Avoid touching the drum, since oil from your skin can permanently damage its surface and affect print quality.
Do not touch the transfer roller to avoid damaging it.
Do not let the paper’s edge slide across your skin because the edge of the paper may cut you.
Safety Information
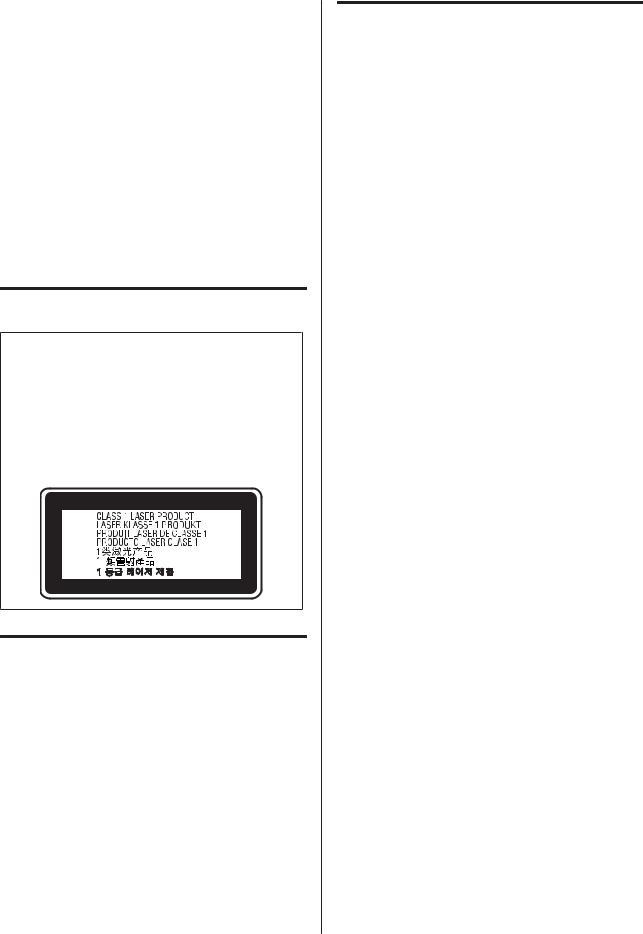
Laser safety labels
!Warning:
The performance of procedures and adjustments other than those specified in the printer’s documentation may result in hazardous radiation exposure. Your printer is a Class 1 laser product as defined in the IEC60825 specifications. The label similar to the one shown below is attached to the back of the printer in countries where required.
Internal laser radiation
There is a Class III b Laser Diode Assembly that has an invisible laser beam inside the printer head unit. The printer head unit is NOT A SERVICE ITEM, therefore, the printer head unit should not be opened under any circumstances. An additional laser warning label is affixed to the inside of the printer.
Ozone safety
Ozone emission
Ozone gas is generated by laser printers as a by-product of the printing process. Ozone is produced only when the printer is printing.
Ozone exposure limit
The Epson laser printer generates less than 1.5 mg/h of continuous printing.
Minimize the risk
To minimize the risk of exposure to ozone, you should avoid the following conditions:
Use of multiple laser printers in a confined area
Operation in conditions of extremely low humidity
Poor room ventilation
Long, continuous printing together with any of the above
Printer location
The printer should be located so that the exhaust gases and heat generated are:
Not blown directly into the user’s face
Vented directly out of the building whenever possible
Restrictions on Making Copies
Observe the following restrictions in order to ensure the responsible and legal use of this printer.
10
AL-M320DN/AL-M310DN/AL-M220DN User's Guide
Important Instructions
Making copies of the following items is prohibited by law
Bank bills, coins, government-issued marketable securities, government bond securities, and municipal securities
Unused postage stamps, pre-stamped postcards, and other official postal items bearing valid postage
Government-issued revenue stamps, and securities issued according to legal procedure
Exercise caution when making copies of the following items
Private marketable securities (stock certificates, negotiable notes, checks, etc.), monthly passes, concession tickets, etc.
Passports, driver’s licenses, warrants of fitness, road passes, food stamps, tickets, etc.
Responsible use of copyrighted materials
The printer may be used mistakenly or improperly to illegally copy copyrighted materials. You must act responsibly when copying copyrighted materials; by acquiring the permission of the copyright holder or acting on the advice of a knowledgeable attorney.
11

AL-M320DN/AL-M310DN/AL-M220DN User's Guide
Getting to Know Your Printer
Getting to Know Your Printer
Printer Parts
Front and right side view
AL-M320DN/AL-M310DN
AL-M220DN
1. |
cover F2 |
|
|
2. |
cover F1 |
|
|
3. |
MP tray |
|
|
4. |
security slot |
|
|
5. |
window for knowing the remaining amount of |
|
paper |
|
|
6. |
cassette 2/3 (optional paper cassette) |
|
|
7. |
cassette 1 (standard paper cassette) |
|
|
8. |
power switch |
|
|
9. |
ventilation window |
|
|
10. |
button to open covers F1 and F2 |
|
|
11.paper support
Inside the paper cassette
1.paper guide (side guide)
2.paper guide (back guide)
Inside the printer
1. |
lever to remove maintenance unit A |
|
|
2. |
toner cartridge |
|
|
3. |
maintenance unit A |
|
|
4. |
lock release button for toner cartridge |
|
|
5. |
maintenance unit B |
|
|
Rear view
12

AL-M320DN/AL-M310DN/AL-M220DN User's Guide
Getting to Know Your Printer
1. |
cover E |
|
|
2. |
AC inlet |
|
|
3. |
Ethernet interface connector |
|
LED1: data light |
|
LED2: status light |
|
For the information that the lights indicate, see the |
|
table below. |
|
|
4. |
USB interface connector |
|
|
LED Status
a: LED1 |
b: LED2 |
Network Status |
|
|
|
Yellow |
Green |
Ready (1000BASE-T) |
|
|
|
Yellow |
Green |
Receiving packets |
(Flashing) |
|
(1000BASE-T) |
|
|
|
Yellow |
Orange |
Ready (100BASE-TX) |
|
|
|
Yellow |
Orange |
Receiving packets |
(Flashing) |
|
(100BASE-TX) |
|
|
|
Yellow |
Off |
Ready (10BASE-Te) |
|
|
|
Yellow |
Off |
Receiving packets |
(Flashing) |
|
(10BASE-Te) |
|
|
|
Off |
Green |
Deep sleep mode* |
|
|
(1000BASE-T) |
|
|
|
Off |
Off |
Deep sleep mode* |
|
|
(100BASE-TX/10BASE-Te) |
|
|
Power off mode* |
* See “Energy Saver Menu” on page 25 for details.
13
AL-M320DN/AL-M310DN/AL-M220DN User's Guide
Getting to Know Your Printer
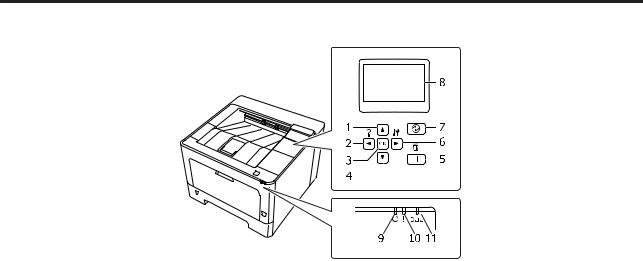
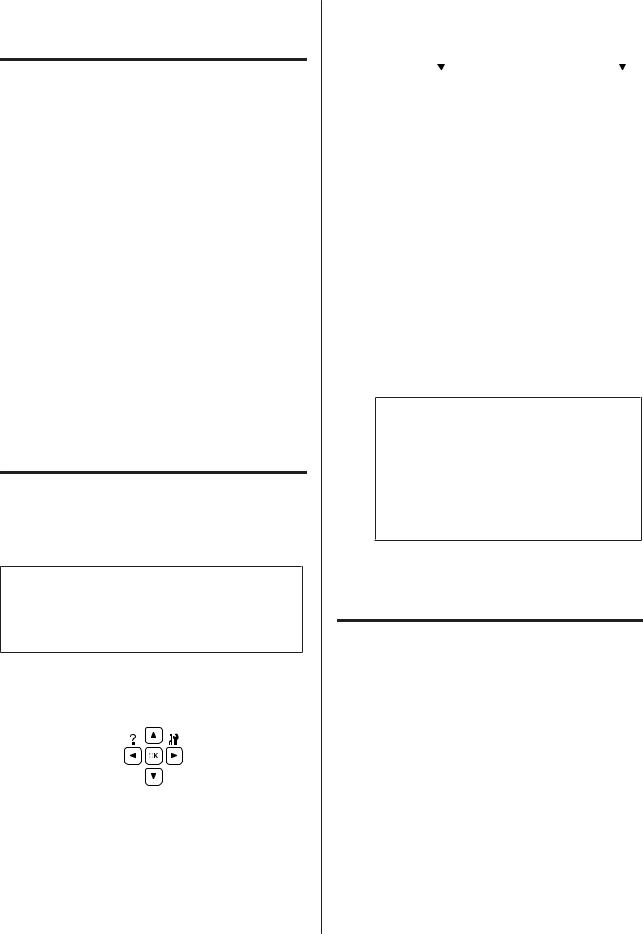
Control Panel for AL-M320DN/AL-M310DN
|
|
|
|
|
|
|
|
|
|
|
|
|
|
|
|
|
|
|
|
|
|
|
|
|
|
|
|
|
|
|
|
1. |
u Up button |
Press to scroll the items on the control panel menus. |
|||||
|
|
|
|||||
2. |
l Left button |
Press to go back to the previous menu, or press to show the help if l Press for |
|||||
|
|
help is displayed. |
|||||
|
|
|
|||||
3. |
OK button |
Press to set the menu, item or setting. |
|||||
|
|
When the error light is flashing, pressing this button clears the error and switches the |
|||||
|
|
printer to ready status. |
|||||
|
|
|
|||||
4. |
d Down button |
Press to scroll the items on the control panel menus. |
|||||
|
|
|
|||||
5. |
Pause/Release button |
Press once to pause. Press again to recover from pause. While paused, the following |
|||||
|
|
operations are available on the control panel. |
|||||
|
|
Canceling the current print job or stored print jobs. |
|||||
|
|
See “Cancelling a Print Job” on page 62. |
|||||
|
|
Interrupting print jobs to print a stored print job. |
|||||
|
|
Ejecting a paper (Form Feed) by holding down the OK button for more than 2 |
|||||
|
|
seconds. |
|||||
|
|
|
|||||
6. |
r Right button |
Press to go to the next menu, item or setting. |
|||||
|
|
|
|||||
7. |
Wakeup/Sleep button |
Press to switch the status between available for printing and saving power. |
|||||
|
|
This button lights up when the printer is in the sleep mode (the deep sleep mode). |
|||||
|
|
This button blinks when the printer enters the power off mode, which saves power |
|||||
|
|
because almost all functions are not available. |
|||||
|
|
For more details about the power off mode, see “Energy Saver Menu” on |
|||||
|
|
page 25. |
|||||
|
|
|
|||||
8. |
LCD panel |
Displays printer status messages and control panel menu settings. |
|||||
|
|
|
|||||
9. |
Ready light |
On when the printer is ready, indicating that the printer is ready to receive and print |
|||||
|
|
data. |
|||||
|
|
Off when the printer is not ready, or in the sleep mode. |
|||||
|
|
|
|||||
10. |
Error light (Orange) |
On or flashes when an error has occurred. |
|||||
|
|
Pressing the OK button or Auto Cont setting in the Setup Menu clears the errors |
|||||
|
|
that are flashing. |
|||||
|
|
|
|
|
|
|
|
14
AL-M320DN/AL-M310DN/AL-M220DN User's Guide
Getting to Know Your Printer
11. |
Data light |
On when print data is stored in the print buffer (the section of printer memory |
|
|
reserved for receiving data) but not yet printed. |
|
|
Flashes when the printer is processing data. |
|
|
Off when no data remains in the print buffer. |
|
|
|
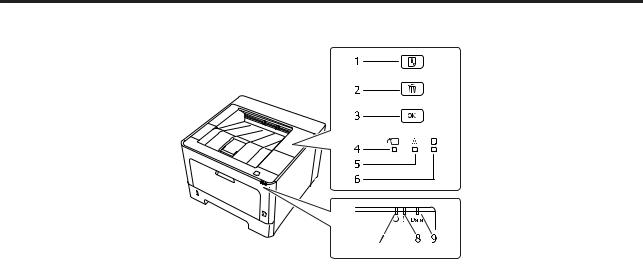
Control Panel for AL-M220DN
1. |
Information button |
Prints status sheets when the Error light is off and no warning is indicated. Prints a |
|
|
status sheet when pressed once. Pressing this button for more than two seconds |
|
|
prints a network status sheet. Clears the warning when a warning is indicated. |
|
|
|
2. |
Job Cancel button |
Press once to cancel the current print job. Press and hold for more than two seconds |
|
|
to delete all jobs from the printer memory. |
|
|
|
3. |
OK button |
When the error light is flashing, pressing this button clears the error and switches the |
|
|
printer to ready status. |
|
|
|
4. |
Cover & Maintenance light |
Lit when the printer’s cover is open, or when an error related to consumable |
|
|
products or maintenance parts other than toner occurred. Flashes when a warning |
|
|
related to these occurred. |
|
|
|
5. |
Toner light |
On when the printer’s toner cartridge has run out of toner. Flashes to indicate that |
|
|
toner is running low. If this light is flashing, have a new toner cartridge ready. |
|
|
|
6. |
Paper light |
Turns on or flashes, and when in combination with the Error light, usually indicates a |
|
|
paper-related problem. |
|
|
On usually indicates a paper jam, while flashing usually indicates a paper-related |
|
|
error or warning, such as when the paper source is empty. |
|
|
|
7. |
Ready light |
On when the printer is ready, indicating that the printer is ready to receive and print |
|
|
data. |
|
|
Off when the printer is not ready. This light also comes on in combination with other |
|
|
lights to indicate error situations. |
|
|
|
8. |
Error light (Orange) |
On or flashes when an error has occurred. |
|
|
|
9. |
Data light |
On when print data is stored in the print buffer (the section of printer memory |
|
|
reserved for receiving data) but not yet printed. Flashes when the printer is |
|
|
processing data. Off when no data remains in the print buffer. |
|
|
|
15

AL-M320DN/AL-M310DN/AL-M220DN User's Guide
Getting to Know Your Printer
Note:
When the printer is in sleep or deep sleep mode, all lights are off. When in sleep or deep sleep mode, pressing any button returns the printer to the ready state.
For details about LED light statuses, see “Status and Error Lights (for AL-M220DN)” on page 78.
16
AL-M320DN/AL-M310DN/AL-M220DN User's Guide
Getting to Know Your Printer
Using the Control Panel
When to make control panel settings
In general, printer driver settings override settings made using the control panel.
You should make the following settings by using the control panel because these settings cannot be made in the printer driver.
Settings to select emulation modes and IES (Intelligent Emulation Switching) mode
Settings to specify a channel and configure the interface
Settings to specify the size of the memory buffer used to receive data
For AL-M220DN, which does not have an LCD panel, you can do the control panel settings using EpsonNet Config. See “How to access the control panel menus (AL-M220DN)” on page 17.
How to access the control panel menus (AL-M320DN/ AL-M310DN)
Note:
Some menus and items appear only when a corresponding optional device is installed or an appropriate setting has been done.
A Press the r Right button to access the control panel menus.
B Use the u Up and d Down buttons to scroll through the menus.
C Press the r Right button to view the items in a menu. Depending on the menu, the LCD panel displays an item and the current setting separated ( YYYY=ZZZZ), or only an item (
YYYY).
D Use the u Up and d Down buttons to scroll through the items, or press the l Left button to return to the previous level.
E Press the r Right button to carry out the operation indicated by an item, such as printing a configuration status sheet or resetting the printer, or to view the settings available for an item, such as paper sizes or emulation modes.
Use the u Up and d Down buttons to scroll through available settings, then press the r Right button to select a setting and return to the previous level. Press the l Left button to return to the previous level without changing the setting.
Note:
You need to turn the printer off and then on to activate the settings you changed in the
Network Menu, USB Menu or RAM Disk in the Setup Menu.
The OK button can be used instead of the r Right button in step 3 or 5.
F Press the l Left button once or more times to exit the control panel menus.
How to access the control panel menus (AL-M220DN)
Although there are no panels that can display menus, you can do settings that correspond to the operation panel menus from a computer that is connected to the printer. You can do the settings using the following procedure.
From EpsonNet Config (web version)
You can do settings when the printer is connected to the network.
The method to open the settings screen is shown below.
17
AL-M320DN/AL-M310DN/AL-M220DN User's Guide
Getting to Know Your Printer
A Connect the printer to the same network as your computer.
Note:
See the following manuals for how to connect the printer to the network.
Setup Guide
IP Address and Password Setup Sheet
B Enter the printer’s IP address into the address bar of your web browser.
From the printer driver
You can set the following items that you think you will use often as printer settings, whether the printer is connected via USB or a network.
-MP Tray Size / MP Tray Type
-Cassette1 Size / Cassette1 Type
-Density
-Emphasize Thin Lines
-Paper Source
-Wide A4
-MP Tray Priority
-Page Protect
-Auto Eject Page
-I/F Time Out
-Size Ignore
-Time Setting
-Auto Cont
-Time to Sleep
-Language (Status Sheet)
Note:
For references for the corresponding control panel menus, see the following sections.
“Tray Menu” on page 28
“Printing Menu” on page 29
“Setup Menu” on page 21
“Energy Saver Menu” on page 25
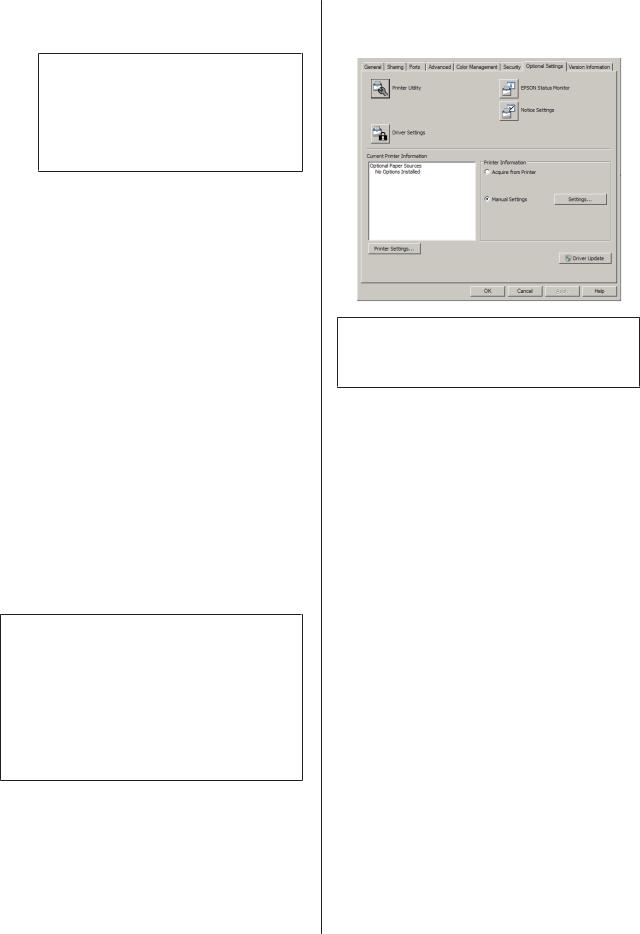
To open the screen to do settings, follow the steps below:
A |
Access the printer driver’s properties from Start |
-Devices and Printers. |
B Click the Optional Settings tab, and then click the Printer Settings button.
Note:
A warning appears if the time is not set after purchasing the printer. Use Printer Settings to set the time.
18

AL-M320DN/AL-M310DN/AL-M220DN User's Guide
Getting to Know Your Printer
Language
Item |
Explanation |
|
|
|
|
|
|||
Language |
Specifies the language displayed on the LCD panel (AL-M320DN/AL-M310DN only) and |
|||
|
that printed on the status sheet. |
|
|
|
|
|
|
|
|
|
Settings (default in bold): |
|
|
|
|
English, Français, Deutsch, Italiano, ESPAÑOL, SVENSKA, Dansk, Nederlands, SUOMI, |
|
||
|
Português, Norsk, CATALÀ, |
, Türkçe, Polski, Ceština, Magyar, |
, |
, |
|
, |
|
|
|
|
|
|
|
|
System Information
System Information
Note:
To use EpsonNet Config with a web browser to confirm settings, access Information > System > System Information.
Item |
Explanation |
|
|
Main Version |
Displays the version of the firmware installed on each printer. |
|
|
IPL Version |
|
|
|
MCU Version |
|
|
|
Serial No |
Displays the serial number of each printer. |
|
|
Memory |
Displays the amount of memory of each printer. |
|
|
MAC Address |
Displays the MAC address of each printer. |
|
|
System Report
Note:
To use EpsonNet Config with a web browser to print a report, access Information > Confirmation.
Item |
Explanation |
|
|
Print Configuration Status |
Prints a sheet showing the current printer settings and installed options. This sheet can be |
Sheet |
useful to confirm whether option have been installed correctly. |
|
|
Print Supplies Status Sheet |
Prints a sheet showing information about consumables. |
|
|
Print Usage History Sheet |
Prints a sheet showing the history of the printer’s usage. |
|
|
Reserve Job List (AL-M320DN/ |
Prints a list of reserved print jobs stored on the printer’s memory. |
AL-M310DN only) |
This item is available only when the jobs are stored by using the Quick Print Job |
|
|
|
feature. |
|
|
19
AL-M320DN/AL-M310DN/AL-M220DN User's Guide
Getting to Know Your Printer
Item |
Explanation |
|
|
Network Status Sheet |
Prints a sheet showing the working status of the network. |
|
This item is available only when the Network I/F setting in Network Menu is set to On. |
|
|
PS3 Font List |
Prints a sample of the fonts available for your selected printer emulation. |
|
|
PCL Font Sample |
|
|
|
ESCP2 Font Sample |
|
|
|
FX Font Sample |
|
|
|
I239X Font Sample |
|
|
|
Machine Status
Note:
To use EpsonNet Config with a web browser to do settings, access Information > System > Machine status.
Item |
Explanation |
|
|
|
|
Toner |
The number of asterisks (*) between “E” and “F” indicates the remaining service lives of |
|
|
replacement parts. If a non-genuine replacement part is used, “?” is displayed instead of |
|
Fuser Unit Life (AL-M320DN |
||
the indicator. |
||
only) |
|
|
|
|
|
Maintenance Unit A Life |
|
|
(AL-M320DN/AL-M310DN |
|
|
only) |
|
|
|
|
|
Maintenance Unit B Life |
|
|
(AL-M320DN/AL-M310DN |
|
|
only) |
|
|
|
|
|
Total Pages |
Displays the total number of pages printed by the printer. |
|
|
|
Quick Print JobMenu (AL-M320DN/AL-M310DN only)
This menu allows you to print or delete print jobs that were stored in the printer’s memory using the Quick Print Job feature (Re-Print Job, Verify Job) of the printer driver’s Reserve Job function. For instructions on using this menu, see“Using the Reserve Job function (AL-M320DN/AL-M310DN)” on page 57.
ConfidentialJobMenu (AL-M320DN/AL-M310DN only)
This menu allows you to print or delete print jobs stored in the printer’s memory using the Confidential Job feature of the printer driver’s Reserve Job function. You need to enter the correct password to access this data. For instructions on using this menu, see “Using the Reserve Job function (AL-M320DN/AL-M310DN)” on page 57.
20
AL-M320DN/AL-M310DN/AL-M220DN User's Guide
Getting to Know Your Printer
Common Settings
Setup Menu
Note:
To use EpsonNet Config with a web browser to do settings, access Configuration > Common Settings > Setup Menu.
Item |
Explanation |
|
|
I/F Time Out |
Specifies the length of the time, in seconds, before a time out when interfaces are being |
|
switched automatically. The time before a time out occurs is the length of time from the |
|
point when no data is being received from an interface until the point of switching the |
|
interface. If the printer has a print job when switching the interface, the printer prints the |
|
print job. |
|
|
|
Settings (default in bold): |
|
0, 5 ... 60 ... 300 in increments of 1 |
|
|
MP Tray Priority |
This setting determines whether the MP tray has the highest or lowest priority when Auto |
|
is selected as the Paper Source setting in the printer driver. When Normal (default) is |
|
selected as the MP Tray Priority, the MP tray has the highest priority as the paper |
|
source. If you select Last, the MP tray has the lowest priority. |
|
|
Cassette Order (AL-M320DN/ |
Specifies the cassette order for feeding paper when the setting for the printer driver’s |
AL-M310DN only) |
Paper Source is Auto Select. |
|
|
|
Settings: |
|
Top>Bottom, Bottom>Top |
|
|
Manual Feed |
Allows you to select the manual feed mode for the MP tray. |
|
|
|
Settings (default in bold): |
|
Off, 1st Page, EachPage |
|
|
Copies |
Designates the number of copies to be printed, from 1 through 999. |
|
|
Duplex |
Turns duplex printing on or off. This allows you to print on both sides of a page. |
|
For the paper sizes for which duplex printing is available, see “Available Paper and |
|
Capacities” on page 40. |
|
|
|
Settings (default in bold): |
|
Off, On |
|
|
Binding |
Specifies the binding direction of the printout. |
|
For the paper sizes for which duplex printing is available, see “Available Paper and |
|
Capacities” on page 40. |
|
|
|
Settings (default in bold): |
|
Long Edge, Short Edge |
|
|
21
AL-M320DN/AL-M310DN/AL-M220DN User's Guide
Getting to Know Your Printer
Item |
Explanation |
|
|
Start Page |
Specifies whether duplex printing starts from the front or back of the page. |
|
For the paper sizes for which duplex printing is available, see “Available Paper and |
|
Capacities” on page 40. |
|
|
|
Settings (default in bold): |
|
Front, Back |
|
|
Skip Blank Page |
Enables you to skip blank pages when printing. |
|
This function is available only for ESCP2, FX, or I239X mode. |
|
|
|
Settings (default in bold): |
|
Off, On |
|
|
Auto Eject Page |
Specifies whether or not to eject paper when the limit specified in the I/F Time Out |
|
setting is reached. The default is Off, which means paper is not ejected when the time-out |
|
limit is reached. |
|
This function is not available in PS3 and PCL. |
|
|
|
Settings (default in bold): |
|
Off, On |
|
|
Size Ignore |
If you want to ignore a paper size error, select On. When you turn this item on, the printer |
|
keeps printing even if the image size exceeds the printable area for the specified paper |
|
size. This may cause smudges because of the toner that is not transferred onto the paper |
|
properly. When this item is turned off, the printer stops printing if a paper size error occurs. |
|
|
|
Settings (default in bold): |
|
Off, On |
|
|
Auto Cont |
When you turn this setting on, the printer automatically continues printing after a certain |
|
period of time when one of the following errors occurs: Set Paper, Print Overrun, or |
|
Memory Overflow. When this option is off, you must press the OK button to resume |
|
printing. |
|
|
|
Settings (default in bold): |
|
Off, On |
|
|
Page Protect |
Allocates additional printer memory for printing data, as opposed to receiving it. You may |
|
need to turn this setting on if you are printing a very complex page. If a Print Overrun |
|
error message appears on the LCD panel (AL-M320DN/AL-M310DN), or on the computer |
|
screen while printing, turn this setting on and reprint your data. This reduces the amount |
|
of memory reserved for processing data so your computer may take longer to send the |
|
print job, but it will allow you to print complex jobs. Page Protect usually works best |
|
when Auto is selected. |
|
Note: |
|
Changing the Page Protect setting reconfigures the printer’s memory, which |
|
causes any downloaded fonts to be deleted. |
|
This function is available only for ESCP2, FX, or I239X mode. |
|
|
|
Settings (default in bold): |
|
Auto, On |
|
|
22
AL-M320DN/AL-M310DN/AL-M220DN User's Guide
Getting to Know Your Printer
Item |
Explanation |
|
|
|
|
A4/LT Auto Switching |
If LT->A4 (or A4->LT) is selected, if letter (or A4) size paper is selected for printing but there |
|
|
is no paper source set to letter (or A4), the printout is output on A4 (or Letter). |
|
|
If A4<->LT is selected, if A4 or letter size paper is selected for printing but there is no paper |
|
|
source set to the selected paper size, the printout is output on the alternate paper size. (A4 |
|
|
for letter or letter for A4) |
|
|
|
|
|
Settings (default in bold): |
|
|
LT->A4, A4->LT, A4<->LT, Off |
|
|
|
|
LCD Contrast (AL-M320DN/ |
Adjusts the contrast of the LCD panel. Use the u Up and d Down buttons to set the |
|
AL-M310DN) |
contrast between 0 (lowest contrast) and 15 (highest contrast). |
|
|
|
|
|
Settings (default in bold): |
|
|
0 ... 7 ... 15 |
|
|
|
|
LCD Backlight (AL-M320DN/ |
If Auto is selected, the LCD backlight lights. Also, it turns off during Sleep or Deep Sleep |
|
AL-M310DN) |
mode. If Off is selected, the LCD backlight is always off. |
|
|
|
|
|
Settings (default in bold): |
|
|
Auto, Off |
|
|
|
|
RAM Disk (AL-M320DN/ |
Specifies the RAM disk size available for the Reserve Job function. |
|
AL-M310DN) |
After this item is changed, the setting value takes effect after a warm boot or after the |
|
|
||
|
power is turned on again. |
|
|
|
|
|
Settings (default in bold): |
|
|
Off, Normal, Maximum |
|
|
|
|
Convert to Simplex |
In the duplex printing mode, specifies whether to print the last page of a job in one side |
|
|
printing mode. Setting Odd Page or 1 Page can prevent the last page from being printed |
|
|
on an unexpected page when you are printing on preprinted paper or hole-punched |
|
|
paper. |
|
|
Odd Page: 1-page jobs or the last page of a job with an odd number of pages are |
|
|
|
printed in one side printing mode. |
|
|
1 Page: 1-page jobs are printed in one side printing mode. |
|
Off: The last page of all jobs (including 1-page jobs or jobs with an odd number of |
|
|
|
pages) is printed in duplex printing mode. |
|
|
|
Confirm Media Type |
Displays a message when the paper type in the tray selected for printing is different from |
|
|
that selected on Paper Type in the printer driver. |
|
|
|
|
|
Settings (default in bold): |
|
|
No, Yes |
|
|
|
|
Cassette Warning |
Sets whether to display messages in the following situations when cassettes have been |
|
(AL-M320DN/AL-M310DN) |
added. |
|
|
- No cassette other than the lowest tray is inserted |
|
|
- A cassette other than the lowest tray has run out of paper |
|
|
Off: Does not display |
|
|
Warning: Indicates that there is no paper |
|
|
|
Warning & Error: First, a message indicating to check the conditions of the |
|
|
cassettes appears. When the print data is received, it shows that the cassette has |
|
|
been pulled out, and the printer stops operating. |
|
|
|
23
AL-M320DN/AL-M310DN/AL-M220DN User's Guide
Getting to Know Your Printer
Item |
Explanation |
|
|
|
|
|
|
||||
Job Information (M320DN/ |
Selects the pattern in which the job information is displayed on the control panel. |
||||
M310DN) |
If Off is selected, no job information is displayed on the control panel, even if the Pause/ |
||||
|
Release button is pressed to cancel or skip a job. |
|
|
||
|
If Norsk, CATALÀ, |
, Türkçe, |
, |
, or |
is selected as Language |
|
when the printer is turned on for the first time after you purchase it, the default value is |
||||
|
Off. If other language is selected, the default value is Display Pattern 1. |
||||
|
Do not select Display Pattern 1 when the following languages are selected as |
||||
|
Language: Norsk, CATALÀ, |
, Türkçe, |
, |
, |
|
|
|
|
|
|
|
|
Settings: |
|
|
|
|
|
Display Pattern 1, Display Pattern 2, Off |
|
|
|
|
|
|
||||
Local Time Diff. |
Specifies the current date and time by entering the time difference from Greenwich Mean |
||||
|
time. |
|
|
|
|
|
|
|
|
|
|
|
Settings (default in bold): |
|
|
|
|
|
-14:00 … 0:00 … +14:00 |
|
|
|
|
|
|
||||
Time Setting |
Specifies the current date and time by entering them directly. |
||||
|
|
|
|
|
|
|
Settings: |
|
|
|
|
|
2010/ 01/01 00:00 to 2098/12/31 23:59 |
|
|
|
|
|
|
|
|
|
|
Date Format |
Specifies the format to display the date. |
|
|
|
|
Settings (default in bold):
DD/MM/YY, MM/DD/YY, YY/MM/DD
USB Menu
Note:
After any item in the menu is changed, the setting takes effect after a warm boot or after the power is turned on again. While it is reflected in the Status Sheet, the actual change takes effect after a warm boot or after the power is turned on again.
To use EpsonNet Config with a web browser to do settings, access Configuration > Common Settings > USB Menu.
Item |
Explanation |
|
|
USB I/F |
Allows you to activate or deactivate the USB interface. |
|
|
|
Settings (default in bold): |
|
On, Off |
|
|
USB Speed |
Allows you to select the operation mode of USB interface. Selecting HS is recommended. |
|
Select FS if HS does not work on your computer system. |
|
|
|
Settings (default in bold): |
|
HS, FS |
|
|
24

AL-M320DN/AL-M310DN/AL-M220DN User's Guide
Getting to Know Your Printer
Item |
Explanation |
|
|
Buffer Size |
Determines the amount of memory to be used for receiving data and printing data. |
Note:
To activate Buffer Size settings, you must turn off the printer for more than five seconds then turn it back on. Or, you can perform a Reset All operation, as explained in Reset Menu.
Resetting the printer erases all print jobs. Make sure the Ready light is not flashing when you reset the printer.
Settings (default in bold):
Normal, Maximum, Minimum
Network Menu
See the Network Guide for each setting.
Note:
In order to do IP address settings for AL-M220DN’s first setup, you must install EpsonNet Config for Windows or for Mac OS X. Note that you cannot do IP address settings using EpsonNet Config on a web browser for the first setup. For details, see the IP Address and Password Setup Sheet, and Network Guide.
After any item in the menu is changed, the setting takes effect after a warm boot or after the power is turned on again. While it is reflected in the Status Sheet, the actual change takes effect after a warm boot or after the power is turned on again.
Energy Saver Menu
Note:
To use EpsonNet Config with a web browser to do settings, access Configuration > Common Settings > Energy Saver Menu.
Item |
Explanation |
|
|
Time to Sleep(Auto) |
When this setting is set to Enable, the printer automatically determines the time to enter |
|
the sleep or deep sleep mode, based on the operation history ofthe printer. Note if Enable |
|
is selected, the Time to Sleep and Eco Fuser settings are ignored. |
|
|
|
Settings (default in bold): |
|
Enable, Disable |
|
|
Time to Sleep |
Specifies the length of the time until the printer enters the sleep mode or deep sleep mode |
|
if there are no button operations and no jobs to be printed. |
|
|
|
Settings (default in bold): |
|
1Min, 3Min, 5Min, 15Min, 30Min, 60Min, 120Min |
|
|
25
AL-M320DN/AL-M310DN/AL-M220DN User's Guide
Getting to Know Your Printer
Item |
Explanation |
|
|
Deep Sleep Mode |
When this setting is set to On, the printer switches to the deep sleep mode instead of the |
|
sleep mode if the printer is not operated or receives no jobs. In deep sleep mode, the |
|
Wakeup/Sleep button lights (for AL-M320DN/AL-M310DN) or the Ready light blinks (for |
|
AL-M220DN) and more power is saved than when in sleep mode. |
|
Note: |
|
The printer does not enter the deep sleep mode in the following cases: |
|
- PS3 is selected in Network of Emulation Menu. |
|
- MS Network is set to On in Network Menu. |
|
- Network Administrator - UPnP - Universal Plug and Play is enabled (default) in |
|
EpsonNet Config (web version) |
|
The printer recovers from the deep sleep mode in the following cases: |
|
- When the printer receives a print job |
|
- When the Wakeup/Sleep button is pressed (For AL-M320DN/AL-M310DN) |
|
- When any button is pressed (for AL-M220DN) |
|
|
|
Settings (default in bold): |
|
On, Off |
|
|
Power Off If Inactive (Power Off |
When this setting is set to On, the printer automatically turns off at the time specified in the |
mode) |
Time to Off setting. If EU is selected as Region Setting when the printer is turned on |
|
for the first time after you purchase it, the default value is On. If some other region is |
|
selected, the default value is set to Off. |
|
Note: |
|
The printer does not enter the power off mode if it is receiving or sending data. |
|
The printer recovers from the power off mode when the power switch is turned on. |
|
|
|
Settings (default in bold): |
|
On, Off |
|
|
Time to Off (Inactive) |
Specifies the length of the time until the printer enters the power off mode if there are no |
|
button operations and no jobs to be printed. |
|
Note: |
|
You can adjust the time before power management is applied. Any increase will affect |
|
the product’s energy efficiency. Please consider the environment before making any |
|
change. |
|
|
|
Settings: |
|
120Min, 180Min, 240Min, 360Min, 480Min |
|
|
Power Off If Disconnect |
When these settings are enabled, the printer enters power off mode when it detects that |
|
no interfaces have been in use for over 30 minutes. |
|
States in which interfaces are unavailable are: |
|
- When a cable is not connected to the interface |
|
- When panel settings do not use interfaces |
|
- When the hub and connected computers are off |
|
|
|
Settings: |
|
On, Off |
|
|
26

AL-M320DN/AL-M310DN/AL-M220DN User's Guide
Getting to Know Your Printer
Sleep Schedule Menu
Note:
You need to use EpsonNet Config with a web browser to reset the history, because this item is not displayed on the control panel. See the Network Guide for the procedure to access EpsonNet Config with a web browser.
Item |
Explanation |
|
|
Reset Operate History |
Resets the printer’s operation history, which is based on the Time to Sleep(Auto) |
|
calculation. |
|
|
Sleep Schedule |
Sets a start time and a sleep pattern for up to five time periods through the day. The Sleep |
|
Pattern options are as follows: |
|
On: Enters sleep mode according to the Time to Sleep(Auto) or Time to Sleep |
|
settings. |
|
Quick: Enters sleep mode as soon as possible. |
|
Note: |
|
For an image of these settings, see “Making a weekly sleep schedule” on page 60. |
|
|
Excluded Day |
Specifies a special date on which to apply the sleep pattern for some other day, and |
|
specifies the day for up to two days. Each specified date setting is valid once within the |
|
each coming specified date. |
|
|
Sleep Status |
Displays the status of the sleep settings for one week starting from the current day. For |
|
example, after Time to Sleep(Auto) is set to Enable, you can check if each time-to |
|
sleep value, based on the operation history, has been calculated or is still being prepared. |
|
|
Reset Menu
Item |
Explanation |
|
|
|
|
Clear Warning |
Clears warnings except for those that occur from consumable products or |
|
|
mandatory-replacement parts. |
|
|
|
|
Clear All Warnings |
Clears all warnings that are shown on the LCD panel or by LED lights. |
|
|
|
|
Reset All |
Stops printing and clears the printer memory. The print jobs received from all interfaces |
|
|
are erased. Also resets the life counters for maintenance units A and B. |
|
|
Note: |
|
|
Performing Reset All clears print jobs received from all interfaces. Be careful not to |
|
|
interrupt someone else’s job. |
|
|
|
|
Reset Maintenance A Counter |
Reset the maintenance unit life counter when you replace the maintenance unit. For |
|
|
instructions on replacing the maintenance unit, see the documentation supplied with the |
|
Reset Maintenance B Counter |
||
maintenance unit. |
||
|
Note: |
|
|
After Performing Reset Maintenance Counter A or Reset Maintenance |
|
|
Counter B, the printer reboots automatically. Be careful not to interrupt someone |
|
|
else’s job. |
|
|
|
27
AL-M320DN/AL-M310DN/AL-M220DN User's Guide
Getting to Know Your Printer
Printer Settings
Note:
The settings in the Printing Menu are overridden by the settings done in the printer driver from the Printing Preferences.
You can also set items in Printing Menu from Printer Properties > Optional Settings > Printer Settings.
Tray Menu
Item |
Explanation |
|
|
|
|
Paper Size Warning |
Specifies the trays that need a message to confirm that the paper size in the tray matches |
|
(AL-M320DN/AL-M310DN) |
the settings on the control panel. This warning message is displayed on the control panel |
|
|
when you load paper in the MP tray and when you close a paper cassette. |
|
|
|
|
|
Settings (default in bold): |
|
|
Off, Cassette, Cassette & MP, MP Tray |
|
|
|
|
Size Warning Timeout |
Specify the length of the time until the Paper Size Warning message is turned off. |
|
(AL-M320DN/AL-M310DN) |
|
|
Settings (default in bold): |
||
|
||
|
5 sec, 10 sec |
|
|
|
|
MP Tray Size |
Specifies the paper size loaded in MP Tray. |
|
|
For the sizes of paper that are available, refer to “Available Paper and Capacities” on |
|
|
page 40. |
|
|
|
|
MP Tray Type |
Specifies the paper type loaded in the MP tray. |
|
|
For the types of paper that are available, refer to “Available Paper and Capacities” on |
|
|
page 40. |
|
|
|
|
Cassette1 Size |
Specifies the paper size loaded in the standard paper cassette. |
|
|
For the sizes of paper that are available, refer to “Available Paper and Capacities” on |
|
|
page 40. |
|
|
|
|
Cassette1 Type |
Specifies the paper type loaded in the standard paper cassette. |
|
|
For the types of paper that are available, refer to “Available Paper and Capacities” on |
|
|
page 40. |
|
|
|
|
Cassette2 Size/Cassette3 Size |
Specifies the paper size loaded in the optional paper cassette. |
|
(AL-M320DN/AL-M310DN |
For the sizes of paper that are available, refer to “Available Paper and Capacities” on |
|
page 40. |
||
only) |
||
|
||
|
|
|
Cassette2 Type/Cassette3 |
Specifies the paper type loaded in the optional paper cassette. |
|
Type |
For the types of paper that are available, refer to “Available Paper and Capacities” on |
|
(AL-M320DN/AL-M310DN |
page 40. |
|
|
||
only) |
|
|
|
|
|
MP Tray AutoSel/Cassette1 |
Specifies whether the tray can be selected for printing when Paper Source is selected for |
|
AutoSel/Cassette2 AutoSel*/ |
Auto Selection in the printer driver. |
|
Cassette3 AutoSel* |
|
|
Settings (default in bold): |
||
* AL-M320DN/AL-M310DN |
||
On, Off |
||
only |
||
|
||
|
|
28
AL-M320DN/AL-M310DN/AL-M220DN User's Guide
Getting to Know Your Printer
Printing Menu
Item |
Explanation |
|
|
Page Size |
Specifies the paper size. |
|
|
|
Settings (default in bold): |
|
A4, A5, A6, B5, LT, HLT, LGL, GLT, GLG, EXE, F4, MON, C10, DL, C5, C6, IB5, CTM* |
|
* For the sizes of paper that are available for CTM, refer to “Available Paper and Capacities” |
|
on page 40. |
|
|
Wide A4 |
Selecting On decreases the left and right margins to 3.4 mm. |
|
|
|
Settings (default in bold): |
|
Off, On |
|
|
Media Type |
Specifies the paper type. |
|
|
|
Settings (default in bold): |
|
Unspecified, Plain, SemiThk, Preprinted, Letterhead, Recycled, Color, Transparency, |
|
Labels, Thick, ExtraThk, SuperThk, Thin, Envelope, Special |
|
|
Page Side |
Specifies 2-sided printing manually. Select Back when printing on the back side of the |
|
paper. |
|
|
|
Settings (default in bold): |
|
Front, Back |
|
|
Paper Source |
Specifies whether paper feeds into the printer from the MP tray, the standard paper |
|
cassette (Cassette 1), or the optional paper cassette unit (Cassette 2/3/4/5). |
|
If you select Auto, paper feeds from the paper source containing paper that matches your |
|
Paper Size setting. |
|
|
|
Settings (default in bold): |
|
Auto, MP Tray, Cassette1, Cassette2*, Cassette3* |
|
* For AL-M320DN/AL-M310DN only |
|
|
Orientation |
Specifies whether the page is printed in portrait or landscape orientation. |
|
|
|
Settings (default in bold): |
|
Port, Land |
|
|
Resolution |
Specifies the printing resolution. |
|
|
|
Settings (default in bold): |
|
300, 600, 1200 |
|
|
RITech |
Turning on RITech (Resolution Improvement Technology) on produces smoother and |
|
crisper lines, text, and graphics. |
|
|
|
Settings (default in bold): |
|
On, Off |
|
|
29
AL-M320DN/AL-M310DN/AL-M220DN User's Guide
Getting to Know Your Printer
Item |
Explanation |
|
|
Toner Save |
When this setting is selected, the printer saves toner by substituting a gray shade for the |
|
black inside of characters. The characters are outlined in full black on the right and lower |
|
edges. |
|
|
|
Settings (default in bold): |
|
Off, On |
|
|
Density |
Specifies the printing density. The printout becomes darker as the value increases. |
|
|
|
Settings (default in bold): |
|
1, 2, 3, 4, 5 |
|
|
Emphasize Thin Lines |
Adjusts the weight of thin lines sothey are printed clearly. The correction results differ |
|
depending on the application software. |
|
More: Makes thin lines even easier to see (thickens them) than Emphasize, and then prints |
|
them |
|
Emphasize: Makes thin lines easier to see (thickens them), and then prints |
|
Off: Prints without emphasizing thin lines |
|
|
Top Offset |
Makes fine adjustments to the vertical printing position of the page. |
|
c Important: |
|
Make sure that the printed image does not extend beyond the edge of the paper. |
|
Otherwise, you may damage the printer. |
|
|
|
Settings (default in bold): |
|
-99.0 ... 0.0 ... 99.0 mm in 0.5 mm increments |
|
|
Left Offset |
Makes fine adjustments to the horizontal printing position of the page. |
|
c Important: |
|
Make sure that the printed image does not extend beyond the edge of the paper. |
|
Otherwise, you may damage the printer. |
|
|
|
Settings (default in bold): |
|
-99.0 ... 0.0 ... 99.0 mm in 0.5 mm increments |
|
|
T Offset B |
Adjusts the vertical printing position on the back of the paper when printing on both |
|
sides. Use this if the printout on the back is not where you expected. |
|
|
|
Settings (default in bold): |
|
-99.0 ... 0.0 ... 99.0 mm in 0.5 mm increments |
|
|
L Offset B |
Adjusts the horizontal printing position on the back of the paper when printing on both |
|
sides. Use this if the printout on the back is not where you expected. |
|
|
|
Settings (default in bold): |
|
-99.0 ... 0.0 ... 99.0 mm in 0.5 mm increments |
|
|
30
 Loading...