


 Loading...
Epson BrightLink 536Wi, BrightLink 575Wi, BrightLink 585Wi, BrightLink 595Wi, PowerLite 570 Operation Guide
...EasyMP Multi PC Projection
Operation Guide

Contents |
|
Introduction to EasyMP Multi PC Projection............................................................................................. |
7 |
EasyMP Multi PC Projection Features ................................................................................................. |
7 |
Connection to Various Devices........................................................................................................ |
7 |
Four-Panel Display.......................................................................................................................... |
8 |
Change Presenters and Projection Position .................................................................................... |
9 |
Moderator Function ....................................................................................................................... |
10 |
Setting Up EasyMP Multi PC Projection for the First Time .................................................................... |
12 |
Installing the Software ........................................................................................................................ |
12 |
EasyMP Multi PC Projection System Requirements...................................................................... |
12 |
Installing EasyMP Multi PC Projection (Windows)......................................................................... |
14 |
Installing EasyMP Multi PC Projection (Mac OS X) ....................................................................... |
14 |
Setting Up the Projector ..................................................................................................................... |
15 |
Setting Up a Projector to Connect in Advanced Connection Mode (Wireless)............................... |
15 |
Setting Up a Projector to Connect in Advanced Connection Mode (Wired) ................................... |
16 |
Connecting to the Projector and Projecting Images .............................................................................. |
18 |
Connection Methods .......................................................................................................................... |
18 |
Connection Methods for Various Meeting Styles ........................................................................... |
18 |
Connecting to the Projector from the Software over a Network System ........................................ |
20 |
Selecting the Projector Search Method .............................................................................................. |
23 |
Search Methods ............................................................................................................................ |
24 |
Searching for Network Projectors Automatically............................................................................ |
24 |
Searching for Network Projectors by Specifying an IP Address or Projector Name....................... |
25 |
Searching for Network Projectors Using a Profile .......................................................................... |
27 |
Profiles for Search .................................................................................................................... |
27 |
Performing a Profile Search...................................................................................................... |
27 |
Registering a Profile.................................................................................................................. |
29 |
Exporting a Profile..................................................................................................................... |
31 |
Importing a Profile..................................................................................................................... |
31 |
Sharing a Profile over a Network............................................................................................... |
32 |
Controlling the Projected Display ....................................................................................................... |
33 |
3
Screen Types for Projection Control.............................................................................................. |
33 |
Operating the Projected Display Status......................................................................................... |
34 |
Changing the Number of Projected Panels.................................................................................... |
35 |
Changing the Presenter................................................................................................................. |
37 |
Changing the Projection Position................................................................................................... |
38 |
Disconnecting..................................................................................................................................... |
39 |
Using Additional Functions...................................................................................................................... |
42 |
Searching for Network Projectors Using a Shortcut ........................................................................... |
42 |
Creating a Shortcut........................................................................................................................ |
42 |
Connecting to Multiple Projectors (Mirroring) ..................................................................................... |
43 |
Outputting Audio from the Projector ................................................................................................... |
44 |
Projecting Your Screen ...................................................................................................................... |
45 |
Changing the Moderator..................................................................................................................... |
46 |
Hiding the Projection Control Screen ................................................................................................. |
47 |
Solving Problems ...................................................................................................................................... |
49 |
Solving Network Connection Problems .............................................................................................. |
49 |
Solutions When You Cannot Connect Projectors (Wireless) ......................................................... |
49 |
Solutions When You Cannot Connect Projectors (Wired).............................................................. |
51 |
Solving Problems During Projection................................................................................................... |
52 |
Solutions When the Computer Screen is Not Displayed Properly.................................................. |
53 |
Solutions When the Screen is Not Projected Properly................................................................... |
53 |
Solutions When Audio is Not Played Properly ............................................................................... |
54 |
Error Messages List ........................................................................................................................... |
54 |
Error Messages When Starting up EasyMP Multi PC Projection ................................................... |
55 |
Error Messages When Searching for and Selecting Projectors ..................................................... |
57 |
Error Messages When Projecting .................................................................................................. |
58 |
Error Messages When Operating a Profile .................................................................................... |
58 |
Error Messages When Using the Moderator Function ................................................................... |
59 |
Event ID List ....................................................................................................................................... |
60 |
Screen Summary ....................................................................................................................................... |
62 |
Search Screen ................................................................................................................................... |
62 |
Save Screen....................................................................................................................................... |
65 |
Set options ......................................................................................................................................... |
66 |
4
Set options - User Settings ............................................................................................................ |
66 |
Set options - General settings ....................................................................................................... |
68 |
Set options - Adjust performance .................................................................................................. |
69 |
Set options - Audio Output............................................................................................................. |
70 |
Toolbar............................................................................................................................................... |
71 |
Projection Control Screen .................................................................................................................. |
73 |
Appendix.................................................................................................................................................... |
78 |
Updating and Uninstalling the Software ............................................................................................. |
78 |
Getting the Latest Version of the Application................................................................................. |
78 |
Uninstalling EasyMP Multi PC Projection (Windows XP/Windows Vista/Windows 7).................... |
78 |
Uninstalling EasyMP Multi PC Projection (Windows 8).................................................................. |
79 |
Uninstalling EasyMP Multi PC Projection (Mac OS X)................................................................... |
79 |
Supported Resolutions and Colors..................................................................................................... |
80 |
Supported Resolutions .................................................................................................................. |
80 |
Display Color ................................................................................................................................. |
80 |
Limitations.......................................................................................................................................... |
81 |
Connection Limitations .................................................................................................................. |
81 |
Limitations when Projecting from Windows Photo Gallery or Windows Live Photo Gallery ........... |
82 |
Limitations in Windows Aero.......................................................................................................... |
82 |
Limitations when Projecting from Windows Media Center............................................................. |
83 |
Notices ............................................................................................................................................... |
83 |
Copyright Notice............................................................................................................................ |
84 |
About Notations............................................................................................................................. |
84 |
General Notice............................................................................................................................... |
85 |
Copyright Attribution...................................................................................................................... |
85 |
5

Introduction to EasyMP Multi PC Projection
See the information here to learn more about EasyMP Multi PC Projection software.
EasyMP Multi PC Projection Features
EasyMP Multi PC Projection Features
EasyMP Multi PC Projection is software that allows you to hold interactive meetings by projecting images from network projectors. You can use a variety of display options for your environment.
Connection to Various Devices
Four-Panel Display
Change Presenters and Projection Position
Moderator Function
Parent topic: Introduction to EasyMP Multi PC Projection
Connection to Various Devices
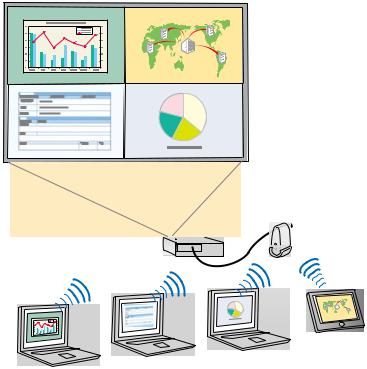
When you install EasyMP Multi PC Projection on a networked computer and use it to connect to the projector, up to 50 other devices on the network can project images from the projector. (Up to four devices can project at one time.) The 50 devices can be a combination of computers running EasyMP Multi PC Projection and wireless devices, such as smartphones and tablets, running Epson iProjection. The computers running EasyMP Multi PC Projection can control the projection from multiple devices, but the devices running Epson iProjection can only project.
You can also hold remote meetings over a network by simultaneously projecting the same image on up to four projectors on the network.
7

Parent topic: EasyMP Multi PC Projection Features
Related tasks
Connecting to Multiple Projectors (Mirroring)
Related topics
Connection Methods
Four-Panel Display
You can simultaneously display up to four screens in separate projected panels, which is useful in both business and educational environments.
For example, you can compare and analyze data while simultaneously projecting screens from multiple devices. In an educational environment, you can project lesson material on one part of the screen and student answers on another to enhance the learning experience.
8
Parent topic: EasyMP Multi PC Projection Features
Related tasks
Changing the Number of Projected Panels
Change Presenters and Projection Position
Using EasyMP Multi PC Projection, you can easily change the screen being projected and the projection position by simply dragging and dropping user names in panels on the projection control screen.
You can share the projector with other users on the same network without having to change cable connections, allowing users to take turns giving presentations.
9

Note: The projection control screen may not be available on all versions of this software.
Parent topic: EasyMP Multi PC Projection Features
Related tasks
Changing the Presenter
Changing the Projection Position
Moderator Function
When using the moderator function, only one person plays a role of moderator who can control the projected display. This function is suitable for meetings in which one user is the moderator and the other users are participants, and the moderator must control the projected display.
This can also be useful in a classroom environment where the moderator must control the lesson without interruption.
10
Note: This function is available only for supported models.
Parent topic: EasyMP Multi PC Projection Features
Related tasks
Changing the Moderator
Related topics
Connection Methods
11

Setting Up EasyMP Multi PC Projection for the First Time
Follow these instructions before connecting a computer to the projector over a network.
Installing the Software
Setting Up the Projector
Installing the Software
Install EasyMP Multi PC Projection from the EPSON Projector Software CD-ROM supplied with your projector.
Note:
•If the language selected for the installation differs from the language of the operating system being used, the screens may not be displayed correctly.
•You can download the latest version of EasyMP Multi PC Projection from the EPSON Web site.
•If a previous version of EasyMP Multi PC Projection is already installed on your computer, uninstall it first and then install EasyMP Multi PC Projection.
EasyMP Multi PC Projection System Requirements
Installing EasyMP Multi PC Projection (Windows)
Installing EasyMP Multi PC Projection (Mac OS X)
Parent topic: Setting Up EasyMP Multi PC Projection for the First Time
Related tasks
Getting the Latest Version of the Application
EasyMP Multi PC Projection System Requirements
Your computer must meet the following system requirements to use the EasyMP Multi PC Projection software.
12
Requirement |
Windows |
Mac |
||
Operating system |
Windows XP |
Mac OS X |
||
|
• |
Professional (32-bit) |
• |
10.4.x (32-bit) |
|
• |
Home Edition (32-bit) |
• 10.5.1 or later (32-bit) |
|
|
• Tablet PC Edition (32-bit) |
• |
10.6.x (32and 64-bit) |
|
|
Windows Vista |
• |
10.7.x (32and 64-bit) |
|
|
• |
Ultimate (32-bit) |
• |
10.8.x (64-bit) |
|
• |
Enterprise (32-bit) |
|
|
|
• |
Business (32-bit) |
|
|
|
• Home Premium (32-bit) |
|
|
|
|
• Home Basic (32-bit) |
|
|
|
|
Windows 7 |
|
|
|
|
• |
Ultimate (32and 64-bit) |
|
|
|
• |
Enterprise (32and 64-bit) |
|
|
|
• |
Professional (32and 64-bit) |
|
|
|
• Home Premium (32and 64-bit) |
|
|
|
|
• Home Basic (32-bit) |
|
|
|
|
• |
Starter (32-bit) |
|
|
|
Windows 8 |
|
|
|
|
• Windows 8 (32and 64-bit) |
|
|
|
|
• Windows 8 Pro (32and 64-bit) |
|
|
|
|
• Windows 8 Enterprise (32and 64-bit) |
|
|
|
CPU |
Mobile Pentium III 1.2 GHz or faster |
Power PC G3 900 MHz or faster |
||
|
(Pentium M 1.6 GHz or faster |
(CoreDuo 1.5 GHz or faster |
||
|
recommended) |
recommended) |
||
Memory |
256 MB or more |
|
|
|
|
(512 MB or more recommended) |
|
|
|
Hard disk space |
20 MB or more |
|
|
|
13
Requirement |
Windows |
Mac |
Display |
Resolution between 1024 × 768 (XGA) and 1920 × 1200 (WUXGA) |
|
|
16-bit color or greater (approximately 32,000 display colors) |
|
Note:
•Operation is not guaranteed for Windows XP without any service packs installed, or Windows XP Service Pack 1.
•Operation is not guaranteed for Mac OS X 10.5.0 because the Firewall settings are not set correctly when the version is updated.
Parent topic: Installing the Software
Installing EasyMP Multi PC Projection (Windows)
Install EasyMP Multi PC Projection on your computer.
Note: You need administrator authority to install the software.
1.Turn on your computer.
2.Make sure all running applications are closed.
3.Insert the EPSON Projector Software CD-ROM into the computer. The installer starts automatically.
4.If the installer does not start automatically, open the CD-ROM drive from My Computer (or
Computer), and then double-click InstallNavi.exe.
5.Follow the on-screen instructions to install.
Parent topic: Installing the Software
Installing EasyMP Multi PC Projection (Mac OS X)
Install EasyMP Multi PC Projection on your computer.
1.Turn on your computer.
2.Make sure all running applications are closed.
3.Insert the EPSON Projector Software CD-ROM into the computer.
4.Double-click the Install Navi icon in the EPSON window.
14
Installation starts.
5. Follow the on-screen instructions to install.
Parent topic: Installing the Software
Setting Up the Projector
Follow these instructions to set up a projector to connect to a wireless or wired LAN. When connecting the projector to a wireless LAN, connect using the Advanced Connection Mode. You cannot connect using the Quick Connection Mode.
Setting Up a Projector to Connect in Advanced Connection Mode (Wireless)
Setting Up a Projector to Connect in Advanced Connection Mode (Wired)
Parent topic: Setting Up EasyMP Multi PC Projection for the First Time
Setting Up a Projector to Connect in Advanced Connection Mode (Wireless)
To connect a computer to the projector over a wireless LAN, you need to select network settings on the computer and the projector.
1.Contact your network administrator and write down the settings for the access point, such as the SSID and security settings.
2.Connect the computer to the network.
Note: To set up a network connection, if necessary, see the documentation supplied with your computer or network adapter.
3.Install the wireless LAN unit in the projector, if necessary. See the User's Guide supplied with the projector for more details.
4.Turn on the projector.
5.Press the Menu button on the remote control or the control panel, select the Network menu, and then select Network Configuration.
6.Select Wireless LAN.
A screen like one of the following is displayed.
15

7.Select On for Wireless LAN Power.
8.Select Advanced for Connection Mode.
9.Select other options as necessary for your network. See the User's Guide supplied with the projector for more details.
10.Select security settings on the Security menu as necessary for your network. Check with your network administrator for more information on making the correct settings.
11.When you have finished making settings, select Setup Complete or Complete, and follow the onscreen instructions to save your settings and exit the menus.
Parent topic: Setting Up the Projector
Related tasks
Connecting to the Projector from the Software over a Network System
Setting Up a Projector to Connect in Advanced Connection Mode (Wired)
To connect a computer to the projector using a wired LAN, you need to select network settings on the computer and the projector.
1.Contact your network administrator and check that DHCP is available under the current network environment.
Note: If DHCP is not available, write down the following values that are available for your projector.
•IP Address
•Subnet Mask
•Gateway Address
16

2.Connect the computer to the network.
Note: To set up a network connection, if necessary, see the documentation supplied with your computer or network adapter.
3.Connect a LAN cable to the projector.
4.Turn on the projector.
5.Press the Menu button on the remote control or the control panel, select the Network menu, and select Network Configuration.
6.Select Wired LAN.
A screen like one of the following is displayed.
7.Select IP settings as necessary.
•DHCP is available: Set DHCP to On.
•DHCP is not available: Set DHCP to Off and enter the projector's IP Address, Subnet Mask, and Gateway Address values as necessary.
8.When you have finished making settings, select Setup Complete or Complete, and follow the onscreen instructions to save your settings and exit the menus.
Parent topic: Setting Up the Projector
Related tasks
Connecting to the Projector from the Software over a Network System
17

Connecting to the Projector and Projecting Images
Follow these instructions to connect the computer and the projector over a network, and to project images from your computer screen using the projector.
Make sure you have already set up EasyMP Multi PC Projection.
Connection Methods
Selecting the Projector Search Method
Controlling the Projected Display
Disconnecting
Related topics
Installing the Software
Setting Up the Projector
Connection Methods
You can select a suitable method to connect the computer and the projector over a network depending on your meeting style.
Connection Methods for Various Meeting Styles
Connecting to the Projector from the Software over a Network System
Parent topic: Connecting to the Projector and Projecting Images
Connection Methods for Various Meeting Styles
You can choose a connection method to suit the style of your meeting.
Decide how you want to hold your meeting. Depending on the connection method you selected, the connection procedure differs.
Note: Depending on your projector, some connection methods may not be available. See the User's Guide supplied with the projector for more details.
•All users can control the projected display and become presenters. (Holding discussions and interacting with other users in a business environment.)
18

•Only one user is the moderator and has full control over the meeting using the moderator function. (Holding a class or lesson using the participants' computer screens in an educational environment.)
19

Note: To start a meeting using the moderator function, one user must connect to the projector as the moderator and the other users must connect to the projector as participants.
Parent topic: Connection Methods
Related tasks
Changing the Moderator
Connecting to the Projector from the Software over a Network System
Connecting to the Projector from the Software over a Network System
When your projector is set up as indicated below, you can connect the projector and a computer over a network by using EasyMP Multi PC Projection.
•The wireless LAN unit is installed in the projector (wireless networks only).
•A LAN cable is connected to the projector (wired networks only).
•The projector's connection method is set to Advanced.
Note: Make sure you also connected a computer to the network.
20
1.Press the LAN button or Source Search button on the remote control to switch the input source to LAN.
The LAN standby screen is projected.
2.Start EasyMP Multi PC Projection.
•Windows XP, Windows Vista, and Windows 7: Click Start, select Programs (or All Programs), EPSON Projector, EasyMP Multi PC Projection, and then click EasyMP Multi PC Projection Ver.X.XX.
•Windows 8: Navigate to the Start screen and select EasyMP Multi PC Projection Ver.X.XX.
•Mac OS X: Double-click EasyMP Multi PC Projection Ver.X.XX from the Applications folder. The search screen is displayed.
Note: You can also create a shortcut and use it to start EasyMP Multi PC Projection and to automatically search for saved projectors.
3.Search for the projector using one of the following methods.
•Automatic search: Searches for the projector automatically.
•Manual search: Searches for the projector based on a specified IP address or projector name.
•Profile: Searches for the projector based on a previously saved profile.
The projector search results are displayed.
21

4.Select the projector you want to connect to from the Projector List, and then perform one of the following operations.
•All users can become presenters, or are participants in the moderator function: Make sure Connect as Moderator is not selected, and then click Join.
•User is the moderator in the moderator function: Select Connect as Moderator, and then click
Join.
Note:
•The moderator function is available only for supported models and may not be available on all versions of this software.
•When one user connects as a moderator, the moderator function turns on.
When Projector Keyword is set to On in the projector settings, the keyword entry screen is displayed.
5. Enter the keyword displayed on the LAN standby screen, and then click OK as necessary.
When the connection is complete, the EasyMP Multi PC Projection toolbar is displayed on the computer screen.
22

The computer screen for the user who connects first is projected in full screen mode. Users who connect later can project their own screen by clicking the  button on the toolbar or can control the projected display from the projection control screen by clicking the
  button on the toolbar.
Note:
•When a connection is established, the input source for the projector automatically switches to the LAN source if no other signal is being input. If the input source does not automatically switch to the LAN source, press the LAN button or Source Search button on the remote control.
•The displayed toolbar varies depending on the connection method and the version of this software.
•When using the moderator function, only the moderator can control the projected display.
Parent topic: Connection Methods
Related tasks
Setting Up a Projector to Connect in Advanced Connection Mode (Wireless)
Setting Up a Projector to Connect in Advanced Connection Mode (Wired)
Disconnecting
Related topics
Selecting the Projector Search Method
Controlling the Projected Display
Searching for Network Projectors Using a Shortcut
Selecting the Projector Search Method
You can select a suitable method to search for a projector depending on the status or location of the projector you want to connect to.
Search Methods
Searching for Network Projectors Automatically
Searching for Network Projectors by Specifying an IP Address or Projector Name
Searching for Network Projectors Using a Profile
23
Parent topic: Connecting to the Projector and Projecting Images
Search Methods
You can use one of the following methods to search for the projector you want to connect to. Choose the best method depending on your environment.
•Searching for Network Projectors Automatically
You can automatically search for available projectors on the network.
Searches are performed only on the same subnet. Projectors on different subnets are not displayed in the search results.
•Searching for Network Projectors by Specifying an IP Address or Projector Name
If the projector you want to connect to is not found automatically, you can search for the target projector by specifying the IP address or a projector name. You can also search for projectors at remote locations on a different subnet.
•Searching for Network Projectors Using a Profile
You can save network projector information as a profile, and then specify the profile to search for the same projector instead of providing projector details each time you search. By creating a group of profiles for each place where a projector is setup and managing them with folders, the target projector can be found quickly.
Parent topic: Selecting the Projector Search Method
Searching for Network Projectors Automatically
You can automatically search for available projectors on the network, and then project images by simply selecting the projector.
Click Automatic search on the search screen.
24
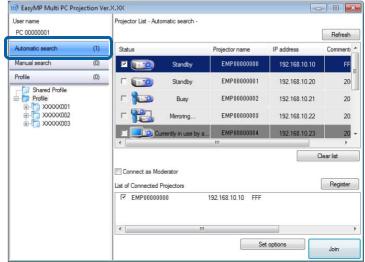
The search results are displayed.
When you click Refresh, the latest information is displayed.
If you cannot find any projectors, try one of the other search methods.
Parent topic: Selecting the Projector Search Method
Related concepts
Search Methods
Related tasks
Searching for Network Projectors by Specifying an IP Address or Projector Name
Related topics
Searching for Network Projectors Using a Profile
Searching for Network Projectors by Specifying an IP Address or Projector Name
If the projector you want to connect to is not found automatically, you can search for the target projector by specifying the IP address or the projector name.
25

1. Click Manual search on the search screen.
2.Enter the IP address or the projector name for the projector you want to connect to, and then click
Search.
26
Loading...