


The KGB/CIA World Factbook CD-ROM game included with your system is an newer version of this game then the one installed on your computer’s hard disk drive. To install this game correctly in Windows please follow the instructions given below:
Removing the Existing KGB/CIA World Factbook from the Hard Drive
1.Exit to Windows Program Manager by clicking on the EXIT button on the right side of the FocalPoint screen.
2.From The Program Manager window open the FILE menu and select EXIT WINDOWS.
3.At the C:\> prompt type the following: Deltree C:\KGBCIA then press Enter.
4.Press Y then press Enter to answer the question Delete directory “kgbcia” and all its subdirectories? [yn]
5.Reboot you computer.
Reinstalling KGB/CIA World Factbook
1.Exit to Windows Program Manager by clicking on the EXIT button on the right side of the FocalPoint screen.
2.Place the KGB/CIA disk into the CD-ROM drive.
3.From The Program Manager window open the FILE menu and select RUN option.
4.In the Command Line, type D:SETUP and press Enter.
5.The installation will begin. You will be asked on which drive and directory you want the software installed. To choose the default setting, press Enter or click Continue.
6.The Necessary files will now be installed onto your hard drive.
When the installation process is done correctly you will see a new group called “M.O.S.T.” in the Windows Program Manager.
Installing the Program in FocalPoint
To Setup KGB/CIA World Factbook in FocalPoint please follow the instruction given below.
1.Single click on the SETUP button on the right side of the FocalPoint screen, this will activate FocalPoint SETUP.
2.Single click on the KGB/CIA World Factbook icon.
3.In the Command Line, type C:\KGBCIAMOST.EXE KGBCIA.INI.
4.Click on the Icon button, in the File Name area type C:\KGBCIA\MOST.EXE, then click on the OK button. Click on the OK button one more time to go back to FocalPoint main menu screen.
5.To deactivate FocalPoint SETUP single click on the SETUP button again. This will complete the KGB/CIA Setup process in FocalPoint.
Loading the Program in FocalPoint
To load the KGB/CIA World Factbook (M.O.S.T.) Windows software from FocalPoint, singleclick on the KGB/CIA World Factbook program icon.

Update
This update revises the Read This First booklet that came with your computer. In addition to the multimedia software listed in that booklet, your computer also comes with these multimedia programs:
InterplayTM Battle Chess® game |
software on CD |
||
Technical |
support: |
(714) |
553-6678 |
Fax: |
|
(714) |
252-2820 |
BBS: |
|
(714) |
252-2822 |
Paramount |
Interactive |
Lenny’s |
MusicToonsT Mgame software |
on CD |
|
|
|
Technical |
support: |
(415) |
813-8030 |
Fax: |
|
(415) |
813-8045 |
This update tells you how |
to use |
Microsoft® Windows T Mto install |
|
these programs on your computer’s hard disk drive and how to create buttons for them in the EPSON® FocalPoint TM Windows environment program. See your Read This First booklet, your Windows documentation, and the on-line help utilities for in-depth information on using Windows and FocalPoint.
For information on using Battle Chess and Lenny’s MusicToons, see the program’s README file or on-line help utility, or contact the manufacturer at the numbers listed above.
lnstalling BattIe Chess
To install Battle Chess using Windows, follow these steps:
1.Start the Windows Program Manager.
2.Insert the Battle Chess CD into the CD-ROM drive. Then wait for the green light on the CD-ROM drive to light up.
3.From the File menu, select Run.
1
4.Then select Browse.
5.In the Drives dialog box, select drive D: to specify your CD-ROM drive.
6.In the Directories box, select the MPCCHESS directory.
7.In the File Name box, select setup. exe. Then select OK.
8.You see the Battle Chess installation screen. Follow the instructions on the screen to accept the suggested directory and select Continue.
9.The installation program copies the files from the CD to your hard disk drive and creates the Battle Chess group and program icon in Windows. When the installation is complete, you see a confirmation message. Select OK to continue.
10.Your computer automatically starts Battle Chess. Make sure you
hear |
the sound the program produces and can select items on |
the |
screen to test it. Then select Exit from the File menu to exit |
the |
program. |
Adding Battle Chess to FocalPoint
To add a program button for Battle Chess in the FocalPoint program, follow these steps:
1. |
Start FocalPoint and select the Games program group. |
2. |
Go to page 2 of the Games group. |
3. |
Select the Setup control button (with the wrench icon) on the |
|
right side of the screen. The Setup bar appears on the left side of |
|
the screen and empty program buttons appear in the program |
|
icon selection screen in the middle. |
4.Select one of the empty program buttons. You see the Button Properties dialog box.
2

5. |
In the Title field, type Battle Chess |
|
6. |
Move |
the cursor to the Command Line field and select the |
|
F i n d |
P r o g r a m b u t t o n . |
7.In the Drives box, select drive D :
8.In the Directories box, select the MPCCHESS directory.
9.In the File Name box, select mpcchess . exe. Then select OK.
10.You see the Button Properties dialog box. FocalPoint Setup automatically fills in the Working Directory box and selects the Battle Chess icon. Select OK.
11.Select the Setup control button again to exit FocalPoint Setup. Now Battle Chess is installed in Windows and in FocalPoint
Installing Lenny’s Music Toons
To install Lenny’s MusicToons using Windows, follow these steps:
1.Start the Windows Program Manager.
2.Insert the Lenny’s MusicToons CD into the CD-ROM drive Then wait a few seconds for the CD to initialize.
3.From the File menu, select Run.
4.Then select Browse.
5.In the Drives dialog box, select drive D : to identify your CD-ROM drive.
6. |
In the File Name box, |
select install. exe. Then select OK. |
|
7. |
You see the |
program’s |
installation screen. Follow the instructions |
|
on the screen |
to install |
the program and continue. |
3

8.The installation program copies the files from the CD to your hard disk drive, creates the Lenny’s MusicToons group, and creates Lennys’ MusicToons, Sound Test, and Read Me program icons. When the installation is complete, you see a confirmation message. Select OK to continue.
9.You see a prompt asking if you want to view the program’s README.DOC file. Select Yes or No.
10.When you see the Lenny’s MusicToons program group, select the icon to run the program and test it. Make sure you hear the sound the program produces and can select items on the screen. Then exit the program.
Adding Lenny’s Music Toons to FocalPoint
To add program buttons for Lenny’s MusicToons in the FocalPoint program, follow these steps:
1.Start FocalPoint and select the Games program group
2.Go to page 2 of the Games group.
3.Select the Setup control button (with the wrench icon) on the
right side of the screen. The Setup bar appears on the left side of the screen and empty program buttons appear in the program icon selection screen in the middle.
4.Select one of the empty program buttons. You see the Button Properties dialog box.
5.In the Title field, type Lenny’s MusicToons.
6. Move the cursor to the Command Line field and select the F i n d P r o g r a m b u t t o n .
7.In the Drives box, select drive D :
8.In the File Name box, select lenny . exe. Then select OK.
4

10. You see the Button Properties dialog box. FocalPoint Setup automatically fills in the Working Directory box and selects the Lenny’s MusicToons icon. Select OK.
11.Repeat steps 4 through 10 to create the Sound Test button substituting the following information:
In the Title field, type Sound Test.
In the File Name box, select lensnoop. exe.
12.Repeat steps 4 through 6 again to create the Read Me button substituting Lenny’s Read Me in the Title field.
13.In the Drives box. select drive C :
14. In the Directories box, select the windows directory.
15.In the File Name box, select notepad. exe. Then select OK.
16.You see the Button Properties dialog box. Move the cursor to
the end of the command in the Command Line field and type c : \ l e n n y \ r e a d m e . d o c .
17.Now select the icon shown in the Icon box. In the dialog box, select the following:
Drive : c :
D i r e c t o r y : w i n d o w s
F i l e N a m e : * . e x e
18.Then select the file notepad. exe when the *.exe files are listed.
19.Select OK.
20.Select the Setup control button again to exit FocalPoint Setup.
Now all the components of Lenny’s MusicToons are installed in Windows and in FocalPoint.
5
EPSON is a registered trademark of Seiko Epson Corporation.
FocalPoint is a trademark of Epson America, Inc.
General Notice: Other product names used herein are for |
identification purposes only and may |
be trademarks of their respective companies. |
|
Copyright © 1994 by Epson America, Inc. |
400346500 |
Torrance, California, USA |
6/94 |
6

IMPORTANT NOTlCE
DISCLAIMER OF WARRANTY
Epson America makes no representations or warranties, either express or implied, by or with respect to anything in this manual, and shall not be liable for any implied warranties ofmerchantability and fitness for a particular purpose or for any indirect, special, or consequential damages. Some states do not allow the exclusion of incidental or consequential damages, so this exclusion may not apply to you.
COPYRlGHT NOTlCE
All rights reserved. No part of this publication may be reproduced, stored in a retrieval system, or transmitted, in any form or by any means, electronic, mechanical, photocopying, recording, or otherwise, without the prior written permission of Epson America, Inc. No patent liability is assumed with respect to the use of information contained herein. Nor is any liability assumed for damages resulting from the use of the information contained herein. Further, this publication and features described herein are subject to change without notice.
|
|
|
TRADE MARKS |
EPSON is a registered trademark of Seiko Epson Corporation |
|||
EPSON |
Connection is a service mark of Epson America, Inc |
||
General |
Notice: Other |
product names |
used herein are for identification purposes only and |
may be trademarks of |
their respective |
companies. |
|
Copyright © 1994 by Epson America, Inc. |
400352000 |
Torrance, California, USA |
6/94 |
i i

Important Safety Instructions
Read all of these instructions |
and save them for later reference. Follow |
||||||||
all |
warnings and instructions |
marked on the |
computer. |
|
|||||
• |
Unplug |
the computer before cleaning. Clean with |
a |
damp |
cloth only. |
||||
|
Do |
not |
spill |
liquid on the |
computer. |
|
|
|
|
• |
Do |
not |
place |
the computer |
on an unstable |
surface |
or |
near |
a radiator |
|
or |
heat |
register. |
|
|
|
|
|
|
• Do not block or cover the openings in the computer’s cabinet. Do not insert objects through the slots.
• Use only the type of power source indicated on the computer’s label.
•Connect all equipment to properly grounded power outlets. Avoid using outlets on the same circuit as photocopiers or air control
systems that regularly switch on and off.
• |
Do |
not |
let the computer’s power cord become damaged or frayed. |
|||
• |
If |
you |
use an extension cord with the computer, make sure the total |
|||
|
ampere |
rating of the devices plugged into the extension |
cord does |
|||
|
not exceed the cord’s ampere rating. Also, make sure the total of all |
|||||
|
devices |
plugged into the wall outlet does not |
exceed |
15 |
amperes. |
|
• |
Except |
as specifically explained in this User'S |
Guide, |
do |
not attempt |
|
|
to service the computer yourself. |
|
|
|
||
• |
Unplug |
the computer and refer servicing to qualified service |
||||
|
personnel under the following conditions: |
|
|
|
||
|
If the power cord or plug is damaged; if liquid has entered the |
|||||
|
computer; if the computer has been dropped |
or the |
cabinet damaged; |
|||
|
if the computer does not operate normally or exhibits a distinct |
|||||
|
change |
in performance. Adjust only those controls that are covered |
||||
|
by |
the |
operating instructions. |
|
|
|
• |
If |
you |
plan to use the computer in Germany, |
observe |
the following: |
|
To provide adequate short-circuit protection and over-current protection for this computer, the building installation must be protected by a 16 Amp circuit breaker.
Beim Anschluß des Computers an die Netzversorgung muß sichergestellt werden, daß die Gebaudeinstallation mit einem 16 A Uberstromschutzschalter abgesichert ist.
.. .
111
Importantes instructions de securite
Lire attentivement les instructions suivantes et les conserver pour les consulter en cas de besoin. Observer soigneusement tous les avertissements et directives marques sur l’ordinateur.
• Debrancher l’ordinateur avant de le nettoyer. N’utiliser chiffon chiffon humide. Veiller a ne pas renverser de liquides sur l’appareil.
• Ne pas placer l’ordinateur sur une surface instable ni pres d'une source de chaleur.
• Ne pas bloquer ni couvrir les orifices d’aeration de l’appareil. Ne pas introduire d’objets dans les ouvertures.
•Utiliser seulement le type de source d’alimentation electrique indiqué sur l’étiquette.
•Tout l’équipement doit étre branché sur des prises de courant avec contact de terre. Ne jamais utiliser une prise sur le méme circuit
qu’un appareil a photocopies ou un systeme de controle de ventilation avec commutation marche-arrêt automatique.
•S’assurer que le cordon d’alimentation de l’ordinateur n’est pas abîmé ni effiloché.
•Dans le cas oú on utilise un cordon de rallonge avec l’ordinateur, s’assurer que l’intensité en amperes requise pour tous les appareils
branches sur ce cordon ne soit pas supérieure a la capacité du cordon. S’assurer aussi que cette intensté ne dépasse jamais la somme de 15 amperes pour l’ensemble des appareils.
• Sauf dans les cas spécifiques expliqués dans ce manuel |
de l’usager, |
ne pas essayer d’entretenir ou de reparer l’ordinateur |
soi-méme. |
•Debrancher l’ordinateur et contacter un technicien qualifié dans les circonstances suivantes:
Si le cordon ou la prise sont abîmes; si un liquide a pénétré á l’intérieur de l’appareil; si on a laissé tomber l’appareil ou si le boîtier est endommagé; sil’ordinateur ne fonctionne pas normalement ou fonctionne d'une maniére trés différente de l’ordinaire. N’ajuster que les commandes décrites dans les directives.
•Pour utiliser l’ordinateur en Allemagne, il est nécessaire que le bâtiment soit munid’un disjoncteur de 16 amperes pour protéger l’ordinateur contre les courts-circuits et le survoltage.
iv

Contents |
|
|
|
|
||
Introduction |
|
|
|
|
||
VGA Drivers . . |
. |
. . . . |
. . . . . . . . . . . . . . . . . . . . . . . . |
2 |
||
Optional |
Equipment . . . |
. . . . . . . . . . . . . . . . . . . . . . . . |
3 |
|||
M e m o r y . . . . . . . . . . . . . . . . . . . . . . . . . . . . . . . |
3 |
|||||
Video |
Memory . . . |
. . . . . . . . . . . . . . . . . . . . . . . . |
3 |
|||
Microprocessor . . . |
. . . . . . . . . . . . . . . . . . . . . . . . |
3 |
||||
Drives |
. . . |
. |
. . . . |
. . . . . . . . . . . . . . . . . . . . . . . . |
3 |
|
Math Coprocessor . |
. . . . . . . . . . . . . . . . . . . . . . . . |
4 |
||||
How to Use This Manual |
. . . . . . . . . . . . . . . . . . . . . . . . |
4 |
||||
Where to Get Help |
. . . . |
. . . . . . . . . . . . . . . . . . . . . . . . |
5 |
|||
CompuServe On-line Support . . . . . . . . . . . . . . . . . . |
6 |
|||||
Chapter |
I |
Setting Up Your-System |
|
|||
Unpacking Your |
Computer . . . . . . . . . . . . . . . . . . . . . . |
1-1 |
||||
Setting the Voltage Selector Switch . . . . . . . . . . . . . . . . . . |
1-2 |
|||||
Connecting |
Computer Components . . . . . . . . . . . . . . . . . |
1-3 |
||||
Connecting a Keyboard and Mouse . . . . . . . . . . . . . . . |
1-4 |
|||||
Connecting |
a |
Monitor . . . . . . . . . . . . . . . . . . . . . . . |
1-5 |
|||
Connecting a Printer or Other Device . . . . . . . . . . . . . . |
1-6 |
|||||
Connecting |
the Power Cord . . . . . . . . . . . . . . . . . . . |
1-7 |
||||
Turning |
On |
the |
Computer . . . . . . . . . . . . . . . . . . . . . . . |
1-7 |
||
Turning |
Off |
the |
Computer . . . . . . . . . . . . . . . . . . . . . . . |
1-9 |
||
Running |
the |
SETUP Program . . . . . . . . . . . . . . . . . . . . . |
1-10 |
|||
Starting the |
SETUP |
Program . . . . . . . . . . . . . . . . . . . |
1-10 |
|||
Displaying |
System |
Information . . . . . . . . . . . . . . . . . |
1-12 |
|||
Setting the Date and Time . . . . . . . . . . . . . . . . . . . . |
1-12 |
|||||
Setting |
the |
Diskette |
Drive(s) . . . . . . . . . . . . . . . . . . . |
1-12 |
||
Setting the Hard Disk Drive(s) . . . . . . . . . . . . . . . . . . |
1-13 |
|||||
Checking System Memory . . . . . . . . . . . . . . . . . . . . |
1-14 |
|||||
Setting the Video Display Type . . . . . . . . . . . . . . . . . |
1-14 |
|||||
Setting |
Keyboard Options . . . . . . . . . . . . . . . . . . . . |
1-15 |
||||
Setting |
the |
Processor Speed . . . . . . . . . . . . . . . . . . . |
1-15 |
|||
Cyrix Cache |
Option |
. . . . . . . . . . . . . . . . . . . . . . . . |
1-16 |
|||
Setting |
Chip |
Set Feature Control Options . . . . . . . . . . . |
1-16 |
|||
V

Exiting |
SETUP . . . . . . . . . . . |
1-17 |
|||
Post-SETUP |
Procedures . . . . . . . . |
1-17 |
|||
Chapter |
2 |
|
Using Your Computer |
|
|
|
|
||||
W o r k i n g C o m f o r t a b l y |
2-1 |
||||
I n s e r t i n g a n d R e m o v i n g D i s k s |
2-2 |
||||
Stopping a Command or Program |
2-3 |
||||
R e s e t t i n g t h e C o m p u t e r |
2-4 |
||||
Changing |
the |
|
Processor Speed |
|
2-5 |
Chapter |
3 |
|
Installing and Removing Options |
|
|
|
|
||||
R e m o v i n g t h e C o v e r |
3-2 |
||||
Replacing |
the |
Cover |
|
3-4 |
|
Locating |
the |
Internal Components |
3-5 |
||
C h a n g i n g t h e J u m p e r S e t t i n g s |
3-7 |
||||
S e t t i n g t h e J u m p e r s |
3-8 |
||||
Installing |
Memory Modules (SIMMs) |
3-10 |
|||
I n s e r t i n g S I M M s |
3-11 |
||||
R e m o v i n g S I M M s |
3-13 |
||||
I n s t a l l i n g a n O p t i o n C a r d |
3-15 |
||||
R e m o v i n g a n O p t i o n C a r d |
3-18 |
||||
A d d i n g V i d e o M e m o r y |
3-18 |
||||
I n s t a l l i n g t h e V i d e o C h i p s |
3-18 |
||||
Installing |
the |
|
Math Coprocessor |
|
3-20 |
P o s t - i n s t a l l a t i o n P r o c e d u r e s |
3-22 |
||||
Chapter |
4 |
|
lnstalling and Removing Drives |
|
|
|
|
||||
S e t t i n g t h e I D E H a r d D i s k D r i v e J u m p e r s |
4-2 |
||||
Removing |
Mounting Frames |
|
4-3 |
||
Installing a Drive in the Front Internal Drive Bay |
4-4 |
||||
Removing a Drive From the Front Internal Drive Bay |
4-8 |
||||
Installing a Drive in an External Drive Bay |
4-9 |
||||
Removing a Drive From an External Drive Bay |
4-12 |
||||
Installing a Drive in the Rear Internal Drive Bay |
4-14 |
||||
Removing |
a Drive From the Rear |
Internal Drive Bay |
4-17 |
||
P o s t - i n s t a l l a t i o n |
P r o c e d u r e s |
4-19 |
|||
v i

Chapter 5 Troubleshooting
I d e n t i f y i n g Y o u r S y s t e m
The Computer Will Not Start
The Computer Does Not Respond
K e y b o a r d P r o b l e m s
M o u s e P r o b l e m s
M o n i t o r P r o b l e m s
D i s k e t t e P r o b l e m s
D i s k e t t e D r i v e P r o b l e m s
H a r d D i s k D r i v e P r o b l e m s
S o f t w a r e P r o b l e m s
P r i n t e r P r o b l e m s
O p t i o n |
C a r d P r o b l e m s |
M e m o r y |
M o d u l e P r o b l e m s |
C o n t r o l l e r P r o b l e m s
Internal Battery Problems
Appendix A Specifications
CPU and Memory . . . . . . . . . . . . . . . . . .
Controllers . . . . . . . . . . . . . . . . . . . . . .
Interfaces . . . . . . . . . . . . . . . . . . . . . . .
Mass Storage . . . . . . . . . . . . . . . . . . . . .
Keyboard . . . . . . . . . . . . . . . . . . . . . . .
SETUP Program . . . . . . . . . . . . . . . . . . .
Physical Characteristics . . . . . . . . . . . . . . .
Power Supply . . . . . . . . . . . . . . . . . . . . .
Environmental Requirements . . . . . . . . . . .
Tested Operating Environments . . . . . . . . . .
Video Memory and Supported Resolutions . . .
Options Available from EPSON . . . . . . . . . .
Hard Disk Drive Types . . . . . . . . . . . . . . .
Drive Option Information . . . . . . . . . . . . .
DMA Assignments . . . . . . . . . . . . . . . . .
Hardware Interrupts . . . . . . . . . . . . . . . .
System Memory Map . . . . . . . . . . . . . . . .
System I/O Address Map . . . . . . . . . . . . .
Connector Pin Assignments . . . . . . . . . . . .
5-1
5-3
5-4
5-4
5-5
5-5
5-6
5-7
5-8
5-9
5-10
5-11
5-11
5-12
5-12
A - 1 A - 2 A - 2 A - 3 A - 4 A - 4 A - 4 A - 5 A - 5 A - 6 A - 7 A - 7 A - 8 A - 1 0 A - 1 1 A - 1 2 A - 1 3 A - 1 4 A - 1 6
v i i

Glossary
Index
EPSON U.S. and International Marketing Locations
. . .
V l l l

lntroduction
Your new EPSON® computer provides the following features:
Cyrix ® 486SLC-33 or 486SLC2-50 microprocessor
2MB, 4MB, or 8MB of internal memory, expandable to 16MB
System and video BIOS shadow RAM
At least 512KB of on-board video memory; 512KB is expandable to 1024KB (1MB)
Built-in, local bus SVGA port
Two built-in serial ports and one built-in parallel port
One built-in |
PS/2TM compatible keyboard port and one |
built-in PS/ |
2 compatible mouse port |
1KB of internal cache
Support for relocation of 128KB of memory
High-speed local bus video controller with True Color’” support, providing resolutions up to 1280 x 1024 in 16 colors
Socket for an optional math coprocessor
Five full-length, 16-bit, ISA-compatible option slots
Space for up to seven mass storage devices (four externally accessible and three internal)
Support for up to two IDE hard disk drives and two diskette drives (or one diskette drive and one tape drive)
Real-time clock and calendar on main system board with built-in rechargeable battery backup.
Introduction 1

The 486SLC microprocessor in this computer is i486SX instruction set compatible. It features a 32-bit internal/ 16-bit external data path.
The shadow RAM feature speeds up processing by moving the system and video BIOS into the RAM area of memory.
Using the built-in interfaces, you can connect most of your peripheral devices directly to the computer so you do not have to install option cards. You can use the option slots to enhance your system with extra functions such as a modem card, a network controller card, or additional interface ports.
The local bus video interface provides data transfer at the full speed of the processor, rather than at the standard 8.33 MHz ISA bus speed.
VGA Drivers
Your computer comes with VGA drivers and utilities for use with the integrated video interface. With these drivers, you can take advantage of the extended VGA features such as high resolutions and 132-column text mode when you run popular applications. If your system was configured for you, these drivers and utilities may be installed on your hard disk. If you need to install them yourself, see the README files on your Drivers diskettes or your hard drive, as described in Chapter 1. To obtain drivers for additional applications, call the EPSON Connection SM or access the Epson America Forum on CompuServe@.
2 Introduction

Optional Equipment
You can easily upgrade your computer by installing additional memory and a wide variety of options, as described in
Chapters 3 and 4.
Memory
By adding 1MB or 4MB SIMMs (single inline memory modules) to the main system board, you can expand the computer’s memory up to 16MB.
Video Memory
Your system came with at least 512KB of video memory. If your system came with 512KB, you can increase it to 1024KB (lMB), which allows you to use higher resolutions with more colors.
Microprocessor
Your system supports one of the following microprocessors:
4 8 6 S L C - 3 3
4 8 6 S L C 2 - 5 0 .
Drives
Your system can hold up to seven mass storage devices, including hard disk drives, diskette drives, tape drive(s), a CD-ROM drive, or optical drive(s). As your storage needs expand, you can install additional drives.
Introduction 3

Math Coprocessor
You may want to install an optional math coprocessor, which allows your computer to perform mathematical calculations and process graphics more quickly.
How to Use This Manual
This manual contains the information you need to get the best results from your computer. You do not have to read everything; check the following chapter summaries.
Chapter 1 provides simple instructions for setting up your system, turning it on and off, and connecting peripheral devices such as the monitor and printer. It also describes running the SETUP program to define your computer’s configuration.
Chapter 2 covers general operating procedures, such as using diskettes, resetting the computer, and changing the processor speed.
Chapter 3 describes how to remove and replace the computer’s cover, change jumper settings, and install optional equipment such as option cards and memory modules.
Chapter 4 explains how to install and remove disk drives
Chapter 5 contains troubleshooting tips.
Appendix A lists the specifications of your computer.
At the end of this manual you’ll find a Glossary, an Index, and a list of international marketing locations.
4 Introduction

Where to Get Help
If you purchased your computer in the United States or Canada, EPSON provides customer support and service through a network of Authorized EPSON Customer Care Centers. EPSON also provides support services through the EPSON Connection. In the United States, dial (800) 922-8911. In Canada, dial (800) GO-EPSON.
Call the EPSON Connection for the following:
Technical assistance with the installation, configuration, and operation of EPSON products
Assistance in locating your nearest Authorized EPSON Reseller or Service Center
C u s t o m e r R e l a t i o n s
EPSON technical information library fax service
Product literature on current and new products.
You can purchase accessories, manuals, or parts for EPSON products from EPSON Accessories at (800) 873-7766 (U.S. sales only). In Canada, call (800) GO-EPSON for sales locations.
When you call for technical assistance, be ready to identify your system and its configuration, and provide any error messages to the support staff. See Chapter 5 for more information.
If you purchased your computer outside the United States or Canada, contact your EPSON dealer or the marketing location nearest you for customer support and service. International marketing locations are listed at the end of this manual.
Introduction 5
If you need help with any software application program you
are |
using, see |
the documentation that came with that program |
for |
technical |
support information. |
CompuServe On-line Support
The fastest way to access helpful tips, specifications, drivers, application notes, tables for DIP switch or jumper settings, and bulletins for EPSON products is through the Epson America Forum on CompuServe.
If you are not currently a member of CompuServe, you are eligible for a free introductory membership as an owner of an EPSON product. This membership entitles you to:
An introductory $15 credit on CompuServe
Your own user ID and password
A complimentary subscription to CompuServe Magazine, CompuServe’s monthly publication.
To take advantage of this offer, call (800) 848-8199 in the United States and Canada and ask for representative #529. In other countries, call the following U.S. telephone number:
(614) 529-1611 or your local CompuServe access number.
If you are already a CompuServe member, simply type
GO EPSON at the menu prompt to reach the Epson America Forum.
6 Introduction
Chapter 1
Setting Up Your System
This chapter briefly describes how to set up your computer. It includes the following information:
U n p a c k i n g y o u r c o m p u t e r
Setting the voltage selector switch
Connecting the computer components
Turning the computer on and off
Running the SETUP program
Post - SETUP procedures .
Unpacking Your Computer
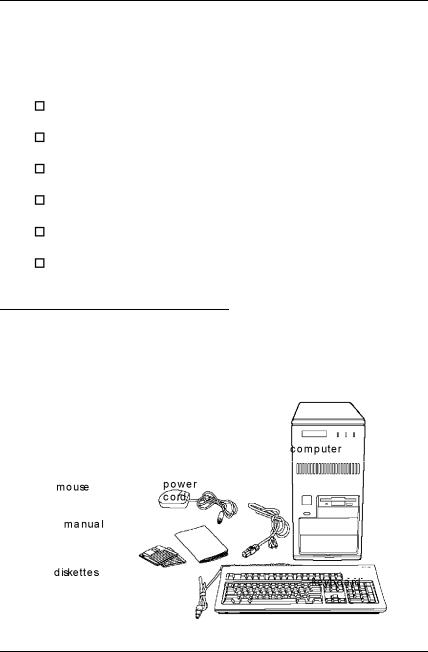
When you unpack your system components, make sure you have these items:
Setting Up Your System |
1-1 |

If you purchased any optional equipment that goes inside the computer-such as option cards, memory modules, a hard disk drive, or a diskette drive-you should install these devices before you connect your computer. See Chapters 3 and 4 for instructions.
Setting the Voltage Selector Switch
Your system is powered by a 200 Watt power supply. The power supply voltage is controlled by a voltage selector switch on the computer’s back panel. You can set this switch to
110 VAC or 220 VAC.
EPSON ships the computer with the voltage selector switch set to 110 VAC. This setting is appropriate for line source voltages between 100 and 120 VAC, and is generally the appropriate setting to select if you plan to use your computer in North America, Mexico, or Japan.
If you plan to operate the computer in the United Kingdom, Europe, or South American countries, you will probably need to reset the voltage selector switch to 220 VAC. Doing so allows your computer to handle line source voltages between 200 and 240 VAC.
Caution
Before you turn on the power to your system, make sure the voltage selector is set to the appropriate setting for the electrical power source in your location or you will seriously damage your system.
1-2 Setting Up Your System

To change the voltage selector |
switch setting, |
slide |
the |
switch |
to the right to select 220 VAC, |
or to the left to |
select |
110 |
VAC, |
as shown below. |
|
|
|
|
Connecting Computer Components
Use the illustration below to locate the ports on the back of your system as you connect the keyboard, monitor, printer, and other devices.
Setting Up Your System |
1-3 |

Your system may also include two removable game port panels below the option slots. You can remove one or both of these if you want to install one or two connectors to the optional port interface on the system board.
Connecting a Keyboard and Mouse
To |
connect a keyboard, hold the cable connector so the |
arrow |
on |
the connector faces up. Insert it into the port marked |
K/B. |
If you have a PS/ 2 compatible mouse, insert the connector into the port marked MOUSE
Caution
Although the connectors and ports for the mouse and keyboard are physically identical, they cannot be used interchangeably. Be sure to plug the mouse connector into the MOUBE port, or you may damage your system.
You must install a mouse driver if your system has not been preconfigured. See your mouse manual for instructions. (If you are using Windows, the installation program automatically loads a mouse driver for Windows applications.)
1-4 Setting Up Your System

Connecting a Monitor
If you have a VGA or SVGA monitor (or a multifrequency monitor with an analog connector), follow these steps to connect it to the computer’s built-in VGA port:
1.There should be two cables provided with your monitor: the monitor cable (to connect it to the computer) and the power cable (to connect it to the power source). On some
monitors, the monitor cable is permanently attached. If your monitor does not have an attached cable, connect the cable to it now.
2.Insert the monitor connector into the VGAport on the computer.
3.If the connector has retaining screws, tighten them.
4.Plug the monitor’s power cable into the power inlet on the back of the monitor. Plug the other end of the power cable
into |
a grounded |
electrical outlet or into the power outlet on |
the |
back of the |
computer. |
Caution
Before you plug the monitor’s power cable into the back of your computer, make sure the monitor’s power requirements do not exceed 1 Amp for 115 VAC and
0.5 Amp for 230 VAC.
Setting Up Your System |
1-5 |

Connecting a Printer or Other Device
Your computer has one bi-directional parallel and two serial ports. To connect a printer or other peripheral device, follow the appropriate instructions below.
Using the parallel port
Follow these steps to connect a parallel printer to your computer:
1.Plug the connector end of the printer cable into the computer’s PARALLEL port. If the connector has retaining screws, tighten them.
2.Connect the other end of the cable to the printer. To secure
the cable, squeeze the clips at each side of the printer port and push them into place.
3.Plug the printer’s power cord into a grounded electrical outlet.
Using the serial ports
If you have a printer, modem, or other device with a serial interface, you can connect it to one of the serial (RS-232C) ports on the back of the computer. Make sure you have a cable compatible with a DB-9P connector.
To connect a serial device, insert the connector into one of the ports marked COM1 and COM2. If you are connecting only one serial device, use the COM1 port.
If you want to assign COM1 as COM3 or COM2 as COM4, see Chapter 3 for information on jumper settings.
1-6 Setting Up Your System

Connecting the Power |
Cord |
|
|
|
|||||
Follow these |
steps |
to connect |
the |
power |
cord: |
|
|||
1. Plug |
the |
power |
cord |
into |
the |
power |
inlet on the |
back panel |
|
|
of the computer. |
|
|
|
|
|
|||
|
|
|
|
|
|
|
|
||
|
WARNING |
|
|
|
|
|
|
||
|
To |
avoid an electric |
shock, be sure to plug the cord into |
||||||
|
the |
computer |
before |
plugging it into the wall |
outlet. |
||||
|
|
|
|
|
|
|
|
|
|
2.Plug the other end of the power cord into an appropriate grounded electrical outlet.
Turning On the Computer
Before you turn on your computer, be sure to read the Important Safety Instructions at the beginning of this manual.
Follow these steps to turn on your system :
1.If there is a protective card in the diskette drive, remove it now.
2.Turn on the monitor, printer, and any other peripheral devices connected to the computer.
3.If you do not have a hard disk with an operating system loaded on it, insert your main operating system diskette in drive A.
Setting Up Your System |
1- 7 |

4.Press the power button located on the left side of the front panel, as shown below.
power button
reset button
drive bays
The power indicator lights up. After a few seconds, the computer displays a count of its system memory, and then performs its power-on diagnostics. This is a series of checks the computer runs each time you turn it on to make sure everything is working correctly.
If necessary, use the controls on your monitor to adjust the brightness and contrast until you can easily see the characters on the screen.
5.When the system has successfully completed its diagnostics,
M S - D O S® prompts you to verify the correct date and time. If they are correct, press Enter. Otherwise, enter the current date and time.
1-8 Setting Up Your System

If your system is configured to automatically start Microsoft® Windows™ ’or a word processing program, or has a different operating system, you will see the first menu or screen of that program displayed at this point. If your system is not configured to start like this, you will see the MS-DOS operating prompt, such as C: \ > or A: \>, each time you turn on the computer.
Follow the instructions in the “Running the SETUP Program” section to configure your system using the SETUP program.
Turning Off the Computer
Whenever you turn off your system, follow these steps:
1.Save your data and exit any application program you are using.
2. Check the hard disk drive |
light and the diskette drive light(s) |
to make sure they are not |
on. Do not turn off the computer |
if a drive light is on, because you can damage the drive or lose data.
3. Remove any diskette(s) from the diskette drive(s).
4.Press the power button to turn off the computer and then turn off the monitor, printer, and any other peripheral devices.
Setting Up Your System |
1-9 |
 Loading...