


 Loading...
User’s Guide
NPD4428-00 EN

Epson AcuLaser C1700 Series User’s Guide
Contents
Preface
Copyright and Trademarks. . . . . . . . . . . . . . . . . . . . . . . . . . . . . . . . . . . . . . . . . . . . . . . . . . . . . . . . . . . . . . . 7
Using This Guide. . . . . . . . . . . . . . . . . . . . . . . . . . . . . . . . . . . . . . . . . . . . . . . . . . . . . . . . . . . . . . . . . . . . . . . . 8
Conventions. . . . . . . . . . . . . . . . . . . . . . . . . . . . . . . . . . . . . . . . . . . . . . . . . . . . . . . . . . . . . . . . . . . . . . . 8
Product Features. . . . . . . . . . . . . . . . . . . . . . . . . . . . . . . . . . . . . . . . . . . . . . . . . . . . . . . . . . . . . . . . . . . . . . . . 9
Features. . . . . . . . . . . . . . . . . . . . . . . . . . . . . . . . . . . . . . . . . . . . . . . . . . . . . . . . . . . . . . . . . . . . . . . . . . . 9
Chapter 1 Specifications
Specifications. . . . . . . . . . . . . . . . . . . . . . . . . . . . . . . . . . . . . . . . . . . . . . . . . . . . . . . . . . . . . . . . . . . . . . . . . . 10
Chapter 2 Basic Operation
Main Components. . . . . . . . . . . . . . . . . . . . . . . . . . . . . . . . . . . . . . . . . . . . . . . . . . . . . . . . . . . . . . . . . . . . . 13
Front View. . . . . . . . . . . . . . . . . . . . . . . . . . . . . . . . . . . . . . . . . . . . . . . . . . . . . . . . . . . . . . . . . . . . . . . . 13
Rear View. . . . . . . . . . . . . . . . . . . . . . . . . . . . . . . . . . . . . . . . . . . . . . . . . . . . . . . . . . . . . . . . . . . . . . . . . 14
Operator Panel. . . . . . . . . . . . . . . . . . . . . . . . . . . . . . . . . . . . . . . . . . . . . . . . . . . . . . . . . . . . . . . . . . . . 14
Printing a Panel Settings Page. . . . . . . . . . . . . . . . . . . . . . . . . . . . . . . . . . . . . . . . . . . . . . . . . . . . . . . . . . . . 16
The Operator Panel. . . . . . . . . . . . . . . . . . . . . . . . . . . . . . . . . . . . . . . . . . . . . . . . . . . . . . . . . . . . . . . . 16
The Printer Setting Utility. . . . . . . . . . . . . . . . . . . . . . . . . . . . . . . . . . . . . . . . . . . . . . . . . . . . . . . . . . . 16
Power Saver Mode. . . . . . . . . . . . . . . . . . . . . . . . . . . . . . . . . . . . . . . . . . . . . . . . . . . . . . . . . . . . . . . . . . . . . . 17
Setting the Time for the Power Saver Mode. . . . . . . . . . . . . . . . . . . . . . . . . . . . . . . . . . . . . . . . . . . . . 17
Exiting the Power Saver Mode. . . . . . . . . . . . . . . . . . . . . . . . . . . . . . . . . . . . . . . . . . . . . . . . . . . . . . . . 18
Chapter 3 Printer Management Software
Print Driver. . . . . . . . . . . . . . . . . . . . . . . . . . . . . . . . . . . . . . . . . . . . . . . . . . . . . . . . . . . . . . . . . . . . . . . . . . . 19
Printer Setting Utility (Windows Only). . . . . . . . . . . . . . . . . . . . . . . . . . . . . . . . . . . . . . . . . . . . . . . . . . . . 19
Status Monitor (Windows Only). . . . . . . . . . . . . . . . . . . . . . . . . . . . . . . . . . . . . . . . . . . . . . . . . . . . . . . . . . 19
Launcher (Windows Only). . . . . . . . . . . . . . . . . . . . . . . . . . . . . . . . . . . . . . . . . . . . . . . . . . . . . . . . . . . . . . . 20
Status Monitor Widget (Mac OS X Only). . . . . . . . . . . . . . . . . . . . . . . . . . . . . . . . . . . . . . . . . . . . . . . . . . . 21
Contents 2

Epson AcuLaser C1700 Series User’s Guide
Chapter 4 Installing the Print Driver
Connecting Your Printer. . . . . . . . . . . . . . . . . . . . . . . . . . . . . . . . . . . . . . . . . . . . . . . . . . . . . . . . . . . . . . . . 25 Connecting Printer to Computer. . . . . . . . . . . . . . . . . . . . . . . . . . . . . . . . . . . . . . . . . . . . . . . . . . . . . 25 Installing Print Driver on Computers Running Windows. . . . . . . . . . . . . . . . . . . . . . . . . . . . . . . . . . . . . 27 USB Connection Setup. . . . . . . . . . . . . . . . . . . . . . . . . . . . . . . . . . . . . . . . . . . . . . . . . . . . . . . . . . . . . . 27 Installing Print Driver on Computers Running Mac OS X. . . . . . . . . . . . . . . . . . . . . . . . . . . . . . . . . . . . . 29 Installing the Driver. . . . . . . . . . . . . . . . . . . . . . . . . . . . . . . . . . . . . . . . . . . . . . . . . . . . . . . . . . . . . . . . 29 Installing the Software. . . . . . . . . . . . . . . . . . . . . . . . . . . . . . . . . . . . . . . . . . . . . . . . . . . . . . . . . . . . . . 29 Adding a Printer. . . . . . . . . . . . . . . . . . . . . . . . . . . . . . . . . . . . . . . . . . . . . . . . . . . . . . . . . . . . . . . . . . . 30
Chapter 5 Printing Basics
About Print Media. . . . . . . . . . . . . . . . . . . . . . . . . . . . . . . . . . . . . . . . . . . . . . . . . . . . . . . . . . . . . . . . . . . . . 33
Print Media Usage Guidelines. . . . . . . . . . . . . . . . . . . . . . . . . . . . . . . . . . . . . . . . . . . . . . . . . . . . . . . . 33
Print Media That Can Damage Your Printer. . . . . . . . . . . . . . . . . . . . . . . . . . . . . . . . . . . . . . . . . . . . 34
Supported Print Media. . . . . . . . . . . . . . . . . . . . . . . . . . . . . . . . . . . . . . . . . . . . . . . . . . . . . . . . . . . . . . . . . . 34
Usable Print Media. . . . . . . . . . . . . . . . . . . . . . . . . . . . . . . . . . . . . . . . . . . . . . . . . . . . . . . . . . . . . . . . . 35
Loading Print Media. . . . . . . . . . . . . . . . . . . . . . . . . . . . . . . . . . . . . . . . . . . . . . . . . . . . . . . . . . . . . . . . . . . . 36
Capacity. . . . . . . . . . . . . . . . . . . . . . . . . . . . . . . . . . . . . . . . . . . . . . . . . . . . . . . . . . . . . . . . . . . . . . . . . . 36
Print Media Dimensions. . . . . . . . . . . . . . . . . . . . . . . . . . . . . . . . . . . . . . . . . . . . . . . . . . . . . . . . . . . . 37
Loading Print Media in the Multipurpose Feeder (MPF). . . . . . . . . . . . . . . . . . . . . . . . . . . . . . . . . . 37
Manual Duplex Printing (Windows Print Driver Only). . . . . . . . . . . . . . . . . . . . . . . . . . . . . . . . . . . 46
Using the Output Tray Extension. . . . . . . . . . . . . . . . . . . . . . . . . . . . . . . . . . . . . . . . . . . . . . . . . . . . . 49
Printing. . . . . . . . . . . . . . . . . . . . . . . . . . . . . . . . . . . . . . . . . . . . . . . . . . . . . . . . . . . . . . . . . . . . . . . . . . . . . . 49
Sending a Job to Print. . . . . . . . . . . . . . . . . . . . . . . . . . . . . . . . . . . . . . . . . . . . . . . . . . . . . . . . . . . . . . . 49
Canceling a Print Job. . . . . . . . . . . . . . . . . . . . . . . . . . . . . . . . . . . . . . . . . . . . . . . . . . . . . . . . . . . . . . . 50
Selecting Printing Options. . . . . . . . . . . . . . . . . . . . . . . . . . . . . . . . . . . . . . . . . . . . . . . . . . . . . . . . . . . 51
Printing Custom Size Paper. . . . . . . . . . . . . . . . . . . . . . . . . . . . . . . . . . . . . . . . . . . . . . . . . . . . . . . . . . 56
Checking Status of Print Data. . . . . . . . . . . . . . . . . . . . . . . . . . . . . . . . . . . . . . . . . . . . . . . . . . . . . . . . 58
Printing a Report Page. . . . . . . . . . . . . . . . . . . . . . . . . . . . . . . . . . . . . . . . . . . . . . . . . . . . . . . . . . . . . . 59
Printer Settings. . . . . . . . . . . . . . . . . . . . . . . . . . . . . . . . . . . . . . . . . . . . . . . . . . . . . . . . . . . . . . . . . . . . 60
Chapter 6 Using the Operator Panel
Resetting to Factory Defaults. . . . . . . . . . . . . . . . . . . . . . . . . . . . . . . . . . . . . . . . . . . . . . . . . . . . . . . . . . . . . 62 Understanding the Operator Panel Lights. . . . . . . . . . . . . . . . . . . . . . . . . . . . . . . . . . . . . . . . . . . . . . . . . . 62 Common Light Sequences. . . . . . . . . . . . . . . . . . . . . . . . . . . . . . . . . . . . . . . . . . . . . . . . . . . . . . . . . . . 63 Warnings. . . . . . . . . . . . . . . . . . . . . . . . . . . . . . . . . . . . . . . . . . . . . . . . . . . . . . . . . . . . . . . . . . . . . . . . . 64
Contents 3

Epson AcuLaser C1700 Series User’s Guide
Operator Call Errors. . . . . . . . . . . . . . . . . . . . . . . . . . . . . . . . . . . . . . . . . . . . . . . . . . . . . . . . . . . . . . . . 65 Secondary light sequences. . . . . . . . . . . . . . . . . . . . . . . . . . . . . . . . . . . . . . . . . . . . . . . . . . . . . . . . . . . 67 Fatal Errors. . . . . . . . . . . . . . . . . . . . . . . . . . . . . . . . . . . . . . . . . . . . . . . . . . . . . . . . . . . . . . . . . . . . . . . 69 Firmware Errors. . . . . . . . . . . . . . . . . . . . . . . . . . . . . . . . . . . . . . . . . . . . . . . . . . . . . . . . . . . . . . . . . . . 69
Chapter 7 Troubleshooting
Clearing Jams. . . . . . . . . . . . . . . . . . . . . . . . . . . . . . . . . . . . . . . . . . . . . . . . . . . . . . . . . . . . . . . . . . . . . . . . . . 71 Avoiding Jams. . . . . . . . . . . . . . . . . . . . . . . . . . . . . . . . . . . . . . . . . . . . . . . . . . . . . . . . . . . . . . . . . . . . . 71 Identifying the Location of Paper Jams. . . . . . . . . . . . . . . . . . . . . . . . . . . . . . . . . . . . . . . . . . . . . . . . . 72 Clearing Paper Jams From the Front of the Printer. . . . . . . . . . . . . . . . . . . . . . . . . . . . . . . . . . . . . . . 73 Clearing Paper Jams From the Back of the Printer. . . . . . . . . . . . . . . . . . . . . . . . . . . . . . . . . . . . . . . 74 Clearing Paper Jams From the Center Output Tray. . . . . . . . . . . . . . . . . . . . . . . . . . . . . . . . . . . . . . 76 Jam Problems. . . . . . . . . . . . . . . . . . . . . . . . . . . . . . . . . . . . . . . . . . . . . . . . . . . . . . . . . . . . . . . . . . . . . 78
Basic Printer Problems. . . . . . . . . . . . . . . . . . . . . . . . . . . . . . . . . . . . . . . . . . . . . . . . . . . . . . . . . . . . . . . . . . 79 Display Problems. . . . . . . . . . . . . . . . . . . . . . . . . . . . . . . . . . . . . . . . . . . . . . . . . . . . . . . . . . . . . . . . . . . . . . . 79 Printing Problems. . . . . . . . . . . . . . . . . . . . . . . . . . . . . . . . . . . . . . . . . . . . . . . . . . . . . . . . . . . . . . . . . . . . . . 80 Print Quality Problems. . . . . . . . . . . . . . . . . . . . . . . . . . . . . . . . . . . . . . . . . . . . . . . . . . . . . . . . . . . . . . . . . . 81 The Output Is Too Light. . . . . . . . . . . . . . . . . . . . . . . . . . . . . . . . . . . . . . . . . . . . . . . . . . . . . . . . . . . . 81 Toner Smears or Print Comes Off/Stain on Back Side. . . . . . . . . . . . . . . . . . . . . . . . . . . . . . . . . . . . 82 Random Spots/Blurred Images. . . . . . . . . . . . . . . . . . . . . . . . . . . . . . . . . . . . . . . . . . . . . . . . . . . . . . . 83 The Entire Output Is Blank. . . . . . . . . . . . . . . . . . . . . . . . . . . . . . . . . . . . . . . . . . . . . . . . . . . . . . . . . . 84 Streaks Appear on the Output. . . . . . . . . . . . . . . . . . . . . . . . . . . . . . . . . . . . . . . . . . . . . . . . . . . . . . . . 84 Pitched Color Dots. . . . . . . . . . . . . . . . . . . . . . . . . . . . . . . . . . . . . . . . . . . . . . . . . . . . . . . . . . . . . . . . . 85 Vertical Blanks. . . . . . . . . . . . . . . . . . . . . . . . . . . . . . . . . . . . . . . . . . . . . . . . . . . . . . . . . . . . . . . . . . . . 85 Mottle. . . . . . . . . . . . . . . . . . . . . . . . . . . . . . . . . . . . . . . . . . . . . . . . . . . . . . . . . . . . . . . . . . . . . . . . . . . . 86 Ghosting. . . . . . . . . . . . . . . . . . . . . . . . . . . . . . . . . . . . . . . . . . . . . . . . . . . . . . . . . . . . . . . . . . . . . . . . . 86 Fog. . . . . . . . . . . . . . . . . . . . . . . . . . . . . . . . . . . . . . . . . . . . . . . . . . . . . . . . . . . . . . . . . . . . . . . . . . . . . . 87 Bead-Carry-Out (BCO). . . . . . . . . . . . . . . . . . . . . . . . . . . . . . . . . . . . . . . . . . . . . . . . . . . . . . . . . . . . . 88 Auger Mark. . . . . . . . . . . . . . . . . . . . . . . . . . . . . . . . . . . . . . . . . . . . . . . . . . . . . . . . . . . . . . . . . . . . . . . 89 Wrinkled/Stained Paper. . . . . . . . . . . . . . . . . . . . . . . . . . . . . . . . . . . . . . . . . . . . . . . . . . . . . . . . . . . . . 89 The Top Margin Is Incorrect. . . . . . . . . . . . . . . . . . . . . . . . . . . . . . . . . . . . . . . . . . . . . . . . . . . . . . . . . 90 Color Registration Is out of Alignment. . . . . . . . . . . . . . . . . . . . . . . . . . . . . . . . . . . . . . . . . . . . . . . . 91 Protrudent/Bumpy Paper. . . . . . . . . . . . . . . . . . . . . . . . . . . . . . . . . . . . . . . . . . . . . . . . . . . . . . . . . . . . 93 Adjusting Color Registration. . . . . . . . . . . . . . . . . . . . . . . . . . . . . . . . . . . . . . . . . . . . . . . . . . . . . . . . . . . . . 93 Performing Auto Correct. . . . . . . . . . . . . . . . . . . . . . . . . . . . . . . . . . . . . . . . . . . . . . . . . . . . . . . . . . . . 93 Printing the Color Registration Chart. . . . . . . . . . . . . . . . . . . . . . . . . . . . . . . . . . . . . . . . . . . . . . . . . . 94 Determining Values. . . . . . . . . . . . . . . . . . . . . . . . . . . . . . . . . . . . . . . . . . . . . . . . . . . . . . . . . . . . . . . . 95 Entering Values. . . . . . . . . . . . . . . . . . . . . . . . . . . . . . . . . . . . . . . . . . . . . . . . . . . . . . . . . . . . . . . . . . . . 96
Contents 4

Epson AcuLaser C1700 Series User’s Guide
Noise. . . . . . . . . . . . . . . . . . . . . . . . . . . . . . . . . . . . . . . . . . . . . . . . . . . . . . . . . . . . . . . . . . . . . . . . . . . . . . . . . 97
Other Problems. . . . . . . . . . . . . . . . . . . . . . . . . . . . . . . . . . . . . . . . . . . . . . . . . . . . . . . . . . . . . . . . . . . . . . . . 99
Contacting Service. . . . . . . . . . . . . . . . . . . . . . . . . . . . . . . . . . . . . . . . . . . . . . . . . . . . . . . . . . . . . . . . . . . . . . 99
Getting Help. . . . . . . . . . . . . . . . . . . . . . . . . . . . . . . . . . . . . . . . . . . . . . . . . . . . . . . . . . . . . . . . . . . . . . . . . . 99
Operator Panel Lights. . . . . . . . . . . . . . . . . . . . . . . . . . . . . . . . . . . . . . . . . . . . . . . . . . . . . . . . . . . . . . . 99
Status Monitor Alerts. . . . . . . . . . . . . . . . . . . . . . . . . . . . . . . . . . . . . . . . . . . . . . . . . . . . . . . . . . . . . . . 99
Non Genuine Toner Mode. . . . . . . . . . . . . . . . . . . . . . . . . . . . . . . . . . . . . . . . . . . . . . . . . . . . . . . . . . . . . . 100
The Printer Setting Utility. . . . . . . . . . . . . . . . . . . . . . . . . . . . . . . . . . . . . . . . . . . . . . . . . . . . . . . . . . 100
Chapter 8 Maintenance
Cleaning the Printer. . . . . . . . . . . . . . . . . . . . . . . . . . . . . . . . . . . . . . . . . . . . . . . . . . . . . . . . . . . . . . . . . . . 101 Cleaning Inside the Printer. . . . . . . . . . . . . . . . . . . . . . . . . . . . . . . . . . . . . . . . . . . . . . . . . . . . . . . . . 101 Cleaning the Color Toner Density (CTD) Sensor. . . . . . . . . . . . . . . . . . . . . . . . . . . . . . . . . . . . . . . 104 Replacing Toner Cartridges. . . . . . . . . . . . . . . . . . . . . . . . . . . . . . . . . . . . . . . . . . . . . . . . . . . . . . . . . . . . . 106 Overview. . . . . . . . . . . . . . . . . . . . . . . . . . . . . . . . . . . . . . . . . . . . . . . . . . . . . . . . . . . . . . . . . . . . . . . . 106 Removing the Toner Cartridges. . . . . . . . . . . . . . . . . . . . . . . . . . . . . . . . . . . . . . . . . . . . . . . . . . . . . 108 Installing a Toner Cartridge. . . . . . . . . . . . . . . . . . . . . . . . . . . . . . . . . . . . . . . . . . . . . . . . . . . . . . . . . 109 Ordering Supplies. . . . . . . . . . . . . . . . . . . . . . . . . . . . . . . . . . . . . . . . . . . . . . . . . . . . . . . . . . . . . . . . . . . . . 111 Consumables. . . . . . . . . . . . . . . . . . . . . . . . . . . . . . . . . . . . . . . . . . . . . . . . . . . . . . . . . . . . . . . . . . . . . 111 When to Order Toner Cartridges. . . . . . . . . . . . . . . . . . . . . . . . . . . . . . . . . . . . . . . . . . . . . . . . . . . . 111 Storing Consumables. . . . . . . . . . . . . . . . . . . . . . . . . . . . . . . . . . . . . . . . . . . . . . . . . . . . . . . . . . . . . . . . . . 112 Managing the Printer. . . . . . . . . . . . . . . . . . . . . . . . . . . . . . . . . . . . . . . . . . . . . . . . . . . . . . . . . . . . . . . . . . 112 Checking Printer Status with Status Monitor (Windows Only). . . . . . . . . . . . . . . . . . . . . . . . . . . . 112 Conserving Supplies. . . . . . . . . . . . . . . . . . . . . . . . . . . . . . . . . . . . . . . . . . . . . . . . . . . . . . . . . . . . . . . . . . . 113 Checking Page Counts (Windows Only). . . . . . . . . . . . . . . . . . . . . . . . . . . . . . . . . . . . . . . . . . . . . . . . . . 113 Moving the Printer. . . . . . . . . . . . . . . . . . . . . . . . . . . . . . . . . . . . . . . . . . . . . . . . . . . . . . . . . . . . . . . . . . . . 114
Appendix A Where To Get Help
Contacting Epson Support. . . . . . . . . . . . . . . . . . . . . . . . . . . . . . . . . . . . . . . . . . . . . . . . . . . . . . . . . . . . . . 118 Before Contacting Epson. . . . . . . . . . . . . . . . . . . . . . . . . . . . . . . . . . . . . . . . . . . . . . . . . . . . . . . . . . . 118 Help for Users in Europe. . . . . . . . . . . . . . . . . . . . . . . . . . . . . . . . . . . . . . . . . . . . . . . . . . . . . . . . . . . 118 Help for Users in Taiwan. . . . . . . . . . . . . . . . . . . . . . . . . . . . . . . . . . . . . . . . . . . . . . . . . . . . . . . . . . . 118 Help for Users in Singapore. . . . . . . . . . . . . . . . . . . . . . . . . . . . . . . . . . . . . . . . . . . . . . . . . . . . . . . . . 120 Help for Users in Thailand. . . . . . . . . . . . . . . . . . . . . . . . . . . . . . . . . . . . . . . . . . . . . . . . . . . . . . . . . . 120 Help for Users in Vietnam. . . . . . . . . . . . . . . . . . . . . . . . . . . . . . . . . . . . . . . . . . . . . . . . . . . . . . . . . . 121 Help for Users in Indonesia. . . . . . . . . . . . . . . . . . . . . . . . . . . . . . . . . . . . . . . . . . . . . . . . . . . . . . . . . 121
Contents 5

Epson AcuLaser C1700 Series User’s Guide
Help for Users in Hong Kong. . . . . . . . . . . . . . . . . . . . . . . . . . . . . . . . . . . . . . . . . . . . . . . . . . . . . . . 123 Help for Users in Malaysia. . . . . . . . . . . . . . . . . . . . . . . . . . . . . . . . . . . . . . . . . . . . . . . . . . . . . . . . . . 123 Help for Users in India. . . . . . . . . . . . . . . . . . . . . . . . . . . . . . . . . . . . . . . . . . . . . . . . . . . . . . . . . . . . . 124 Help for Users in the Philippines. . . . . . . . . . . . . . . . . . . . . . . . . . . . . . . . . . . . . . . . . . . . . . . . . . . . 125
Index
Contents 6

Epson AcuLaser C1700 Series User’s Guide
Preface
Copyright and Trademarks
No part of this publication may be reproduced, stored in a retrieval system, or transmitted in any form or by any means, mechanical, photocopying, recording, or otherwise, without the prior written permission of Seiko Epson Corporation. No patent liability is assumed with respect to the use of the information contained herein.
Neither is any liability assumed for damages resulting from the use of the information contained herein. Neither Seiko Epson Corporation nor its affiliates shall be liable to the purchaser of this product or third parties for damages, losses, costs, or expenses incurred by purchaser or third parties as a result of: accident, misuse, or abuse of this product or unauthorized modifications, repairs, or alterations to this product, or (excluding the U.S.) failure to strictly comply with Seiko Epson Corporation’s operating and maintenance instructions.
Seiko Epson Corporation and its affiliates shall not be liable against any damages or problems arising from the use of any options or any consumable products other than those designated as Original Epson Products or Epson Approved Products by Seiko Epson Corporation.
Apple®, Bonjour®, ColorSync®, Macintosh®, and Mac OS® are trademarks of Apple Inc. in the United States and/or other countries.
Microsoft®, Windows Vista®, Windows®, and Windows Server® are trademarks of Microsoft Corporation in the United States and/or other countries.
EPSON is a registered trademark and EPSON AcuLaser is a trademark of Seiko Epson Corporation.
General Notice: Other product names used herein are for identification purposes only and may be trademarks of their respective owners. Epson disclaims any and all rights in those marks.
Copyright © 2011 Seiko Epson Corporation. All rights reserved.
Preface 7
Epson AcuLaser C1700 Series User’s Guide
Using This Guide
Conventions
1.In this guide, personal computers and workstations are collectively called “computers”.
2.The following terms are used throughout this guide:
Important:
Important information that must be read and followed.
Note:
Additional information that merits emphasis.
See Also:
References within this guide.
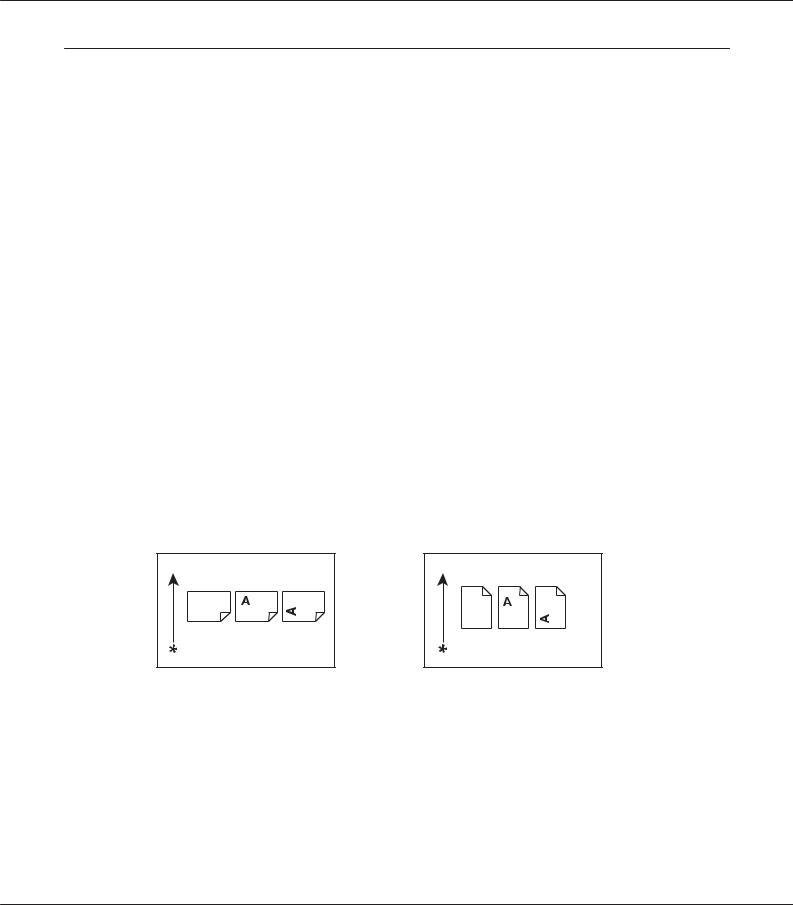
3.Orientation of documents or paper is described in this guide as follows:
 ,
,  , Long Edge Feed (LEF): Loading the document or paper in portrait orientation.
 ,
,  , Short Edge Feed (SEF): Loading the document or paper in landscape orientation.
LEF Orientation SEF Orientation
* Paper feed direction
Preface 8
Epson AcuLaser C1700 Series User’s Guide
Product Features
Features
This section describes the product features and indicates their links.
2 Sided Print (Manual) |
|
|
|
Multiple-Up Print |
|
|
|
|
|
||||||||||||||||
|
|
|
|
|
|
|
|
|
|
|
|
|
|
|
|
|
|
|
|
|
|
|
|
|
|
|
|
|
|
|
|
|
|
|
|
|
|
|
|
|
|
|
|
|
|
|
|
|
|
|
|
|
|
|
|
|
|
|
|
|
|
|
|
|
|
|
|
|
|
|
|
|
|
|
|
|
|
|
|
|
|
|
|
|
|
|
|
|
|
|
|
|
|
|
|
|
|
|
|
|
|
|
|
|
|
|
|
|
|
|
|
|
|
|
|
|
|
|
|
|
|
|
|
|
|
|
|
|
|
|
|
|
|
|
|
|
|
|
|
|
|
|
|
|
|
|
|
|
|
|
|
|
|
|
|
|
|
|
|
|
|
|
|
|
|
|
|
|
|
|
|
|
|
|
|
|
|
|
|
|
|
|
|
|
|
|
|
|
|
|
|
|
|
|
|
|
|
|
|
|
|
|
|
|
|
|
|
|
|
|
|
|
|
|
|
|
|
|
|
|
|
|
|
|
|
|
|
|
|
|
|
|
|
|
|
|
|
|
|
|
|
|
|
|
|
|
|
|
|
|
|
|
|
|
|
|
|
|
|
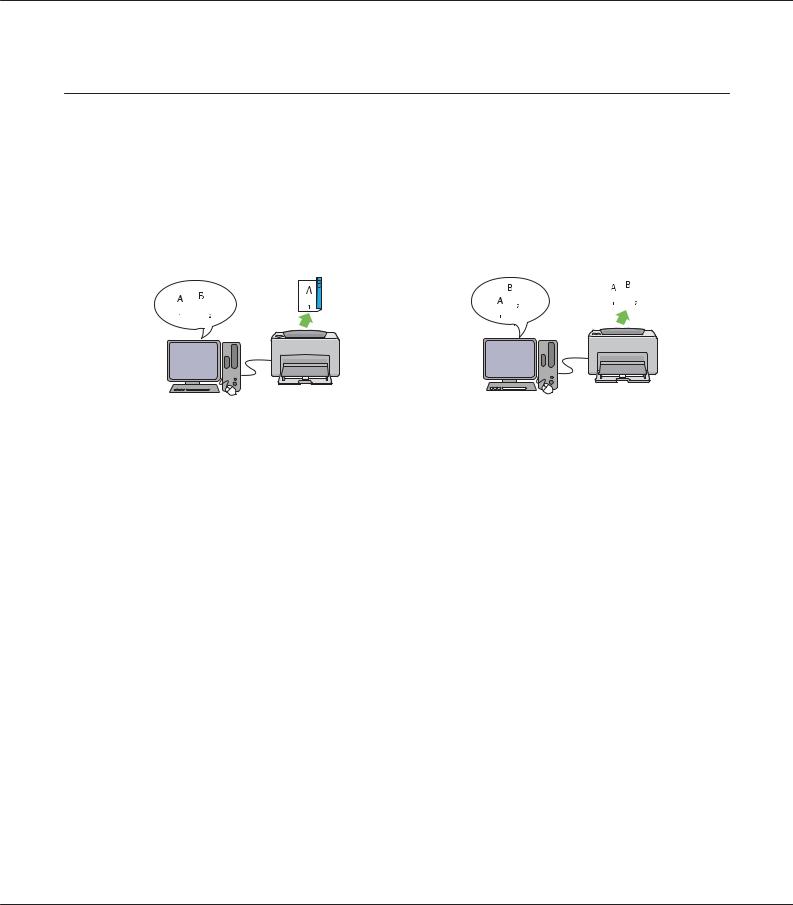
2 Sided Print is to print two or more pages on the front and back sides of a single sheet of paper manually. This feature allows you to reduce the paper consumption.
For more information, see “Manual Duplex Printing (Windows Print Driver Only)” on page 46.
Multiple-Up enables you to print multiple pages on a single sheet of paper. This feature allows you to reduce the paper consumption.
For more information, see the print driver’s Help.
Preface 9

Epson AcuLaser C1700 Series User’s Guide
Chapter 1
Specifications
Specifications
This chapter lists the main specifications of the printer. Note that the specifications of the product may change without prior notice.
Items |
Description |
|
|
Product Code |
Epson AcuLaser C1700 220V: C11CB71001 |
|
Epson AcuLaser C1700 110V: C11CB71011 |
|
|
Type |
Desktop |
|
|
Printing method |
LED Xerography |
|
Important: |
|
LED + LED electrophotographic system |
|
|
Fusing system |
Thermal fusing system using a belt |
|
|
Continuous print speed*1 |
A4 : When plain paper fed is from the multipurpose feeder |
|
Color 1 Sided*2: 10 sheets/min |
|
Monochrome 1 Sided: 12 sheets/min |
|
Important: |
|
*1 Print speed may decrease due to factors such as paper type, paper size, and |
|
printing conditions. |
|
*2 When continuously printing a single document of A4 . |
|
|
Resolution |
Data Processing Resolution: |
|
600 ×600 dpi |
|
Output Resolution: |
|
1200 ×2400 dpi |
|
|
Tone/Color |
256 tones/color (16.7 million colors) |
|
|
Specifications 10
Epson AcuLaser C1700 Series User’s Guide
Items |
Description |
|
|
Paper Size |
Multipurpose feeder: |
|
A4,B5,A5, Legal(8.5 ×14"), Folio (8.5 ×13"),Letter (8.5 ×11"), Executive, #10 Env, |
|
Monarch, DL, C5, Custom Size (Width: 76.2 – 215.9 mm, Length: 127 – 355.6 |
|
mm) |
|
Image loss: 4.1 mm from the top, bottom, left, and right edges |
|
|
Paper Type |
Plain, Bond, Lightweight Cardstock, Lightweight Glossy Cardstock, Recycled, |
|
Labels, Envelope, Letterhead, Pre-Printed, Hole Punched, Colored, Special, |
|
Custom Type |
|
Important: |
|
Use only the recommended paper. Using paper other than that |
|
recommended for the printer can cause printing problems. Do not use |
|
special ink jet paper. |
|
Note that poor printing quality due to paper-related printing problems |
|
can occur when using the printer in an environment that is dry, cold, or |
|
very humid. |
|
Printing over the printed side or on the reverse side of paper that already |
|
has been printed on can result in poor print quality. |
|
When printing on envelopes, use envelopes that do not have adhesive |
|
applied. |
|
The type of paper being used and environmental conditions can affect |
|
printing quality. Because of this, it is recommended that you test print and |
|
confirm proper print quality before using the printer. |
|
|
Paper capacity |
Standard: |
|
Multipurpose feeder: 150 sheets |
|
|
Output tray capacity |
Standard: approximately 100 sheets (face down) |
|
|
2-sided Printing Feature |
Standard (Manual) |
|
|
Memory capacity |
Standard: 64 MB (Onboard) |
|
Important: |
|
The above memory capacity does not guarantee print quality depending on |
|
the type and content of print data. |
|
|
Hard disk |
— |
|
|
Page Description Language |
— (Host-based) |
|
|
Specifications 11

Epson AcuLaser C1700 Series User’s Guide
Items |
Description |
|
|
|
|
|
|
|
|||||
Supported OS*1 |
Windows®XP, Windows®XP x64 Edition, Windows Vista®, Windows Vista® |
|||||
|
x64 Edition, Windows Server®2003, Windows Server® |
2003 x64 Edition, |
||||
|
Windows Server®2008, Windows Server® |
2008 x64 Edition, Windows |
||||
|
Server |
2008 R2 x64 Edition, Windows |
|
7, Windows |
7 x64 Edition, Mac |
|
|
OS®*2® |
|
® |
|
® |
|
|
Important: |
|
|
|
|
|
|
*1 For the latest information about the supported operating systems, contact |
|||||
|
our Customer Support Center or your dealer. |
|
||||
|
*2 Mac OS®X 10.3.9 – 10.6 are supported. |
|
|
|||
Interface |
Standard: USB 1.1/2.0 (Hi-Speed) |
|
|
|
|
|
|
|
|
||||
Power |
AC 110 – 127 V ± 10%; 7 A; both 50/60 Hz ± 3 Hz |
|
||||
|
AC 220 – 240 V ± 10%; 5 A; both 50/60 Hz ± 3 Hz |
|
||||
|
|
|||||
Power consumption |
Maximum: 285 W, During Mode 2 of Power Saver Mode: 5 W or less |
|||||
|
Average: |
|
|
|
|
|
|
During standby: 66 W, |
|
|
|
|
|
|
During continuous color printing: 285 W, |
|
|
|
||
|
During continuous monochrome printing: 285 W |
|
||||
|
Important: |
|
|
|
|
|
|
Mode 1 of Power Saver Mode: 11 W average |
|
||||
|
(The printer does not use electricity when the power is switched off even with |
|||||
|
the power cord is plugged in.) |
|
|
|
|
|
|
|
|
|
|
|
|
Dimensions (main unit only) |
394 (W) ×304 (D)*1 ×234 (H) mm |
|
|
|
|
|
|
Important: |
|
|
|
|
|
|
*1 When the front cover is closed. |
|
|
|
|
|
|
|
|||||
Weight |
Main Unit: 10.55 kg (main unit only, including toner cartridges) |
|||||
|
|
|||||
Usage Environment |
During Use: Temperature: 10 – 32 ˚C; Humidity: 10 – 85% (except malfunctions |
|||||
|
due to dew condensation) |
|
|
|
|
|
|
Non-Use:Temperature:-20 –40 ˚C; Humidity: 5 – 85% (except malfunctions due |
|||||
|
to dew condensation) |
|
|
|
|
|
|
Important: |
|
|
|
|
|
|
Until the conditions (temperature and humidity) inside the printer become |
|||||
|
acclimated to the installation environment, certain qualities of the paper can |
|||||
|
cause poor printing. |
|
|
|
|
|
|
|
|
|
|
|
|
Specifications 12
Epson AcuLaser C1700 Series User’s Guide
Chapter 2
Basic Operation
Main Components
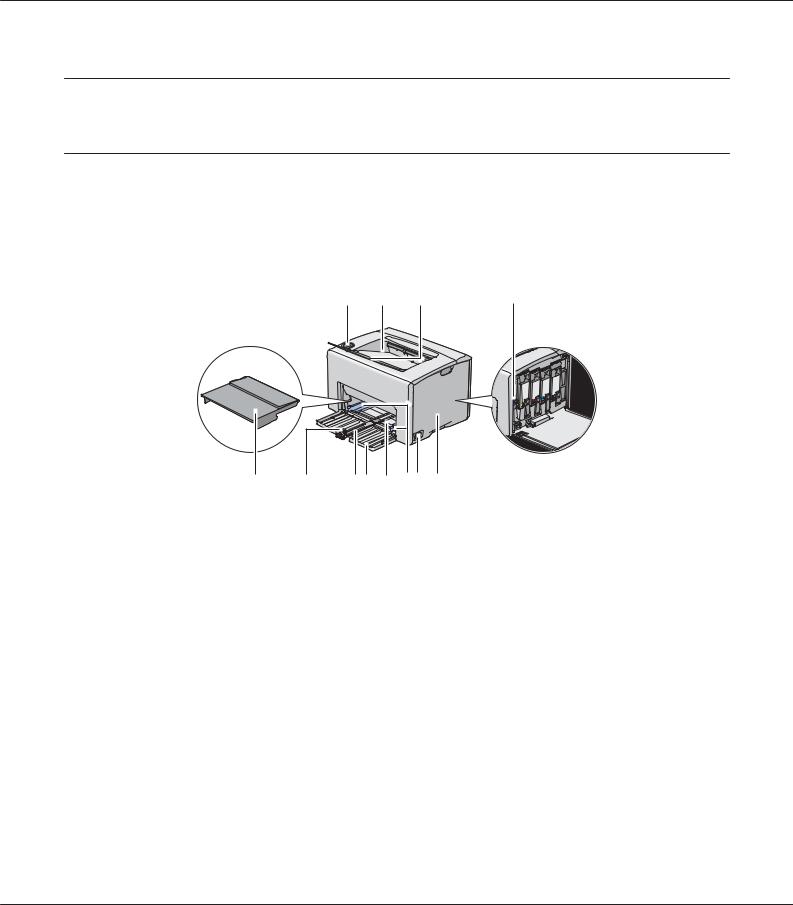
This section provides an overview of your Epson AcuLaser C1700 series.
Front View
1 |
2 |
3 |
4 |
12 |
11 |
10 9 |
8 |
7 6 |
5 |
1 |
Operator Panel |
2 |
Center Output Tray |
|
|
|
|
3 |
Output Tray Extension |
4 |
Print Head Cleaning Rod |
|
|
|
|
5 |
Toner Access Cover |
6 |
Power Switch |
|
|
|
|
7 |
Paper Width Guides |
8 |
Multipurpose feeder (MPF) |
|
|
|
|
9 |
Front Cover |
10 |
Slide Bar |
|
|
|
|
11 |
Length Guide |
12 |
Paper Cover |
|
|
|
|
Basic Operation 13

Epson AcuLaser C1700 Series User’s Guide
Rear View
1 |
2 |
9 |
|
8 |
|
7 |
3 |
6 |
|
5 |
|
4
1 |
Power Connector |
2 |
Rear Cover Handle |
|
|
|
|
3 |
USB Port |
4 |
Rear Door |
|
|
|
|
5 |
Transfer Roller |
6 |
Paper Chute |
|
|
|
|
7 |
Paper Feed Roller |
8 |
Transfer Belt |
|
|
|
|
9 |
Levers |
|
|
|
|
|
|
Operator Panel
The operator panel has two buttons and several indicators that show the status of the printer.
1
8 |
2 |
7 |
3 |
|
4 |
5
6
1.Toner Indicators
Indicates that the toner is low or empty, or toner error occurred.
Basic Operation 14

Epson AcuLaser C1700 Series User’s Guide
2. (Energy Saver) Indicator
Indicates that the printer is in the Power Saver Mode.
3. (Jam) Indicator
Indicates that a paper jam occurred.
4. (Cancel Job) Button
Press this button to cancel a job or clear an error.
5. (Start) Button/Indicator
Press this button to start 2 sided printing after loading paper.
Press and hold this button to print the report pages.
6. (Error) Indicator
Indicates that an error occurred.
7. (Load Paper) Indicator
Indicates that no paper is loaded or the wrong size of paper is loaded.
8. (Ready/Data) Indicator
Indicates the printer status, such as receiving and printing data.
The indicators provide information on the status of the printer and help you locate each problem.
Indicator |
Status |
Condition |
|
|
|
Toner |
Orange on |
The specified toner is low or not installed when genuine toner |
|
|
cartridges are used (Non Genuine Toner is set to off at the Printer |
|
|
Setting Utility). |
|
|
All toner indicators light up when the printer is in the non-genuine |
|
|
toner mode (Non Genuine Toner is set to On at the Printer Setting |
|
|
Utility). |
|
|
|
|
Orange blinks |
The specified toner cartridge is empty or invalid when genuine toner |
|
|
cartridges are used (Non Genuine Toner is set to off at the Printer |
|
|
Setting Utility). |
|
|
|
Basic Operation 15

Epson AcuLaser C1700 Series User’s Guide
Indicator |
Status |
Condition |
|
|
|
|
|
Energy Saver |
Green on |
The printer is in the Power Saver Mode. |
|
|
|
|
|
|
Green blinks |
The printer is canceling a print job. |
|
|
|
|
|
Jam |
Orange blinks |
A paper jam occurred. |
|
|
|
|
|
Start |
Green blinks |
To continue printing, press the |
(Start) button. |
|
|
|
|
Error |
Orange on |
An error occurred. |
|
|
|
|
|
|
Orange blinks |
A fatal error occurred. |
|
|
|
|
|
Load Paper |
Orange blinks |
No paper is loaded or the wrong size of paper is loaded. |
|
|
|
|
|
Ready/Data |
Green on |
The printer is ready to print. |
|
|
|
|
|
|
Green blinks |
The printer is processing, printing or canceling. |
|
|
|
|
|
Printing a Panel Settings Page
The Panel Settings page shows current settings for the system and maintenance.
The Operator Panel
1.Press and hold the  (Start) button when the
  (Ready/Data) indicator lights (ready status) until the
  (Ready/Data) indicator blinks.
The Panel Settings page, Printer Settings page, and Error History Report are printed.
The Printer Setting Utility
The following procedure uses Microsoft® Windows®XP as an example.
1.Click start — All Programs — EPSON — EPSON Printer Software — EPSON AL-C1700 — Printer Setting Utility.
Note:
The Select Printer window appears in this step, when multiple print drivers are installed on your computer. In this case, click the name of the desired printer listed in Printer Name.
Basic Operation 16

Epson AcuLaser C1700 Series User’s Guide
The Printer Setting Utility appears.
2.Click the Printer Settings Report tab.
3.Select Information Pages from the list at the left side of the page. The Information Pages page is displayed.
4.Click the Panel Settings button. The Panel Settings page is printed.
Power Saver Mode
The printer has a power saving feature which reduces power consumption during periods of inactivity. This feature operates in two modes: the Mode 1 and Mode 2. The power consumption of the printer in Mode 2 is lower than in Mode 1. As delivered, the printer switches to the Mode 1 five minutes after the last print job is printed. The printer then switches to the Mode 2 after another six minutes of inactivity. When the printer is in the Mode 1, all lamps on the operator panel except for the  (Energy Saver) indicator and the indicator announcing that a problem occurs go out. In the Mode 2, all lamps on the operator panel except for the
  (Energy Saver) indicator go out.
The factory default settings of five minutes (Mode 1) and six minutes (Mode 2) are changeable within the range of 5 to 30 minutes (Mode 1) and 1 to 6 minutes (Mode 2). The printer returns to the ready-to-print state in about 25 seconds when re-activated.
Setting the Time for the Power Saver Mode
You can specify the time for the Power Saver Mode. The printer switches to the Power Saver Mode after the specified time.
The following procedure uses Microsoft Windows XP as an example.
1.Click start — All Programs — EPSON — EPSON Printer Software — EPSON AL-C1700 — Printer Setting Utility.
Note:
The Select Printer window appears in this step, when multiple print drivers are installed on your computer. In this case, click the name of the desired printer listed in Printer Name.
Basic Operation 17

Epson AcuLaser C1700 Series User’s Guide
The Printer Setting Utility appears.
2.Click the Printer Maintenance tab.
3.Select System Settings from the list at the left side of the page. The System Settings page is displayed.
4.Specify the time for Mode 1 and Mode 2 for Power Saver Mode.
5.Click the Apply New Settings button to take effect.
Exiting the Power Saver Mode
The printer automatically exits the Power Saver Mode when it receives a print job from a computer. To manually exit the Power Saver Mode, press any button on the operator panel.
Note:
Opening and closing the rear door will cause the printer to exit the Mode 1.
Basic Operation 18

Epson AcuLaser C1700 Series User’s Guide
Chapter 3
Printer Management Software
Print Driver
To access all of your printer’s features, install the print driver from the Software Disc.
The print driver enables your computer and printer to communicate and provides access to your printer features.
See Also:
“Installing Print Driver on Computers Running Windows” on page 27
“Installing Print Driver on Computers Running Mac OS X” on page 29
Printer Setting Utility (Windows Only)
The Printer Setting Utility allows you to view or specify the system settings. You can also diagnose the system settings by using the Printer Setting Utility.
The Printer Setting Utility consists of the Printer Settings Report, Printer Maintenance, and
Diagnosis tabs.
The Printer Setting Utility is installed with your Epson print driver.
Status Monitor (Windows Only)
You can check the printer status with Status Monitor. Double-click the Status Monitor printer icon on the taskbar at the bottom right of the screen. The Select Printer window appears, which displays the printer name, printer connection port, and printer status. Check the column Status to know the current status of your printer.
Status Setting button: Displays the Status Settings screen and allows you to modify the Status Monitor settings.
Printer Management Software 19

Epson AcuLaser C1700 Series User’s Guide
Click the name of the desired printer listed on the Select Printer window. The Status Monitor window appears.
The StatusMonitor window alerts you when there is a warning or when an error occurs, for example, when a paper jam occurs or toner is running low.
By default, the Status Monitor window launches automatically when printing starts. You can specify the conditions for starting the Status Monitor window in Auto start setup.
To change the pop-up settings for the Status Monitor window:
The following procedure uses Microsoft® Windows®XP as an example.
1.Click start — All Programs — EPSON — Status Monitor — Activate Status Monitor. The Select Printer window appears.
2.Click Status Setting.
The Status Settings dialog box appears.
3.Select the Pop up setting tab, and then select the type of the pop-up from Auto start setup.
You can also check the toner level of your printer and the job information on the Status Monitor window.
The Status Monitor is installed with your Epson print driver.
Launcher (Windows Only)
Using the Launcher window, you can open the Status Window and Printer Setting Utility. The Launcher is installed with your Epson print driver.
The following procedure uses Windows XP as an example.
To open the Launcher window:
1. Click start — All Programs — EPSON — EPSON Printer Software — Launcher.
Printer Management Software 20
Epson AcuLaser C1700 Series User’s Guide
The Launcher window appears.
2.The Launcher window provides two buttons; Status Window and Printer Setting Utility. To exit, click the X button at the top-right of the window.
For details, click the Help button/icon of each application.
Status Window |
Click to open the Status Monitor window. |
|
See also: |
|
“Status Monitor (Windows Only)” on page 19 |
|
|
Printer Setting Utility |
Click to open the Printer Setting Utility. |
|
See also: |
|
“Printer Setting Utility (Windows Only)” on page 19 |
|
|
Status Monitor Widget (Mac OS X Only)
Status Monitor Widget is a printer utility that promotes efficient use of the printer through the exchange of information between the Mac OS®X and the printer.
You can install the Status Monitor Widget from the Software Disc. For information on the installation, see “Installing the Software” on page 29.
To open the Status Monitor Widget:
Printer Management Software 21
Epson AcuLaser C1700 Series User’s Guide
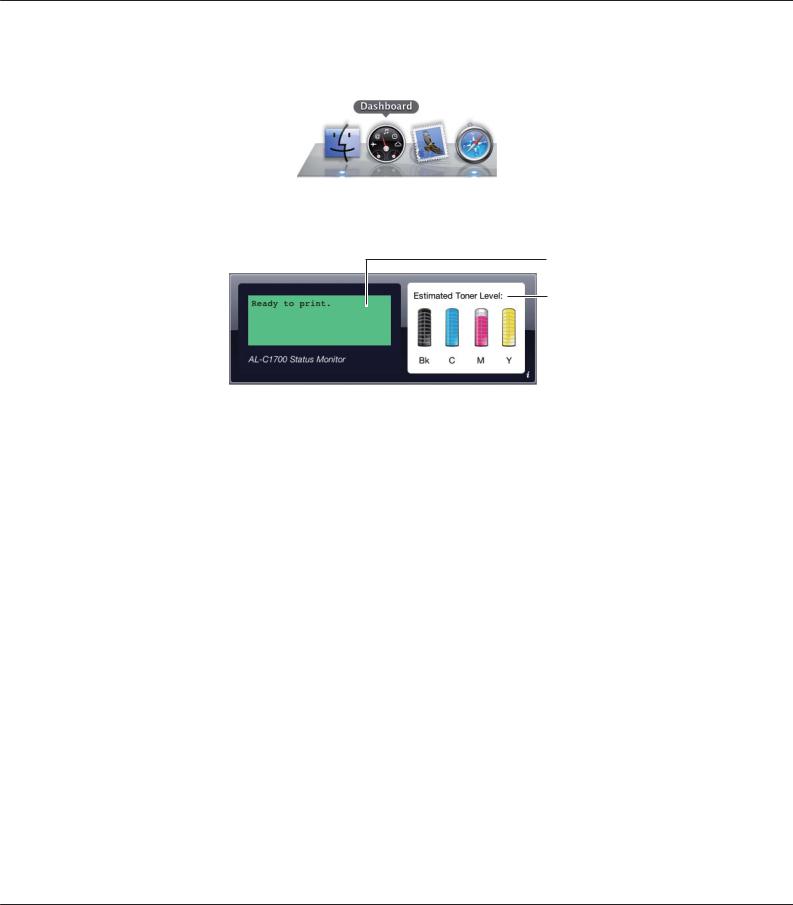
Click the Dashboard icon in the dock to launch Dashboard.
Status Monitor window appears.
1
2
 3
3
1.Printer Status Message Area
Displays a message of the current printer status.
Note:
The Status Monitor Widget automatically obtains the printer information at the updated interval that can be specified in preferences. Also, the printer status is refreshed when you launch the Dashboard or close the preferences.
If you receive no response from the printer or the printer is processing a job using a USB connection, “Cannot get printer information.” is displayed.
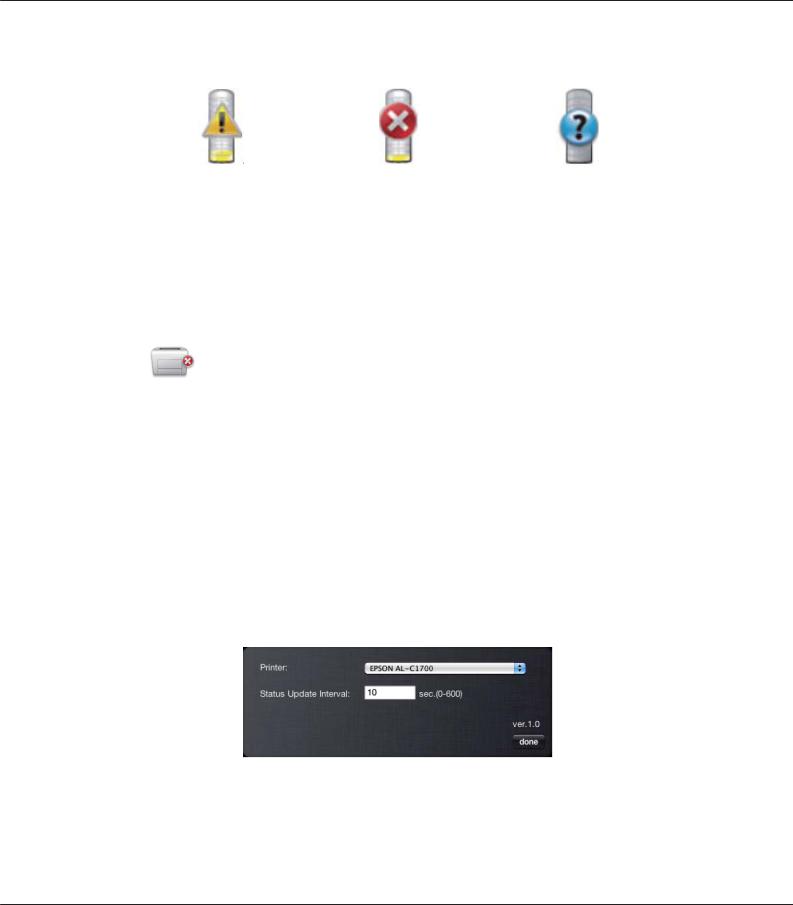
2.Printer Status Image Area
Displays the image of printer condition.
Estimated Toner Level image
Displays the estimated toner level of each color if the printer is functioning properly.
Printer Management Software 22
Epson AcuLaser C1700 Series User’s Guide
Less than 29% |
Less than 9% |
Unknown |
Note:
If the utility does not receive a response from the printer, the unknown toner image appears.
Printer error image
Displays an indication image when an error occurs.
An error has occurred and the printer cannot be used.
Note:
To know the details on the error and how to clear the problem, check the operator panel lights and refer to “Understanding the Operator Panel Lights” on page 62 for their meanings.
3.Info (i) button
Click this button to open preferences.
Note:
The info (i) button appears on the lower-right corner of the window when the cursor is over the Status Monitor window.
Printer |
Displays a list of available printer names in the drop-down list. The first printer |
|
displayed in this list is set as default. |
|
|
Printer Management Software 23

Epson AcuLaser C1700 Series User’s Guide
Status Update Interval |
You can specify the update interval of the printer status. By default, it is set to |
|
obtain the printer information every 10 seconds. The range varies between 0 and |
|
600. |
|
|
done button |
Click this button to return to the Status Monitor window. |
|
|
Printer Management Software 24
Epson AcuLaser C1700 Series User’s Guide
Chapter 4
Installing the Print Driver
Connecting Your Printer
Your Epson AcuLaser C1700 series interconnection cable must meet the following requirement:
Connection Type |
Connection Specification |
USB |
USB 1.1/2.0 compatible |
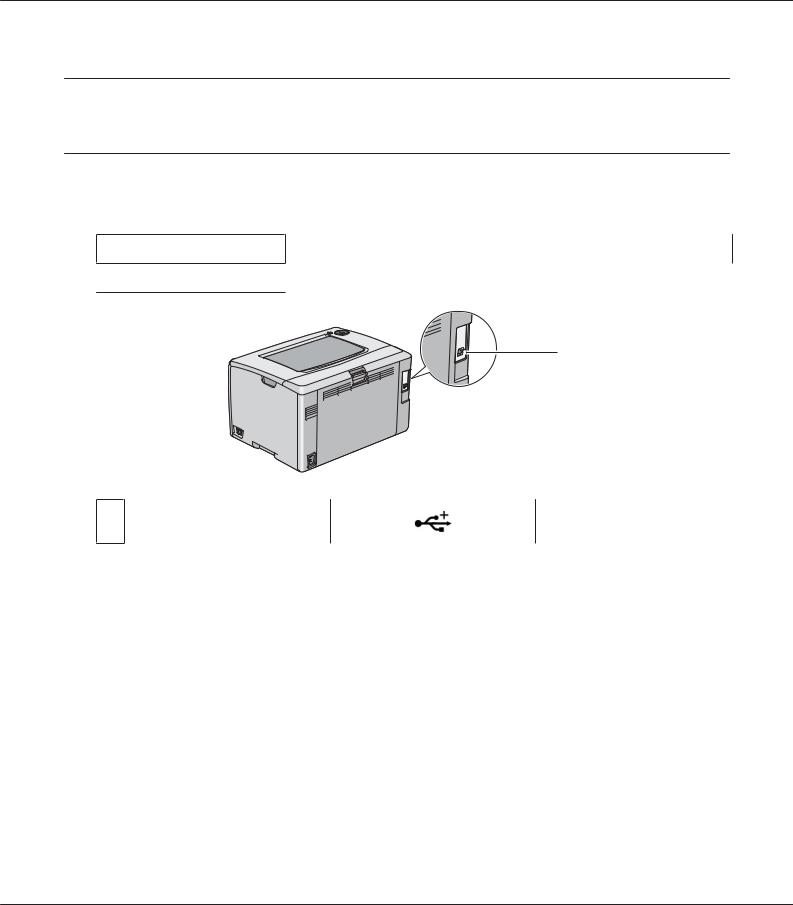
1
1 USB Port
Connecting Printer to Computer
Connect the printer via USB. A USB connection is a direct connection and is not used for networking. The available feature is shown in the following table.
Connection Type |
Available Feature |
|
|
USB |
You can instruct print jobs from a computer. |
|
|
USB Connection
A local printer is a printer which is directly attached to your computer using the USB cable.
Installing the Print Driver 25
Epson AcuLaser C1700 Series User’s Guide
The following operating systems support USB connection:
Microsoft® Windows® XP
Windows XP 64-bit Edition
Windows Server®2003
Windows Server 2003 x64 Edition
Windows Server 2008
Windows Server 2008 64-bit Edition
Windows Server 2008 R2
Windows Vista®
Windows Vista 64-bit Edition
Windows 7
Windows 7 64-bit Edition
Mac OS® X 10.3.9/10.4.11/10.5.8 -10.6 To attach the printer to a computer:
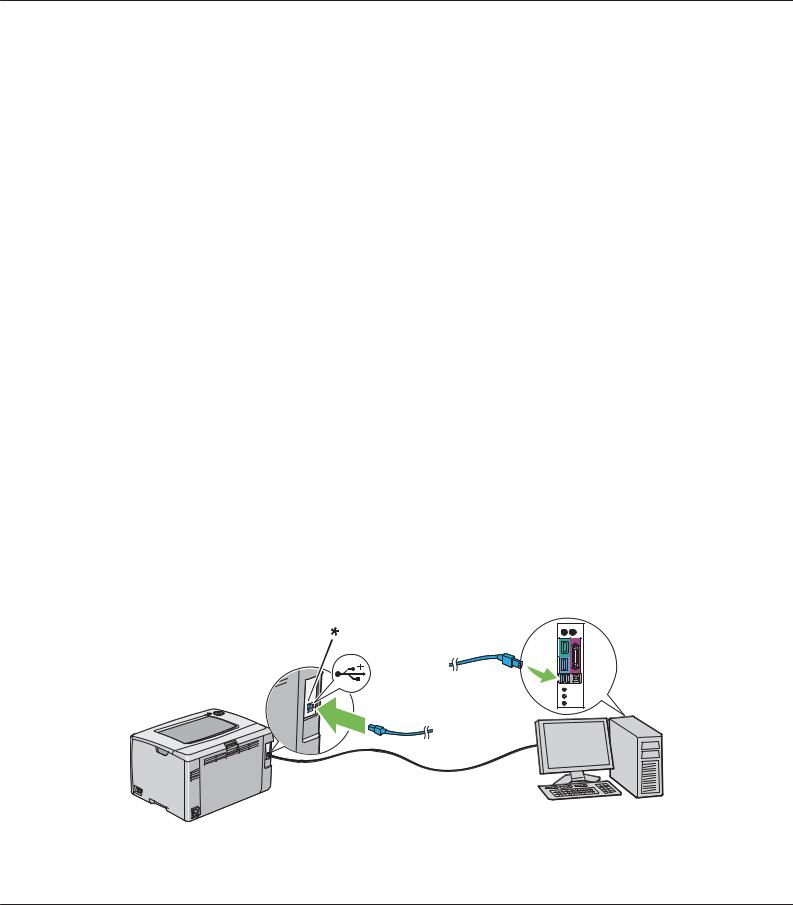
1.Ensure that the printer, computer, and any other attached devices are turned off and unplugged from the power source/outlet.
2.Connect the smaller USB connector into the USB port at the back of the printer and the other end of the cable into a USB port of the computer.
Installing the Print Driver 26

Epson AcuLaser C1700 Series User’s Guide
* USB port
Note:
Do not connect the printer USB cable to the USB connector available on the keyboard.
Installing Print Driver on Computers Running Windows
USB Connection Setup
The following procedure uses Windows XP as an example.
When the Printer is Connected to Computer With a USB Cable
1.Insert the Software Disc into your computer’s CD/DVD drive.
Note:
If the Software Disc does not automatically launch, click Start (start for Windows XP) — All Programs (for Windows Vista and Windows 7) — Accessories (for Windows Vista and Windows 7) — Run, and then enter D:\setup.exe (where D is the drive letter of your computer), and then click
OK.
2.Turn on the printer.
Note:
If Found New Hardware Wizard appears, click Cancel at this time.
3.Click Easy Install.
The SOFTWARE LICENSE AGREEMENT appears.
4.If you agree to the terms of the SOFTWARE LICENSE AGREEMENT, select Agree and then click
Next.
The Easy Install Navi launches.
5.Click Installing Drivers and Software.
6.Follow the on-screen instructions.
Installing the Print Driver 27

Epson AcuLaser C1700 Series User’s Guide
The Plug and Play installation starts and the installation software proceeds to the next page automatically.
7. Click Finish to exit the wizard.
When the Printer is not Connected to Computer With a USB Cable
1.Turn off the printer.
2.Insert the Software Disc into your computer’s CD/DVD drive.
Note:
If the Software Disc does not automatically launch, click Start (start for Windows XP) — All Programs (for Windows Vista and Windows 7) — Accessories (for Windows Vista and Windows 7) — Run, and then enter D:\setup.exe (where D is the drive letter of your computer), and then click
OK.
3.Click Easy Install.
The SOFTWARE LICENSE AGREEMENT appears.
4.If you agree to the terms of the SOFTWARE LICENSE AGREEMENT, select Agree and then click
Next.
The Easy Install Navi launches.
5.Click Installing Drivers and Software.
6.Follow the on-screen instructions to connect the computer and the printer with the USB cable, and then turn on the printer.
7.Click Finish to exit the wizard.
8.Proceed the Plug and Play installation.
Installing the Print Driver 28

Epson AcuLaser C1700 Series User’s Guide
Installing Print Driver on Computers Running Mac OS X
Installing the Driver
The following procedure uses Mac OS X 10.6 as an example.
1.Run the Software Disc on the Mac OS X.
2.Double-click the AL-C1750 C1700 Installer icon.
3.Click Continue on the displayed screen.
4.Click Continue on the Introduction screen.
5.Select a language for the Software License Agreement.
6.After reading the Software License Agreement, click Continue.
7.If you agree to the terms of the Software License Agreement, click Agree to continue the installation process.
8.Click Install to perform the standard installation.
9.Enter the administrator’s name and password, and then click OK.
10.Click Close to complete installation.
Installing the Software
The following procedure uses Mac OS X 10.6 as an example.
1.Run the Software Disc on the Mac OS X.
2.Double-click the AL-C1700 Status Monitor Installer icon.
3.Click Continue on the Introduction screen.
4.Select a language for the Software License Agreement.
Installing the Print Driver 29

Epson AcuLaser C1700 Series User’s Guide
5.After reading the Software License Agreement, click Continue.
6.If you agree to the terms of the Software License Agreement, click Agree to continue the installation process.
7.Click Install to perform the standard installation.
8.Enter the administrator’s name and password, and then click OK.
9.Click Close to complete installation.
Adding a Printer
Adding a Printer on Mac OS X 10.5.8/10.6 or Later Version(s)
1.Turn off the printer and your computer.
2.Connect the printer and your computer with the USB cable.
3.Turn on the printer and your computer.
4.Display System Preferences, and then click Print & Fax.
5.Confirm your USB printer is added to Print & Fax.
If your USB printer is not displayed, execute the following procedures.
6.Click the plus (+) sign, and then click Default.
7.Select the printer connected via USB from the Printer Name list.
Name, Location, and Print Using are automatically entered.
8.Click Add.
Adding a Printer on Mac OS X 10.4.11
1.Turn off the printer and your computer.
2.Connect the printer and your computer with the USB cable.
Installing the Print Driver 30
Loading...