


 Loading...
PhoneEasy
338gsm

English
1. |
Side key (volume) |
12. |
Charging contacts (for use |
2. |
Menu key |
|
with charging stand) |
3. |
Display |
13. |
Emergency call key |
4. |
Memory keys |
14. |
Headset socket |
5. |
Call key/OK |
15. |
Battery cover |
6. |
Numeric keypad |
16. |
Charging socket |
7. |
* / Key lock |
17. |
Power on/off |
8. |
# / Change profile |
18. |
Loudspeaker |
9. |
End call/back/Clear |
19. |
Microphone |
10.Arrow keys
11.Phonebook key
Svenska
1. |
Sidoknapp (volym) |
12. |
Laddningskontakter |
2. |
Menyknapp |
|
(för användning med ett |
3. |
Display |
|
laddningsställ) |
4. |
Snabbval |
13. |
Knapp för nödsamtal |
5. |
Samtalsknapp/OK |
14. |
Batterilucka |
6. |
Numerisk knappsats |
15. |
Uttag för headset |
7. |
* / Knapplås |
16. |
Uttag för laddare |
8. |
# / Byt profil |
17. |
På/av |
9. |
Avsluta samtal/radera/bakåt |
18. |
Högtalare |
10. |
Pilknappar |
19. |
Mikrofon |
11. |
Telefonbok |
|
|
Norsk
1. |
Sidetast (volum) |
12. |
Ladekontakter (for bruk med |
2. |
Menytast |
|
ladestativ) |
3. |
Display |
13. |
Tast for nødanrop |
4. |
Hurtigtaster |
14. |
Batterideksel |
5. |
Ringetast/OK |
15. |
Hodesettkontakt |
6. |
Talltastatur |
16. |
Ladekontakt |
7. |
* / Tastelås |
17. |
Strøm på/av |
8. |
# / Endre profil |
18. |
Høyttaler |
9. |
Avslutt samtale/slette |
19. |
Mikrofon |
10.Piltaster
11.Telefonbok
Dansk
1. |
Sidetast (lydstyrke) |
12. |
Stik til oplader (til brug med |
2. |
Menutast |
|
opladningsholder) |
3. |
Display |
13. |
Nødopkaldstast |
4. |
Hurtig Opkald |
14. |
Batteridæksel |
5. |
Opkaldstast/OK |
15. |
Stik til headset |
6. |
Numerisk tastatur |
16. |
Stik til oplader |
7. |
* / Tastaturlås |
17. |
Strøm til/fra |
8. |
# / Skift profil |
18. |
Højtaler |
9. |
Afslut opkald/slette |
19. |
Mikrofon |
10.Piletaster
11.Telefonbog
Suomi
1. |
Sivupainike |
11. |
Puhelinmuistio |
|
(äänenvoimakkuus) |
12. |
Latauksen kosketuspinnat |
2. |
Valikko |
|
(lataustelinettä varten) |
3. |
Näyttö |
13. |
Turvapuhelupainike |
4. |
Pikavalinta |
14. |
Akkukotelon kansi |
5. |
Soittopainike/OK |
15. |
Kuulokemikrofoniliitäntä |
6. |
Numeronäppäimistö |
16. |
Laturin liitäntä |
7. |
* / Näppäinlukko |
17. |
Virta päälle/pois |
8. |
# / Vaihda profiilia |
18. |
Kaiutin |
9. |
Lopeta puhelu/poista |
19. |
Mikrofoni |
10. |
Nuolinäppäimet |
|
|

English
Contents
Installation . . . . . . . . . . . . . . . . . . . . . . . . . . . . . . . . . . . . 2
Installing the SIM card and battery . . . . . . . . . . . . . . . . . . 2 Charging . . . . . . . . . . . . . . . . . . . . . . . . . . . . . . . . . . . . 3
Operation. . . . . . . . . . . . . . . . . . . . . . . . . . . . . . . . . . . . . . 4
Activating the phone . . . . . . . . . . . . . . . . . . . . . . . . . . . . 4 Making a call . . . . . . . . . . . . . . . . . . . . . . . . . . . . . . . . . 5 Making a call from the Phonebook . . . . . . . . . . . . . . . . . . 5 Receiving a call . . . . . . . . . . . . . . . . . . . . . . . . . . . . . . . 5 Volume control . . . . . . . . . . . . . . . . . . . . . . . . . . . . . . . . 5 Call information . . . . . . . . . . . . . . . . . . . . . . . . . . . . . . . 5
Display symbols . . . . . . . . . . . . . . . . . . . . . . . . . . . . . . . . . 6 Additional functions . . . . . . . . . . . . . . . . . . . . . . . . . . . . . . 7
Handsfree mode (qkey) . . . . . . . . . . . . . . . . . . . . . . . 7 Call log . . . . . . . . . . . . . . . . . . . . . . . . . . . . . . . . . . . . . 7 Text input. . . . . . . . . . . . . . . . . . . . . . . . . . . . . . . . . . . . 8 Speed dial . . . . . . . . . . . . . . . . . . . . . . . . . . . . . . . . . . . 8 Phonebook . . . . . . . . . . . . . . . . . . . . . . . . . . . . . . . . . . . 9 Key lock. . . . . . . . . . . . . . . . . . . . . . . . . . . . . . . . . . . . 10 Silent mode . . . . . . . . . . . . . . . . . . . . . . . . . . . . . . . . . 10 Headset . . . . . . . . . . . . . . . . . . . . . . . . . . . . . . . . . . . . 10 SOS calls . . . . . . . . . . . . . . . . . . . . . . . . . . . . . . . . . . . 11 Emergency Call key . . . . . . . . . . . . . . . . . . . . . . . . . . . . 11
SMS messaging . . . . . . . . . . . . . . . . . . . . . . . . . . . . . . . . 12
Incoming messages . . . . . . . . . . . . . . . . . . . . . . . . . . . . 12
Settings . . . . . . . . . . . . . . . . . . . . . . . . . . . . . . . . . . . . . 13
Time and date. . . . . . . . . . . . . . . . . . . . . . . . . . . . . . . . 13 SMS receive . . . . . . . . . . . . . . . . . . . . . . . . . . . . . . . . . 15 Emergency . . . . . . . . . . . . . . . . . . . . . . . . . . . . . . . . . . 16 Security settings . . . . . . . . . . . . . . . . . . . . . . . . . . . . . . 17
Safety instructions . . . . . . . . . . . . . . . . . . . . . . . . . . . . . . 18 Troubleshooting . . . . . . . . . . . . . . . . . . . . . . . . . . . . . . . . 21 Care and maintenance . . . . . . . . . . . . . . . . . . . . . . . . . . . 23 Warranty and technical data . . . . . . . . . . . . . . . . . . . . . . . 24
1
English
Installation
Warning!
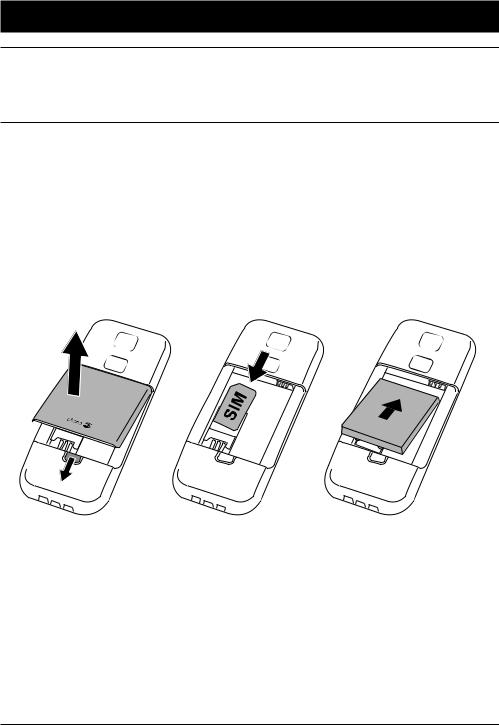
Turn off the phone and disconnect the charger before removing the battery cover.
Installing the SIM card and battery
The SIM card holder is located behind the battery. Remove the battery if it is already installed.
Insert the SIM card by carefully sliding it into the holder. Make sure that the SIM card’s contacts are facing inwards and that the cut-off corner is pointing upwards. Take care not to scratch or bend the contacts on the SIM card.
2

English
Charging
Warning!
Only use batteries, charger and accessories that have been approved for use with this particular model. Connecting other accessories may be dangerous and may invalidate the phone’s type approval and guarantee.
When the battery is running low,  is displayed and a warning signal is heard. To charge the battery, connect the mains adapter to the wall socket and to the charging socket y.
 is displayed briefly when the charger is connected to the phone, and
  when it is disconnected. The battery charge indicator will be animated while charging.
Charge the battery for 3 hours the first time. After that, it takes approximately 3 hours to fully charge the battery.
 is displayed when charging is completed.
Note!
Full battery capacity will not be reached until the battery has been charged 3–4 times.
The ambient temperature must be in the range -10 °C to +55 °C when charging.
Batteries degrade over time, which means that call time and standby time will normally decrease with regular use.
3

English
Operation
Activating the phone
Press and hold 1to turn the phone on/off. The following messa-
ges may be displayed:
Insert SIM
SIM card missing or incorrectly inserted.
SIM card damaged or not valid.
If the SIM card is valid but protected with a PIN code (Personal Identification Number), PIN: is displayed. Enter the PIN code and press OK. Skip backwards with L.
Note!
If PIN and PUK codes were not provided with your SIM card, please contact your network operator.
Trials: # shows the number of PIN attempts left. When no more attempts remain, SIM blocked is displayed. The SIM card must now be unlocked with the PUK code (Personal Unblocking Key).
1.Enter the PUK code and confirm with OK.
2.Enter a new PIN code and confirm with OK.
Changing the language, time and date
If the operator supports automatic time/date setting, you might get a question upon installation if you want to update to the suggested time. Press Yes to accept or No to reject the suggested time.
On first use, the phone language, time and date must be set. The default language is determined by the SIM card. See Settings on how to change language, time and date.
4

English
Making a call
1.Enter the phone number. Skip backwards with L.
2.Press qto dial.
3.Press Lto end the call.
Note!
When making international calls, press * twice for the international prefix "+".
Making a call from the Phonebook
1.Press bto open the phonebook.
2.Use the arrow keys  /
/  to scroll through the phonebook, or quick search by pressing the key corresponding to the first letter of the entry, see Text input.
3.Press qto dial the selected entry, or press Lto return to standby mode.
Receiving a call
1.Press qto answer.
Alternately, press Lto reject the call directly.
2.Press Lto end the call.
Volume control
Use the side keys +/– to adjust the sound volume. The volume level is indicated on the display.
Call information
During a call, the called or calling phone number and the elapsed call time is displayed.
If the identity of the caller is withheld, Unknown is displayed.
5
|
English |
|
|
|
|
|
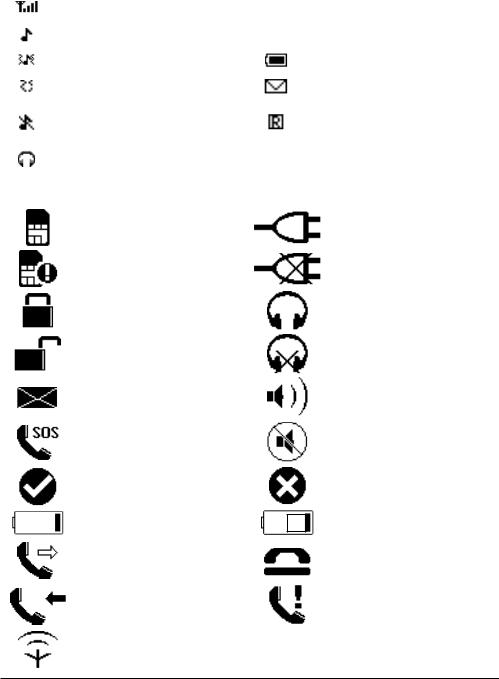
Display symbols |
|
|
|
|
Signal strength |
Missed call |
|
Ring only |
Keylock on |
|
Ring + vibration |
Battery level |
|
Vibration only |
New message |
|
Silent mode |
Roaming (connected to |
|
other network) |
||
|
Headset connected
SIM card missing |
|
Charger connected |
SIM card error |
|
Charger disconnected |
Keypad locked |
|
Headset connected |
Unlocking keypad |
|
Headset disconnected |
New SMS message |
|
Handsfree on |
SOS calls only |
|
Handsfree off |
OK (confirmed) |
|
Error |
Battery level low |
|
Charging (animated) |
|
||
|
||
Calling |
|
Call ended |
Incoming call |
|
Missed call |
Searching |
|
|
6
English
Additional functions
Handsfree mode (qkey)
Activates handsfree mode during a call, which allows you to speak without holding the phone.
Speak clearly into the microphone at a maximum distance of 1 meter (3 feet). Use the side keys +/– to adjust the loudspeaker volume.
Press qto return to normal mode.
Note!
The handsfree function allows only one person at a time to talk. Switching between talk/listen is triggered by the
sound of the person talking. Loud noises (music, etc.) in the background may interfere with the handsfree function.
Call log
Answered, missed, and outgoing calls are saved in a combined call log. 20 calls of each type can be stored in the log. For multiple calls related to the same number, only the most recent call is saved.
Retrieving and dialling
1.Press q.
2.Use the arrow keys  /
/  to scroll through the call list.
= Incoming call = Outgoing call = Missed call
3.Press qto show details for the selected call.
4.Press qto dial the number or press and hold wfor the following settings:
Delete |
Delete the call |
|
|
Delete all |
Delete all calls in the call log |
|
|
Save |
Save the number in the Phonebook |
|
|
7

English
Text input
Text is entered by pressing the numerical keys repeatedly to select characters.
Press the key repeatedly until the desired character is shown. Wait a few seconds before entering the next character.
Press * for a list of special characters. Select the desired character and press OK to enter it.
Use the arrow keys  /
/  to move the cursor within the text. Press # to cycle upper case, lower case and numerals.
ABC |
UPPER CASE |
abc |
lower case |
123 |
Numerals |
Speed dial
The keys A, B and C can be used for speed dialling.
Adding speed dial numbers
1.Enter the phone number.
2.Press and hold A.
3.Enter a name for the contact, see Text input. Delete with L.
4.Press OK. You can now speed-dial this entry by press and hold A.
5.Repeat to add speed dial entries for keys B and C.
If you need to change a number, store the new number in the same location as the old one.
8

English
Phonebook
The phonebook can store 50 entries.
Creating a phonebook entry
1.Press and hold w, scroll to  and press OK.
2.Select Add new and press OK.
3.Select Name and press OK.
4.Enter a name for the contact, see Text input. Delete with L.
5.Press OK.
6.Select Number and press OK.
7.Enter the phone number, then press OK.
8.Press Lone or more times to return to stand-by.
Managing phonebook entries
1.Press and hold w, scroll to  and press OK.
2.Select an entry and press and hold w.
3.Select one of the following options and press OK.
View
Will show details of contact. Press qto call the contact.
Edit
Edit the name/number. Skip backwards with L.
Delete
Press OK to delete the selected phonebook entry. Press OK to confirm or Lto abort.
Delete all
Select From SIM or From Phone and press OK to delete all phonebook entries from the SIM card or phone memory.
Enter the phone-/SIM code and press OK to confirm.
9

English
Key lock
Press and hold * to lock/unlock the keypad.
Incoming calls can be answered by pressing qeven if the keypad is locked. During the call, the keypad is unlocked. When the call is ended or rejected, the keypad is locked again.
See Settings for key lock options.
Note!
The emergency number 112 can be dialled without unlocking the keypad.
Silent mode
Silent mode is a fixed profile with SMS and ring signals disabled, while vibration and key tone settings are unchanged. Press and hold # to activate/deactivate Silent mode.
See also Settings/User profile (rings & tones).
Headset
When a headset is connected, the internal microphone in the phone is automatically disconnected.
When receiving a call you can use the answer key on the headset cable to answer and end calls.
Warning!
Using a headset at high volume can damage your hearing. Adjust the sound volume carefully when using a headset.
10

English
SOS calls
As long as the phone is switched on, it is always possible to place an emergency call by entering 112 followed by q.
Most – but not all – networks accept calls to 112 without a valid SIM card. Contact your network operator for more information.
Emergency Call key
To make an emergency call, press and hold the Emergency Call key on the back of the phone for 3 seconds, or press it two times within 1 second. The phone will send an emergency SMS text message to all numbers in the Emergency numbers list. The phone will then dial the first number on the list. If the call is not answered within 30 seconds, the next number is dialled. Dialling is repeated 3 times or until the call is answered, or until Lis pressed.
The Emergency Call function must be activated before use. See Settings on how to activate this function, enter Emergency Numbers, and edit the emergency SMS message.
Note!
Automatic calls to 112 is normally not allowed. Do not save this number in the list of numbers to be called automatically.
Some private security companies can accept automatic calls from their clients. Always contact the security company before programming in its number.
11

English
SMS messaging
Incoming messages
The phone can receive (but not send) SMS text messages.  is shown in the display when a message is received.
1.Press and hold w, scroll to  and press OK.
2.Select a message from the list and press OK. Use the arrow keys to scroll the message up/down.
3.Press qto dial the number or press and hold wfor the following settings:
Call sender
Call the selected number.
Delete
Press OK to delete the message, or Lto return to the menu.
Use number
Displays all phone numbers contained in the message as well as the number of the sender.
1.Use the arrow keys to select one of the displayed numbers.
2.Press and hold w,
3.Select one of the following options and press OK.
Dial |
Call the selected number |
|
|
Save |
Save the number in the phonebook |
|
|
12

English
Settings
Note!
The settings described in this chapter are carried out in standby mode.
Time and date
Setting the time and date
1.Press and hold w(on the side), scroll to  and press OK.
2.Select Time & date and press OK.
3.Select Set time and press OK.
4.Press OK. Enter the time (HH:MM), then press OK.
5.Select Set date and press OK.
6.Press OK. Enter the date (YYYY/MM/DD), then press OK.
7.Press Lone or more times to return to stand-by.
Setting the time format
1.Press and hold w, scroll to  and press OK.
2.Select Time & date and press OK.
3.Select Time Format and press OK.
4.Select 12 hours or 24 hours and press OK.
5.Press Lone or more times to return to stand-by.
Setting Auto time on/off
Select if time/date should automatically be detected from operator when power on the phone. Does only work with some operators.
1.Press and hold w, scroll to  and press OK.
2.Select Time & date and press OK.
3.Select Auto time and press OK.
4.Select On or Off and press OK.
5.Press Lone or more times to return to stand-by.
13

English
User setup
Tone setup
1.Press and hold w, scroll to  and press OK.
2.Select User setup and press OK.
3.Select Tone setup and press OK.
4.Select Ring tone and press OK.
5.Select one of the available tones, the tone will be played. Press OK to confirm, or press Lto discard changes.
6.Set up the SMS tone and Keypad tone in the same way.
7.Press Lone or more times to return to stand-by.
Tone volume
1.Press and hold w, scroll to  and press OK.
2.Select User setup and press OK.
3.Select Tone setup and press OK.
4.Select Volume and press OK.
5.Scroll up/down to change the ring volume, then press OK.
6.Press Lone or more times to return to stand-by.
Alert type (ring/vibrate)
Incoming calls can be signalled by a ring tone and/or vibration, or by display message only.
1.Press and hold w, scroll to  and press OK.
2.Select User setup and press OK.
3.Select Alert type and press OK.
4.Select the desired signalling mode and press OK.
5.Press Lone or more times to return to stand-by.
14

English
Changing the language
The default language for the phone menus, messages etc. is determined by the SIM card. You can change this to any other language supported by the phone.
1.Press and hold w, scroll to  and press OK.
2.Select User setup and press OK.
3.Select Language and press OK.
4.Scroll up/down to select a language, then press OK.
5.Press Lone or more times to return to stand-by.
SMS receive
You can disable SMS receive to simplify use of the phone.
1.Press and hold w, scroll to  and press OK.
2.Select SMS Receive and press OK.
3.Select On/Off and press OK.
15

English
Emergency
Settings for the Emergency Call key function.
See also Operation/Emergency call.
1. Press and hold w, scroll to |
and press OK. |
2. Select Emergency and press OK for the following settings:
Activation
Select one of the following options and press OK.
Off |
Emergency call key disabled. |
|
|
|
|
On |
Emergency Call key enabled. To activate, press and hold key |
|
for >3 seconds, or press 2 times within 1 second. |
||
|
||
|
|
|
On (3) |
Emergency Call key enabled. |
|
To activate, press key 3 times within 1 second. |
||
|
||
|
|
Message
The SMS text message to be sent when the Emergency Call key is pressed. Enter/edit text, then press OK to save.
Numbers list
Be careful about including numbers with automatic answering in the call list, as the alarm sequence stops once the call is answered.
The list of numbers that will be called when the Emergency Call ley is pressed.
To add a new emergency number, select <Empty> and press OK. Repeat until you have max. 5 emergency numbers.
See Phone book on how to add names/numbers.
To edit an existing entry, select it and press OK, then select Edit or Delete and press OK.
Alarm information
Please read this important safety information before enabling the Emergency Call function.
16
English
Security settings
1.Press and hold w, scroll to  and press OK.
2.Select Security and press OK.
SIM lock
The SIM card is protected with a PIN code (Personal Identification Number). The phone can be set to ask for the PIN code on startup.
Select On/Off and press OK to enable/disable SIM card lock.
Note!
You need to input the current PIN code to disable SIM lock.
Phone lock
Select On/Off and press OK to enable/disable the Phone lock.
Note!
You need to input the current Phone code to change this setting. The default Phone code is 1234.
Auto key lock
Select the time delay for automatic keypad locking and press OK to confirm.
Change Passwords (PIN/PIN2/Phone lock code)
1.Enter the current code and confirm with OK
2.Enter a new code and confirm with OK.
3.Enter the new code again and confirm with OK.
Reset
Resets the phone to the factory settings.
Input the phone lock password and press OK to reset.
17

English
Safety instructions
Warning!
The unit and the accessories can contain small parts. Keep all of the equipment out of the reach of small children.
Operating environment
Follow the rules and laws that apply wherever you are, and always turn off the unit whenever its use is prohibited or can cause interference or hazards. Only use the unit in its normal user position.
This unit complies with guidelines for radiation when it is used either in a normal position against your ear, or when it is at least 2.2 cm from your body. If the unit is carried close to your body in a case, belt holder or other holder, these holders should not contain any metal, and the product should be placed at the distance from your body specified above. Make sure that the distance instructions above are followed until the transfer is complete.
Parts of the unit are magnetic. The unit can attract metal objects. Do not keep credit cards or other magnetic media near the unit. There is a risk that information stored on them can be erased.
Medical units
The use of equipment that transmits radio signals, for example, mobile phones, can interfere with insufficiently protected medical equipment.
Consult a doctor or the manufacturer of the equipment to determine if it has adequate protection against external radio signals, or if you have any questions. If notices have been put up at health care facilities instructing you to turn off the unit while you are there, you should comply. Hospitals and other health care facilities sometimes use equipment that can be sensitive to external radio signals.
18

English
Pacemakers
The Health Industry Manufacturers Association recommends that a minimum separation of 15 cm be maintained between a handheld wireless phone and a pacemaker to avoid potential interference with the pacemaker. Persons with pacemakers:
•Should always keep the phone more than 15 cm from their pacemaker when the phone is turned on
•Should not carry the phone in a breast pocket
•Should use the ear opposite the pacemaker to minimize the potential for interference
If you have any reason to suspect that interference is taking place, turn the phone off immediately.
Areas with explosion risk
Always turn off the unit when you are in an area where there is a risk of explosion. Follow all signs and instructions. There is a risk of explosion in places that include areas where you are normally requested to turn off your car engine. In these areas, sparks can cause explosion or fire which can lead to personal injury or even death.
Turn off the unit at filling stations, and any other place that has fuel pumps and auto repair facilities.
Follow the restrictions that apply to the use of radio equipment near places where fuel is stored and sold, chemical factories and places where blasting is in progress.
Areas with risk for explosion are often – but not always – clearly marked. This also applies to below decks on ships; the transport or storage of chemicals; vehicles that use liquid fuel (such as propane or butane); areas where the air contains chemicals or particles, such as grain, dust or metal powder.
19

English
Emergency calls
Important!
Mobile phones use radio signals, the mobile phone network, the terrestrial network and user-programmed functions. This means that connection cannot be guaranteed in all circumstances. Therefore, never rely only on a mobile phone for very important calls such as medical emergencies.
Hearing aids
This device should work with most hearing aid equipment in the market. However, full compatibility with all equipment can not be promised.
Vehicles
Radio signals can affect electronic systems in motor vehicles (for example, electronic fuel injection, ABS brakes, automatic cruise control, air bag systems) that have been incorrectly installed or are inadequately protected. Contact the manufacturer or its representative for more information about your vehicle or any additional equipment.
Do not keep or transport flammable liquids, gases or explosives together with the unit or its accessories. For vehicles equipped with air bags:
Remember that air bags fill with air with considerable force.
Do not place objects, including fixed or portable radio equipment in the area above the airbag or the area where it might expand. Serious injuries may be caused if the mobile phone equipment is incorrectly installed and the airbag fills with air.
It is prohibited to use the unit in flight. Turn off the unit before you board a plane. Using wireless telecom units inside a plane can pose risks to air safety and interfere with telecommunications. It may also be illegal.
Specific Absorption Rate (SAR)
This device meets applicable international safety requirements for exposure to radio waves.
Doro PhoneEasy 338gsm measures 0.521 W/kg (GSM 900MHz) / 0.159 W/kg (DCS 1800MHz) measured over 10 g tissue. The maximum limit according to WHO is 2.0 W/kg measured over 10 g tissue.
20

English
Troubleshooting
Phone cannot be switched on
Battery charge low |
Connect the power adapter and |
|
charge the battery for 12 hours. |
|
|
Battery incorrectly installed |
Check the installation of the |
|
battery. |
|
|
Failure to charge the battery
Battery or charger damaged |
Check the battery and charger. |
|
|
Battery recharged in temperatures |
Improve the charging environment. |
< 10°C or > 55°C |
|
|
|
Charger incorrectly connected to |
Check the charger connections. |
phone or power socket |
|
|
|
Standby time decreases
Battery charge capacity too low |
Install a new battery. |
|
|
Too far from base station, phone is |
Searching the network consumes |
constantly searching for signal |
battery power. Find a place with a |
|
stronger signal, or temporarily turn |
|
off the phone. |
|
|
PIN code not accepted
Wrong PIN code entered too many |
Enter the PUK code to change the |
times |
PIN code, or contact the network |
|
operator. |
|
|
21

English |
|
|
|
|
|
SIM card error |
|
|
|
SIM card damaged |
Check the condition of the SIM |
|
card. If it is damaged, contact the |
|
network operator. |
|
|
SIM card incorrectly installed |
Check the installation of the SIM |
|
card. Remove the card and reinstall |
|
it. |
|
|
SIM card dirty or damp |
Wipe the contact surfaces of the |
|
SIM card with a clean cloth. |
|
|
|
|
Failure to connect to network |
|
|
|
SIM card invalid |
Contact the network operator. |
|
|
No coverage of GSM service |
Contact the network operator. |
|
|
Signal too weak |
See Weak signal below. |
|
|
|
|
Weak signal |
|
|
|
Too far from base station |
Try again from another location. |
|
|
Network congestion |
Try calling at a later time. |
|
|
|
|
Echo or noise |
|
|
|
Regional problem from bad network |
Hang up and redial. This may |
relay |
switch to another network relay. |
|
|
|
|
Failure to add a contact |
|
|
|
Phonebook memory full |
Delete contacts to free up memory. |
|
|
|
|
Failure to set a function |
|
|
|
Function not supported or |
Contact the network operator. |
subscribed from network |
|
|
|
22

English
Care and maintenance
Your unit is a technically advanced product and should be treated with the greatest care. Negligence may void the warranty.
•Protect the unit from moisture. Rain/snowfall, moisture and all types of liquid can contain substances that corrode the electronic circuits. If the unit gets wet, you should remove the battery and allow the unit to dry completely before you replace it.
•Do not use or keep the unit in dusty, dirty environments. The unit’s moving parts and electronic components can be damaged.
•Do not keep the unit in warm places. High temperatures can reduce the lifespan for electronic equipment, damage batteries and distort or melt certain plastics.
•Do not keep the unit in cold places. When the unit warms up to normal temperature, condensation can form on the inside which can damage the electronic circuits.
•Do not try to open the unit in any other way than that which is indicated here.
•Do not drop the unit. Do not knock or shake it either. If it is treated roughly the circuits and precision mechanics can be broken.
•Do not use strong chemicals to clean the unit.
The advice above applies to the unit, battery, mains adapter and other accessories. If the phone is not working as it should, please contact the place of purchase for service. Don’t forget the receipt or a copy of the invoice.
23

English
Warranty and technical data
This product is guaranteed for a period of 24 months from the date of purchase. In the unlikely event of a fault occurring during this period, please contact the place of purchase. Proof of purchase is required for any service or support needed during the guarantee period.
This guarantee will not apply to a fault caused by an accident or a similar incident or damage, liquid ingress, negligence, abnormal usage, nonmaintenance or any other circumstances on the user’s part. Furthermore, this guarantee will not apply to any fault caused by a thunderstorm or any other voltage fluctuations. As a matter of precaution, we recommend disconnecting the charger during a thunderstorm.
Batteries are consumables and are not included in any guarantee.
This guarantee does not apply if batteries other than DORO original batteries are used.
Specifications
Network: |
GSM 900/DCS1800/PCS1900 Triple Band |
Dimensions: |
125 mm x 52 mm x 16 mm |
Weight: |
95 g (including battery) |
Battery: |
3.7V/850 mAh Li-ion battery |
Declaration of Conformity
Doro hereby declares that Doro PhoneEasy 338gsm conforms to the essential requirements and other relevant regulations contained in the Directives 1999/5/EC (R&TTE) and 2002/95/EC (RoHS).
A copy of the Declaration of Conformity is available at www.doro.com/dofc
© 2009 Doro AB. All rights reserved.
24

Svenska
Innehåll
Installation . . . . . . . . . . . . . . . . . . . . . . . . . . . . . . . . . . . . 2
Sätta i SIM-kortet och batteriet . . . . . . . . . . . . . . . . . . . . 2 Ladda batteriet . . . . . . . . . . . . . . . . . . . . . . . . . . . . . . . . 3
Använda telefonen . . . . . . . . . . . . . . . . . . . . . . . . . . . . . . . 4
Aktivera telefonen . . . . . . . . . . . . . . . . . . . . . . . . . . . . . . 4 Ringa ett samtal . . . . . . . . . . . . . . . . . . . . . . . . . . . . . . . 5 Ringa ett samtal med hjälp av Telefonboken . . . . . . . . . . . 5 Ta emot ett samtal . . . . . . . . . . . . . . . . . . . . . . . . . . . . . 5 Volymkontroll . . . . . . . . . . . . . . . . . . . . . . . . . . . . . . . . . 5 Samtalsinformation . . . . . . . . . . . . . . . . . . . . . . . . . . . . 5
Displaysymboler . . . . . . . . . . . . . . . . . . . . . . . . . . . . . . . . . 6 Övriga funktioner . . . . . . . . . . . . . . . . . . . . . . . . . . . . . . . . 7
Högtalarfunktion (qknapp) . . . . . . . . . . . . . . . . . . . . . 7 Samtalslista . . . . . . . . . . . . . . . . . . . . . . . . . . . . . . . . . . 7 Skriva in text . . . . . . . . . . . . . . . . . . . . . . . . . . . . . . . . . 8 Snabbval . . . . . . . . . . . . . . . . . . . . . . . . . . . . . . . . . . . . 8 Telefonbok . . . . . . . . . . . . . . . . . . . . . . . . . . . . . . . . . . . 9 Knapplås . . . . . . . . . . . . . . . . . . . . . . . . . . . . . . . . . . . 10 Tyst läge. . . . . . . . . . . . . . . . . . . . . . . . . . . . . . . . . . . . 10 Headset . . . . . . . . . . . . . . . . . . . . . . . . . . . . . . . . . . . . 10 SOS-samtal . . . . . . . . . . . . . . . . . . . . . . . . . . . . . . . . . 11 Knapp för nödsamtal . . . . . . . . . . . . . . . . . . . . . . . . . . . 11
SMS . . . . . . . . . . . . . . . . . . . . . . . . . . . . . . . . . . . . . . . . 12
SMS-meddelanden . . . . . . . . . . . . . . . . . . . . . . . . . . . . 12
Inställningar . . . . . . . . . . . . . . . . . . . . . . . . . . . . . . . . . . 13
Datum & tid . . . . . . . . . . . . . . . . . . . . . . . . . . . . . . . . . 13 Användarinställningar . . . . . . . . . . . . . . . . . . . . . . . . . . 14 Ta emot SMS . . . . . . . . . . . . . . . . . . . . . . . . . . . . . . . . 16 Nödsamtal . . . . . . . . . . . . . . . . . . . . . . . . . . . . . . . . . . 16 Säkerhet . . . . . . . . . . . . . . . . . . . . . . . . . . . . . . . . . . . 18
Säkerhetsinstruktioner . . . . . . . . . . . . . . . . . . . . . . . . . . . 19 Felsökning . . . . . . . . . . . . . . . . . . . . . . . . . . . . . . . . . . . . 22 Skötsel och underhåll . . . . . . . . . . . . . . . . . . . . . . . . . . . . 24 Garanti och tekniska data . . . . . . . . . . . . . . . . . . . . . . . . . 25
1
Svenska
Installation
Varning!
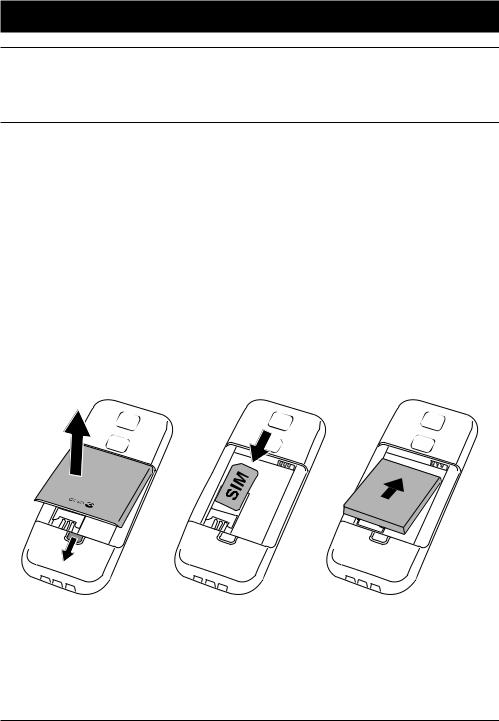
Stäng av telefonen och koppla ur laddaren innan du tar bort batteriluckan.
Sätta i SIM-kortet och batteriet
Hållaren för SIM-kortet finns bakom batteriet.
1.Ta bort batteriet om det redan är isatt.
2.Sätt i SIM-kortet genom att försiktigt skjuta in det i hållaren. Se till så att kontakterna på SIM-kortet är vända inåt och att det avklippta hörnet pekar uppåt. Var försiktig så att du inte skrapar eller böjer kontakterna på SIM-kortet.
3.Sätt i batteriet genom att skjuta in det i batterifacket med kontakterna vända uppåt åt höger.
4.Sätt tillbaka batterilocket.
2
Loading...