


 Loading...
Version 1.00 | 06/13/2018
User Manual
PowerLine AV2 1000 Wi-Fi AC1200 Starter Kit
DHP-W611AV (DHP-P600AV & DHP-W610AV)

Preface
D-Link reserves the right to revise this publication and to make changes in the content hereof without obligation to notify any person or organization
of such revisions or changes.
Manual Revisions
Revision |
Date |
Description |
1.00 |
14 June, 2018 |
• Initial release |
|
|
|
|
|
Trademarks |
D-Link and the D-Link logo are trademarks or registered trademarks of D-Link Corporation or its subsidiaries in the United States or other countries. All other company or product names mentioned herein are trademarks or registered trademarks of their respective companies.
Copyright © 2018 by D-Link Corporation, Inc. All rights reserved. This publication may not be reproduced, in whole or in part, without prior expressed written permission from D-Link Corporation, Inc.
Power Usage
This device is an Energy Related Product (ErP) with High Network Availability (HiNA), and automatically switches to a power-saving Network Standby mode within 1 minute of no packets being transmitted. It can also be turned off through a power switch to save energy when it is not needed.
DHP-W610AV:
Network Standby: 6.15 watts Switched Off: 0.1 watts
This device is an Energy Related Product (ErP) with High Network Availability (HiNA), and automatically switches to a power-saving Network Standby mode within 1 minute of no packets being transmitted. If it is not needed during certain periods of time, it can be unplugged to save energy.
DHP-P600AV:
Network Standby: 2.23 watts
D-Link DHP-W611AV User Manual |
i |

Table of Contents
Table of Contents
Preface.................................................................................................. |
i |
Manual Revisions............................................................................................... |
i |
Trademarks........................................................................................................... |
i |
Power Usage........................................................................................................ |
i |
Product Overview.............................................................................. |
1 |
Package Contents............................................................................................ |
1 |
System Requirements.................................................................................... |
2 |
Introduction....................................................................................................... |
3 |
Features............................................................................................................... |
4 |
DHP-W610AV............................................................................................ |
5 |
Connections........................................................................................ |
5 |
LEDs....................................................................................................... |
6 |
DHP-P600AV............................................................................................. |
7 |
Connections........................................................................................ |
7 |
LEDs....................................................................................................... |
8 |
Hardware Installation........................................................................ |
9 |
Wireless Installation Considerations....................................................... |
10 |
Powerline Installation Considerations.................................................... |
11 |
Important Safety Notes............................................................................... |
12 |
DHP-W610AV Configuration........................................................... |
13 |
Setup.................................................................................................................. |
13 |
Setup Wizard.......................................................................................... |
14 |
Wireless Settings................................................................................... |
15 |
Network Settings.................................................................................. |
16 |
LAN Settings - Static IP.................................................................. |
17 |
PLC Settings ........................................................................................... |
18 |
Advanced.......................................................................................................... |
19 |
MAC Address Filter............................................................................... |
19 |
Advanced Wireless............................................................................... |
20 |
User Limit................................................................................................. |
21 |
Tools.................................................................................................................... |
22 |
Admin....................................................................................................... |
22 |
System...................................................................................................... |
23 |
Firmware.................................................................................................. |
24 |
Time........................................................................................................... |
25 |
System Check......................................................................................... |
26 |
Status.................................................................................................................. |
27 |
Device Info.............................................................................................. |
27 |
Logs........................................................................................................... |
28 |
Statistics................................................................................................... |
29 |
Wireless.................................................................................................... |
30 |
IPv6............................................................................................................ |
31 |
Help..................................................................................................................... |
32 |
Connecting to a Wireless Network.................................................. |
33 |
Using Mac OS.................................................................................................. |
33 |
Using Windows® 10 ....................................................................................... |
35 |
Using Windows® 8.......................................................................................... |
37 |
Using Windows® 7.......................................................................................... |
41 |
Using Windows Vista® .................................................................................. |
43 |
Configuring Wireless Security.......................................................... |
45 |
D-Link DHP-W611AV User Manual |
ii |

Table of Contents |
|
Troubleshooting............................................................................... |
47 |
Wireless Basics ................................................................................. |
49 |
What is Wireless?............................................................................................ |
49 |
How does wireless work?................................................................... |
49 |
Wireless Local Area Network (WLAN)............................................ |
49 |
Wireless Security.............................................................................. |
52 |
What is WPA?................................................................................................... |
52 |
Configuring WPA/WPA2 Personal............................................................ |
53 |
Technical Specifications................................................................... |
54 |
(DHP-W610AV)................................................................................................ |
54 |
(DHP-P600AV)................................................................................................. |
56 |
Regulatory Information................................................................... |
57 |
(DHP-W610AV)................................................................................................ |
57 |
(DHP-P600AV)................................................................................................. |
66 |
D-Link DHP-W611AV User Manual |
iii |

Section 1 - Product Overview
Product Overview
Package Contents
|
|
|
|
|
|
D-Link DHP-W610AV PowerLine AV2 1000 Wi-Fi AC1200 Adapter |
|
|
|
|
|
|
D-Link DHP-P600AV PowerLine AV2 1000 Gigabit Passthrough Adapter |
|
|
|
|
|
|
CAT5 Ethernet Cable (x2) |
|
Wi-Fi Configuration Note |
|
Wi-Fi Configuration Card |
|||
|
|
|
|
|
|
Quick Installation Guide |
|
|
|
|
|
|
|
|
|
|
|
|
|
|
|
|
|
|
|
|
|
|
|
|
|
|
|
|
|
|
|
|
|
|
|
D-Link DHP-W611AV User Manual |
1 |

Section 1 - Product Overview
System Requirements
• An Ethernet broadband connection Network Requirements • 10/100/1000 Ethernet clients OR
• 802.11ac/n/g/a wireless clients
• Internet Explorer 7.0 or higher
Browser Requirements • Firefox 3.5 or higher
• Safari 4.0 or higher
• Chrome 8.0 or higher
D-Link DHP-W611AV User Manual |
2 |

Section 1 - Product Overview
Introduction
The DHP-W610AV allows you to connect both wired and wireless computers, high-definition TVs, networking devices, and gaming consoles using the most pervasive medium in your home - the electrical wiring. Share Internet connections and experience smooth file transfers, streaming multimedia, online gaming, and more. The DHP-W611AV is a complete solution that consists of the DHP-W610AV PowerLine AV2 1000 Wi-Fi AC1200 Adapter and the DHP-P600AV PowerLine AV2 1000 Gigabit Passthrough Adapter, giving you everything you need to create a high-speed Powerline network in your home. Simply plug the devices into your home’s electrical outlets and you’ll be able to use your existing wiring to expand your Internet access and wireless network.
The PowerLine AV2 1000 Wi-Fi AC1200 Adapter incorporates the latest technology to improve on AV data speeds over a home’s existing electrical wiring. This faster transmission speed provides ample bandwidth suitable for streaming HD video while simultaneously providing high-speed Internet access throughout the home. With Quality of Service (QoS) support, you can prioritize and allocate bandwidth based on media type. This feature ensures that applications that require real-time communication (such as VoIP calling and online gaming) stay uninterrupted even while streaming Internet TV and music.
A D-Link exclusive, the Clone My Wi-Fi feature lets you quickly and easily set up your Powerline devices in your existing network if you are using a compatible router. Simply choose the Clone My Wi-Fi option in the setup wizard and the extender will automatically copy your current network settings to your new Powerline devices. Gigabit Ethernet and Wireless AC provide high speed data transfers so you can enjoy speedy performance no matter how you are connected. Plug and Play completes the package, so you can expand your home network and share your Internet connection with other devices at the touch of a button.
D-Link DHP-W611AV User Manual |
3 |

Section 1 - Product Overview
Features
Data Transmission Over Electrical Wiring
The D-Link DHP-W610AV PowerLine AV2 1000 Wi-Fi AC1200 Adapter, compliant with the HomePlug AV2 standard, uses your home’s existing electrical wiring1 to create or extend your network. It turns every power outlet into a potential network connection to access digital media devices, game consoles, print servers, computers, and network storage devices throughout your home. Additionally, Wireless AC provides high speed transfers without the need for unsightly network cables.
Faster Wireless Speeds & Wider Operational Range
The Wireless AC technology incorporated into the DHP-W610AV offers increased speed and range beyond standard 802.11n technology. Initial wireless setup can be accomplished quickly, thanks to a convenient setup wizard. WPA/WPA2 encryption keeps your network traffic safe and secure.
Ideal For Bandwidth-Intensive Applications
The DHP-W610AV is capable of delivering Powerline AV data transfer rates even higher than the old AV standard.This rapid transmission speed makes it ideal for bandwidth-intensive applications, guaranteeing smooth HD video streaming, clear VoIP calls, and lag-free online gaming experiences. In addition, it prioritizes Internet traffic, ensuring that multimedia applications do not experience glitches while web surfing and downloads are in progress. This device provides ample network bandwidth, enabling digital home consumers to tap into existing electrical wiring for high-quality multimedia streaming.
Convenient Setup and Secure Operation
The DHP-W611AV devices plug directly into a power outlet, and do not require any additional power cables. Extend your home network by connecting multiple devices in the farthest corners of your home via Ethernet cable or Wireless AC. For convenient setup, wired or wireless encryption keys can be quickly configured with the push of a button on top of the device. The adapter implements 128 bit AES data encryption to protect the network from unauthorized wiretapping. With hassle-free plug and play installation, the DHP-W611AV is an ideal solution to create a wall-to-wall home network.
1Power outlets and electrical wiring must all be part of the same electrical circuit. Certain electrical conditions in your home, such as wiring condition and configuration, may affect the performance of this product. Additional D-Link PowerLine AV adapters are required to add new devices to the network. A minimum of two D-Link PowerLine AV Network Adapters are required to create a network. Connecting this product to a power strip with a surge protector may adversely affect the performance of this product. For best results, plug the adapter directly into a wall outlet.
D-Link DHP-W611AV User Manual |
4 |
Section 1 - Product Overview
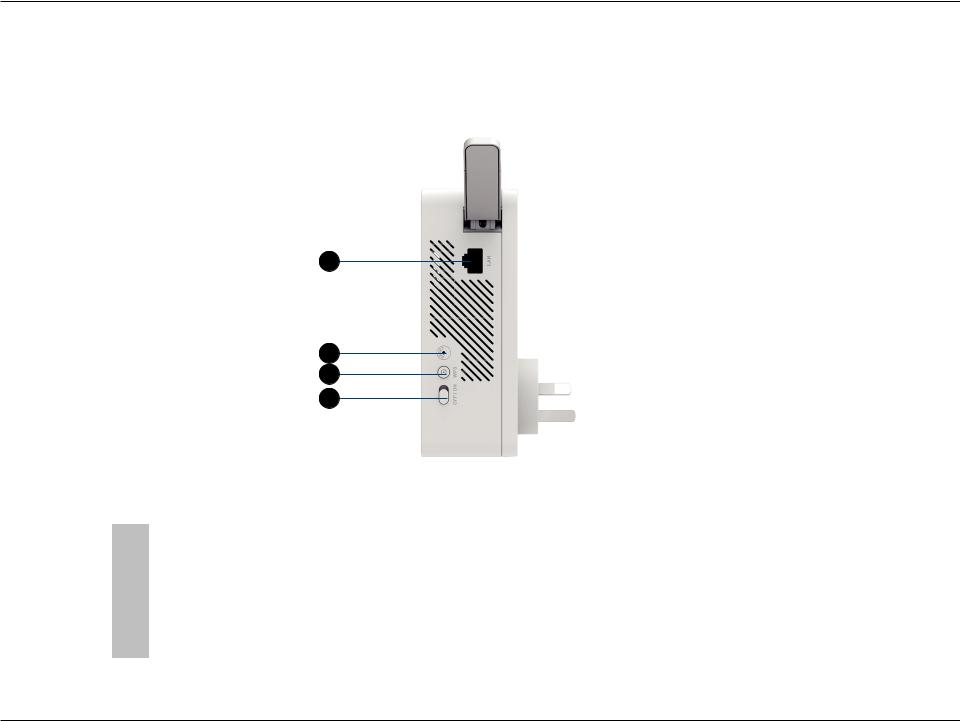
Hardware Overview
DHP-W610AV
Connections
1
2
3
4
1 |
RJ-45 10/100BASE-TX Ethernet Port |
Connects to Digital Media Devices, PCs, Game Consoles, Network Storage Devices |
|
|
|
|
|
2 |
Reset Button |
Press and hold the button for 5 seconds to reset to factory defaults. |
|
|
|
|
|
|
|
Push this button to create a secure Powerline connection with another adapter. For |
|
3 |
Simple Connect/WPS Button |
more details on how to do this, go to Hardware Installation on page 9. It can also be |
|
used to connect using Wi-Fi Protected Setup (WPS). To connect using WPS, press this |
|||
|
|
||
|
|
button, then press the WPS button on your wireless client. |
|
4 |
On/Off Switch |
Slide this switch to power on or off the device. |
|
|
|
|
D-Link DHP-W611AV User Manual |
5 |
Section 1 - Product Overview
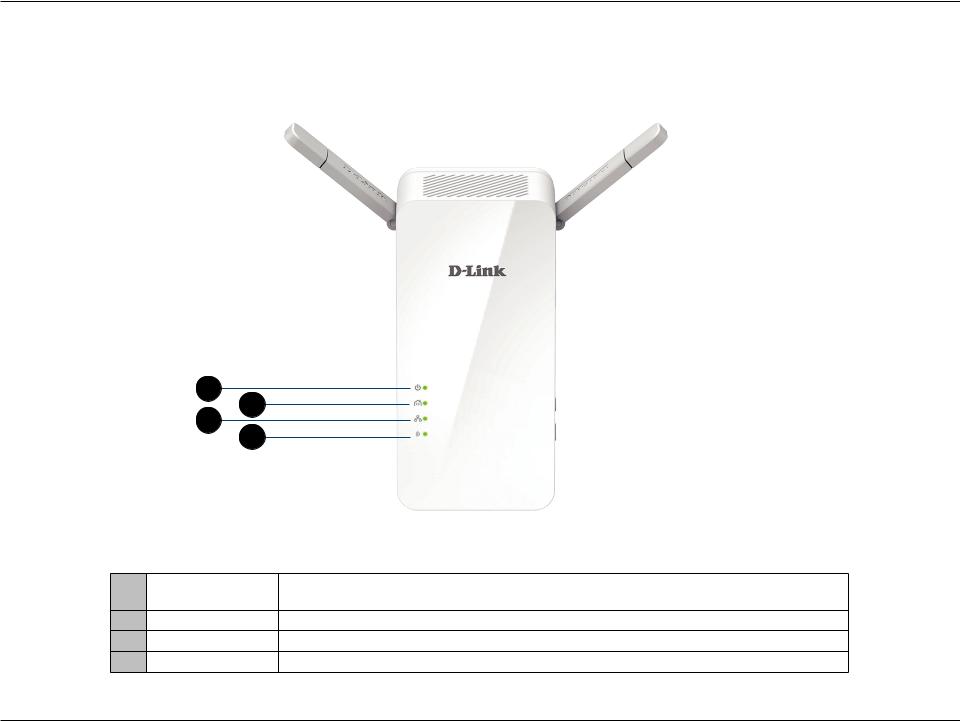
Hardware Overview
LEDs
1
3
2
4
1 |
Power LED |
A solid light indicates a proper connection to the power supply. A blinking light indicates it is in sleep |
|
mode or seeking a Powerline connection. |
|||
|
|
2Powerline LED A solid light indicates that a Powerline connection is established.
3Ethernet LED A solid light indicates a connection to an Ethernet-enabled device.
4Wireless LED A solid light indicates that the wireless network is ready.
D-Link DHP-W611AV User Manual |
6 |
Section 1 - Product Overview
Hardware Overview
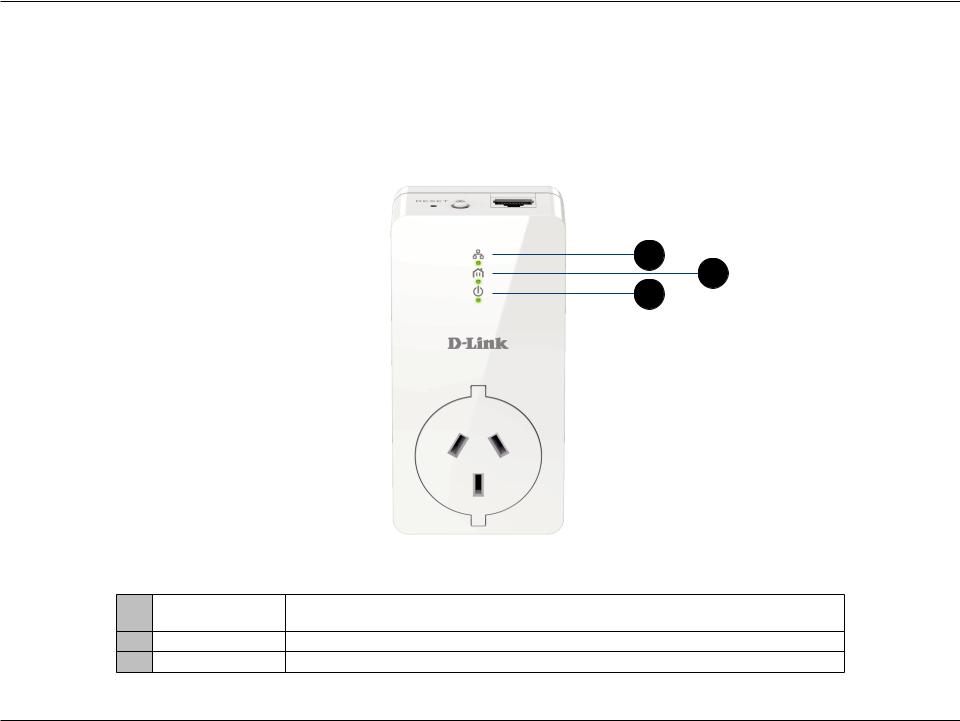
DHP-P600AV
Connections
1
2
1 |
RJ-45 10/100BASE-TX Ethernet Port |
Connects to digital media devices, PCs, game consoles, network storage devices. |
|
|
|
|
|
2 |
Simple Connect Button |
Press this button for 3-5 seconds to set up a Powerline network or press it for 10 |
|
seconds to perform a factory reset. |
|||
|
|
||
|
|
|
D-Link DHP-W611AV User Manual |
7 |
Section 1 - Product Overview
Hardware Overview
DHP-P600AV
LEDs
3
1
2
1 |
Power LED |
A solid light indicates a proper connection to the power supply. A blinking light indicates it is in sleep |
|
mode (after 5 minutes of inactivity) or seeking a Powerline connection. |
|||
|
|
2Powerline LED A solid light indicates that a Powerline connection is established.
3Ethernet LED A solid light indicates a connection to an Ethernet-enabled device.
D-Link DHP-W611AV User Manual |
8 |
Section 2 - Installation
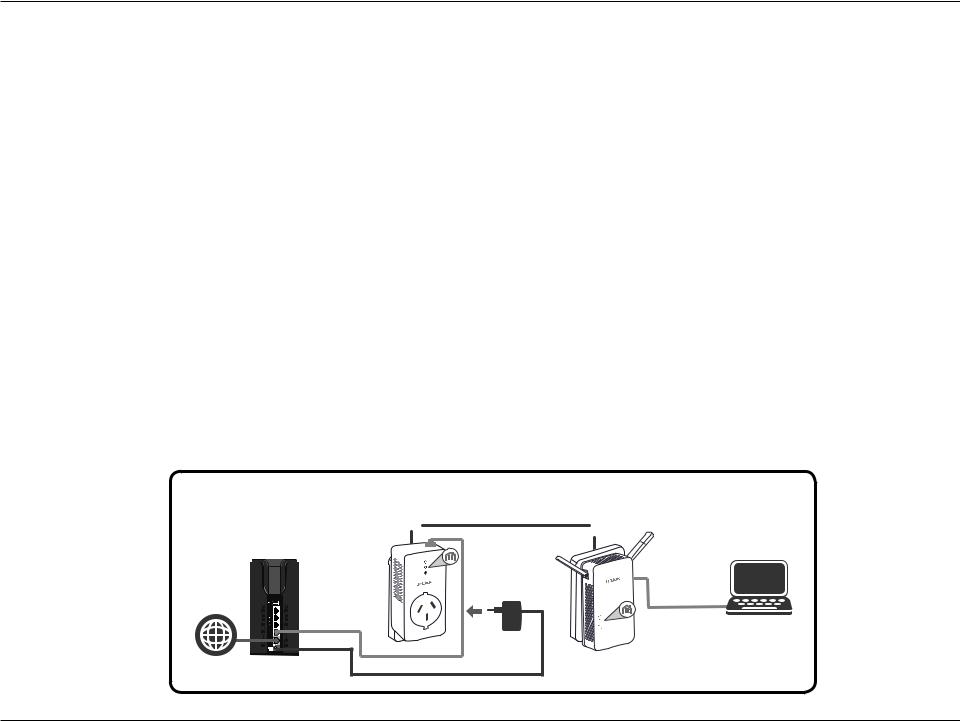
Hardware Installation
Power
Plug the DHP-P600AV into a wall outlet near your router. Fully extend the antennas and plug the DHP-W610AV into a wall outlet where you want to extend your network. Slide the power switch on the side of the device to the ON position. The Power LED will light to indicate the devices are receiving power.
Connect the Devices
Press the Simple Connect Button on the DHP-P600AV for 3 seconds. Then, press the Simple Connect Button on the DHP-W610AV for 3 seconds. This must be done within two minutes after pressing the Simple Connect Button on the DHP-P600AV.
Note: Network connectivity is confirmed when the Powerline LEDs on both Powerline devices are steadily lit. This will indicate that your network is now secure.
Plug in the Ethernet Cable
You should already own a router connected to a modem. Connect one of the supplied Ethernet cables between your router and the DHP-P600AV. Connect the other Ethernet cable between your DHP-W610AV and your computer. Read the guidelines on the following pages, and continue to
DHP-W610AV Configuration on page 13.
Adding More Devices (optional)
If you have more Powerline devices now or in the future, you may add them to your network in the same way as above. Be sure to press the Simple Connect Button on the new device, then the Simple Connect Button on the existing network.
ROOM A |
ROOM B |
DHP-P600AV |
DHP-W610AV |
PC
Internet Router
D-Link DHP-W611AV User Manual |
9 |

Section 2 - Installation
Wireless Installation Considerations
The DHP-W610AV lets you access your network using a wireless connection from anywhere within the operating range of your wireless network. Keep in mind that the number, thickness and location of walls, ceilings, or other objects that the wireless signals must pass through may limit the range. Typical ranges vary depending on the types of materials and background RF (radio frequency) noise in your home or business. The key to maximizing wireless range is to follow these basic guidelines:
1.Keep the number of walls and ceilings between the DHP-W610AV and other network devices to a minimum. Each wall or ceiling can reduce your adapter’s range by 3-90 feet (1-30 meters.) Position your devices so that the number of walls or ceilings is minimized.
2.Be aware of the direct line between network devices. A wall that is 1.5 feet thick (.5 meters) at a 45-degree angle appears to be almost 3 feet (1 meter) thick. At a 2-degree angle it looks over 42 feet (14 meters) thick! Position devices so that the signal will travel straight through a wall or ceiling (instead of at an angle) for better reception.
3.Building materials make a difference. A solid metal door or aluminum studs may have a negative effect on range. Try to position the wireless DHP-W610AV and computers so that the signal passes through drywall or open doorways. Materials and objects such as glass, steel, metal, walls with insulation, water (fish tanks), mirrors, file cabinets, brick, and concrete will degrade your wireless signal.
4.Keep your product away (at least 3-6 feet or 1-2 meters) from electrical devices or appliances that generate RF noise.
5.If you are using 2.4 GHz cordless phones or wireless products such as ceiling fans, lights, and home security systems, your wireless connection may degrade dramatically or drop completely. Make sure your 2.4 GHz phone base is as far away from your wireless devices as possible. The base transmits a signal even if the phone is not in use.
D-Link DHP-W611AV User Manual |
10 |

Section 2 - Installation
Powerline Installation Considerations
Plan the location of your Powerline devices:
1.Connect Powerline devices to electrical outlets that are not controlled by a wall switch to avoid accidentally turning off power to the device.
2.Do not connect the Powerline devices to an extension cord, surge protector, or power strip as this might prevent it from working correctly, or negatively impact network performance.
3. Avoid using the Powerline devices in an electrical outlet that is located near an appliance that uses a lot of power, such as a washer or dryer, or a refrigerator. This may prevent the adapter from working correctly, or negatively impact network performance.
4. Verify that your Powerline devices are electrically rated to operate with the power available in your location.
5. To help prevent against electrical shock, be sure to plug the power cables into properly grounded electrical outlets.
6.The Powerline device is designed to help ensure proper grounding. Do not use adapter plugs or remove the grounding prong from the device.
D-Link DHP-W611AV User Manual |
11 |

Section 2 - Installation
Important Safety Notes
Please read all of the safety and operating instructions before using your device:
1.Do not open the device or attempt to repair or service the device.
2.Ensure that the device is plugged into the wall in a vertical position.
3.Use the device in a dry location, and avoid placing it in humid environments.
4.Do not submerge the device in liquid or attempt to clean it with liquids or solvents. To clean the device, disconnect it from the power outlet and use a damp towel.
5.Keep the device out of direct sunlight.
6.Do not cover or block the vents on the device.
7.Make sure that the device has adequate room for ventilation.
8.Avoid placing the device near a heater or radiator.
D-Link DHP-W611AV User Manual |
12 |

Section 3 - Configuration
DHP-W610AV Configuration
Setup
This section covers configuration of your DHP-W610AV PowerLine AV2 1000 Wi-Fi AC1200 Adapter. The DHP-P600AV PowerLine AV2 1000 Gigabit Passthrough Adapter does not require configuration other than the initial Powerline connection.
If you wish to change the default settings or optimize the performance of the
DHP-W610AV, you may use the web-based configuration utility.
To access the configuration utility, open a web browser such as Internet Explorer and enter either http://dlinkapWXYZ.local. (this is on the Wi-Fi Configuration Card) or http://dlinkapWXYZ in the address field.
By default, Admin will be the User Name. Leave the password blank to log in.
If you receive a“Page Cannot be Displayed”error, please refer to Troubleshooting on page 47 for assistance.
You will automatically proceed to the Setup heading after logging in.
D-Link DHP-W611AV User Manual |
13 |

Section 3 - Configuration
Setup Wizard
Use the wizard’s on-screen instructions to conveniently set up your network if you have not done so already. You can also manually configure your network by going to Settings from the main page. Wi-Fi settings are covered in Wireless Settings on page 15 and Powerline settings are under
PLC Settings on page 18.
D-Link DHP-W611AV User Manual |
14 |

Section 3 - Configuration
Wireless Settings
The DHP-W610AV lets you customize your wireless settings for your access point. This device allows you to extend your current network so you can roam about the house while staying connected to the Internet. The following settings apply to both 2.4G and 5G modes.
WiFi Security You can choose to use WPA/WPA2 encryption or copy the Mode: settings from your current router if you have a router that
supports Clone My Wi-Fi.
Wi-Fi Network The Service Set Identifier (SSID) is the name of your wireless Name: network. Create a name using up to 32 characters. The SSID
is case-sensitive.
Enable Auto The auto channel selection setting can be selected to allow Channel Scan: this device to choose the channel with the least amount of
interference.
Wireless Channel: By default the channel is set to 1.The channel can be changed to match the channel setting for an existing wireless network or to customize the wireless network. If you enable Auto Channel Scan, this option will be greyed out.
WPA/WPA2 Use of TKIP/AES security framework provides the optimum Network Key: mix of security and compatibility. Choose a password that is strong. A good password uses both letters and numbers in unpredictable places. Example bad passwords could be
password or 12345678.
Click Save Settings for the changes to take effect.
D-Link DHP-W611AV User Manual |
15 |
Section 3 - Configuration
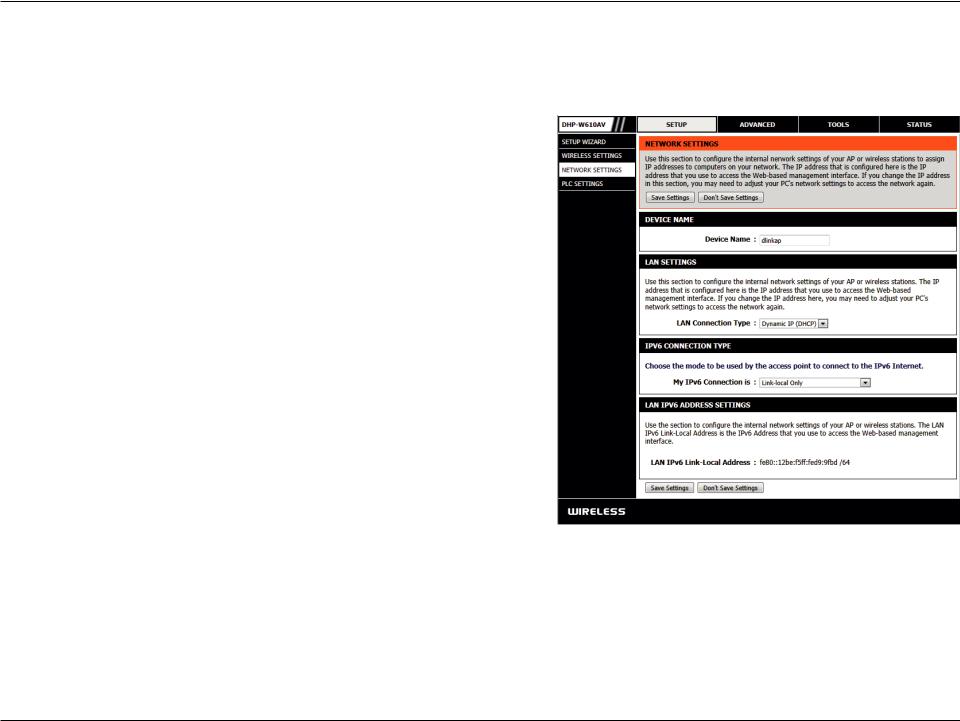
Network Settings
This section will allow you to change the local network settings of the DHP-W610AV and to configure the DHCP settings.
Device Name: You can customize the Device Name of your DHP-W610AV.
You will use this name to connect to it through a web browser.
The default name is listed on your Wi-Fi Configuration Card.
LAN Connection Use the drop-down menu to select Static IP or Dynamic IP Type: (DHCP) to automatically obtain an IP address on the LAN/ private network. For Static IP setup, please see the next page.
IPv6 Connection Your Internet Service Provider (ISP) may require this to be set
Type: a certain way for Internet access. You can choose from Static
IPv6, Autoconfiguration, or Link-local Only. Contact your
ISP for more help on the above requirements.
IPv6 DNS This shows the current IPv6 address of the DHP-W610AV on
Settings: your network.
Click Save Settings for the changes to take effect.
D-Link DHP-W611AV User Manual |
16 |
Section 3 - Configuration
LAN Settings - Static IP
Select Static IP to manually enter the IP address, subnet mask, and default gateway addresses.
LAN Connection Select Static IP from the drop-down menu.
Type:
IPv4 Address: Enter the IP address of the DHP-W610AV. The default IP address is 192.168.0.50. If you change the IP address, once you click Apply, you will need to enter the new IP address in your browser to return to the configuration
utility. You can also connect with the device name. (See previous page.)
Subnet Mask: Enter the Subnet Mask.
Gateway Enter the Gateway. This is usually the LAN or internal IP
Address: address of your router.
Primary and This is the Domain Name Server that looks up addresses on Secondary DNS the Internet, you may choose your preferred DNS provider
Servers: as well as a backup.
Click Save Settings for the changes to take effect.
D-Link DHP-W611AV User Manual |
17 |
Section 3 - Configuration
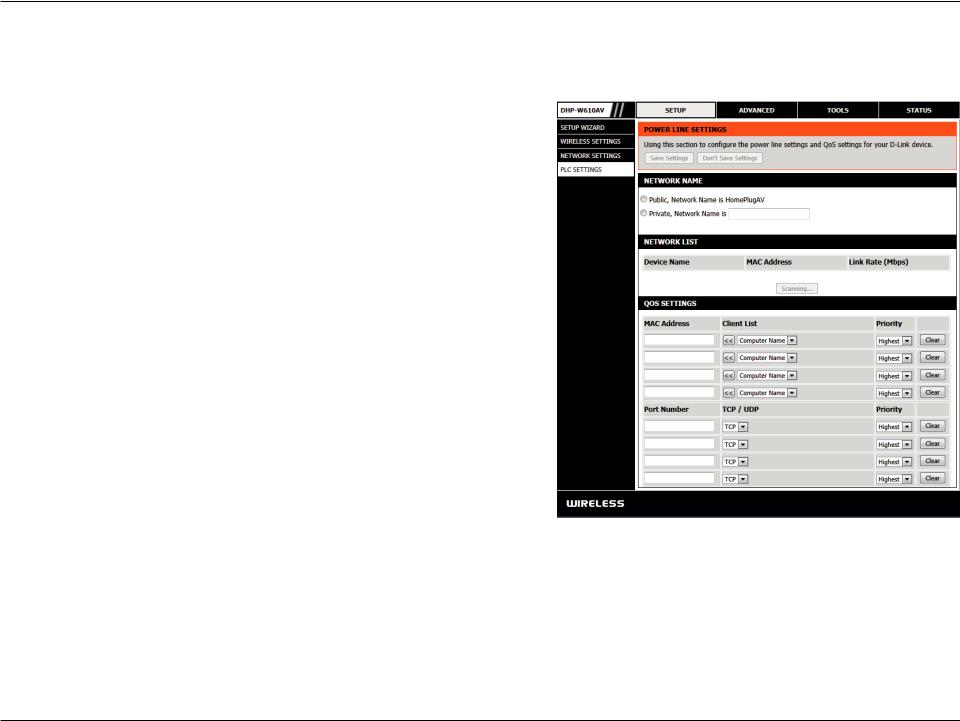
PLC Settings
This section will show you how to configure your new Powerline device using the web-based configuration utility.
Network Name: You can set the name of your network and set it as either public or private. Make sure the network names of all of the devices within your Powerline network is the same.
Public Network Select this option if you would like to make your Powerline Name: network public using “HomePlugAV” as the default network name. Since this is a commonly used network name, it is less
secure than a private network name.
Private Network Select this option if you wish to make your Powerline network
Name: more secure by using a private network name.
Network List: This section lists devices connected to your Powerline network as well as their MAC address and connection speed. Click the Scan button to scan for new Powerline devices. This list is automatically updated and will refresh with this page.
QoS Settings: Here you can set the Quality of Service (QoS) Settings for each network device. QoS helps you prioritize network traffic based on the device or port.
MAC Address/ Select a device from the Client List dropdown box and then Priority: click the << next to Computer Name to automatically fill in the device’s MAC Address. Then set the order of priority for the device under the Priority dropdown box. Clear settings
for a rule using the Clear button.
Click Save Settings for the changes to take effect.
D-Link DHP-W611AV User Manual |
18 |
Section 3 - Configuration
Advanced
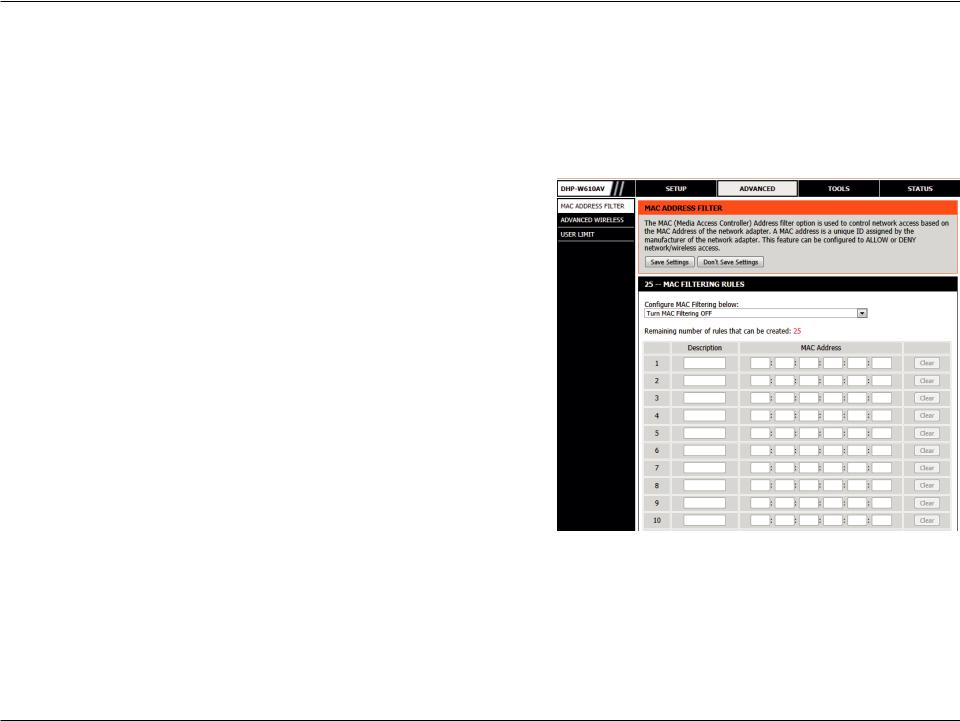
MAC Address Filter
Use MAC (Media Access Control) Filters to authorize wireless clients to access your network by their MAC addresses. When enabled, you can choose to block the devices listed, or only allow the devices listed.
MAC Filtering Set MAC Filtering to ALLOW, DENY, or OFF. ALLOW means Rules: only the devices listed can access the network. DENY means the devices listed cannot access the network. OFF means this
function is currently disabled.
Description: You enter a custom description for convenience; for example, “My PC” or “My friend’s smartphone”.
MAC Address: Enter the MAC address you would like to filter.
Note: If you are filtering to ALLOW only the listed devices, make sure to add your own computer to the list or you will be denied access to the network and the configuration utility. If you DENY the listed addresses be sure not to include your own computer. You can delete the rule by clicking on the Clear button next to the rule.
Click Save Settings for the changes to take effect.
D-Link DHP-W611AV User Manual |
19 |
Section 3 - Configuration
Advanced Wireless
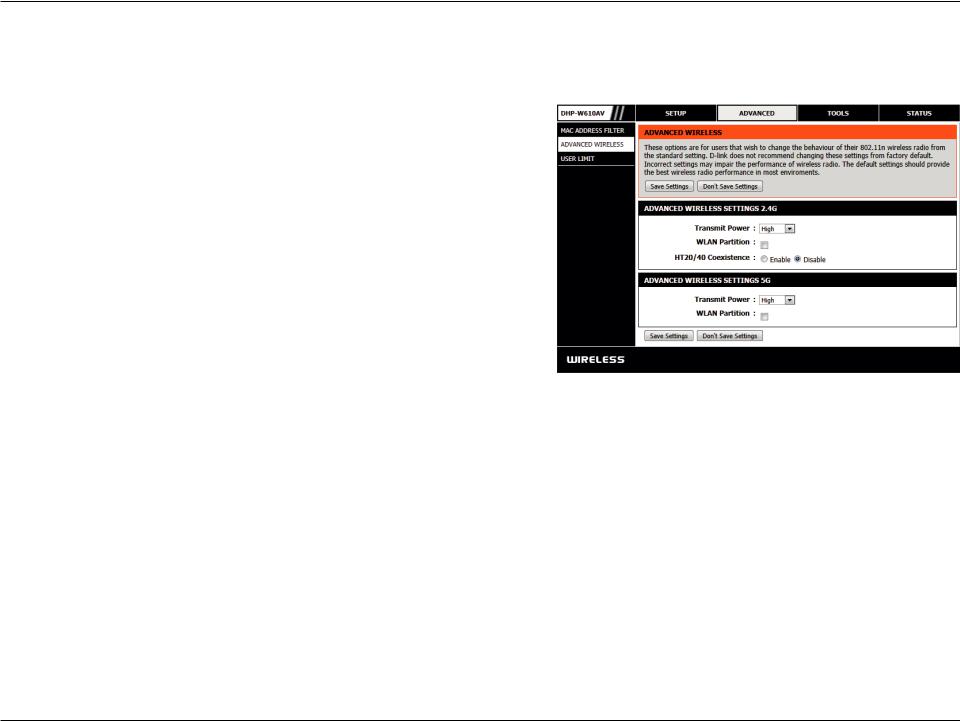
This section allows you to change several advanced settings for both 2.4G and 5G on your DHP-W610AV.
Transmit Power: Sets the power of the antennas.
WLAN Partition: Select this checkbox to enable WLAN partition. If this feature is disabled, then there is no barrier between communication among wireless stations connecting to the DHP-W610AV. If this is enabled, wireless clients are not allowed to exchange data with each other through the DHP-W610AV.
HT20/40 Enabling this function allows compatibility with both Coexistence: 802.11ac/n devices as well as 802.11a/g by using both bands.
Disabling this may provide higher speeds by automatically selecting one band but may only allow 802.11ac/n devices to function.
Click Save Settings for the changes to take effect.
D-Link DHP-W611AV User Manual |
20 |
Loading...