


EO141164

www.delonghi.com
5711810018_00_0519 printed in China
EO141164
AIR FRY CONVECTION OVEN
FOUR À CONVECTION AIR FRY
HORNO DE CONVECCIÓN AIR FRY

EN
page 10 page 30 pág. 57
FR
ES
BUA
D
F
G
H
C
I
L
M
T
N
O
E
P
Q
R
S
V
3

CONTENTS
ELECTRICAL CONNECTION .......................................................4
IMPORTANT SAFEGUARDS ......................................................5
TECHNICAL SPECIFICATION .....................................................6
DESCRIPTION OF THE APPLIANCE ...........................................6
INSTALLATION .........................................................................6
ERROR MESSAGE .....................................................................7
SETTING THE CLOCK .................................................................7
OVEN FUNCTION ......................................................................7
FUNCTION SUMMARY TABLE ...................................................8
TOAST .................................................................................... 10
BAKE ......................................................................................11
CONVECTION .........................................................................12
BROIL/GRILL ..........................................................................13
PIZZA .....................................................................................14
AIR FRY ..................................................................................16
COOKIES .................................................................................17
KEEP WARM ...........................................................................18
REHEAT ..................................................................................19
CARE AND CLEANING ............................................................20
DISPOSAL ..............................................................................20
RECIPES LIST..........................................................................21
TROUBLESHOOTING ..............................................................24
RECIPES .................................................................................26
ELECTRICAL CONNECTION
Only use a three-pin, 120 Volt, 60 Hz power outlet
GROUNDING INSTRUCTIONS
CAUTION: MAKE SURE THAT THE PLUG IS CORRECTLY
GROUNDED
This appliance must be grounded: in the event of short
circuits, the ground connection reduces the risk of electric shock, allowing the electrical current to be dispersed.
This appliance is tted with a power cable with ground
wire.
The plug must be connected to a power outlet that has
been correctly installed and grounded.
WARNING: IMPROPER USE OF THE GROUND
WIRE MAY LEAD TO THE RISK OF ELECTRIC
SHOCK.
If you are not sure that the power outlet is properly
grounded, contact a qualied electrician.
The length of the power cable for this appliance has been
devised so as to avoid the possibility of tripping on or
getting entangled in a long cable.
If an extension cord is required, only use three-wire
extension cords with three-pin plugs and sockets that t
the plug on the appliance.
The electrical ratings of the extension cord must be at
least as great as the electrical ratings of the appliance.
If a longer cable is required, an extension cord UL/CSA
approved can be used.
When using an extension cord, make sure it does not
hang loose in the work area or where someone may
accidentally trip on it or get entangled in it.
Handle the power cable with care for longer life; avoid
pulling or stressing the cable around the connectors to
the power outlet and the appliance.
4

IMPORTANT SAFEGUARDS
When using electrical appliances, a number of fundamental safety rules must be observed, including the
following:
READ ALL INSTRUCTIONS
1.
THIS PRODUCT IS DESIGNED FOR HOUSEHOLD
USE ONLY. DO NOT USE OUTDOORS.
2. Do not use this appliance for purposes other than
those it has been designed for.
3. Do not touch the hot surfaces. Only use the knobs or
handles to operate the appliance
4. Remove any objects located above the appliance.
Do not use on surfaces that may be damaged by the
heat. If the oven is used on countertop made in solid
surface material (e.g. Silestone®, Corian®, etc.), follow carefully the indications of countertop manufacturer and/or supplier.
5. To avoid electric shock, do not immerse the appliance
in water. See the instructions for cleaning.
6. If the appliance is used when children are around,
pay careful attention to the metal walls of the oven
and the door, which become very hot
The appliance must not be used by children or per-
sons with reduced physical, sensory or mental capabilities or lack of experience and knowledge without
supervision. Make sure that children do not play with
the appliance.
7. Unplug the appliance from the power outlet before
cleaning.
Wait for the appliance to cool down at least 30 min-
utes before tting or removing any parts.
8. Never operate the appliance with the cable or the
plug damaged, if any malfunctions have occurred, or
if the appliance has been damaged in any way. Take
the appliance to the nearest authorized service center, which will inspect it and, if necessary, will adjust
or repair it.
9. After-sales accessories may be used if their shape,
size and material are suitable for the use on this oven.
The use of accessories that are not recommended by
the manufacturer may cause injuries.
10. Do not let the power cable hang from the counter or
come into contact with hot surfaces.
.
.
11. Do not place the appliance above or near a gas or
electric cooker.
12. Use maximum care when moving the appliance or
accessories if they contain hot oil or other hot liquids.
Always use oven gloves.
13. If the plug heats up, contact a qualied electrician.
14. Use maximum care when removing the bake pan or
throwing out the hot fat.
15. Do not use abrasive/aggressive/acid detergent, metal sponges or steel wool to clean the appliance.
16. To ensure the safe operation of the appliance, never
introduce foods that are too large for the oven.
17. If the appliance, when operating, is covered by or
comes into contact with ammable materials, such
as curtains, fabrics or wall coverings etc. there will
be risk of re! Use extreme care to avoid these conditions.
18. WARNING: Never leave the appliance unattended
when operating (especially when broiling or toasting).
19. When broiling, the bake pan and the wire racks must
be used as described in the instructions.
20. Extreme care must be taken when using containers
made from materials other than glass, metal or ovenproof ceramics.
21. Do not place any objects in the oven when it is not
being used, apart from the accessories recommended by the manufacturer.
22. Do not place any of the following materials into or
on top of the oven: paper, cardboard, plastic and the
like.
23. Do not cover parts of the oven with metal foil, to
avoid overheating. Do not place any materials over
the vent openings (T), located on top housing.
24. To switch the appliance o, press START/STOP button.
25. To disconnect the appliance, turn o any control,
than remove the plug from wall outlet.
26. Oversize food or metal utensils must not be inserted
inside the oven as they may create risk of re or risk
of electric shock.
27. The appliance does not exceed 60 minutes “on” in a
two hour period.
28. This product is in compliance with UL and CSA safety
standards.
5

SAVE THESE INSTRUCTIONS
(20cm)
WARNING: After having removed the appliance from its
packaging, check that the door is intact.
The door is made from glass and is therefore fragile. If
it is visibly chipped, scored or scratched, it should be replaced. While using, cleaning or moving the appliance,
avoid slamming or knocking the door. Do not pour cold
liquid onto the glass while the appliance is hot.
WARNING: The accessories for cooking of this appliance
are not suitable for food preservation. Avoid leaving
for prolonged time acid substances as lemon/orange
juice, tomato or vinegar on accessories surface. If left
on surfaces for prolonged time these substances may
damage and deteriorate the non stick coating.
WARNING: Caution should be exercised when using
baking paper or metal foil to cover accessories, pans
and dishes. Close contact with heating elements of
baking paper and metal foil may cause overheating
and risk of re.
TECHNICAL SPECIFICATION
Voltage: 120 V ~ 60Hz
Absorbed power: 1800 W
Overall dimensions: LxPxH 193x173x118 in (490x445x300 cm)
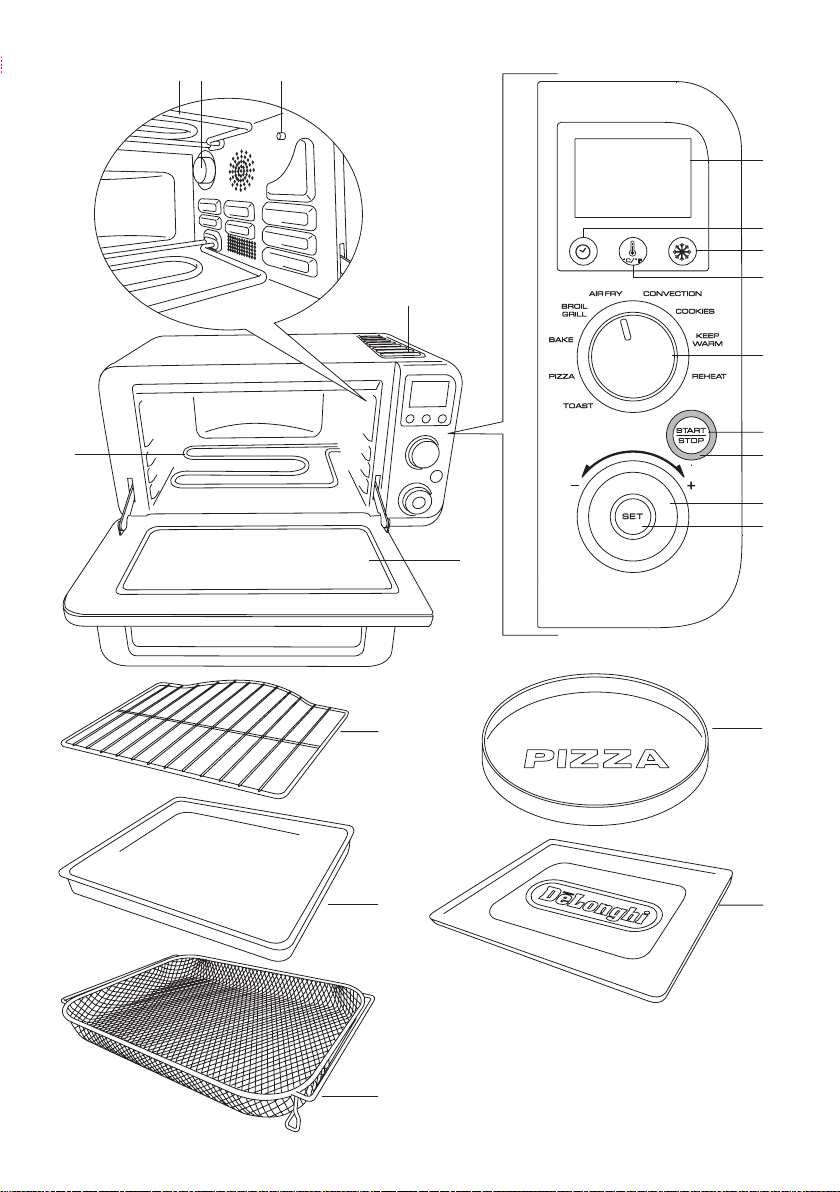
DESCRIPTION OF THE APPLIANCE
A Top heating element
B Internal light
C Vent openings
D Lower heating element
E Glass door
F Display
G Clock button
H Frozen option button
I Internal temperature check button (°C/°F setting).
L Function selec tion dial
M START/STOP button
N Time/temperature/toast color/pizza size/slices/ tray dial
O SET button
P Wire rack
Q Bake pan
R Pizza pan
S Crumb tray
T Red ON light
U Temperature probe
V Air fry basket
DISPLAY
Toast color
level
Function icon
Timer/clock
Temperature/
size/slices
INSTALLATION
• Check that the appliance has not suered any damage due
to transportation.
• Place the appliance on a at, stable surface out of the reach
of children (the glass door becomes hot while the oven is in
operation).
• Before using this appliance, move it away from the wall or
any object on the counter top. Remove any object that may
have been placed on top of the appliance. Do not use on
surfaces where heat may be a problem.
4 “
Min
Min
(85cm)
(10cm)
8 “
Min
4 “
(10cm)
Min
33.5 “
• In order to remove any protective substances on the heating elements surfaces, it is necessary to run the oven empty for 30 minutes in BAKE function at 450 °F, as rst use.
This operation may result in minimal smell and smoke. This
is normal. Let the appliance cool down for 30 minutes after
this operation.
• The crumb tray (S) must be always placed on oven bottom,
under lower heating element (D).
6
indicator
indicator
ERROR MESSAGES
If ERR message is shown on display, with relevant acoustic signal, the oven had a malfunction. Press START/STOP button (M)
for 5 seconds to reset the control and disconnect the plug from
wall outlet. Check troubleshooting section.
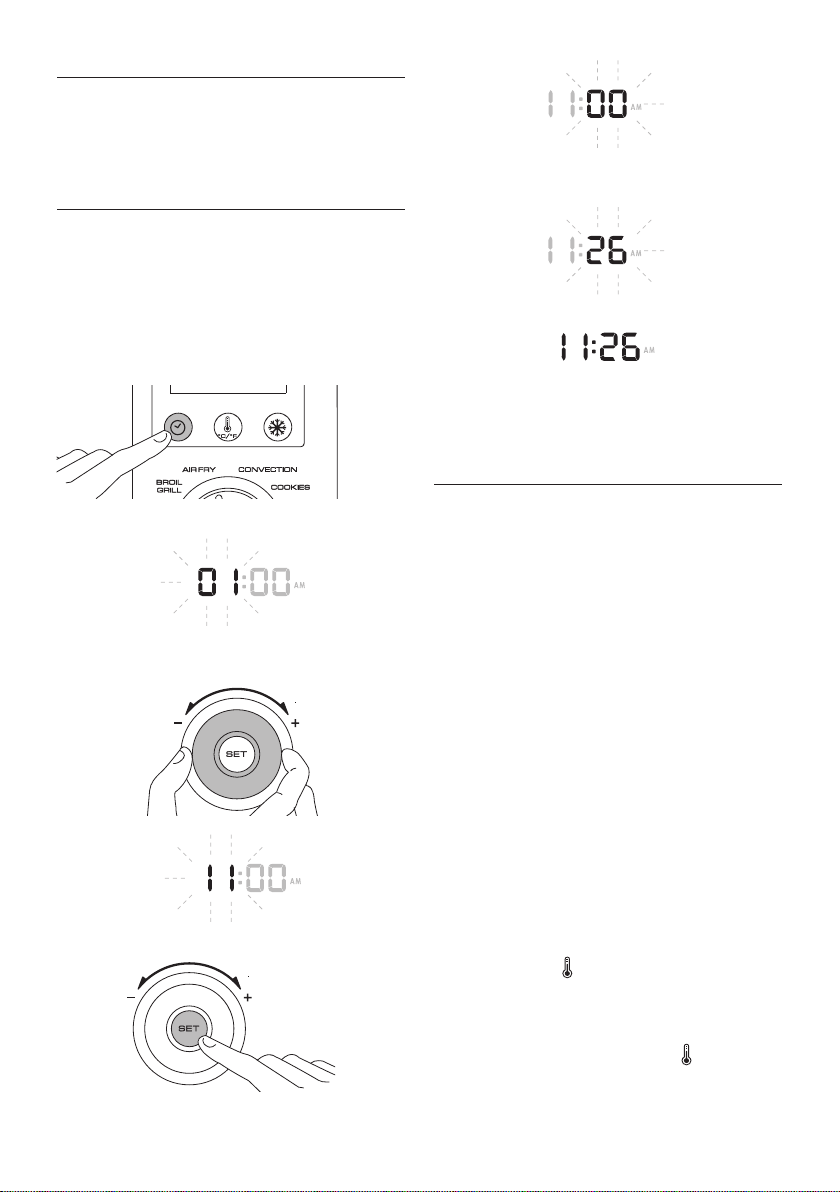
SETTING THE CLOCK
The rst time the appliance is connected to the main electricity
supply or after it has been without power for some time, it will
beep and “01 :00 am” blink on the display.
After 5 seconds the display will turn o, since the clock has not
been set, and the electronic control will go into stand-by mode.
To set the time, proceed as follows:
Set the minutes with Time/temperature/toast color/pizza size/
slices/ tray dial (N).
Press the
SET button
(O). The set time is displayed.
Press the Clock button (G) for at least 2 seconds.
The hour ashes.
Set the hour with
tray dial
Press the
Time/temperature/toast color/pizza size/slices/
(N).
SET button
(O). The minutes ash.
If you want to adjust the time later, repeat the setting procedure
described above. The electronic control must be in stand-by
mode to adjust the clock.
OVEN FUNCTION
In the stand-by mode, the Display shows the
• Press any button/key (G H I M O) or turn any dial (L N). The oven
turns on. The modiable values ash.
If there are no buttons pressed or dials turned within 2 minutes of
the selection mode function, the control defaults back into standby mode.
• Turn the Function selection dial (L) to selec t the desired func tion.
• Turn the
• Press the SET button (O) to set the temperature.
• In some functions the temperature is automatically set (the dis-
• Press the START/STOP button (M) to start cooking. The red ON
Press START/STOP button (M) to reset the oven. The oven goes
• It is possible to choose the temperature visualization in °F or in
Time/temperature/toast color/pizza size/slices/ tray
dial
(N)
to set the time if needed (not required in some pro-
grams).
play doesn’t show the preset temperature).
light (T), that is located around the edge of the START/STOP
button (M), turns on. When the timer elapsed, the display shows
“End” and plays a sound signal.
into stand-by mode. In the BAKE, CONVECTION, AIR FRY, REHEAT
and COOKIES functions, the oven plays a sound signal when the
rst target temperature is reached. In BAKE, AIR FRY, REHEAT and
CONVECTION function it is possible to check the internal temperature by pressing the
temperature is displayed for 5 seconds.
°C. Default setting is in °F. To change this setting, select BAKE, AIR
F RY, REHEAT or CONVECTION function, press
ture check button (I) 1 time. The visualization will change to °C
with acoustic signal. To come back to °F visualization repeat the
same oparation.
Internal temperature check button (I). The
clock (if set)
Internal tempera-
or 01:00.
7
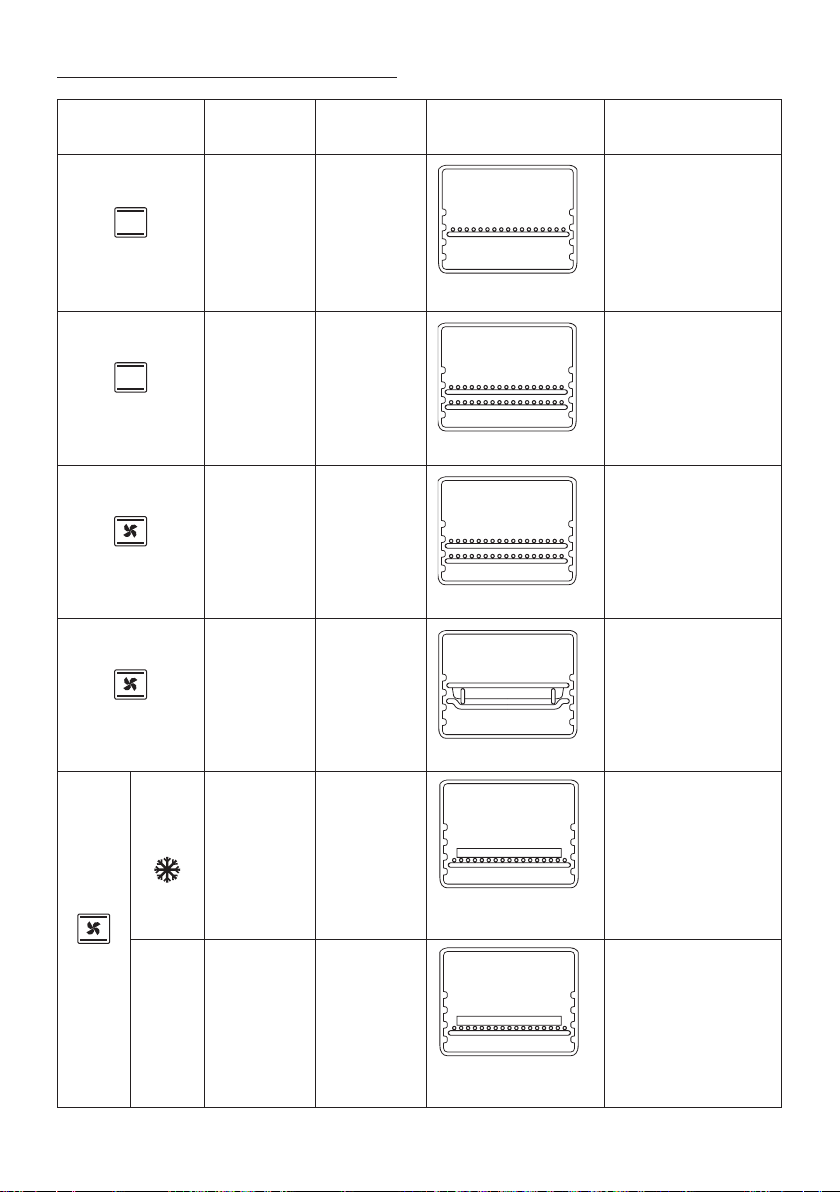
FUNCTIONS SUMMARY TABLE
4
3
2
1
4
3
2
1
3
2
1
4
3
2
1
3
2
1
3
2
1
3
2
1
FUNCTION
TOAST
BAKE
CONVECTION
AIR FRY
TEMPERATURE
(Auto selected) (Auto selected)
170°F - 450°F
75°C - 230°C
170°F - 450°F
75°C- 230°C
375°F - 450°F
190°C- 230°C
TIMER
1:00 (minutes) -
2:00 (hours)
1:00 (minutes) -
2:00 (hours)
1:00 (minutes) -
2:00 (hours)
WIRE RACK AND BAKE
PAN POSITION
wire rack in position 2
wire rack in position 1 or 2
wire rack in position 1 or 2
RECIPES
Specic for toasting slices
of bread.
3
2
1
Ideal for:
cakes
sh
3
lasagna
2
1
Ideal for:
quiches
bread
3
pastry cakes
2
1
Ideal for:
frozen food (as potatoes,
nugget etc.)
3
fresh chicken,
2
1
sausage, etc.
PIZZA
Frozen
Fresh (Auto selected)
(Auto selected)
air fry basket in position 3
Automatic program for crispy
frozen pizza.
(Auto selected
and adjustable)
pizza pan on wire rack in
position 1
Automatic program for
perfect fresh pizza.
(Auto selected
and adjustable)
pizza pan on wire rack in
position 1
8
 Loading...