

Page 1
www.dell.com | support.dell.com
Model HVO1T
Dell™ Digital Jukebox
Owner’s Manual
Page 2
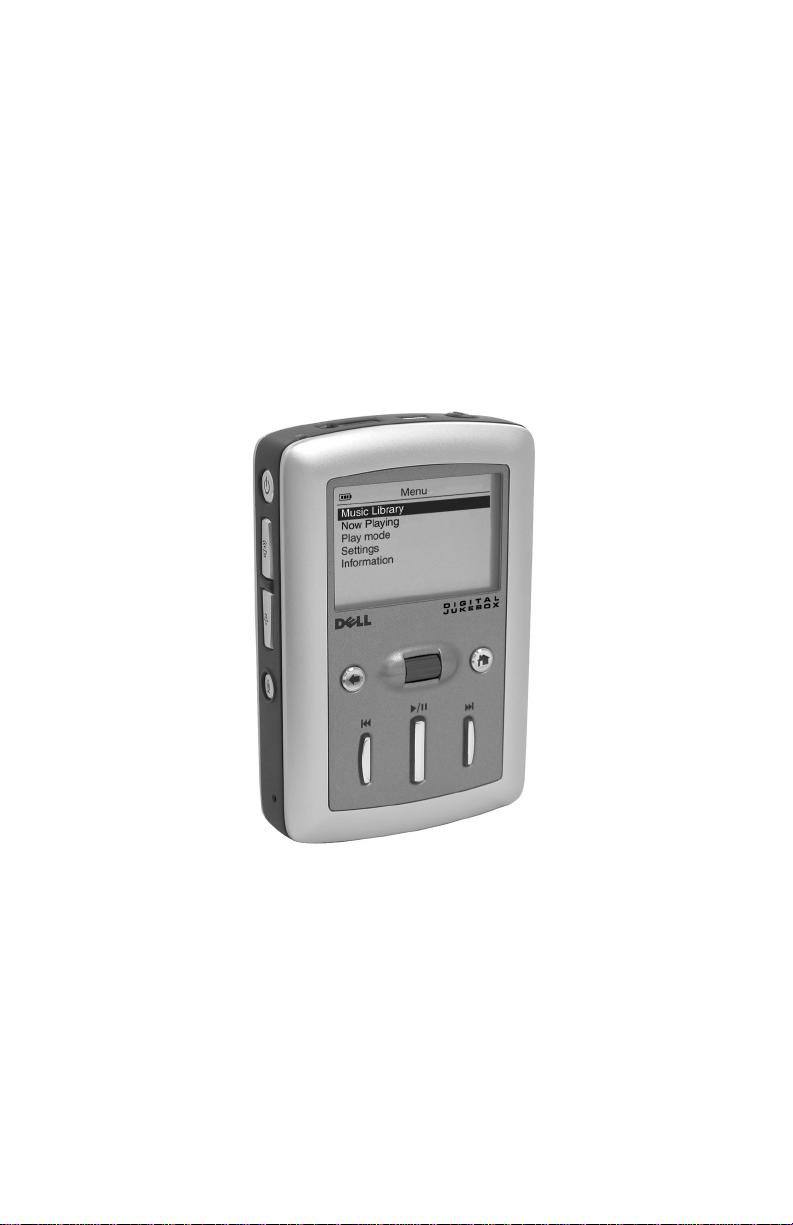
Dell™ Digital Jukebox
Owner’s Manual
Page 3

Notes, Notices, and Cautions
NOTE: A NOTE indicates important information that helps you make better
use of your device.
NOTICE: A NOTICE indicates either potential damage to hardware or loss
of data and tells you how to avoid the problem.
CAUTION: A CAUTION indicates a potential for property
damage, personal injury, or death.
Abbreviations and Acronyms
For a complete list of abbreviations and acronyms, see "Glossary" on
page 60.
____________________
Information in this document is subject to change without notice.
© 2003-2004 Dell Inc. All rights reserved.
Reproduction in any manner whatsoever without the written permission of Dell Inc. is strictly
forbidden.
Trademarks used in this text: Dell, the DELL logo, Dell DJ, TrueMobile, Inspiron, Dell Precision,
Dimension, OptiPlex, Latitude, PowerEdge, PowerVault, PowerApp, and Dell OpenManage are
trademarks of Dell Inc.; Intel, Pentium, and Celeron are registered trademarks of Intel
Corporation; Microsoft and Windows are registered trademarks of Microsoft Corporation;
MusicMatch is a registered trademark of MusicMatch Inc.
Other trademarks and trade names may be used in this document to refer to either the entities
claiming the marks and names or their products. Dell Inc. disclaims any proprietary interest in
trademarks and trade names other than its own.
Model HV01T
February 2004 P/N T2485 Rev. A01
Page 4

Contents
Finding Information
PRECAUCIÓN: Instrucciones de Seguridad . . . . . . . . . . . . . . . . . . 9
Cuando utilice su equipo
CAUTION: Safety Instructions . . . . . . . . . . . . . . . . . . . . . . . . . . . . . 13
When Using Your Device . . . . . . . . . . . . . . . . . . . . . . . . . . . . . . . . . 15
Información general . . . . . . . . . . . . . . . . . . . . . . . . . . . . . . . . . . 9
Energía. . . . . . . . . . . . . . . . . . . . . . . . . . . . . . . . . . . . . . . . . . . . . . 9
Viaje Aéreo . . . . . . . . . . . . . . . . . . . . . . . . . . . . . . . . . . . . . . . . . 10
Instrucciones de CEM. . . . . . . . . . . . . . . . . . . . . . . . . . . . . . . . 11
Hábitos ergonómicos de uso de computadoras. . . . . . . . . . 11
General . . . . . . . . . . . . . . . . . . . . . . . . . . . . . . . . . . . . . . . . . . . . 13
Power. . . . . . . . . . . . . . . . . . . . . . . . . . . . . . . . . . . . . . . . . . . . . . 13
Air Travel . . . . . . . . . . . . . . . . . . . . . . . . . . . . . . . . . . . . . . . . . . . 14
EMC Instructions . . . . . . . . . . . . . . . . . . . . . . . . . . . . . . . . . . . . 14
Ergonomic Computing Habits . . . . . . . . . . . . . . . . . . . . . . . . . 15
1 About Your Device
Introduction. . . . . . . . . . . . . . . . . . . . . . . . . . . . . . . . . . . . . . . . . . . . . 17
Front and Side Views. . . . . . . . . . . . . . . . . . . . . . . . . . . . . . . . . . . . . 18
Wired Remote (Optional) . . . . . . . . . . . . . . . . . . . . . . . . . . . . . . . . . 20
Installing Software . . . . . . . . . . . . . . . . . . . . . . . . . . . . . . . . . . . . . . 21
Contents 3
Page 5

Connecting to a Computer . . . . . . . . . . . . . . . . . . . . . . . . . . . . . . . . 22
Charging the Battery. . . . . . . . . . . . . . . . . . . . . . . . . . . . . . . . . . . . . 23
Performing a Reset . . . . . . . . . . . . . . . . . . . . . . . . . . . . . . . . . . . . . . 24
2 Using Your Dell DJ
Playing Digital Music. . . . . . . . . . . . . . . . . . . . . . . . . . . . . . . . . . . . 25
Playing Tracks Using Music Library . . . . . . . . . . . . . . . . . . . 25
Transferring Music to the Dell DJ . . . . . . . . . . . . . . . . . . . . . . . . . 28
Transferring Music Tracks Using MusicMatch
DJ . . . . . . . . . . . . . . . . . . . . . . . . . . . . . . . . . . . . . . . . . . . . . . . . 28
Transferring Music Tracks from MusicMatch Library . . . . 28
Transferring Music Tracks Using Dell DJ Explorer. . . . . . . 30
Recording Files Using the Dell DJ. . . . . . . . . . . . . . . . . . . . . . . . . 32
Accessing and Managing Your Recordings. . . . . . . . . . . . . 33
Transferring Recordings Between the Dell DJ and Your
Computer . . . . . . . . . . . . . . . . . . . . . . . . . . . . . . . . . . . . . . . . . . 33
Storing Data files On the Dell DJ . . . . . . . . . . . . . . . . . . . . . . . . . . 35
®
to your Dell
Managing Files from the Main Menu . . . . . . . . . . . . . . . . . . . . . . 36
Music Library. . . . . . . . . . . . . . . . . . . . . . . . . . . . . . . . . . . . . . . 36
Now Playing and the Selected Music List . . . . . . . . . . . . . . 40
Play Mode . . . . . . . . . . . . . . . . . . . . . . . . . . . . . . . . . . . . . . . . . 45
Settings. . . . . . . . . . . . . . . . . . . . . . . . . . . . . . . . . . . . . . . . . . . . 46
Information. . . . . . . . . . . . . . . . . . . . . . . . . . . . . . . . . . . . . . . . . 49
3 Frequently Asked Questions
Installation . . . . . . . . . . . . . . . . . . . . . . . . . . . . . . . . . . . . . . . . . . . . . 51
Usage. . . . . . . . . . . . . . . . . . . . . . . . . . . . . . . . . . . . . . . . . . . . . . . . . . 52
4 Contents
Page 6

General. . . . . . . . . . . . . . . . . . . . . . . . . . . . . . . . . . . . . . . . . . . . . . . . . 53
Error Indications. . . . . . . . . . . . . . . . . . . . . . . . . . . . . . . . . . . . . . . . . 54
Troubleshooting in Rescue Mode . . . . . . . . . . . . . . . . . . . . . . . . . . 55
4 Appendix
Specifications. . . . . . . . . . . . . . . . . . . . . . . . . . . . . . . . . . . . . . . . . . . 58
Glossary . . . . . . . . . . . . . . . . . . . . . . . . . . . . . . . . . . . . . . . . . . . . . . . . 60
Regulatory Notices . . . . . . . . . . . . . . . . . . . . . . . . . . . . . . . . . . . . . . 63
FCC Notices (U.S. Only). . . . . . . . . . . . . . . . . . . . . . . . . . . . . . . 64
IC Notice (Canada Only) . . . . . . . . . . . . . . . . . . . . . . . . . . . . . . 65
NOM Information (Mexico Only). . . . . . . . . . . . . . . . . . . . . . . 66
Limited Warranties and Return Policy. . . . . . . . . . . . . . . . . . . . . . 67
Limited Warranty for Dell-Branded Hardware
Products (U.S. Only) . . . . . . . . . . . . . . . . . . . . . . . . . . . . . . . . . 67
"Total Satisfaction" Return Policy (U.S. Only) . . . . . . . . . . . . 71
Limited Warranty Terms for Dell-Branded
Hardware Products (Canada Only). . . . . . . . . . . . . . . . . . . . . 71
"Total Satisfaction" Return Policy (Canada Only) . . . . . . . . . 75
Dell Software and Peripherals (Canada Only) . . . . . . . . . . . 76
1-Year End-User Manufacturer Guarantee
(Latin America and the Caribbean Only) . . . . . . . . . . . . . . . . 77
5 Index
Contents 5
Page 7

6 Contents
Page 8

Finding Information
What are you looking for? Find It Here:
How to set up my device and
information on the connectors and
buttons on my device.
Information on using my device. Dell™
Information on using MusicMatch with
my device
Information on using Dell DJ Explorer
with my device
Connecting to and synchronizing with a
computer
Up-to-date information on your device
including the latest software downloads,
latest versions of the
Getting Started
to the most Frequently Asked
Questions
My Service Tag Located on the back of the device
Owner's Manual,
placemats and answers
Getting Started
Owner’s Manual
Owner’s Manual
MusicMatch® online help
Start
Click
MusicMatch
MusicMatch.
Click
Start
Dell DJ Explorer
Help
Dell™
Owner’s Manual
online help
support.dell.com
placemat and the Dell™
→
All Programs
. Click
→
All Programs
→
→
Help
in
→
Dell DJ Explorer
and MusicMatch
Dell
www.dell.com | support.dell.com
→
Finding Information 7
Page 9

www.dell.com | support.dell.com
8 Finding Information
Page 10

PRECAUCIÓN: Instrucciones de Seguridad
Utilice las siguientes guías de seguridad para garantizar su propia seguridad personal y para
ayudar a proteger el equipo y el entorno laboral contra posibles daños.
Información general
• No intente reparar el equipo con sus propios recursos, a menos que sea un técnico de
servicio capacitado. Siempre siga estrictamente las instrucciones de instalación.
• En caso de utilizar una extensión de cable de corriente eléctrica con su adaptador de
corriente continua CC, asegúrese de que la potencia nominal de amperaje total de los
productos enchufados a la extensión no exceda la potencia nominal de amperaje del
cable de extensión.
• No empuje ningún objeto hacia el interior de los orificios de respiración o aberturas de
aire de su equipo. Hacerlo podría ocasionar un incendio o choque eléctrico al provocar
un corto circuito en los elementos internos.
• Mantenga su equipo lejos de radiadores y fuentes de calor. Evite colocar papeles
sueltos debajo de su equipo; no coloque el equipo dentro de una unidad cerrada con
paredes o sobre una cama, sofá o tapete.
• Cuando utilice el adaptador de CC para hacer funcionar el equipo o para cargar la
batería, colóquelo en un área ventilada, por ejemplo, sobre la superficie del escritorio o
sobre el piso. No cubra el adaptador de CC con papeles u otros artículos que reduzcan
su enfriamiento; tampoco utilice el adaptador de CC dentro del estuche.
• El adaptador de CC puede calentarse durante la operación normal de su equipo.
Maneje con mucho cuidado el adaptador durante o inmediatamente después de la
operación.
• No utilice su equipo en un entorno húmedo, por ejemplo cerca de una tina de baño,
lavabo o alberca, o bien en un sótano húmedo.
• Con la finalidad de ayudarle a evitar el riesgo de choque eléctrico, no conecte o
desconecte ningún cable ni realice ninguna operación de mantenimiento o
reconfiguración de este producto durante una tormenta eléctrica. No utilice su equipo
durante una tormenta eléctrica a menos que todos los cables estén desconectados y
que el equipo se encuentre funcionando por medio de una batería.
• Antes de limpiar su equipo, desconéctelo de la toma de corriente. Limpie su equipo
con un paño suave y humedecido con agua. No utilice limpiadores líquidos o en
aerosol que pudieran contener sustancias inflamables.
www.dell.com | support.dell.com
Energía
• Solamente utilice el adaptador proporcionado por Dell, aprobado para su uso con este
equipo. El empleo de otro adaptador de CC podría ocasionar un incendio o explosión.
PRECAUCIÓN: Instrucciones de Seguridad 9
Page 11

• Antes de conectar el equipo a la toma de corriente eléctrica, verifique la potencia
nominal de voltaje del adaptador de CC para garantizar que el voltaje requerido y la
frecuencia corresponden a la de la fuente de energía disponible.
• Para desconectar el equipo de todas las fuentes de energía, apáguelo y desenchufe el
adaptador de CC de la toma de corriente.
• Con la finalidad de ayudar a evitar un choque eléctrico, enchufe el adaptador de CC y
los cables de corriente eléctrica del equipo a las fuentes de energía eléctrica
adecuadamente conectadas a tierra. Estos cables de corriente eléctrica pueden estar
equipados con enchufes de 3 patas para proporcionar una conexión puesta a tierra. No
utilice conectores adaptadores ni quite la pata de conexión a tierra del enchufe del
cable de corriente eléctrica. Si utiliza una extensión del cable de corriente eléctrica,
ésta debe ser del tipo adecuado, es decir de 2 ó 3 patas, para que sea compatible con el
cable de corriente eléctrica del adaptador de CC.
• Asegúrese de que no quede nada en el cable de corriente eléctrica del adaptador de
www.dell.com | support.dell.com
CC y que el cable no se encuentre en un lugar donde alguien pueda tropezarse con él
o pisarlo.
• En caso de que esté utilizando un contacto múltiple, tenga precaución al enchufar el
cable de corriente del adaptador de CC en el contacto. Algunos de los contactos
pueden permitir que inserte el enchufe incorrectamente. La inserción incorrecta del
enchufe podría ocasionar un daño permanente en su equipo, así como el riesgo de un
choque eléctrico y/o incendio. Asegúrese de que la pata de conexión a tierra del
enchufe está insertada dentro del contacto de servicio a tierra del contacto múltiple.
Viaje Aéreo
• Algunas normas y/o restricciones específicas para líneas aéreas de la Administración
Federal de Aviación podrían aplicar a la operación del equipo Dell cuando usted lo
lleva a bordo de una aeronave. Por ejemplo, las normas/restricciones podrían prohibir
el uso de cualquier dispositivo electrónico personal (PED, por sus siglas en inglés) que
tenga la capacidad de transmitir una radiofrecuencia u otras señales
electromagnéticas, de manera intencional, mientras se viaja en una aeronave.
– Para cumplir de la mejor forma con esas restricciones, si su equipo Dell está
equipado con Dell TrueMobile™ o algún otro dispositivo de comunicación
inalámbrico, favor de desactivar este dispositivo antes de abordar el avión y seguir
las instrucciones proporcionadas por el personal de la línea aérea respecto a estos
dispositivos.
– Además, el uso de cualquier PED, por ejemplo un dispositivo portátil, podría
estar prohibido en la aeronave durante ciertas etapas críticas del vuelo como el
despegue y el aterrizaje. Algunas líneas aéreas podrían además definir como etapa
crítica de vuelo cualquier momento en el que la aeronave se encuentre por
debajo de 3050 m (10,000 pies). Favor de seguir las instrucciones específicas de la
línea aérea acerca de las ocasiones en que se autoriza el uso de un PED.
10 PRECAUCIÓN: Instrucciones de Seguridad
Page 12

Instrucciones de CEM
Utilice cables de señal blindados para garantizar que se mantiene la clasificación de
compatibilidad electromagnética (EMC, por sus siglas en inglés) adecuada para el entorno
propuesto. Si lo prefiere, puede solicitar un cable a Dell a través de su sitio Web en
www.dell.com.
Cuando utilice su equipo
Observe las siguientes guías de manejo seguro para evitar daños en su equipo:
• Cuando instale el equipo para operarlo, colóquelo sobre una superficie lisa.
• Cuando viaje, no documente el equipo como equipaje. Puede pasar el equipo a través
de una máquina de seguridad de rayos X, pero nunca lo pase a través del detector de
metales.
• Cuando viaje, no coloque el equipo en los compartimentos superiores, donde se
podría estar moviendo. No deje caer el equipo ni lo someta a otros golpes mecánicos.
• Proteja el equipo de riesgos ambientales como tierra, polvo, alimentos, líquidos,
temperaturas extremas y exceso de exposición a la luz solar.
• Cuando mueva su equipo a entornos distintos con rangos de temperatura y/o
humedad diferentes, puede formarse una condensación sobre o dentro del equipo.
Para evitar dañar el equipo, déle tiempo suficiente para que la humedad se evapore
antes de utilizarlo.
AVISO: Cuando lleve el equipo de condiciones de baja temperatura a un entorno más
caliente o de condiciones de alta temperatura a un entorno más frío, permita que el
equipo se aclimate a la temperatura ambiente antes de encenderlo.
• Cuando desconecte un cable, jale de la clavija o del anillo de acoplamiento, nunca del
cable. Conforme jala la clavija hacia afuera, manténgala alineada uniformemente para
evitar que las terminales se doblen. También, antes de conectar un cable asegúrese que
ambos conectores se encuentran correctamente orientados y alineados.
• Maneje los componentes con cuidado.
• Limpie la pantalla con un paño suave y limpio y agua. Aplique agua al paño; después
pase el paño en toda la pantalla en una dirección, moviéndolo de la parte superior de la
pantalla a la parte inferior. Quite la humedad de la pantalla rápidamente y manténgala
seca. La exposición a largo plazo a la humedad puede dañar la pantalla. No utilice
limpiadores comerciales para cristales al limpiar la pantalla.
www.dell.com | support.dell.com
Hábitos ergonómicos de uso de computadoras
PRECAUCIÓN: El uso inadecuado o prolongado del equipo puede ocasionar lesiones.
PRECAUCIÓN: Ver la pantalla o el monitor exterior durante períodos de tiempo
prolongados puede ocasionar fatiga ocular.
PRECAUCIÓN: Instrucciones de Seguridad 11
Page 13

www.dell.com | support.dell.com
12 PRECAUCIÓN: Instrucciones de Seguridad
Page 14

CAUTION: Safety Instructions
Use the following safety guidelines to help ensure your own personal safety and to help
protect your device and working environment from potential damage.
General
• Do not attempt to service the device yourself unless you are a trained service
technician. Always follow installation instructions closely.
• If you use an extension power cable with your DC adapter, ensure that the total
ampere rating of the products plugged in to the extension power cable does not exceed
the ampere rating of the extension cable.
• Do not push objects into air vents or openings of your device. Doing so can cause fire
or electric shock by shorting out interior components.
• Keep your device away from radiators and heat sources. Avoid placing loose papers
underneath your device; do not place your device in a closed-in wall unit or on a bed,
sofa, or rug.
• Place the DC adapter in a ventilated area, such as a desk top or on the floor, when you
use it to run the device or to charge the battery. Do not cover the DC adapter with
papers or other items that will reduce cooling; also, do not use the DC adapter inside a
carrying case.
• The DC adapter may become hot during normal operation of your device. Use care
when handling the adapter during or immediately after operation.
• Do not use your device in a wet environment, for example, near a bath tub, sink, or
swimming pool or in a wet basement.
• To help avoid the potential hazard of electric shock, do not connect or disconnect any
cables or perform maintenance or reconfiguration of this product during an electrical
storm. Do not use your device during an electrical storm unless all cables have been
disconnected and the device is operating on battery power.
• Before you clean your device, disconnect the device from the electrical outlet. Clean
your device with a soft cloth dampened with water. Do not use liquid or aerosol
cleaners, which may contain flammable substances.
www.dell.com | support.dell.com
Power
• Use only the Dell-provided DC adapter approved for use with this device. Use of
another DC adapter may cause a fire or explosion.
• Before you connect the device to an electrical outlet, check the DC adapter voltage
rating to ensure that the required voltage and frequency match the available power
source.
• To remove the device from all power sources, turn the device off and disconnect the
DC adapter from the electrical outlet.
CAUTION: Safety Instructions 13
Page 15

• To help prevent electric shock, plug the DC adapter and device power cables into
properly grounded power sources. These power cables may be equipped with 3-prong
plugs to provide an earth grounding connection. Do not use adapter plugs or remove
the grounding prong from the power cable plug. If you use a power extension cable,
use the appropriate type, 2-prong or 3-prong, to mate with the DC adapter power
cable.
• Be sure that nothing rests on your DC adapter’s power cable and that the cable is not
located where it can be tripped over or stepped on.
• If you are using a multiple-outlet power strip, use caution when plugging the DC
adapter’s power cable into the power strip. Some power strips may allow you to insert
the plug incorrectly. Incorrect insertion of the power plug could result in permanent
damage to your device, as well as risk of electric shock and/or fire. Ensure that the
ground prong of the power plug is inserted into the mating ground contact of the
www.dell.com | support.dell.com
power strip.
Air Travel
• Certain Federal Aviation Administration regulations and/or airline-specific restrictions
may apply to the operation of your Dell device while you are on board an aircraft. For
example, such regulations/restrictions may prohibit the use of any personal electronic
device (PED) that has the capacity for intentional transmission of radio frequency or
other electromagnetic signals while on an aircraft.
– In order to best comply with all such restrictions, if your Dell device is equipped
with Dell TrueMobile™ or some other wireless communication device, please
disable this device before you board the aircraft and follow all instructions
provided by airline personnel with regard to such device.
– Additionally, the use of any PED, such as a portable device, may be prohibited in
aircraft during certain critical phases of flight, for example, takeoff and landing.
Some airlines may further define the critical flight phase as any time the aircraft
is below 3050 m (10,000 ft). Please follow the airline’s specific instructions as to
when the use of a PED is allowed.
EMC Instructions
Use shielded signal cables to ensure that you maintain the appropriate electromagnetic
compatibility (EMC) classification for the intended environment. If you prefer, you can
order a cable from Dell at its worldwide website at www.dell.com.
14 CAUTION: Safety Instructions
Page 16
When Using Your Device
Observe the following safe-handling guidelines to prevent damage to your device:
• When setting up the device for work, place it on a level surface.
• When traveling, do not check the device as baggage. You can put your device through
an X-ray security machine, but never put your device through a metal detector.
• When traveling, do not place the device in overhead storage compartments where it
could slide around. Do not drop your device or subject it to other mechanical shocks.
• Protect your device from environmental hazards such as dirt, dust, food, liquids,
temperature extremes, and overexposure to sunlight.
• When you move your device between environments with very different temperature
and/or humidity ranges, condensation may form on or within the device. To avoid
damaging the device, allow sufficient time for the moisture to evaporate before using
the device.
NOTICE: When taking the device from low-temperature conditions into a warmer
environment or from high-temperature conditions into a cooler environment, allow the
device to acclimate to room temperature before turning on power.
• When you disconnect a cable, pull on its connector or on its strain-relief loop, not on
the cable itself. As you pull out the connector, keep it evenly aligned to avoid bending
any connector pins. Also, before you connect a cable make sure both connectors are
correctly oriented and aligned.
• Handle components with care.
• Clean the display with a soft, clean cloth and water. Apply the water to the cloth; then
stroke the cloth across the display in one direction, moving from the top of the display
to the bottom. Remove moisture from the display quickly and keep the display dry.
Long-term exposure to moisture can damage the display. Do not use a commercial
window cleaner to clean your display.
www.dell.com | support.dell.com
Ergonomic Computing Habits
CAUTION: Improper or prolonged use of the device may result in injury.
CAUTION: Viewing the display or external monitor screen for extended periods of time
may result in eye strain.
CAUTION: Safety Instructions 15
Page 17

www.dell.com | support.dell.com
16 CAUTION: Safety Instructions
Page 18

About Your Device
Introduction
Congratulations on purchasing the Dell Digital Jukebox! In this document,
you can find instructions on how to use the key features of you new Dell
Digital Jukebox (Dell DJ™) with the accompanying software.
You can also find more sources of useful information in "Finding
Information" on page 7.
Your Dell DJ comes with a Dell DJ Software and Documentation CD that
you can use to install software onto your computer. The software includes
the Dell DJ drivers, Dell DJ Explorer and MusicMatch
You can use the software to manage your music library and to transfer audio
tracks and data files between your Dell DJ and your computer. In order to
transfer these files, your Dell DJ must be connected to your computer using
the USB cable included with your Dell DJ. See "Installing Software" on
page 21 to get started.
After installing the software on your computer, you can use your Dell DJ in a
number of ways:
• As a digital music player
• As a digital recording device
• As a data storage device
For details about using these features and getting the most out of your Dell
DJ, see "Using Your Dell DJ" on page 25.
®
.
NOTICE: Dell's Limited Warranty does not cover data loss resulting from the
unlikely failure of the hard disk drive in the device.
Page 19
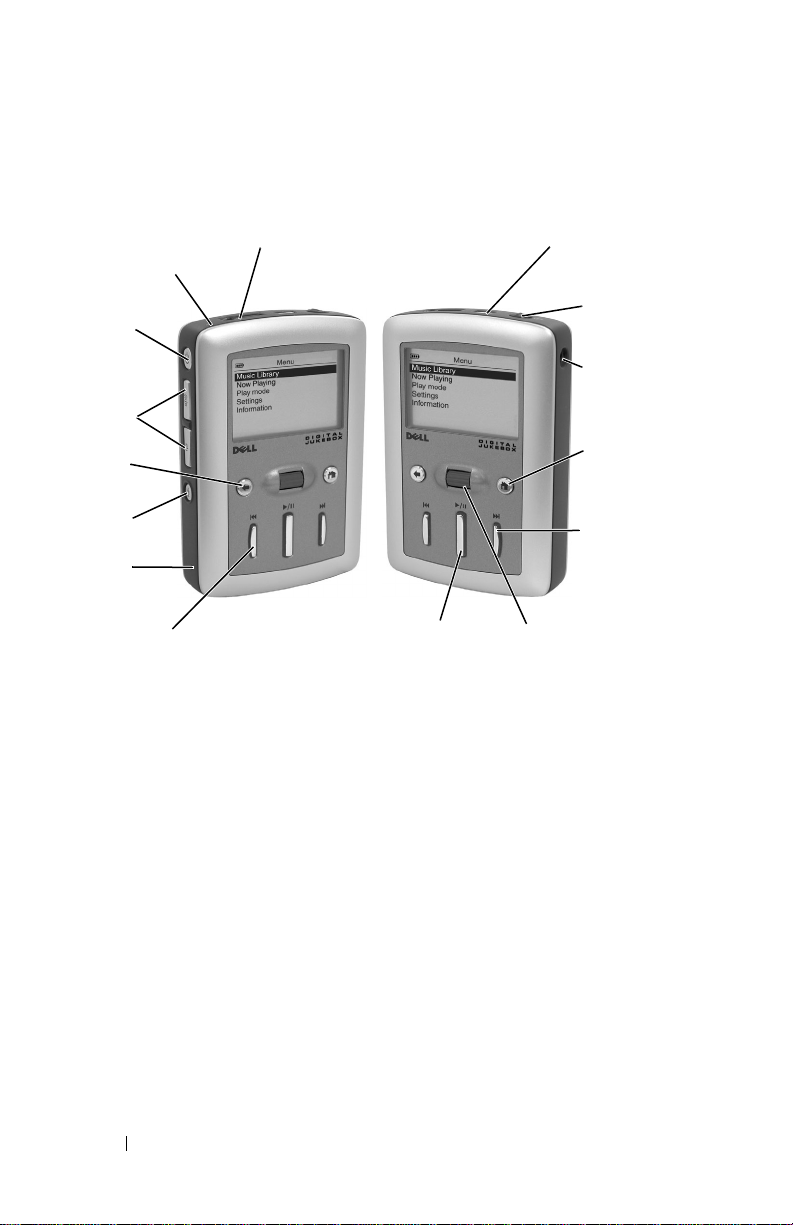
Front and Side Views
integrated
microphone
power
button
volume
buttons
back
www.dell.com | support.dell.com
button
record
button
reset
button
reverse/skip
back button
POWER BUTTON — Press and hold the power button for 2 seconds to turn the
device on or off.
VOLUME BUTTONS — Press and hold the volume buttons to increase or decrease
the volume.
RECORD BUTTON — Press and hold the record button for 2 seconds to start
recording audio through the integrated microphone.
RESET BUTTON — See "Performing a Reset" on page 24 for information on using
the reset button.
BACK BUTTON — Press the back button to return to the previous view, or to move
back one character.
REVERSE/SKIP BACK BUTTON — Press the reverse/skip back button to move to the
start of the current track, or to go to the previous track. Press and hold the
reverse/skip back button to move back within a track.
PLAY/PAUSE BUTTON — Press the play/pause button to start or pause a track or
recording.
headphone
connector
play/pause button
USB 2.0 / 1.1
connector
button lock
switch
DC
adapter
connector
Home
button
forward /
skip
forward
button
scroll
dial
18 About Your Device
Page 20
SCROLL DIAL
• Press the scroll dial to perform actions similar to pressing <Enter> on
a keyboard.
• Rotate the scroll dial up or down to perform actions similar to using
the up- and down-arrow keys on a keyboard.
NOTE: In other parts of this Owner’s Manual, scroll-select means to rotate and
then press the scroll dial. You can scroll-select menu options and tracks.
FORWARD/SKIP FORWARD BUTTON — Press the forward/skip forward button to go
to the next track, or to move ahead within a track.
HOME BUTTON — Press the Home button to access other functions in the device.
See "Using Your Dell DJ" on page 25 for information.
DC ADAPTER CONNECTOR — Connect the DC adapter.
BUTTON LOCK SWITCH — Move this to lock or unlock the buttons on your device.
Lock the buttons when you want to prevent them from being pressed accidentally.
NOTE: When your device is locked, you cannot turn your device on or off.
USB 2.0 / 1.1 CONNECTOR — Connect your device to your computer. See
"Connecting to a Computer" on page 22 for information.
HEADPHONE CONNECTOR — Attach the earphones, headphones, or optional wired
remote. See "Wired Remote (Optional)" on page 20 for information.
INTEGRATED MICROPHONE — Allows you to record audio. See "Recording Files
Using the Dell DJ" on page 32 for information.
www.dell.com | support.dell.com
About Your Device 19
Page 21
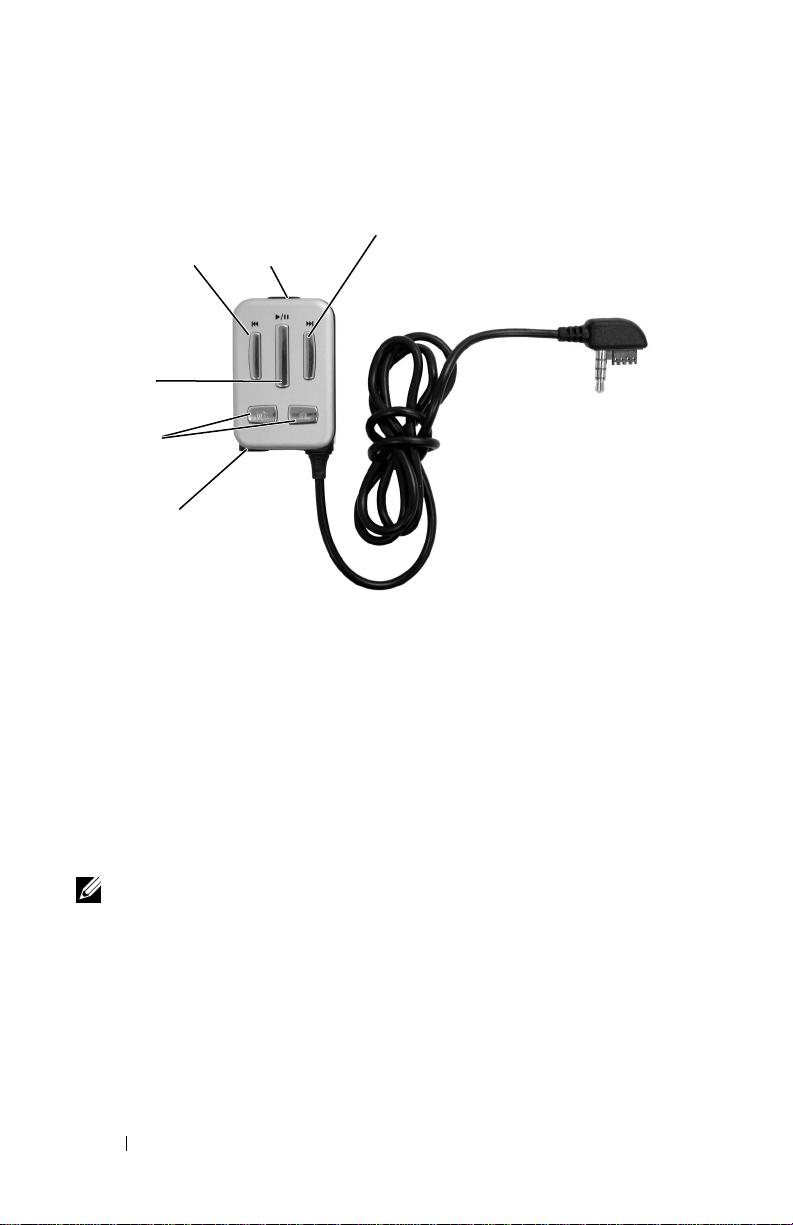
Wired Remote (Optional)
reverse/skip
back button
play/pause
button
volume
buttons
www.dell.com | support.dell.com
headphone
connector
REVERSE/SKIP BACK BUTTON — Press the reverse/skip back button to move to the
start of the current track, or to go to the previous track. Press and hold the
reverse/skip back button to move back within a track.
PLAY/PAUSE BUTTON — Press the play/pause button to start or pause a track or
recording.
VOLUME BUTTONS —
volume.
HEADPHONE CONNECTOR —
BUTTON LOCK SWITCH —
Lock the buttons when you want to prevent them from being pressed accidentally.
button lock
switch
Press and hold
Attach earphones or headphones.
Move this to lock or unlock the buttons on your device.
forward/skip
forward button
the volume buttons
to increase or decrease the
NOTE: When your device is locked, you cannot turn your device on or off.
FORWARD/SKIP FORWARD BUTTON — Press the forward/skip forward button to go
to the next track, or to move ahead within a track
20 About Your Device
.
Page 22

Installing Software
Your device comes with software that helps you create audio tracks and
manage Music Library.
To install drivers and software:
NOTICE: Ensure that your device is not connected to your computer during the
software installation process.
NOTICE: Close all other applications while installing the software.
1
Insert the
The CD runs automatically, and the installation process begins.
If the CD does not run automatically:
a
b
2
When the Dell Digital Jukebox installation screen appears, click
start the software installation process. Follow the instructions on the
screen and click
The software may determine that you have a newer version of
MusicMatch already on your computer. If so, you will be asked whether
or not you would like to continue installing MusicMatch from the CD.
Make your selection to proceed.
If you select "Yes," the installation process will continue.
If you select “No” you will be asked if you would like to install the
MusicMatch plug-in for the Dell DJ.
the plug-in, if you intend to use MusicMatch with your Dell DJ.
3
After the software installation is complete, a message appears asking if
you want to restart your computer now or later. Select
your computer immediately or
later.
Dell DJ Software and Documentation
Using Windows® Explorer® or the
to the drive where you loaded the
Documentation
Double-click
CD.
start.exe
OK, Next
.
or
Ye s
when prompted.
You must select “Yes” and install
No
if you will restart you computer
CD into your CD drive.
My Computer
icon, navigate
Dell DJ Software and
Ye s
to restart
OK
www.dell.com | support.dell.com
to
NOTE: The software is not enabled until after you restart your computer.
4
After restarting your computer, connect your Dell DJ to your computer,
see "Connecting to a Computer" on page 22.
About Your Device 21
Page 23
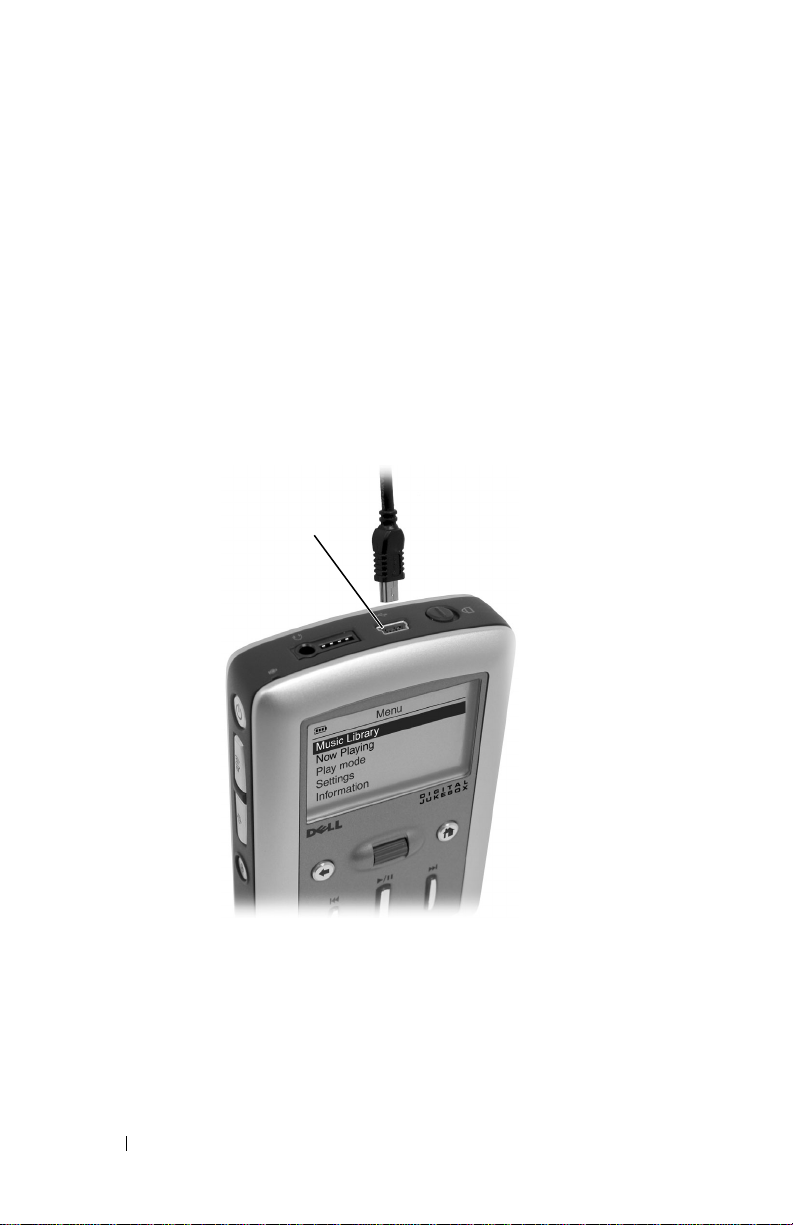
Connecting to a Computer
You can connect your device to a computer using the USB cable provided.
Connect your device to a computer to transfer data files or audio tracks.
See "Transferring Music to the Dell DJ" on page 28 for information on
transferring data files and audio tracks.
To connect the device to a computer:
1
Connect the smaller end of the USB cable to the USB connector on
your device.
2
Connect the larger end of the USB cable to the USB connector on your
www.dell.com | support.dell.com
computer.
USB
connector
22 About Your Device
Page 24
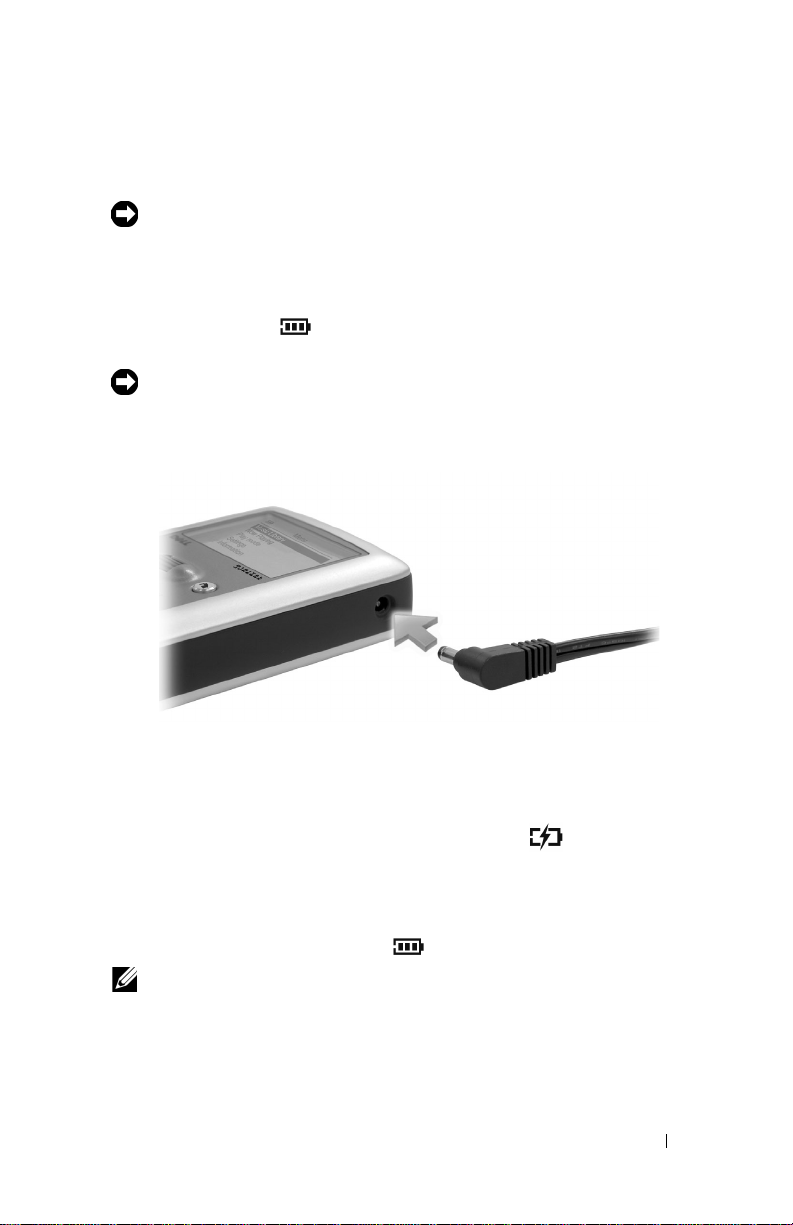
Charging the Battery
NOTICE: Do not use your device until you have charged the battery for at least
6 hours.
Your device has an integrated, rechargeable, lithium-ion battery. Before you
use your device for the first time, you must charge the battery.
Use the battery icon on your device’s screen to monitor the battery
charge.
NOTICE: Do not attempt to replace or remove the integrated battery from your
device. You may damage the device permanently. Any attempt to open your
device voids the warranty.
www.dell.com | support.dell.com
1
Connect one end of the power cable to the DC adapter connector on
your device.
2
Connect the other end of the power cable to an electrical outlet.
Your device displays the Charging Battery icon on the top left
corner of the screen.
3
To check if the battery is fully charged, disconnect the DC adapter
cable from your device. If the battery is fully charged, your device
displays the Full Battery icon .
NOTE: You can charge your device through the USB connector on your
computer only if the battery icon indicates your device has at least a 25 percent
charge remaining. If it is less than 25 percent, you must use the DC adapter to
charge your device. To charge your device from your computer’s USB
connector, your computer must be turned on.
About Your Device 23
Page 25
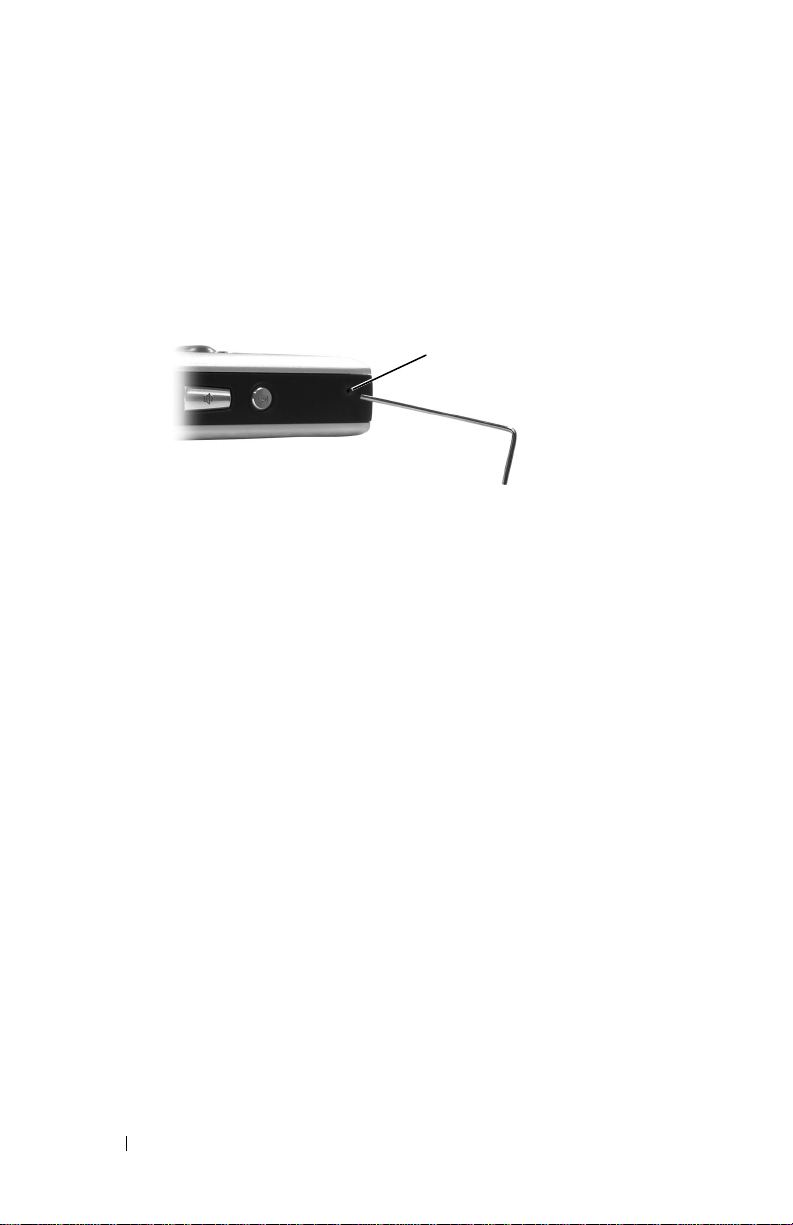
Performing a Reset
If your device stops responding, perform a reset. Files or tracks that are being
transferred may be lost but other data is normally retained.
To perform a reset, insert the end of a thin object, such as a straightened
paper clip, into the reset button.
reset
button
www.dell.com | support.dell.com
24 About Your Device
Page 26
Using Your Dell DJ
Your Dell DJ can be used in different ways:
• As a digital music player (see below),
• As a digital recording device (see "Recording Files Using the Dell DJ"
on page 32), or
• As a data storage device (see "Transferring Music to the Dell DJ" on
page 28).
Playing Digital Music
The Dell DJ can play tracks in MP3, WMA or WAV file formats. The Dell
DJ comes with a few sample MP3 tracks already loaded into the Music
Library. To load your own music files onto the Dell DJ, see "Transferring
Music to the Dell DJ" on page 28.
NOTE: Scroll-select means to rotate and then press the scroll dial.
Listed below are some quick tips on playing music on your Dell DJ. See
"Music Library" on page 36 for more information.
Playing Tracks Using Music Library
Tracks on your Dell DJ can be viewed and played by category (playlist,
album, artist or genre).
To play all tracks within a particular category:
1
Press the Home button on your Dell DJ.
2
Scroll-select
Music Library
.
Page 27
3
Scroll-select
Playlists, Albums, Artists
albums, artists, or genres appears.
, or
Genres
. A list of playlists,
To play a playlist, scroll-select a playlist in
Play
.
To play an album, scroll-select an album in
Play Album
.
To play an artist, scroll-select an artist in
Artist
.
To play a genre, scroll-select a genre in
Genre
.
NOTE: If you have no playlists in your Dell DJ, see "Creating a Playlist" on
www.dell.com | support.dell.com
page 43
Playlists
Albums
Artists
, then scroll-select
Genres
, then scroll-select
To find and play an album by a particular artist:
1
Press the Home button on your Dell DJ.
2
Scroll-select
3
Scroll-select
4
Scroll-select an artist. A list of options appears.
5
Scroll-select
6
Scroll-select an album, and then scroll-select
Music Library
Artists
.
View Albums
.
. A list of albums by the artist appears.
Play Album
To play one track within a category:
1
Press the Home button on your Dell DJ.
2
Scroll-select
3
Scroll-select
Music Library
.
Playlists, Albums, Artists
, or
Genres
. A list of playlists,
albums, artists, or genres appears.
4
Scroll-select a playlist, album, artist or genre, then scroll-select
Tr ac ks
.
5
Scroll-select the track, and then select
Play Track
.
, then scroll-select
, then scroll-select
Play
Play
.
View
To play one track using View All Tracks:
1
Scroll-select
2
Scroll-select
26 Using Your Dell DJ
Music Library
View All Tracks
.
.
Page 28

3
Scroll-select a track, and then scroll-select
Play Track
.
To play all music tracks:
1
Press the Home button on your Dell DJ.
2
Scroll-select
3
Scroll-select
Music Library
.
Play All Music Tracks
.
All tracks are added to the Selected Music list. Playback starts after all
music tracks have been queued.
After selecting
Play All Music Tracks
, your Dell DJ plays all music
tracks in the sequence determined by the Play Mode setting.
To change the Play Mode setting, see "Play Mode" on page 45.
www.dell.com | support.dell.com
Using Your Dell DJ 27
Page 29

Transferring Music to the Dell DJ
With Musicmatch®, you can transfer music tracks from your own personal
music library to the Dell DJ. MusicMatch has the capability to ’rip’ or
convert music CDs to digital music files on your computer. Refer to the
MusicMatch Help tutorial to create digital music files from your music CDs.
With Dell DJ Explorer, you can organize and transfer music tracks, voice
recordings and data files between your PC and the Dell DJ using familiar
Microsoft
www.dell.com | support.dell.com
Transferring Music Tracks Using MusicMatch® to your Dell DJ
Dell Jukebox software powered by Musicmatch® makes buying and enjoying
digital music easy by providing a simple graphical interface between your
computer and the Dell DJ, as well as access to the Musicmatch Downloads
service.
Some of the basic features of MusicMatch are covered below, but for
complete instructions on how to use the MusicMatch software, click Help
on the MusicMatch toolbar (see "Finding Information" on page 7).
®
Windows® methods such as copy-and-paste and drag-and-drop.
NOTE: Before transferring data files or music tracks, you must first connect
your Dell DJ to your computer using the included USB cable.
NOTE: Dell DJ Explorer will not transfer files that are copyright protected by
Digital Rights Management (DRM).
Transferring Music Tracks from MusicMatch Library
1
Connect the Dell DJ to your computer using the included USB cable.
2
Start MusicMatch by clicking
MusicMatch Jukebox
3
Click
Vie w
→
Portable Device Manager.
. The MusicMatch main window appears.
Using Drag-and-Drop or Copy-and-Paste:
1
Follow steps 1 through 3 above.
2
With the Portable Device Manager (PDM) open, you can transfer
tracks or playlists in a drag-and-drop or copy-and-paste operation from
your computer's MusicMatch Jukebox playlists onto the DJ.
28 Using Your Dell DJ
Start
→
All Programs
→
MusicMatch
→
Page 30

3
To drag-and-drop, locate and click the track or playlist that you want to
copy, then drag it to Dell Digital Jukebox or one of its playlists.
4
To copy-and-paste, locate and right-click the track or playlist that you
want to copy, then click Copy. Right-click on Dell Digital Jukebox or
one of its playlists, then click Paste.
Using the Open Music Window:
1
Open the Portable Device Manager (PDM) as described above.
2
Right-click
Digital Jukebox
3
Click the
Music
4
To add all categories
category
Dell Digital Jukebox
. The
Open Music
Library Tracks
or
and select
window appears.
Playlists
window.
, click
Select All
, select the category and click
Add Track(s) to Dell
icon on the left side of the
and then click
Add
. Double-click a category to
Add. To add one
Open
see its sub-categories and tracks.
MusicMatch displays the main PDM window when all selected tracks
are added.
Use these steps to locate and transfer files from any folder on your computer:
1
Open the Portable Device Manager (PDM) as described above.
2
Right-click
Digital Jukebox
3
Click the
Dell Digital Jukebox
. The
Open Music
My Computer
icon on the left side of the
and select
Add Track(s) to Dell
window appears.
Open Music
window.
4
Locate the folder where your tracks are stored.
5
To add all categories
category
, select the category and click
, click
Select All
and then click
Add
. Double-click a category to
Add. To add one
see its sub-categories and tracks.
www.dell.com | support.dell.com
MusicMatch displays the main PDM window when all selected tracks
are added.
Using Synchronization:
1
Open the Portable Device Manager (PDM) as described above.
Using Your Dell DJ 29
Page 31

2
Click the
Options
page.
3
Select either the
Playlist Synchronization
button, then click the
Synchronization
Complete Library Synchronization
option.
or
Selected
tabbed
If you select
Selected Playlist Synchronization
, then also select the
box next to one or more playlists that you wish to have synchronized
with your Dell DJ. Click
NOTE: Synchronization is a one-way process. It will only copy files from the
computer to the Dell DJ. It will not copy files from the Dell DJ to the computer.
NOTICE: On the Synchronization tab, ensure that the option beneath "Protect
www.dell.com | support.dell.com
Content on Device" is checked before starting Synchronization. This protects
any existing files on your Dell DJ from being deleted during the synchronization
process.
4
Click the
Sync
button to update your device with files from your
OK
when you have selected the playlists.
computer.
Select
Help
on the MusicMatch toolbar for more information.
Transferring Music Tracks Using Dell DJ Explorer
With Dell DJ Explorer, you can transfer music tracks using the copy-andpaste or drag-and-drop method.
NOTE: When transferring music tracks to your Dell DJ, be sure to transfer
them to the Music Library folder of your Dell DJ. If you transfer music files from
your PC to the Data Library folder of your Dell DJ, these music tracks will not be
playable on your Dell DJ. They are stored on your Dell DJ as a data files.
Access the Music Library folder on your Dell DJ:
1
Connect your Dell DJ to your computer using the included USB cable.
2
Select
Start
→
All Programs
Explorer
,
or
Open Microsoft Windows Explorer, then double-click
Explorer
.
→
Dell
→
Dell DJ Explorer
→
Dell DJ
Dell DJ
30 Using Your Dell DJ
Page 32
3
With Dell DJ Explorer open, click
Folders
in the Dell DJ Explorer
toolbar.
The drives and main directories associated with the computer are
displayed in the left window. The right window displays the contents of
the drive, directory or folder that is selected in the left window.
4
Click
5
Dell DJ Explorer
Click
Dell Digital Jukebox
in the left window to expand its contents.
beneath
Dell DJ Explorer
in the left
window to expand its contents.
6
Click
Music Library
beneath
Dell Digital Jukebox
in the left window
to expand its contents.
Using Copy-and-Paste:
1
Using Dell DJ Explorer, locate the track, file or folder you want to copy.
2
Right-click the track, file or folder you want to copy and click
3
Locate and right-click the folder in which you want to place the copy,
and then click
Paste
. A copy of the track, file or folder is placed in the
selected folder.
Using drag-and-drop:
1
Using Dell DJ Explorer, locate the track, file or folder you want to copy.
2
Click the track, file or folder you want to copy, and drag it to the folder
in which you want to place the track, file or folder.
Copy
www.dell.com | support.dell.com
.
NOTE: To select several files, hold down the <CTRL> key and click the files.
NOTE: To select consecutive files, hold down the <SHIFT> key and click the
first and last files.
NOTE: To learn more about using Dell DJ Explorer, click the Help icon on
the Dell DJ Toolbar.
Using Your Dell DJ 31
Page 33
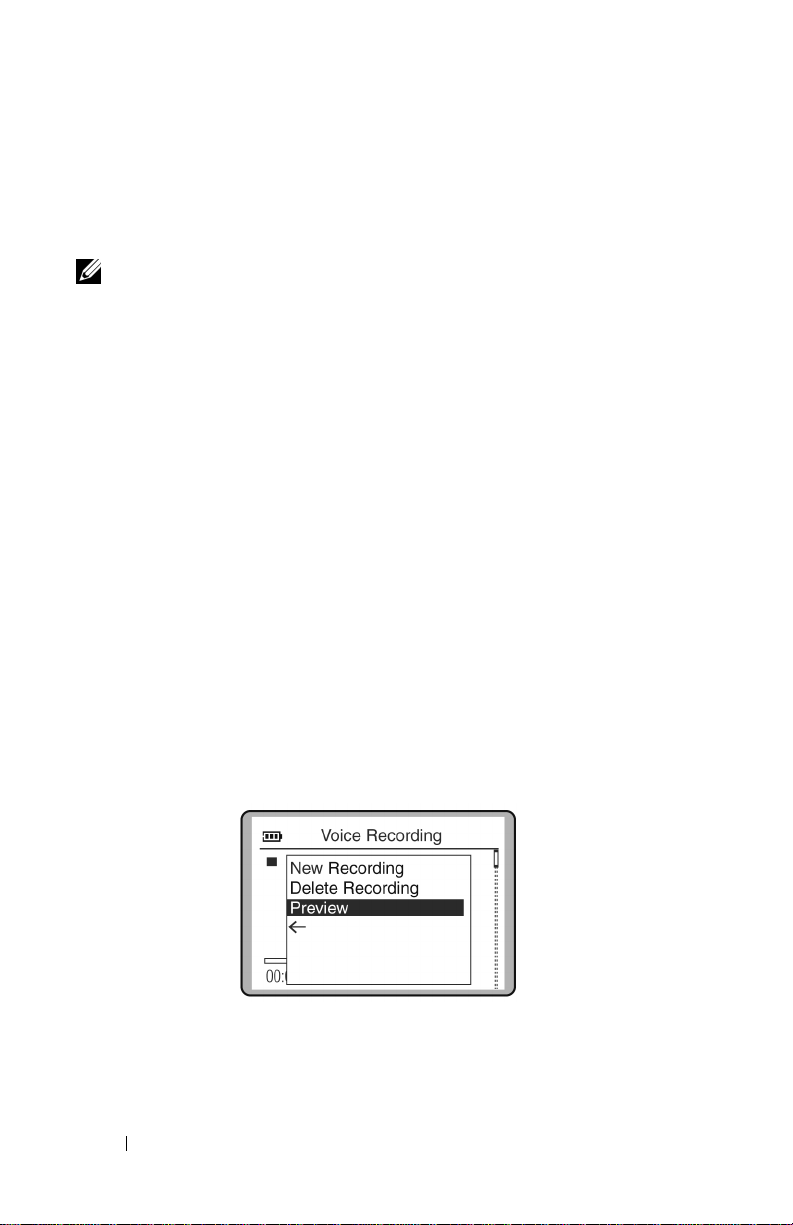
Recording Files Using the Dell DJ
You can create recordings of interviews, lectures, meetings or personal notes
using your Dell DJ's integrated microphone.
NOTE: When recording, the available recording time is displayed in the lower
right hand corner of the display screen. Available recording time is determined
by the amount of available space in your Dell DJ and the remaining battery
power.
To make a recording:
1
Press and hold the record button for 2 seconds, then release.
www.dell.com | support.dell.com
The Dell DJ prepares to record and then automatically starts recording.
The timer in the lower left section of the display screen begins
counting.
2
Press the record button to stop recording.
The Dell DJ processes and saves the recording using a date and time
format such as the following:
YYYY-MM-DD HH:MM:SS
To preview a new recording:
1
After stopping a recording, press the scroll dial. A list of options
appears.
2
Scroll-select
Preview
to hear the recording. Press the Play/Pause button
to stop playback.
32 Using Your Dell DJ
Page 34
To delete a new recording:
1
After stopping a recording, press the scroll dial. A list of options
appears.
2
Scroll-select
Delete Recording
.
To start a new recording immediately after finishing a recording:
1
After stopping a recording, press the scroll dial. A list of options
appears.
2
Scroll-select
NOTE: You can also start a new recording by pressing the record button.
New Recording
, then press the record button.
When you have finished your recordings, press the Home button on the
device to return to the Main Menu.
Accessing and Managing Your Recordings
You can also play, view details, select or delete a recording from your Dell DJ
using the following steps:
1
Press the Home button to return to the Main Menu.
2
Scroll-select
Dell DJ.
3
Scroll-select the desired voice recording track from the list.
4
Scroll-select the desired function,
to Selected
Voic e Rec or din gs
or
Delete Track
to display a list of the recordings on your
Play Track, View Track Details, Add
.
www.dell.com | support.dell.com
Transferring Recordings Between the Dell DJ and Your Computer
You can transfer your Dell DJ recordings to your computer using Dell DJ
Explorer.
NOTE: Recordings cannot be transferred between the Dell DJ and a computer
unless Dell DJ Explorer is installed on the computer. Recordings must be stored
in the Recordings folder inside the Dell DJ Music Library folder in order to be
played by the Dell DJ.
Access the Recordings folder in the Music Library folder on your Dell DJ:
1
Connect your Dell DJ to your computer using the included USB cable.
Using Your Dell DJ 33
Page 35
2
Select
Start
→
All Programs
Explorer
or
,
Open Microsoft Windows Explorer, then double-click
Explorer
3
With Dell DJ Explorer open, click
.
toolbar.
The drives and main directories associated with the computer will be
displayed in the left window. The right window will display the
contents of the drive, directory or folder that is selected in the left
4
5
window.
Click
Dell DJ Explorer
Click
Dell Digital Jukebox
www.dell.com | support.dell.com
window to expand its contents.
6
Click
Music Library
beneath
to expand its contents.
7
Click
Recordings
beneath
its contents.
Transfer recordings between the Dell DJ Recordings folder and the
computer using the same copy-and-paste or drag-and-drop methods
previously described in "Transferring Music Tracks Using Dell DJ
Explorer" on page 30.
→
Dell
→
Dell DJ Explorer
→
Dell DJ
Dell DJ
Folders
in the Dell DJ Explorer
in the left window to expand its contents.
beneath
Music Library
Dell DJ Explorer
Dell Digital Jukebox
in the left window to expand
in the left
in the left window
NOTE: To learn more about using Dell DJ Explorer, click the Help icon on
the Dell DJ Toolbar.
34 Using Your Dell DJ
Page 36

Storing Data files On the Dell DJ
Using the included Dell DJ Explorer software, your Dell DJ can be used as a
data storage device. You can transfer data files between your Dell DJ and any
computer with Dell DJ Explorer installed..
NOTE: Data files cannot be transferred between the Dell DJ and a computer
unless Dell DJ Explorer is installed on the computer. Files stored in the Dell DJ
Data Library are not accessible using MusicMatch. This includes music tracks
or recordings that are stored in the Dell DJ data library.
Access the Data Library folder on your Dell DJ:
1
Connect your Dell DJ to your computer using the included USB cable.
2
Select
Start
→
All Programs
Explorer
,
or
Open Microsoft Windows Explorer, then double-click
Explorer
3
With Dell DJ Explorer open, click
.
toolbar.
The drives and main directories associated with the computer will be
displayed in the left window. The right window will display the
contents of the drive, directory or folder that is selected in the left
window.
4
Click
Dell DJ Explorer
5
Click
Dell Digital Jukebox
window to expand its contents.
6
Click
Data Library
beneath
expand its contents.
→
Dell
→
Dell DJ Explorer
→
Dell DJ
Dell DJ
Folders
in the Dell DJ Explorer
in the left window to expand its contents.
beneath
Dell Digital Jukebox
Dell DJ Explorer
in the left window to
in the left
www.dell.com | support.dell.com
Transfer data files between the Dell DJ Data Library and the computer
using the same copy-and-paste or drag-and-drop methods previously
described in "Transferring Music Tracks Using Dell DJ Explorer" on
page 30.
Using Your Dell DJ 35
Page 37
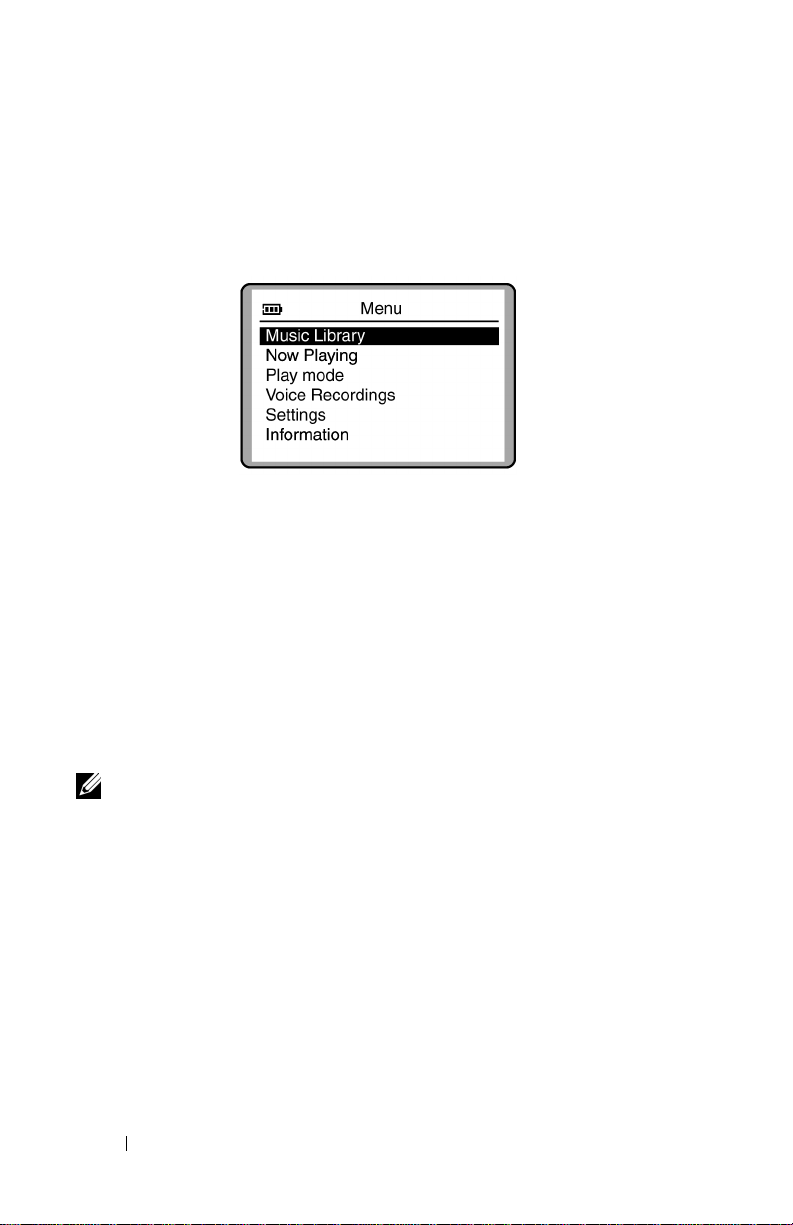
Managing Files from the Main Menu
The Main Menu of the Dell Digital Jukebox is the starting place for the Dell
DJ operations. To get to the Main Menu, press the Home button on your
Dell DJ.
www.dell.com | support.dell.com
Music Library
Now Playing
tracks.
Play Mode
are played.
Voice Recordings
Settings
personal preference.
Information
your Dell DJ.
NOTE: Songs and recordings are stored on the Dell DJ as individual files called
tracks. Tracks can be viewed in lists or sorted into categories according to
playlist, album, artist and genre.
is your window to the music tracks stored on your Dell DJ.
provides you access the currently playing track or selected
enables you to change the sequence and manner in which tracks
is your window to the voice tracks stored on your Dell DJ.
enables you to customize certain settings, such as EQ, to your
provides you with data such as firmware version and space on
Music Library
You can use Music Library to:
• Access music tracks via Playlists, Albums, Artists, Genres and All Tracks
• Play all music tracks
36 Using Your Dell DJ
Page 38
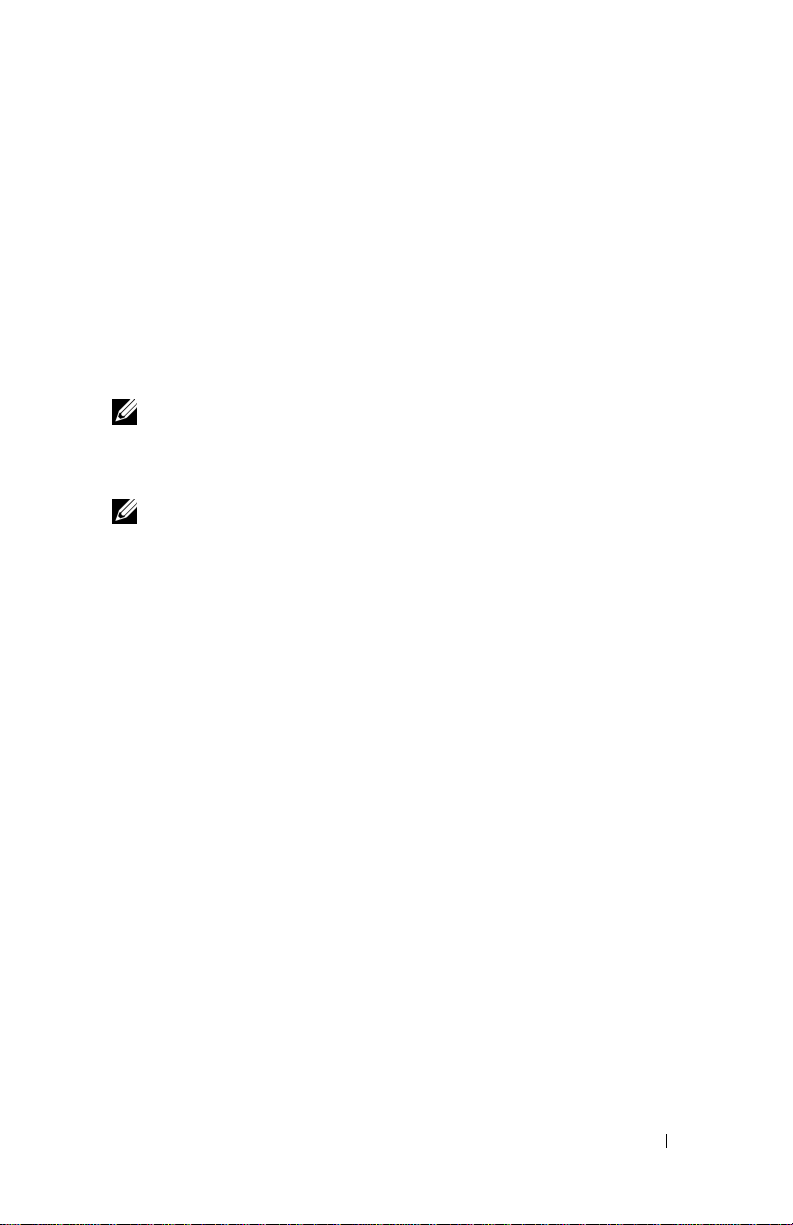
By accessing a playlist, album, artist or genre, you can perform tasks such as:
• Locating tracks
• Playing playlists, albums, artists or genres or tracks within these
categories
• Viewing track information
• Adding to and managing the Selected Music list, then creating playlists
from the Selected Music list
• Deleting tracks, playlists, albums, artists or genres in your Dell DJ
NOTE: Recordings made with your Dell DJ automatically become tracks and
can be found in All Tracks in Music Library, or in Voice Recordings found in your
Dell DJ’s main menu. For the instructions that follow, recordings will be known
as "tracks."
NOTE: "All Tracks" is a list containing all files from the various categories.
Tracks can be found in more than one category. Tracks with no album names,
artist names, or genres are located under "<unknown>". This sub-category is
found in the album, artist, and genre categories.
Locating Tracks in Music Library
You can locate a track by category if you know the album, artist, or genre to
which the track belongs.
To find a track in Music Library:
1
Press the Home button on your Dell DJ.
2
Scroll-select
3
Scroll-select a category. For example, if you want to find a track in a
particular album, scroll-select
4
Scroll-select the sub-category. For example, under
Music Library
.
Albums
.
Albums
, scroll-select
an album.
5
Scroll-select
View Tracks
. The tracks within the sub-category appear.
www.dell.com | support.dell.com
You can also find tracks using the
1
Press the Home button on your Dell DJ.
2
Scroll-select
3
Scroll-select
Music Library
View All Tracks
View all Tracks
.
, then scroll-select the desired track.
option::
Using Your Dell DJ 37
Page 39

To find a track alphabetically in Music Library:
1
Press the Home button on your Dell DJ.
2
Scroll-select
3
Scroll-select
4
Scroll-select
5
Scroll-select the first character of the track name.
Music Library
View All Tracks
Find Track
. A list of characters appears.
.
.
The Dell DJ displays music tracks in alphabetical order, beginning with
the character you selected. Scroll-select a different first character to
view tracks beginning with that character.
6
www.dell.com | support.dell.com
Press the Back button on your Dell DJ.
You can now scroll through the tracks. Scroll-select a track to play it,
view track details, add it to the Selected Music list, or to delete it.
Playing Tracks
Refer to"Playing Tracks Using Music Library" on page 25 for the steps to
select and play tracks and categories on your Dell DJ.
Viewing Track Information
With Music Library, you can view track information such as track title, artist,
album, genre or duration.
To view track information:
1
Find the track using one of the methods described in "Locating Tracks
in Music Library" on page 37.
2
Scroll-select the desired track. A list of options appears.
38 Using Your Dell DJ
Page 40
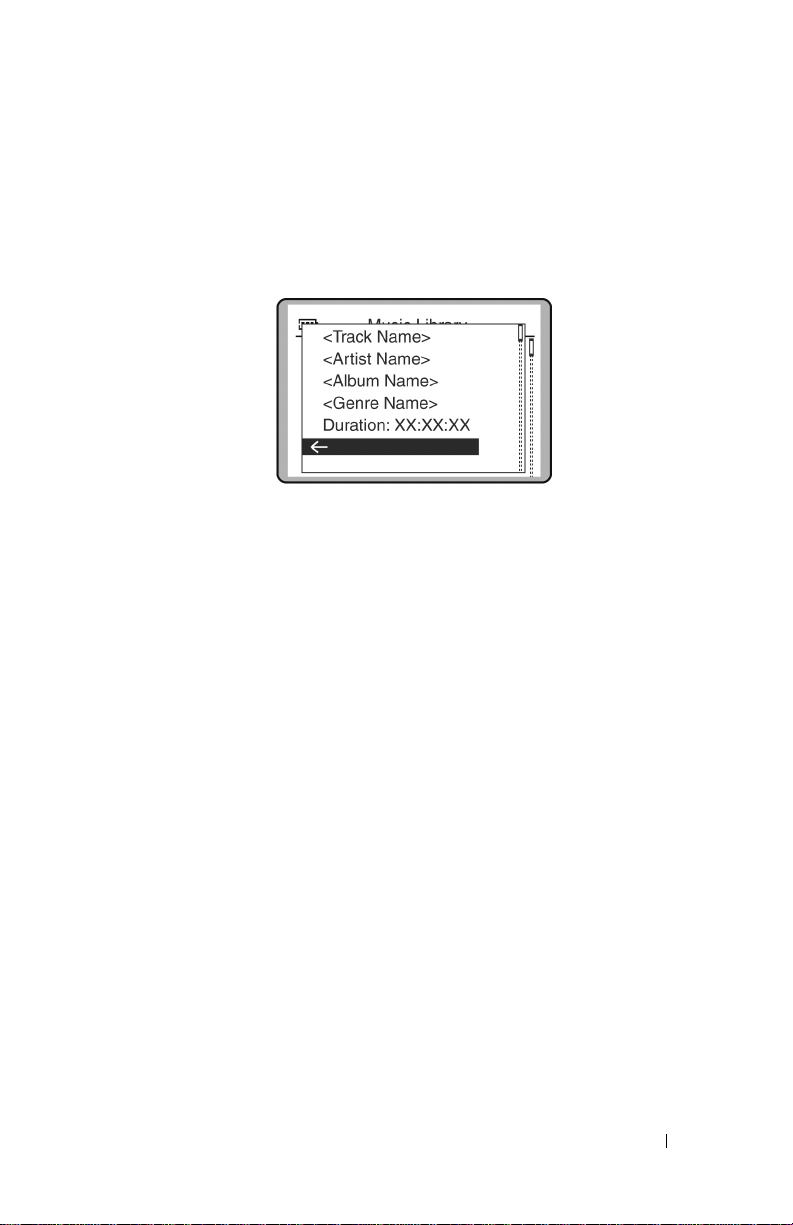
3
Scroll-select
View Track Details
. A message box appears, listing track
information.
If the names do not fit in the screen, press the scroll dial to scroll right
or left to view the details.
Viewing an Album
In Music Library, you can view the contents of an album by an artist.
To locate an album by artist:
1
Press the Home button on your Dell DJ.
2
Scroll-select
3
Scroll-select
4
Scroll-select an artist. A list of options appears.
5
Scroll-select
Music Library
Artists
.
View Albums
.
. A list of albums for the selected artist
appears.
6
Scroll-select an album. A list of options appears.
www.dell.com | support.dell.com
You can then scroll-select an option to:
•Play the album
• View the tracks in the album
• Add the album to the Selected Music list, or
• Delete the album from Music Library.
Using Your Dell DJ 39
Page 41

Now Playing and the Selected Music List
The Selected Music list contains all of the music that you have selected for
playback in a given session. Use the Now Playing option to view and manage
the contents of the Selected Music list.
The Selected Music list is initially created by selecting a track or category of
tracks for playback. You can then add to the Selected Music list by selecting
additional tracks or categories of tracks and then selecting the
Selected
selection by selecting the
option. Or, you can replace the Selected Music list with a new
Play
option.
The Selection Music list can easily be cleared using the
option.
www.dell.com | support.dell.com
Creating and Viewing a Selected Music List
To create a Selected Music list, locate and play a track or category of tracks
using one of the previously described methods.
To view the Selected Music list:
1
Press the Home button on your Dell DJ.
2
Scroll-select
3
Scroll-select
Viewing Track Information
Now Playing
.
Selected Music
.
In the Selected Music list, you can view track information such as track title,
track length, artist, album, or genre.
Add to
Clear Selection
To view information about a track in the Selected Music list:
1
Press the Home button on your Dell DJ.
2
Scroll-select
3
Scroll-select
4
Scroll-select a track.
40 Using Your Dell DJ
Now Playing
.
Selected Music
. A list of tracks appears.
Page 42
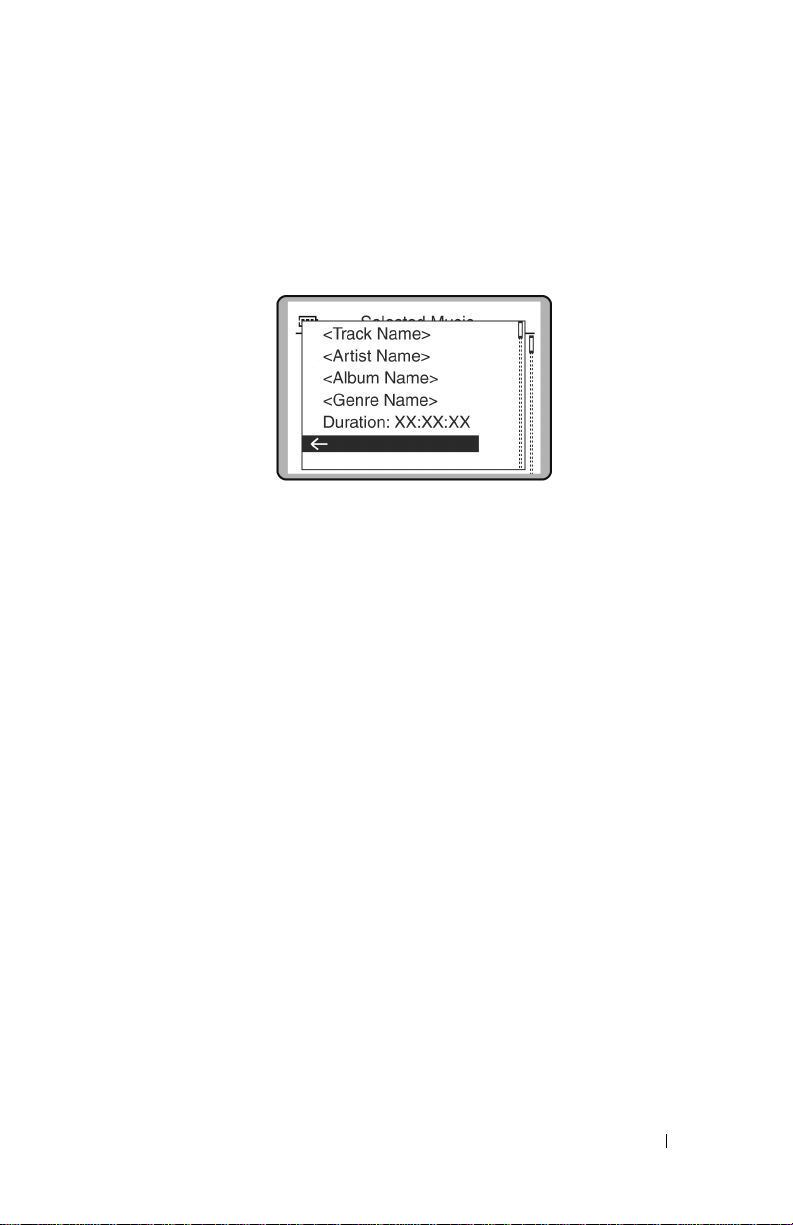
5
Scroll-select
View Track Details.
A message box appears, listing track
information.
If the names do not fit in the screen, press the scroll dial to scroll right
or left to view the details.
Adding Tracks to the Selected Music List
You can add tracks from Music Library to the Selected Music list using the
Add to Selected
the
Play
option.
option, or replace the tracks in the Selected Music list using
To add tracks:
1
Press the Home button on your Dell DJ.
2
Scroll-select
3
Scroll-select a category. For example, if you want to add a track from a
particular album, scroll-select
4
Scroll-select the sub-category . For example, under
Music Library
.
Albums
.
Albums
, scroll-
select an album.
www.dell.com | support.dell.com
If you are adding an entire album, artist, genre, or playlist, skip to
step 6.
5
Scroll-select
6
Scroll-select
View Tracks
. Use the scroll dial to highlight a track.
Add to Selected
.
To replace the current Selected Music list with a new Selected Music list,
locate and play new tracks:
1
Press the Home button on your Dell DJ.
Using Your Dell DJ 41
Page 43

2
Scroll-select
3
Scroll-select an audio category, for example,
4
Scroll-select the sub-category . For example, under
Music Library
.
Albums
.
Albums
, scroll-
select an album.
If you are replacing the Selected Music list with an entire album, artist,
genre, or playlist, skip to step 7.
5
Scroll-select
6
Scroll-select a track.
7
Scroll-select
www.dell.com | support.dell.com
Clearing the Selected Music List
View Tracks
Play
.
.
You can clear all tracks from the Selected Music list without deleting the
tracks from your Dell DJ.
To clear all tracks from the Selected Music list:
1
Press the Home button on your Dell DJ.
2
Scroll-select
3
Scroll-select
Now Playing
.
Clear Selection
, then scroll-select
Ye s
,
or
1
Press the Home button on your Dell DJ.
2
Scroll-select
3
Scroll-select
4
Scroll-select
5
Press the Home button on your Dell DJ to return to the Main Menu.
Now Playing
.
Selected Music
Clear Selection
, then scroll-select a track.
, then scroll-select
Ye s
.
NOTE:
Tracks that are cleared or removed from the Selected Music list
are not deleted from your device. To delete a track from Music Library,
see "Deleting Tracks From Your Dell DJ" on page 43 for information.
Removing a Track from the Selected Music List
To remove a track from the Selected Music list:
1
Press the Home button on your Dell DJ.
2
Scroll-select
42 Using Your Dell DJ
Now Playing
.
Page 44

3
Scroll-select
4
Scroll-select a track.
5
S
croll-select
Creating a Playlist
Selected Music
Remove Track
to display the Selected Music list.
.
If you like the contents and arrangement of your current Selected Music list,
you can save the list as a playlist for retrieval and playback later.
To create a play list:
1
Press the Home button on your Dell DJ.
2
Scroll-select
3
Scroll-select
4
Scroll-select any track in the list. A list of options appears.
5
Scroll-select
6
Use the scroll dial to enter a name for the playlist.
Now Playing
.
Selected Music
Save as Playlist
to display the Selected Music list.
.
For different character sets, such as accented characters or numerals,
scroll-select
7
When you have finished entering the name, scroll-select OK.
Deleting Tracks From Your Dell DJ
Charset
.
To permanently delete tracks, albums, artists, genres, or playlists, you must
remove them from Music Library.
You can remove tracks from the Selected Music list without permanently
deleting the tracks from your Dell DJ. See "Clearing the Selected Music
List" and "Removing a Track from the Selected Music List" on page 42.
www.dell.com | support.dell.com
To delete a track:
1
Follow steps 1 through 5 in "Locating Tracks in Music Library" on
page 37.
2
Scroll-select the track you want to delete. A list of options appears.
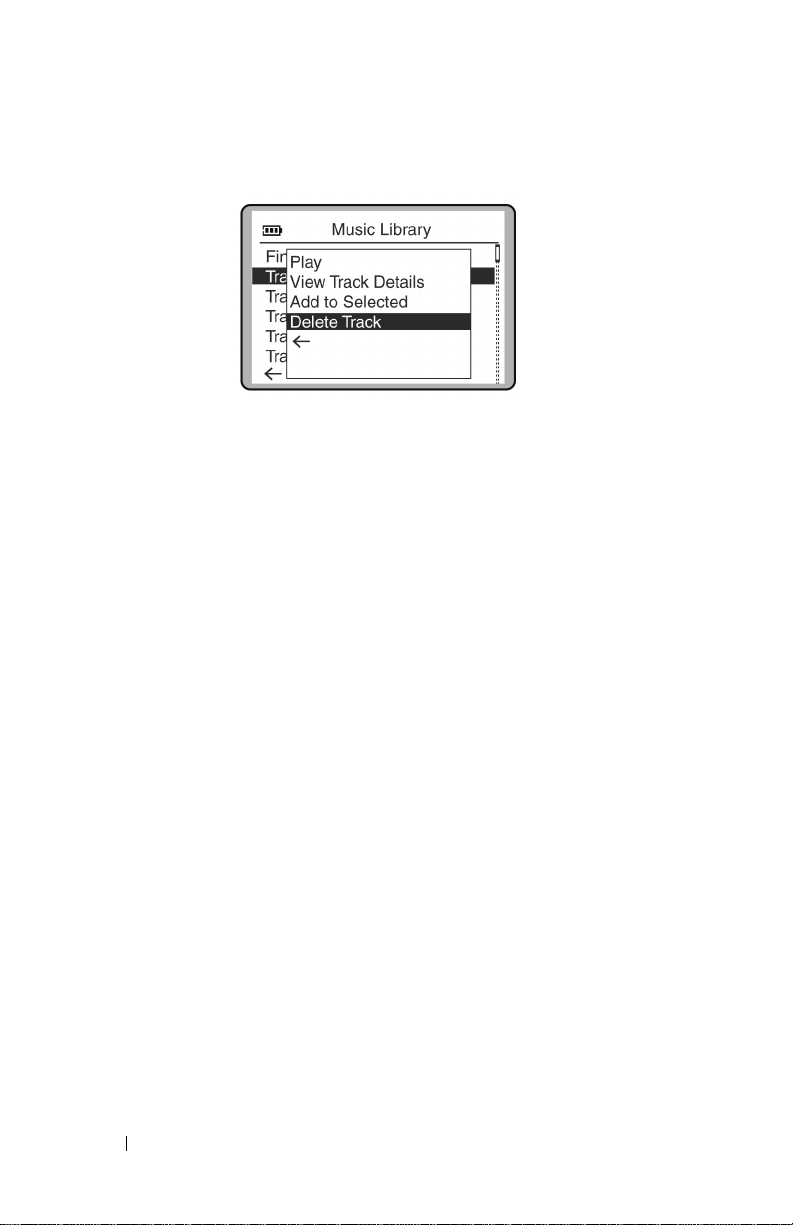
3
Scroll-select
Delete Track
. A message box appears, asking if you want
to delete the selected track.
Using Your Dell DJ 43
Page 45
4
Scroll-select
Ye s
to delete the track from your Dell DJ.
To delete an entire album, artist, genre, or playlist:
www.dell.com | support.dell.com
1
Press the Home button on your Dell DJ.
2
Scroll-select
3
Scroll-select an audio category. For example, if you want to delete a
particular album, scroll-select
4
Scroll-select the sub-category . For example, under
Music Library
.
Albums
.
select the album you want to delete. A list of options appears.
5
Depending on the sub-categoy you selected, scroll-select
Album
,
Delete Artist, Delete Genre
, or
A message box appears, asking if you want to delete the selected
album, artist, genre, or playlist.
6
Scroll-select
Yes
, to delete the album, artist, genre, or playlist from your
Dell DJ.
Albums
Delete Playlist
, scroll-
Delete
.
Renaming a Playlist
To rename a playlist, you must load the playlist into the Selected Music list
as previously described and then save it under a new name. The old playlist
can then be deleted.
To rename a playlist:
1
Clear the Selected Music List using the Clear Selection feature
described in "Clearing the Selected Music List" on page 42.
2
Load the playlist to the Selected Music list. See "Adding Tracks to the
Selected Music List" on page 41 for more information.
3
Save the Selected Music list as a new playlist.
44 Using Your Dell DJ
Page 46
4
Delete the old playlist.
Play Mode
You can use the Play Mode function to determine the sequence in which the
selected tracks are played.
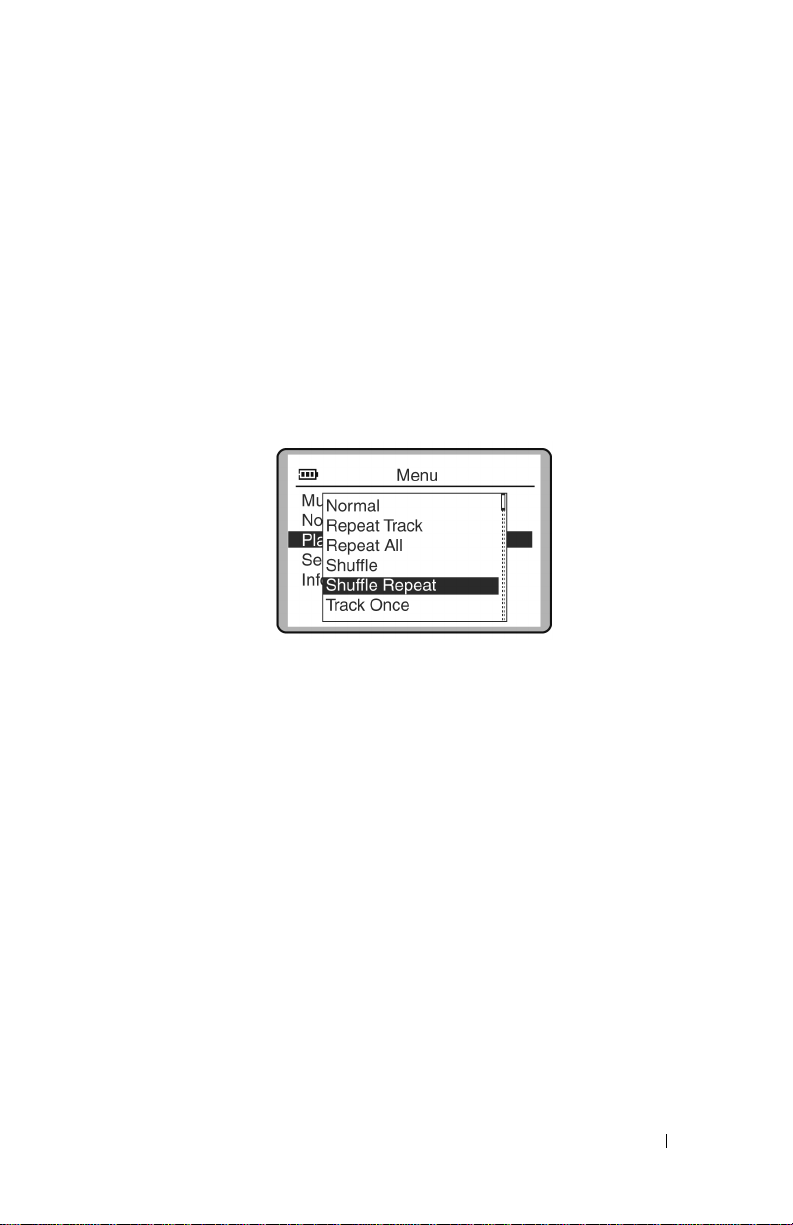
To view play mode options:
1
Press the Home button on your Dell DJ.
2
Scroll-select
3
To change the play mode, scroll-select a play mode.
Play Mode
.
www.dell.com | support.dell.com
Normal
Repeat Track
plays each selected track one time in sequential order.
repeatedly plays the selected track until you turn off the Dell
DJ or change the play mode.
Repeat All
repeatedly plays all of the selected tracks until you turn off the
Dell DJ or change the play mode.
Shuffle
randomly plays the selected tracks one time without repeating any
tracks.
Shuffle Repeat
randomly plays the selected music tracks, then repeats them
in a different random sequence until you turn off the Dell DJ or change the
play mode.
Trac k Onc e
plays the selected track one time and then stops.
Using Your Dell DJ 45
Page 47
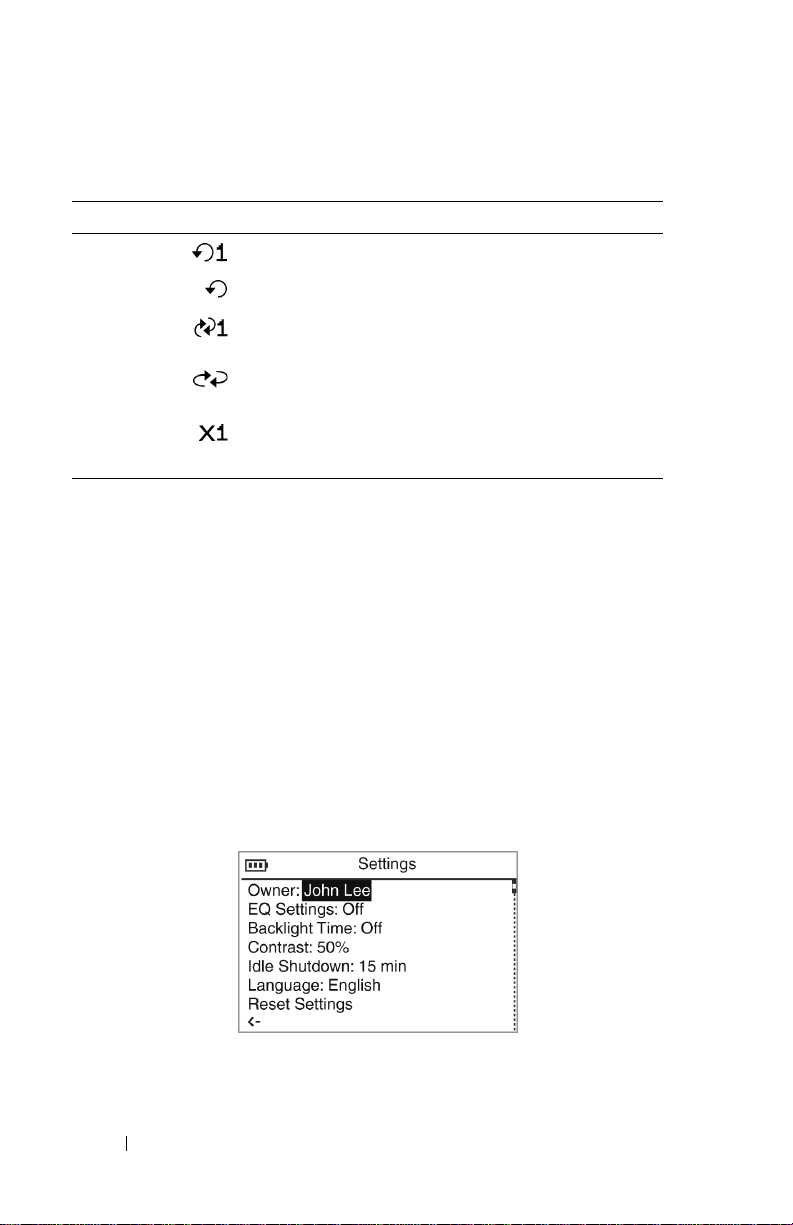
Play Mode Icons
Icon Description
Repeat Track Play and repeat the selected track.
Repeat All Play and repeat all Selected Music tracks.
Shuffle Randomly play all Selected Music tracks once
without repeating.
Shuffle Repeat Randomly play all Selected Music tracks once, then
repeat in a different random sequence.
Track Once Play the selected track once.
www.dell.com | support.dell.com
Settings
You can customize the Dell DJ to your preferences by adjusting the settings.
Yo u c a n set :
• Owner name — enter your name, or a name for your Dell DJ.
• EQ preset — choose from available presets or create a custom EQ
• Backlight duration — choose how long the back light remains lit
• Contrast level — choose a contrast level for optimal viewing
• Idle shutdown time — choose how much idle time passes before your
Dell DJ shuts itself off
• Language — choose the Dell DJ’s display language
46 Using Your Dell DJ
Page 48
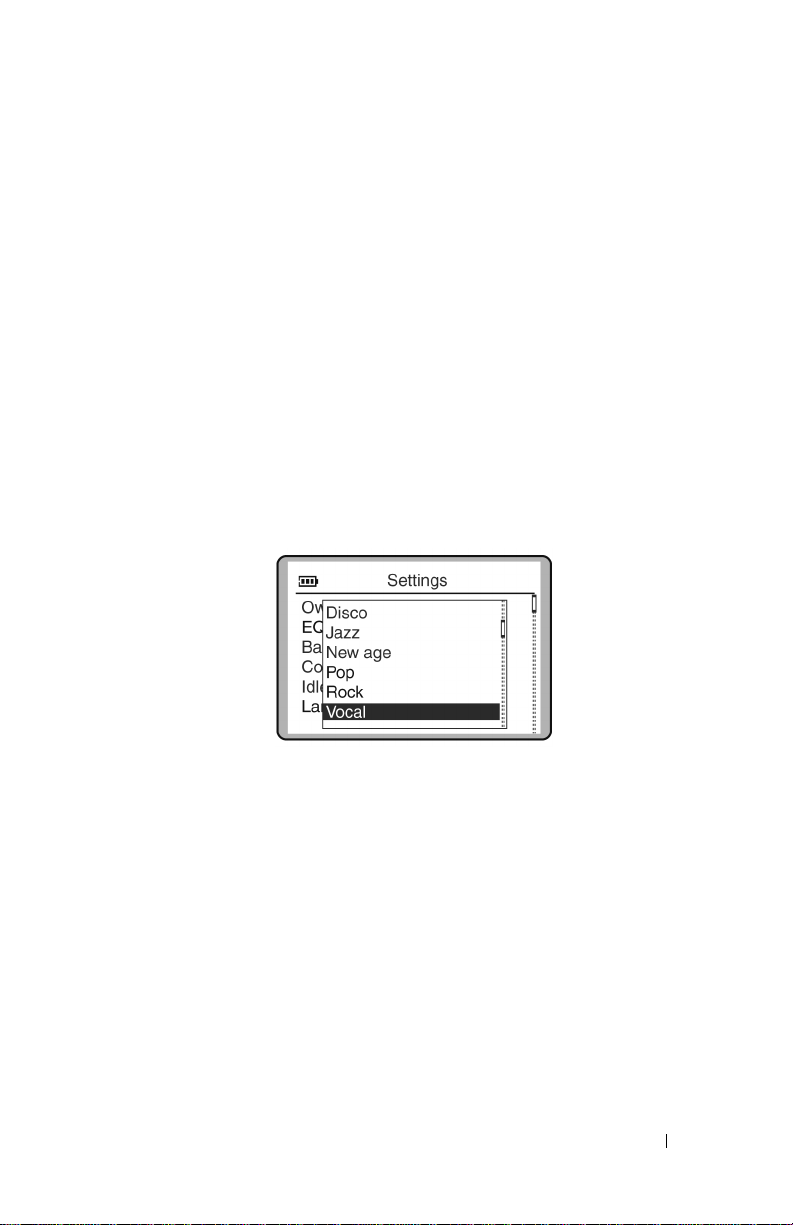
To set the owner’s name:
1
Press the Home button.
2
Scroll-select
3
Scroll-select the owner’s name. A list of characters appear.
4
Scroll-select characters to form the name.
To select other characters, scroll-select
5
Scroll-select
Settings
OK
.
.
Charset
.
To select an EQ setting:
1
Press the Home button.
2
Scroll-select
3
Scroll-select the current EQ setting. A list of EQ presets appears. To
Settings
.
select one of the EQ presets, scroll select the preset.
www.dell.com | support.dell.com
To create a custom EQ setting:
1
Scroll-select
2
Scroll-select a frequency slider and rotate the scroll dial to adjust sound
Custom EQ
. The equalizer control box appears.
output.
Using Your Dell DJ 47
Page 49
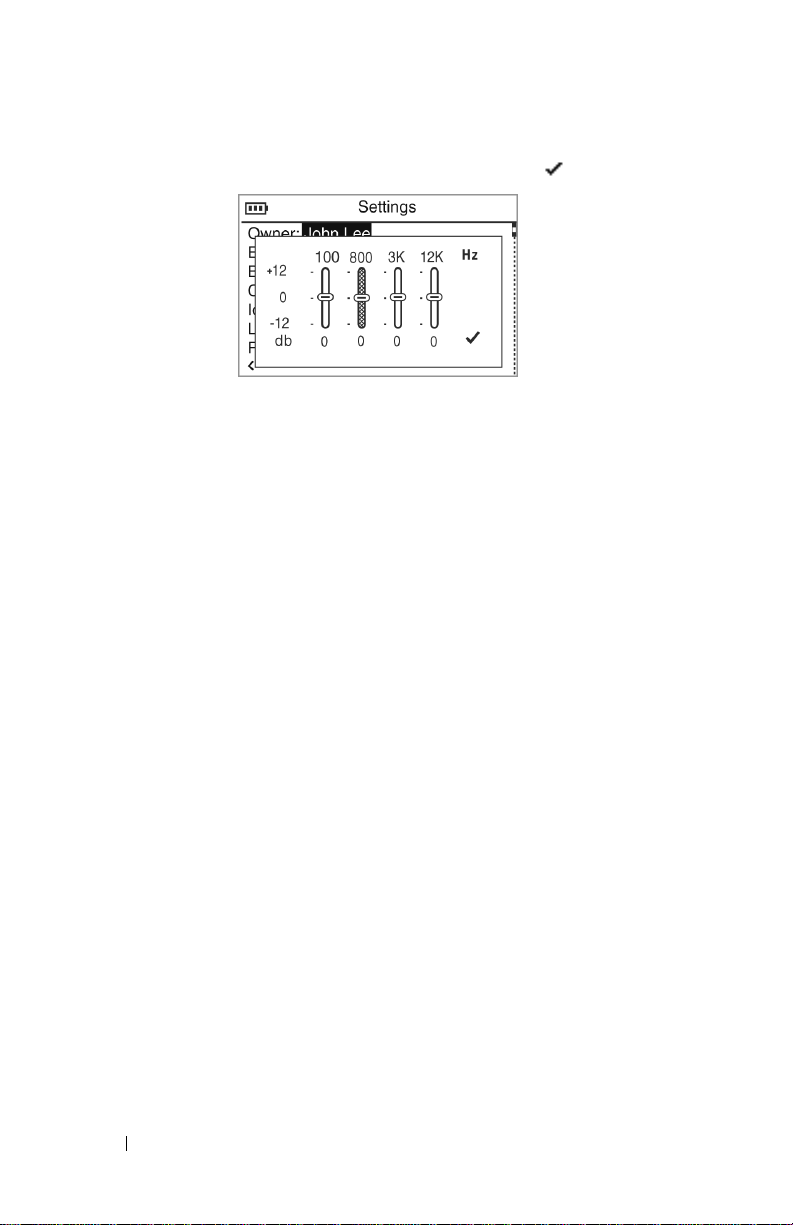
3
To save your EQ setting, scroll-select the check mark icon.
To set the backlight duration:
1
www.dell.com | support.dell.com
Press the Home button.
2
Scroll-select
3
Scroll-select the current backlight time. A list of available durations
Settings
.
appears.
4
Scroll-select a duration.
To set the contrast level:
1
Press the Home button.
2
Scroll-select
3
Scroll-select the current contrast level. A list of available levels appears.
4
Scroll-select a level.
Settings
.
To set the idle shutdown time:
1
Press the Home button.
2
Scroll-select
3
Scroll-select the current idle shutdown time. A list of available times
Settings
.
appears.
4
Scroll-select a shutdown time.
To set the display language:
1
Press the Home button.
2
Scroll-select
48 Using Your Dell DJ
Settings
.
Page 50

3
Scroll-select the current display language. A list of available languages
appears.
4
Scroll-select a language.
Information
You can check your Dell DJ for the following information:
• Firmware version
• Total amount of space for storing music or data
• Available space for storing music or data
• Number of tracks stored
• Number of albums stored
• Number of playlists stored
To check the information for your Dell DJ:
1
Press the Home button.
2
Scroll-select
Information
.
www.dell.com | support.dell.com
Using Your Dell DJ 49
Page 51

www.dell.com | support.dell.com
50 Using Your Dell DJ
Page 52
Frequently Asked Questions
This section covers common problems you might encounter or questions
you might have while using your Dell DJ. If you have a problem that is not
addressed in this chapter, visit
Installation
support.dell.com
for more information.
I can’t install the Dell DJ software on my computer, which has Microsoft®
Windows
halfway.
You cannot install the Dell DJ software on a computer with Windows 98 or
Windows 95.
Upgrade your computer’s operating system to Windows XP or Windows
2000 before attempting to install the Dell DJ.
My Dell DJ cannot be recognized by MusicMatch or Dell DJ Explorer,
after installing the software from the Product Software and
Documentation CD.
In MusicMatch or Dell DJ Explorer, I can’t see my Dell DJ.
Your Dell DJ was probably connected to your computer during the installation.
Your Dell DJ may not be properly connected to your computer.
Disconnect your Dell DJ and restart your computer. You may also have to reinstall the software from the Product Software and Documentation CD. Be
sure to follow the installation steps carefully. Do not connect your Dell DJ to
your computer during software installation.
®
95 or Windows 98 installed on it. The installation stops
NOTE: During installation, if you choose not to install MusicMatch from the
Dell CD, you must still install the MusicMatch plug-in, when prompted, in order
to use MusicMatch with the Dell DJ. See "Installing Software" on page 21.
Page 53

Your Dell DJ may not have sufficient battery charge to operate on your
computer’s USB power.
Connect your Dell DJ to the DC adapter as described in "Charging the
Battery" on page 23.
Usage
I can’t turn my Dell DJ on.
You may not be holding down the Power button long enough.
Press and hold the Power button for at least 3 seconds.
I can’t turn my Dell DJ off.
www.dell.com | support.dell.com
I was using my Dell DJ, and now all the buttons are flashing, and the Dell
DJ is not responding.
The button lock switch on the Dell DJ is in the locked position (red)
Move the switch to the unlocked position (black).
The Dell DJ’s operating system may be locked.
Insert the end of a thin object, such as a straightened paper clip, into the
reset button, located on the left side of your Dell DJ.
The buttons on my Wired Remote don’t work anymore.
The button lock switch on the Wired Remote is in the locked position (red).
Move the switch to the unlocked position (black).
I can’t turn my Dell DJ on, and all the buttons flash when I hold down the
Power button.
The button lock switch on the Dell DJ is in the locked position (red)
Move the switch to the unlocked position (black).
I’ve disconnected my Dell DJ from my computer, but the display still
shows that it is connected.
The Dell DJ’s operating system may be locked.
Insert the end of a thin object, such as a straightened paper clip, into the
reset button, located on the left side of your Dell DJ.
52 Frequently Asked Questions
Page 54

My computer does not recognize my Dell DJ.
You may be using a USB hub to connect your Dell DJ to your computer.
Connect your Dell DJ directly to your computer’s USB port.
I don’t see the charging icon anymore, but my Dell DJ seems to be working.
The charging icon disappears when the Dell DJ’s battery is fully charged.
This is not a problem. You can verify that the battery is fully charged by
following these steps:
1
Run your Dell DJ on battery power for thirty minutes.
2
Connect the DC adapter to your Dell DJ and charge it as described in
"Charging the Battery" on page 23.
3
While the battery is charging, note if the charging icon appears.
The Power button flashes regularly until the battery is fully charged.
The charging icon disappears.
Whenever I turn my Dell DJ on, it starts up in Rescue Mode.
Your Dell DJ’s firmware or operating system may be damaged.
Go to
support.dell.com
latest firmware into your player. For more information on what you can do in
Rescue mode, see "Troubleshooting in Rescue Mode" on page 55.
When I turn my Dell DJ on, a ’Re-building Library’ message appears.
The Dell DJ sometimes needs to re-map the location of music tracks and files.
Wait for your player to finish verifying the location of music tracks, files and
playlists.
for the latest updates for your Dell DJ, and load the
www.dell.com | support.dell.com
General
When I listen to music tracks, I hear a lot of noise or drop-outs.
The track you are listening to was not recorded or encoded properly.
Verify that the music track sounds the same when you play it from the Dell
DJ and from your computer. You can then acquire a better recording of the
track and transfer it to your Dell DJ.
Frequently Asked Questions 53
Page 55

I want to delete all the music tracks on my Dell DJ, but I can’t find the
option in the main menu.
From the main menu, you can only delete one track, album, artist, genre or
playlist at a time.
To delete all content from your Dell DJ, enter Rescue mode and use the
Format All
mode, see "Troubleshooting in Rescue Mode" on page 55.
option. For more information about what you can do in Rescue
Error Indications
Rescue mode firmware error indication
www.dell.com | support.dell.com
Your Dell DJ’s firmware has been erased, or damaged.
Reload the firmware as described in "Troubleshooting in Rescue Mode" on
page 55.
Rescue mode Hard Disk problem
Your Dell DJ’s internal storage space may be corrupted.
Use the
Mode" on page 55.
All the buttons on my Dell DJ flash three times when I try to turn my
player on.
The button lock switch on the Dell DJ is in the locked position (red)
Move the switch to the unlocked position (black).
Format All
option as described in "Troubleshooting in Rescue
54 Frequently Asked Questions
Page 56

Troubleshooting in Rescue Mode
In Rescue mode, you can quickly resolve issues that involve your Dell DJ’s
firmware and hard disk operations.
To activate Rescue mode:
Press the Play button while inserting the end of a thin object such as a
straightened paper clip into the reset at the same time, then hold the Play
button until your Dell DJ turns on.
In Rescue mode, you can select the following options:
•
Clean Up
No files, music tracks or playlists are lost.
•
Format All
tracks and playlists are lost. You must reload all files, music tracks and
playlists.
•
Reload Firmware
updated firmware. NOTE: Do not choose this option until you have
downloaded updated firmware into your computer.
•
Reboot
Clean Up
Choose this option if you experience audio drop-outs, repeated
Library
messages or if your player is frequently unresponsive.
No
files, music tracks or playlists are lost when this option is selected.
To clean up your Dell DJ:
1
Activate Rescue mode as described above.
2
Scroll-select
3
Scroll-select
A progress display appears.
The cleanup can take more than a few minutes, depending on how
many music tracks you have in your Dell DJ.
— searches for and fixes fragmented files and lost clusters.
— reformats the Dell DJ’s hard disk. NOTE: All files, music
— clears firmware in the Dell DJ so that you can load
— restarts the Dell DJ after testing.
Re-building
Clean Up
Ye s
.
.
www.dell.com | support.dell.com
Format All
Choose this option if you experience audio drop-outs, repeated
Library
messages or if your player is frequently unresponsive.
All
files, music tracks or playlists are lost when this option is selected.
Frequently Asked Questions 55
Re-building
Page 57

To Form a t you r Del l DJ:
1
Activate Rescue mode as described above.
2
Scroll-select
3
Scroll-select
Format All
Ye s
.
.
A progress display appears.
Reload Firmware
Choose this option to upgrade your Dell DJ’s firmware, or if you want to
correct firmware problems. You should also choose this option when your
player becomes unresponsive frequently.
This option removes the firmware in your Dell DJ so that you can load
www.dell.com | support.dell.com
updated firmware or reload current firmware. You should have the firmware
file on your computer before choosing this option.
You can download updated firmware from support.dell.com. No files, music
tracks or playlists are lost when you reload or upgrade firmware.
To reload firmware:
1
Activate Rescue mode as described above.
2
Scroll-select
3
Scroll-select
4
Connect your Dell DJ to your computer using the USB cable.
5
Turn your Dell DJ on, and double-click the firmware file on your
Reload Firmware
Ye s
.
.
computer.
Your Dell DJ is automatically detected. The firmware is loaded and the
Dell DJ restarts.
6
Restart your computer if prompted.
Reboot
Choose this option to get out of Rescue mode, and return to your Dell DJ’s
normal display.
When in Rescue mode, scroll-select
Reboot.
You can press and hold the
Power button.
56 Frequently Asked Questions
Page 58

Appendix
Page 59

Specifications
Hardware
Display LCD
160 x 104 resolution
blue EL back light
Storage media 15/20 GB HDD
www.dell.com | support.dell.com
Battery Embedded lithium-ion polymer
DC-in power 4V ±5%, 2.4A
PC connection USB 2.0/1.1
Voice recording integrated microphone
Performance Parameters
Audio quality (specifications based on 32-ohm load at
1-kHz tone are typical values)
Signal-to-noise ratio
Channel separation
Frequency response
Harmonic distortion
up to 94 dB
up to 65 dB
20 Hz–20 kHz (line-out)
24 Hz–20 kHz (headphones)
< 0.1%
Playtime up to 20 hours (based on 128 kbps MP3
songs, continuous playback)
58 Appendix
Page 60

Performance Parameters
Battery charging DC power in — full charge in 6 hours
USB charging — full charge in 7.5 hours
(battery must have 25% charge for USB
charging)
www.dell.com | support.dell.com
Appendix 59
Page 61

Glossary
BITRATE — A bitrate indicates the average number of bits in 1 second of a digital
audio track. MP3 encoders allow you to specify the bitrate when making MP3 files.
The higher the bitrate, the better the audio quality. Unfortunately, this also means
a larger file size.
C
ATEGORY — A general grouping of audio tracks, for example, artist, album or
genre.
DIGITAL RIGHTS MANAGEMENT (DRM) — A technology enabling the copyright owner of
intellectual property, like a digital audio track, to control file usage. It is normally
used to allow you to download digital audio tracks while preventing you from
distributing the files to other people or other devices. With DRM, digital audio
tracks contain digital signatures. Your device is DRM-compliant.
www.dell.com | support.dell.com
G
IGABYTE (GB) — About a thousand million bytes. A 1-GB device can store 1000
MB worth of MP3 files. If your MP3 files are encoded at 128 kbps and each file is
about 4 minutes long, a 10-GB device can store about 2500 MP3 files.
FIRMWARE — The software in your device that allows you to perform numerous
functions including playing and recording audio.
KBPS — Kilobits-per-second. A measure of how good the bitrate is. 128 kbps is the
standard bitrate for MP3 files. 128-kbps MP3s are near-CD quality. Some other
commonly used encoding rates are 160 or 192Kbps.
LITHIUM-ION BATTERY (LI-ION) — A battery composed of lithium, a light metal with
high electrochemical potential. Lithium batteries are light and store high amounts
of electrical energy. Because of this, lithium-ion batteries are ideal for portable
devices like yours. Lithium-ion batteries do not use poisonous metals, such as lead,
mercury, or cadmium, and have no memory effect problems. However, they are
more expensive than conventional nickel-cadmium (NiCad) and nickel metalhydride (NiMH) batteries. Your device uses a li-ion battery.
M
EGABYTE (MB) — About 1 million bytes. Bytes, megabytes, and gigabytes are
measures of how much data a storage device can hold. For example, a 3-minute
MP3 encoded at standard bitrates is approximately 3 MB in size.
M
EMORY EFFECT — A property of some NiCad batteries that can surface when a
battery is not fully used or discharged before it is recharged. This can cause the
battery to have a false ‘memory’ as to how much electrical energy it can store. This
results in significantly lower battery levels, even after a full charge.
MP3 — A member of the MPEG compression family, MP3 is a commonly used
compressed digital-audio format. MP3 encoding transforms digital audio files (like
WAV) to provide reasonable audio quality in relatively small file sizes.
M
USIC LIBRARY — An organized collection of audio tracks in your device. Tracks are
60 Appendix
Page 62

grouped by categories, namely, All tracks, Albums, Artists, and Genres.
LAYLIST — A grouping of audio tracks. Using a playlist, you can create a playback
P
sequence of audio tracks from multiple albums or categories without actually
rearranging any audio tracks in the device’s Music Library. You can also name a
playlist, for example, My Favorite Pop Songs.
S
ELECTED MUSIC LIST — The Selected Music list is a line of tracks. You can choose an
album or a playlist of tracks to be played. In Normal mode, tracks are played in the
order in which they are queued.
SHUFFLE — A Play mode that randomly plays tracks once only from the Selected
Music list.
SHUFFLE REPEAT — A Play Mode that randomly plays tracks from the Selected Music
List repeatedly.
USB — Universal Serial Bus. A moderately high-speed input/output technology for
"hot swap" data transfers, meaning that you can connect or disconnect a USB
device without turning off your computer. Your device uses the newer USB 2.0
standard that allows for higher speed transfers than USB 1.1
W
IRED REMOTE — An accessory for your device that you can use to remotely access
the device controls.
www.dell.com | support.dell.com
Appendix 61
Page 63

www.dell.com | support.dell.com
62 Appendix
Page 64

Regulatory Notices
Electromagnetic Interference (EMI) is any signal or emission, radiated in free space or
conducted along power or signal leads, that endangers the functioning of a radio navigation
or other safety service or seriously degrades, obstructs, or repeatedly interrupts a licensed
radio communications service. Radio communications services include but are not limited to
AM/FM commercial broadcast, television, cellular services, radar, air-traffic control, pager,
and Personal Communication Services (PCS). These licensed services, along with
unintentional radiators such as digital devices, including computers, contribute to the
electromagnetic environment.
Electromagnetic Compatibility (EMC) is the ability of items of electronic equipment to
function properly together in the electronic environment. While this device has been
designed and determined to be compliant with regulatory agency limits for EMI, there is no
guarantee that interference will not occur in a particular installation. If this equipment does
cause interference with radio communications services, which can be determined by turning
the equipment off and on, you are encouraged to try to correct the interference by one or
more of the following measures:
• Reorient the receiving antenna.
• Relocate the device with respect to the receiver.
• Move the device away from the receiver.
• Plug the device into a different outlet so that the device and the receiver are on
different branch circuits.
If necessary, consult a Dell Technical Support representative or an experienced
radio/television technician for additional suggestions.
Dell™ devices are designed, tested, and classified for their intended electromagnetic
environment. These electromagnetic environment classifications generally refer to the
following harmonized definitions:
• Class A is typically for business or industrial environments.
• Class B is typically for residential environments.
Information Technology Equipment (ITE), including devices, expansion cards, printers,
input/output (I/O) devices, monitors, and so on, that are integrated into or connected to the
device should match the electromagnetic environment classification of the device.
A Notice About Shielded Signal Cables: Use only shielded cables for connecting devices to
any Dell device to reduce the possibility of interference with radio communications
services. Using shielded cables ensures that you maintain the appropriate EMC
classification for the intended environment.
www.dell.com | support.dell.com
Appendix 63
Page 65

Most Dell devices are classified for Class B environments. However, the inclusion of certain
options can change the rating of some configurations to Class A. To determine the
electromagnetic classification for your device, see the following sections specific for each
regulatory agency. Each section provides country-specific EMC/EMI or product safety
information.
FCC Notices (U.S. Only)
Most Dell devices are classified by the Federal Communications Commission (FCC) as
Class B digital devices. To determine which classification applies to your device, examine all
FCC registration labels located on the bottom, side, or back panel of your device, on cardmounting brackets, and on the cards themselves. If any one of the labels carries a Class A
rating, your entire device is considered to be a Class A digital device. If all labels carry an
FCC Class B rating as distinguished by either an FCC ID number or the FCC logo, ( ),
your device is considered to be a Class B digital device.
www.dell.com | support.dell.com
Once you have determined your device’s FCC classification, read the appropriate FCC
notice. Note that FCC regulations provide that changes or modifications not expressly
approved by Dell could void your authority to operate this equipment.
This device complies with Part 15 of the FCC Rules. Operation is subject to the following
two conditions:
• This device may not cause harmful interference.
• This device must accept any interference received, including interference that may
cause undesired operation.
Class A
This equipment has been tested and found to comply with the limits for a Class A digital
device pursuant to Part 15 of the FCC Rules. These limits are designed to provide reasonable
protection against harmful interference when the equipment is operated in a commercial
environment. This equipment generates, uses, and can radiate radio frequency energy and, if
not installed and used in accordance with the manufacturer’s instruction manual, may cause
harmful interference with radio communications. Operation of this equipment in a
residential area is likely to cause harmful interference, in which case you will be required to
correct the interference at your own expense.
Class B
This equipment has been tested and found to comply with the limits for a Class B digital
device pursuant to Part 15 of the FCC Rules. These limits are designed to provide reasonable
protection against harmful interference in a residential installation. This equipment
generates, uses, and can radiate radio frequency energy and, if not installed and used in
accordance with the manufacturer’s instruction manual, may cause interference with radio
communications. However, there is no guarantee that interference will not occur in a
64 Appendix
Page 66

particular installation. If this equipment does cause harmful interference to radio or
television reception, which can be determined by turning the equipment off and on, you are
encouraged to try to correct the interference by one or more of the following measures:
• Reorient or relocate the receiving antenna.
• Increase the separation between the equipment and the receiver.
• Connect the equipment into an outlet on a circuit different from that to which the
receiver is connected.
• Consult the dealer or an experienced radio/television technician for help.
FCC Identification Information
The following information is provided on the device or devices covered in this document in
compliance with FCC regulations:
• Model number: HV01T
• Company name:
Dell Inc.
One Dell Way
Round Rock, Texas 78682 USA
512-338-4400
IC Notice (Canada Only)
Most Dell devices (and other Dell digital apparatus) are classified by the Industry Canada
(IC) Interference-Causing Equipment Standard #3 (ICES-003) as Class B digital devices.
To determine which classification (Class A or B) applies to your device (or other Dell digital
apparatus), examine all registration labels located on the bottom, side, or the back panel of
your device (or other digital apparatus). A statement in the form of "IC Class A ICES-003" or
"IC Class B ICES-003" will be located on one of these labels. Note that Industry Canada
regulations provide that changes or modifications not expressly approved by Dell could void
your authority to operate this equipment.
www.dell.com | support.dell.com
This Class B (or Class A, if so indicated on the registration label) digital apparatus meets
the requirements of the Canadian Interference-Causing Equipment Regulations.
Cet appareil numérique de la Classe B (ou Classe A, si ainsi indiqué sur l’étiquette
d’enregistration) respecte toutes les exigences du Reglement sur le Materiel Brouilleur du
Canada.
Appendix 65
Page 67

NOM Information (Mexico Only)
The following information is provided on the device(s) described in this
document in compliance with the requirements of the official Mexican
standards (NOM):
Exporter: Dell Inc.
Importer: Dell Inc.
www.dell.com | support.dell.com
Ship to: Dell Inc.
Model number: HV01T
Supply voltage: 100/240 VAC
Frequency: 50/60Hz
Input Current Consumption:
Output voltage: 5.4 VDC
Output current: 2.41 A
One Dell Way
Round Rock, TX 78682
Paseo de la Reforma 2620 - 11° Piso
Col. Lomas Altas
11950 México, D.F.
al Cuidado de Kuehne & Nagel de México S. de R.L.
Avenida Soles No. 55
Col. Peñon de los Baños
15520 México, D.F.
0.4A
66 Appendix
Page 68

Limited Warranties and Return Policy
Dell-branded hardware products purchased in the U.S. or Canada come with either a 90-day,
1-year, 2-year, 3-year, or 4-year limited warranty. To determine which warranty came with
your hardware product(s), see your packing slip or invoice. The following sections describe
the limited warranties and return policy for the U.S., the limited warranties and return policy
for Canada, and the manufacturer guarantee for Latin America and the Caribbean.
Limited Warranty for Dell-Branded Hardware Products (U.S. Only)
What is covered by this limited warranty?
This limited warranty covers defects in materials and workmanship in your—our end-user
customer's—Dell-branded hardware products, including Dell-branded peripheral products.
What is not covered by this limited warranty?
This limited warranty does not cover:
• Software, including the operating system and software added to the Dell-branded
hardware products through our factory-integration system, third-party software, or the
reloading of software
• Non-Dell-branded and Solution Provider Direct products and accessories
• Problems that result from:
– External causes such as accident, abuse, misuse, or problems with electrical
power
– Servicing not authorized by Dell
– Usage that is not in accordance with product instructions
– Failure to follow the product instructions or failure to perform preventive
maintenance
– Problems caused by using accessories, parts, or components not supplied by Dell
• Products with missing or altered Service Tags or serial numbers
• Products for which Dell has not received payment
www.dell.com | support.dell.com
Appendix 67
Page 69

THIS WARRANTY GIVES YOU SPECIFIC LEGAL RIGHTS, AND YOU MAY ALSO
HAVE OTHER RIGHTS WHICH VARY FROM STATE TO STATE (OR
JURISDICTION TO JURISDICTION). DELL'S RESPONSIBILITY FOR
MALFUNCTIONS AND DEFECTS IN HARDWARE IS LIMITED TO REPAIR AND
REPLACEMENT AS SET FORTH IN THIS WARRANTY STATEMENT. ALL
EXPRESS AND IMPLIED WARRANTIES FOR THE PRODUCT, INCLUDING BUT
NOT LIMITED TO ANY IMPLIED WARRANTIES AND CONDITIONS OF
MERCHANTABILITY AND FITNESS FOR A PARTICULAR PURPOSE, ARE
LIMITED IN TIME TO THE TERM OF THE LIMITED WARRANTY PERIOD
REFLECTED ON YOUR PACKING SLIP OR INVOICE. NO WARRANTIES,
WHETHER EXPRESS OR IMPLIED, WILL APPLY AFTER THE LIMITED
WARRANTY PERIOD HAS EXPIRED. SOME STATES DO NOT ALLOW
LIMITATIONS ON HOW LONG AN IMPLIED WARRANTY LASTS, SO THIS
LIMITATION MAY NOT APPLY TO YOU.
www.dell.com | support.dell.com
WE DO NOT ACCEPT LIABILITY BEYOND THE REMEDIES PROVIDED FOR IN
THIS LIMITED WARRANTY OR FOR CONSEQUENTIAL OR INCIDENTAL
DAMAGES, INCLUDING, WITHOUT LIMITATION, ANY LIABILITY FOR THIRDPARTY CLAIMS AGAINST YOU FOR DAMAGES, FOR PRODUCTS NOT BEING
AVAILABLE FOR USE, OR FOR LOST DATA OR LOST SOFTWARE. OUR
LIABILITY WILL BE NO MORE THAN THE AMOUNT YOU PAID FOR THE
PRODUCT THAT IS THE SUBJECT OF A CLAIM. THIS IS THE MAXIMUM
AMOUNT FOR WHICH WE ARE RESPONSIBLE.
SOME STATES DO NOT ALLOW THE EXCLUSION OR LIMITATION OF
INCIDENTAL OR CONSEQUENTIAL DAMAGES, SO THE ABOVE LIMITATION
OR EXCLUSION MAY NOT APPLY TO YOU.
How long does this limited warranty last?
This limited warranty lasts for the time period indicated on your packing slip or invoice,
except for the following Dell-branded hardware:
• Portable computer batteries carry a 1-year limited warranty.
• Projector lamps carry a 90-day limited warranty.
• Memory carries a lifetime limited warranty.
• Monitors carry the longer of either a 3-year limited warranty or the remainder of the
warranty for the Dell computer to which the monitor will be connected.
• Other add-on hardware carries the longer of either a 1-year limited warranty for new
parts and a 90-day limited warranty for reconditioned parts or, for both new and
reconditioned parts, the reminder of the warranty for the Dell computer on which
such parts are installed.
The limited warranty on all Dell-branded products begins on the date of the packing slip or
invoice. The warranty period is not extended if we repair or replace a warranted product or
any parts. Dell may change the availability of limited warranties, at its discretion, but any
changes will not be retroactive.
68 Appendix
Page 70

What do I do if I need warranty service?
Before the warranty expires, please call us at the relevant number listed in the following
table. Please also have your Dell Service Tag or order number available.
Individual Home Consumers: U.S. Only
Technical Support 1-800-624-9896
Customer Service 1-800-624-9897
Individual Home Consumers who purchased through an
Employee Purchase Program:
Technical Support and Customer Service 1-800-822-8965
Home and Small Business Commercial Customers:
Technical Support and Customer Service 1-800-456-3355
Medium, Large, or Global Commercial Customers, Healthcare
Customers, and Value-Added Resellers (VARs):
Technical Support and Customer Service 1-800-822-8965
Government and Education Customers:
Technical Support and Customer Service 1-800-234-1490
Dell-Branded Memory
1-888-363-5150
What will Dell do?
During the 90 days of the 90-day limited warranty and the first year of all other limited
warranties: During the 90 days of the 90-day limited warranty and the first year of all other
limited warranties, we will repair any Dell-branded hardware products returned to us that
prove to be defective in materials or workmanship. If we are not able to repair the product,
we will replace it with a comparable product that is new or refurbished.
When you contact us, we will issue a Return Material Authorization Number for you to
include with your return. You must return the products to us in their original or equivalent
packaging, prepay shipping charges, and insure the shipment or accept the risk if the product
is lost or damaged in shipment. We will return the repaired or replacement products to you.
We will pay to ship the repaired or replaced products to you if you use an address in the
United States (excluding Puerto Rico and U.S. possessions and territories). Otherwise, we
will ship the product to you freight collect.
If we determine that the product is not covered under this warranty, we will notify you and
inform you of service alternatives that are available to you on a fee basis.
NOTE: Before you ship the product(s) to us, make sure to back up the data on the hard drive(s)
and any other storage device(s) in the product(s). Remove any confidential, proprietary, or
personal information and removable media such as floppy disks, CDs, or PC Cards. We are not
responsible for any of your confidential, proprietary, or personal information; lost or corrupted
data; or damaged or lost removable media.
www.dell.com | support.dell.com
Appendix 69
Page 71

During the remaining years: For the remaining period of the limited warranty, we will replace
any defective part with new or refurbished parts, if we agree that it needs to be replaced.
When you contact us, we will require a valid credit card number at the time you request a
replacement part, but we will not charge you for the replacement part as long as you return
the original part to us within 30 days after we ship the replacement part to you. If we do not
receive the original part within 30 days, we will charge to your credit card the then-current
standard price for that part.
We will pay to ship the part to you if you use an address in the United States (excluding
Puerto Rico and U.S. possessions and territories). Otherwise, we will ship the part freight
collect. We will also include a prepaid shipping container with each replacement part for
your use in returning the replaced part to us.
NOTE: Before you replace parts, make sure to back up the data on the hard drive(s) and any
other storage device(s) in the product(s). We are not responsible for lost or corrupted data.
www.dell.com | support.dell.com
What if I purchased a service contract?
If your service contract is with Dell, service will be provided to you under the terms of the
service agreement. Please refer to that contract for details on how to obtain service.
If you purchased through us a service contract with one of our third-party service providers,
please refer to that contract for details on how to obtain service.
How will you fix my product?
We use new and refurbished parts made by various manufacturers in performing warranty
repairs and in building replacement parts and systems. Refurbished parts and systems are
parts or systems that have been returned to Dell, some of which were never used by a
customer. All parts and systems are inspected and tested for quality. Replacement parts and
systems are covered for the remaining period of the limited warranty for the product you
bought. Dell owns all parts removed from repaired products.
May I transfer the limited warranty?
Limited warranties on systems may be transferred if the current owner transfers ownership of
the system and records the transfer with us. The limited warranty on Dell-branded memory
may not be transferred. You may record your transfer by going to Dell's website:
• If you are an Individual Home Consumer, go to
www.dell.com/us/en/dhs/topics/sbtopic_015_ccare.htm
• If you are a Home Office, Small, Medium, Large, or Global Commercial Customer, go
to www.dell.com/us/en/biz/topics/sbtopic_ccare_nav_015_ccare.htm
• If you are a Government, Education, or Healthcare Customer, or an Individual Home
Consumer who purchased through an Employee Purchase Program, go to
www.dell.com/us/en/pub/topics/sbtopic_015_ccare.htm
If you do not have Internet access, call your customer care representative or call
1-800-624-9897.
70 Appendix
Page 72

"Total Satisfaction" Return Policy (U.S. Only)
We value our relationship with you and want to make sure that you're satisfied with your
purchases. That's why we offer a "Total Satisfaction" return policy for most products that
you—the end-user customer—purchase directly from Dell. Under this policy, you may return
to Dell products that you purchased directly from Dell for a credit or a refund of the
purchase price paid, less shipping and handling and applicable restocking fees as follows:
• New Hardware Products and Accessories — All new hardware, accessories, parts, and
unopened software still in its sealed package, excluding the products listed below, may
be returned within 30 days from the date on the packing slip or invoice. To return
applications software or an operating system that has been installed by Dell, you must
return the entire computer. A different return policy applies to nondefective products
purchased through Dell's Software and Peripherals division by customers of our Small
and Medium Business divisions. Those products may be returned within 30 days from
the date on the packing slip or invoice, but a fifteen percent (15%) restocking fee will
be deducted from any refund or credit. The "Total Satisfaction" Return Policy and
Software and Peripherals division return policy are not available for Dell | EMC
storage products, EMC-branded products, or enterprise software.
• Reconditioned or Refurbished Dell-Branded Hardware Products and Parts — All
reconditioned or refurbished Dell-branded server and storage products may be
returned within 30 days from the date on the packing slip or invoice. All other
reconditioned or refurbished Dell-branded hardware products and parts may be
returned within 14 days of the date on the packing slip or invoice.
To return products, e-mail or call Dell customer service to receive a Credit Return
Authorization Number within the return policy period applicable to the product you want to
return. You must obtain a Credit Return Authorization Number in order to return the
product. See "Contacting Dell" or "Getting Help" in your customer documentation (or
www.dell.com/us/en/gen/contact.htm) to find the appropriate contact information for
obtaining customer assistance.
You must ship the products to Dell within 5 days of the date that Dell issues the Credit
Return Authorization Number. You must also return the products to Dell in their original
packaging, in as-new condition along with any media, documentation, and all other items
that were included in the original shipment, prepay shipping charges, and insure the
shipment or accept the risk of loss or damage during shipment.
www.dell.com | support.dell.com
Limited Warranty Terms for Dell-Branded Hardware Products
(Canada Only)
What is covered by this limited warranty?
This limited warranty covers defects in materials and workmanship in your—our end-user
customer's—Dell-branded hardware products, including Dell-branded peripheral products.
Appendix 71
Page 73

What is not covered by this limited warranty?
This limited warranty does not cover:
• Software, including the operating system and software added to the Dell-branded
hardware products through our factory-integration system, or the reloading of the
software
• Non-Dell branded and Solution Provider Direct products and accessories
• Problems that result from:
– External causes such as accident, abuse, misuse, or problems with electrical
power
– Servicing not authorized by Dell
– Usage that is not in accordance with product instructions
www.dell.com | support.dell.com
– Failure to follow the product instructions or failure to perform preventive
maintenance
– Problems caused by using accessories, parts, or components not supplied by Dell
• Products with missing or altered Service Tags or serial numbers
• Products for which Dell has not received payment
THIS WARRANTY GIVES YOU SPECIFIC LEGAL RIGHTS, AND YOU MAY ALSO
HAVE OTHER RIGHTS WHICH VARY FROM PROVINCE TO PROVINCE. DELL'S
RESPONSIBILITY FOR MALFUNCTIONS AND DEFECTS IN PRODUCT IS LIMITED
TO REPAIR AND REPLACEMENT AS SET FORTH IN THIS WARRANTY
STATEMENT, FOR THE TERM OF THE WARRANTY PERIOD REFLECTED ON
YOUR PACKING SLIP OR INVOICE. EXCEPT FOR THE EXPRESS WARRANTIES
CONTAINED IN THIS WARRANTY STATEMENT, DELL DISCLAIMS ALL OTHER
WARRANTIES AND CONDITIONS, EXPRESS OR IMPLIED, INCLUDING WITHOUT
LIMITATION IMPLIED WARRANTIES AND CONDITIONS OF MERCHANTABILITY
AND FITNESS FOR A PARTICULAR PURPOSE, STATUTORY OR OTHERWISE.
SOME PROVINCES DO NOT ALLOW THE EXCLUSION OF CERTAIN IMPLIED
WARRANTIES OR CONDITIONS, OR LIMITATIONS ON HOW LONG AN IMPLIED
WARRANTY OR CONDITION LASTS. THEREFORE, THE FOREGOING
EXCLUSIONS AND LIMITATIONS MAY NOT APPLY TO YOU.
WE DO NOT ACCEPT LIABILITY BEYOND THE REMEDIES PROVIDED FOR IN
THIS WARRANTY STATEMENT OR FOR SPECIAL, INDIRECT, CONSEQUENTIAL,
OR INCIDENTAL DAMAGES, INCLUDING, WITHOUT LIMITATION, ANY
LIABILITY FOR THIRD-PARTY CLAIMS AGAINST YOU FOR DAMAGES, FOR
PRODUCTS NOT BEING AVAILABLE FOR USE, OR FOR LOST DATA OR LOST
SOFTWARE. OUR LIABILITY WILL BE NO MORE THAN THE AMOUNT YOU PAID
FOR THE PRODUCT THAT IS THE SUBJECT OF A CLAIM. THIS IS THE MAXIMUM
AMOUNT FOR WHICH WE ARE RESPONSIBLE.
SOME PROVINCES DO NOT ALLOW THE EXCLUSION OR LIMITATION OF
SPECIAL, INDIRECT, INCIDENTAL, OR CONSEQUENTIAL DAMAGES, SO THE
ABOVE LIMITATION OR EXCLUSION MAY NOT APPLY TO YOU.
72 Appendix
Page 74

How long does this limited warranty last?
This limited warranty lasts for the time period indicated on your packing slip or invoice,
except that the limited warranty on Dell-branded batteries lasts only 1 year and the limited
warranty on the lamps for Dell-branded projectors lasts only 90 days. The limited warranty
begins on the date of the packing slip or invoice. The warranty period is not extended if we
repair or replace a warranted product or any parts. Dell may change the terms and availability
of limited warranties, at its discretion, but any changes will not be retroactive (that is, the
warranty terms in place at the time of purchase will apply to your purchase).
What do I do if I need warranty service?
Before the warranty expires, please call us at the relevant number listed in the following
table. Please also have your Dell Service Tag or order number available.
Individual Home Consumers; Home Office and Small
Business Customers:
Technical Support and Customer Service 1-800-847-4096
Medium, Large, and Global Commercial Customers;
Government, Education, and Healthcare Customers; and
Value-Added Resellers (VARs):
Technical Support 1-800-387-5757
Customer Service 1-800-326-9463
Government or Education Customers, or Individual
Home Consumers who purchased through an Employee
Purchase Program:
Technical Support 1-800-387-5757
Customer Service 1-800-326-9463 (Extension 8221
Dell-Branded Memory
Canada Only
for Individual Consumers)
1-888-363-5150
www.dell.com | support.dell.com
What will Dell do?
During the 90 days of the 90-day limited warranty and the first year of all other limited
warranties: During the 90 days of the 90-day limited warranty and the first year of all other
limited warranties, we will repair any Dell-branded hardware products returned to us that
prove to be defective in materials or workmanship. If we are not able to repair the product,
we will replace it with a comparable product that is new or refurbished.
When you contact us, we will issue a Return Material Authorization Number for you to
include with your return. You must return the products to us in their original or equivalent
packaging, prepay shipping charges, and insure the shipment or accept the risk if the product
is lost or damaged in shipment. We will return the repaired or replacement products to you.
We will pay to ship the repaired or replaced products to you if you use an address in Canada.
Otherwise, we will ship the product to you freight collect.
Appendix 73
Page 75

If we determine that the problem is not covered under this warranty, we will notify you and
inform you of service alternatives that are available to you on a fee basis.
NOTE: Before you ship the product(s) to us, make sure to back up the data on the hard drive(s)
and any other storage device(s) in the product(s). Remove any confidential, proprietary or
personal information, removable media, such as floppy disks, CDs, or PC Cards. We are not
responsible for any of your confidential, proprietary or personal information; lost or corrupted
data; or damaged or lost removable media.
During the remaining years following the first year of all limited warranties: We will replace
any defective part with new or refurbished parts, if we agree that it needs to be replaced.
When you contact us, we will require a valid credit card number at the time you request a
replacement part, but we will not charge you for the replacement part as long as you return
the original part to us within 30 days after we ship the replacement part to you. If we do not
receive the original part within 30 days, we will charge to your credit card the then-current
standard price for that part.
www.dell.com | support.dell.com
We will pay to ship the part to you if you use an address in Canada. Otherwise, we will ship
the part freight collect. We will also include a prepaid shipping container with each
replacement part for your use in returning the replaced part to us.
NOTE: Before you replace parts, make sure to back up the data on the hard drive(s) and any
other storage device(s) in the product(s). We are not responsible for lost or corrupted data.
What if I purchased a service contract?
If your service contract is with Dell, service will be provided to you under the terms of the
service contract. Please refer to that contract for details on how to obtain service. Dell's
service contracts can be found online at www.dell.ca or by calling Customer Care at 1-800-
847-4096. If you purchased through us a service contract with one of our third-party service
providers, please refer to that contract (mailed to you with your packing slip or invoice) for
details on how to obtain service.
How will you fix my product?
We use new and refurbished parts made by various manufacturers in performing warranty
repairs and in building replacement parts and systems. Refurbished parts and systems are
parts or systems that have been returned to Dell, some of which were never used by a
customer. All parts and systems are inspected and tested for quality. Replacement parts and
systems are covered for the remaining period of the limited warranty for the product you
bought. Dell owns all parts removed from repaired products.
May I transfer the limited warranty?
Limited warranties on systems may be transferred if the current owner transfers ownership of
the system and records the transfer with us. The limited warranty on Dell-branded memory
may not be transferred. You may record your transfer by going to Dell’s website:
74 Appendix
Page 76

• For Canada-purchased computers (in-country transfers) and to transfer from one
customer to another, go to
www.dell.ca/ca/en/gen/topics/segtopic_ccare_nav_013_ccare.htm
• For out-of-country transfers (outside of the original country of purchase), go to
www.dell.com/us/en/biz/topics/sbtopic_ccare_nav_016_ccare.htm
If you do not have Internet access, call Dell at 1-800-847-4096 (Home Consumer customers)
or 1-800-326-9463 (Corporate Commercial or Government customers).
"Total Satisfaction" Return Policy (Canada Only)
If you are an end-user customer who bought new products directly from Dell, you may return
them to Dell up to 30 days after you receive them for a refund or credit of the product
purchase price. If you are an end-user customer who bought reconditioned or refurbished
products from Dell, you may return them to Dell within 14 days after the date on the
packing slip or invoice for a refund or credit of the product purchase price. In either case, the
refund or credit will not include any shipping and handling charges shown on your packing
slip or invoice and will be subject to a fifteen percent (15%) restocking fee, unless otherwise
prohibited by law. If you are an organization that bought the products under a written
agreement with Dell, the agreement may contain different terms for the return of products
than specified by this policy.
To return products, you must call Dell Customer Service at 1-800-847-4096 to receive a
Credit Return Authorization Number. To expedite the process of your refund or credit, Dell
expects you to return the products to Dell in their original packaging within 5 days of the
date that Dell issues the Credit Return Authorization Number. You must also prepay
shipping charges and insure the shipment or accept the risk of loss or damage during
shipment. You may return software for a refund or credit only if the sealed package
containing the floppy disk(s) or CD(s) is unopened. Returned products must be in as-new
condition, and all of the manuals, floppy disk(s), CD(s), power cables, and other items
included with a product must be returned with it. For customers who want to return, for
refund or credit only, either application or operating system software that has been installed
by Dell, the whole system must be returned, along with any media and documentation that
may have been included in the original shipment.
The "Total Satisfaction" Return Policy does not apply to Dell | EMC storage products. It also
does not apply to products purchased through Dell's Software and Peripherals division. For
those products, please instead refer to Dell's Software and Peripheral's then-current return
policy (see the following section, "Dell Software and Peripherals (Canada Only)").
www.dell.com | support.dell.com
Appendix 75
Page 77

Dell Software and Peripherals (Canada Only)
Third-Party Software and Peripherals Products
Similar to other resellers of software and peripherals, Dell does not warrant third-party
products. Third-party software and peripheral products are covered by the warranties
provided by the original manufacturer or publisher only. Third-party manufacturer
warranties vary from product to product. Consult your product documentation for specific
warranty information. More information may also be available from the manufacturer or
publisher.
While Dell offers a wide selection of software and peripheral products, we do not specifically
test or guarantee that all of the products we offer work with any or all of the various models
of Dell computers, nor do we test or guarantee all of the products we sell on the hundreds of
different brands of computers available today. If you have questions about compatibility, we
www.dell.com | support.dell.com
recommend and encourage you to contact the third-party software and peripheral product
manufacturer or publisher directly.
Dell-Branded Peripheral Products
Dell does provide a limited warranty for new Dell-branded peripheral products (products for
which Dell is listed as the manufacturer) such as monitors, batteries, memory, docking
stations, and projectors. To determine which limited warranty applies to the product you
purchased, see the Dell packing slip or invoice and/or the product documentation that
accompanied your product. Descriptions of Dell's limited warranties are described in
preceding sections.
Return Policy
If you are an end-user customer who bought Dell Software and Peripherals products directly
from a Dell company, you may return Dell Software and Peripherals products that are in asnew condition to Dell up to 30 days from the date on the packing slip or invoice for a refund
of the product purchase price if already paid. This refund will not include any shipping and
handling charges shown on your packing slip or invoice; you are responsible for those.
To return products, you must call Dell Customer Service at 1-800-387-5759 to receive a
Credit Return Authorization Number. You must ship the Dell Software and Peripherals
products back to Dell in their original manufacturer's packaging (which must be in as-new
condition), prepay shipping charges, and insure the shipment or accept the risk of loss or
damage during shipment.
To qualify for refund or replacement, returned products must be in as-new condition,
software products must be unopened, and all of the manuals, floppy disk(s), CD(s), power
cables, and other items included with a product must be returned with it.
76 Appendix
Page 78

1-Year End-User Manufacturer Guarantee
(Latin America and the Caribbean Only)
Guarantee
Dell Computer Corporation ("Dell") warrants to the end user in accordance with the
following provisions that its branded hardware products, purchased by the end user from a
Dell company or an authorized Dell distributor in Latin America or the Caribbean, will be
free from defects in materials, workmanship, and design affecting normal use, for a period of
1 year from the original purchase date. Products for which proper claims are made will, at
Dell’s option, be repaired or replaced at Dell’s expense. Dell owns all parts removed from
repaired products. Dell uses new and reconditioned parts made by various manufacturers in
performing repairs and building replacement products.
Exclusions
This Guarantee does not apply to defects resulting from: improper or inadequate
installation, use, or maintenance; actions or modifications by unauthorized third parties or
the end user; accidental or willful damage; or normal wear and tear.
Making a Claim
Claims must be made in Latin America or the Caribbean by contacting the Dell point of sale
within the guarantee period. The end user must always supply proof of purchase, indicating
name and address of the seller, date of purchase, model and serial number, name and address
of the customer, and details of symptoms and configuration at the time of malfunction,
including peripherals and software used. Otherwise, Dell may refuse the guarantee claim.
Upon diagnosis of a warranted defect, Dell will make arrangements and pay for ground
freight and insurance to and from Dell’s repair/replacement center. The end user must
ensure that the defective product is available for collection properly packed in original or
equally protective packaging together with the details listed above and the return number
provided to the end user by Dell.
www.dell.com | support.dell.com
Limitation and Statutory Rights
Dell makes no other warranty, guarantee or like statement other than as explicitly stated
above, and this Guarantee is given in place of all other guarantees whatsoever, to the fullest
extent permitted by law. In the absence of applicable legislation, this Guarantee will be the
end user’s sole and exclusive remedy against Dell or any of its affiliates, and neither Dell nor
any of its affiliates shall be liable for loss of profit or contracts, or any other indirect or
consequential loss arising from negligence, breach of contract, or howsoever.
This Guarantee does not impair or affect mandatory statutory rights of the end user against
and/or any rights resulting from other contracts concluded by the end user with Dell and/or
any other seller.
Dell World Trade LP
One Dell Way, Round Rock, TX 78682, USA
Appendix 77
Page 79

Dell Computadores do Brasil Ltda (CNPJ No. 72.381.189/0001-10)
Avenida Industrial Belgraf, 400
92990-000 - Eldorado do Sul – RS - Brasil
Dell Computer de Chile Ltda
Coyancura 2283, Piso 3- Of.302,
Providencia, Santiago - Chile
Dell Computer de Colombia Corporation
Carrera 7 #115-33 Oficina 603
Bogota, Colombia
Dell Computer de Mexico SA de CV
Paseo de la Reforma 2620 - 11° Piso
Col. Lomas Altas
11950 México, D.F.
www.dell.com | support.dell.com
78 Appendix
Page 80

DELL SOFTWARE LICENSE AGREEMENT
This is a legal agreement between you, the user, and Dell Products, L.P ("Dell"). This agreement covers all software that is distributed with the Dell product, for which
there is no separate license agreement between you and the manufacturer or owner of the software (collectively the "Software"). This agreement is not for the sale of
Software or any other intellectual property. All title and intellectual property rights in and to Software is owned by the manufacturer or owner of the Software. All rights
not expressly granted under this agreement are reserved by the manufacturer or owner of the Software. By opening or breaking the seal on the Software packet(s), installing
or downloading the Software, or using the Software that has been preloaded or is embedded in your product, you agree to be bound by the terms of this agreement. If you
do not agree to these terms, promptly return all Software items (disks, written materials, and packaging) and delete any preloaded or embedded Software.
You may use one copy of the Software on only one computer at a time. If you have multiple licenses for the Software, you may use as many copies at any time as you have
licenses. "Use" means loading the Software in temporary memory or permanent storage on the computer. Installation on a network server solely for distribution to other
computers is not "use" if (but only if) you have a separate license for each computer to which the Software is distributed. You must ensure that the number of persons using
the Software installed on a network server does not exceed the number of licenses that you have. If the number of users of Software installed on a network server will
exceed the number of licenses, you must purchase additional licenses until the number of licenses equals the number of users before allowing additional users to use the
Software. If you are a commercial customer of Dell or a Dell affiliate, you hereby grant Dell, or an agent selected by Dell, the right to perform an audit of your use of the
Software during normal business hours, you agree to cooperate with Dell in such audit, and you agree to provide Dell with all records reasonably related to your use of the
Software. The audit will be limited to verification of your compliance with the terms of this agreement.
The Software is protected by United States copyright laws and international treaties. You may make one copy of the Software solely for backup or archival purposes or
transfer it to a single hard disk provided you keep the original solely for backup or archival purposes. You may not rent or lease the Software or copy the written materials
accompanying the Software, but you may transfer the Software and all accompanying materials on a permanent basis as part of a sale or transfer of the Dell product if you
retain no copies and the recipient agrees to the terms hereof. Any transfer must include the most recent update and all prior versions. You may not reverse engineer,
decompile, or disassemble the Software. If the package accompanying your computer contains compact discs, 3.5", and/or 5.25" disks, you may use only the disks
appropriate for your computer. You may not use the disks on another computer or network, or loan, rent, lease, or transfer them to another user except as permitted by this
agreement.
LIMITED WARRANTY
Dell warrants that the Software disks will be free from defects in materials and workmanship under normal use for ninety (90) days from the date you receive them. This
warranty is limited to you and is not transferable. Any implied warranties are limited to ninety (90) days from the date you receive the Software. Some jurisdictions do not
allow limits on the duration of an implied warranty, so this limitation may not apply to you. The entire liability of Dell and its suppliers, and your exclusive remedy, shall
be (a) return of the price paid for the Software or (b) replacement of any disk not meeting this warranty that is sent with a return authorization number to Dell, at your cost
and risk. This limited warranty is void if any disk damage has resulted from accident, abuse, misapplication, or service or modification by someone other than Dell. Any
replacement disk is warranted for the remaining original warranty period or thirty (30) days, whichever is longer.
Dell does NOT warrant that the functions of the Software will meet your requirements or that operation of the Software will be uninterrupted or error free. You assume
responsibility for selecting the Software to achieve your intended results and for the use and results obtained from the Software.
DELL, ON BEHALF OF ITSELF AND ITS SUPPLIERS, DISCLAIMS ALL OTHER WARRANTIES, EXPRESS OR IMPLIED, INCLUDING, BUT NOT LIMITED
TO, IMPLIED WARRANTIES OF MERCHANTABILITY AND FITNESS FOR A PARTICULAR PURPOSE, FOR THE SOFTWARE AND ALL ACCOMPANYING
WRITTEN MATERIALS. This limited warranty gives you specific legal rights; you may have others, which vary from jurisdiction to jurisdiction.
IN NO EVENT SHALL DELL OR ITS SUPPLIERS BE LIABLE FOR ANY DAMAGES WHATSOEVER (INCLUDING, WITHOUT LIMITATION, DAMAGES FOR
LOSS OF BUSINESS PROFITS, BUSINESS INTERRUPTION, LOSS OF BUSINESS INFORMATION, OR OTHER PECUNIARY LOSS) ARISING OUT OF USE
OR INABILITY TO USE THE SOFTWARE, EVEN IF ADVISED OF THE POSSIBILITY OF SUCH DAMAGES. Because some jurisdictions do not allow an exclusion
or limitation of liability for consequential or incidental damages, the above limitation may not apply to you.
U.S. GOVERNMENT RESTRICTED RIGHTS
The software and documentation are "commercial items" as that term is defined at 48 C.F.R. 2.101, consisting of "commercial computer software" and "commercial
computer software documentation" as such terms are used in 48 C.F.R. 12.212. Consistent with 48 C.F.R. 12.212 and 48 C.F.R. 227.7202-1 through 227.7202-4, all U.S.
Government end users acquire the software and documentation with only those rights set forth herein. Contractor/manufacturer is Dell Products, L.P., One Dell Way,
Round Rock, Texas 78682.
GENERAL
This license is effective until terminated. It will terminate upon the conditions set forth above or if you fail to comply with any of its terms. Upon termination, you agree
that the Software and accompanying materials, and all copies thereof, will be destroyed. This agreement is governed by the laws of the State of Texas. Each provision of
this agreement is severable. If a provision is found to be unenforceable, this finding does not affect the enforceability of the remaining provisions, terms, or conditions of
this agreement. This agreement is binding on successors and assigns. Dell agrees and you agree to waive, to the maximum extent permitted by law, any right to a jury trial
with respect to the Software or this agreement. Because this waiver may not be effective in some jurisdictions, this waiver may not apply to you. You acknowledge that you
have read this agreement, that you understand it, that you agree to be bound by its terms, and that this is the complete and exclusive statement of the agreement between
you and Dell regarding the Software.
www.dell.com | support.dell.com
Appendix 79
Page 81

www.dell.com | support.dell.com
80 Appendix
Page 82

Index
A
adding tracks, 41
automatic shutdown, 46
available space, 49
B
backlight duration, 46, 48
battery charging, 23
bitrate, 60
button lock switch, 19-20
buttons
back, 18
forward/skip forward, 19-20
play/pause, 18, 20
power, 18
record, 18
reset, 18
reverse/skip back, 18, 20
scroll dial, 19
volume, 18, 20
charging the battery, 23
charset, 47
checking device
information, 49
connecting your device, 22
connectors
DC adapter, 19
headphone, 19-20
USB 2.0/1.1, 19
contrast, 46
contrast level, 48
creating a playlist, 43
custom EQ, 46
D
delete recording, 33
deleting tracks, 43
deleting tracks from your
device, 43
device connection, 22
C
categories, 60
category, 60
character sets, 47
display language, 46, 48
E
EQ setting, 46-47
Index 81
Page 83

F
M
file management, 36
file transfer, 28
firmware, 60
firmware version, 49
G
gigabyte (GB), 60
glossary, 60
H
hardware specifications, 58
Home button, 19
I
idle shutdown, 46
idle shutdown time, 48
managing files, 36
megabyte (MB), 60
MP3, 60
MP3 encoding, 60
Music Library, 36, 38, 60
N
new recording, 33
now playing, 40
number of albums, 49
number of playlists, 49
number of tracks, 49
O
owner’s name, 46
P
K
kbps, 60
L
language, 46
lithium-ion battery (li-ion), 60
locating tracks, 37
82 Index
performance parameters, 58
performing a reset, 24
play mode icons, 46
playing digital music, 25
playlist, 61
preview recording, 32
Page 84

R
V
removing tracks, 43
renaming a playlist, 44
resetting your device, 24
S
safety instructions, 9, 13
screen contrast, 46
scroll dial, 19
scroll-select, 19
selected music, 40
selected music list, 41, 61
shuffle, 61
shuffle repeat, 61
specifications, 58
T
transferring files, 28
viewing an album, 39
viewing track information, 38,
40
views
front, 18
side, 18
W
warranty, 67
wired remote, 19-20, 61
U
USB, 61
USB charging, 23
using
MusicMatch, 28
Selected Music list, 40
using your Dell DJ, 25
Index 83
Page 85

84 Index
 Loading...