


CANDY FXH 609 X, FXH 629 VX, FXLP 649 LX, FXLP 649 RX, FXMH 629 NX User Manual
...OVENS |
GB |
USER INSTRUCTIONS |
FORNI |
|
|||||||||
ISTRUZIONI PER L'USO |
|
|
|
|
|
|
|
IT |
||
HORNOS EMPOTRABLES |
|
|||||||||
INSTRUCCIONES DE USO |
|
|
|
|
ES |
|||||
PIEKARNIKI DO ZABUDOWY |
|
|||||||||
INSTRUKJA OBSŁUGI |
|
|
|
|
|
|
|
|
PL |
|
TROUBY |
|
|||||||||
NÁVOD K OBSLUZE |
|
|
|
|
|
|
|
|
|
CZ |
ДУХОВКИ |
|
|||||||||
РУКОВОДСТВО ПОЛЬЗОВАТЕЛЯ |
|
RU |
||||||||
PEČICE |
|
|||||||||
NAVODILA ZA UPORABO |
|
|
|
|
|
|
SL |
|||
PEĆNICE |
|
|||||||||
KORIŠTENJE PRIRUČNIK |
|
HR |
||||||||
EINBAUBACKÖFEN |
|
|||||||||
BEDIENUNGSANLEITUNG |
|
|
|
DE |
||||||
ANKASTRE FIRIN |
|
|||||||||
KULLANIM KILAVUZU |
|
|
|
|
|
|
|
|
TR |
|
NOTICE D'EMPLOI ET D'INSTALLATION |
|
|||||||||
DES FOURS ENCASTRABLES |
|
|
FR |
|||||||
OVEN |
|
|||||||||
GEBRUIKSAANWIJZING |
|
|
|
|
|
|
|
|
NL |
|
CANDY HOOVER GROUP S.R.L. • Via Privata Eden Fumagalli • 20047 Brugherio Milano Italy

|
CONTENTS |
GB |
|
|
SPIS TREŚCI |
PL |
||
Safety Instructıons ...................................................................... |
04 |
Instrukcje Bezpıeczeństwa ......................................................... |
31 |
|||||
1. |
General warnings ................................................................... |
05 |
1. |
Wskazówki Ogólne ................................................................. |
32 |
|||
1.1 |
Declaration of compliance ....................................................... |
05 |
1.1 |
Deklaracja Zgodności ............................................................ |
32 |
|||
1.2 |
Safety hints ............................................................................ |
05 |
1.2 |
Wskazówki Dotyczące Bezpieczeństwa .................................. |
32 |
|||
1.3 |
Recommendations .................................................................. |
05 |
1.3 |
Zalecenia ................................................................................ |
32 |
|||
1.4 |
Installation .......................................................................... |
05 |
1.4 |
Instalacja ................................................................................. |
32 |
|||
1.5 |
Electrical connection .............................................................. |
05 |
1.5 |
Podłączenie Elektryczne ........................................................ |
32 |
|||
2. Accessories ............................................................................ |
06 |
2. |
Technologia Pro/expr (W Zależności Od Modelu) ................. |
33 |
||||
2.1 |
Oven equipment .................................................................... |
06 |
2.1 |
Wyposażenıe Piekarnika (W Zależności Od Modelu) ............ |
33 |
|||
2.2 |
Rotisserie ........................................................................... |
06 |
2.2 |
Rożen (W Zależności Od Modelu) ......................................... |
33 |
|||
2.3 |
LED VISION ........................................................................ |
06 |
2.3 |
Oświetlenie Diodowe Led (W Zależności Od Modelu) ............ |
33 |
|||
3. |
Cleaning the oven .................................................................... |
06 |
3. |
Czyszczenie Pıekarnika ......................................................... |
34 |
|||
4. |
Service centre ......................................................................... |
07 |
4. |
Centrum Serwisowe ................................................................ |
34 |
|||
5. |
Description of the display ..................................................... |
08 |
5. |
Panel Sterowania .................................................................... |
35 |
|||
5.1 |
Before using the oven for the first time .................................... |
09 |
5.1 |
Przed Użyciem Piekarnika Po Raz Pierwszy ..................... |
36 |
|||
5.2 |
How to use the oven ............................................................... |
09 |
5.2 |
Używanie Piekarnika ......................................................... |
36 |
|||
5.3 The programmation ................................................................ |
10 |
5.3 |
Programowanie .................................................................. |
37 |
||||
5.4 |
Using the end of cooking timer ................................................ |
10 |
5.4 |
Korzystanie z wyłącznika konca pieczenia ............................. |
37 |
|||
5.5 |
Cooking tips ........................................................................... |
10 |
5.5 |
Pıeczenie W Piekarniku – Porady Praktyczne ........................ |
37 |
|||
5.6 Adjusting the display contrast ................................................. |
10 |
5.6 |
Regulacja Kontrastu Wyświetlacza ......................................... |
37 |
||||
5.7 |
Use Of Touch Control Clock Programmer ................................ |
11 |
5.7 |
Zegar Dotykowy ...................................................................... |
38 |
|||
5.8 |
Setting The Correct Time.......................................................... |
11 |
5.8 |
Ustawianie Zegara ................................................................... |
38 |
|||
6. |
Pyrolytic cycle .................................................................... |
12 |
6. |
Czyszczenie Pyrolityczne (W Zalezności Od Modelu) .......... |
39 |
|||
7. |
Child safety ......................................................................... |
12 |
7. |
Blokada Przed Dostępem Dzıeci ............................................ |
39 |
|||
|
INDICE |
IT |
|
|
OBSAH |
CZ |
||
..............................................................Indıcazıonı Dı Sıcurezza |
13 |
Bezpečnostní Pokyny ................................................................ |
40 |
|||||
1. Avvertenze Generali ............................................................... |
14 |
1. |
Všeobecna Upozorněni ........................................................... |
41 |
||||
1.1 |
Dichiarazione Di Conformità .................................................... |
14 |
1.1 |
Prohlašeni O Shodě ............................................................... |
41 |
|||
1.2 |
Suggerimenti Sulla Sicurezza .................................................. |
14 |
1.2 |
Bezpečnostni Tipy .................................................................... |
41 |
|||
1.3 |
Raccomandazioni .................................................................... |
14 |
1.3 |
Doporučeni ............................................................................. |
41 |
|||
1.4 |
Installazione ............................................................................ |
14 |
1.4 |
Instalace ................................................................................. |
41 |
|||
1.5 |
Collegamenti Elettrici ............................................................... |
14 |
1.5 |
Přıpojeni K Elektricke Siti ........................................................ |
41 |
|||
2. |
Tecnologia Pro/exp'r ............................................................... |
15 |
2. |
Pro/exp'r Technologie ............................................................ |
42 |
|||
2.1 Accessori Del Forno ................................................................ |
15 |
2.1 |
Vybaveni Trouby ..................................................................... |
42 |
||||
2.2 |
Girarrosto ................................................................................. |
15 |
2.2 |
Rožeň ...................................................................................... |
42 |
|||
2.3 |
Led Vısıon ............................................................................... |
15 |
2.3 |
Led Vısıon .............................................................................. |
42 |
|||
3. |
Pulizia Del Forno ...................................................................... |
16 |
3. |
Čıštěnı Trouby ........................................................................ |
43 |
|||
4. |
Risoluzione Dei Problemi ....................................................... |
16 |
4. |
Servısnı Středısko .................................................................. |
43 |
|||
5. |
Descrizione Del Display .......................................................... |
17 |
5. |
Popıs Displeje ........................................................................ |
44 |
|||
5.1 |
Prima Di Utilizzare İl Forno Per La Prima Volta ....................... |
18 |
5.1 |
Před Prvnim Použitim Trouby ................................................. |
45 |
|||
5.2 |
Utilizzo Del Forno ..................................................................... |
18 |
5.2 |
Použiti Trouby ........................................................................ |
45 |
|||
5.3 |
Programmazione ..................................................................... |
19 |
5.3 |
Programovani ........................................................................ |
46 |
|||
5.4 |
Uso del temporızzatore ............................................................ |
19 |
5.4 |
Použiti Časovače Na Ukončeni Doby Přıpravy ....................... |
46 |
|||
5.5 |
Suggerimenti Per La Cottura ................................................... |
19 |
5.5 Typy K Pečeni ......................................................................... |
46 |
||||
5.6 |
Regolazione Del Contrasto Del Display ................................... |
19 |
5.6 |
Nastaveni Kontrastu Displeje ................................................. |
46 |
|||
5.7 |
Timer Elettronico A Sfioramento ............................................... |
20 |
5.7 |
Využití Času Dotykové Ovládání Programmer - Programování ..... |
47 |
|||
5.8 |
Regolazıone Ora ..................................................................... |
20 |
5.8 |
Nastavení Správného Času .................................................... |
47 |
|||
6. |
Ciclo Pirolitico ......................................................................... |
21 |
6. |
Cıclo Pirolitico ...................................................................... |
48 |
|||
7. |
Funzione Di Protezione ........................................................... |
21 |
7. |
Dětsky Zamek ........................................................................ |
48 |
|||
CONTENIDO |
ES |
|
|
COДЕРЖАНИЕ |
RU |
||
...........................................Instruccıones Para Un Uso Seguro |
22 |
Правила Техники Безопасности ..................................... |
49 |
||||
1. Advertencias Generales .......................................................... |
23 |
1. |
Общие Меры Предосторожности ....................................... |
50 |
|||
1.1 |
Declaracıon De Cumplımıento ................................................. |
23 |
1.1 |
Декларация Соответствия ..................................................... |
50 |
||
1.2 |
Consejos De Segurıdad .......................................................... |
23 |
1.2 |
Меры Предосторожности ...................................................... |
50 |
||
1.3 |
Recomendacıones ................................................................... |
23 |
1.3 |
Рекомендации ........................................................................ |
50 |
||
1.4 |
Instalacıón .............................................................................. |
23 |
1.4 |
Установка ............................................................................... |
50 |
||
1.5 |
Conexıón Eléctrıca .................................................................. |
23 |
1.5 |
Подключение К Электросети ................................................ |
51 |
||
2. Tecnología Pro/exp’r (depende Del Modelo) ....................... |
24 |
2. |
Технология Pro/exp'r .............................................................. |
51 |
|||
2.1 |
Equıpo Del Horno (depende Del Modelo) ............................. |
24 |
2.1 |
Принадлежности Духовки ..................................................... |
51 |
||
2.2 Asador (depende Del Modelo) ............................................... |
24 |
2.2 |
Вертел .................................................................................... |
51 |
|||
2.3 |
Vısıón Led (depende Del Modelo) ......................................... |
24 |
2.3 |
Светодиодное Освещение ..................................................... |
52 |
||
3. Lımpıeza Del Horno ................................................................ |
25 |
3. |
Чистка Духовки ..................................................................... |
52 |
|||
4. Servıcıo Técnıco .................................................................... |
25 |
4. |
Сервисный Центр .................................................................. |
52 |
|||
5. Descrıpcıón De La Pantalla ................................................... |
26 |
5. |
Описание Дисплея ................................................................ |
53 |
|||
5.1 Antes De Utılızar El Horno Por Prımera Vez .......................... |
27 |
5.1 |
Перед Первым Использованием Духовки ............................ |
54 |
|||
5.2 |
Cómo Utılızar El Horno .......................................................... |
27 |
5.2 |
Как Пользоваться Духовкой ................................................... |
54 |
||
5.3 |
Programacıón ......................................................................... |
28 |
5.3 |
Программирование................................................................. |
55 |
||
5.4 |
Uso del temporızador ............................................................. |
28 |
5.4 |
Иcποль30bahиetaйmepa okohчahия Bpemehи .......пpигotobлehия 56 |
|||
5.5 |
Consejos De cocción .............................................................. |
28 |
5.5 |
Советы По Приготовлению Пищи ........................................ |
56 |
||
5.6 Ajuste Del Contraste De La Pantalla ...................................... |
28 |
5.6 |
Регулировка Контрастности Дисплея .................................. |
56 |
|||
5.7 |
Temporizador Táctil ................................................................ |
29 |
5.7 |
Таймер С Сенсорным Управлением .................................... |
57 |
||
5.8 Ajuste De La Hora ................................................................... |
29 |
5.8 |
........................................................ |
57 |
|||
6. Cıclo Pırolítıco (depende Del Modelo) ................................... |
30 |
6. |
Цикл Пиролитической Чистки ............................................. |
58 |
|||
7. Consejos de cocción ............................................................... |
30 |
7. |
Амок От Детей ........................................................................ |
58 |
|||

VSEBINA |
SL |
|
Varnostna Navodıla ................................................................... |
59 |
|
1. Splošna Opozorila ................................................................... |
60 |
|
1.1 Izjava O Skladnosti ................................................................ |
60 |
|
1.2 Varnostni Napotki .................................................................... |
60 |
|
1.3 Priporočila ............................................................................... |
60 |
|
1.4 Namestitev In Priključitev ........................................................ |
60 |
|
1.5 Priključitev Pečice Na Električno Omrežje ............................. |
60 |
|
2. Tehnologija Pro/exp'r ............................................................. |
60 |
|
2.1 Oprema Pečice (Odvisno Od Modela) ..................................... |
61 |
|
2.2 Raženj (Odvisno Od Modela) .................................................. |
61 |
|
2.3 Led Vision (Odvisno Od Modela) ............................................ |
61 |
|
3 Čiščenje Pečice ........................................................................ |
62 |
|
4. Servisiranje .............................................................................. |
62 |
|
5. Opis Prikazovalnika ................................................................ |
63 |
|
5.1 Pred Prvo Uporabo Pečice ..................................................... |
64 |
|
5.2 Uporaba Pečice ...................................................................... |
64 |
|
5.3 Programiranje ......................................................................... |
65 |
|
5.4 Using the end of cooking timer ............................................... |
65 |
|
5.5 Nekaj Koristnih Nasvetov ........................................................ |
65 |
|
5.6 Prilagajanje Kontrasta Prikazovalnika .................................... |
65 |
|
5.7 Uporaba Programske Ure Z Upravljanjem Na Dotik ................ |
66 |
|
5.8 Nastavljanje Točnega Časa ..................................................... |
66 |
|
6. Piroliza (Odvisno Od Modela) ................................................. |
67 |
|
7. Sistem Za Varnost Otrok ........................................................ |
67 |
|
SADRŽAJ |
HR |
|
Sıgurnosne Upute ........................................................................ |
68 |
|
1. Općenita Upozorenja ............................................................... |
69 |
|
1.1 |
Izjava O Sukladnosti ................................................................ |
69 |
1.2 |
Sigurnosni Savjeti .................................................................... |
69 |
1.3 |
Preporuke................................................................................. |
69 |
1.4 |
Instalacija ................................................................................ |
69 |
1.5 |
Električno Spajanje ................................................................ |
69 |
2. Pro/exp'r Tehnologija (zavisno O Modelu) ............................ |
70 |
|
2.1 |
Oprema Pećnice (zavisno O Modelu) ..................................... |
70 |
2.2 |
Ražanj (zavisno O Modelu Pećnice) ....................................... |
70 |
2.3 |
Led Vision (zavisno O Modelu Pećnice) .................................. |
70 |
3. Cleaning The Oven................................................................... |
71 |
|
4. Ovlašteni Servis ...................................................................... |
71 |
|
5. Opis Ekrana ............................................................................. |
72 |
|
5.1 |
Prije Prvog Korištenja Pećnice ................................................. |
73 |
5.2 |
Kako Koristiti Pećnicu ............................................................. |
73 |
5.3 |
Programiranje ......................................................................... |
74 |
5.4 |
Using the end of cooking timer ................................................ |
74 |
5.5 |
Savjeti Za Kuhanje ................................................................... |
74 |
5.6 |
Podešavanje Kontrasta Ekrana .............................................. |
74 |
5.7 |
Uporaba Programatora Vremena S Upravljanjem Na Dodır ....75 |
|
5.8 |
Postavljanje Točnog Vremena .................................................. |
75 |
6. Pyrolytic Cycle ........................................................................ |
76 |
|
7. Blokada Funkcija Pećnice (sigurnost za djecu) .................... |
76 |
|
INHALTSVERZEICHNIS |
DE |
|
Sıcherheıtsvorschrıften .............................................................. |
77 |
|
1. Allgemeine Hinweise .............................................................. |
78 |
|
1.1 |
Konformitätserklärung................................................................ |
78 |
1.2 |
Sicherheitshinweise.................................................................. |
78 |
1.3 |
Empfehlungen .......................................................................... |
78 |
1.4 |
Installation .............................................................................. |
78 |
1.5 |
Elektrischer Anschluss.............................................................. |
78 |
2. Pro/Exp'r Technologie (Modellabhängig)................................. |
79 |
|
2.1 |
Zubehör (Modellabhängig)........................................................ |
79 |
2.2 |
Grillspieß (Modellabhängig)........................................................ |
79 |
2.3 |
Led Vision ................................................................................ |
79 |
3. Reinigung ................................................................................. |
80 |
|
4. Technischer Kundendienst...................................................... |
80 |
|
5. Display ...................................................................................... |
81 |
|
5.1 |
Nützliche Hinweise vor dem ersten Betrieb................................ |
82 |
5.2 |
Benutzung Des Backofens........................................................ |
82 |
5.3 |
Programmierung....................................................................... |
83 |
5.4 |
Benutzung des tımers für backzeıtende.................................... |
83 |
5.5 |
Tipps ......................................................................................... |
83 |
5.6 |
Kontrasteinstellung.................................................................... |
84 |
5.7 |
Kontrast Des Displays Einstellen............................................... |
84 |
5.8 |
Eınstellung Der Rıchtıgen Uhrzeıt.............................................. |
84 |
6. Pyrolytische Reinigung............................................................ |
85 |
|
7. Kindersicherung ...................................................................... |
85 |
|
İÇİNDEKİLER |
TR |
|
Güvenlik Uyarıları ........................................................................ |
86 |
|
1. Genel Uyarılar .......................................................................... |
87 |
|
1.1 |
Uygunluk Beyanı ...................................................................... |
87 |
1.2 |
Emniyetle İlgili İpuçları ............................................................... |
87 |
1.3 |
Öneriler ................................................................................... |
87 |
1.4 |
Kurulum ................................................................................... |
87 |
1.5 |
Elektrik Bağlantısı ..................................................................... |
87 |
2. Pro/Exp'r Teknolojisi ................................................................. |
88 |
|
2.1 |
Fırın Ekipmanı .......................................................................... |
88 |
2.2 |
Şiş ........................................................................................... |
88 |
2.3 |
Led Aydınlatma ......................................................................... |
88 |
3. Fırın Temizlenmesi ................................................................... |
89 |
|
4. Servis Merkezi ........................................................................... |
89 |
|
5. Ekran Açıklaması ...................................................................... |
90 |
|
5.1 |
Fırını İlk Kez Kullanmadan Önce ............................................... |
91 |
5.2 |
Fırın Kullanımı .......................................................................... |
91 |
5.3 |
Programlama ........................................................................... |
92 |
5.4 |
Zaman Kullanımı ....................................................................... |
92 |
5.5 |
Pişirme İpuçları ........................................................................ |
92 |
5.6 |
Ekran Kontrastın Ayarlanması .................................................... |
92 |
5.7 |
Dokunmatik Zamanlayıcı ........................................................... |
93 |
5.8 |
Saatin Ayarlanması .................................................................... |
93 |
6. Pirolitik Döngü ......................................................................... |
94 |
|
7. Çocuk Güvenliği ....................................................................... |
94 |
|
Garanti Belgesi ............................................................................ |
95 |
|
SOMMAIRE |
FR |
|
Conseils De Sécurité .......................................................... |
96 |
|
1. Instructions générales ...................................................... |
97 |
|
1.1 |
Declaration de conformité ................................................. |
97 |
1.2 |
Consignes de sécurité ........................................................ |
97 |
1.3 |
Recommandations .............................................................. |
97 |
1.4 |
Installation ........................................................................... |
97 |
1.5 |
Raccordement éléctrique ................................................... |
97 |
2. ACCESSORIES (According to model) ................................ |
98 |
|
2.1 |
Equipement du four ............................................................ |
98 |
2.2 |
Tournebroche ..................................................................... |
98 |
2.3 LED VISION ....................................................................... |
98 |
|
3. Entretien général du four ................................................... |
99 |
|
4. Assistance technique ....................................................... |
99 |
|
5. Présentation du tableau de bord ....................................... |
100 |
|
5.1 |
Conseils avant la premiere utilisation .................................. |
101 |
5.2 |
Recommandations .............................................................. |
101 |
5.3 |
La programmation ............................................................... |
102 |
5.4 |
Utılısatıon Du Mınuteur Coupe-cırcuıt .................................. |
102 |
5.5 |
Quelques conseils de cuisson ............................................... |
102 |
5.6 |
Réglage du contraste du cadran d’affichage .......................... |
103 |
5.7 |
Utilisation Du Programmateur Électronique .......................... |
103 |
5.8 |
Reglage De L'heure ............................................................... |
103 |
6. Pyrolyse .................................................................................. |
104 |
|
7. La sécurité enfant .................................................................. |
104 |
|
INHOUDSOPGAVE |
NL |
|
Veiligheidsvoorschriften .......................................................... |
105 |
|
1. Algemene Aanwijzingen ........................................................ |
106 |
|
1.1 |
Conformiteit ........................................................................... |
106 |
1.2 |
Veiligheidsvoorschriften.......................................................... |
106 |
1.3 |
Aanbevelingen........................................................................ |
106 |
1.4 |
Installatie .............................................................................. |
106 |
1.5 |
Elektrische Aansluiting ........................................................... |
106 |
2. Accessorıes (according To Model) ......................................... |
107 |
|
2.1 |
Uitrusting Van De Oven ......................................................... |
107 |
2.2 |
Het Draaispit ........................................................................ |
107 |
2.3 |
Led Vısıon .......................................................................... |
107 |
3. Onderhoud Van De Oven ...................................................... |
107 |
|
4. Diensten Service .................................................................... |
108 |
|
5. Voorstelling Van Het Scherm ............................................... |
109 |
|
5.1 |
Tips Voorafgaande Aan Een Eerste Gebruik ......................... |
110 |
5.2 |
Aanbevelingen ...................................................................... |
110 |
5.3 |
Programmering ..................................................................... |
111 |
5.4 |
Gebruık Van De Tımer Met Uıtschakelfunctıe ........................ |
111 |
5.5 |
Raadgevingen Bij Het Bakken ................................................ |
111 |
5.6 |
Regeling Van Het Contrast Van Het Weergavescherm .......... |
112 |
5.7 |
Elektronische Programma's Gebruiken ............................... |
112 |
5.8 |
De Juiste Tijd Instellen ........................................................ |
113 |
6. Pyrolyse ................................................................................. |
113 |
|
7. Kinderbeveiliging ................................................................... |
113 |
|

SAFETY INSTRUCTIONS
WARNING: The appliance and its accessible parts become hot during use. Care should be taken to avoid touching heating elements.
•Children under 8 Year of age must be kept away from the appliance unless they are continuously supervised.
•This appliance can be used by children aged from 8 years and above and persons with reduced physical, sensory or mental capabilities or lack of experience and knowledge if they have been given supervision or instruction concerning use of the appliance in a safe way and understand the hazards involved.
•Children must not play with the appliance.
•Cleaning and user maintenance shall not be made by children without supervision.
•During use the appliance becomes hot. Care should be taken to avoid touching heating elements inside the oven.
WARNING:Accessible parts may become hot during use. Young children must be kept away.
•Do not use harsh abrasive cleaners or sharp metal scrapers to clean the oven door glass since they can scratch the surface, which may result in shattering of the glass.
•The oven must be switched off before removing the guard, after cleaning, the guard must be replaced in accordance with the instructions.
•Only use the temperature probe recommended for this oven.
•Do not use a steam cleaner for cleaning operations.
•WARNING:Avoid possibility of electric shock - ensure the appliance is switched off before replacing the lamp.
•The means for disconnection must be incorporated in the fixed wiring in accordance with the wiring rules.
•The instructions state the type of cord to be used, taking into account the temperature of the rear surface of the appliance.
•If the supply cord is damaged, it must be replaced by a special cord or assembly available from the manufacturer or its service agent.
•CAUTION: In order to avoid a hazard due to inadvertent resetting of the thermal cutout, this appliance must not be supplied through an external switching device, such as a timer, or connected to a circuit that is regularly switched on and off by the utility.
•CAUTION:Accessible parts may be hot when the grill is in use. Young children must be kept away.
•Excess spillage must be removed before cleaning.
•During self-cleaning pyrolytic operation the surfaces may get hotter than usual and children MUST be kept away.
04 GB
1. GENERAL WARNINGS
Read the instructions carefully to make the most of your oven. We recommend you keep the instructions for installation and use for later reference, and before installing the oven, note its serial number in case you need to get help from the after-sales service.
When you have unpacked the oven, make sure that it has not been damaged in any way. If you have any doubts at all, do not to use it. Contact a professionally qualified person. Keep packing materials such as plastic bags, polystyrene, or nails out of the reach of children because they are dangerous to children.
The company shall not be liable if the instructions provided in this document are not complied with.
! NOTE: Functions, properties and accessories of ovens which are mentioned in this manual, can be change depending on oven models.
1.1 DECLARATION OF COMPLIANCE |
|
1.4 INSTALLATION |
|
|
|
The parts of this appliance that may come into contact with foodstuffs comply with the provisions of EEC Directive 89/109.Appliance complies with European Directives 2006/95/EC and 2004/108/EC, and subsequent amendments.When you have unpacked the oven, make sure that it has not been damaged in
any way. If you have any doubts at all, do not use it: contact a professionally qualified person.
Keep packing materials such as plastic bags, polystyrene, or nails out of the reach of children because they are dangerous to children.
1.2 SAFETY HINTS
•The oven must be used only for the purpose for which it was designed. It must only be used for cooking food.Any other use, e.g. as a form of heating, is an improper use of the oven and is therefore dangerous.
•The manufacturers cannot be held responsible for any damage caused by improper, incorrect or unreasonable use.
When using any electrical appliance you must follow a few basic rules.
-Do not pull on the power cable to remove the plug from the socket.
-Do not touch the oven with wet or damp hands or feet.
-Do not use the oven unless you are wearing something on your feet.
-It is not generally a good idea to use adapters, multiple sockets for several plugs or cable extensions.
-If the oven breaks down or develops a fault switch it off at the mains and do not touch it.
• If the cable is damaged it must be replaced promptly. When replacing the cable, follow these instructions.
Remove the power cable and replace it with one of the H05VV-F type. The cable must be able to bear the electrical current required by the oven.Cable replacement must be carried out by properly qualified technicians.
The earthing cable (yellow-green) must be 10 mm longer than the power cable.
Use only an approved service centre for repairs and ensure that only original parts are used. If the above instructions are not adhered to the manufacturers cannot guarantee the safety of the oven.
•The oven you have just acquired has the described technical characteristics and you must not make any modifications to it.
•Do not store flammable products in the oven; they can catch fire if the oven comes on accidentally.
•Do not press on and do not let children sit on the oven door.
•Use kitchen oven gloves, when putting into or removing a dish from the oven.
1.3RECOMMENDATIONS
•After each use of the oven, a minimum of cleaning will help keep the oven perfectly clean.
•Do not line the oven walls with aluminium foil or single-use protection available from stores. Aluminium foil or any other protection, in direct contact with the hot enamel, risks melting and deteriorating the enamel of the insides.
•In order to prevent excessive dirtying of your oven and the resulting strong smokey smells, we recommend not using the oven at very high temperature. It is better to extend the cooking time and lower the temperature a little.
Identification plate
•In addition to the
accessories supplied with the oven, we advise you only use dishes and baking moulds resistant
to very high Temperatures.
Code produit:
Numéro de série :
The manufacturers have no obligation to carry this out. If the assistance of the manufacturer is required to rectify faults arising from incorrect installation, this assistance is not covered by the guarantee. The installation instructions for professionally qualified personnel must be followed. Incorrect installation may cause harm or injury to people, animals or belongings. The manufacturer cannot be held responsible for such harm or injury.
The kitchen unit in which the oven is to be fitted must be made of material resistant to temperatures of at least 70°C.
The oven can be located high in a column or under a worktop.
Before fixing, you must ensure good ventilation in the oven space to allow proper circulation of the fresh air required for cooling and protecting the internal parts. Make the openings specified on last page according to the type of fitting.
1.5 ELECTRICAL CONNECTION
THE ELECTRICAL CONNECTION SHOULD BE CARRIED OUT BY AN APPROVED CONTRACTOR OR TECHNICIAN WITH SIMILAR QUALIFICATIONS.
The installation receiving the appliance must comply with the standard in force in the installation country.
The manufacturer does not accept any responsibility if this provision is not complied with.
Connection to the network must be by earthed socket outlet, or by means of a multipole circuit-breaker, in compliance with the installation country.
The installation must be protected by suitable fuses, and have wires with a large enough cross-section to supply the oven normally.
CONNECTION:
The oven is fitted with a power lead for connecting exclusively to a voltage of 220-240 V AC across the phases or across phase and neutral.
Connection must be carried out having first checked: -the supply voltage indicated on the meter,
The lead protection wire (green/yellow) connected to the earth terminal of the oven must be connected to the earth terminal of the installation.
Caution:
•Have the earth continuity of the installation checked by an electrician before making the connection.
•The manufacturer will not be liable for any incident, or the possible consequences that may arise from the use of the oven not earthed, or connected to an earth with defective continuity.
NB: Do not forget that the oven may require after-sales service.
Also, locate the socket outlet so that the oven can be connected once it is removed from its space.
Power supply cable: If the power supply cable has to be changed, please have this done by the after-sales service or by someone with similar qualifications.
05 GB

2. ACCESSORIES (According to model)
2.1 OVEN EQUIPMENT
It is necessary to do an initial cleaning of the equipment before the first use of each of them. Wash them with a sponge. Rinse and dry off.
The shelf can take moulds and dishes.
The drip tray catches the juices from grilled foods.
Never use he drip tray as a roasting tray as fat deposits can be quickly spread throughout the oven, which produces excess smoke.
Never place the drip tray directly on the oven bottom.
The pizza stone for a crisper pizza equipped according to the model with its stand and the pizza roller.
The pastry tray must be placed on the shelf. It is for cooking small pastries like choux, biscuits, meringues, etc...
Never place the pastry tray directly on the oven bottom.
2.2 ROTISSERIE
No pre-heating is required for rotisserie cooking. Cooking with the door closed.
The energy consumption is 90-95% less than traditional system.
3
2
1
1- Grid 4
2- Spit
3- Hooks & Screws
4- Handle
HOW TO USE TURNSPIT
1.Unscrew the hooks
2.Put the spit into the meat
3.Fix the meat with the hooks
4.Tighten the screws
5.Insert the spit into the motor hole
6.The handle
2.3 LED VISION
Is an illumination system which replaces the traditional « light bulb ». 14 LED (for non-pyrolitic versions) or 10 High Power LED (for pyrolitic versions) lights are integrated within the door. These produce white high quality illumination which enables to view the inside of the oven with clarity without any shadows on all the shelves.
Advantages :
This system, besides providing excellent illumination inside the oven, lasts longer than the traditional light bulb its easier and to maintain and most of all saves energy.
-Optimum view -Long life illumination
-Very low energy consumption, -95% in comparison with the traditional illumination High.
3. CLEANING THE OVEN
•Wait for the oven to cool down before doing any cleaning by hand. •Never clean your oven with abrasive cleaners, wire wool or sharp objects, or the enamel may be damaged beyond repair.
•Only use soapy water or bleach (ammonia) cleaners. •Never line the oven sides with aluminium foil.
GLASS PARTS
We recommend you wipe clean the glass door with absorbent kitchen paper every time you use the oven. If the spattering is heavy, then you can clean with a well squeezed sponge and detergent, and rinse.
Do not use harsh abrasive cleaners or sharp metal scrapers to clean the oven door glass since they can scratch the surface, which may result in shattering of the glass.
OVEN DOOR SEAL
If this gets dirty, clean the oven seal with a slightly damp sponge.
ACCESSORIES
Clean them with a sponge soaked in soapy water. Rinse with clean water and dry off.Avoid abrasive cleaners.
DRIP TRAY
After grilling, remove the drip tray from the oven. Take care to pour the warm grease into a container. Wash and rinse the drip tray in hot water with a sponge soaked in washing up liquid.
If residues remain attached, soak them off in water and detergent.
It can also go in a dishwasher or be cleaned with a commercial oven cleaner.
Never place a soiled drip tray in the oven.
OVEN LIGHTING
Disconnect the power supply from the oven before cleaning or replacing the lamp.
The bulb and its cover are made of material resistant to high temperatures.
When the oven is in use, any unused accessories should be removed from the oven.
06 GB

Bulb characteristics:
230 V AC - 25W- E 14 base Temperature 300°C to change a defective bulb, just :
•Unscrew the glass cover, •Unscrew the bulb,
•Replace it with the same type: see characteristics above, •After replacing the defective bulb, screw back the
protective glass cover.
4. SERVICE CENTRE
Before calling the Service Centre.
If the oven is not working, we recommend that:
•Check that, if the oven is properly plugged into the power supply.
If the cause of the fault cannot be detected:
•Disconnect the oven from the mains, do not touch the oven and call the after sales service.
Before calling the Service Centre remember to make a note of the serial number on the serial number specifications plate.
The oven is supplied with a guarantee certificate that ensures that it will be repaired free of charge by the Service Centre whilst under guarantee.
This appliance is marked according to the European
directive 2002/96/EC on Waste Electrical and
Electronic Equipment (WEEE).
By ensuring this product is disposed of correctly, you will help prevent potential negative consequences for the environment and human health, which could otherwise be caused by inappropriate waste handling
of this product.
The symbol on the product indicates that this product may not be treated as household waste.
Instead it shall be handed over to the applicable collection point for the recycling of electrical and electronic equipment Disposal must be carried out in accordance with local environmental regulations for waste disposal.
For more detailed information about treatment, recovery and recycling of this product, please contact your local city office, your household waste disposal service or the shop where you purchased the product.
07 GB

5. DESCRIPTION OF THE DISPLAY
Display panel : time, programming of cooking mode, indicator lights, cooking temperature function and shelf positioning
BUTTON FOR REGULATION |
|
|
|
AND CONFIRMATION |
|
|
|


 Settings: temperature, programming cooking and end of cooking time -
Regulated by turning the button towards “ - ” or “ + ”


 To confirm setting: press the button.
220
PYRO 


|
Clock / |
Programme symbol display: cooking |
||
Indicator light: |
Programmation / |
|||
Time Cooking timer |
Cooking end |
|||
Cooking temperature |
||||
rising temperature |
||||
|
|
|
||
|
|
Indicator light |
||
|
|
Child safety device |
||
|
PYRO |
Led swich off when the door opens |
||
|
|
|||
|
|
|
|
|
|
Indicator light |
Oven functionning display |
|
|
Booster display: |
|||
and recommended level |
|
Turnspit |
Pre-heating |
Closing of the oven door |
||
position |
|
|
|
|
||
|
|
|
|
|||
08 GB

5.1BEFORE USING THE OVEN FOR THE FIRST TIME
•PRELIMINARY CLEANING
-Clean the oven before using for the first time: -Wipe over external surfaces with a damp soft cloth.
-Wash all accessories and wipe inside the oven with a solution of hot water and washing up liquid.
-Set the empty oven to the maximum temperature and leave on for about 1 hour, this will remove any lingering smells of newness. Ensure that the room is well ventilated while this is being done.
•THINGS TO REMEMBER
Confirmation of operation on timer
Modification must be confirmed by pressing the button.
Stopping the oven:
This may be necessary if you have input an incorrect instruction.
To stop the oven .... turn back the function selector knob to the Stop Position.
Child safety device:
To lock the oven controls, select the child safety device. Refer to the section entitled “Programming - The child safety device”.
The cooling fan :
This protects the control panel and electronics from heat damage.
It begins and then stops automatically even when the oven is switched off.
Oven lighting :
By turning to the light symbol, you can switch on the oven light when it is not in use.
When the oven is in use, the light stays on during all of the oven functions and when the door is opened.
•CLOCK SETTING
When the oven is connected to the electricity supply or after a long power cut, the clock must be re-set.
To set the clock :
1 - Turn the control knob to the “Clock” symbol :
2 - Set the clock with the central button by turning to the “-” or “+”, 3 - Turn back the control knob to the STOP position.
10:30
5.2 HOW TO USE THE OVEN
•THE MANUAL MODE
The cooking methods suggested in manual mode are set out in the table below.Atemperature is also suggested for each cooking method. This can be modified within a pre-determined range.
Function Mode |
|
Pre-set |
Pre-determined |
Function |
|||
according to the oven |
Temperature |
||||||
Temperature |
o |
C |
Booster* |
||||
model |
|
oC |
|
||||
Bottom + Fan |
|
210 |
50-220 |
|
|
Booster |
|
Bottom |
|
160 |
50-220 |
|
|
Booster |
|
Bottom + Top |
|
220 |
50-240 |
|
|
|
|
Bottom + Top + Fan |
|
210 |
50-230 |
|
|
|
|
Circular Heating Element + Fan |
180 |
50-230 |
|
|
|
||
Grill |
|
L2 |
L1-L3 |
|
|
|
|
Grill + Fan |
|
190 |
50-200 |
|
|
Booster |
|
Grill + Turnspit + Fan |
240 |
180-240 |
|
|
Booster |
||
Defrost |
|
40 |
No |
|
|
|
|
Keep Warm |
|
60 |
No |
|
|
|
|
Pizza |
** |
230 |
230 |
|
|
|
|
Pyro |
** |
Pyro |
ECO: 425 / 65min |
|
|||
|
|
|
SUP: 425 / 1h 30min |
|
|||
*Booster: rapid temperature raised
**Oven must have this function
1- Turn the oven selector knob to the function required to the cooking. The heating elements in operation for the selected cooking method are displayed.
2- The appropriate temperature according to the cooking method selected is displayed. It can be modified within a pre-determined range - see the table above.
To modify the temperature setting, turn the central button and on the timer confirm the setting by pressing the same button.
... the temperature display is fixed but can be modified during the cooking cycle.
The oven will start cooking and will start to heat up.
The indicator light flashes until the selected temperature has been reached. An audible signal sounds at the end of this operation and the indicator light becomes fixed.
3- A cooking time and an end of cooking time can be programmed by turning the programme selector knob to “cooking time” or “end of cooking time”.
The “cooking time” or “end of cooking time” display starts flashing. Using the central button, modify the settings as required and on the timer confirm.
When you have done this, do not forget to turn the programme selector knob back to “stop position” to confirm the new setting.
For more details about programming, refer to the chapter 5.3 entitled PROGRAMMES.
4- At the end of the cooking cycle, turn the function selector knob back to “stop position”.
The indicator flashes again, it will remain also turned on after having extinguished the oven and it will estinguish when the inside temperature of the oven is sufficiently low.
• COOKING MODE
All cooking should be carried out with the door closed.
 BOTTOM + FAN - The combination of the bottom heating element and fan is ideal for fruit flans, tarts, quiches and pastries. It prevents food from becoming too dry and encourages bread dough to rise. Place the shelf in the bottom position in the oven.
 BOTTOM - Using the lower element. Ideal for cooking all pastry based dishes. Use this for flans, quiches, tarts, pâté and any cooking that needs more heat from below.
 BOTTOM + TOP - Both top and bottom heating elements are in use. This method is ideal for all traditional roasting and baking.When cooking red meat, roast beef, leg of lamb, game, bread or foil wrapped foods.
 BOTTOM + TOP + FAN - Both top and bottom heating elements are used in conjunction with the fan, which circulates hot air throughout the oven.We recommend this method for poultry, pastries, fish and vegetables. By using this method better heat penetration is achieved and cooking and preheating times are also reduced. The fan cooking option allows you to cook different foods together at different positions in the oven all at the same time, providing even heat distribution but without the risk of mingling tastes and smells. When cooking different foods at the same time allow a further 10 minutes.
 CIRCULAR HEATING ELEMENT + FAN - Air that has been heated is blown by the fan onto the different levels. It is ideal for cooking different types of food at the same time (e.g. Meet and fish) without mixing tastes and smell. It cooks very gently and is ideal for sponge cakes, pastries, etc.
 GRILL - Using the top heating element. Success is guaranteed for mixed grills, kebabs and gratin dishes. The grill should be pre-heated to a high temperature for 5 minutes. White meats should always be placed at some distance from the grill element, the cooking time is slightly longer but the meat will be more succulent. Red meat and fish fillets can be placed directly onto the shelf with the drip tray placed beneath on lower shelf position.
 GRILL + FAN - The top heating element is used in conjunction with the fan which circulates the hot air around the oven. Pre heating is recommended for red meats but is not necessary for white meats. Grilling is ideal for cooking thicker food items such as pork or poultry. Food to be grilled should be placed directly at the centre of the middle shelf.
By sliding the drip tray underneath the shelf it will ensure that any juices are collected. For best results always make sure that the food is not too close to the grill element and turn the food over half way through the cooking time.
 GRILL + TURNSPIT + FAN - The advantage of using the top oven element at the same time as the fan and rotisserie is that the food is evenly cooked, preventing it from becoming dry and tasteless. The rotisserie is programmed to continue rotating for approximately five minutes after cooking, making full use of the residual oven heat.No preheating is required for rotisserie cooking.
 DEFROST - When the dial is set to this position. The fan circulates hot air around the frozen food so that it defrosts in a few minutes without the protein content of the food being changed or altered.
The temperature is preset in 40°C constant, no regulation is possible.
 KEEP WARM - This is recommended to reheat precooked foodstuff, positioning the shelf on the second level from top, or to defrost bread pizza or pastry by positioning the shelf on the lower level.
The temperature is preset in 60°C constant, no regulation is possible.
 PIZZA - With this function hot air circulated in the oven to ensure perfect result for dishes such as pizza or cake.


 PYRO - The oven takes care of the entire inside oven cleaning -Two choices are possible ECO, SUPER
09 GB
5.3 PROGRAMMES
|
|
|
|
|
|
DISPLAY SYMBOLS |
|
|
|
|
|
|
Lamp |
|
|
|
|
|
|
Time Setting |
|
|
|
|
|
|
|
|
|
|
|
|
|
Cooking time programming |
|
|
|
|
|
|
|
|
|
|
|
|
STOP |
End of cooking time programming |
|
|
|
|
|
|
Timer in operation |
Selecteur |
|
|
Child safety device operational |
|||
programmation |
|
|
Locking oven door |
|||
|
|
|
|
|
|
|
THE TIMER:
The timer works independently of the oven and has no effect on the heating elements. It is simply a reminder.
•Turn the knob to the Timer position. The Timer symbol will appear. The digits 00:00 will appear on the display.
•The minutes will then flash, turn the central button to the required number of minutes and confirm by pressing the same button.
•The hours will flash, turn the central button to the required number of hours and confirm by pressing the same button.
•Turn the knob back to the Stop position.
When the time is up, the cooking time will disappear.An audible signal will sound for 15 seconds and the Timer display will flash (to stop it before the 15 seconds are up, just press the central button).
PROGRAMMING THE COOKING TIME:
Various recipes are pre-programmed with a cooking time. In Manual mode, Defrosting or Keep warm Mode can be pre-set, if required. •Turn the knob to the Cooking time position. The Cooking time symbol will appear.Apre-programmed cooking time for the various recipes will appear, or 00:00 for other functions of the oven.
•With the minutes flashing, turn the central button to the required number of minutes confirm by pressing the same button.
•With the hours flashing, turn the central button to the required number of hours and confirm by pressing the same button.
•Turn the programme selector knob back to the Stop position to confirm the new cooking time.
When the time is up, the cooking time will disappear from the display. An audible signal will sound for 15 seconds and the Cooking time and STOP symbols will flash.
•Turn the programme function knob back to Stop. If you do not do this, the Cooking time and STOP symbols will continue flashing.
PROGRAMMING THE END OF COOKING TIME:
Various recipes are pre-programmed with a cooking time and therefore with an end of cooking time. In Manual Mode, Defrosting or Keep warm mode can be pre-set, if required.
•Turn the knob to the End of cooking position.The STOP symbol will appear.Apre-programmed end of cooking time for the various recipes will appear, or 00:00 for other oven functions or the time of day will be shown.
•Turn the programme selector knob to confirm the end time.
•The minutes will flash. Turn the central button to indicate the required number of minutes, and confirm your choice by pressing the same button.
•The hours will then flash.Turn the central button to indicate the required number of hours, and confirm your choice by pressing the same button.
NB : With a delayed start, the end of programme time will appear on the display with the “Cooking time” and “STOP” symbols, and only the function Recipe mode of the oven remains.
The oven automatically calculates the start time (end time minus cooking time).
At the end of the cycle the oven switches itself off automatically. For 15 seconds, an audible signal lets you know that the cycle has ended and the “Cooking time” and STOP symbols will flash.
•Turn the function selector knob to Stop. Unless you do this, the symbols will continue flashing.
•This function is typically used with “cooking duration” function.
For example if the dish has to be cooked for 45 minutes and needs to be ready by 12:30;
- select the required function
-set the cooking duration time to 45 minutes
-set the end of cooking time to 12:30.
Cooking will start automatically at 11:45 (12:30 minus 45 mins) and will continue until the pre-set end-of-
cooking-time, when the oven will switch itself off automatically.
WARNING.
If the END of cooking is selected without setting the length of cooking time, the oven will start cooking immediately and it will stop at the END of cooking time set.
5.4 USING THE END OF COOKING TIMER
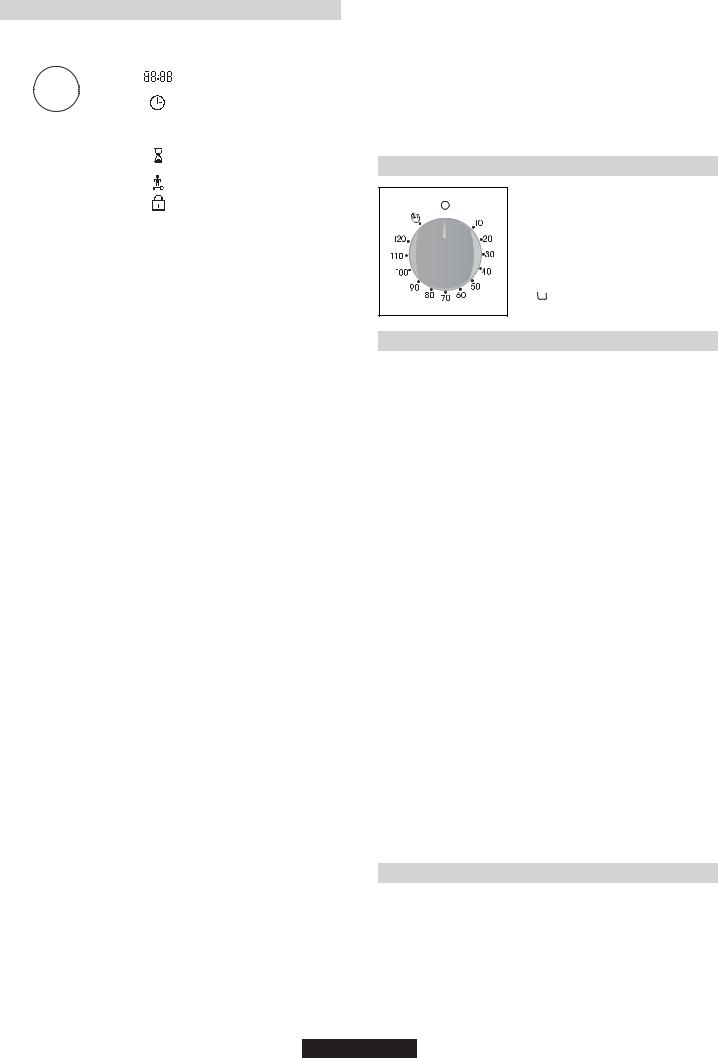
This control enables to set the desired cooking time (max. 120 min.) the oven will automatically switch off at the end of the set time.
The timer will count down from the set time return to the O position and switch off automatically.
For normal use of oven set the timer to the 
 position.
To set the oven ensure the timer is not on the O position.
5.5 COOKING TIPS
It is better not to salt meats until after cooking as salt encourages the meat to spatter fat. This will dirty the oven and make a lot of smoke.
Joints of white meat, pork, veal, lamb and fish can be put into the oven cold. The cooking time is longer than in a preheated oven, but it cooks through to the centre better as the heat has more time to penetrate the joint.
Correct preheating is the basis of successful red meat cookery.
GRILLS
• Before loading the grill:
Remove the meat from the refrigerator a few hours before grilling. Lay it on several layers of kitchen paper. This improves seizing, making it tastier and avoids it staying cold at the centre.
Add pepper and spices to the meat before grilling, but add any salt after cooking. This way it will seize better and stay juicy. Baste all the food to be cooked with a little oil. This is best done with a wide flat basting brush.Then sprinkle with more pepper and herbs (thyme, etc.).
• During cooking:
Never pierce the food during cooking even when you turn it. This lets the juice out and it becomes dry.
BAKING
Avoid using shiny tins, they reflect the heat and can spoil your cakes. If your cakes brown too quickly, cover them with greaseproof paper or aluminium foil.
Caution: The correct way to use foil is with the shiny side in towards the cake. If not the heat is reflected by the shiny surface and does not penetrate the food.
Avoid opening the door during the first 20 to 25 minutes of cooking:
Soufflés, brioches, sponge cakes, etc. will tend to fall.You can check if cakes are done by pricking the centre with a knife blade or metal knitting needle. If the blade comes out nice and dry, your cake is ready and you can stop cooking. If the blade comes out moist or with bits of cake attached, continue baking but slightly lower the thermostat so that it is finished off without burning.
5.6 ADJUSTING THE DISPLAY CONTRAST
The display contrast can be adjusted at any time.
The default setting is “C5”. To adjust the setting, carry out the following:
•Turn the programme selector to “Light” and the function selector to “0”. Press in the central key for 3 seconds and “CX” will appear on the display (where X = the contrast level).
Turn the central key to adjust the contrast setting. The settings go from 1 to 9. Confirm the new setting by pressing the central key for 3 seconds.
10 GB
5.7 USE OF TOUCH CONTROL CLOCK PROGRAMMER
FUNCTION |
HOW TO ACTIVATE IT |
HOWTO SWITCH ITOFF |
WHAT IT DOES |
WHAT IT IS FOR |
|
|
•Push the central button |
•When the set time as |
•Sounds an alarm at the |
•Allows to use the oven as |
|
MINUTE |
elapsed an audible alarm |
end of the set time. |
alarm clock (could be |
||
1 times |
|||||
is activated (this alarm will |
•During the process, the |
activated either with |
|||
MINDER |
•Press the buttons "-" "+" |
||||
stop on its own, however it |
display shows the |
operating the oven or with |
|||
|
to set the required time |
can be stopped immediately |
remaining time. |
out operating the oven) |
|
|
•Release all the buttons |
||||
|
by pressing the button) |
|
|
||
|
|
|
|
||
|
|
SELECT. |
|
|
|
|
•Push the central button |
•When the time is elapsed |
•It allows to preset the |
•Push any button to stop |
|
|
2 times |
the oven will switch off |
cooking time required |
the signal. Push the central |
|
COOKING |
•Press the buttons |
automatically. Should you |
for the recipe chosen |
button to return to the clock |
|
"-" or "+" |
wish to stop cooking earlier |
•To check how long is left |
function |
||
TIME |
to set the lenght of |
either turn the function |
to run press the SELECT |
|
|
|
cooking required |
selector to 0, or set time |
button 2 Times. |
|
|
|
•Release all buttons |
to 0:00 (SELECT and |
•To alter/change the |
|
|
|
•Set the cooking function |
"-" "+" buttons) |
preset time press SELECT |
|
|
|
with the oven function |
|
and "-" "+" buttons |
|
|
|
selector |
|
|
|
|
|
•Push the central button |
•At the time set, the oven |
•Enables you to set the |
•This function is typically used |
|
|
3 times |
will switch off. To switch |
end of cooking time |
with “cooking time” function. |
|
END OF |
•Press the buttons "-" "+" |
off manually, turn the oven |
•To check the preset time |
For example if the dish has to |
|
to set the time at which |
function selector to |
push the central button |
be cooked for 45 minutes and |
||
COOKING |
you wish the oven to |
position O. |
3 times |
needs to be ready by 12:30, |
|
switch off |
|||||
|
|
•To modify the preset |
simply select the required |
||
|
•Release the buttons |
|
|||
|
•Set the cooking function |
|
time press buttons |
function, set the cooking time |
|
|
with the oven function |
|
SELECT + "-" "+" |
to 45 minutes and the end of |
|
|
selector |
|
|
cooking time to 12:30. |
|
|
•Child Lock function is |
•Child Lock function is |
|
•At the end of the cooking set |
|
|
activated by touching Set (+) |
deactivated by touching |
|
time, the oven will switch off |
|
KEY LOCK |
for a minimum of 5 seconds. |
touchpad Set (+) again for a |
|
automatically and an audible |
|
From this moment on all |
minimum of 5 seconds. From |
|
alarm will ring. |
||
|
other function are locked and |
this moment on all functions |
|
•Cooking will start |
|
|
the display will flash STOP |
are selectable again. |
|
automatically at 11:45 (12:30 |
|
|
and preset time intermittently. |
|
|
minus 45 mins) and will |
|
|
|
|
|
continue until the pre-set end- |
|
|
|
|
|
of-cooking-time, when the |
|
|
|
|
|
oven will switch itself off |
|
|
|
|
|
automatically. |
|
|
|
|
|
WARNING. |
|
|
|
|
|
If the END of cooking is |
|
|
|
|
|
selected without setting the |
|
|
|
|
|
length of cooking time, the |
|
|
|
|
|
oven will start cooking |
|
|
|
|
|
immediately and it will stop |
|
|
|
|
|
at the END of cooking time |
|
|
|
|
|
set. |
5.8 SETTING THE CORRECT TIME
 00:00
00:00
select
WARNING : the first operation to carry out after the oven has been installed or following the interruption of power supply (this is recognizable the display pulsating and showing 12:00 ) is setting the correct time. This is achieved as follows
•Push the central button 4 times •Set time with "-" "+" buttons. •Release all buttons.
ATTENTION: The oven will only operate providing the clock is set.
11 GB

6. PYROLYTIC CYCLE
**Oven must have this function
The oven is equipped with a pyrolyser cleaning system, which destroys food residues at high temperature.The operation is carried out automatically by means of the programmer.The resulting fumes are rendered “clean” by passing over a Pyrolyser wich starts as soon as cooking begins. As very high temperatures are required by the Pyrolyser, the oven door is fitted with a safety lock.
The pyrolyser can be stopped at any time. The door cannot be opened until the safety lock is displayed.
NOTE : If a hob has been fitted above the oven, never use the gas burners or the electric hot-plates while the Pyrolyser is working, this will prevent the hob from overheating.
TWO PYROLYTIC CYCLE are pre-set.
. ECO PYROCLEAN : Cleans a moderately stained oven.Operates for a period of 65 minutes.
. SUPER PYROCLEAN : Cleans a heavily stained oven.Operates for a period of 90 minutes.
Never use commercially available cleaning products on a Pyrolytic oven !
Tip : Carrying out Pyrolytic cleaning immediately after cooking allows you to take advantage of residual heat, thus saving energy.
Before carrying out a Pyrolytic cycle :
•Remove all accessories from the oven :They cannot withstand the high temperatures and would be damaged by pyrolytic temperatures. •Remove any large spillages or stains as it would take too long to destroy them. Also excessively large amounts of grease could ignite when subject to the very high temperatures of the Pyrolyticcycle.
•Close the oven door.
•excess spillage must be removed before cleaning
Using the pyrolytic cycle :
1- Turn the function selector knob to “Pyrolytic Mode”. “PYRO” will appear on screen. ECO mode flashes.
Remember : ECO - cycle of 65 minutes - moderately stained oven SUP - cycle of 90 minutes - heavily stained oven
2- By using the central button select the required Pyrolytic mode, according the degree of staining : ECO or SUP.
• Your choice is confirmed after 3 seconds...
The oven starts the pyrolytic cycle. The pyrolytic mode selected flashes and the “time” and “stop” indicator lights will appear.
During the pyrolytic cycle, the locking oven door appears, it indicates that the door is locked. The cooling fan will operate.
The indicator light flashes until the temperature required is not reached and then it becomes fixed.
* The start of the pyrolytic cycle can be delayed by selecting an end of time. Turn the programmation control knob to the end of time and set the end of time required.
•During sel-cleaning pyrolytic operation the surfaces may get hotter than usual and children should be kept away.
At the end of the pyrolytic cycle the oven will automatically switch off.
For 15 seconds, an audible signal lets you know that the cycle has ended and the “time” and “Stop” indicator lights will flash.
•Turn the function knob to stop. Unless you do this, the symbols will continue flashing. The symbol “Pyro” disappears on the Timer, the pyrolytic mode. The oven door will remain locked until the temperature is high. So, as the locking oven door is light, the oven can not be opened.
The cooling fan does not switch itself off until the temperature of the oven components is reasonable.
At the end of the cycle, the indicator flashes again, it will remain also turned on after having extinguished the oven and it will estinguish when the inside temperature of the oven is sufficiently low.
Pyrolysis leaves a white residue on the oven walls. Wait for the oven to cool completely then clean the inside of the oven with a damp sponge to wipe off the residue.
7. CHILD SAFETY
This function is essential, especially when children are around. It prevents children from switching the oven on or altering the preset programmes.
This safety system locks the oven control panel while it is operating.
There are two levels of safety :
LEVEL 1 : Locking selector control knob and the central button. •To activate : Turn the programmation control knob to child safety. •Action : The control knobs are inactive*.
•To deactivate : Turn the programmation control knob to 0.
LEVEL 2 : Locking function selector knobs
•To activate : Turn the function selector knob to child safety and keep the central button pressed in for 3 seconds.
•Action :All the controls are inactive*.
•To dactivate : the same procedure as for activating. Turn the function selector knob to child safety and keep the central button Pressed in for 3 seconds.
*Note : In all cases, for reasons of safety, even when the controls are locked, the oven can be switched off by turning the selector knob to 0.
12 GB

INDICAZIONI DI SICUREZZA
•ATTENZIONE: l'apparecchio e le parti accessibili diventano calde durante l'uso. Prestare attenzione a non toccare le parti calde.
•I bambini al di sotto di 8 anni dovrebbero essere tenuti a distanza se non continuamente supervisionati.
•L'apparecchio può essere usato da bambini dagli 8 anni in su e persone con ridotte capacità fisiche, sensoriali o mentali o senza esperienza e conoscenza del prodotto se supervisionate o dando loro istruzioni riguardo al funzionamento dell'apparecchio in maniera sicura e coscente del rischio possibile.
•I bambini non dovrebbero giocare con l'apparecchio.
•La pulizia e la manutenzione non dovrebbero essere fatte da bambini senza supervisione
•Durante l’uso l’apparecchio diventa molto caldo. Si dovrebbe fare attenzione a non toccare gli elementi riscaldanti all’interno del forno.
•ATTENZIONE: Le parti accessibili possono diventare molto calde durante l’uso. I bambini dovrebbero essere tenuti a distanza.
•Non usare per la pulizia materiali ruvidi abrasivi o raschietti metallici affilati per pulire le porte di vetro del forno dato che possono graffiare la superficie e causare la frantumazione del vetro.
•Spegnere il forno prima di rimuovere lo schermo di protezione e, dopo la pulizia, rimontarlo secondo le istruzioni.
•Usare solo la sonda termica raccomandata per questo forno.
•Non utilizzare un pulitore a vapore.
•ATTENZIONE: Assicurarsi che l’apparecchio sia spento prima di sostituire la lampada per evitare la possibilità di scosse elettriche.
•Il mezzo di disconnessione deve essere incorporato nel cablaggio fisso in accordo con le leggi di cablaggio.
•Le istruzioni devono indicare quale tipo di cavo debba essere utilizzato, tenendo presente la temperatura della superficie posteriore dell’apparecchio.
•Se il cavo di alimentazione è danneggiato, esso deve essere sostituito da un cavo o un assieme speciali disponibili presso il costruttore o il suo servizio assistenza tecnica.
•ATTENZIONE: Al fine di evitare ogni pericolo dovuto al riarmo accidentale del dispositivo termico di interruzione, il presente apparecchio non deve essere alimentato con un dispositivo di manovra esterno, quale un temporizzatore oppure essere connesso a un circuito che viene regolarmente alimentato o disalimentato dal servizio.
•ATTENZIONE: Le parti accessibili possono diventare calde quando il grill è in uso. I bambini dovrebbero essere tenuti a distanza.
•Gli eccessi di materiale tracimato devono essere tolti prima della pulizia.
•Durante la Pyrolisi le superfici possono scaldarsi più del solito è pertanto consigliato tenere i bambini a distanza.
13 IT
1. AVVERTENZE GENERALI
Per utilizzare in modo ottimale il forno, è consigliabile leggere con attenzione queste istruzioni e conservarle in un luogo sicuro in modo da poterle consultare in caso di bisogno. Prima di installare il forno, prendere nota del numero di serie in modo da poterlo comunicare al personale del servizio di assistenza in caso di richiesta di intervento. Dopo aver rimosso il forno dall'imballaggio, verificare che non abbia subito danni durante il trasporto. In caso di dubbi, non utilizzare il forno e richiedere l'assistenza di un tecnico qualificato. Tenere tutto il materiale da imballaggio, come sacchetti di plastica, polistirolo e chiodi fuori della portata dei bambini perché potrebbero essere pericolosi.
Il produttore declina ogni responsabilità in caso di mancata osservanza delle istruzioni contenute in questo documento. NOTA: le funzioni, le proprietà e gli accessori dei forni citati in questo manuale possono variare a seconda dei modelli.
1.1 DICHIARAZIONE DI CONFORMITÀ
Tutti i componenti di questo elettrodomestico destinati a venire a contatto con gli alimenti
sono conformi che le disposizione della Direttiva CEE 89/109. Il forno è conforme alle Direttive europee 73/23/CEE e
89/336/CEE, sostituite dalle direttive 2006/95/CE e 2004/108/CE e successive modifiche.
1.2 SUGGERIMENTI SULLA SICUREZZA
•Utilizzare il forno solo per lo scopo per cui è stato progettato, ossia solo per la cottura di alimenti. Qualsiasi altro utilizzo, ad esempio come fonte di riscaldamento, è considerato improprio e quindi pericoloso.
•Il produttore declina ogni responsabilità per eventuali danni dovuti a un uso improprio, errato o irragionevole del forno. Durante l'uso di elettrodomestici elettrici, è indispensabile attenersi ad alcune semplici regole di base:
-Non tirare il cavo di alimentazione per staccare la spina dalla presa a muro
-Non toccare il forno con mani o piedi bagnati o umidi -Non utilizzare i forno con i piedi scalzi
-È generalmente sconsigliabile utilizzare adattatori, basette di alimentazione o prolunghe.
-Se il forno si guasta o uno degli interruttori risulta difettoso, spegnerlo immediatamente e non utilizzarlo.
•Sostituire immediatamente il cavo di alimentazione se danneggiato. Attenersi alle seguenti istruzioni per sostituire il cavo di alimentazione. Rimuovere il cavo di alimentazione difettoso e sostituirlo con uno dei seguenti modelli: H05RR-F, H05VV-F o H05V2V2-F. Verificare che le specifiche elettriche del cavo di alimentazione corrispondano a quelle del forno. Fare sostituire il cavo di alimentazione da un tecnico qualificato. Verificare che il cavo di messa a terra (giallo/verde) sia 10 mm più lungo del cavo di alimentazione. Rivolgersi solo a centri di assistenza autorizzati e verificare che vengano utilizzate solo parti di ricambio originali. Il produttore non è in grado di garantire la sicurezza del forno in caso di mancata osservanza delle istruzioni indicate in precedenza.
•Il forno ha le caratteristiche tecniche descritte in questo documento e non deve essere in alcun modo modificato.
•Non utilizzare mai vapore o getti ad alta pressione per pulire il forno. •Non conservare materiale infiammabile nel forno perché potrebbe incendiarsi nel caso in cui il forno venga accidentalmente acceso. •Non esercitare pressione sullo sportello del forno e impedire ai bambini di sedervisi sopra.
•Utilizzare sempre guanti per inserire e rimuovere le pietanze nel/dal forno.
1.3 RACCOMANDAZIONI
•Dopo l'uso, sono sufficienti alcune semplici operazioni di pulizia per mantenerlo perfettamente pulito.
•Non rivestire le pareti del forno con fogli d'alluminio da cucina o fogli monouso commerciali, perché potrebbero fondersi a contatto con le superfici in smalto caldo e danneggiare le superfici in smalto all'interno del forno.
•Per evitare di sporcare eccessivamente il forno e prevenire la diffusione di fumo maleodorante, è consigliabile non utilizzare il forno a temperature molto alte. È generalmente preferibile impostare un tempo di cottura più lungo e utilizzare una temperatura più bassa.
Oltre agli accessori forniti con il forno, è consigliabile utilizzare piatti e teglie resistenti alle alte temperature.
1.4 INSTALLAZIONE
Il produttore non è obbligato a occuparsi dell'installazione. Gli eventuali interventi di assistenza necessari per correggere problemi dovuti a un'errata installazione non sono coperti da garanzia. L'installazione deve essere effettuata da un tecnico qualificato e in conformità con queste istruzioni. Un'installazione impropria potrebbe causare infortuni alle persone, agli animali domestici o danni alle attrezzature. Il produttore declina ogni responsabilità per eventuali lesioni o danni dovuti a un'errata installazione. L'unità della cucina in cui viene installato il forno deve essere fabbricato in un materiale in grado di tollerare una temperatura di almeno 70°C.
Il forno può essere installato sopra una colonna o sotto a un piano di lavoro.
Prima di fissare in posizione il forno, verificare che lo spazio attorno allo stesso sia sufficiente a garantire la circolazione del flusso di aria fresco necessario a garantire il raffreddamento del forno e la sicurezza dei componenti interni. Realizzare le aperture indicate nell'ultima pagina del manuale, a seconda del tipo di installazione.
1.5 COLLEGAMENTI ELETTRICI
FARE EFFETTUARE I COLLEGAMENTI ELETTRICI A UN'ELETTRICISTA O TECNICO QUALIFICATO. La rete di alimentazione a cui viene collegato il forno deve essere conforme con le normative in vigore nel paese di installazione. Il produttore declina ogni responsabilità per eventuali danni derivanti dalla mancata osservanza di tali disposizioni. Il forno deve essere collegato alla rete elettrica tramite una presa a muro con messa a terra o tramite un sezionatore con più poli, a seconda delle disposizioni in vigore nel paese di installazione. La rete elettrica deve essere protetta mediante fusibili idonei e devono essere utilizzati cavi con una sezione trasversale idonea a garantire una corretta alimentazione del forno.
COLLEGAMENTO
Il forno viene fornito con un cavo di alimentazione, che deve essere collegato solo a una rete elettrica con una tensione di 230 VCA tra le fasi o tra la fase e il neutro. Prima di collegare il forno alla rete elettrica, è indispensabile controllare: - la tensione di alimentazione indicata sul misuratore, - l'impostazione del sezionatore. Il filo di messa a terra (giallo/verde) collegato al morsetto di terra del forno deve essere collegato al morsetto di terra della rete elettrica.
Attenzione:
•Prima di collegare il forno alla rete elettrica, far controllare la continuità della messa a terra della rete elettrica a un elettricista qualificato.
•Il produttore declina ogni responsabilità per eventuali incidenti o altri problemi derivanti dal mancato collegamento a terra del forno o dal suo collegamento a una messa a terra con una continuità difettosa.
Nota: poiché il forno potrebbe richiedere interventi di assistenza, è consigliabile prevedere la disponibilità di un'ulteriore presa a muro a cui collegare il forno dopo che è stato rimosso dallo spazio in cui è stato installato.
Cavo di alimentazione: il cavo di alimentazione deve essere sostituito solo dal personale dell'assistenza tecnica o da tecnici con qualifiche analoghe.
Code produit:
Numéro de série :
14 IT
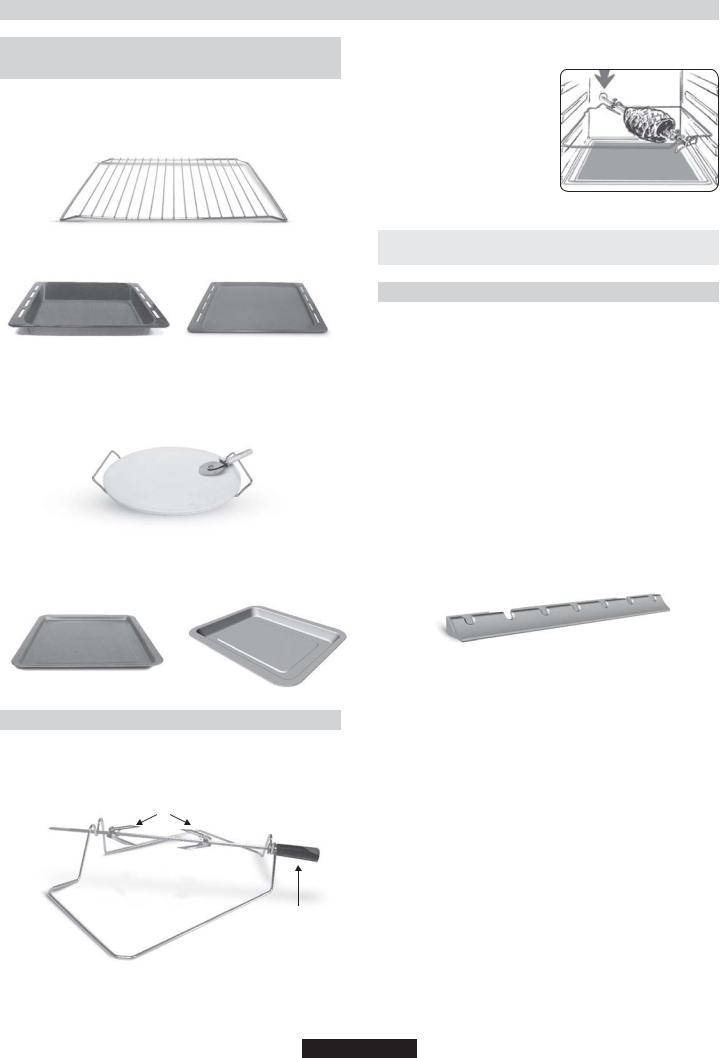
2. TECNOLOGIA PRO/EXP'R (A SECONDA DEI MODELLI)
2.1 ACCESSORI DEL FORNO (A SECONDA DEI MODELLI)
Prima di utilizzare il forno per la prima volta, è necessario pulire tutti gli accessori, lavandoli con una spugna bagnata, sciacquandoli e asciugandoli.
La griglia può sostenere teglie e piatti
La leccarda serve a raccogliere i residui che sgocciolano durante la cottura di alimenti con il grill.
MODALITÀ UTILIZZO
GIRARROSTO
1.Svitare i ganci
2.Infilare lo spiedo all'interno della carne
3.Bloccare la carne con i ganci
4.Stringere le viti dei ganci
5.Inserire lo spiedo all'interno della cavità del forno
6.Smontare l'impugnatura prima di iniziare la cottura
Quando il forno è in funzione bisogna togliere dalla cavità tutti gli accessori inutilizzati.
Non utilizzare la vaschetta di gocciolamento come teglia per gli arrosti perché i depositi di grasso possono disperdersi rapidamente all'interno del forno e causare la produzione di un fumo eccessivo.
La piastra per pizza, che consente di cucinare pizze più croccanti, è munita di una base e di uno stendipizza.
La teglia per i dolci deve essere collocata sul vassoio e può essere utilizzata per cucinare pasticcini, come bignè, biscotti, meringhe, ecc.... Non collocare mai la teglia per i dolci direttamente sul ripiano inferiore del forno.
2.3 LED VISION (A SECONDA DEI MODELLI)
Questo sistema di illuminazione sostituisce le “lampadine” tradizionali. I 14 LED (sui modelli non pirolitici) o i 10 LED ad alta potenza (sui modelli pirolitici) sono integrati direttamente nello sportello. Questi LED producono una luce bianca di alta qualità che consente di vedere bene tutti i ripiani all'interno del forno senza ombre.
Vantaggi :
Oltre a garantire una buona visibilità all'interno del forno, questo sistema è più resistente rispetto alla lampadine tradizionali, richiede una minore manutenzione e consuma meno dei sistemi tradizionali.
-Ottima visibilità
-Illuminazione di lunga durata
-Consumi ultra-ridotti, Consuma il 95% in meno rispetto ai sistemi tradizionali
«Elettrodomestico con luci LED bianche di classe 1M, conforme a IEC 60825- 1:1993 + A1: 1997 + A2: 2001 (equivalente allo standard EN 60825-1: 1994 + A1: 2002 + A2: 2001); emissione luminosa massima pari a 459 nm < 150uW.
2.2 FUNZIONE GIRARROSTO
Per arrostire non è richiesto il pre riscaldamento del forno Effettuare la cottura con la porta forno chiusa
Il consumo di energia è inferiore del 90-95% rispetto al metodo tradizionale
3
2
1
4
1- Griglia
2- Spiedo
3- Ganci e viti
4- Impugnatura
15 IT

3.PULIZIA DEL FORNO 4. RISOLUZIONE DEI PROBLEMI
•Attendere che il forno si raffreddi prima di effettuare operazioni di pulizia manuali.
•Non utilizzare mai detergenti abrasivi, pagliette di ferro o oggetti appuntiti per la pulizia per non danneggiare in modo irreparabile le parti smaltate.
•Utilizzare solo acqua e sapone o detergenti a base di candeggina (ammoniaca).
•Non rivestire mai le pareti del forno con fogli d'alluminio da cucina.
PARTI IN VETRO
È consigliabile pulire lo sportello in vetro con carta assorbente da cucina dopo ogni utilizzo del forno. Per rimuovere le macchie più ostinate, è possibile anche utilizzare una spugna imbevuta di detergente ben strizzata e sciacquare con acqua.
*Non utilizzare mai detergenti abrasivi o oggetti appuntiti perché potrebbero graffiare la superficie in vetro o frantumarla.
GUARNIZIONE DELLO SPORTELLO DEL FORNO
Se sporca, la guarnizione può essere pulita con una spugna leggermente inumidita.
ACCESSORI
Pulire gli accessori con una spugna imbevuta con acqua e sapone, sciacquarli e asciugarli. Evitare di usare detergenti abrasivi.
VASCHETTADI GOCCIOLAMENTO
Dopo l'uso del grill, rimuovere la vaschetta dal forno. Versare il grasso caldo in un contenitore. Lavare e sciacquare la vaschetta in acqua calda utilizzando una spugna e del detergente per piatti. Se rimangono dei residui di grasso, immergere la vaschetta in acqua e detergente. In alternativa, è possibile anche lavare la vaschetta nella lavastoviglie oppure utilizzare un detergente per forni di tipo commerciale. Non reinserire mai una vaschetta sporca nel forno.
LUCE DEL FORNO
Scollegare il forno dall'alimentazione elettrica prima di pulire o sostituire la lampadina. La lampadina e la sua copertura sono fabbricati in materiale plastico resistente alle temperature elevate.
Caratteristiche della lampadina:
230 VCA 2 5W E 14, temperatura di base 300°C. Per sostituire una lampadina difettosa:
•Allentare la copertura in vetro. •Svitare la lampadina.
•Sostituirla con una nuova dello stesso modello (vedere le caratteristiche descritte in precedenza).
•Dopo aver sostituito la lampadina difettosa, riavvitare la copertura in vetro.
4. ASSISTENZA TECNICA
Prima di rivolgersi all'assistenza tecnica:
Se il forno non funziona, è consigliabile:
•Controllare che il forno sia correttamente collegato all'alimentazione elettrica.
Se non è possibile individuare la causa del guasto:
•Scollegare il forno dall'alimentazione elettrica, non toccarlo e rivolgersi all'assistenza tecnica.
Prima di chiamare il centro di assistenza, ricordarsi di prendere nota del numero di serie riportato sulla targhetta identificativa.
Il forno viene fornito con un certificato di garanzia che ne garantisca la riparazione gratuita presso un centro di assistenza durante il periodo di validità della garanzia.
Il forno è marcato in conformità con la Direttiva
europea 2002/96/CE relativa alle apparecchiature
elettriche ed elettroniche usate (WEEE). Uno smaltimento corretto del prodotto evita di causare danni all'ambiente e alla salute umana. Il simbolo
riportato sul prodotto indica che non può essere smaltito come normale rifiuto domestico.
Il forno deve essere invece consegnato a un centro di raccolta specializzato nello smaltimento di apparecchiature elettriche ed elettroniche usate.
Questo elettrodomestico deve essere smaltito in conformità con i regolamenti locali in materia di smaltimento di rifiuti. Per ulteriori informazioni sullo smaltimento, il recupero e il riciclaggio di questo prodotto, rivolgersi all'ufficio locale responsabile, al servizio di raccolta di rifiuti locali o al punto vendita presso cui è stato acquistato.
16 IT
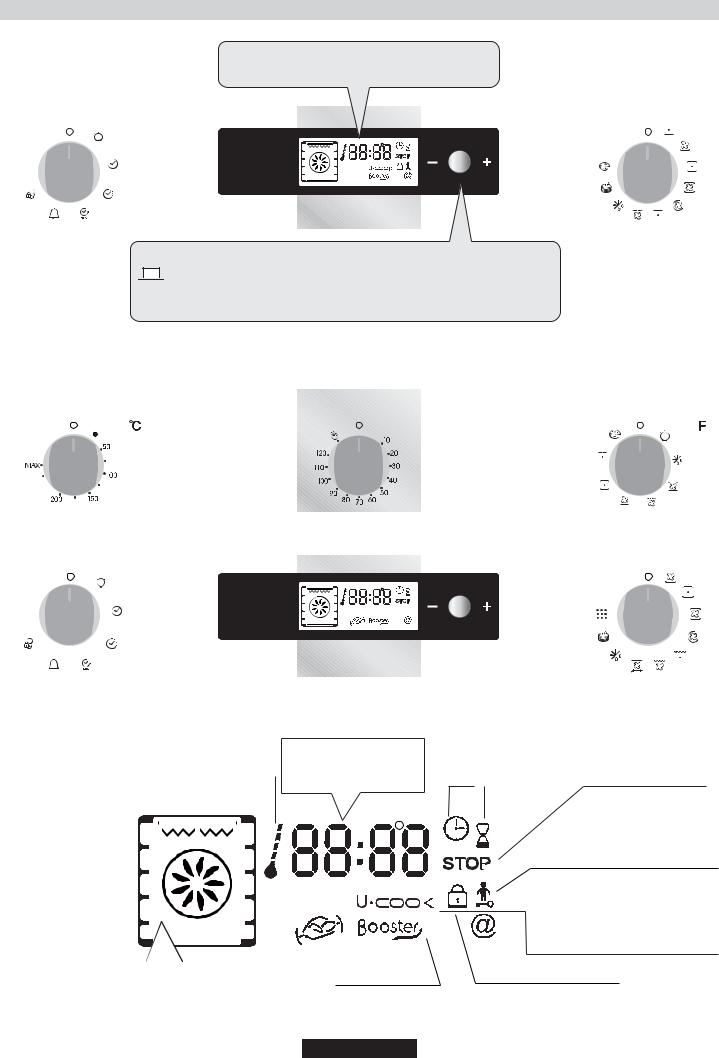
5. DESCRIZIONE DEL DISPLAY
Display: orario, programmazione della modalità di cottura, indicatori luminosi, temperatura di cottura e posizionamento delle mensole.
PULSANTE PER REGOLARE -  + CONFERMARE

 Impostazioni: temperatura, programmazione del ciclo di cottura e della fine del ciclo di cottura, regolabile ruotando il selettore verso “-“ oppure “+”


 Per confermare l'impostazione: premere il pulsante
220
PYRO 


|
Indicatore luminoso: |
Orologio / |
Simbolo programma: cottura |
|||
|
Programmazione / |
Tempo |
Timer |
fine del ciclo di cottura |
||
|
|
Temperatura di cottura |
||||
incremento della temperatura |
||||||
|
|
|||||
|
|
|
|
|
|
|
|
|
|
|
|
|
|
|
|
|
|
|
|
|
|
|
|
|
|
Indicatore luminoso |
|
|
|
|
|
|
|
|
|
|
|
|
|
|
|
|
|
|
|
|
|
|
|
|
|
|
|
|
|
|
|
|
|
|
|
|
|
|
|
|
|
|
|
|
|
|
|
|
|
|
|
|
|
|
|
|
|
|
|
|
|
|
|
|
|
|
|
|
|
|
|
|
|
|
|
|
|
|
|
|
|
|
|
|
|
|
|
|
|
|
|
|
|
|
|
|
|
|
|
|
|
|
|
|
|
|
|
|
|
|
|
|
|
|
|
|
|
|
|
|
|
|
|
|
|
|
|
|
|
|
|
|
|
||
|
|
|
|
|
|
|
|
|
|
|
|
|
|
|
|
|
|
|
|
|
|
|
|
|
|
Dispositivo di protezione del forno |
|
|
|
|
|
|
|
|
|
|
|
|
|
|
|
|
PYRO |
|
|
|
|
|
|
|
Inserirei la specifica che nei forni |
||
|
|
|
|
|
|
|
|
|
|
|
|
|
|
|
|
|
|
|||||||||
|
|
|
|
|
|
|
|
|
|
|
|
|
|
|
|
|
|
|||||||||
|
|
|
|
|
|
|
|
|
|
|
|
|
|
|
|
|
|
|
|
|
|
|
|
|
|
|
|
|
|
|
|
|
|
|
|
|
|
|
|
|
|
|
|
|
|
|
|
|
|
|
|
|
piro i led si spengono quando si |
|
|
|
|
|
|
|
|
|
|
|
|
|
|
|
|
|
|
|
|
|
|
|
|
|
|
apre la porta |
|
|
|
|
|
|
|
|
|
|
|
|
|
|
|
|
|
|
|
|
|
||||||
|
|
|
|
|
|
|
|
|
|
|
|
|
|
|
|
|
|
|
|
|||||||
Stato operativo del forno |
|
|
|
|
|
|
|
|
|
|
Display Booster |
|
|
Indicatore luminoso |
||||||||||||
e livello consigliato |
|
|
Girarrosto |
Pre-riscaldamento |
|
|
Chiusura sportello forno |
|||||||||||||||||||
|
|
|
|
|
|
|
|
|
|
|
|
|
|
|
|
|
|
|
|
|
|
|
|
|
|
|
17 IT

5.1PRIMA DI UTILIZZARE IL FORNO PER LA PRIMA VOLTA
PULIZIA PRELIMINARE
-Pulire sempre il forno prima di utilizzarlo per la prima volta:
-Pulire le superfici esterne con un panno morbido leggermente inumidito. -Lavare tutti gli accessori e pulire l'interno del forno con del detergente per piatti ed acqua calda.
-Verificare che il forno sia vuoto, impostare la temperatura massima e lasciarlo acceso per almeno 1 ora per rimuovere tutti gli odori normalmente presenti nei forni nuovi. Verificare che la cucina sia ben ventilata durante l'esecuzione di queste operazioni.
PROMEMORIA
Controllare che il timer funzioni correttamente
Premere il pulsante del timer per verificare che funzioni.
Arresto del forno
Può essere necessario effettuare questa operazione se si seleziona un comando errato. Per arrestare il forno, ruotare all'indietro il selettore e portarlo in posizione di arresto.
Blocco dei comandi
Per bloccare i comandi del forno, selezionare il dispositivo di protezione del forno. Per ulteriori informazioni, consultare la sezione intitolata “Programmazione del dispositivo di sicurezza”.
Ventola di raffreddamento
Lo scopo della ventola è proteggere il pannello di controllo e l'elettronica dal calore. La ventola si avvia automaticamente e si arresta al momento in cui viene spento il forno.
Luce del forno
Ruotando il selettore della luce, è possibile spegnere la luce del forno quando questo non è in uso. La luce è sempre accesa quando il forno è in uso e si accende quando si apre lo sportello.
•IMPOSTAZIONE DELL'OROLOGIO
L'orologio deve sempre essere reimpostato quando si collega il forno all'alimentazione elettrica o dopo un'interruzione prolungata dell'alimentazione elettrica.
Per impostare l'orologio
1- Ruotare il selettore dei comandi e impostarlo sul simbolo dell'orologio;
2- utilizzare il pulsante centrale per impostare l'orologio e ruotare la manopola in direzione “-” o “+”;
3- riportare la manopola di comando in posizione diARRESTO.
10:30
5.2 COME UTILIZZARE IL FORNO
•MODALITÀ MANUALE
I metodi di cottura consigliati per la modalità manuale sono descritti nella seguente tabella, che riporta anche la temperatura consigliata per ciascun metodo di cottura. La temperatura può tuttavia essere impostata su qualsiasi valore compreso entro l'intervallo indicato.
Modalita di |
|
Temperatura |
Temperatura |
Funzione |
|
funzionamento secondo |
pre-impostata |
||||
pre-determinata °C |
Booster* |
||||
il modello di forno |
|
°C |
|
|
|
Parte inferiore+Ventole |
210 |
50-220 |
Booster |
||
Parte inferiore |
|
160 |
50-220 |
Booster |
|
Parte inferiore+Parte superiore |
220 |
50-240 |
|
||
Parte inferiore+Parte superiore+Ventole |
210 |
50-230 |
|
||
Elementodiriscaldamentocircolare+Ventole |
180 |
50-230 |
|
||
Grill |
|
L2 |
L1-L3 |
|
|
Grill+Ventole |
|
190 |
50-200 |
Booster |
|
Grill+Girarrosto+Ventole |
240 |
180-240 |
Booster |
||
Sbrinamento |
|
40 |
No |
|
|
Mantenere in caldo |
|
60 |
No |
|
|
Pizza |
** |
230 |
230 |
|
|
*Booster: aumento rapido della temperatura.
**Il forno deve avere questa funzione
1-Ruotare il selettore del forno impostandolo sulla funzione di cottura desiderata. Vengono visualizzati gli elementi di riscaldamento che verranno utilizzati per il metodo di cottura scelto.
2-Viene quindi visualizzata la temperatura appropriata per il metodo di cottura selezionato. La temperatura può tuttavia essere impostata su qualsiasi valore compreso entro l'intervallo indicato (vedere la tabella precedente). Per modificare la temperatura, ruotare il pulsante centrale e premerlo appena il timer visualizza la temperatura corretta. La temperatura visualizzata sul display è fissa, ma può comunque essere modificata in fase di cottura. Il forno avvia il ciclo di cottura e inizia a riscaldarsi. L'indicatore luminoso lampeggia fino al raggiungimento della temperatura selezionata. Al termine dell'operazione, il forno emette un avviso acustico e l'indicatore luminoso si accende fisso.
3-Per programmare il tempo di cottura e l'ora di fine del ciclo di cottura, è sufficiente ruotare il selettore dei programmi e posizionarlo sul “tempo di cottura” o “l'ora di fine del ciclo di cottura” desiderati. L'icona del “tempo di cottura” o “dell'ora di fine del ciclo di cottura” inizia a lampeggiare. Utilizzare il pulsante centrale per modificare le impostazioni e controllare che il timer visualizzi i tempi desiderati. Dopo aver effettuato queste operazioni, riportare il selettore in posizione di “arresto” per confermare la nuova impostazione.
Per ulteriori informazioni sulla programmazione, fare riferimento al Capitolo 5.3 - PROGRAMMAZIONE.
4 - Al termine del ciclo di cottura, riportare il selettore delle funzioni in posizione di arresto. L'indicatore luminoso inizia nuovamente a lampeggiare e continua a rimanere acceso anche dopo che il forno è stato spento, fino a quando la temperatura non si abbassa a sufficienza.
• MODALITÀ DI COTTURA
 ELEMENTO RISCALDANTE INFERIORE In questa modalità viene utilizzato l'elemento inferiore. Questa modalità è ideale per cuocere tutti i piatti a base di pasta; ad esempio flan, quiche, paté e qualsiasi pietanza che richieda più calore e irradiazione dal basso.
Tenere sempre lo sportello del forno chiuso durante la cottura.
 ELEMENTO RISCALDANTE INFERIORE + VENTOLA - L'uso combinato dell'elemento riscaldante inferiore e della ventola è ideale per la cottura di torte di frutta, crostate, quiche e dolci.
 ELEMENTO RISCALDANTE INFERIORE + SUPERIORE - In questa modalità di cottura vengono utilizzati entrambi gli elementi riscaldanti, ossia quello inferiore e superiore. Questo metodo è ideale per gli arrosti e le pietanze più tradizionali, come la carne rossa, il roastbeef, le cosce di agnello, la selvaggina, il pane e le pietanze avvolte in fogli di alluminio.
 ELEMENTO RISCALDANTE INFERIORE + SUPERIORE + VENTOLA - In questa modalità vengono utilizzati entrambi gli elementi riscaldanti, ossia quello superiore e inferiore, ma viene contemporaneamente fatta circolare aria calda all'interno del forno. È consigliabile utilizzare questo metodo per cucinare carne bianca, torte salate, pesce e verdura. Questo metodo assicura una maggiore penetrazione del calore e richiede un tempo di pre-riscaldamento minore. L'uso della ventola consente di cucinare temporaneamente tipi di alimenti diversi, perché consente di distribuire uniformemente il calore senza il rischio che si mescolino sapori e odori. Quando si cucinano più tipi di alimenti contemporaneamente, è consigliabile incrementare di 10 minuti il tempo di cottura.
 ELEMENTO RISCALDANTE CIRCOLARE + VENTOLA In questa modalità di cottura vengono contemporaneamente utilizzati gli elementi riscaldanti inferiore, superiore e circolare, che provvede a far circolare aria calda all'interno del forno. Questa modalità di cottura è indicata per le stesse pietanze indicate nella sezione relativa alla cottura con ventola.
 GRILL In questa modalità di cottura viene utilizzato solo l'elemento riscaldante superiore. Questa modalità di cottura è particolarmente indicata per i piatti grigliati, gli spiedini e i piatti gratinati. Il grill deve essere pre-riscaldato a una temperatura alta per 5 minuti. Per ottenere risultati di cottura ottimali e rendere la carne più succulenta, è consigliabile collocarla a una certa distanza dal grill anche se i tempi di cottura sono più lunghi. I filetti di carne rossa e pesce devono essere collocati direttamente sul ripiano con la vaschetta di gocciolamento posizionata sotto al ripiano inferiore.
 GRILL+ VENTOLA In questa modalità di cottura viene utilizzato l'elemento riscaldante superiore insieme alla ventola per fare circolare aria calda all'interno del forno. È consigliabile pre-riscaldare il forno solo per le carni rosse, ma non per quelle bianche. Il grill è ideale per le pietanze con un maggiore spessore, come la carne di suino o pollo. Gli alimenti da grigliare devono essere collocati al centro del ripiano intermedio. Collocare la vaschetta di gocciolamento sotto al ripiano per raccogliere l'eventuale grasso che gocciola in fase di cottura. Per ottenere risultati ottimali, non collocare gli alimenti troppo vicino al grill e girare la carne a metà del ciclo di cottura.
 GRILL+ GIRARROSTO+ VENTOLA - L'uso simultaneo dell'elemento riscaldante superiore e della ventola e del girarrosto consentono di cucinare le pietanze in modo uniforme senza che si secchi e diventi insapore. Il girarrosto è programmato per continuare a ruotare per circa cinque minuti dopo la cottura, in modo da consentire l'uso del calore residuo del forno. Quando si utilizza il girarrosto, non è necessario pre-riscaldare il forno.
 SCONGELAMENTO Questa modalità si attiva quando si sposta il selettore in questa posizione. La ventola fa circolare aria calda attorno all'alimento congelato e ne consente quindi uno scongelamento rapido senza alcuna alterazione del sapore originale.
La temperatura è preimpostata su 40°C e non può essere modificata.
 RISCALDAMENTO Questa modalità è quella consigliata per riscaldare alimenti pre-cotti (che devono essere posizionati sul secondo ripiano in basso dall'alto) o per scongelare pasta o pizza congelata (in questo caso è necessario utilizzare il ripiano più basso).
La temperatura è preimpostata su 60°C e non può essere modificata.
 PIZZA Questa funzione consente di far circolare aria calda all'interno del forno ed è particolarmente indicata per pietanze come pizze o dolci.

 PYRO - The oven takes care of the entire inside oven cleaning -Two choices are possible ECO, SUPER
18 IT

5.3 PROGRAMMAZIONE
SIMBOLI VISUALIZZATI SUL DISPLAY
Luce

 Timer
Timer
Programmazione del tempo di cottura
 STOP Programmazione dell'ora di fine cottura
Selettore |
Timer attivo |
dei programmi
Protezione del forno attiva Chiusura dello sportello del forno
TIMER:
Il funzionamento del timer è indipendente dal forno e non ha alcun effetto sugli elementi riscaldanti. Il suo scopo è fungere semplicemente da promemoria.
•Spostare la manopola in posizione timer. Sul display vengono visualizzati prima il simbolo del timer, quindi le cifre 00:00.
•Appena i minuti iniziano a lampeggiare, ruotare il pulsante centrale, posizionarlo sul numero di minuti desiderato e premere nuovamente il pulsante per confermare.
•Appena le ore iniziano a lampeggiare, ruotare il pulsante centrale, posizionarlo sul numero di ore desiderato, quindi premere nuovamente il pulsante per confermare.
•Spostare la manopola in posizione di arresto.Alla scadenza dell'intervallo impostato, il tempo di cottura scompare dal display. Viene generato un segnale acustico per 15 secondi e l'icona del timer inizia a lampeggiare (per disattivare l'icona prima dell'intervallo di 15 secondi, premere il pulsante centrale).
PROGRAMMAZIONE DEL TEMPO DI COTTURA:
Il tempo di cottura è pre-programmato per numerose ricette. Se necessario, è possibile impostare un tempo di cottura in modalità Manuale, Scongelamento o Riscaldamento.
•Spostare la manopola in posizione di cottura. Sul display viene visualizzata l'icona del tempo di cottura. Successivamente, vengono visualizzati il tempo di cottura per le varie ricette oppure 00:00 per le altre funzioni del forno.
•Appena i minuti iniziano a lampeggiare, ruotare il pulsante centrale, posizionarlo sul numero di minuti desiderato e premere nuovamente il pulsante per confermare.
•Appena le ore iniziano a lampeggiare, ruotare il pulsante centrale, posizionarlo sul numero di ore desiderato, quindi premere nuovamente il pulsante per confermare.
•Riportare la manopola in posizione di arresto per confermare il nuovo tempo di cottura.Alla scadenza dell'intervallo impostato, il tempo di cottura scompare dal display. Viene generato un segnale acustico per 15 minuti e i simboli del tempo di cottura e di arresto iniziano a lampeggiare.
•Riportare la manopola in posizione di arresto. Se non si effettua questa operazione, i simboli del tempo di cottura e di arresto continuano a lampeggiare.
PROGRAMMAZIONE DELL'ORADI FINE COTTURA:
Il tempo di cottura e di fine cottura è pre-programmato per molte ricette. Se necessario, è possibile tempi diversi in modalità Manuale, Scongelamento o Riscaldamento.
•Spostare la manopola in posizione di fine cottura. Viene visualizzato il simbolo di arresto. Vengono visualizzati i tempi di fine cottura per varie ricette oppure 00:00 per le altre funzioni o l'ora del giorno.
•Ruotare il selettore dei programmi per confermare l'ora di fine cottura. •Appena i minuti iniziano a lampeggiare, ruotare il pulsante centrale e impostarlo sul numero di minuti desiderato, quindi premerlo nuovamente per confermare.
•Appena le ore iniziano a lampeggiare, ruotare il pulsante centrale e impostarlo sul numero di ore desiderato, quindi premerlo nuovamente per confermare.
Nota: quando si imposta un avvio differito, l'ora di fine cottura viene visualizzata sul display insieme ai simbolo del tempo di cottura e di arresto, ed è possibile selezionare solo la modalità Ricetta. Il forno calcola automaticamente l'ora di inizio e l'ora di fine in base al tempo di cottura, spegnendosi automaticamente al termine del ciclo di cottura. Al termine del ciclo di cottura, viene generato anche un avviso acustico della durata di 15 secondi e sul display iniziano a lampeggiare i simbolo del tempo di cottura e di arresto.
•Ruotare il selettore delle funzioni e impostarlo in posizione di arresto. Se non si effettua questa operazione, i simboli continuano a lampeggiare sul display.
Ad esempio, se il piatto che si desidera preparare deve essere cotto per 45 minuti e deve essere pronto alle 12.30, è necessario:
-Selezionare la funzione desiderata
-Impostare la durata di cottura pari a 45 minuti
- Impostare il termine della cottura alle ore 12.30
La cottura inizierà alle 11.45 (ovvero 12.30 meno 45 minuti) e continuerà fino all'ora precedentemente impostata; il forno si spegnerà automaticamente al termine del tempo impostato.
ATTENZIONE:
Se la funzione "FINE della cottura" è stata selezionata senza stabilire la durata totale, il forno inizierà a funzionare immediatamente e si fermerà nel momento in cui il timer indicherà l'ora impostata tramite la funzione.
5.4 USO DEL TEMPORIZZATORE
5.5SUGGERIMENTI PER LA COTTURA
Èconsigliabile salare la carne solo al termine della cottura, perché il sale favorisce gli schizzi di grasso, che sporca il forno e produce molto fumo.
I tagli di carne bianca, di maiale, vitello e pesce possono essere inseriti freddi nel forno. Benché questo accorgimento allunghi i tempi di cottura, consente di cuocere meglio la porzione centrale del taglio di carne perché il calore a disposizione più tempo per penetrare nel taglio di carne.
Per cucinare in modo corretto la carne rossa, è indispensabile preriscaldare in modo appropriato il forno.
GRILL
•Prima di utilizzare il grill
Rimuovere la carne dal congelatore qualche ora prima della cottura. Collocare la carne su più strati di carta da cucina per mantenere inalterato il sapore delle pietanze ed evitare che la porzione centrale rimanga cruda. Aggiungere pepe e spezie alla carne prima di grigliarla, ma non aggiungere sale per mantenere la carne più succosa e tenera. Applicare un leggero strato di olio alla carne, preferibilmente con un pennello da cucina largo. Quindi, cospargere altro pepe e spezie (timo, ecc.) sulla carne.
•Durante la cottura:
Non perforare mai la carne mentre la si gira, perché ciò provoca la dispersione del sugo e rende la carne più secca.
COTTURADI DOLCI
Evitare di usare teglie lucide perché riflettono il calore e possono rovinare la cottura. Se il dolce cuoce troppo rapidamente, coprirlo con carta oleata o carta d'alluminio. Attenzione: applicare la carta d'alluminio in modo che il lato lucido sia rivolto verso il dolce perché altrimenti il calore viene riflesso dalla superficie lucida e non penetra nel dolce.
Evitare di aprire lo sportello durante i primi 20-15 minuti
L'apertura dello sportello del forno potrebbe provocare lo “sgonfiamento” di sufflè, brioche, pandispagna, ecc. Per controllare se il dolce è perfettamente cotto, è sufficiente punzecchiare il centro con la lama di un coltello o un ago da maglia in metallo. Se l'ago estratto è asciutto, il dolce è pronto e la cottura può definirsi conclusa. Se l'ago che si estrae dal dolce è umido o se ci sono pezzetti di dolce attaccati, proseguire la cottura, abbassando leggermente la temperatura del forno per evitare che il dolce si bruci.
5.6REGOLAZIONE DEL CONTRASTO DEL DISPLAY
Èpossibile regolare il contrasto del display in qualsiasi momento. L'impostazione predefinita è “C5”. Per regolare il contrasto, attenersi alla seguente procedura:
Ruotare il selettore dei programmi e impostarlo su “Luce”, quindi ruotare il selettore delle funzioni e impostarlo su “O”. Premere il pulsante centrale per 3 secondi e attendere che venga visualizzato il messaggio“CX” sul display, dove X è il livello di contrasto. Ruotare il pulsante centrale per regolare il contrasto. È possibile impostare un qualsiasi valore compreso tra 1 e 9. Premere nuovamente il pulsante centrale per 3 secondi per confermare.
19 IT
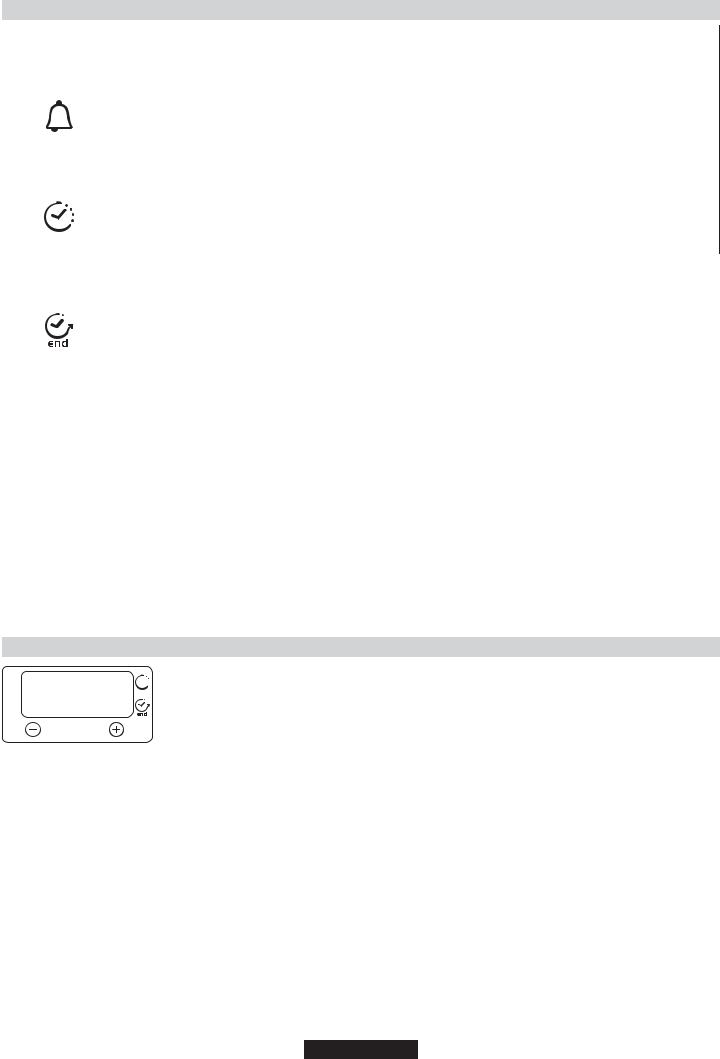
5.7 TIMER ELETTRONICO A SFIORAMENTO
FUNZIONE |
COME SI ATTIVA |
COME SI SPEGNE |
COSA FA |
A COSA SERVE |
|
|
|
•Premere il tasto centrale |
•Al termine della durata |
•Da un segnale sonoro al |
•Permette di utilizzare il |
|
|
CONTAMINUTI |
1 volta. |
impostata la funzione si |
termine di un tempo |
programmatore del forno |
|
|
spegne da sola ed avvisa |
stabilito |
come una sveglia (può |
|
|
||
|
•Premere i tasti "- " "+" |
con un segnale sonoro (il |
•Durante il funzionamento |
|
|
|
|
per regolare la durata |
segnale sonoro si ferma da |
il display visualizza il |
essere usato con forno |
|
|
|
•Lasciare i tasti |
solo; per fermarlo subito |
tempo rimanente. |
funzionante o spento. |
|
|
|
|
premere il tasto) SELECT. |
|
|
|
|
|
•Premere il tasto centrale |
•Al termine della durata |
•Permette di impostare la |
•Per interrompere il segnale |
|
|
DURATA |
2 volte |
impostata il forno si spegne |
durata della cottura del |
premere un tasto qualsiasi. |
|
|
•Premere i tasti "- " "+" |
da solo; se deve essere |
cibo inserito nel forno |
Premere il tasto centrale |
|
|
|
COTTURA |
per regolare la durata |
fermato prima si deve |
•Per visualizzare il tempo |
per tornare alla funzione |
|
|
|
•Lasciare i tasti |
portare la manopola |
rimanente premere il |
orologio. |
|
|
|
•Selezionare la funzione |
commutatore in posizione |
tasto SELECT. |
|
|
|
|
di cottura con la |
O oppure portare a 0:00 la |
•Per modificare il tempo |
|
|
|
|
manopola commutatore |
durata della cottura |
rimanente premere il |
|
|
|
|
|
(tasti SELECT e "- " "+"). |
tasto SELECT e "- " "+" |
|
|
|
|
•Premere il tasto centrale |
•All’ora impostata il forno |
•Permette di |
•Tipicamente si utilizza questa |
|
|
FINE |
3 volte |
si spegne da solo; se deve |
memorizzare l’ora di fine |
funzione con la funzione |
|
|
•Premere i tasti "- " "+" |
essere fermato prima |
cottura |
DURATA COTTURA–ad |
|
|
|
COTTURA |
per regolare l’ora di fine |
è necessario portare la |
•Per visualizzare l’ora |
esempio il cibo desiderato |
|
|
deve cuocere per 45 minuti e |
|
|
||||
|
cottura |
manopola commutatore |
programmata premere il |
desidero che sia pronto per le |
|
|
|
•Lasciare i tasti |
in posizione O. |
tasto centrale 3 volte |
ore 12:30; in tal caso: |
|
|
|
•Selezionare la funzione |
|
•Per modificare l’ora |
•Al termine della durata |
|
|
|
di cottura con la |
|
programmata premere i |
|
|
|
|
manopola commutatore |
|
tasti SELECT e "- " "+" |
impostata il forno si spegne |
|
|
|
|
|
|
automaticamente ed avvisa |
|
|
|
•Tenere premuto per 5 |
•Tenere premuto per 5 |
|
con un segnale sonoro. |
|
|
|
secondi il tasto (+), Da |
|
|
|
|
|
|
secondi il tasto (+). Da |
|
Selezionare la funzione di |
|
|
|
|
questo momento lo |
|
|
|
||
BLOCCO |
questo momento tutte le |
|
cottura desiderata |
|
|
|
schermo visualizza |
|
|
|
|||
BAMBINO |
funzioni sono riabilitate. |
|
Impostare la durata cottura |
|
|
|
alternativamente “STOP” |
|
|
|
|||
|
e il tempo preimpostato. |
|
|
a 45 minuti ( "- " "+") |
|
|
|
|
|
Impostare la fine cottura alle |
|
|
|
|
|
|
|
|
|
|
|
|
|
|
ore 12:30 ( "- " "+" ) |
|
|
|
|
|
|
La cottura avrà auto- |
|
|
|
|
|
|
maticamente inizio alle |
|
|
|
|
|
|
11:45 (12:30 meno 45 |
|
|
|
|
|
|
minuti), all’ora impostata |
|
|
|
|
|
|
come fine cottura il forno si |
||
|
|
|
|
spegne automaticamente. |
||
|
|
|
|
ATTENZIONE: impostando |
||
|
|
|
|
solo la fine cottura e non la |
||
|
|
|
|
durata della cottura, il |
||
|
|
|
|
forno si accenderà subito e |
||
|
|
|
|
si spegnerà all’ora di fine |
||
|
|
|
|
cottura impostata |
|
|
5.8 REGOLAZIONE ORA 
 00:00
00:00
select
ATTENZIONE: la prima operazione da eseguire dopo l’installazione o dopo una interruzione di corrente (tali  situazioni si riconoscono perchè sul dispay lampeggia l’ora 12:00 ) è la regolazione dell’ora, come di seguito
descritto.
•Premere il tasto centrale 4 volte. Impostare l'ora con i tasti "- " "+". •Lasciare i tasti.
ATTENZIONE: Il forno funziona solo se impostato in modalità manuale o cottura programmata.
20 IT
6. CICLO PIROLITICO (A SECONDA DEI MODELLI)
PYRO È possibile configurare il forno in modo che esegua automaticamente la pulizia Le due opzioni disponibili sono ECO e SUPER
**L'opzione può essere configurata solo sui forni dotati di tale funzione
Il forno è dotato di un sistema di pulizia con pirolizzatore ad alta temperatura che distrugge i residui di cibo. L'operazione viene eseguita automaticamente tramite il programmatore. I fumi risultanti vengono “puliti” perché vengono convogliati attraverso un pirolizzatore che si avvia al momento dell'inizio della cottura. Sullo sportello di questo tipo di forni, viene installata una chiusura di sicurezza a causa del fatto che il pirolizzatore utilizza temperature molto elevate. Il pirolizzatore può essere arrestato in qualsiasi momento, tuttavia non è possibile aprire lo sportello finché non viene visualizzata l'icona della chiusura di sicurezza.
NOTA: se il forno è dotato di piastre, non utilizzare il becco a gas o le piastre elettriche mentre il pirolizzatore è in funzione per evitare che le piastre si surriscaldino eccessivamente.
Sono disponibili due CICLI PIROLITICI pre-programmati.
•CICLO PIROLITICO ECO: questo ciclo consente di pulire i forni moderatamente sporchi ed ha la durata di 65 minuti.
•CICLO PIROLITICO SUPER: questo ciclo è indicato per i forni particolarmente sporchi ed ha la durata di 90 minuti.
Non utilizzare detergenti commerciali per pulire forni pirolitici. Suggerimento: l'esecuzione del ciclo pirolitico al termine della cottura consente di sfruttare il calore residuo al termine del ciclo di cottura e di risparmiare energia.
Prima di eseguire un ciclo pirolitico:
•Rimuovere tutti gli accessori dal forno perché non sono in grado di tollerare le temperature elevate utilizzate durante il ciclo di pulizia pirolitico.
•Rimuovere tutte le tracce di grasso e le macchie estese che potrebbero richiedere troppo tempo per rimuovere. Questo tipo di macchie potrebbero incendiarsi a causa delle temperature estremamente elevate del ciclo pirolitico.
•Chiudere lo sportello del forno.
Utilizzo del ciclo pirolitico:
1- Ruotare il selettore delle funzioni e impostarlo sulla “modalità pirolitica”. Sul display viene visualizzato il messaggio “PYRO”. L'icona della modalità ECO inizia a lampeggiare. Promemoria: ECO ciclo di 65 minuti, indicato per forni moderatamente sporchi.
SUP Ciclo di 90 minuti, indicato per forni molto sporchi
2- Selezionare la modalità pirolitica desiderata con il pulsante centrale, a seconda del grado di sporco: ECO o SUP.
•L'opzione selezionata viene confermata dopo 3 secondi.. Il forno avvia il ciclo pirolitico. La modalità pirolitica selezionata lampeggia e vengono visualizzate le icone dell'ora e di arresto. Mentre è in corso il ciclo pirolitico, viene visualizzata l'icona dello sportello chiuso a conferma del fatto che lo sportello è bloccato. La ventola è sempre attiva durante il ciclo pirolitico.
L'indicatore luminoso lampeggia finché non viene raggiunta la temperatura richiesta, quindi si accende fissa.
* Per ritardare l'avvio del ciclo pirolitico, è sufficiente selezionare un'ora di fine. Ruotare il selettore dei comandi fino a impostarlo sull'ora di fine e impostare l'ora di finale desiderata.
Al termine del ciclo pirolitico, il forno si spegne automaticamente. Il forno emette un avviso acustico per 15 secondi a conferma della fine del ciclo e contemporaneamente le icone del tempo e di arresto iniziano a lampeggiare.
•Ruotare il selettore delle funzioni per terminare il ciclo pirolitico. Se non si effettua questa operazione, le icone continuano a lampeggiare. Il simbolo “Piro” scompare e viene visualizzata l'icona del timer. Tuttavia, lo sportello del forno continua a rimanere bloccata finché la temperatura non si abbassa. Appena si accende l'indicatore luminoso dello sportello, è possibile aprirlo.
The ventola di raffreddamento si spegne solo al momento in cui la temperatura dei componenti del forno è sufficientemente bassa.
Al termine del ciclo, l'indicatore luminoso inizia nuovamente a lampeggiare, rimane acceso dopo lo spegnimento del forno e si spegne solo al momento in cui la temperatura interna del forno è abbastanza bassa.
La pirolisi lascia un residuo di colore biancastro sulle pareti del forno. Attendere che il forno si sia completamente raffreddato prima di rimuovere tali residui con una spugna umida.
7. DISPOSITIVO DI PROTEZIONE
Questa funzione deve sempre essere attivata se nell'abitazione ci sono dei bambini, perché impedisce loro di accendere il forno o di modificare i programmi pre-impostati. Questa funzione di sicurezza impedisce l'uso del pannello di controllo mentre il forno è in funzione.
È possibile impostare due livelli di sicurezza:
LIVELLO 1 : blocco del selettore dei comandi e il pulsante centrale. •Per attivare la funzione: ruotare il selettore dei comandi e impostarlo sulla funzione di protezione.
•Risultato: i selettori vengono disattivati*.
•Per disattivare la funzione: ruotare il selettore dei comandi e impostarlo su 0.
•LIVELLO 2 : blocco dei selettori delle funzioni.
•Per attivare la funzione: ruotare il selettore delle funzioni e impostarlo sulla funzione di sicurezza, quindi premere e tenere premuto il pulsante per 3 secondi.
•Risultato: tutti i comandi vengono disattivati*.
•Per disattivare la funzione: effettuare le operazioni descritte per la procedura di attivazione. Ruotare il selettore delle funzioni e impostarlo sulla funzione di protezione, quindi premere e tenere premuto il pulsante centrale per 3 secondi.
*Nota : per motivi di sicurezza, anche se tutti i comandi sono bloccati, è comunque spegnere il forno impostando il selettore su 0.
ATTENZIONE! L'applicazione di una coppia superiore a quella necessaria per fissare le viti in posizione potrebbe ostruire le aperture di ventilazione su entrambi i lati. Verificare che l'apertura di questi canali di ventilazione sia pari ad almeno 2 mm dopo l'installazione del mobilio.
Il sacchetto all'interno del forno contiene quattro viti di fissaggio.
Fissaggio
Quando lo sportello del forno è aperto, è possibile accedere ai fori su entrambi i lati.
Utilizzare le viti fornite in dotazione per fissare in posizione il forno.
Il produttore declina ogni responsabilità per inesattezze contenute nel documento stampato o per errori di trascrizione contenuti in questa brochure. Inoltre, si riserva il diritto di apportare modifiche al prodotto, nell'interesse dei consumatori, senza alcun pregiudizio per la sua sicurezza o funzionalità.
21 IT

INSTRUCCIONES PARA UN USO SEGURO
ADVERTENCIA: El aparato y sus componentes accesibles se calientan durante el uso. Se debe tener cuidado de no tocar los elementos calefactores.
•Los niños menores de 8 años deben permanecer alejados o supervisados de forma continuada por una persona adulta.
•Este aparato puede ser usado por niños mayores de 8 años y personas con capacidades físicas, sensoriales o mentales reducidas o falta de experiencia y conocimiento siempre y cuando hayan sido supervisadas o instruidas sobre el uso del aparato de forma segura y del conocimiento de los riesgos que comporta.
•Los niños no deben jugar con el aparato.
•La limpieza y el mantenimiento que debe realizar el usuario no será realizada por niños sin supervisión.
•Durante el uso, se calienta el aparato. Se debe tener cuidado de no tocar los elementos calefactores del interior del horno.
ADVERTENCIA: Las partes accesibles pueden calentarse durante el uso. Los niños deben permanecer alejados.
•No utilizar limpiadores abrasivos o rascadores metálicos afilados para limpiar el cristal de la puerta del horno ya que pueden rayar la superficie, pudiendo comportar la rotura del cristal.
•Se debe apagar el horno antes de retirar la pantalla, después de la limpieza, se debe colocar según las instrucciones.
•Use solamente el sensor de temperatura recomendado para este horno.
•No utilice limpiadores de vapor para la limpieza del aparato.
ADVERNTENCIA:Asegúrese de que el aparato está apagado antes de sustituir la lámpara para evitar la posibilidad de una descarga eléctrica.
•Los medios de desconexión deben ser incorporados en el cableado fijo en conformidad con las reglas del cableado.
•las instrucciones indicarán el tipo de cable a utilizar, teniendo en cuenta la temperature de la parte posterior del aparato.
•Si el cable de alimentación está dañado, se debe sustituir por un cable o conjunto especial suministrado por el fabricante o el servicio técnico.
PRECAUCIÓN: Con el fin de evitar peligros derivados de alteraciones en el suministro energético, este aparato no debe ser suministrado a través de un dispositivo de conmutación externo, como un temporizador, o conectado a un circuito que sea encendido y apagado frecuentemente por los servicios públicos.
PRECAUCIÓN: Las partes accesibles se pueden calentar con el uso del grill. Los niños deben permanecer alejados.
•Se debe eliminar el exceso de derrames antes de la limpieza.
•Durante la operación de auto limpieza pirolítica, las superficies pueden calentarse más de lo habitual; los niños deben permanecer alejados.
22 ES

1. ADVERTENCIAS GENERALES
Leer las instrucciones detalladamente para sacar el mejor partido del horno. Recomendamos conservar las instrucciones de instalación y utilización para futuras consultas.Antes de instalar el horno anote el número de serie por si necesitase contactar con el servicio de atención al cliente.
Una vez desembalado el horno, asegurarse de que no está dañado. En caso de tener dudas, no utilizar. Contactar con una persona cualificada. Conservar el embalaje (bolsas de plástico, polietileno o clavos) fuera del alcance de los niños ya que puede ser peligroso para ellos.
La compañía no se hará responsable en caso de no cumplir las instrucciones indicadas en este documento.
ANTENCIÓN: Las funciones, propiedades o accesorios del horno mencionadas en este manual pueden variar dependiendo del modelo de horno.
1.1 CONSEJOS DE CUMPLIMIENTO
Las piezas del aparato que puedan estar en contacto con alimentos cumplen las disposiciones de la Directiva EEC 89/109.
CE El Aparato cumple las Directivas Europeas 73/23/EEC y 89/336/EC, sustituidas por la 2006/95/EC y la 2004/108/EC y sus enmiendas correspondientes
1.2 TRUCOS DE SEGURIDAD
•El horno ha de utilizarse únicamente con el fin para el que ha sido diseñado. Sólo se puede utilizar para cocinar alimentos. Otros uso, como por ejemplo, medio de calefacción, es un uso indebido del horno y por lo tanto es peligroso.
•Todas las piezas accesibles y elementos de calefactores están calientes cuando esté en funcionamiento el horno. Ha de tenerse cuidado y no tocarlas.
•El fabricante no puede responsabilizarse de caños causados por un uso inadecuado, incorrecto o no razonable.
Cuando se utilicen dispositivos eléctricos han de seguirse las normas siguientes:
-No tirar del cable eléctrico para desenchufarlo.
-No tocar el horno con las manos (o los pies) húmedas o mojadas.
-No utilizar el horno salvo que lleve calzado en los pies.
-No suele ser recomendable la utilización de alargadores o ladrones para varios enchufes o alargadores.
-Si el horno se estropea o tiene un fallo desenchúfelo de la corriente y no lo toque.
-Si el cable está dañado ha de sustituirse inmediatamente.
Cuando se sustituya el cable, síganse las instrucciones siguientes: Extraer el cable y sustituir por uno del tipo H05RR-F, H05VV-F, H05V2V2- F. El cable tiene que poder soportar la carga eléctrica que requiere el horno. La sustitución del cable tiene que hacerla un técnico cualificado. El cable de tierra (amarillo-verde) tiene que ser 10 mm más largo que el cable eléctrico.
Utilizar sólo el servicio de atención al cliente adecuado para las reparaciones y asegurar que sólo se utilizan piezas originales. Si no se siguen las instrucciones anteriores, los fabricantes no pueden garantizar la seguridad del horno.
•El horno adquirido tiene las características técnicas descritas y usted no puede modificarlas.
•Jamás utilice un espray de difusión o a presión para limpiar el horno. •No guardar en el horno productos inflamables, podrían prender fuego si se accionase el horno accidentalmente.
•No permitir que los niños se sienten en la puerta del horno, menos aún cuando esté encendido.
•Utilizar guantes de horno cuando introduzca o saque los recipientes del horno.
CUIDADO: Puede que las piezas internas del horno esten calientes cuando se utilice el grill. Mantener alejados a los ninos.
1.3 RECOMENDACIONES
•Una limpieza mínima después de utilizar el horno ayudará a mantenerlo limpio durante más tiempo.
•No forrar las paredes del horno con aluminio u otras protecciones disponibles en tiendas. El aluminio o los protectores, en contacto directo con el esmalte caliente puede derretirse y deteriorar el esmalte del interior.
•Para evitar un exceso de suciedad en el horno y que pueden derivar en olores y humo en exceso, recomendamos no utilizar el horno a temperaturas muy elevadas. Es mejor ampliar el tiempo de cocción y bajar un poco la temperatura.
Placa de identificación
•Además de los accesorios |
|
|
|
|
|
|
|
|
|
|
|
|
|
|
|
|
|
|
|
|
|
|
|
|
|||
proporcionados |
con el |
|
|
|
|
|
|
|
|
|
|
|
|
horno, sugerimos |
utilizar |
|
|
|
|
|
|
|
|
|
|
|
Code produit: |
|
|
|
|
|
|
|
|
|
|
|
Numéro de série : |
||
sólo recipientes y |
moldes |
|
|
|
|
|
|
|
|
|
|
|
|
|
|
|
|
|
|
|
|
|
|
|
|
||
resistentes a temperaturas |
|
|
|
|
|
|
|
|
|
|
|
|
|
muy elevadas. |
|
|
|
|
|
|
|
|
|
|
|
|
|
1.4 INSTALACIÓN
No es obligación del fabricante instalar el horno. Si se requiere la ayuda del fabricante para subsanar fallos derivados de una instalación incorrecta, dicha asistencia no la cubrirá la garantía.
Han de seguirse a rajatabla las instrucciones de instalación para personal cualificado. Una instalación incorrecta puede provocar daños personales, materiales o en animales. El fabricante no se hace responsable de esos posibles daños.
La cocina en la que se vaya a instalar el horno tiene que estar hecha de un material resistente a temperaturas de al menos 70ºC.
El horno se puede colocar encima, en una columna, o debajo de una encimera.
Antes de fijar el horno hay que asegurar una buena ventilación en el hueco donde se vaya a colocar y que el aire necesario para enfriar y proteger las piezas internas circula sin problema. Realizar las aperturas especificadas en la última página según el tipo de altura.
1.5 CONEXIÓN ELÉCTRICA
LA CONEXIÓN ELÉCTRICA HA DE REALIZARLA UN CONTRATISTA APROBADO O UN TÉCNICO CON FORMACIÓN SIMILAR.
La instalación a la que va a conectarse el horno tiene que cumplir los estándares vigentes en el país de instalación.
El fabricante no asume responsabilidad alguna si no se cumple la presente esta disposición.
La conexión a la red debe tener toma de tierra, o un cortacircuitos multipolar, como corresponda al país de instalación.
La instalación tiene que disponer de los fusibles correspondientes y los cables han de tener un cruce de sección de largo suficiente como para alimentar eléctricamente el horno.
CONEXIÓN:
El horno está diseñado para una conexión exclusiva de 230 voltiosAC en las fases o en la fase y el neutro.
La conexión tiene que hacerse comprobando primero:
-el voltaje indicado.
-la configuración del cortacircuitos.
El cable correspondiente a la toma de tierra (amarillo/verde) del horno tiene que conectarse a la toma de tierra de la instalación.
Atención:
•Antes de la conexión el electricista tiene que comprobar la continuidad de tierra de la instalación.
•El fabricante no se responsabiliza de incidente, o consecuencias del mismo, que puedan derivarse del uso de hornos que no tengan toma de tierra o conectados a una toma de tierra con continuidad defectuosa.
NB: Recordar que el horno puede necesitar el servicio de atención al cliente. También es importante que el enchufe esté ubicado en un sitio accesible para conectar el horno una vez que éste esté colocado.
Cable eléctrico: Si hay que cambiar el cable eléctrico, contactar con el servicio de atención al cliente o con alguien de cualidades similares
23 ES
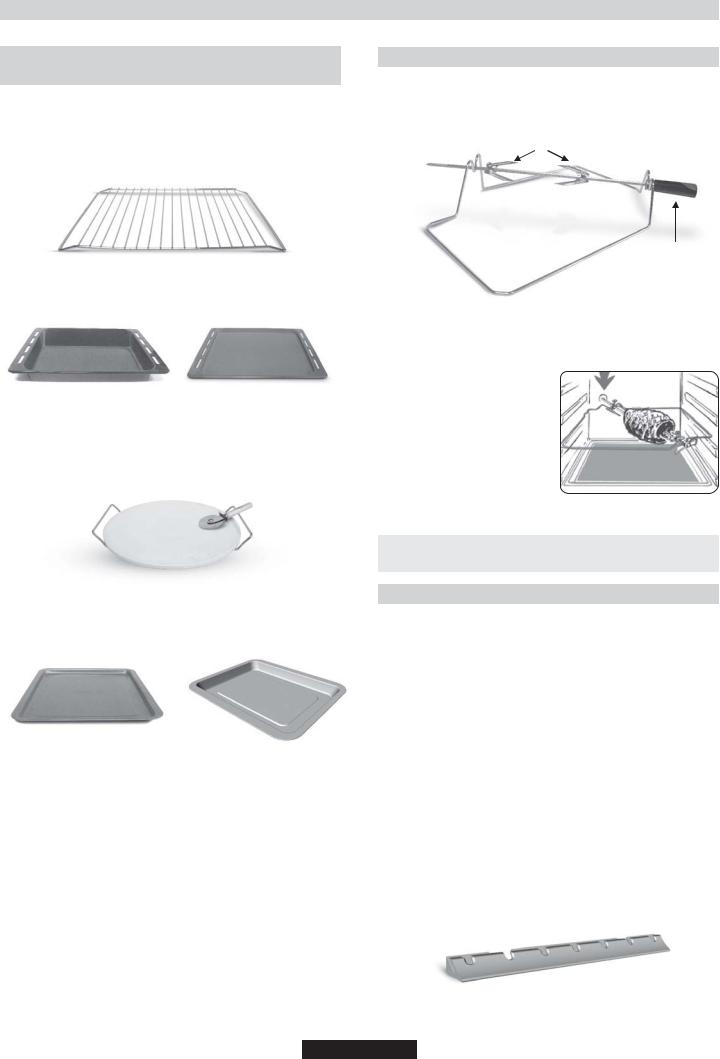
2. TECNOLOGÍA PRO/EXP’R (DEPENDE DEL MODELO)
2.1 EQUIPAMIENTO DEL HORNO (DEPENDE DEL MODELO)
Es necesario hacer una limpieza inicial de todas las partes del equipo antes de utilizarlo por primera vez. Lavar con una esponja. Enjuagar y secar.
2.2 ASADOR (DEPENDE DEL MODELO)
No se requiere calentamiento previo del horno para esta función. Cocinar con la puerta cerrada.
El consumo de energía es de un 90-95% menos que con el sistema tradicional.
La rejilla puede sostener moldes y bandejas.
La bandeja recoge los flujos de los alimentos asados.
No utilizar nunca la bandeja como bandeja de asar ya que la grasa puede esparcirse rápidamente por todo el horno, lo que provocaría un exceso de humo.
Soporte para pizza, para una pizza crujiente acorde al modelo del horno, con agarraderas y cortapizzas.
La bandeja de repostería tiene que colocarse encima de la rejilla. Se utiliza para cocinar dulces como cremas, bizcochos, merengues, etc…
No colocar jamás la bandeja de repostería en el horno en contacto con la parte inferior del mismo.
3
2
1
4
1-Rejilla
2-Asador
3-Ganchos y tuercas
4-Mango
CÓMO UTILIZAR EL ASADOR
1.Desenroscar los ganchos 2.Atravesar la carne con el asador 3.Fijar la carne con los ganchos 4.Ajustar las tuercas
5.Insertar el asador en el agujero del motor
6.Desmontar el mango
Cuando se está utilizando el horno, los accesorios innecesarios han de extraerse del interior del horno.
2.3 VISIÓN LED (DEPENDE DEL MODELO)
Es un sistema de iluminación que sustituye el tradicional sistema “de bombilla”. En la puerta del horno se integran 14 luces LED (en versiones no pirolíticas) o 10 luces LED de Potencia Superior (en modelos pirolíticos). Las luces LED crean una iluminación blanca de calidad que permite ver dentro del horno con claridad todas las bandejas sin sombras.
Ventajas:
Este sistema, además de proporcionar una iluminación excelente dentro del horno, dura más que la bombilla tradicional, tiene un mantenimiento más sencillo y, sobre todo, ahorra energía.
-Visión óptima -Iluminación duradera
consumo energético muy bajo, reducción del 95% en comparación con la iluminación tradicional.
“Los hornos con luz blanca LED Clase 1M según el IEC 60825- 1:1991 + A1:1997 + A2:2001n(equivalente a la EN 60825-1:1994 +A1:2002 + A2:2001); la potencia máxima de luz emitida es 459nm<150uW.
No observar directamente con instrumentos óptimos.”
24 ES
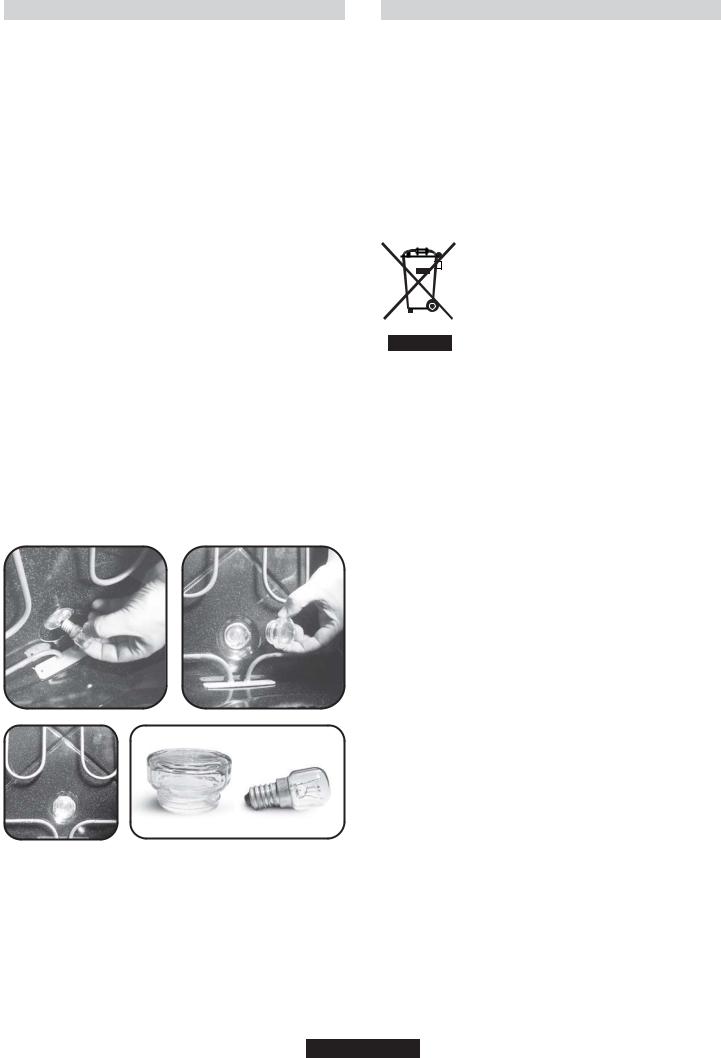
3. LIMPIEZA DEL HORNO
•Esperar a que se enfríe el horno antes de limpiarlo manualmente. •No limpiar el horno con limpiadores abrasivos, estropajo de metal o cuchillas. El esmalte tampoco ya que podría resultar dañado. •Utilizar sólo agua con jabón o limpiadores con lejía (amoníaco)
•No forrar jamás las paredes internas del horno con papel de aluminio.
PIEZAS DE CRISTAL
Recomendamos limpiar el cristal de la puerta con papel de cocina cada vez que se utilice el horno. Si el cristal tiene muchas salpicaduras, limpiar con una esponja y detergente, y secar posteriormente.
•No utilizar limpiadores abrasivos o cuchillas ya que podrían rayar el cristal y derivar en salpicaduras en el mismo.
SELLO DE LAPUERTADEL HORNO
En caso de ensuciarse, limpiar el sello del horno con una esponja ligeramente humedecida.
•No utilizar limpiadores abrasivos o rascadores metálicos afilados para limpiar el cristal de la puerta del horno ya que pueden rayar la superficie, pudiendo comportar la rotura del cristal.
ACCESORIOS
Después del uso, sacar la bandeja del horno. Lavar la rejilla con una esponja, agua caliente y jabón. Secar.
Si quedan residuos, sumergir en agua y detergente.
También se puede meter en el lavavajillas o con limpiadores comerciales para hornos.
No colocar rejillas sucias en el horno.
ILUMINACIÓN DEL HORNO
Desconectar del horno antes de limpiar o sustituir a bombilla.
La bombilla y su cubierta están hechas de un material resistente a temperaturas elevadas.
Características de la bombilla:
230 V AC -25W 14 Base Temperatura 300ºC para cambiar una bombilla estropeada, simplemente:
•Desatornillar la cubierta de cristal •Desatornillas la bombilla
•Sustituirla por una igual: ver características superiores. •Después de recolocar la bombilla, volver a atornillar la cubierta protectora de cristal.
4. SERVICIO TÉCNICO
Antes de llamar al Servicio Técnico.
Si el horno no funciona, recomendamos:
•Comprobar si el horno está bien conectado a la red eléctrica.
Si no se puede detectar el fallo:
•Desconectar el horno de la corriente, no tocar el horno y llamar al servicio de atención al ciudadano.
Antes de llamar al Servicio Técnico recordar tomar nota del número de serie de la placa de especificaciones del número de serie.
El horno tiene un certificado de garantía que asegura que se reparará de forma gratuita por parte del Servicio Técnico mientras dicha garantía esté en vigor.
Este electrodoméstico dispone de la marca de la
Directiva Europea 2002/96/EC sobre Residuos de
Aparatos Eléctricos y Electrónicos (WEEE). Asegurándose de que este producto se elimina de forma correcta se evitarán consecuencias negativas
potenciales para el medioambiente y la salud que podrían darse en caso contrario.
El símbolo en el producto indica que el producto no puede tratarse como residuo doméstico. En su lugar debe llevarse al punto de recogida para el
reciclaje de equipos eléctricos y electrónicos. Debe eliminarse de acuerdo con la normativa local medioambiental para la eliminación de residuos.
Para más información sobre el tratamiento, recuperación y reciclaje del producto, póngase en contacto con su oficina local, el servicio de recogida de residuos o la tienda en la que haya comprado el producto.
25 ES

5. DESCRIPCIÓN DE LA PANTALLA
Pantalla: tiempo, programación del modo de cocción, luces de indicación, temperatura de cocinado y posición de la bandeja.
BOTÓN DE REGULACIÓN |
|
|
|
Y CONFIRMACIÓN |
|
|
|


 Configuraciones: temperatura, programación de cocción y finalización del tiempo de cocción – Se regula girando el botón hacia “-“ o “+”


 Para confirmar la configuración: pulsar el botón.
220
PYRO 


|
Reloj/ |
Símbolo de pantalla del programa: cocinando |
|
Indicador: |
Programación/ |
||
Hora Tiempo de cocción Final de cocción |
|||
Temperatura de cocción |
|||
Aumento de temperatura |
|||
|
|
Indicador luminoso
Dispositivo seguridad niños
PYRO 


|
|
|
|
|
|
|
|
|
NOTA: La función “bloqueo para |
|
|
Asador Booster: |
Indicador luminoso |
||||
niños” se puede activar tanto si el |
|
Giratorio |
Calentamiento previo |
Cierre de la puerta del horno |
||||
horno está encendido (ON) como |
|
|||||||
apagado (OFF). |
|
|
|
|
|
|||
|
|
|
|
|
|
|
|
|
26 ES
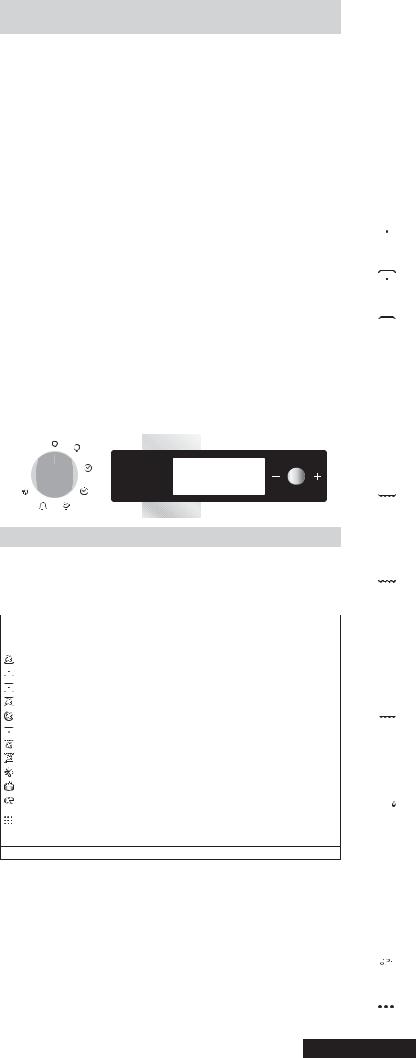
5.1ANTES DE UTILIZAR EL HORNO POR PRIMERA VEZ
•LIMPIEZAPREVIA
-Limpiar el horno antes de utilizarlo por primera vez: -Limpiar la superficie externa con un paño húmedo.
-Lavar todos los accesorios y el interior del horno con agua caliente y líquido limpiador.
-Poner el horno vacío a temperatura máxima durante 1 hora, con ello se eliminarán los olores del dispositivo nuevo.Asegurar una buena ventilación de la habitación durante esa hora.
•RECORDAR
Confirmación del temporizador
Las modificaciones se tiene que confirmar pulsando el botón. Detención del horno:
Puede ser necesario en caso de configurar una orden incorrecta.
Para detener el horno… girar el mando de selector de función a la posición de Stop.
Dispositivo de seguridad para niños:
Para bloquear los controles del horno, seleccionar el dispositivo de seguridad para niños. Ver la sección “ProgramaciónDispositivo de seguridad para niños”.
Ventilador refrigerante:
Protege el panel de control y la electrónica de los daños por calor. Se arranca y se para automáticamente cuando se apaga el horno. Iluminación del horno:
Colocando el mando en el símbolo de luz se puede encender la luz del horno cuando no se está utilizando.
Cuando se está utilizando el horno la luz permanece encendida durante todas las funciones y cuando la puerta está abierta.
•CONFIGURACIÓN DEL RELOJ
Habrá que configurarse nuevamente cuando se conecte el horno a la corriente o después de mucho tiempo sin utilizarlo
Configurar el reloj:
1-Girar el mando de control a la posición con el símbolo “Reloj”: 2-Configurar el reloj con el botón central girando hacia “-“ ó “+”, 3-Volver a colocar el mando de control en la posición STOP.
10:30
5.2 CÓMO UTILIZAR EL HORNO
•EN MODO MANUAL
Los métodos de cocción que se sugieren en el modo manual aparecen en la tabla siguiente. También se recomienda la temperatura para cada método de cocina. Estos valores pueden modificarse dentro de un rango predeterminado.
Modo Función según |
Temperatura |
Temperatura |
|
||
en ºC |
en ºC |
Función |
|||
modelo de horno |
|
||||
|
configurada |
predeterminada |
|
||
|
|
|
|||
Base + Ventilador |
|
210 |
50-220 |
Booster |
|
Base |
|
160 |
50-220 |
Booster |
|
Base + Superior |
|
220 |
50-240 |
|
|
Base + Superior +Ventilador |
|
210 |
50-230 |
|
|
Resistencia circular + Ventilador |
180 |
50-230 |
|
||
Grill |
|
L2 |
L1-L3 |
|
|
Grill + Ventilador |
|
190 |
50-200 |
Booster |
|
Grill + asador + ventilador |
|
240 |
180-240 |
Booster |
|
Descongelado |
|
40 |
No |
|
|
Conservar el calor |
|
60 |
No |
|
|
Pizza |
** |
230 |
230 |
|
|
Pyro |
** |
Pyro |
ECO: 425 / 65min |
|
|
|
|
|
SUP: 425 / 1h 30min |
|
|
* Booster: aumento rápido de la temperatura
** El horno ha de tener esa función
1-Girar el selector del horno hacia la función necesaria para cocinar.
Se muestran en pantalla los elementos de calentamiento operativos en el modo de cocción seleccionado..
2-Se muestra en pantalla la temperatura adecuada según el método seleccionado. Se puede modificar dentro del rango predeterminado –ver arriba.
Para modificar la configuración de la temperatura, girar el botón central y confirmar en el temporizador la configuración pulsando el mismo botón. Se fija la temperatura seleccionada, pero se puede modificar durante el ciclo de cocinado.
El horno empezará a funcionar y aumentará su temperatura.
El indicador parpadea hasta alcanzar la temperatura seleccionada. Suena un pitido al final de esta operación y el indicador luminoso deja de parpadear.
3- Se puede programar el tiempo de cocción y su finalización girando el
selector de programa a “tiempo de cocción” o “final del cocción”.
Empieza a parpadear en la pantalla el “tiempo de cocinado” o “final del cocción”. Utilizar el botón central para modificar las configuraciones y confirmar el temporizador.
Una vez hecho esto, no olvidar girar el selector de programa a la posición “Stop” para confirmar la nueva configuración.
Más datos sobre programación en el capítulo 5.3 PROGRAMACIÓN.
4- Al final del ciclo de cocción, girar el selector de función a la posición “stop”.
El indicador vuelve a parpadear, seguirá encendido hasta que se apague el horno y se apagará cuando la temperatura interior del horno sea lo suficientemente baja.
• MODO DE COCCIÓN
Todos los procesos de cocinado han de realizarse con la puerta cerrada.
 BASE + VENTILADOR – La combinación del elemento de calentamiento inferior y el ventilador es ideal para fruta, tartas, quiches y repostería. Evita que los alimentos se deshidraten en exceso y hace que la masa suba. Colocar la bandeja en la parte inferior del horno.
 BASE – Utilizar el elemento inferior. Ideal para todo tipo de repostería. Utilizar para flanes, quiches, tartas, pastas y procesos que requieran más calor desde abajo.
 BASE + TECHO –Ambos elementos de calentamiento están en uso. Esta función es ideal para los asados tradicionales. Carne roja, roast beef, pierna de cordero, caza, papillote y bollos.
 BASE + TECHO + VENTILADOR – Utilización de los elementos inferior y superior en combinación con el ventilador que facilita la circulación del aire caliente en todo el horno. Se recomienda este modo para pollo, repostería, pescado y verduras. Con este modo se mejora la penetración del calor reduciéndose el tiempo de cocina y precalentamiento. El ventilador permite cocinar distintos alimentos a la vez en diferentes posiciones en el horno distribuyendo el calor sin riesgo de que se mezclen los olores y los sabores. Cuando se cocinen distintos alimentos al mismo tiempo añada 10 minutos al período normal de asado.
 RESISTENCIA CIRCULAR + VENTILADOR - Utilización de los elementos inferior y superior en combinación con el ventilador que facilita la circulación del aire caliente en todo el horno. Su definición es la misma que la del método de cocinado con Ventilador.
 GRILL – Utilización del elemento de calentamiento superior. Éxito asegurado para gratinados varios, kebabs y parrilla. El grill ha de calentarse previamente a temperatura elevada durante 5 minutos. Las carnes blancas han de colocarse siempre a cierta distancia del grill, el tiempo de cocinado es ligeramente superior pero la carne queda más suculenta. Las carnes rojas y el pescado se pueden colocar directamente en la bandeja con la bandeja antigoteo justo debajo.
 GRILL + VENTILADOR – Se utiliza el elemento superior de calentamiento en combinación con el ventilador circulando así el aire caliente en todo el horno. Se recomienda el calentamiento previo para carnes rojas y no es necesario en caso de carnes blancas. El grill es ideal para cocinar alimentos de mayor grosor, como el cerdo o el pollo. Los alimentos que se vayan a hacer al grill han de colocarse directamente en el centro de la bandeja.
Si se coloca la bandeja antigoteo debajo de la bandeja de la comida se asegura que los jugos que pueda soltar no se esparcirán por el horno. Para un mejor resultado asegurarse de que los alimentos no están demasiado cerca del grill y poder voltear los alimentos a mitad de proceso.
 GRILL + ASADOR + VENTILADOR - La ventaja de utilizar la parte superior del horno más el ventilador y el asador es que los alimentos se cocinan evitando que se deshidraten y se queden sin sabor. El asador está programado para seguir girando durante unos cinco minutos una vez finalizado el período de cocina, utilizando por completo el calor residual del horno. No se requiere calentamiento previo para este modo de cocina.
 DESCONGELADO – Cuando se pone el mando en esta opción. El ventilador activa el aire caliente alrededor del alimento congelado y lo descongela en unos minutos sin cambiar o alterar el contenido proteínico del alimento. La temperatura preestablecida es de 40ºC constantes, no siendo posible su regulación.
 CONSERVAR EL CALOR – Se recomienda para recalentar los alimentos cocinados previamente, colocando la bandeja en el segundo nivel desde arriba, o para descongelar pan, pizza o repostería colocando la bandeja en la parte más inferior.
La temperatura preseleccionada es de 60ºC constantes, no siendo posible su regulación.
 PIZZA – Con esta función el aire caliente circula por todo el horno asegurando un resultado perfecto para platos como Pizza o Bizcochos.


 PYRO – El horno se encarga de limpiar el interior del horno. -Existen dos opciones ECO ó SUPER
27 ES

5.3 PROGRAMACIÓN
SÍMBOLOS DE LA PANTALLA
|
|
|
|
|
|
Luz |
|
|
|
|
|
|
Configuración temporizador |
|
|
|
|
|
|
|
|
|
|
|
|
|
|
|
|
|
|
|
|
Temporizador en funcionamiento |
|
|
|
|
|
STOP |
Programación del tiempo de cocción |
Selector de |
|
|
Final de la programación del |
|||
|
|
tiempo de cocción |
||||
Programación |
|
|
En funcionamiento el dispositivo |
|||
|
|
|
|
|
|
|
|
|
|
|
|
|
de seguridad para niños |
|
|
|
|
|
|
Cierre de la puerta del horno |
TEMPORIZADOR:
El temporizador funciona independientemente del horno y no afecta a los elementos de calentamiento. Sólo es un recordador.
•Girar el mando a la posición Temporizador. Aparecerá el símbolo en la pantalla.Aparecerá en pantalla 00:00
•Cuando parpadeen los minutos, girar el botón central hasta el número de minutos necesario y confirmar pulsando el mismo botón.
•Cuando parpadeen las horas, girar el botón central hasta el número de horas necesario y confirmar pulsando el mismo botón.
•Volver a poner el botón en la posición Stop.
Cuando finaliza el tiempo, el tiempo de cocina desaparece. Se escuchará un pitido durante 15 segundos y parpadeará el Temporizador de la pantalla (para parar el pitido antes de los 15 segundos sólo hay que pulsar el botón central).
PROGRAMACIÓN DEL TIEMPO DE COCCIÓN:
Dispone de varias recetas programadas con el tiempo de cocción. En el modo Manual, Descongelado o Conservar Calor se puede preseleccionar si es necesario.
•Girar el mando a la posición de “cocción”.Aparecerá el símbolo de tiempo de cocción. Aparecerá el tiempo de cocción programado para distintas recetas, o 00:00 para otras funciones del horno.
•Cuando parpadeen los minutos, girar el botón central hasta el número de minutos necesario y confirmar pulsando el mismo botón.
•Cuando parpadeen las horas, girar el botón central hasta el número de horas necesario y confirmar pulsando el mismo botón.
•Volver a poner el botón en la posición Stop para confirmar el nuevo tiempo.
Cuando finaliza el tiempo, el tiempo de cocción desaparece. Se escuchará un pitido durante 15 segundos y parpadearán los símbolos de tiempo de cocinado y STOP.
•Girar el mando de función de programa a la posición Stop. En caso contrario, los símbolos de Tiempo de cocción y STOP seguirán parpadeando.
PROGRAMACIÓN DEL FINAL DEL TIEMPO DE COCCIÓN:
Hay varias recetas que tienen programado un tiempo de cocción y por tanto, con un final de tiempo de cocción. En el Modo Manual, Descongelación o Conservación de Calor se puede configurar si se quiere.
•Girar el mando a la posición de Final de cocción. Aparecerá el símbolo STOP. Aparecerá un final del tiempo de cocinado para varias recetas, o 00:00 para otras funciones o la hora del día.
•Girar el mando de selector de programa para confirmar el final del tiempo. •Cuando parpadeen los minutos, girar el botón central hasta el número de minutos necesario y confirmar pulsando el mismo botón.
•Cuando parpadeen las horas, girar el botón central hasta el número de horas necesario y confirmar pulsando el mismo botón.
NB: En el inicio diferido, aparecerá en la pantalla el final del tiempo de cocinado junto con los símbolos de “tiempo de cocinado” y “STOP”, y sólo queda la función Modo Receta del horno.
El horno calcula automáticamente la hora de inicio (el tiempo final menos el tiempo de cocción).
Al final del ciclo el horno se apaga automáticamente. Durante 15 segundos sonará un pitido que indica el final del ciclo y parpadearán los símbolos de “Tiempo de cocción” y “STOP”.
•Girar el mando del selector de función hasta Stop. En caso contrario los símbolos seguirán parpadeando.
•Esta función se suele utilizar con la función “duración de la cocción”.
Por ejemplo, si el plato requiere 45 minutos de cocción y debe estar listo a las 12:30 h:
-Seleccionar la funcocción
-Establecer el tiempo de duración de la cocción a 45 minutos
-Definir el final del tiempo de cocción a las 12:30.
La cocción se iniciará automáticamente a las 11:45 (12:30 menos 45
minutos) y continuará hasta el fin del tiempo de cocción preestablecido, cuando el horno se apagará automáticamente.
ADVERTENCIA:
Si se selecciona el final de la cocción sin fijar la duración del tiempo de cocción, el horno empezará inmediatamente a cocinar y se detendrá al final del tiempo de cocción establecido.”
5.4 USO DEL TEMPORIZADOR
5.5 CONSEJOS DE COCCIÓN
Es mejor no salar la comida hasta después de cocinarla ya que la sal hace que pierda antes la grasa, lo que ensuciará el horno y creará mucho humo.
Las carnes blancas, cerdo, ternera, cordero y pescado con hueso o espina se pueden meter en el horno sin calentarlo previamente. El tiempo de cocinado es superior que en un horno precalentado, pero cocina mejor porque el calor tiene más tiempo para llegar a la zona del hueso.
Un calentamiento previo correcto es la base de un asado de carne roja en su punto.
GRILL
•Antes de utilizar el grill del horno
Sacar la carne de la nevera unas horas antes. Dejarla sobre varias capas de papel de cocina. Con ello se consigue que temple y quede más jugosa evitando que se quede fría en el medio.
Añadir pimienta y especias a la carne antes del grill, pero la sal después. Así se hará mejor y quedará jugosa. Añadir a la comida que se va a cocinar con poco de aceite (esto es mejor hacerlo con un pincel plano). Luego añadir más pimienta y hierbas aromáticas (tomillo, etc.)
• Durante el asado:
No pinchar los alimentos cuando se están haciendo, ni siquiera cuando se les de la vuelta ya que haría que perdiese el jugo y se secase.
ASADO
Evitar utilizar recipientes brillantes ya que reflejarían el calor podrían estropear los bizcochos. Si el bizcocho se dora muy rápido, cubrir con papel antiadherente o papel de aluminio.
Atención: La forma correcta de utilizar el papel es con la parte brillante hacia el bizcocho ya que de lo contrarío el calor se reflejaría en la superficie brillante y no llegaría a la comida.
Evitar abrir la puerta durante los primeros 20 o 25 minutos durante el cocinado:
Los soufflés, brioches, bizcochos, etc. tienden a desinflarse. Se puede comprobar si están hechos introduciendo un cuchillo o una aguja de metal en el centro. Si la hoja sale limpia y seca, es que está listo y se puede detener la cocción. Si la hoja sale mojada o con trocitos de bizcocho adherido, dejar el horno en funcionamiento pero bajando la temperatura del termostato para que termine de hacerse pero sin quemarse.
5.6 AJUSTE DEL CONTRASTE DE LA PANTALLA
El contraste de la pantalla se puede ajustar en todo momento.
La configuración por defecto es “C5”. Para ajustar la configuración hay que:
•Girar el selector de programa hasta “luz” y el selector de función en “0”. Presionar la llave central durante 3 segundos y aparecerá en la pantalla “CX” (siendo X el nivel de contraste).
Girar el mando central para ajustar la configuración de contraste. Las configuraciones van de 1 a 9. Confirmar la nueva configuración presionando el punto central durante 3 segundos.
28 ES

5.7 TEMPORIZADOR TÁCTIL
FUNCIÓN |
MODO DE ACTIVACIÓN |
MODO DE DESCONEXIÓN |
FUNCIONAMIENTO |
FINALIDAD |
|
|
|
|
|
|
|
|
•Pulse el botón central |
•Cuando transcurre el |
•Emite una señal |
•Permite utilizar el |
|
|
1 vez |
tiempo seleccionado, el |
acústica finalizado el |
programador del horno a |
|
MINUTERO |
•Pulse las teclas"-" "+" |
funcionamiento se para |
tiempo establecido |
modo de alarma (puede |
|
solo y avisa con una señal |
|||||
|
para ajustar la duración |
acústica (la señal acústica |
•Durante el |
utilizarse con horno en |
|
|
•Suelte las teclas |
se para sola; interrumpirlo |
funcionamiento, la |
funcionamiento o |
|
|
|
inmediatamente |
pantalla muestra el |
desconectado) |
|
|
|
tiempo restante. |
|||
|
|
pulse la tecla SELECT |
|
||
|
|
|
|
||
|
|
|
|
|
|
|
•Pulse el botón central |
•Cuando transcurre el |
•Permite seleccionar el tiempo |
•Para detener la señal, |
|
|
2 veces |
tiempo seleccionado, el |
de cocción del alimento |
pulse cualquier tecla. |
|
DURACIÓN DE |
•Pulse las teclas "-" "+" |
horno se desconecta solo; |
introducido en el horno. |
Pulse el botón central |
|
para el ajuste de la |
párelo antes de situer el |
•Para visualizar el tiempo |
para volver a la función |
||
LA COCCIÓN |
duración |
mando selector de función |
restante pulse la tecla SELECT. |
de reloj. |
|
|
•Suelte las teclas |
en la posición O ó ajuste a |
•Para modificar el tiempo |
|
|
|
•Seleccione la función de |
0:00 el tiempo de la |
restante, pulse la tecla |
|
|
|
cocción con el mando |
cocción (teclas SELECT |
SELECT+ "-" "+" |
|
|
|
selector de función |
"-" "+". |
|
|
|
|
•Pulse el botón central |
•A la hora seleccionada el |
•Permite memorizar la |
Normalmente se utiliza esta |
|
|
función con la finalidad de |
||||
FIN DE LA |
3 veces |
horno se desconectará |
hora de fin de la cocción. |
||
DURACIÓN DE LA COCCIÓN |
|||||
COCCIÓN |
•Pulse las teclas "-" "+" |
solo; si desea interrumpirlo, |
•Para visualizar la hora |
A modo de ejemplo: el alimento |
|
para ajustar la hora del |
situer antes el mando |
programada, Pulse el |
|||
|
debe cocinarse durante 45 |
||||
|
fin de cocción. |
selector de función en la |
botón central 3 veces |
minutos y deseo que esté listo |
|
|
•Suelte las teclas |
posición O. |
•Para modificar la hora |
para las 12:30; en tal caso |
|
|
•Seleccione la función de |
||||
|
cocción con el mando |
|
programada, pulse las |
Seleccione la función de |
|
|
|
teclas END +"-" "+" |
cocción deseada. Ajuste el |
||
|
selector de función |
|
|||
|
|
|
tiempo de la cocción en 45 |
||
|
Para activar la función del |
|
|
||
|
Para desactivar la función del |
|
minutos ( "-" "+") |
||
|
“Bloqueo para niños”, se |
“Bloqueo para niños”, se debe |
|
Ajuste el fin de la cocción a |
|
BLOQUEO |
debe pulsar “Set (+)” |
pulsar nuevamente “Set (+)” |
|
las 12:20 h. ("-" "+" ) |
|
durante un mínimo de 5 |
durante un mínimo de 5 |
|
•Cuando termina el tiempo |
||
PARA NIÑOS: |
|
||||
segundos, A partir de este |
segundos. A partir de este |
|
seleccionado, el horno se |
||
|
momento, todas las demás |
momento, todas las funciones |
|
desconecta automática- |
|
|
funciones están loqueadas |
están disponibles. |
|
mente y avisa emitiendo |
|
|
El display muestra STOP y |
|
|
una señal acústica |
|
|
seleccionar hora |
|
|
La cocción comenzará auto- |
|
|
alternativamente. |
|
|
máticamente a las11:45 h |
|
|
|
|
|
(12:30, menos 45minutos), y |
|
|
|
|
|
a la hora seleccionada como |
|
|
|
|
|
fin de la cocción el horno se |
|
|
|
|
|
desconectará automática- |
|
|
|
|
|
mente. ATENCIÓN: Si |
|
|
|
|
|
selecciona únicamente el fin |
|
|
|
|
|
de cocción sin el tiempo de |
|
|
|
|
|
cocción, el horno se |
|
|
|
|
|
conectará inmediatamente y |
|
|
|
|
|
se desconectará a la hora de |
|
|
|
|
|
fin de la cocción seleccionada |
|
|
|
|
|
|
5.8 AJUSTE DE LA HORA 
 00:00
00:00
select
ATENCIÓN: la primera operación que hay que efectuar después de la instalación o después de una interrupción de la corriente (este tipo de situaciones se reconocen al observar que en la pantalla de visualización
parpadea la hora 12:00 ) es el ajuste de la hora, como se indica a continuación:
•Pulse el botón central 4 vez.
•Ajustar la hora con los botones "-" "+". •Suelte las teclas.
ATENCIÓN: Elhornofuncionasólosilahoraestáprogramada.
29 ES

6. CICLO PIROLÍTICO (DEPENDE DEL MODELO)
PYRO .El horno se ocupa de la limpieza del interior. -Hay dos opciones posibles, ECO y SUPER.
** El horno debe tener esta función
El horno dispone de un sistema de limpieza por pirolisis que destruye los residuos de comida a alta temperatura. La operación se hace automáticamente mediante el programador. Como se necesitan temperaturas muy altas, la puerta del horno se fija con un cierre de seguridad.
La pirolisis se puede detener en todo momento. La puerta no se podrá abrir hasta que se muestre el cierre de seguridad.
NOTA: Si hay una encimera de cocción encima del horno no utilizar los quemadores de gas o las placas eléctricas cuando esté en funcionamiento el sistema pirolítico para evitar que se caliente en exceso la cocina.
Se disponen DOS CICLOS PIROLÍTICOS preconfigurados:
•ECO PYROCLEAN: Limpia hornos medianamente sucios. Funciona durante 65 minutos.
•SUPER PYROCLEAN: Limpia hornos muy sucios. Funciona durante 90 minutos.
No utilizar productos de limpieza en un horno pirolítico.
Consejo: La limpieza pirolítica inmediatamente posterior a la utilización del horno permite utilizar el calor residual, con lo que se consigue un ahorro energético.
Antes del Ciclo pirolítico:
•Retirar del horno todos sus accesorios: No pueden soportar temperaturas elevadas y podrían dañarse con las temperaturas de pirolisis.
•Retirar todos los restos ya que se tardaría mucho en destruirlos. Asimismo una gran cantidad de grasa podría dar lugar a fuego cuando se sometiese a temperaturas muy elevadas durante el ciclo de pirolisis.
•Cerrar la puerta del horno.
Utilización del ciclo pirolítico:
1-Girar el mando del selector de función a “Modo Pirolítico”. Aparecerá en la pantalla “PYRO” y parpaderará el modo ECO.
Recordar: ECO – ciclo de 65 minutos –horno moderadamente sucio SUP –ciclo de 90 minutos – horno muy sucio
2-Con el botón central seleccionar el modo Pirolítico deseado según el grado de suciedad: ECO o SUP.
•La selección se confirmará en 3 segundos…
El horno empieza el ciclo pirolítico. El modo pirolítico seleccionado parpadea y aparecen los indicadores luminosos de “tiempo” y “stop”. Durante el ciclo pirolítico aparece el cierre de la puerta del horno, lo que indica que la puerta está cerrada. Funcionará el ventilador de refirgeración.
El indicador luminoso parpadeará hasta que se alcance la temperatura, que entonces permanecerá fijo.
•El arranque del ciclo pirolítico se puede demorar seleccionado un final de tiempo. Girar el mando de control de programación a final de tiempo y configurar la hora a la que se quiere que termine.
•Durante la operación de auto limpieza pirolítica, las superficies pueden calentarse más de lo habitual; los niños deben permanecer alejados.
Al final de ciclo pirolítico el horno se apaga automáticamente. Durante 15 segundo suena un pitido que indica el final del ciclo y en la pantalla parpadean los indicadores de “tiempo” y “Stop”.
•Girar el mando de función a stop. En caso contrario los símbolos seguirán parpadeando. Desaparece el símbolo “Pyro” del Temporizador, el modo pirolítico. La puerta del horno seguirá bloqueada ya que la temperatura es muy alta de forma que la puerta no se podrá abrir hasta que deje de estar iluminado el símbolo de bloqueo de puerta.
El ventilador de refrigeración no se desconecta hasta que la temperatura de los componentes sea la adecuada.
Al final del ciclo el indicador parpadea de nuevo y seguirá encendido hasta que el horno se apague (se apagará cuando la temperatura interna del horno sea lo suficientemente baja).
La pirólisis deja restos blancos en las paredes. Esperar a que el horno se enfríe completamente, luego limpiar el interior del horno con una esponja húmeda y retirar los restos.
7. SEGURIDAD DE LOS NIÑOS
Esta función es esencial, especialmente cuando hay niños cerca. Evita que los niños enciendan el horno o modifiquen los programas configurados.
El sistema de seguridad bloquea el panel de control del horno cuando está en funcionamiento.
Hay dos niveles de seguridad:
NIVEL 1: Bloqueo del mando del control del selector y el botón central.
•Activación: Girar el mando de control de programación hasta seguridad para niños.
•Acción: los mandos de control están inoperativos*. •Desactivación: Girar el mando de control de programación a 0.
NIVEL 2: Bloqueo de los mandos del selector de función
•Activación: Girar el mando del selector de función a seguridad para niños u mantener presionado el botón central durante 3 segundos. •Acción: Todos los controles están inoperativos*.
Desactivación: el mismo proceso que para la activación. Girar el mando del selector de función hasta seguridad para niños y mantener el botón central Pulsado durante 3 segundos.
*Nota: En todos los casos, por motivos de seguridad, aunque los controles estén bloqueados, el horno se puede desconectar poniendo el mando del selector en 0.
30 ES
 Loading...