


FORNI DA INCASSO |
|
|||||||||
IT |
||||||||||
ISTRUZIONI PER L’USO |
|
|
|
|
|
|
|
|||
|
|
|
|
|
|
|
|
|||
OVENS |
|
|||||||||
GB |
||||||||||
USER INSTRUCTIONS |
|
|
|
|
|
|
|
|
||
|
|
|
|
|
|
|
|
|||
HORNOS EMPOTRABLES |
|
|||||||||
ES |
||||||||||
INSTRUCCIONES DE USO |
|
|
|
|
|
|||||
|
|
|
|
|
|
|||||
OVEN |
|
|||||||||
NL |
||||||||||
GEBRUIKSAANWIJZING |
|
|
|
|
|
|
||||
|
|
|
|
|
|
|||||
EINBAUBACKÖFEN |
|
|||||||||
DE |
||||||||||
BEDIENUNGSANLEITUNG |
|
|
|
|
||||||
|
|
|
|
|
||||||
FOURS ENCASTRABLES |
|
|||||||||
FR |
||||||||||
NOTICE D’EMPLOI ET D’INSTALLATION |
|
|
||||||||
|
|
|
||||||||
FORNOS |
|
|||||||||
PT |
||||||||||
MANUAL DE INSTRUÇÕES DE UTILIZAÇÃO |
|
|||||||||
|
|
|||||||||
|
|
|
|
|
|
|
|
|
|
|
|
|
|
|
|
|
|
|
|
|
|
|
|
|
|
|
|
|
|
|
|
|
|
|
|
|
|
|
|
|
|
|
|
CANDY ELETTRODOMESTICI - Via Privata Eden Fumagalli - 20047 Brugherio Milano Italy

AVVERTENZE GENERALI
Leggere attentamente le istruzioni incluse in questo libretto. Vi danno importanti indicazioni sulla sicurezza d'installazione e d'impiego, per la manutenzione e la pulizia, ed anche qualche consiglio per un ottimo utilizzo del forno. Conservare con cura questo documento per ogni consultazione ulteriore ed annotare qui sotto, prima dell'installazione il numero di serie del forno, nel caso di richiesta d'intervento
del servizio di assistenza.
Placca segnaletica (situata sul lato
Dopo aver sballato il forno assicurarsi che non sia danneggiato, |
dell’ apparecchio) |
|
in caso di dubbi contattare personale qualificato.
Tenere i materiali utilizzati per l’imballo (buste di plastica, polistirolo, chiodi o graffette) fuori dalla portata dei bambini.
Il produttore declina ogni responsabilità nel caso di
non rispetto delle istruzioni spiegate nel presente libretto
DICHIARAZIONE DI CONFORMITA
•Questa apparecchiatura nelle parti destinate a venire a contatto con sostanze alimentari, è conforme alla prescrizione della dir. CEE 89/109 e al D.L. di attuazione N° 108 del 25/01/92.
Apparecchio conforme alle Direttive Europee 89/336/CEE, 73/23/CEE e successive modifiche
INFORMAZIONI SULLA SICUREZZA
•Questo apparecchio dovrà essere destinato solo all’uso per il quale è stato espressamente concepito, e cioè per la cottura di alimenti.
Ogni altro uso (ad esempio riscaldamento ambiente) è da considerarsi improprio e quindi pericoloso. Il costruttore non può essere considerato responsabile per eventuali danni derivanti da usi impropri, erronei ed irragionevoli.
•L’uso di un qualsiasi apparecchio elettrico comporta l’osservanza di alcune regole fondamentali. In particolare:
-non tirare il cavo di alimentazione per staccare la spina dalla presa di corrente
-non toccare l’apparecchio con mani o piedi bagnati o umidi
-non usare l’apparecchio a piedi nudi
-non permettere che l’apparecchio sia usato dai bambini o da incapaci, senza sorveglianza
-in generale è sconsigliabile l’uso di adattatori, prese multiple e prolunghe.
-In caso di guasto e/o di cattivo funzionamento dell’apparecchio, spegnerlo e non manometterlo.
•In caso di danneggiamento del cavo, provvedere tempestivamente alla sua sostituzione secondo le seguendi indicazioni: aprire il coperchio morsettiera, togliere il cavo di alimentazione e sostituirlo con uno corrispondente,(tipo H05RR-F, H05VV-F, H05V2V2-F) e adeguato alla portata dell’apparecchio. Tale operazione dovrà essere eseguita da personale professionalmente qualificato. Il conduttore di terra (giallo-verde), deve obbligatoriamente essere più lungo di circa 10 mm. rispetto ai conduttori di linea.
Per l’eventuale riparazione rivolgersi solamente ad un centro di assistenza tecnica autorizzato e richiedere l’utilizzo di ricambi originali.
Il mancato rispetto di quanto sopra può compromettere la sicurezza dell’apparecchio.
•Il forno possiede delle caratteristiche tecniche ben definite e perció non potrete apportare modifiche.
•Non utilizzate mai macchine a vapore o ad alta pressione per la pulizia del forno.
•Non mettete alcun prodotto infiammabile nel forno. Potrebbe incendiarsi se il forno venissa acceso accidentalmente.
•Non appogiatevi e non fate sedere i bambini sulla porta del forno.
•Usate gli appositi guanti da forno per introdurre ed estrarre dal forno recipienti, cibi ed accessori.
RACCOMANDAZIONI
•Dopo ogni utilizzo, eseguire la manutenzione favorirà una perfetta pulizia con la pirolisi.
•Non rivestire mai le pareti del forno con alluminio o con altri materiali simili. Si rischia di bruciare il foglio d'alluminio e di danneggiare le pareti del forno.
•É consigliato di non utilizzare il forno alle alte temperature per non rischiare di provocare fumo e odori. É dunque meglio allungare il tempo di cottura e abbassare leggermente la temperatura.
•Vi consigliamo di utilizzare solo dei piatti che resistano alle alte temperature.
INSTALLAZIONE
L’installazione è a carico dell’acquirente e la Casa Costruttrice è esonerata da questo servizio, gli eventuali interventi richiesti alla Casa Costruttrice che dipendono da una errata installazione non sono compresi nella garanzia.
L’installazione deve essere effettuata secondo le istruzioni da personale professionalmente qualificato. Una errata installazione può causare danni a persone, animali o cose, nei confronti dei quali il costruttore non può essere considerato responsabile. Il mobile nel quale il forno deve essere incassato deve essere realizzato con materiali resistenti al calore.
Il forno puó essere incassato sia sotto un piano di cottura sia in colonna.
Prima del fissaggio : é indispensabile assicurare una buona aerazione del vano di incasso al fine di permettere una buona circolazione dell'aria necessaria al raffreddamento ed alla protezione dei meccanismi interni. Bisogna quindi praticare aperture (vedere ultima pagina).
COLLEGAMENTO ELETTRICO
L'INSTALLAZIONE DEL FORNO DEVE ESSERE EFFETTUATA DA UN INSTALLATORE AUTORIZZATO O DA UN TECNICO QUALIFICATO.
L'installazione di questo apparecchio deve essere effettuata in conformità delle Norme vigenti.
La casa costruttrice, declina ogni responsabilità in caso di mancato rispetto delle suddette norme.
Importante: la casa costruttrice resta sollevata da ogni responsabilità per eventuali danni a persone o cose, derivanti dal mancato allacciamento della linea di terra.
Il forno è conforme ai requisiti di sicurezza previsti dalle norme e deve essere munito di spina tripolare con polo di terra che assicura la completa messa a terra.
L'efficacia della sicurezza è comunque subordinata anche alla corretta messa a terra del vostro impianto. Pertanto, prima di alimentare elettricamente il forno accertarsi che la presa abbia un corretto collegamento di messa a terra e che la portata amperometrica del contatore elettrico risulti idonea per l'assorbimento indicato dai dati di targa del forno. Nota: non dimenticate che l'apparecchio potrebbe aver bisogno di manutenzione da parte dell'assistenza tecnica. Ponete quindi la presa di corrente in una posizione facilmente accessibile. Questo apparecchio é venduto provvisto di cordone di alimentazione con presa di corrente e deve essere utilizzato esclusivamente con una tensione di 230 Volts.
Attenzione: nel caso si desideri realizzare una connessione fissa alla rete, si dovrà interporre tra l'apparecchio e la rete, un dispositivo omnipolare di interruzione con distanza dei contatti di almeno 3 mm. Il cavo di terra non deve essere interrotto dall'interruttore.
FAR VERIFICARE L'EFFICIENZA DELL'IMPIANTO DI MESSA A TERRA.
La sostituzione del cordone di alimentazione deve essere effettuata dal servizio di assistenza tecnica o da personale altamente qualificato, in conformità alle caratteristiche d'origine. Prima di effettuare qualsiasi operazione di smontaggio, si deve staccare la spina dalla presa di corrente o togliere corrente a mezzo dell'interruttore generale dell'impianto elettrico.
1 IT
DOTAZIONE DEL FORNO
Prima di utilizzare gli accessori del forno per la prima volta è necessario pulirli. Per questa operazione si consiglia di utilizzare una spugna. Successivamente risciacquare ed asciugare gli accessori.
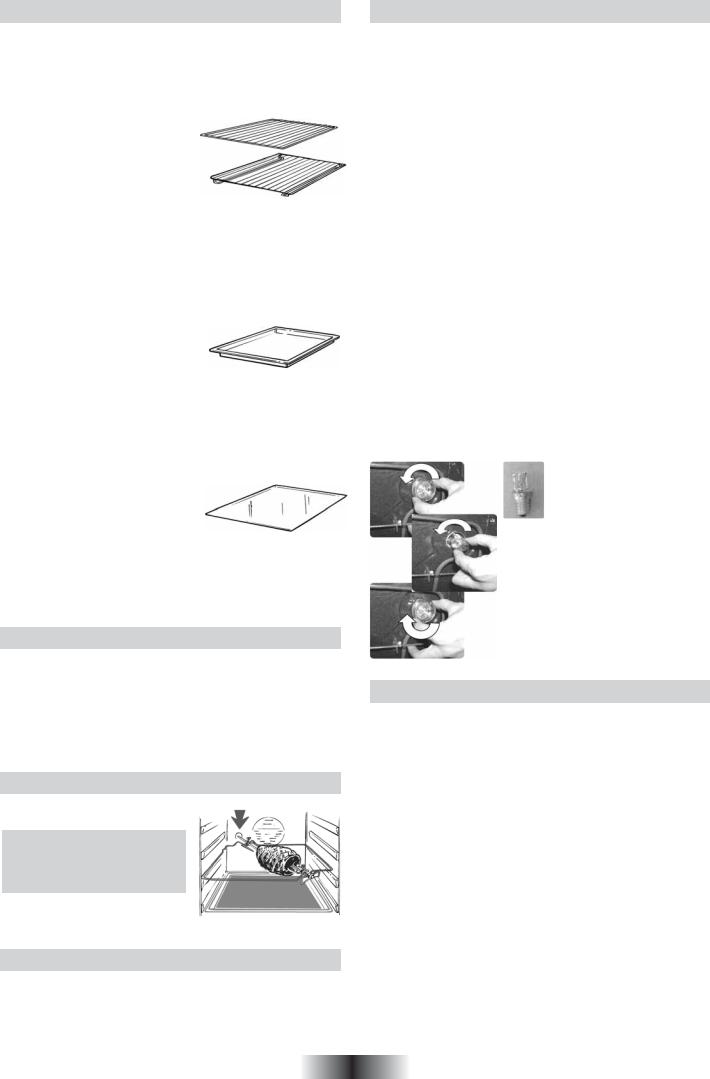
La griglia semplice serve da supporto per teglie, pirofile, stampi per i dolci.
La griglia porta-piatto serve in particolare per le grigliate di carne poiché sostiene anche la leccarda che raccoglie i grassi che colano.
Grazie ai loro profili speciali, le griglie restano sempre in orizzontale, anche quando vengono estratte verso l'esterno. Non c'é nessun rischio quindi che i tegami scivolino o si ribaltino.
La leccarda serve a raccogliere i grassi che colano durante la cottura con il grill. Puo essere appoggiata sotto la griglia, inserita nelle apposite guide della griglia o ancora, posta sul fondo del forno. Deve essere utilizzata solamente con il grill, il girarrosto o il turbo girarrosto.
Attenzione: in tutti gli altri modi di cottura, la leccarda deve essere tolta dal forno.
Non usare mai la leccarda per cuocere gli arrosti perché ne risulterebbe un eccessivo sviluppo di fumo e vapori e il forno si sporcherebbe inultimente.
La piastra pasticcera deve essere messa direttamente sulla griglia. Si utilizza per cuocere piccola pasticceria come ad esempio biscotti, meringhe, basi per torte, .....
Non mettere mai questo accessorio sul fondo del forno.
Gli accessori devono essere tolti dal forno se non vengono utilizzati.
LA COTTURA AL GRILL
Questo tipo di cottura consente la doratura rapida dei cibi. A questo scopo consigliamo di inserire la griglia generalmente nel 3° o 4° ripiano, secondo le dimensioni dei cibi (Fig. pag. 6). Quasi tutte le carni possono essere cotte al grill, fanno eccezione alcune carni magre di selvaggina ed i polpettoni. La carne ed il pesce da cucinare al grill vanno leggermente unti con olio.
IL GIRARROSTO
Non si effettua preriscaldamento per le cotture al girarrosto. Le cotture al girarrosto si effettuano a porta chiusa.
TEMPI DI COTTURA
Alle pagine 6-7 riportiamo una tabella indicativa dove sono indicati tempi e temperature consigliati per le prime cotture. Ad esperienza acquisita potrete variare a vostro piacimento i valori riportati nella tabella stessa.
MANUTENZIONE DEL FORNO
•Prima di effettuare la pulizia attendere che l'apparecchio si raffreddi.
•Non usare mai prodotti abrasivi, pagliette metalliche o oggetti taglienti che potrebbero danneggiare lo smalto e l'acciaio.
•Usare semplicemente acqua saponata o prodotti a base di ammoniaca.
LE PARTI IN VETRO
Alla fine di ogni utilizzo del forno, asciugate con carta assorbente. Se gli schizzi sono troppo grandi, pulite con una spugna ed un detergente. Sciacquate ed asciugate. Non usare mai prodotti abrasivi o oggetti taglienti.
LA GUARNIZIONE PORTA FORNO
Pulire con una spugna e del detergente.
GLI ACCESSORI
Pulire con una spugna imbevuta d'acqua saponata. Risciacquare e asciugare. Non usare prodotti abrasivi.
LA LECCARDA
Dopo aver grigliato, estrarre la leccarda dal forno. Abbiate cura di svuotarla in un recipiente a parte, lavare e risciaquare con dell'acqua calda e una spugna imbevuta di detersivo. Lasciarla a riposo con uno strato d'acqua e detergente per ammorbidire le incrostazioni.
Puo anche essere lavata, in lavastoviglie o con prodotti reperibili in commercio.
Non lasciare mai la leccarda sporca all'interno del forno.
LUCE FORNO
Staccare la spina di alimentazione prima di ogni operazione di pulizia o di sostituzione della lampadina.
La lampadina e il bulbo protettivo sono realizzati con un materiale resistente alle alte temperature.
Caratteristiche della lampadina: 230 V~ - 25 W - Base E 14 - Temperatura 300°C.
Per la sostituzione della lampadina difettosa, è sufficiente smontare il bulbo in vetro,
-togliere la lampadina,
-sostituirla con una lampadina identica e,
-riavvitare il bulbo in vetro che serve come protezione.
FORNO AUTOPULENTE CATALITICO
Speciali pannelli autopulenti ricoperti da uno smalto a struttura microporosa, offerti come accessori opzionali per tutti i modelli, eliminano la pulizia manuale del forno.
I grassi proiettati sulle pareti durante la cottura, vengono decomposti dallo smalto, mediante un processo catalitico di ossidazione e trasformati in prodotti gassosi.
Schizzi eccessivi di grasso possono ostruire i pori e quindi impedire l’autopulizia. Tale caratteristica può essere ripristinata mediante un riscaldamento per circa 10-20 minuti del forno vuoto impostando la manopola forno in corrispondenza della massima temperatura. Non usare prodotti abrasivi, pagliette metalliche, oggetti appuntiti, panni ruvidi, prodotti chimici o detersivi che possono danneggiare irrimediabilmente lo smalto.
Si consiglia inoltre di utilizzare pentole a bordi alti nel caso di cotture di vivande particolarmente grasse (arrosti, ecc.) e di usare la leccarda quando si esegue la cottura al grill.Qualora, per particolari condizioni di sporco, non fosse sufficiente l’azione precedente, si consiglia di intervenire asportando i grassi con un panno morbido od una spugna inumiditi con acqua calda. La porosità dello smalto è fondamentale per garantire l’azione autopulente.
N.B.: Tutti i pannelli autopulenti in commercio hanno un’efficacia di rendimento di circa 300 ore di funzionamento forno. Dopo tale limite i pannelli dovrebbero essere sostituiti.
2 IT
PULIZIA DEL FORNO: LA PIROLISI
La pirolisi è un sistema di pulizia che sfrutta le alte temperature per rimuovere lo sporco.
I fumi risultanti dal processo vengono puliti tramite il passaggio nel filtro catalizzatore.
poiché durante il processo di pirolisi la temperatura è estremamente alta, la porta del forno è munita di un blocco di sicurezza per impedirne l'apertura.
Durante la pirolisi è possibile che un leggero odore si propaghi nella stanza; sarà più o meno percettibile a seconda dell'aerazione della stessa.
IMPORTANTE :
- Prima della pirolisi:
•Togliete tutti gli accessori dal forno perché potrebbero danneggiarsi con l'alta temperatura della pirolisi.
•É importante togliere ogni accumulo di grasso. Residui grassi in quantità elevata potrebbero infiammarsi sotto l'azione del calore intenso che si sprigiona durante la pirolisi.
•Chiudere la porta del forno
•Nel caso di installazione di un piano di cottura sopra il forno, non utilizzare mai i bruciatori o le piastre elettriche durante l'operazione di pirolisi allo scopo di evitare un eccessivo riscaldamento del cruscotto del forno.
•É altamente sconsigliato l'utilizzo dei prodotti detergenti o altri prodotti per la pulizia dei forni.
La pirolisi lascia sulle pareti del forno un deposito di qualche residuo biancastro.
Attendere il raffreddamento del forno poi pulire l'interno del forno con una spugna umida.
Nota:
•una pulizia dopo una cottura permette di beneficiare del calore già immagazzinato nel forno e quindi economia di energia.
Il forno pirolisi é dotato di una turbina di raffreddamento per proteggere dal calore i componenti del forno. La turbina di raffreddamento parte automaticamente quando il centro forno raggiunge temperature elevate e continua a funzionare per qualche minuto dopo la fine della pirolisi.
Attivazione del ciclo di pirolisi
1.Ruotare il selettore funzioni in posizione P
2.Il tempo proposto è di 1 ora 30 minuti, che può essere variato da 10 minuti a 2 ore tramite il programmatore (tasti B+ E o F). Se il forno è molto sporco suggeriamo di aumentare il tempo della pirolisi a 2 ore, viceversa, se il forno è poco sporco suggeriamo di ridurre il tempo di pirolisi ad 1 ora.
3.E’ possibile impostare una partenza ritardata del ciclo di pirolisi, impostando il tempo di fine cottura sul programmatore (tasti C + F) 4.Confermare le impostazioni premendo il tasto A del programmatore.
-ATTENZIONE: IL CICLO DI PIROLISI NON PARTE SE IL TASTO A NON VIENE PREMUTO.
5.Il ciclo di pirolisi può essere fermato in ogni momento riportando a ‘0’ il selettore delle funzioni (la scritta OFF appare sul display per 3 secondi)
6.Dopo aver impostato e confermato i parametri del ciclo di pirolisi scelto non è possibile modifica gli stessi. Per cambiarli è necessario reimpostare tutto dall’inizio (punto 1) dopo aver cancellato il ciclo impostato (girare il selettore funzioni su ‘0’, la scritta OFF appare per 3 secondi)
SERVIZIO ASSISTENZA CLIENTI
Prima di chiamare il servizio di Assistenza Tecnica in caso di mancato funzionamento vi consigliamo di verificare il buon inserimento della spina nella presa di corrente.
Nel caso non si individui la causa di mal funzionamento: spegnere l’apparecchio non manometterlo e chiamare il Servizio di Assistenza Tecnica.
• CERTIFICATO DI GARANZIA: cosa fare?
Il Suo prodotto è garantito, alle condizioni e nei termini riportati sul certificato inserito nel prodotto ed in base alle previsioni del decreto legislativo 24/02, fino a 24 mesi decorrenti dalla data di consegna del bene.
Il certificato di garanzia dovrà essere da Lei conservato, debitamente compilato, per essere mostrato al Servizio Assistenza Tecnica Autorizzato, in caso di necessità, unitamente ad un documento fiscalmente valido rilasciato dal rivenditore al momento dell’acquisto (bolla di consegna, fattura, scontrino fiscale, altro) sul quale siano indicati il nominativo del rivenditore, la data di consegna, gli estremi identificativi del prodotto ed il prezzo di cessione. Il Servizio di Assistenza Tecnica Autorizzato, verificato il diritto all’intervento, lo effettuerà senza addebitare il diritto fisso di intervento a domicilio, la manodopera ed i ricambi che sono totalmente gratuiti.
• ESTENSIONE DELLA GARANZIA FINO A 5 ANNI: come?
Le ricordiamo inoltre che sullo stesso certificato di garanzia convenzionale Lei troverà le informazioni ed i documenti necessari per prolungare la garanzia dell’apparecchio sino a 5 anni e così, in caso di guasto, non pagare il diritto fisso di intervento a domicilio, la manodopera ed i ricambi.
Per qualsiasi informazione necessitasse, La preghiamo rivolgersi al numero telefonico del Servizio Clienti 0392086811.
• ANOMALIE E MALFUNZIONAMENTI: a chi rivolgersi?
Per qualsiasi necessità il centro assistenza autorizzato è a Sua completa disposizione per fornirLe i chiarimenti necessari; comunque qualora il Suo apparecchio presenti anomalie o mal funzionamenti, prima di rivolgersi al Servizio Assistenza Autorizzato, consigliamo vivamente di effettuare i controlli indicati sopra.
•UN SOLO NUMERO TELEFONICO PER OTTENEREASSISTENZA
Qualora il problema dovesse persistere, componendo il “Numero Utile” sotto indicato, sarà messo in contatto direttamente, con il Servizio Assistenza Tecnica Autorizzato che opera nella Sua zona di residenza.
•MATRICOLA DEL PRODOTTO. Dove si trova?
È importante che comunichi al Servizio
Assistenza Tecnica Autorizzato la sigla del prodotto ed il numero di matricola (16 caratteri che iniziano con la cifra 3) che troverà sul certificato di garanzia op-
pure sulla targa matricola del prodotto (figura in ultima pagina). In questo modo Lei potrà contribuire ad evitare trasferte inutili del tecnico, risparmiando oltretutto i relativi costi.
Questo elettrodomestico è marcato conformemente alla Direttiva Europea 2002/96/CE sui rifiuti da apparecchiature elettriche ed elettroniche
(WEEE).
Assicurandovi che questo prodotto sia smaltito correttamente, aiuterete ad evitare possibili conseguenze negative all’ambiente e alla salute delle persone, che potrebbero verificarsi a causa
d’un errato trattamento di questo prodotto giunto a fine vita.
Il simbolo sul prodotto indica che questo apparecchio non può essere trattato come un normale rifiuto domestico; dovrà invece essere consegnato al punto più vicino di raccolta per il riciclo delle apparecchiature elettr iche ed elettroniche. Lo smaltimento deve essere effettuato in accordo con le regole ambientali vigenti per lo smaltimento dei rifiuti.
Per informazioni più dettagliate sul trattamento, recupero e riciclo di questo prodotto, per favore contattare l’ufficio pubblico di competenza (del dipartimento ecologia e ambiente), o il vostro servizio di raccolta rifiuti a domicilio, o il negozio dove avete acquistato il prodotto.
3 IT

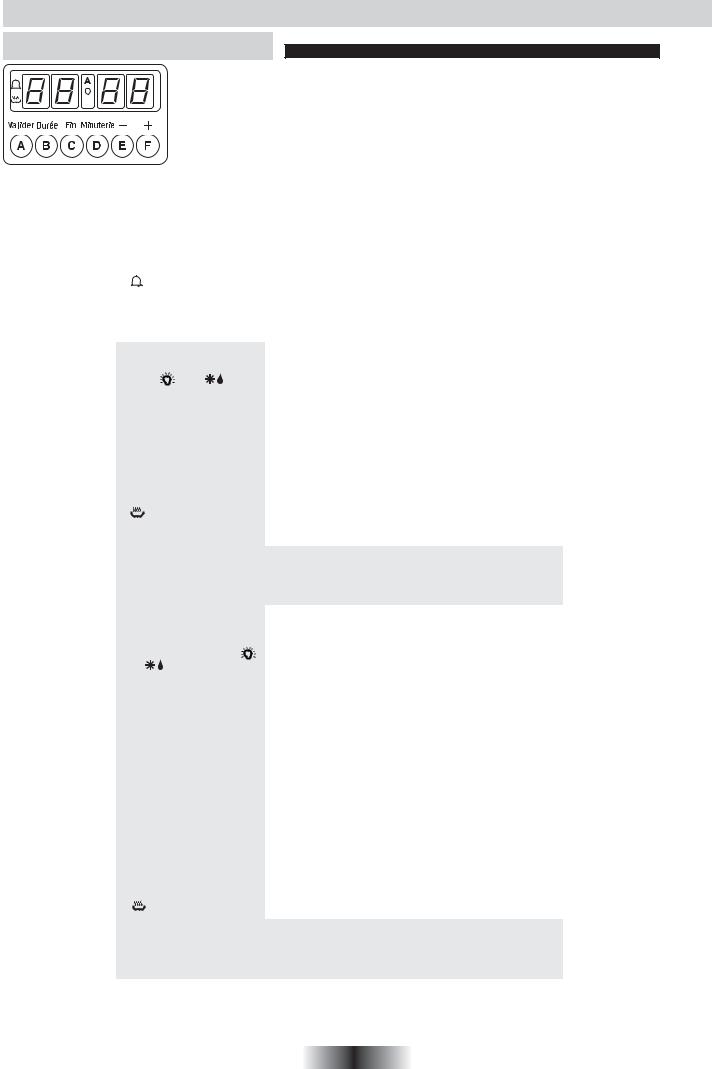
USO DEL PROGRAMMATORE ELETTRONICO
REGOLAZIONE DELL’ORA
ATTENZIONE: Il forno non funziona se l’ora non è stata impostata Il forno non funziona se sul display lampeggia la scritta 


 .
.
L’ora può essere regolata solo con il selettore funzioni in posizione ‘0’.
• Regolazione dell’ora
Premere i bottoni ‘E’ o ‘F’ per regolare l’ora. Sul display appaiono ore e minuti (hh:mm), regolabili da 0 :00 a 23.59.
Trascorsi 3 secondi dopo la pressione dell’ultimo tasto l’ora impostata è memorizzata, per modificarla premere e tenere premuto per 5 secondi il tasto D, quindi regolare l’ora premendo i tasti ‘E’ o ‘F’.
FUNZIONE |
COME SI ATTIVA |
COME SI SPEGNE |
COSA FA |
A COSA SERVE |
||||||
|
|
|
|
|
|
|
|
|
|
|
|
•Premere il tasto D |
|
• Al termine del tempo impo- |
• Emette un segnale sonoro |
• Permette di utilizzare il |
|||||
|
•Premere i tasti E o F per |
stato il programmatore |
al termine di un tempo |
programmatore del forno |
||||||
|
regolare la durata. |
|
emette un segnale sonoro |
impostato |
come una sveglia |
|||||
|
•Lasciare i tasti |
|
|
per 1 minuto, per fermarlo |
• Per visualizzare il tempo |
• Può essere utilizzato solo |
||||
CONTAMINUTI |
•Dopo 3 secondi il simbolo |
prima premere qualsiasi |
rimanente premere il tasto |
a forno spento |
||||||
appare sul display ed il |
tasto |
|
D |
|
|
|||||
|
conto alla rovescia ha inizio |
• Il contaminuti viene azzera- |
|
|
|
|||||
|
•Sul display appare nuova- |
to automaticamente quan- |
|
|
|
|||||
|
mente l’ora corrente |
|
do viene selezionata una |
|
|
|
||||
|
|
|
|
|
|
qualsiasi funzione di cottura |
|
|
|
|
|
|
|
|
|
|
|||||
|
•Girare il selettore funzioni |
• Al termine della durata di |
•Permette di scegliere la |
• Permette di |
realizzare |
|||||
|
su una funzione di cottura |
cottura impostata il forno |
durata della cottura |
le cotture |
desiderate |
|||||
|
(diversa da |
o |
). Il |
si spegne automaticamen- |
desiderata |
|
|
|||
|
display mostra la tempera- |
te e sul display appare la |
•Il tempo rimanente viene |
|
|
|||||
|
tura ed il tempo suggeriti. |
scritta END, viene emesso |
visualizzato sul display |
|
|
|||||
|
•Il tempo proposto può es- |
un segnale sonoro per 1 |
•Per visualizzare la tempe- |
|
|
|||||
|
sere |
modificato come |
minuto. |
|
ratura premere il tasto F |
|
|
|||
|
segue: |
|
|
|
• Per fermare prima il segna- |
•La durata della cottura può |
|
|
||
|
- premere il tasto B |
|
le sonoro premere qualsia- |
essere modificata premen- |
|
|
||||
DURATA |
- premere i tasti E o F per |
si tasto oppure riportare il |
do il tasto B e successiva- |
|
|
|||||
COTTURA |
modificare il tempo |
|
selttore funzioni su ‘0’ (in |
mente i tasti E o F |
|
|
||||
- confermare la scelta pre- |
quest’ultimo caso sul |
|
|
|
||||||
|
|
|
|
|||||||
|
mendo il tasto A.Il simbolo |
display appare la scritta |
|
|
|
|||||
|
appare sul display ed il |
OFF per 3 secondi) |
|
|
|
|
||||
|
forno |
inizia |
la |
cottura. |
• La durata cottura può esse |
|
|
|
||
|
Se la funzione non viene |
azzerata in ogni momento |
|
|
|
|||||
|
confermata premendo |
il |
riportando il selettore |
|
|
|
||||
|
tasto A il forno si ferma dopo |
funzioni su ‘0’. |
|
|
|
|
||||
|
1 minuto e sul display appare la scritta END, per azzerare riportare il selettore funzioni |
|
|
|||||||
|
su ‘0’ (appare la scritta OFF per 3 secondi) |
|
|
|
|
|||||
|
NOTA: la massima durata impostabile è 10 ore, la minima 2 minuti. |
|
|
|||||||
|
•Viene utilizzata in abbina- |
• All’ora definita il forno si |
• Permette di impostare un |
• Questa funzione è utiliz- |
||||||
|
mento con la durata della |
spegne automaticamente e |
ora di fine cottura |
zata in combinazione con |
||||||
|
cottura |
|
|
|
sul display appare la scritta |
• Il tempo rimanente viene |
la durata della cottura. Per |
|||
|
•Dopo aver girato il selettore |
END, viene emesso un |
mostrato sul display |
esempio il |
cibo deve |
|||||
|
funzioni su una funzione di |
segnale sonoro per |
1 |
• Per visualizzare la tempe- |
cuocere per 45 minuti e si |
|||||
|
cottura (diversa da |
o |
minuto. |
|
ratura impostata premere il |
desidera sia pronto alle |
||||
|
) ed aver impostato |
|
• Per fermare prima |
il |
tasto F |
12:30. Selezionare la |
||||
|
una durata della cottura |
segnale sonoro premere |
• Per modificare l’ora di fine |
funzione di cottura, impo- |
||||||
|
(come indicato |
sopra) |
qualsiasi tasto oppure |
cottura premere il tasto C |
stare la durata della cottura |
|||||
|
•Impostare l’ora |
di fine |
riportare il selttore funzioni |
e poi i tasti E o F |
a 45 minuti e la fine cottura |
|||||
|
cottura come |
segue: |
su ‘0’ (in quest’ultimo caso |
|
alle 12:30. |
|
||||
|
- premere il tasto C |
|
sul display appare la scritta |
|
• La cottura parte automati- |
|||||
|
- premere i tasti E o F per |
OFF per 3 secondi) |
|
|
camente alle 11:45 (12:30 |
|||||
FINE |
impostare l’ora desiderata |
• La cottura può esse fermata |
|
meno 45 minuti); al termine |
||||||
- confermare |
la |
scelta |
in ogni momento riportando |
|
della cottura il forno si |
|||||
COTTURA |
premendo il |
tasto A. Il |
il selettore funzioni su ‘0’. |
|
spegne automaticamente. |
|||||
|
simbolo ‘A’ appare sul |
|
|
|
ATTENZIONE: se viene |
|||||
|
display ed il forno si mette |
|
|
|
||||||
|
in attesa. |
|
|
|
|
|
|
impostata un ora di fine |
||
|
•Sul |
display |
vengono |
|
|
|
cottura senza impostare |
|||
|
visualizzati alternativa- |
|
|
|
una durata il forno parte |
|||||
|
mente la temperatura di |
|
|
|
immediatamente e si |
|||||
|
cottura e l’ora di fine cottura |
|
|
|
spegne solo all’ora di fine |
|||||
|
•All’ora definita il forno si |
|
|
|
cottura impostata |
|||||
|
accende, sul |
display |
si |
|
|
|
|
|
||
|
spegne il simbolo ‘A’ e si |
|
|
|
|
|
||||
|
accende il simbolo |
|
|
|
|
|
|
|||
|
|
|
|
|
|
|
||||
|
Se la funzione non viene confermata premendo il tasto A il forno si ferma dopo 1 |
|
|
|||||||
|
minuto e sul display appare la scritta END, per azzerare riportare il selettore funzioni |
|
|
|||||||
|
su ‘0’ (appare la scritta OFF per 3 secondi) |
|
|
|
|
|||||
|
NOTA: la massima durata impostabile è 23 ore 59 minuti. |
|
|
|||||||
ATTENZIONE: quando il programmatore è in modalità di attesa (cottura ritardata), il display mostra alternativamente la temperatura impostata ed il tempo
NB: in ogni momento durante la cottura è possibile visualizzare la temperatura impostata premendo il tasto F
4 IT
ISTRUZIONI PER L’USO
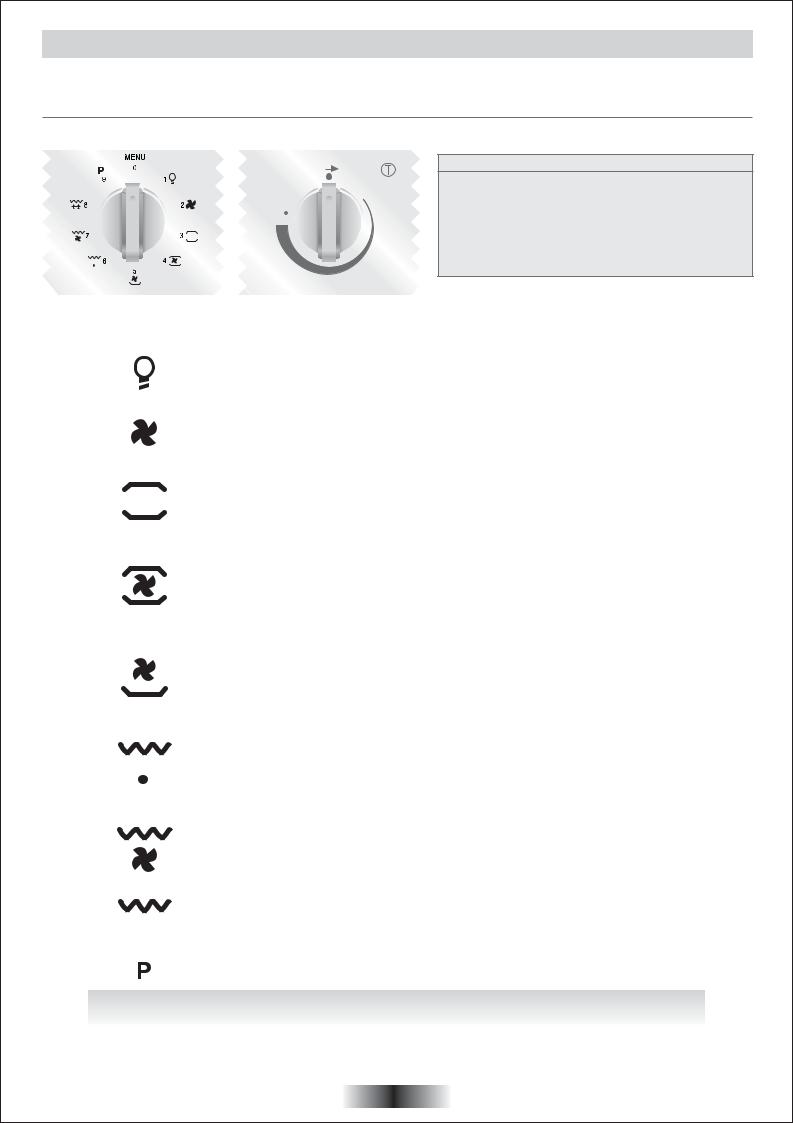
La nostra gamma comprende estetiche diverse con colori diversi. Per poter individuare le caratteristiche tecniche e funzionali relative al modello del forno che avete appena acquistato seguite gli schemi sotto riportati.
Alcuni modelli sono dotati di manopole a scomparsa, estrarle premendo per poterle ruotare . Durante il funzionamento del forno la luce interna rimane accesa.
Esempio manopola |
Esempio manopola |
commutatore |
termostato |
|
MAX |
ATTENZIONE:
Qualsiasi impostazione del forno (tempo, temperatura, ..) DEVE essere confermata premendo il tasto A. In caso contrario il forno si spegne dopo un minuto e compare la scritta END sul display. Riportare il selettore funzioni su ‘0’, la scritta OFF compare sul display per 3 secondi, allo spegnimento della scritta OFF è possibile reimpostare il forno.
Manopola |
Tempera- |
Manopola |
Funzione |
|||||||
tura pro- |
||||||||||
commutatore |
termostato |
|||||||||
|
|
|
|
|
|
|
posta |
|
|
|
|
|
|
|
|
|
|
|
|
Accende la luce interna. |
|
|
|
|
|
|
|
|
|
|
Viene inserito anche il ventilatore di raffreddamento (solo per i modelli |
|
|
|
|
|
|
|
|
|
|
raffreddati) |
|
|
|
|
|
|
|
|
|
|
SCONGELAMENTO |
|
|
|
|
|
|
|
|
|
|
Utilizzo della turbina di cottura. Questa funzione permette di scongelare |
|
|
|
|
|
|
|
|
|
|
rapidamente prima della cottura. |
|
|
|
|
|
|
|
|
|
|
|
|
|
|
|
|
|
|
|
|
|
CONVEZIONE NATURALE |
|
|
|
|
|
|
|
|
220 |
50 280 |
Sfrutta il calore prodotto contemporaneamente dalla resistenza superiore ed |
|
|
|
|
|
|
|
|
inferiore. Dopo aver preriscaldato il forno per circa 10 minuti, è il modo di |
|||
|
|
|
|
|
|
|
|
|
cottura ideale per arrostire carni rosse, roast beef, cosciotti di agnello, per |
|
|
|
|
|
|
|
|
|
|
cuocere pane e biscotti. Posizionate il ripiano a metà del forno. |
|
|
|
|
|
|
|
|
|
|
|
|
|
|
|
|
|
|
|
|
|
CONVEZIONE FORZATA |
|
|
|
|
|
|
|
|
|
|
Utilizza entrambe le resistenze insieme con la ventilazione. Questa funzione |
|
|
|
|
|
|
|
|
|
|
è raccomandata per pollame, pasticceria, pesce e verdure. Grazie alla |
|
|
|
|
|
|
|
|
200 |
50 280 |
circolazione forzata il calore penetra meglio nel cibo ed il tempo |
|
|
|
|
|
|
|
|
di cottura e di riscaldamento è inferiore. Si possono inoltre cuocere pietanze |
|||
|
|
|
|
|
|
|
|
|
||
|
|
|
|
|
|
|
|
|
diverse contemporaneamente, poichè la distribuzione del calore non mescola |
|
|
|
|
|
|
|
|
|
|
gli odori tra loro. Calcolare 10 minuti in più quando si cucinano differenti piatti |
|
|
|
|
|
|
|
|
|
|
contemporaneamente. |
|
|
|
|
|
|
|
|
|
|
VENTILAZIONE E RESISTENZA SUOLA |
|
|
|
|
|
|
|
|
|
|
Utilizzo della resistenza di suola e della ventilazione. É il metodo ideale per |
|
|
|
|
|
|
|
|
160 |
50 280 |
cuocere crostate e paté. Evitando l'essiccazione delle pietanze, è |
|
|
|
|
|
|
|
|
particolarmente adatto per dolci che devono lievitare, per pasta di pane e |
|||
|
|
|
|
|
|
|
|
|
altre pietanze simili. Per sfruttare questa funzione vi consigliamo di mettere |
|
|
|
|
|
|
|
|
|
|
la teglia al livello più basso. Per questo modo di cottura il forno necessita un |
|
|
|
|
|
|
|
|
|
|
preriscaldamento in convezione forzata di una decina di minuti. |
|
|
|
|
|
|
|
|
|
|
GRILL: l'utilizzo del grill richiede la porta chiusa. |
|
|
|
|
|
|
|
|
|
|
Utilizza unicamente la resistenza superiore del forno. La funzione grill puo |
|
|
|
|
|
|
|
|
Livello 5 |
1 5 |
essere regolata in intensità in funzione dell'alimento da cucinare. É la funzione |
|
|
|
|
|
|
|
|
ideale per la carne alla griglia, gli spiedini e le verdure gratinate. Le carni |
|||
|
|
|
|
|
|
|
|
|
rosse e il pesce devono essere poste sulla griglia posizionando |
|
|
|
|
|
|
|
|
|
|
al di sotto la leccarda. Le carni bianche debbono essere poste più lontano |
|
|
|
|
|
|
|
|
|
|
al grill, la cottura sarà più lunga ma la carne risulterà più saporita. |
|
|
|
|
|
|
|
|
|
|
|
|
|
|
|
|
|
|
|
|
|
TURBO-GRILL: l'utilizzo del turbo-grill richiede la porta chiusa. |
|
|
|
|
|
|
|
|
|
|
Utilizzando la ventilazione e la resistenza cielo contemporaneamente. |
|
|
|
|
|
|
|
|
200 |
50 280 |
Si cuociono perfettamente grandi pezzi di cibo, come arrosti, pollame, ecc.. |
|
|
|
|
|
|
|
|
Mettete la griglia a metà del forno e posizione la leccarda |
|||
|
|
|
|
|
|
|
|
|
||
|
|
|
|
|
|
|
|
|
sotto di essa per raccogliere i grassi. Assicuratevi che il cibo non sia troppo |
|
|
|
|
|
|
|
|
|
|
vicino al grill. Girate la carne a metà cottura. |
|
|
|
|
|
|
|
|
|
|
|
|
|
|
|
|
|
|
|
Livello 5 |
1 5 |
GRILL PIÙ GIRARROSTO |
|
|
|
|
|
|
|
|
Inserimento resistenza grill e motorino girarrosto. |
|||
|
|
|
|
|
|
|
|
|
Serve per effettuare cotture allo spiedo. |
|
|
|
|
|
|
|
|
|
|
|
|
|
|
|
|
|
|
|
|
|
Pirolisi |
|
|
|
|
|
|
|
|
|
|
|
|
ATTENZIONE: per tutte le funzioni di cottura il tempo preimpostato é 150 minuti, regolabile da 2 minuti a 10 ore.
*Programma di prova secondo CENELEC EN 50304.
**Programma di prova secondo CENELEC EN 50304 utilizzato per la definizione della classe energetica.
5 IT

CONSIGLI PER LA COTTURA
Le temperature ed i tempi di cottura vengono forniti a titolo indicativo per facilitare l'uso del forno. L'esperienza personale dovrebbe permettere di adattare le ricette ad i gusti ed alle abitudini personali.
Ricordate che la cottura a temperature elevate puó causare schizzi di liquidi ed il forno sporcandosi puó produrre fumo. Vi consigliamo di ridurre la temperatura di cottura, anche se ció significa allungarne la durata.
Le pareti del forno sono dotate di supporti per le griglie a differenti livelli.
PESCE
Piatto |
Modo |
Quantità |
°C |
Tempo |
Posizione |
|
cottura |
cottura |
di cottura |
griglia |
|||
|
|
|||||
Spigola o Orata |
Convezione Naturale |
1kg intero |
220° C |
30 minuti |
1 |
|
|
|
|
|
|
|
|
Coda di rospo |
Convezione Naturale |
1kg brasato |
220° C |
30 minuti |
1 |
|
|
|
|
|
|
|
|
Filetto di sogliola |
Convezione Forzata |
6 pezzi |
160° C |
15-20 minuti |
1 |
|
|
|
|
|
|
|
|
Pesce alla griglia |
Grill |
6 filetti |
275° C |
2x5 minuti |
4 |
|
|
|
|
|
|
|
VERDURE - ALTRI PIATTI
Piatto |
Modo |
Quantità |
°C |
Tempo |
Consigli |
|
cottura |
cottura |
di cottura |
||||
|
|
|
||||
Cavolo al forno |
Convezione Naturale |
per 6 |
200-220° C |
1 ora |
|
|
|
|
|
|
|
|
|
Paté in crosta |
Convezione Naturale |
|
200-220° C |
1 ora/kg |
|
|
Cicoria con |
|
|
|
|
|
|
Convezione Forzata |
per 6 |
180-200° C |
25-30 min |
|
||
emmental |
|
|||||
|
|
|
|
|
||
Soufflé |
Convezione Forzata |
per 6 |
180-200° C |
50-60 min |
Ø 22 |
|
salatini/dolci |
||||||
|
|
|
|
|
||
Pomodori al forno |
Convezione Forzata |
6-8 pezzi |
200-220° C |
40-45 min |
|
|
|
|
|
|
|
|
|
Flan di pere |
Suola ventilata |
per 6 |
220° C |
35-40 min |
|
|
|
|
|
|
|
|
|
“Quiche Lorraine” |
Suola ventilata |
6 pers. |
220° C |
45-50 min |
|
|
“Gratin dauphinois” |
|
|
|
|
|
|
Turbogrill |
6 porzioni |
200° C |
45 min |
Piatto ovale |
||
|
|
|
|
|
|
Tutte le cotture si fanno con la griglia al livello ‘1’, eccetto quelle indicate con ‘*’ che richiedono il posizionamento della griglia al livello centrale
6 IT

CARNE
É consigliabile salare la carne solo a fine cottura, poiché il sale favorisce la fuoriscita dei grassi, il forno si sporca più facilmente e produce più fumo. Gli arrosti di carne bianca, vitello, agnello e pesce possono essere messi nel forno freddo. La cottura risulterà più lunga ma il cibo verrà cotto uniformemente anche nel suo interno.
Per la carne rossa, un buon preriscaldamento del forno è alla base di una cottura migliore.
PER GRIGLIARE
•Prima d'infornare: tirate fuori la carne dal congelatore qualche ora prima di grigliarla. Poggiatela su fogli di carta da cucina per migliorare il gusto ed impedire che la carne rimanga fredda al suo interno. Aggiungete pepe e spezie prima di grigliare ma ricordatevi di salare solamente a fine cottura. Cosí la carne resterà morbida e saporita. Ungete tutta la carne da cuocere con un po' d'olio, possibilmente con un pennello da cucina. Aggiungete ancora un po' di aromi e di pepe. Mettete il piatto nel forno. Girate la carne a metà cottura senza bucarla.
•Durante la cottura: non bucate mai il cibo mentre cuoce, o mentre lo si gira: i grassi e l'acqua della carne escono ed il cibo diventa asciutto.
Piatto |
Modo |
Quantità |
°C |
Tempo |
Consigli |
|
cottura |
cottura |
di cottura |
||||
|
|
|
||||
Anatra |
Convezione Naturale |
1,5 kg |
200-220° C |
1 ora 30 min. |
|
|
|
|
|
|
|
|
|
Tacchino |
Convezione Naturale |
5/6 kg |
160-180° C |
2 ore 30 - 3 ore |
|
|
|
|
|
|
|
|
|
Oca |
Convezione Naturale |
3/4 kg |
160-180° C |
2 - 2 ore 30 min. |
|
|
|
|
|
|
|
|
|
Cosciotto agnello |
Convezione Naturale |
|
200-220° C |
15 min. per 1/2 kg |
|
|
|
|
|
|
|
|
|
Pollo arrosto |
Convezione Naturale |
1/1,5 kg |
220° C |
circa 1 ora |
|
|
|
|
|
|
|
|
|
Roast beef |
Convezione Naturale |
|
240° C |
15 min per 1/2 kg |
|
|
|
|
|
|
|
|
|
Coniglio arrosto |
Convezione Forzata |
800-1 kg |
200-220° C |
50-60 min |
|
|
|
|
|
|
|
|
|
Manzo |
Girarrosto |
1kg |
275° C |
15-20 min |
senza preriscaldam. |
|
|
|
|
|
|
|
|
Agnello / Montone |
Girarrosto |
1 kg |
275° C |
20-25 min |
senza preriscaldam. |
|
|
|
|
|
|
|
|
Kebab |
Grill |
6 pezzi |
275° C |
2x8 min |
Girare a metà |
|
cottura |
||||||
|
|
|
|
|
||
Costolette di maiale |
Grill |
6 pezzi |
275° C |
2x8 min |
Girare a metà |
|
cottura |
||||||
|
|
|
|
|
Ogni ricetta va cucinata con la griglia posizionata sul livello "1".
DOLCI
Evitate di utilizzare degli stampi lucidi perché questi riflettono il calore e possono bruciare l'esterno del dolce. Se la doratura del dolce fosse troppo rapida, ricoprirlo con un foglio di carta da forno o di alluminio. Attenzione : usate il foglio d'alluminio dalla parte giusta: la parte lucida deve essere rivolta verso il dolce. In caso contrario il calore sarà riflesso e non penetrerà all'interno dell'alimento. Evitate di aprire la porta del forno durante i primi 20-25 minuti di cottura altrimenti tutti dolci che richiedono une lievitazione durante la cottura come soufflés, brioches, etc. si sgonfieranno immediatamente. Per controllare la cottura, pungete il centro del dolce con la punta di una lama di coltello. Se una volta estratta sarà pulita, allora il dolce è cotto ed è possibile fermare la cottura. Nel caso in cui la punta della lama rimanga umida, o con dei residui di pasta, continuate la cottura abbassando leggermente la temperatura per evitare che il dolce si bruci esternamente.
Piatto |
Modo |
Quantità |
°C |
Tempo |
Livello |
Consigli |
|
di cottura |
di cottura |
di cottura |
griglia |
||||
|
|
|
|||||
Brioche |
Convezione Forzata |
800 grs |
200° C |
40-45 min |
1 |
|
|
|
|
|
|
|
|
|
|
Pan di spagna |
Convezione Forzata |
|
180-200° C |
30-35 min |
1 |
Ø 27 |
|
|
|
|
|
|
|
|
|
Bigné |
Convezione Forzata |
40 pezzi |
190° C |
35 min |
1 / 3 |
2 teglie* |
|
|
|
|
|
|
|
|
|
Base per torta |
Convezione Forzata |
per 6 |
180-200° C |
20-30 min |
1 |
Ø 27 |
|
|
|
|
|
|
|
|
|
Pasta sfoglia |
Convezione Forzata |
6 pezzi |
200° C |
15-20 min |
1 |
|
|
|
|
|
|
|
|
|
|
Meringhe |
Suola ventilata |
1 teglia |
80-85° C |
4 h 30 |
1 |
|
|
|
|
|
|
|
|
|
* con la ventilazione e la resistenza suola, raccomandiamo il preriscaldamento per risparmiare tempo.
7 IT

GENERAL WARNINGS
• Read the instructions carefully to make the most of your oven. We recommend you keep the instructions for installation and use for later reference, and before installing the oven, note its serial number below in case you need to get help from the after-sales service.
When you have unpacked the oven, make sure that it has not been damaged in any way. If you have any doubts at all, do
not use it: contact a professionally qualified person. Keep packing materials such as plastic bags, polystyrene, or nails out of the reach of children because they are dangerous for children.
The company shall not be liable if the instructions provided in this document are not complied with.
DECLARATION OF COMPLIANCE
•The parts of this appliance that may come into contact with foodstuffs comply with the provisions of EEC Directive 89/109. This appliances complies with Directives 89/336/EEC, 73/23/EEC and following changes.
SAFETY HINTS
•The oven must be used only for the purpose for which it was designed: it must only be used for cooking food.
Any other use, e.g. as a form of heating, is an improper use of the oven and is therefore dangerous.
•The manufacturers cannot be held responsible for any damage caused by improper, incorrect or unreasonable use.
When using any electrical appliance you must follow a few basic rules.
-Do not pull on the power cable to remove the plug from the socket.
-Do not touch the oven with wet or damp hands or feet.
-Do not use the oven unless you are wearing something on your feet.
-Do not allow children or irresponsible people to use the oven unless they are carefully supervised.
-It is not generally a good idea to use adapters, multiple sockets for several plugs or cable extensions.
-If the oven breaks down or develops a fault switch it off at the mains and do not touch it.
•If the cable is damaged it must be replaced promptly.
When replacing the cable, follow these instructions. Remove the power cable and replace it with one of the HO5RR- F, H05VV-F, H05V2V2-F type. The cable must be able to bear the electrical current required by the oven. Cable replacement must be carried out by properly qualified technicians. The earthing cable (yellow-green) must be 10 mm longer than the power cable.
Use only an approved service centre for repairs and ensure that only original parts are used. If the above instructions are not adhered to the manufacturers cannot guarantee the safety of the oven.
•The oven you have just acquired has the described technical characteristics and you must not make any modifications to it.
•Never use a steam or high-pressure spray to clean the oven.
•Do not store flammable products in the oven; they can catch fire if the oven comes on accidentally.
•Do not press on and do not let children sit on the oven door.
•Use kitchen oven gloves, when putting into or removing a dish from the oven.
RECOMMENDATIONS
•After each use of the oven, a minimum of cleaning will help keep the oven perfectly clean.
•Do not line the oven walls with aluminium foil or single-use protection available from stores. Aluminium foil or any other protection, in direct contact with the hot enamel, risks melting and deteriorating the enamel of the insides.
•In order to prevent excessive dirtying of your oven and the resulting strong smoky smells, we recommend not using the oven at too high a temperature. It is better to extend the cooking time and lower the temperature a little.
•In addition to the accessories supplied with the oven, we advise you only use dishes and baking moulds resistant to very high temperatures.
•Identification plate (located on the side of the oven)
INSTALLATION
Installation is the customer’s responsibility. The manufacturers have no obligation to carry this out. If the assistance of the manufacturer is required to rectify faults arising from incorrect installation, this assistance is not covered by the guarantee. The installation instructions for professionally qualified personnel must be followed. Incorrect installation may cause harm or injury to people, animals or belongings. The manufacturer cannot be held responsible for such harm or injury.
The kitchen unit in which the oven is to be fitted must be made of material resistant to temperatures of at least 70°C.
The oven can be located high in a column or under a worktop.
Before fixing: you must ensure good ventilation in the oven space to allow proper circulation of the fresh air required for cooling and protecting the internal parts. Make the openings specified on last page according to the type of fitting.
ELECTRICAL CONNECTION
THE ELECTRICAL CONNECTION SHOULD BE CARRIED OUT BY AN APPROVED CONTRACTOR OR TECHNICIAN WITH SIMILAR QUALIFICATIONS.
The installation receiving the appliance must comply with the standard in force in the installation country.
The manufacturer does not accept any responsibility if this provision is not complied with.
Connection to the network must be by earthed socket outlet, or by means of a multipole circuit-breaker having a distance between contacts of at least 3 mm.
The installation must be protected by suitable fuses, and have wires with a large enough cross-section to supply the oven normally.
CONNECTION:
The oven is fitted with a power lead for connecting exclusively to a voltage of 230 V AC across the phases or across phase and neutral.
Connection must be carried out having first checked:
. the supply voltage indicated on the meter,
. the circuit-breaker setting.
The lead protection wire (green/yellow) connected to the earth terminal of the oven must be connected to the earth terminal of the installation.
Caution:
. Have the earth continuity of the installation checked by an electrician before making the connection.
. The manufacturer will not be liable for any incident, or the possible consequences that may arise from the use of the oven not earthed, or connected to an earth with defective continuity.
NB: Do not forget that the oven may require after-sales service. Also, locate the socket outlet so that the oven can be connected once it is removed from its space.
Power supply cable: if the power supply cable has to be changed, please have this done by the after-sales service or by someone with similar qualifications.
8 GB
OVEN EQUIPMENT
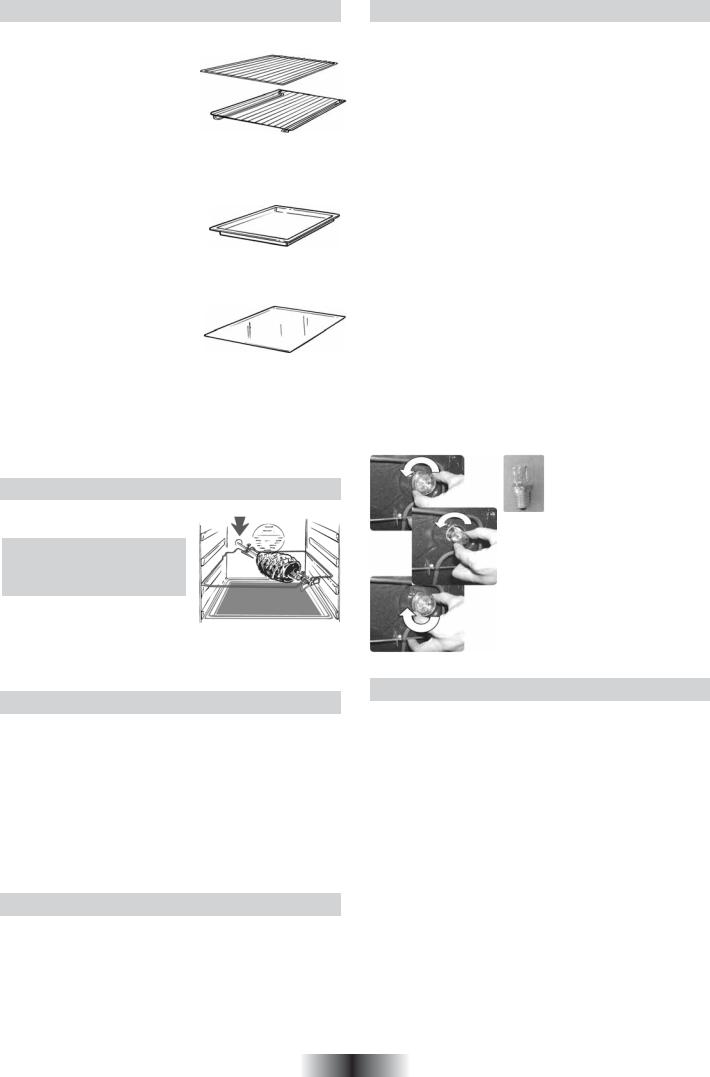
The simple shelf can take moulds and dishes.
The tray holder shelf is especially good for grilling things. Use it with the drip tray.
The special profile of the shelves means they stay horizontal even when pulled right out. There is no risk of a dish sliding or spilling.
The drip tray catches the juices from grilled foods. It can be put on a shelf, or slid under the rails. It is only used with the Grill, Rotisserie, or Fan Assisted Grill; remove it from the oven for other cooking methods.
Never use the drip tray as a roasting tray as this creates smoke and fat will spatter your oven making it dirty.
The pastry tray must be placed on the shelf. It is for cooking small pastries like choux, biscuits, meringues, etc...
Never place the pastry tray directly on the oven bottom.
When the oven is in use, any unused accessories should be removed from the oven.
THE TURNSPIT
No preheating is required for Rotisserie cooking. Rotisserie cooking is done with the door closed.
CLEANING THE OVEN
. Wait for the oven to cool down before doing any cleaning by hand.
. Never clean your oven with abrasive cleaners, wire wool or sharp objects, or the enamel may be damaged beyond repair.
. Only use soapy water or bleach (ammonia) cleaners.
GLASS PARTS
We recommend you wipe clean the glass door with absorbent kitchen paper every time you use the oven. If the spattering is heavy, then you can clean with a well squeezed sponge and detergent, and rinse. Never use abrasive cleaners or sharp objects.
OVEN DOOR SEAL
If this gets dirty, clean the oven seal with a slightly damp sponge.
ACCESSORIES
Clean them with a sponge soaked in soapy water. Rinse with clean water and dry off. Avoid abrasive cleaners.
DRIP TRAY
After grilling, remove the drip tray from the oven. Take care to pour the warm grease into a container. Wash and rinse the drip tray in hot water with a sponge soaked in washing up liquid. If residues remain attached, soak them off in water and detergent. It can also go in a dish washer or be cleaned with a commercial oven cleaner.
Never placer a soiled drip tray in the oven. Never leave the drip tray in during pyrolysis.
OVEN LIGHTING
Disconnect the power supply from the oven before cleaning or replacing the lamp.
The bulb and its cover are made of material resistant to high temperatures.
Bulb characteristics:
230 V AC - 25 W - E 14 base - Temperature 300°C
To change a defective bulb, just
. unscrew the glass cover,
. unscrew the bulb,
. replace it with the same type: see characteristics above,
. after replacing the defective bulb, screw back the protective glass cover.
GRILLING
Grilling makes it possible to give food a rich brown colour quickly. For browning we recommend that you insert the grill onto the fourth level, depending on the proportions of the food (see fig. page 13).
Almost all food can be cooked under the grill except for very lean game and meat rolls.
Meat and fish that are going to be grilled should first be lightly doused with oil.
COOKING TIME
For recommended cooking times and temperatures the first time you use the oven, refer to the tables on pages 13 - 14. You may then wish to vary these times and settings in the light of your own experience.
SELF-CLEANING OVEN WITH CATALYTIC
Special self-cleaning panels covered in a micro-porous coating are available as optional extras for all models. If they are fitted, the oven no longer needs to be cleaned by hand. The fat that is splattered onto the sides of the oven during roasting is eliminated by the microporous coating which breaks the fat down by catalysis and transforms it into gas.
Excessive splattering may nevertheless block the pores and therefore hinder self-cleaning. The self-cleaning capacity may be restored by switching on the empty oven to maximum for about 10-20 minutes.
Do not use abrasive products, metal cleaning wads, sharp objects, rough cloths, or chemical products and detergents that may permanently damage the catalytic lining.
It is a good idea to use deep roasting trays to roast fatty foods such as joints of meat etc. and to put a tray underneath the grill to catch surplus fat.
If the walls of the oven are so thickly coated in grease that the catalytic lining is no longer effective remove surplus grease with a soft cloth or sponge soaked in hot water.
The lining must be porous for self-cleaning to be effective.
N.B.: All catalytic linings currently on the market have a working life of about 300 hours. They should therefore be replaced after about 300 hours.
9 GB
CLEANING THE OVEN : PYROLYSIS
Pyrolysis is a cleaning method that uses high temperatures to destroy dirt.
The resulting smoke is cleaned by the passage of a catalyser. The oven door is provided with a safety lock that prevents it being opened during pyrolysis due to the necessity of high temperatures. The pyrolysis cycle may result in a slight odour in the kitchen which will be more or less noticeable depending on the latter’s aeration.
IMPORTANT:
Before carrying out pyrolysis:
•Take all accessories out of the oven as they will be damaged in the high pyrolysis temperatures;
•Clean away all excess food spills or large scraps of food which would take too long to be destroyed. Effectively, large amounts of grease may catch fire under the intense heat emitted by pyrolysis.
•Close the oven door.
. If you have an hob top installed above the oven, never
use the gas burners or the electric plates during pyrolysis to avoid excessive heating of the oven’s control panel.
. It is strongly advised not to use detergents or any other recommended product for cleaning ovens .
•Open the oven door.
Pyrolysis leaves a white residue on the oven walls. Wait for the oven to cool completely then clean the inside of the oven with a damp sponge to wipe off the residue.
Remarks:
•you will save energy by cleaning directly after cooking thus making use of the residual heat in the oven.
•The cooling fan operates from the start of the pyrolysis.
•The cooling fan only stops when the oven parts are sufficiently cooled.
Activating the pyrolysis cycle
1.Rotate the function selector to the position P
2.The preset time is 1.30 hrs, this can be varied from 10 minutes to two hours via the programmer (buttons B+ E or F). If the oven is very dirty it is recommended to increase the time to 2 hrs., if the oven is moderately dirty reduce the cleaning cycle time to 1 hr.
3.It is possible to defer the start time of the pyroclean cycle by changing the END time via the programmer (buttons C + F)
4.Confirm the setting by pressing the button A on the programmer
– WARNING: THE CLEANING CYCLE WILL NOT START
UNLESS THE CONFIRM BUTTON A HAS BEEN PRESSED.
5.The pyroclean cycle can be stopped at any time by turning the function selector back to ‘0’ (the word OFF will be displayed for 3 seconds)
6.Once the pyro cycle parameters have been set and confirmed it is not possible to modify them. To change it is necessary to start from the beginning by cancelling the cycle ( turn selector to ‘0’ and ‘OFF’ will appear for 3 seconds ) and start again from point 1.
SERVICE CENTRE
Before calling the Service Centre
If the oven is not working, we recommend that:
• you check that the oven is properly plugged into the power supply.
If the cause of the fault cannot be detected:
disconnect the oven from the mains, do not touch the oven and call the after sales service.
Before calling the Service Centre remember to make a note of the serial number on the serial number specifications plate.
The oven is supplied with a guarantee certificate that ensures that it will be repaired free of charge by the Service Centre whilst under guarantee.
This appliance is marked according to the European directive 2002/96/EC on Waste Electrical and Electronic Equipment (WEEE). By ensuring this product is disposed of correctly, you will help prevent potential negative
consequences for the environment and human health, which could otherwise be caused by inappropriate waste handling of this product. The symbol on the product indicates that this product may not be treated as household waste.
Instead it shall be handed over to the applicable collection point for the recycling of electrical and electronic equipment Disposal must be carried out in accordance with local environmental regulations for waste disposal.
For more detailed information about treatment, recovery and recycling of this product, please contact your local city office, your household waste disposal service or the shop where you purchased the product.
10 GB
USE OF THE ELECTRONIC PROGRAMMER
WARNING: The oven will work only once the time has been set.. SETTING THE CORRECT TIME The oven will not work if the clock is showing a pulsating 


 .
.
The time can only be set with the function selector in the 0 position .
• Setting the TIME
Press the button ‘E’ or ‘F’ to set the time. The display will show hh :mm ( 24 hours) the range is between 0 :00 and 23.59. After 3 second have elapsed from releasing the buttons to change the time press the button ‘D’ hold for 5 seconds and press ‘E’ or ‘F’. The new time will now be set.
FUNCTION |
|
|
HOW TO |
|
HOW TO SWITCH |
WHAT IT DOES |
WHAT IT IS FOR |
||||||
|
ACTIVATE IT |
|
IT OFF |
|
|
||||||||
|
|
|
|
|
|
|
|
||||||
|
• |
Press the button |
D |
• At the end of the set time |
• Sounds an alarm at the |
• Allow to use the oven as |
|||||||
|
• Press the buttons |
E or F |
the programmer |
will |
end of the set time |
|
alarm clock. |
||||||
|
to set the duration time |
activate an audible alarm |
• To check how long is left |
• Can only be used with the |
|||||||||
|
• Release the buttons. |
which will ring for 1minute; |
press the button D |
|
oven switched off |
||||||||
MINUTE |
• After |
three seconds the |
to stop the alarm press any |
|
|
|
|||||||
|
|
symbol will be di- |
button. |
|
|
|
|
|
|
|
|||
MINDER |
splayed and countdown |
• The minute minder |
is |
|
|
|
|||||||
|
will commence. |
|
|
automatically |
set |
to |
0 |
|
|
|
|||
|
• The display will indicate the |
whenever another function |
|
|
|
||||||||
|
correct time of the day. |
is selected. |
|
|
|
|
|
|
|||||
|
|
|
|
|
|
|
|||||||
|
• Turn |
the function selector |
• When the time has elapsed |
• It allows to preset the |
|
• For cooking the desired |
|||||||
|
to a cooking function (either |
the oven will switch off |
cooking time required for |
recipes. |
|||||||||
|
than |
or |
). The |
automatically; the display |
the recipe chosen. |
|
|
||||||
|
display will show the re- |
will show the word "END" |
• The cooking time left to run |
|
|||||||||
|
commended temperature |
and an audible alarm is |
is shown on the display. |
|
|||||||||
|
and cooking time.. |
|
activated |
for 1 minute; |
• To view the temperature |
|
|||||||
|
• The preset cooking time |
• the alarm can be stopped |
set, press the button F |
|
|||||||||
|
can be modified as follows. |
by pressing any button or |
• To change the cooking |
|
|||||||||
|
- Press the button B |
|
by turning the |
function |
time/duration, press the |
|
|||||||
COOKING TIME |
- Press the buttons E or F to |
control back to “0”. In the |
button B and then press |
|
|||||||||
DURATION |
set the cooking time. |
latter ‘OFF’ will be lit for |
the buttons E or F |
|
|
||||||||
- Confirm your choice by |
3 seconds. |
|
|
|
|
|
|
||||||
|
|
|
|
|
|
|
|||||||
|
pressing the button A; the |
• To stop |
the |
cooking |
|
|
|
||||||
|
‘ |
’ |
symbol will appear |
function |
early |
turn |
the |
|
|
|
|||
|
on the display and the oven |
function control back to |
|
|
|
||||||||
|
will begin cooking. |
|
“0”. |
|
|
|
|
|
|
|
|||
|
|
|
|
|
|||||||||
|
If the function is not confirmed by pressing A, after 1 minute the oven switches itself |
|
|||||||||||
|
off and the display will show ‘END’, to reset turn the function selector back to 0. |
|
|||||||||||
|
This operation will be followed by the display of ‘OFF ‘which will be lit for 3 seconds. |
|
|||||||||||
|
Note:the maximum cooking duration is 10 hrs and the minimum is 2 mins. |
|
|
||||||||||
|
|
|
|
|
|||||||||
|
• To be set together with |
• At the set time the oven will |
• Enables you to set the end |
• This function is typically |
|||||||||
|
cooking time duration. |
switch off; display will show |
of cooking time. |
|
used with “cooking time” |
||||||||
|
• After turning the function |
the word "END" and an |
• The cooking time left to run |
function. For example |
|||||||||
|
selector (either than |
|
audible alarm is activated |
is shown on the display. |
if the dish has to be cooked |
||||||||
|
or |
) and after |
set- |
for 1 minute; |
|
|
|
• To view the temperature |
|||||
|
|
|
|
for 45 minutes and needs |
|||||||||
|
ting the cooking time ( as |
• the alarm can be stopped |
|||||||||||
|
set press the button |
F |
|||||||||||
|
explained above). |
|
by pressing any button or |
• To change the cooking |
to be ready by 12:30, |
||||||||
|
• Set the end of cooking |
by turning the |
function |
time/duration press |
the |
simply select the required |
|||||||
|
time as follows: |
|
|
control back to “0”. In the |
button B and then press |
function, set the cooking |
|||||||
|
- Press the button |
C |
|
latter “OFF” will be lit for |
the buttons E or F |
|
time to 45 minutes and the |
||||||
|
- Press the button |
E or F |
3 seconds. |
|
|
|
|
|
end of cooking time to |
||||
|
to set the end of cooking |
• To stop the cooking function |
|
|
|||||||||
|
|
|
12:30. |
||||||||||
|
time. |
|
|
early turn the |
function |
|
|
||||||
|
|
|
|
|
• Cooking will start automa- |
||||||||
END OF |
• Confirm your choice by |
control back |
to |
“0”. |
|
|
|||||||
pressing the button A; the |
|
|
|
|
|
|
|
tically at 11:45 (12:30 |
|||||
COOKING |
‘A’ symbol will appear on |
|
|
|
|
|
|
|
minus 45 mins) and will |
||||
|
the display and the oven |
|
|
|
|
|
|
|
continue until the pre-set |
||||
|
will |
begin wait |
mode. |
|
|
|
|
|
|
|
end-of-cooking-time, when |
||
|
• The display will alternate |
|
|
|
|
|
|
|
|||||
|
|
|
|
|
|
|
|
the oven will switch itself |
|||||
|
by showing temperature |
|
|
|
|
|
|
|
|||||
|
|
|
|
|
|
|
|
off automatically. |
|||||
|
and time set. |
|
|
|
|
|
|
|
|
|
|||
|
|
|
|
|
|
|
|
|
|
WARNING. |
|||
|
• At the set time the oven |
|
|
|
|
|
|
|
|||||
|
will switch itself on, the ‘A’ |
|
|
|
|
|
|
|
If the END of cooking is |
||||
|
symbol will go off and the |
|
|
|
|
|
|
|
selected without setting |
||||
|
‘ ’ symbol will be come |
|
|
|
|
|
|
|
the length of cooking time, |
||||
|
on. |
|
|
|
|
|
|
|
|
|
|
||
|
|
|
|
|
|
|
|
|
|
|
the oven will start cooking |
||
|
|
|
|
|
|
|
|
|
|
|
|||
|
If the function is not confirmed by pressing A after 1 minute the oven switches itself |
||||||||||||
|
immediately and it will |
||||||||||||
|
off and the display will show ‘END’,to reset turn the function selector back to “0”.This |
stop at the END of |
|||||||||||
|
opearation will be followed by the display of ‘OFF ‘which will be lit for 3 seconds. |
cooking time set. |
|||||||||||
|
Note:the maximum time which can be set with this function is+ 23h 59' |
|
|||||||||||
ATTENTION: When the programmer is in waiting mode ( delay start set ) the set temperature is displayed alternatively with time.
N.B.At any stage during cooking it is possible to check the oven temperature by pressing the button "F"
11 GB

OPERATING INSTRUCTIONS
Our range includes many different styles and colours. To find the technical specifications and functions of the model which you have bought, study the diagrams below. Some models feature push/pull knobs, press to eject before rotating. During oven operation the internal lamp is on.
Function dial |
Thermostat dial |
|
MAX |
ATTENTION:
Each oven setting, temperature/ time etc. Must be confirmed with by pressing the button "A" . Failure in confirming the setting will result in the oven turning itself off in 1 minutes and in ‘END’being displayed . Turn the funtion selector back to the “0” position ( ‘OFF’ will appear on the display ) wait approx. 3 seconds for this to stop and set the new cooking function.
Function |
T °C |
Thermostat |
Funzione |
||||||
|
|
dial |
presetted |
dial |
|||||
|
|
|
|
||||||
|
|
|
|
|
|
|
|
|
Turns on the oven light |
|
|
|
|
|
|
|
|
|
This will automatically activate the cooling fan (on fan cooled models only) |
|
|
|
|
|
|
|
|
|
|
|
|
|
|
|
|
|
|
|
DEFROST |
|
|
|
|
|
|
|
|
|
The cooking fan runs to circulate the air inside the oven. Ideal for defrosting |
|
|
|
|
|
|
|
|
|
before cooking. |
|
|
|
|
|
|
|
|
|
|
|
|
|
|
|
|
|
|
|
CONVENTIONAL COOKING |
|
|
|
|
|
|
|
220 |
50 280 |
Both top and bottom heating elements are used. Preheat the oven for about |
|
|
|
|
|
|
|
ten minutes. This method is ideal for all traditional roasting and baking. For |
||
|
|
|
|
|
|
|
|
|
seizing red meats, roast beef, leg of lamb, game, bread, foilwrapped food |
|
|
|
|
|
|
|
|
|
(papillotes), flaky pastry. Place the food and its dish on a shelf in mid position. |
|
|
|
|
|
|
|
|
|
|
|
|
|
|
|
|
|
|
|
FAN COOKING |
|
|
|
|
|
|
|
|
|
Both top and bottom heating elements are used with the fan circulating the |
|
|
|
|
|
|
|
|
|
air inside the oven. We recommend you use this method for poultry, |
|
|
|
|
|
|
|
200 |
50 280 |
pastries, fish and vegetables. Heat penetrates into the food better and both |
|
|
|
|
|
|
|
the cooking and preheating times are reduced. You can cook different foods |
||
|
|
|
|
|
|
|
|
|
|
|
|
|
|
|
|
|
|
|
at the same time with or without the same preparation in one or more positions. |
|
|
|
|
|
|
|
|
|
This cooking method gives even heat distribution and the smells are not |
|
|
|
|
|
|
|
|
|
mixed. Allow about ten minutes extra when cooking foods at the same time. |
|
|
|
|
|
|
|
|
|
FAN + LOWER ELEMENT |
|
|
|
|
|
|
|
|
|
The bottom heating element is used with the fan circulating the air inside the |
|
|
|
|
|
|
|
160 |
50 280 |
oven. This method is ideal for juicy fruit flans, tarts, quiches and pâté. |
|
|
|
|
|
|
|
|
|
It prevents food from drying and encourages rising in cakes, bread dough |
|
|
|
|
|
|
|
|
|
and other bottom-cooked food. Place the shelf in the bottom position. |
|
|
|
|
|
|
|
|
|
GRILL: use the grill with the door closed. |
|
|
|
|
|
|
|
|
|
The top heating element is used alone and you can adjust the temperature. |
|
|
|
|
|
|
|
Level 5 |
1 5 |
Five minutes preheating is required to get the elements red-hot. Success is |
|
|
|
|
|
|
|
guaranteed for grills, kebabs and au gratin dishes. White meats should be |
||
|
|
|
|
|
|
|
|
|
put at a distance from the grill; the cooking time is longer, but the meat will |
|
|
|
|
|
|
|
|
|
be tastier. You can put red meats and fish fillets on the shelf with the drip tray |
|
|
|
|
|
|
|
|
|
underneath. |
|
|
|
|
|
|
|
|
|
FAN ASSISTED GRILL: use the turbo-grill with the door closed. |
|
|
|
|
|
|
|
|
|
The top heating element is used with the fan circulating the air inside the |
|
|
|
|
|
|
|
200 |
50 280 |
oven. Preheating is necessary for red meats but not for white meats. Ideal |
|
|
|
|
|
|
|
for cooking thick food items, whole pieces such as roast pork, poultry, etc. |
||
|
|
|
|
|
|
|
|
|
Place the food to be grilled directly on the shelf centrally, at the middle level. |
|
|
|
|
|
|
|
|
|
Slide the drip tray under the shelf to collect the juices. Make sure that the |
|
|
|
|
|
|
|
|
|
food is not too close to the grill. Turn the food over halfway through cooking. |
|
|
|
|
|
|
|
|
|
ROTISSERIE: use the turnspit with the door closed. |
|
|
|
|
|
|
|
Level 5 |
1 5 |
The top heating element is used with the turnspit rotating the food to be |
|
|
|
|
|
|
|
cooked. The heating temperature can be adjusted as required. The turnspit |
||
|
|
|
|
|
|
|
|
|
is best used for medium-sized items. Ideal for rediscovering the taste of |
|
|
|
|
|
|
|
|
|
|
|
|
|
|
|
|
|
|
|
traditional roast. No preheating is required for turnspit cooking. |
|
|
|
|
|
|
|
|
|
|
|
|
|
|
|
|
|
|
|
Pyrolysis |
|
|
|
|
|
|
|
|
|
|
ATTENTION: for any cooking function the preset time is 150 minutes, adjustable from 2 minutes to 10 hours
* Tested in accordance with the CENELEC EN 50304.
**Tested in accordance with the CENELEC EN 50304 used for definition of energy class.
12 GB

COOKING TIPS
Temperatures and cooking times are given for information only to facilitate using the oven. Personal experience should then let you adapt these settings to your taste and habits. Remember that cooking at higher temperatures causes more spattering, and the oven can become dirty and smokey. It is better to slightly reduce the cooking temperature, even if it means increasing the cooking time.
The sides of the oven are equipped with different positions numbered from the bottom.
FISH
Recipes |
Cooking |
Quantity |
Cooking |
Cooking |
Shelf level |
method |
°C |
time |
|
||
|
|
|
|||
|
|
|
|
|
|
Tilefish or bream |
Conv cooking |
1kg whole |
220° C |
30 min |
1 |
|
|
|
|
|
|
Monk fish or Salmon |
Conv cooking |
1kg braised |
220° C |
30 min |
1 |
|
|
|
|
|
|
Fillet of sole |
Fan cooking |
6 pieces |
160° C |
15-20 min |
1 |
|
|
|
|
|
|
Grilled fish |
Grill |
6 fillets |
275° C |
2x5 min |
4 |
|
|
|
|
|
|
VEGETABLES - OTHERS
Recipes |
Cooking |
Quantity |
Cooking |
Cooking |
Tips |
|
method |
°C |
time |
|
|||
|
|
|
||||
|
|
|
|
|
|
|
Braised cabbage |
Conv cooking |
for 6 |
200-220° C |
1 hour |
|
|
|
|
|
|
|
|
|
Pâté en croûte |
Conv cooking |
|
200-220° C |
1 hour/kg |
|
|
|
|
|
|
|
|
|
Chicory with gruyere |
Fan cooking |
for 6 |
180-200° C |
25-30 min |
|
|
Potatoes in their |
|
|
|
|
|
|
Fan cooking |
for 6 |
200-220° |
about 1 hour |
|
||
jackets |
|
|||||
|
|
|
|
|
||
Soufflé |
Fan cooking |
for 6 |
180-200° C |
50-60 min |
Ø 22 |
|
savoury/sweet |
||||||
|
|
|
|
|
||
Stuffed tomatoes |
Fan cooking |
6-8 pieces |
200-220° C |
40-45 min |
|
|
|
|
|
|
|
|
|
Leek flan |
Fan + lower element |
for 6 |
220° C |
35-40 min |
|
|
|
|
|
|
|
|
|
Quiche Lorraine |
Fan + lower element |
for 6 |
220° C |
45-50 min |
|
|
|
|
|
|
3 min to toast one |
|
|
Toast with crottin* |
Turbo grill |
6 pieces |
210° C |
Flat steak pan |
||
side + 4 min/crottin |
All the cooking was done at shelf position "1" except cooking marked thus "*", which requires cooking at a middle position.
13 GB

MEAT
It is better not to salt meats until after cooking as salt encourages the meat to spatter fat. This will dirty the oven and make a lot of smoke. Joints of white meat, pork, veal, lamb and fish can be put into the oven cold. The cooking time is longer than in a preheated oven, but it cooks through to the centre better as the heat has more time to penetrate the joint.
Correct preheating is the basis of successful red meat cookery.
GRILLS
• Before loading the grill: remove the meat from the refrigerator a few hours before grilling. Lay it on several layers of kitchen paper: this improves seizing, making it tastier and avoids it staying cold at the centre.
Add pepper and spices to the meat before grilling, but add any salt after cooking. This way it will seize better and stay juicy. Baste all the food to be cooked with a little oil. This is best done with a wide flat basting brush. Then sprinkle with more pepper and herbs (thyme, etc.).
• During cooking: never pierce the food during cooking even when you turn it. This lets the juice out and it becomes dry.
Recipes |
Cooking |
Quantity |
Cooking |
Cooking |
Tips |
||
method |
°C |
|
time |
|
|||
|
|
|
|
||||
|
|
|
|
|
|
||
Beef with carrots |
Conv cooking |
for 6 |
200-220° C |
about 1 hours |
|
||
|
|
|
|
|
|
|
|
Duck |
Conv cooking |
1,5 kg |
200-220° C |
1 |
hours |
|
|
|
|
|
|
|
|
|
|
Turkey |
Conv cooking |
5/6 kg |
160-180° C |
2 |
- 3 hours |
|
|
|
|
|
|
|
|
||
Goose |
Conv cooking |
3/4 kg |
160-180° C |
2 - 2 hours |
|
||
|
|
|
|
|
|
||
Leg of lamb |
Conv cooking |
|
200-220° C |
15 min/pound |
|
||
|
|
|
|
|
|
||
Roast chicken |
Conv cooking |
1/1,5 kg |
220° C |
about 1 hour |
|
||
|
|
|
|
|
|
||
Roast beef |
Conv cooking |
|
240° C |
15 min/pound |
|
||
|
|
|
|
|
|
||
Roast rabbit |
Fan cooking |
800-1 kg |
200-220° C |
50-60 mins |
|
||
|
|
|
|
|
|
||
Beef |
Rotisserie |
1kg |
275° C |
15-20 min |
No preheat |
||
|
|
|
|
|
|
||
Lamb / Mutton |
Rotisserie |
1 kg |
275° C |
20-25 min |
No preheat |
||
|
|
|
|
|
|
|
|
Kebabs |
Grill |
6 pieces |
275° C |
2x8 min |
Turn over in mid |
||
cooking |
|||||||
|
|
|
|
|
|
||
Pork chop |
Grill |
6 pieces |
275° C |
2x8 min |
Turn over in mid |
||
cooking |
|||||||
|
|
|
|
|
|
||
* All cooking was done at shelf position "1".
BAKING
Avoid using shiny tins, they reflect the heat and can spoil your cakes. If your cakes brown too quickly, cover them with grease-proof paper or aluminium foil. Caution: the correct way to use foil is with the shiny side in towards the cake. If not the heat is reflected by the shiny surface and does not penetrate the food. Avoid opening the door during the first 20 to 25 minutes of cooking: soufflés, brioches, sponge cakes, etc. will tend to fall. You can check if cakes are done by pricking the centre with a knife blade or metal knitting needle. If the blade comes out nice and dry, your cake is ready and you can stop cooking. If the blade comes out moist or with bits of cake attached, continue baking but slightly lower the thermostat so that it is finished off without burning.
Recipes |
Cooking |
Quantity |
Cooking |
Cooking |
Shelf level |
Tips |
|
method |
°C |
time |
|
|
|||
|
|
|
|
||||
|
|
|
|
|
|
|
|
Brioche |
Fan cooking |
800 grs |
200° C |
40-40 min |
1 |
|
|
|
|
|
|
|
|
|
|
Choux pastry |
Fan cooking |
40 pieces |
190° C |
35 min |
1 / 3 |
2 trays |
|
Pastry base |
|
|
180-200° C |
20-30 min |
|
|
|
Fan cooking |
for 6 |
1 |
Ø 27 |
||||
|
|
|
|
|
|
|
|
Puff pastry |
Fan cooking |
6 pieces |
200° C |
15-20 min |
1 |
e.g. |
|
Bouchée |
|||||||
|
|
|
|
|
|
||
Meringues |
Fan+Lower element* |
1 tray |
80-85° C |
4 hours |
1 |
Ø profiteroles |
|
|
|
|
|
|
|
|
|
Fruit tart |
Fan+Lower element* |
for 6 |
220° C |
35-40 min |
1 |
|
|
|
|
|
|
|
|
|
|
St Honoré |
Fan+Lower element* |
6 pieces |
190° C |
30-35 min |
1 |
|
|
|
|
|
|
|
|
|
* with fan and lower element, we recommend preheating with fan cooking to save time.
14 GB

INSTRUCCIONES GENERALES
• Lea atentamente el presente manual para poder sacar el mejor partido de su horno. Le aconsejamos que conserve el manual de uso y de instalación para poder consultarlo más adelante y para anotar, antes de la instalación del horno, el número de serie del aparato para una posible intervención del servicio posventa.
Si el horno presenta cualquier fallo, no lo enchufe o desenchúfelo de la alimentación general y llame directamente a un servicio técnico homologado.
El fabricante no asume ninguna responsabilidad en caso de incumplimiento de las instrucciones contenidas en el presente manual.
DECLARACIÓN DE CONFORMIDAD
•Este aparato, en las partes destinadas a estar en contacto con los alimentos cumple la Directiva CEE 89/109.
Este aparato cumple las Directivas Europeas 89/336/CEE, 73/23/CEE y sucesivas modificationes.
INFORMACIÓN SOBRE SEGURIDAD
•Este aparato deberá destinarse únicamente al uso para el cual ha sido especialmente concebido, es decir, para la cocción de alimentos.
Cualquier otro uso (por ejemplo, calentamiento a temperatura ambiente) debe considerarse impropio, y por lo tanto peligroso.
•El fabricante declina toda responsabilidad por los posibles daños causados por el uso impropio, erróneo e irracional del aparato.
•El uso de cualquier aparato eléctrico comporta la observación de algunas reglas fundamentales. En particular:
—No tire del cable de alimentación para desenchufar el aparato.
—No toque el aparato con las manos o los pies húmedos o mojados.
—No utilice el aparato si no lleva calzado.
—No deje que los niños o las personas incapacitadas usen el
aparato sin vigilancia.
— No utilice adaptadores, ladrones ni alargadores.
—En caso de avería o de mal funcionamiento del aparato, apáguelo y no lo manipule.
En caso de deterioro del cable, sustitúyalo inmediatamente con arreglo a las siguientes indicaciones:
—saque el cable de alimentación y sustitúyalo por uno (tipo HO5RR-F, H05VV-F, H05V2V2-F) y adecuado a la potencia del aparato.
—esta operación deberá realizarla un técnico especializado. El hilo de tierra (amarillo-verde) debe ser obligatoriamente
10 mm más largo que los conductores de línea. En caso de que el aparato precise ser reparado, diríjase únicamente a un centro de asistencia técnica autorizado y exija piezas de recambio originales.
No observar todo lo mencionado puede comprometer la seguridad del aparato.
•El horno que acaba de adquirir posee unas características técnicas definidas que en ningún caso podrán ser modificadas.
•No utilice nunca un limpiador a vapor o de alta presión para limpiar el horno.
•No guarde productos inflamables dentro del horno; podrían prender si alguien pusiera en marcha involuntariamente el horno.
•No se apoye ni deje sentarse a los niños encima de la puerta del horno.
•Utilice guantes térmicos de cocina para introducir o retirar un plato del horno.
RECOMENDACIONES
•Después de cada utilización, limpie el horno superficialmente. Ello le permitirá obtener unos resultados perfectos cuando lo limpie a fondo.
•No cubra las paredes del horno con papel de aluminio o con protecciones desechables que se venden en las tiendas. El papel de aluminio o cualquier otra protección en contacto directo con el esmalte caliente podría fundirse y deteriorar el esmalte de la mufla.
•Para evitar que su horno se ensucie demasiado y que desprenda fuertes olores de humos, recomendamos no utilizarlo a una temperatura demasiado elevada. Es preferible alargar el tiempo de cocción y bajar un poco la temperatura.
•Aparte de los accesorios suministrados con el horno, le aconsejamos que utilice solamente fuentes y moldes de repostería resistentes a temperaturas muy elevadas.
Placa de señalización (situada en el lateral del horno).
INSTALACIÓN
La instalación corre a cargo del comprador y el Fabricante queda exento de este servicio; eventuales intervenciones requeridas a la Casa Constructora que dependan de una instalación incorrenta no están incluidas en la Garantia.
La instalación debe ser efectuada según las instrucciones por personal profesionalmente cualificado. Una instalación errónea puede causar daños a personas, animales o cosas, de los cuales el fabricante no puede ser considerado responsable. El mueble donde se debe empotrar el horno debe estar fabricado de un material resistente a una temperatura de 70°C como mínimo.
Se pued puede e colocar el horno en un lugar alto dentro de una columna o empotrarlo debajo de una superficie de trabajo.
Antes de fijarlo: es imprescindible garantizar una buena ventilación del hueco donde quede empotrado para permitir una buena circulación del aire fresco necesario para la refrigeración y para la protección de los órganos interiores. Para ello, realice las oberturas especificadas en la última página según el tipo de empotramiento.
CONEXIÓN ELÉCTRICA
LA CONEXIÓN ELÉCTRICA DEBE SER REALIZADA POR UN INSTALADOR HOMOLOGADO O POR UN TÉCNICO DE CALIFICACIÓN SIMILAR.
La instalación del aparato debe cumplir la normativa en vigor del país de instalación. El fabricante declina cualquier responsabilidad en caso de incumplimiento de esta exigencia.
La conexión a la red debe efectuarse a través de una toma de corriente con toma de tierra, o mediante un dispositivo con corte omnipolar que tenga una distancia de obertura de los contactos de al menos 3 mm.
Es obligatorio que la instalación quede protegida con los fusibles adecuados, debiendo incluir unos cables con sección suficiente para alimentar el aparato con toda normalidad.
CONEXIÓN:
Este aparato está equipado con un cable de alimentación que permite su conexión exclusivamente con una tensión de 230 V~ entre fases o entre fase y neutro.
La conexión se deberá realizar después de haber comprobado:
• |
la tensión de alimentación indicada en el contador, |
• |
el ajuste del disyuntor. |
El hilo de protección del cable (verde/amarillo) conectado al terminal de tierra del aparato debe estar conectado al terminal de tierra de la instalación.
Atención:
. Un profesional deberá comprobar la continuidad de la tierra de la instalación antes de proceder a la conexión.
. Declinamos toda responsabilidad ante cualquier incidente y sus posibles consecuencias que pudieran producirse debido a la utilización de un aparato no conectado a tierra, o conectado a una tierra cuya continuidad sea defectuosa.
NOTA: Recuerde que la toma de corriente debe quedar colocada de manera que pueda enchufar el horno cuando lo haya sacado del hueco donde está empotrado, por ejemplo en caso de tener que sacarlo ante una posible intervención del servicio de asistencia técnica.
Cable de alimentación: En el caso de que sea necesario cambiarlo, le aconsejamos que recurra al servicio de asistencia técnica o a una persona de calificación similar para realizar dicha operación.
15 ES
 Loading...