


INSTRUCTION BOOK GCH 980NA1T
Heat Pump Tumble Dryer
English 2
Deutsch 16
SlovenskoItaliano 3062
Français 44
Italiano 58
Español 72

INDEX
Introduction |
3 |
Delivery Information |
3 |
Safety Reminders |
3 |
Use |
4 |
Installation |
5 |
The Laundry |
5 |
Ventilation |
6 |
Environmental Issues |
7 |
Gias Service |
7 |
Electrical Requirements |
7 |
Adjusting the Feet |
7 |
Drain Hose Kit: Fitting Instructions |
8 |
Preparing the Load |
9 |
Clothes Preparation |
9 |
Do Not Tumble Dry |
9 |
Energy Saving |
9 |
Sorting the Load |
9 |
Drying Guide |
9 |
Controls and Indicators |
10 |
Selecting the Programme |
11 |
Door and Filter |
12 |
Opening the Door |
12 |
Filter |
12 |
Filter Care Indicator |
12 |
To Clean the Condenser Filter |
12 |
Water Container |
13 |
To Remove the Container |
13 |
Operation |
13 |
Delay Start Function |
14 |
Cancelling and Resetting the Programme |
14 |
Cleaning and Routine Maintenance |
14 |
Cleaning the Dryer |
14 |
Technical Specifications |
14 |
Troubleshooting |
15 |
Customer Service |
15 |
Spares |
15 |
Gias Service |
15 |
EN 2

INTRODUCTION
Please read and follow these instructions carefully and operate the machine accordingly. This booklet provides important guidelines for safe use, installation, maintenance and some useful advice for best results when using your machine.
Keep all documentation in a safe place for future reference or for any future owners.
Delivery Information
Please check that the following items are delivered with the appliance:
●Instruction manual
●Guarantee card
●Energy label
 Check that no damage has occurred to the machine during transit. If it has, call for service by GIAS.
 Failure to comply with the above can compromise the safety of the appliance. You may be charged for a service call if a problem with your machine is caused by misuse.
SAFETY REMINDERS
Use
● This appliance can be used by children aged from 8 years and above and persons with reduced physical, sensory or mental capabilities or lack of experience and knowledge if they have been given supervision or instruction concerning use of the appliance in a safe way and understand the hazards involved.
Children shall not play with the appliance. Cleaning and user maintenance shall not be made by children without supervision.
● This appliances is intended to be used in household and similar applications such as:
-Staff kitchen areas in shops, offices and other working environments;
-Farm houses;
-By clients in hotels, motels and other residential type environments;
-Bed and breakfast type environments.
A different use of this appliance from household environment or from typical housekeeping functions, as commercial use by expert or trained users, is excluded even in the above applications. If the appliance is used in a manner inconsistent with this it may reduce the life of the appliance and may void the manufacturer’s warranty. Any damage to the appliance or other damage or loss arising through use that is not consistent with domestic or household use (even if located in a domestic or household environment) shall not be accepted by the manufacturer to the fullest extent permitted by law.
●WARNING Misuse of a tumble dryer may create a fire hazard.
● This machine is solely for domestic use, i.e. to dry household textiles
and garments.
EN 3

INTRODUCTION
SAFETY REMINDERS
Use
●This machine should only be used for its intended purpose as described in this manual. Ensure that the instructions for installation and use are fully understood before operating the appliance.
●Do not touch the appliance when hands or feet are damp or wet.
● Do not lean on the door when loading the machine or use the door to lift or move the machine.
●Do not allow children to play with the machine or its controls.
● WARNING Do not use the product if the fluff filter is not in position or is damaged; fluff could be ignited.
● WARNING Where the hot surface symbol is  located the temperature rise during operation of the tumble dryer may be in excess of
60 degrees C.
● Remove the plug from the electricity supply. Always remove the plug before cleaning the appliance.
●Do not continue to use this machine if it appears to be faulty.
●Lint and fluff must not be allowed to collect on the floor around the outside of the machine.
●The drum inside may be very hot. Always allow the dryer to complete the cool down period before removing the laundry.
●The final part of a tumble dryer cycle occurs without heat (cool down
cycle) to ensure that the items are left at a temperature that ensures that the items will not be damaged.
●Maximum load drying weight: refer to energy label 8 kg.
●The tumble dryer is not to be used if industrial chemicals have been used for cleaning.
●WARNING: Never stop a tumble dryer before the end of the drying cycle unless all items are quickly removed and spread out so that the heat is dissipated.
EN 4

SAFETY REMINDERS
Installation
● Check that the product has no visible signs of damage before use. If damaged do not use and please call GIAS Service.
● Do not use adapters, multiple connectors and/or extensions.
●Never install the dryer against curtains and be sure to prevent items from falling or collecting behind the dryer.
●The appliance must not be installed behind a lockable door, a sliding door or a door with a hinge on the opposite side to that of the tumble dryer.
The Laundry
●Do not dry unwashed items in the tumble dryer.
● WARNING Do not tumble dry fabrics treated with dry cleaning fluids.
● WA R N I N G F o a m r u b b e r materials can, under certain circumstances, when heated become ignited by spontaneous combustion. Items such as foam rubber (latex foam), shower caps, waterproof textiles, rubber backed articles and clothes or pillows fitted with foam rubber pads MUST NOT be dried in the tumble dryer.
● Always refer to the laundry care labels for directions on suitability for drying.
INTRODUCTION
● Clothes should be spin dried or thoroughly wrung before they are put into the tumble dryer. Clothes that are dripping wet should not be put into the dryer.
●Lighters and matches must not be left in pockets and NEVER use flammable liquids near the machine.
●Glass fibre curtains should
NEVER be put in this machine.
Skin irritation may occur if other garments are contaminated with the glass fibres.
● Items that have been soiled with substances such as cooking oil, acetone, alcohol, petrol, kerosene, spot removers, turpentine, waxes and wax removers should be washed in hot water with an extra amount of detergent before being dried in the tumble dryer.
●Fabric softeners, or similar
products, should be used as specified by the fabric softener instructions.
EN 5
SAFETY REMINDERS
VENTILATION
Adequate ventilation must be provided in the room where the tumble dryer is located to prevent gases from appliances burning other fuels, including open fires, being drawn into the room during operation of the tumble dryer.
●Installing the rear of the appliance close to a wall or vertical surface.
●There should be a gap of at least
12 mm between the machine and any obstrubtions. The inlet and outlet should be kept clear of obstruction. To ensure adequate ventilation the space between the bottomof the machine and the floor must not be obstructed.
● Exhaust air must not be discharged into a flue which is used for exhausting fumes from appliances burning gas or other fuels.
●Check regularly that the air
flowing through the dryer is not restricted.
● Check frequently the fluff filter after use, and clean, if necessary.
●Check the fluff filter after use, and clean, if necessary.
●Prevent items from falling or collecting behind the dryer as these may obstruct the air inlet and outlet.
●NEVER install the dryer up against curtains.
INTRODUCTION
●In cases where the dryer is installed on top of a washing machine, a suitable stacking kit must be used, according to the follow configuration.
●Stacking kit Mod 35100019: for minimum washing machine depth = 49 cm
●Stacking kit Mod 35900120:for
minimum washing machine depth = 51 cm
● The stacking kit shall be one of that above, obtainable from our spare service. The instructions for installation and any fixing attachments, are provided with the staking kit.


 TOMAS DE AIRE
SALIDAS DE AIRE
 SALIDAS DE AIRE EN LA BASE
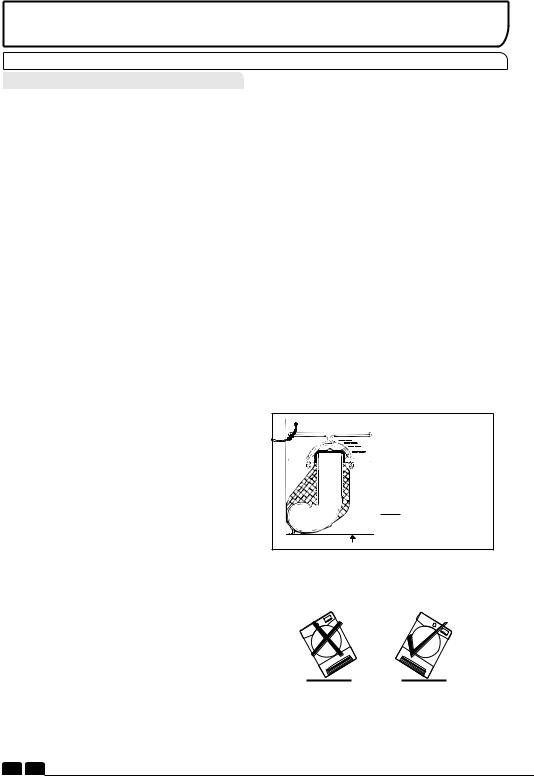
Important: During transport ensure that the dryer is in an upright position, if it's necessary you can only flip in the side shown;
Caution: If the product is in different side, wait at least 4 hours before switching on so that the oil can flow back into the compressor. Failure to do this could result in damage to the compressor.
EN 6

INSTALLATION
Environmental Issues |
Electrical Requirements |
●All packaging materials used are environmentally-friendly and recyclable. Please help dispose of the packaging via environmentally-friendly means. Your local council will be able to give you details of current means of disposal.
●To ensure safety when disposing of an old tumble dryer disconnect the mains plug from the socket, cut the mains power cable and destroy this together with the plug. To prevent children shutting themselves in the machine break the door hinges or the door lock.
European Directive 2012/19/EU
This appliance is marked according to the European directive 2012/19/EU on Waste Electrical and Electronic Equipment (WEEE).
WEEE contains both polluting substances (which can cause negative consequences for the environment) and basic components (which can be re-used). It is important to have WEEE subjected to specific treatments, in order to remove and dispose properly all pollutants, and recover and recycle all materials.
Individuals can play an important role in ensuring that WEEE does not become an environmental issue; it is essential to follow some basic rules:
-WEEE should not be treated as household waste.
-WEEE should be handed over to the relevant collection points managed by the municipality or by registered companies. In many countries, for large WEEE, home collection could be present.
In many countries, when you buy a new appliance, the old one may be returned to the retailer who has to collect it free of charge on a one-to-one basis, as long as the equipment is of equivalent type and has the same functions as the supplied equipment.
GIAS Service
● To ensure the continued safe and efficient operation of this appliance we recommend that any servicing or repairs are only carried out by an authorised GIAS service engineer.
Tumble dryers are supplied to operate at a voltage of 220-240V, 50 Hz single phase. Check that the supply circuit is rated to at least 6 A.
Electricity can be extremely dangerous. This appliance must be earthed.
The socket outlet and the plug on the appliance must be of the same type.
Do not use multiple adapters and/or extension leads.
The plug should be accessible for disconnection after the appliance has been installed.
CE Appliance complies with European Directive 2004/108/EC, 2006/95/EC and subsequent amendments.
 If the appliance is not running properly or breaks down, switch it off and disconnect the plug from the socket. Consult GIAS Service for possible repair.
 You may be charged for a service call if a problem with your machine is caused by incorrect installation.
 If the mains cord on this appliance is damaged, it must be replaced by a special cord which is ONLY obtainable from the spares service. It must be installed by a competent person.
 Do not plug the machine in and switch it on at the mains until the installation is completed.For your safety, this dryer must be correctly installed. If there is any doubt about installation, call GIAS Service for advice.
Adjusting the Feet
Once the machine is in place the feet should be adjusted to ensure that the machine is level.
EN 7
DRAIN HOSE KIT: FITTING INSTRUCTIONS
To avoid having to empty the water container after each drying cycle, the water normally collected during the drying cycle can be discharged directly to a waste water drain pipe (the same drainage system as household sinks).Water Bye-Laws prohibit connection to a surface water drain. The waste water drain pipe system should be located adjacent to the tumble dryer.
xThe kit is composed: 1 hose, 1 straight hose connector, 1 pipe clip and 1 plastic tie.
 WARNING! Switch off and remove the tumble dryer plug from the electricity supply before carrying out any work.
Fit the Kit as Follows:
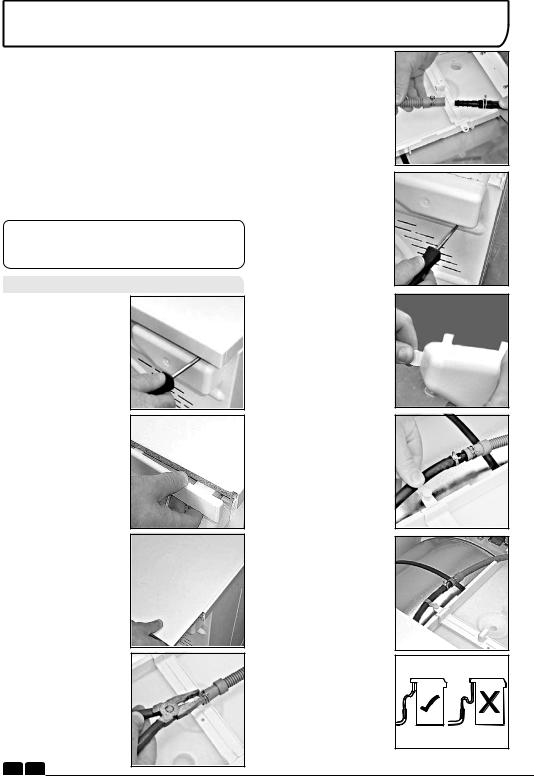
1 . U n s c r e w a n d remove the 3 screws, at the rear of the machine, retaining the worktop trim.
2.Remove the rear worktop trim and the worktop surface by carefully sliding it towards the rear of the machine.
3.The waste water
container is situated at the right-hand side of the machine (viewed from the rear). A grey hose connects to the bridge above the water container. Using pliers, r e m o v e t h e p i p e retaining clip from the bridge.
4.Pull the hose off the bridge connection.
5.Attach the hose from the kit, using the connector and pipe clips supplied, to the hose removed from the bridge connection.
6.Take off the water container cover from the rear of the machine by removing the two screws and unclipping the cover.
7.Break off the tab on the side of the cover and replace the cover on the machine, refit the screws. You should now have revealed a hole in the back of the cabinet next to the Cover.
8.Feed the drain hose through the hole in the cabinet.
9.Locate the grey pipe in the cutout of the tray and secure the pipe assembly to the bridge with the plastic tie.
10.Carefully slide the worktop back into position ensuring that the hose is not trapped
a n d r e p l a c e t h e worktop rear trim with the 3 screws.
11.Connect the new drain hose to the waste water pipe. Make sure that the new hose does not kink when pushing the tumble dryer into position. Ensure that the guidelines, as shown, are followed when routing the new external hose.
12.Connect to the m a i n s e l e c t r i c i t y supply.
13.After emptying the waste water container switch the machine ON
(and press the 'START' button on electronic models) to commence w i t h t h e d r y i n g program.
EN 8
Before using the tumble dryer for the first time:
●Please read this instruction book thoroughly.
●Remove all items packed inside drum.
● Wipe the inside of the drum and door with a damp cloth to remove any dust which may have settled in transit.
Clothes Preparation
Make sure that the laundry you are going to dry is suitable for drying in a tumble dryer, as shown by the care symbols on each item.
Check that all fastenings are closed and that pockets are empty. Turn the articles inside out. Place clothes loosely in the drum to make sure that they don't get tangled.
Do Not Tumble Dry:
Woollens, silk, delicate fabrics, nylon stockings, delicate embroidery, fabrics with metallic decorations, garments with PVC or leather trimmings, training shoes, bulky items such as sleeping bags, etc.
 IMPORTANT: Do not dry articles which have been treated with a dry cleaning fluid or rubber clothes (danger of fire or explosion).
During the last 15 minutes (roughly) the load is always tumbled in cool air
 Do not overload the drum, large items when wet can exceed the maximum admissible clothes load (for example: sleeping bags, duvets).
Energy Saving
Only put into the tumble dryer laundry which has been thoroughly wrung or spin-dried. The drier the laundry the shorter the drying time thus saving electricity.
ALWAYS
●Try to dry the maximum weight of laundry, this will save time and electricity.
●Check that the filter is clean before every drying cycle.
NEVER
●Exceed the maximum weight, this will waste time and electricity.
●Put dripping wet items into the tumble dryer, this may damage the appliance.
PREPARING THE LOAD
Maximum Drying Weight
● |
Cottons |
Max. 8 kg |
● |
Synthetics |
Max. 4 kg |
Sort the Load as Follows
●By care symbols
These can be found on the collar or inside seam:
Suitable for tumble drying.
. . Tumble drying at high temperature.
. Tumble drying at low temperature only.
Do not tumble dry.
If the item does not have a care label it must be assumed that it is not suitable for tumble drying.
●By amount and thickness
Whenever the load is bigger than the dryer capacity, separate clothes according to thickness (e.g. towels from thin underwear).
●By type of fabric
Cottons/linen: Towels, cotton jersey, bed and
table linen.
Synthetics: Blouses, shirts, overalls, etc. made of polyester or polyamid, as well as for cotton/synthetic mixes.
●By drying level
Sort into: iron dry, cupboard dry, etc. For delicate articles press the  button to select low drying temperature.
Drying Guide
The standard cycle HANG DRY (  ) is the most energy efficient and best suited for drying normal wet cotton laundry.
The table below shows the approximate time and energy consumption of the main drying programmes.
CYCLE |
LOAD |
ENERGY |
TIME |
|
|
(kWh) |
(Min) |
Perfect Home |
FULL |
3,40 |
250 |
Store Dry |
FULL |
2,93 |
210 |
Hand Dry |
FULL |
2,66 |
149 |
Hang Dry |
HALF |
1,35 |
115 |
Iron Dry |
FULL |
2,13 |
159 |
|
|
||
Power consumption of "left on-mode" |
0,75 W |
||
Power consumption of "off-mode" |
0,20 W |
||
EN 9

CONTROLS AND INDICATORS
Programme |
Empty Water |
Filter Care |
Program |
Selector |
Indicator |
Indicator |
Display |
Time Selection |
Delay Start |
Acrylic Synthetic |
Anti-Crease |
Start/Pause |
Button |
Button |
Button |
Button |
Button |
Control Panel and Indicator Lights
Knob: You can turn it in both directions to choose the required programme.
Time selection  :To modify the drying timing of required programme; it works only with certain programmes.
Delay start |
:To delay the start of the drying cycle and to dry your laundry when electricity costs |
|||
less (please see dedicated section) |
|
|
||
Delicate fabrics : When pulled, this indicator |
turns off and this new one |
turns on; with this |
||
special function, the drying temperature is lower to better protect your delicate clothes. |
||||
AntiCrease Button |
– Select the anti-crease function at the end of drying cycle. The drum |
|||
keeps moving at regular phases to refresh the laundry. |
|
|||
Cool down |
: This indicator turns on during the final cool phase of the cycle. |
|
||
Start/Pause |
: To start the programme required or to pause the cycle. |
|
||
Automatic programmes: Depending on desired programme, specific indicators turn on (please see “programme list”); ECO indicator turns on when you select a low consumption programme. Filter care
 : When on, please clean the filters.
Full water tank : When on, please empty the water tank.
SELECTING THE PROGRAMME
This machine has a special Sensor Dry to help you choose your preferred programme simply by selecting the level of dryness wanted.
For small loads and pre-dried clothes, please use a Timing programme and select “Delicate fabrics” button to lower the temperature inside the drum.
If the Sensor does not detect any item, this Dryer will work for only 10 minutes before starting the Cool down phase.
If the load is too big or too wet, this Dryer will automatically work for 3 hours and then start the Cool down phase.
At the end of each programme, there is always the Cool Down phase: it is a cool-air refresh phase of around 15 minutes.
EN 10
PROGRAMME
Perfect Home
Store Dry
Hang Dry
Iron Dry
No Crease
Wool
Mix & Dry
Shirts
Rapid 40 Min.
Time
Jeans
SELECTING THE PROGRAMME
IDEAL FOR
Clothes you want completely dryed, e.g. towels, bathrobes, table clothes or sheet. Time: around 3h.
Clothes you want to fold and store without ironing, e.g. shirts in mixed fabrics, socks, baby clothes. Time: around 2h and 45 min.
Clothes you don’t need to iron, but just hang after the drying cycle. Time: around 2h and 30 min.
Leave clothes slightly damp to allow easier ironing. Time: around 1h and
50 min.
Clothes you just need to refresh. Good for items of clothing which have been left prior to ironing or if they have been dried outside or on radiators. This programme has a specific Anti-Crease function that relaxes fibres and makes easier ironing. Time: 9 min + 3 min cool down.
To soften your woollen clothes or to simply refresh them after a long time in the wardrobe. Time: 12 min.
To dry mixed cotton and synthetic clothes: save time and no need to separate the washing and dry them in different cycles. Time: around 2h (max 4 kg).
To dry shirts both cotton and synthetic fabrics. Time: 1h for 2kg of synthetic shirts (around 10 shirts); 1h and 20 min for 3 kg of cotton shirts (around 10 shirts).
For dry, refreshed and ready to dress clothes in onyl 40 minutes. Sensor system keeps under control the temperature to have always the best result. Max 2 kg.
If you want to choose drying times, from 30 to 180 minutes. By selecting “20 min” you choose a “cool programme”, ideal to refresh clothes and to remove eventual smells.
To dry up to 4 kg of Jeans (around 5 pairs). The programme works for around 2h, but timing can change according to the load and washing spin speed. Jeans programme can only be used for 100% cotton items, please do not mix colours nor dry jeans with embroideries or accessories.
EN 11

Opening the Door
Pull on handle to open the door.
To restart the dryer, close the door and press  .
.
 WARNING! When the tumble dryer is in use the drum and door may be VERY HOT. Never stop a tumble dryer before the end of the drying cycle unless all items are quickly removed and spread out so that the heat is dissipated.
Filter
IMPORTANT: To maintain the efficiency of the dryer check that the fluff filter is clean before each drying cycle.
Do not operate the dryer without the filters. Clogged filters can increase the drying time and cause damage which may result in expensive repair costs.
1 . P u l l t h e f i l t e r |
||
upwards. |
|
|
2. Open filter as shown. |
||
3.Gently |
remove lint |
|
using a soft brush or |
||
your fingertips. |
|
|
4 . S n a p t h e f i l t e r |
||
together |
and |
push |
back into place. |
|
|
Filter Care Indicator
 Lights when the filter needs cleaning.
Check and clean the main filter in the door and the condenser filters allocated in the bottom of the dryer,If the laundry is not drying check that the filter is not clogged.
DOOR and FILTER
To Clean the Condenser Filter
1 . R e m o v e kickplate.
t h e |
2.Turn the two locking levers anti-clockwise and pull out the front cover.
3.Gently remove the filter frame and clean any dust or fluff with a cloth from the filter. Do not use water to clean
the filter.
4. Remove the sponge gently from its place and then wash the sponge by holding it under a running tap turning it so to remove any dust or fluff.
5. Refit the front cover ensuring it is in the c o r r e c t w a y ( a s indicated by the arrow) and pushed firmly into place. Lock the two levers by turning them clockwise.
6. Refit the kickplate.
 DO NOT USE WATER TO CLEAN THE FILTER.
EN 12
WATER CONTAINER
The water removed from the laundry during the drying cycle is collected in a container inside the door of the dryer. When the container is full the  indicator on the control panel will light, and the container MUST be emptied. However, we recommend that the container is emptied after each drying cycle.
NOTE: Very little water will collect during the first few cycles of a new machine as an internal reservoir is filled first.
To Remove the Container
1.Gently pull out the
t r a y u n t i l i t i s completely removed. Support the tray with both hands. When it is full the water container will weigh about 4kg.
2 . Ti l t t h e w a t e r container to empty the water out through the rear hole.
When emptyslide the water container back into position.
PUSH FIRMLY INTO PLACE.
3. Press  to restart the cycle.
NOTE: If you have the option of drainage near the dryer it is possible to use the discharge kit to provide a permanent drain for the water collected by the dryer.
This will |
remove |
the |
|
need |
to |
empty |
the |
water |
tray. All |
the |
|
i n f o r m a t i o n f o r assembly of the kit is contained in the kit envelope.
OPERATION
1.Open the door and load the drum with laundry. Ensure that garments do not hinder closure of the door.
2.Gently close the door pushing it slowly until you hear the door 'click' shut.
3.Turn the Programme Selector dial to select the required drying programme (see Programme Guide).
4.If drying synthetics, acrylics or delicate items, press the  button to reduce the heat level. The indicator will light up when the machine is in
low heat setting. To deselect in the first few minutes of the programme, press the button
,after this time reset the machine to change the setting.
5.Press the  button. The dryer will start automatically and the indicator above the
button will be continuously lit.
6.If the door is opened during the programme to check the laundry, it is necessary to press to recommence drying after the door has been
closed.
7.When the cycle is nearing completion the machine will enter the cool down phase, the clothes will be tumbled in cool air allowing the load to cool down.
8.Following the completion of the cycle the drum will rotate intermittently to minimize creasing. This will continue until the machine is switched OFF or the door is opened.
 Do not open the door during the automatic programs in order to obtain a proper drying.
EN 13
OPERATION
Delay Start Function
The Delay Start Function  allows the user to delay the start of the drying cycle by 1 to 24 hours.
When the function is first selected the display will show a delay of 1 hour, subsequent presses of the button will increase the delay with 1 hour steps.
To commence the programme press  and the appliance will complete the drying cycle at the end of this time. The indicator light will flash to indicate that the start delay is in progress.
Cancelling and Resetting the Programme
To cancel a programme press the  button for 3 seconds. In the TIME CONTROL display 0:00 Light will flash to indicate that it has been reset.
CLEANING AND ROUTINE MAINTENANCE
Cleaning the Dryer
●Clean the filter and empty the water container after every drying cycle.
●Regularly clean the filters.
●After each period of use, wipe the inside of the drum and leave the door open for a while to allow circulation of air to dry it.
●Wipe the outside of the machine and the door with a soft cloth.
●DO NOT use abrasive pads or cleaning agents.
●To prevent the door sticking or the build up of fluff clean the inner door and gasket with a damp cloth after every drying cycle.
 WARNING! The Drum, door and load may be very hot.
Technical Specifications
Drum capacity |
115 litres |
Maximum load |
8 kg |
Height |
85 cm |
Width |
60 cm |
Depth |
60 cm |
Energy Label Band |
A + |
Information for Test Laboratory |
|
EN 61121 Programme |
Programme To Use |
-DRY COTTON |
-HANG DRY |
-IRON DRY COTTON |
-IRON DRY |
-EASY-CARE TEXTILE |
-HANG DRY + SYNTHETIC |
Note:Install and use the drain hose to discharge the condensing water.
 IMPORTANT Always switch off and remove the plug from the electricity supply before cleaning this appliance.
 For electrical data refer to the rating label on the front of the dryer cabinet (with the door open).
EN 14

TROUBLESHOOTING
What Might be the Cause of...
Defects you can remedy yourself
Before calling GIAS Service for technical advice please run through the following checklist. A charge will be made if the machine is found to be working or has been installed incorrectly or used incorrectly.
If the problem persists after completing the recommended checks, please call GIAS Service, they may be able to assist you over the telephone.
Time display to end could change during drying cycle. The time to end is continuously checked during the drying cycle and the time is adjusted to give the best estimation time. The displayed time may increase or decrease during the cycle and this is normal.
Drying time is too long/clothes are not dry enough…
●Have you selected the correct drying time/programme?
●Were the clothes too wet? Were the clothes thoroughly wrung or spindried?
●Does the filter need cleaning?
●Is the dryer overloaded?
●Has the  option been selected from a previous cycle?
The dryer is noisy…
● Switch off the dryer and contact GIAS Service
for advice.
The  Indicator is on…
●Does the filter need cleaning?
The  Indicator is on…
●Does the water container need emptying?
CUSTOMER SERVICE
Should there still be a problem with your dryer after completing all the recommended checks, please call GIAS Service for advice.
They may be able to assist you over the telephone or arrange for a suitable appointment for an engineer to call under the terms of your guarantee. However, a charge may be made if any of the following applies to your machine:
●Is found to be in working order.
●Has not been installed in accordance with the installation instructions.
●Has been used incorrectly.
The dryer does not operate…
●Is there a working electricity supply to the dryer? Check using another appliance such as a table lamp.
●Is the plug properly connected to the mains supply?
●Is there a power failure?
●Has the fuse blown?
●Is the door fully closed?
●Is the dryer switched on, both at the mains supply and at the machine?
●Has the drying time or the programme been selected?
●Has the machine been switched on again after opening the door?
Spares
Always use genuine spares, available direct from GIAS Service.
GIAS Service
For service and repairs call your local GIAS Service engineer.
The manufacturer declines all responsibility in the event of any printing mistakes in this booklet. The manufacturer also reserves the right to make appropriate modifications to its products without changing the essential characteristics.
EN 15

INDEX
Einführung
Lieferinformationen
Sicherheitshinweise
Gebrauch
Installation
Die Wäsche Entlüftung Umweltschutz GIAS-Service Elektro-Anschluss Einstellen der Füße
Ablaufschlauchbausatz: Installationsanleitung
Vorbereitung der Füllung
Vorbereitung der Textilien Nicht für den Trockner geeignet Energiesparen
Sortierung der Füllung Trocknungswerte
Schalterblende und Anzeigen Auswählen des Programms Tür und Sieb
Öffnen der Tür Sieb Flusensieb-Anzeige
Kondenswasser-Behälter
Um den Behälter herauszunehmen
Kondensator
Entfernen des Kondensators
Betrieb
Startverzögerung
Abbrechen und Zurücksetzen des Programms
Reinigung und Routinewartungen
Reinigung des Trockners Technische Daten
Fehlersuche
Kundendienst
Ersatzteile GIAS-Service
17
17
17
18
19
19
20
21
21
21
21
22
23
23
23
23
23
23
24
25
26
26
26
26
27
27
27
27
28
28
28
28
28
28
29
29
29
29
DE 16

EINFÜHRUNG
Bitte lesen Sie diese Anleitung sorgfältig durch und richten Sie sich bei der Bedienung der Wäschetrockner an die Anleitung. Dieses Handbuch enthält wichtige Hinweise für die sichere Installation, Anwendung und Wartung sowie einige nützliche Hinweise für optimale Ergebnisse beim Gebrauch Ihrer Maschine.
Heben Sie diese Dokumentation an einem sicheren Ort auf, um jederzeit wieder darauf zurückgreifen zu können bzw. um sie an zukünftige Besitzer weitergeben zu können
Liefer informationen
Zum Lieferumfang Ihrer Waschmaschine gehören folgende Dokumentation und Zusatzteile:
●Bedienungsanleitung
●Garantieschein
●Energieeffizienzklasse
SICHERHEITSHINWEISE
Gebrauch
 Kontrollieren Sie,ob die Maschine durch den Transport beschädigt wurde.Falls dies der Fall ist, wenden Sie sich an den GIASService.
 Die Sicherheit des Geräts kann beeinträchtigt werden, wenn Sie sich nicht an diese Sicherheitshinweis e halten. Falls ein Problem mit Ihrer Maschine durch Zweckentfremdung verursacht wird, müssen Sie Reparaturarbeiten möglicherweise selbst bezahlen.
● Kinder unter 8 Jahren sowie Personen, die aufgrund ihrer physischen, sensorischen oder geistigen Fähigkeiten oder ihrer Unerfahrenheit oder Unkenntnis nicht in der Lage sind, die Wäschetrockner sicher zu bedienen, dürfen die Wäschetrockner nicht ohne Aufsicht oder Anweisung durch eine verantwortliche Person benutzen, sich in der Nähe aufhalten oder das Gerät saubermachen.
Kinder sollten nicht mit dem Gerät spielen. Reinigung und Benutzerwartung sollten nicht von Kindern ohne Einführung, ausgeführt werden.
●WARNUNG Zweckentfremdung des Trockners kann zu Brandgefahr führen.
●Dieses Gerät ist ausschließlich für den Haushaltsgebrauch konzipiert bzw. für den haushaltsnahen Gebrauch, wie z.B:
-Teeküchen für das Personal von Büros, Geschäften oder ähnlichen
Arbeitsbereichen;
-Ferienhäuser;
-Gäste von Hotels, Motels und anderen Wohneinrichtungen;
-Gäste von Apartments/Ferienwohnungen, Bed and Breakfast Einrichtungen
Eine andere Nutzung als die normale Haushaltsnutzung, wie z.B. gewerbliche oder professionelle Nutzung durch Fachpersonal, ist auch im Falle der oben erwähnten Einrichtungen ausgeschlossen.
Sollte das Gerät entgegen diesen Vorschriften betrieben werden, kann dies die Lebensdauer des Gerätes beeinträchtigen und den Garantieanspruch gegenüber dem Hersteller verwirken.
DE 17

EINFÜHRUNG
SICHERHEITSHINWEISE
Gebrauch
Eventuelle Schäden am Gerät oder andere Schäden oder Verluste, die durch eine nicht haushaltsnahe Nutzung hervorgerufen werden sollten (selbst wenn sie in einem Haushalt erfolgen), werden, so weit vom Gesetz ermöglicht, vom Hersteller nicht anerkannt.
●Diese Maschine dient als Haushaltsgerät ausschließ lich zum Trocknen von Haushaltstextilien und Kleidungsstücken.
●Verwenden Sie dieses Gerät nur für die vorgesehenen Zwecke gemäß der Anleitung. Lesen Sie die Gebrauchsanleitung sorgfältig durch, bevor Sie das Gerät in Betrieb nehmen.
●Berühren Sie das Gerät nicht mit feuchten oder nassen Händen oder Füß en.
●Lehnen Sie sich nicht gegen die Tür, wenn Sie die Maschine beladen, und fassen Sie die Maschine nicht an der Tür, wenn Sie sie hochheben oder verschieben.
●Lassen Sie Kinder nicht mit der Maschine oder den Schaltern spielen.
●WARNUNG Verwenden Sie das Produkt nicht, wenn das Flusensieb nicht richtig eingebaut oder beschädigt ist; Flusen könnten Feuer fangen.
●WARNUNG An der Stelle, an der sich das Symbol für heiß e Flächen befindet  ,kann die Temperatur während des Trocknerbetriebs auf über
60°C steigen.
●Ziehen Sie den Stecker aus der Steckdose! Ziehen Sie vor dem Reinigen des Geräts immer den Stecker heraus!
●Verwenden Sie die Maschine bei vermuteten Störungen nicht weiter.
●Fusseln und Flusen dürfen sich nicht auf dem Fußboden im Bereich um die Maschine ansammeln.
●Die Trommel in dem Gerät kann sehr heiß werden. Lassen Sie den
Trockner stets vollständig bis zum Ende der Abkühlphase laufen, bevor Sie die Wäsche herausnehmen.
●Der letzte Teil eines Trockenzyklus (Abkühlphase) erfolgt mit einem kalten Luftstrom, um Verbrennungen und Schäden an den Textilien zu vermeiden.
●Max. Füllmenge (Mischwäsche): siehe Energielabel 8kg.
●Der Wäschetrockner darf keinesfalls zur Trocknung von Textilien, die zuvor chemisch gereinigt wurden, benutzt werden.
● WARNUNG: Programme niemals vor dem Ende des Trockenzyklus abbrechen, wenn die Beladung nicht zur Abkühlung unmittelbar entnommen und luftig ausgebreitet wird.
DE 18

SICHERHEITSHINWEISE
Installation
●Überprüfen Sie vor dem
Gebrauch, ob das Produkt sichtbare Schäden aufweist.
Verwenden Sie es nicht, wenn es beschädigt ist, und wenden Sie sich an den GIAS-Service.
●Verwenden Sie keine Adapter, Mehrfachsteck dosen und/oder
Verlängerungskabel.
●Stellen Sie den Trockner nie in der Nähe von Vorhängen auf. Achten Sie darauf, dass keine Gegenstände hinter den Trockner fallen oder sich dort ansammeln können.
●Das Gerät darf nicht hinter einer verschließ baren Tür, einer Schiebetür oder einer Tür mit Scharnier an der dem Trockner e n t g e g e n g e s e t z t e n S e i t e installiert werden.
Die Wäsche
● T r o c k n e n S i e k e i n e ungewaschenen Gegenstände im Trockner.
● WARNUNG AUF KEINEN FALL Stoffe in der Maschine trocknen, die mit chemischen Reinigungs mitteln behandelt wurden.
● W A R N U N G W e n n Schaumgummimaterialien heiß werden, können sie sich unter bestimmten Bedingungen plötzlich entzünden. Gegenstände wie S c h a u m g u m m i ( L a t e x - schaumstoff), Duschhauben, wasserab weisende Textilien, mit
EINFÜHRUNG
Gummi verstärkte Produkte sowie Kleidung-sstücke oder Kissenmit Schaumstoffpolster sind für den W ä s c h e t - r o c k n e r N I C H T GEEIGNET.
●Sehen Sie immer auf den Pflegeetiketten nach, ob das Material für das Trocknen geeig-net ist.
●Textilien vor dem Einfüllen in den Trockner erst schleudern oder gründlich auswringen. Füllen Sie KEINE tropfnassen Textilien in den Trockner.
●Feuerzeuge und Streichhölzer unbedingt aus den Taschen entfernen und AUF KEINEN FALL mit feuergefährlichen Flüssigkeiten in der Nähe der Maschine hantieren.
● K E I N E V o r h ä n g e a u s Glasfasermaterial in die Maschine füllen. Kommen andere Textilien mit Glasfasern in Berührung, so kann dies zu Hautreizungen führen.
● Gegenstände, die mit Substanzen wie Speiseöl, Azeton, Alkohol, Benzin, Kerosin, Fleckenentferner, Te r p e n t i n , W a c h s e n u n d Wachsentferner getränkt sind, sollten mit einer zusätzlichen Menge Waschpulver in heißem Wasser gewaschen werden, bevor sie im Trockner getrocknet werden.
●Weichspüler oder ähnliche
Produkte sollten wie in der G e b r a u c h a n l e i t u n g d e s W e i c h s p ü l e r s a n g e g e b e n verwendet werden.
DE 19

EINFÜHRUNG
SICHERHEITSHINWEISE
ENTLÜFTUNG
In dem Raum, in dem sich der Trockner befindet, muss eine ausreichende Entlüftung vorhanden sein, um zu verhindern, dass Gase aus der Verbrennung anderer Brennstoffe, zum Beispiel offene F e u e r , w ä h r e n d d e s T r o c - knerbetriebs in den Raum gesogen werden.
•Hinweis zur Aufstellung des Gerätes an Wänden oder in Nischen
•Der Mindestabstand zwischen Gerät und sämtlichen angrenzenden Oberflächen beträgt 12 mm. Die Luftzufuhrund Auslassöffnungen m ü s s e n i m m e r g r o ß r ä u m i g freigehalten werden. Den Platz zwischen Geräteunterseite und Boden ebenfalls rundum freihalten.
•Die Abluft darf nicht in einen Kaminschacht geleitet werden, der für das Ableiten von Rauch aus der Verbrennung von Gas oder anderen Brennstoffen verwendet wird.
•Prüfen Sie regelmäß ig die reibungslose Luftzirkulation im Trockner.
•Bitte alle Filter regelmäßig prüfen und ggf. reinigen.
• Bei der Aufstellung als Wasch- / T r o c k e n s ä u l e m u ß a u s Sicherheitsgründen ein geeigneter Zwischenbaurahmen mit den folgenden Eigenschaften verwendet werden.
• Originalzwischenbaurahmen (35100019): für Waschmaschinen mit einer Tiefe von mindestens 49 cm •Originalzwischenbaurahmen (35100120): für Waschmaschinen mit einer Tiefe von mindestens 51 cm
DE 20
•D i e v o r g e n a n n t e n
Originalzwischenbaurahmen sind
über Ihren Händler bzw. unseren Kundendienst zu beziehen. Hinweise zur Anbringung finden Sie in der dem Verpackunsginhalt beigefügten Anleitung. Die
Verwendung von generischen Zwischenbaurahmen ist bei ggf. eingeschränkter Funktionsweise ebenfalls möglich.
•Achten Sie darauf, dass keine
Gegenstände zwischen beiden
Seitenteilen und der Rück-seite des Trockners herunterfallen und sich dort ansammeln, da hierdurch die Ansaugund Abluftanschlüsse blockiert werden können.
•Der Trockner darf AUF KEINEN FALL in der unmittelbaren Nähe von Vorhängen aufgestellt werden.
Air Outlets in the Base
Wichtig: Das Gerät soll möglichst stehend transportiert werden. Bei Bedarf kann es nur in die gezeigte Richtung geneigt werden.
Achtung: Wenn das Gerät in eine andere Lage transportiert wurde, warten Sie mindestens 4
Stunden, bevor Sie es einschalten, damit sich die Flüssigkeit im Kompressor wieder stabilisieren kann. Tun Sie es nicht, können Schäden am Kompressor die Folge sein.
SICHERHEITSHINWEISE
Umweltschutz
● Das gesamte Verpackungsmaterial besteht aus umwelt - freundlichen, wiederverwertbaren
Materialien. Bitte helfen Sie mit, diese umweltfreundlich zu entsorgen. Ihre Stadtverwaltung kann Sie über Entsorgungsmöglichkeiten informieren.
● Ziehen Sie den Stecker aus der Steckdose, zerschneiden Sie das Netzkabel und werfen Sie Netzkabel und Netzstecker getrennt in den Müll, bevor Sie Ihren alten Trockner entsorgen. Zerstören Sie Scharniere und die Türverrie-gelung, damit sich Kinder nicht versehentlich in
der Waschmaschine einsperren können.
Europäische Vorschrift 2012/19/EU
Dieses Gerät ist entsprechend der europäischen Richtlinie 2012/19/EU als elektrisches / elektronisches Altgerät (WEEE) gekennzeichnet.
Elektrische und elektronische Altgeräte enthalten vielfach noch wertvolle Materialien. Sie enthalten aber auch schädliche Stoffe, die für ihre Funktion und Sicherheit notwendig waren. Im Restmüll oder bei falscher Behandlung können diese der menschlichen
Gesundheit und der Umwelt schaden. Es ist daher sehr wichtig, dass elektrische und elektronische
Altgeräte (WEEE) einer speziellen Verwertung zugeführt werden, damit die schädlichen Stoffe ordnungsgemäß entfernt und entsorgt werden bzw. wertvolle Rohstoffe der Wiederverwertung zugeführt werden können
Sie können mit der Beachtung der folgenden simplen Hinweise einen wichtigen Beitrag dazu leisten, dass elektrische und elektronische Altgeräte (WEEE) der menschlichen Gesundheit und der Umwelt nicht schaden:
-Elektrischeund elektronische Altgeräte (WEEE) sollten keinesfalls wie Restoder Haushaltsmüll behandelt werden.
-Nutzen Sie stattdessen die an Ihrem Wohnort eingerichteten kommunalen oder gewerblichen Sammelstellen zur Rückgabe und Verwertung elektrischer und elektronischer Altgeräte (WEEE). Informieren Sie sich, ob ggf. in Ihrem Land bzw. Ihrer
Region für große/sperrige elektrische und elektronische Altgeräte (WEEE) eine Abholung angeboten wird. Sorgen Sie in jedem Falle dafür, dass Ihr Altgerät bis zum Abtransport kindersicher aufbewahrt wird.
In einigen Ländern sind Händler unterbestimmten Voraussetzungen beim Geräteneukauf auch zur Rücknahme des Altgerätes verpflichtet, wenn das
Altgerät dem neuen Fabrikat in der Funktion entspricht.
GIAS Service
● Um einen sicheren und einwandfreien Betrieb dieses Geräts zu gewährleisten, empfehlen wir, alle
Wartungsund Reparatur-arbeiten nur von einem zugelassenen GIAS Kundendienst-techniker durchführen zu lassen.
Elektro-Anschluss
Dieser Trockner ist für eine Netzspannung von 220-240 V und 50 Hz (Einphasenstrom) ausgelegt. Stellen Sie sicher, dass der Stromkreis eine Nennleistung von 6 A hat.
●Strom kann lebensgefährlich sein.
●Dieses Gerät muss an eine geerdete Steckdose mit Schutzkontakt angesch-lossen werden.
●Die Steckdose und der Stecker am Gerät müssen vom selben Typ sein.
●Verwenden Sie keine Mehrfachstecker und/oder Verlängerungskabel.
●Der Stecker sollte so angebracht werden, dass er nach der Installation des Geräts leicht aus der Steckdose zu ziehen ist.
Das Gerät stimmt mit den Bestimmungen der Europäischen Vorschrift 2004/108/EC, 2006/95/ EC sowie deren Nachfolgebes-timmungen überein.
 Falls das Gerät nicht richtig funktioniert oder ausfällt, schalten Sie es aus und ziehen Sie den Stecker aus der Steckdose. Wenden Sie sich an den GIAS-Service.
 Falls ein Problem mit Ihrer Maschine durch falsche Installation verursacht wird, müssen Sie
Reparaturarbeiten möglicherweise selbst bezahlen.
 Sollte das Netzanschlusskab el an diesem Gerät beschädigt sein, muss es durch ein spezielles Kabel ersetzt werden, das NUR beim Ersatzteilservice erhältlich ist. Es muss von einer fachkundigen Person installiert werden.
 Schließen Sie die Maschine erst an und drücken Sie die Einschalttaste erst, wenn die Installation abgeschlossen ist. Zu Ihrer eigenen Sicherheit muss der Trockner richtig installiert werden. Sollten Sie bezüglich der Installation Fragen haben, wenden Sie sich an den GIAS Service.
Einstellen der Füße |
|
||
S o b a l d s i c h d i e |
|
||
M a s c h i n e |
a m |
|
|
e n d g ü l t i g e n O r t |
|
||
befindet, |
sollten |
die |
|
Füße so |
eingestellt |
|
|
w e r d e n , d a s s d i e |
|
||
Maschine eben steht. |
|
||
|
|
DE |
21 |

ABLAUFSCHLAUCHBAUSATZ: INSTALLATIONSANLEITUNG
Um zu vermeiden, dass der Wasserbehälter nach jedem Trocknungsvorgang geleert werden muss, kann das Wasser, dass sich normalerweise während des Trocknungsvorgangs ansammelt, direkt über einen Ablaufschlauch abgelassen werden (in dasselbe Abwassersystem, über das Abwasser von Ihrem Becken abgeleitet wird).
Gemeindewasserverordnungen verbieten einen Anschluss an Oberflächenwasserabläufe. Das Ablaufschlauchsystem sollte sich neben dem Trockner befinden.
WARNUNG! Schalten Sie die Maschine aus und trennen Sie den Stecker des Trockners von der Stromversorgung, bevor Sie Arbeiten daran vornehmen.
Das Kit besteht aus: 1 Schlauch, 1 geraden
Schlauchanschluss, 1 Schlauchklemme und Plastikband.
Bringen Sie den Bausatz wie folgt an:
1.Schrauben Sie die 3 S c h r a u b e n a n d e r Rückseite der Maschine, die die Arbeitsplattenleiste halten, ab und entfernen Sie diese.
2. Nehmen Sie die hintere Arbeitsplattenleiste und die Arbeitsplatte ab, indem Sie sie vorsichtig in Richtung Rückseite der Maschine schieben.
3.Der Abwasser-behälter befindet sich an der r e c h t e n S e i t e d e r Maschine (von hinten gesehen).
Ein grauer Schlauch ist mit dem Steg über dem
W a s s e r b e h ä l t e r verbunden. Entfernen Sie d i e S c h l a u c h - halteklemme mithilfe einer Zange vom Steg.
4 . Z i e h e n S i e d e n S c h l a u c h v o n d e r Stegverbindung ab.
5. Befestigen Sie den S c h l a u c h a u s d e m Bausatz mithilfe der mitgelieferten Anschlussund Schlauchklemmen.
6 . N e h m e n S i e d i e W a s s e r b e h ä l t e r - a b d e c k u n g v o n d e r Rückseite der Maschine ab, indem Sie die zwei Schrauben entfernen und die Abdeckung entriegeln.
7. Brechen Sie die Lasche an der Seite der A b d e c k u n g a b u n d s e t z e n S i e d i e Abdeckung wieder auf die Maschine, bringen Sie die Schrauben wieder an. Sie sollten jetzt eine Öffnung an der Rückseite neben der Abdeckung freigelegt haben.
8 . F ü h r e n S i e d e n Ablaufschlauch durch die Öffnung.
9. Verbinden Sie den grauen Schlauch im Ausschnitt des Behälters
und |
befestigen |
Sie |
den |
Schlauchbausatz |
mit |
||
dem |
Plastikband |
am |
|
Steg. |
|
|
|
10. |
Schieben |
Sie |
die |
Arbeitsplatte vorsichtig wieder in ihre Position und achten Sie dabei d a r a u f , d a s s d e r Schlauch nicht ein- g e k l e m m t w i r d . Befestigen Sie die hintere A r b e i t s p l a t t e n l e i s t e w i e d e r m i t d e n 3 Schrauben.
11. Schließen Sie den neuen Ablaufschlauch an den Abwasserschlauch an. Achten Sie darauf, dass der neue Schlauch nicht geknickt wird, wenn Sie den Trockner in die r i c h t i g e P o s i t i o n schieben. Stellen Sie bei der Verlegung des neuen e x t e r n e n S c h l a u c h s s i c h e r , d a s s d i e beschriebenen Hinweise befolgt werden.
12. Schließen Sie die M a s c h i n e a n d i e Stromversorgung an.
13. Schalten Sie die Maschine nach dem E n t l e e r e n d e s Abwasserbehälters EIN (oder drücken Sie bei elektronischen Modellen die ‘START’-Taste), um d a s T r o c k n u n g s - programm zu beginnen.
DE 22
VORBEREITUNG DER FÜLLUNG
Bevor Sie den Trockner das erste Mal benutzen:
● Lesen Sie die Gebrauchsanleitung bitte sorgfältig durch!
●Entfernen Sie alle in der Trommel befindlichen Gegenstände!
●Wischen Sie die Innenseiten der Trommel und Tür
mit einem feuchten Tuch aus, um den beim
Transport eventuell dort angesammelten Staub zu entfernen.
Vorbereitung der Textilien
Vergewissern Sie sich anhand der Pflegeanleitungssymbole in jedem Wäschestück, dass die Wäsche, die Sie trocknen wollen, für eine Trocknung im Trockner geeignet ist.
Überprüfen Sie, ob alle Verschlüsse zu und die Taschen entleert sind. Wenden Sie die Innen-seiten der Textilien nach außen. Füllen Sie die Kleidungsstücke locker in die Trommel, so dass diese sich nicht verheddern.
Nicht Für Den Trockner Geeignet:
Wollsachen, Seide, empfindliche Stoffe,
Nylonstrümpfe,gewirkte Textilien, Stoffe mit Metall-
Dekor, Kleidungsstücke mit PVC - oder Lederbesatz,Trainingsschuhe, voluminöse
Wäschestücke wie Schlafsäcke usw.
 WICHTIG: Kleidungsstücke, die mit einem chemischen Reinigungsmittel behandelt worden sind, oder Gummibekleidung dürfen nicht im
Wäschetrockner getrocknet werden (Brandoder
Explosionsgefahr).
Innerhalb der letzten 15 Minuten (ca.) wird die Wäsche stets mit kalter Luft getrocknet.
Überladen Sie die Trommel nicht, große Teile können, wenn sie nass sind, die maximal zulässige Wäscheladung überschreiten (zum Beispiel Schlafsäcke, Bettdecken).
Energiesparen
Füllen Sie nur gründlich ausgewrungene oder geschleudert e Wäsche in den Trockner. Je trockener die Wäsche, desto kürzer ist die Trocknungszeit, was sich energiesparend auswirkt.
IMMER
● Es ist wirtschaftlicher, IMMER die maximale Füllmenge zu trocknen.
● K o n t r o l l i e r e n S i e I M M E R v o r j e d e m
Trocknungsvorgang, ob das Sieb sauber ist.
NIE
●Überschreiten Sie NIE die maximale
Füllmenge,denn dies ist zeitaufwendig und Energieverschwendung.
●Füllen Sie AUF KEINEN FALL tropfnasse
Kleidungs-stücke in den Wäschetrockner; dies kann zu Schäden am Gerät führen.
Maximales Fassungsvermögen
●Baumwolle |
max.8 kg |
●Synthetische Stoffe |
max. 4 kg |
Sortieren Sie die Füllung folgendermaßen:
● Anhand der Pflegeanleitungssymbole Diese finden Sie am Kragen oder der Sauminnenseite:
Für Trockner geeignet.
. .
Im Trockner bei hoher Temperatur.
. Im Trockner nur bei geringer Temperatur.
Nicht für den Trockner geeignet.
Falls ein Wäschestück keine Pflegeanleitung hat, muss angenommen werden, dass es nicht für das Trocknen im Trockner geeignet ist.
●Nach Menge und Volumen
Ist die Füllmenge größer als das Fassungsvermögen des Trockners, sortieren Sie die Wäsche nach Stoffdicke (trennen Sie z.B. Handtücher von dünner Unterwäsche).
●Nach Stoffart
Baumwolle/Leinen: Handtücher, Baumwolljersey, Bettund Tischwäsche.
Textilien aus Kunstfaser: Blusen, Hemden, Overalls, usw. aus Polyester oder Polyamid und auch Baumwoll/ Synthetikgemische.
●Nach Trocknungsgrad
Sortieren Sie nach: Bügelfeucht, Schranktrocken, usw.
Für empfindliche Textilien drücken Sie zur Wahl einer niedrigeren Trocknungstemperatur die Taste  .
.
Trocknungswerte
Die Standardardprogramme für die Ermittlung der
Werte auf dem Energielabel BÜGELTROCKEN(  ) bieten die besten Energieverbrauchswerte und eignen sich zur Trocknung von normalfeuchten Baumwolltextilien. Die nachfolgende Tabelle gibt die ungefähren Standardprogrammlaufzeiten und V e r b r a u c h s w e r t e i n d e n e i n z e l n e n
Hauptrockenprogrammen an (gmessen unter
Laborbedingungen).
PROGRAMM |
MAX. BELADUNG ENERGIEVERBRAUCH PROGRAMMDAUER |
|
|
(kWh) |
(Min) |
Perfect Home |
VOLL |
3,40 |
250 |
Schranktrocken VOLL |
2,93 |
210 |
|
Bügeltrocken |
VOLL |
2,66 |
149 |
Bügeltrocken |
HALBVOLL |
1,35 |
115 |
Mangeltrocken VOLL |
2,13 |
159 |
|
Leistungsaufnahme im unausgeschalteten Zustand |
0,75 W |
||
Leistungsaufnahme im Aus-Zustand |
0,20 W |
||
|
|
|
|
DE 23

SCHALTERBLENDE UND ANZEIGEN
Programmwähler |
Spia Pulizia |
AutoProgramm |
Wasseranzeige |
Anzeige |
|
|
Filtro |
Trockendauer |
Startzeit- |
Schontrocknen |
Knitterschutz |
Start/Pause |
|
Vorwahl |
|
Taste |
Taste |
Schalterblende: Kontrollund Leuchtanzeigen
Programmwahlschalter: Der Programmwahlschalter kann in beide Richtungen gedreht werden, um das gewünschte Programm auszuwählen.
Trockendauer : Ermöglicht die individuelle Einstellung der Programmdauer in einigen Programmen. Diese Funktion ist nicht in allen Programmen verfügbar.
Startzeitvorwahl |
: Mit dieser Funktion kann die Startzeit von minimal 1 Stunde bis maximal 23 Stunden |
||
verzögert werden (s. Stratzeitvorwahl). |
|
||
Schontrocken-Option: Nach Drücken dieser Optionstaste leuchtet die entsprechende |
Anzeige auf. Der |
||
Trockenvorgang |
wird zur optimalen Gewebeschonung bei geringerer Temperatur durchgeführt. |
||
Knitterschutz-Option |
: Wenn die Funktion eingeschaltet ist, verlängert sich die Standard- |
||
Knitterschutzphase am Ende des Trockengangs. Die Wäsche bleibt mit dieser |
|
||
Option locker und knitterfrei. Die Wäsche kann während des Knitterschutzprogramms jederzeit entnommen werden.
Abkühlphase : Diese Anzeige leuchtet während der Abkühlphase auf.
Start/Pause : Diese Taste betätigen, um das gewünschte Programm zu starten oder den Trockenvorgang zu unterbrechen (zum Beispiel, um Wäsche nachzulegen).
Sensorgesteuerte Programme: Je nach ausgewähltem Programm (s. Programmübersicht) leuchtet das jeweilige Symbol im Display auf. Das Symbol ECO leuchtet bei Anwahl eines sparsamen Programms auf.
Anzeige Filterreinigung : Alle Filter müssen nach jedem Trockengang sorgfältig gereinigt werden, um einen einwandfreien Betrieb des Trockners zu gewährleisten. Das Aufleuchten der Anzeige weist hierauf hin. Anzeige Behälter leeren : Der Kondensatbehälter muß nach jedem Trockengang entleert werden. Bei vollem Kondensatbehälter leutet die Anzeige Behälter leeren auf. Bitte den Behälter dann komplett entleeren.
AUSWÄHLEN DES PROGRAMMS
Dieser Wäschetrockner verfügt über eine sensorgesteuerte
Trocknung (Fuzzy Logic), bei der man lediglich den gewünschten Trocknungsgrad auswählen muß.
Bei der Trocknung von kleineren Wäscheposten oder bereits
 vorgetrockneter Wäsche wird die Auswahl eines zeitgesteuerten
Trockenprogramms und zusätzlich die Anwahl der "Schontrocknen-
Option" empfohlen.
Wenn die Sensorsteuerung keine eingelegte Wäsche erkennen
kann, wird das gewählte Programm automatisch nach 10 Minuten
abgebrochen und die Abkühlphase eingeleitet.
Wenn die Sensorsteuerung eine Überfüllung bzw. zu feuchte
Wäsche erkennt, wird das gewählte Programm automatisch auf eine Dauer von 3 Stunden verlängert und anschließend die Abkühlphase eingeleitet.
Am Ende jedes Trockenprogramms erfolgt eine Abkühlphase, bei der die Wäsche für ca. 15 Minuten mit kalter Luft abgekühlt wird.
DE 24
Programm
Perfect Home
Schranktrocken
Bügeltrocken
Mangeltrocken
Knitterschutz
Taste'
Wolle
Mix & Dry
Hemden
Kurz 40 Min.
Zeit-programme
Jeans
AUSWÄHLEN DES PROGRAMMS
Geeignet Für
Intensives Trocknen von dicken oder mehrlagigen Textilien, wie Handtüchern etc.; Programmdauer ca. 3 Stunden.
Intensives Trocknen von normal dicken und einlagigen Textilien; Programmdauer 2:45 Stunden.
Für Textilien, die noch gebügelt werden sollen; Programmdauer ca. 2:30 Stunden.
Für Textilien, die erst später gebügelt werden bzw. gemangelt werden sollen; Programmdauer ca. 1:50 Stunden.
Sonderprogramm zum Auffrischen von getragener oder schonenden Reinigen von Textilien mit handelsüblichen Trocknereinigungsmitteln; ideal zur Vorbereitung der Wäsche vor dem Bügeln nach langer lagerung oder wenn diese auf der Leine getrocknet wurden; Programmdauer ca. 9 Minuten + 3 Minuten Abkühlphase
Zum Auffrischen von auf der Leine getrockneter Wolletextilien; Programmdauer ca. 12 Minuten.
Sonderprogramm zur gleichzeitigen Trocknung von Baumwollund Kunstfasertextilien; Programmdauer ca. 2 Stunden (ACHTUNG: maximale Füllmenge 4 kg Wäsche).
Sonderprogramm speziell zur Trocknung von Hemden und Blusen aus Baumwolle und Kunstfaser; Programmdauer ca. 1 Stunde für ca. 2 kg Kunstfasertextilien (ca. 10 Hemden) oder 1:20 Stunden für ca. 3 kg Baumwolltextilien (ca. 10 Hemden).
Zur schnellen Trocknung von max. 2 kg Wäsche in nur 40 Minuten.
Neben den sensorgesteuerten Programmen stehen zeitgesteuerte
Programme zwischen 30 und 180 Minuten zur Auswahl. Im 20 Minuten-
Zyklus wird ausschließlich kalte Luft verwendet, so dass dies optimal zum Lüften von getragener Kleidung ist.
Zur Trockung von bis zu 4 kg Jeans (enstspricht ca. 5 Paar Baumwollhosen). Die Programmdauer beträgt ca. zwei Stunden, kann jedoch auf Grund von der Beladungsmenge und Restfeuchte abweichen. Das Jeans-Programm bitte nur zur Trockung von Wäschestücken aus 100% Baumwolle verwenden. Bitte in diesem Programm nur farbechte Wäsche und keine Kleidungsstücke mit Bestickung oder aufgebrachten Applikationen trocknen.
DE 25

Öffnen der Tür
Ziehen Sie am Griff, um die Tür zu öffnen. Um den Trocknungsvorgang wieder in Gang zu setzen, schließen Sie die Tür und drücken . 
 WARNUNG! Während des Trocknungsvorgangs können Trommel und Tür SEHR HEISS werden. Stoppen Sie den Trockner nie vor Ende des Trocknungsvorgangs, außer alle Gegenstände werden schnell herausgenommen und ausgebreitet, so dass die Wärme abgeleitet wird.
Sieb
WICHTIG: Damit der Wäschetrockner immer optimale Leistung erbringen kann, überprüfen Sie vor jedem Trocknungsvorgang, ob das Flusensieb sauber ist.
Benutzen Sie den Trockner nicht ohne Filter. Durch verstopfte Filter kann sich die Trocknungsdauer verlängern oder es können Schäden verursacht werden, die kostenpflichtige Reparaturen mit sich ziehen.
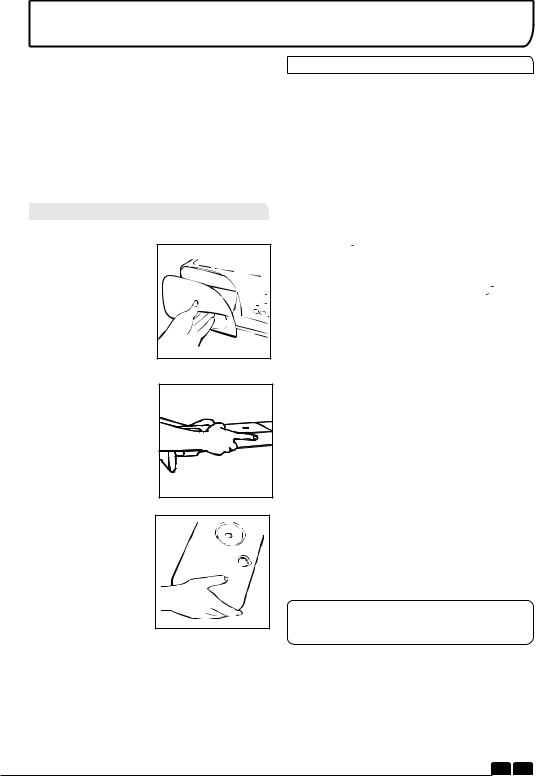
1.Ziehen Sie das Sieb nach oben.
2.Öffnen Sie das Sieb wie auf der Abbildung.
3. Entfernen Sie die Flusen sanft mit einer weichen Bürste oder den Fingerspitzen.
4. Klappen Sie das Sieb zusammen und setzen
Sie es wieder an seinen
Platz ein.
Flusensieb-Anzeige
 leuchtet auf, wenn das Sieb gesäubert werden muss.
Wenn die Wäsche nicht trocknet, kontrollieren Sie, ob das Sieb verstopft ist.
TÜR und SIEB
Reinigung des Kondensatorfilters
1. Entfernen Sie die |
Wartungsklappe |
2. Drehen Sie die zwei |
Verschlusshebel gegen |
den Uhrzeigersinn und |
z i e h e n S i e d e n |
Kondensatordeckel |
heraus |
3 . N e h m e n S i e v o r s i c h t i g d e n Filterrahmen heraus und entfernen Sie etwaigen Staub oder Flusen vorsichtig mit einem Tuch. Reinigen Sie den Filter nicht mit Wasser.
4. Entfernen |
Sie |
den |
Schaumgummifilter |
||
und reinigen Sie |
ihn |
|
u n t e r f l i e ß e n d e m |
||
Wasser, wobei Sie es |
||
drehen, um Flusen und |
||
Staub vollständig |
zu |
|
entfernen. |
|
|
5. Passen |
Sie |
den |
Kondensatordeckel |
||
wieder ein |
(Richtung |
|
wird durch |
den Pfeil |
|
angegeben) und stellen |
||
Sie sicher, dass er fest |
||
a n s e i n e n P l a t z |
||
g e d r ü c k t w i r d . |
||
Schließen Sie die zwei |
||
Verschlusshebel durch |
||
e i n e D r e h u n g i m |
||
Uhrzeigersinn. |
|
|
6. Setzen Sie die Wartungsklappe wieder ein.
REINIGEN SIE DEN FILTER NICHT MIT WASSER
DE 26
 Loading...