


FORNI DA INCASSO ELETTRONICO |
IT |
ISTRUZIONI PER L’USO |
|
BUILT-IN ELECTRONIC OVEN |
GB |
INSTRUCTIONS FOR USE |
|
|
ES |
MULTIFUNKTIONSBACKOFEN MIT |
DE |
ELEKTRONISCHR ZEITSCHALTUHR |
|
|
PT |
ELECTRONISCHE INBOUWOVEN |
NL |
GEBRUIKSAANWIJZING |
|
FOUR ELECTRONIQUE ENCASTRABLE |
FR |
MODE D’EMPLOI |
|
CANDY ELETTRODOMESTICI - Via Privata Eden Fumagalli - 20047 Brugherio Milano Italy |
|

AVVERTENZE GENERALI
Vi ringraziamo per aver scelto uno dei nostri prodotti, per ottenere da questo elettrodomestico le migliori prestazioni consigliamo di:
•Leggere attentamente le avvertenze contenute nel presente libretto.
•Conservare con cura questo libretto per ogni ulteriore consultazione.
Alla prima accensione del forno può svilupparsi fumo di odore acre, causato dal primo riscaldamento del collante dei pannelli d’isolamento avvolgenti il forno. Si tratta di un fenomeno assolutamente normale e, in caso si verificasse, occorre attendere la cessazione del fumo prima di introdurre le vivande.
Il forno è per sua natura un apparecchio che diventa caldo, in modo particolare in corrispondenza del cristallo porta. È buona norma quindi impedire che i bambini possano avvicinarsi al forno quando è in funzione, in particolare quando funziona il grill. Per questo motivo è disponibile presso il nostro Servizio di Assistenza Tecnica, un dispositivo di protezione (solo per i forni serie cristallo) atto a ridurre la temperatura delle superfici frontali della porta forno; questo dispositivo dovrebbe essere montato in caso di presenza di bambini piccoli. Tale parte può essere ottenuta contattando il nostro Servizio di Assistenza Tecnica.
DICHIARAZIONE DI CONFORMITÀ
•Questa apparecchiatura nelle parti destinate a venire a contatto con sostanze alimentari, è conforme alla prescrizione della dir. CEE 89/109 e al D.L. di attuazione N° 108 del 25/01/92.
Apparecchio conforme alle Direttive Europee 89/336/CEE, 73/23/CEE e successive modifiche.
INFORMAZIONI SULLA SICUREZZA
•Questo apparecchio dovrà essere destinato solo all’uso per
il quale è stato espressamente concepito, e cioè per la cottura di alimenti.
Ogni altro uso (ad esempio riscaldamento ambiente) è da considerarsi improprio e quindi pericoloso. Il costruttore non può essere considerato responsabile per eventuali danni derivanti da usi impropri, erronei ed irragionevoli.
•L’uso di un qualsiasi apparecchio elettrico comporta l’osservanza di alcune regole fondamentali. In particolare:
-non tirare il cavo di alimentazione per staccare la spina dalla presa di corrente
-non toccare l’apparecchio con mani o piedi bagnati o umidi
-non usare l’apparecchio a piedi nudi
-non permettere che l’apparecchio sia usato dai bambini o da incapaci, senza sorveglianza
-in generale è sconsigliabile l’uso di adattatori, prese multiple e prolunghe.
-In caso di guasto e/o di cattivo funzionamento dell’apparecchio,
spegnerlo e non manometterlo.
•In caso di danneggiamento del cavo, provvedere tempestivamente alla sua sostituzione secondo le seguendi indicazioni: aprire il coperchio morsettiera, togliere il cavo di alimentazione e sostituirlo con uno corrispondente,(tipo H05RR-F, H05VV-F, H05V2V2-F) e adeguato alla portata dell’apparecchio. Tale operazione dovrà essere eseguita da personale professionalmente qualificato. Il conduttore di terra (giallo-verde), deve obbligatoriamente essere più lungo di circa 10 mm. rispetto ai conduttori di linea.
Per l’eventuale riparazione rivolgersi solamente ad un centro di assistenza tecnica autorizzato e richiedere l’utilizzo di ricambi originali.
Il mancato rispetto di quanto sopra può compromettere la sicurezza dell’apparecchio.
INSTALLAZIONE
L’installazione è a carico dell’acquirente e la Casa Costruttrice è esonerata da questo servizio, gli eventuali interventi richiesti alla Casa Costruttrice che dipendono da una errata installazione non sono compresi nella garanzia.
L’installazione deve essere effettuata secondo le istruzioni da personale professionalmente qualificato. Una errata installazione può causare danni a persone, animali o cose, nei confronti dei quali il costruttore non può essere considerato responsabile.
INSERIMENTO DEL MOBILE
Inserire l’apparecchio nel vano del mobile (sottopiano o in colonna). Il fissaggio si esegue con 4 viti attraverso i fori della cornice, visibili aprendo la porta.
Per consentire la migliore aerazione del mobile, i forni devono essere incassati rispettando le misure e le distanze indicate nella figura in ultima pagina.
Nota: per i forni da abbinamento con piano cottura è indispensabile rispettare le istruzioni contenute nel libretto allegato all’apparecchiatura da abbinare.
IMPORTANTE
Per garantire un buon funzionamento dell’apparecchio da incasso è necessario che il mobile sia di caratteristiche adatte. I pannelli dei mobili adiacenti il forno dovranno essere in materiale resistente al calore. In particolare nel caso di mobili in legno impiallicciato le colle dovranno essere resistenti alla temperatura di 120 °C: materiali plastici o collanti non resistenti a questa temperatura sono causa di deformazioni o scollature. In conformità alle norme di sicurezza, una volta incassato l’apparecchio, non debbono essere possibili eventuali contatti con le parti elettriche. Tutte le parti che assicurano la protezione debbono essere fissate in modo tale da non poter essere tolta senza l’aiuto di qualche utensile.
Per garantire una buona areazione è necessario eliminare la parete posteriore del vano, inoltre il pianale di appoggio deve avere una luce posteriore di almeno 45 mm.
ALLACCIAMENTO ELETTRICO
Inserire la spina in una presa di corrente munita di un terzo contatto corrispondente alla presa di terra, che deve essere collegata in modo efficiente.
Per i modelli sprovvisti di spina, montare sul cavo una spina normalizzata che sia in grado di sopportare il carico indicato in targa. Il conduttore di messa a terra e contraddistinto dai colori giallo verde. Tale operazione dovrà essere eseguita da personale professionalmente qualificato.
In caso di incompatibilità tra la presa e la spina dell’apparecchio fare sostituire la presa con altra di tipo adatto, da personale professionalmente qualificato. Si può effettuare anche l’allacciamento alla rete interponendo tra l’apparecchio e la rete un interruttore omnipolare con l’apertura minima fra i contatti di 3 mm., dimensionato al carico e rispondente alle norme in vigore. Il cavo di terra giallo-verde non deve essere interrotto dall’interruttore. La presa o l’interruttore omnipolare usati per l’allacciamento devono essere facilmente accessibili ad elettrodomestico installato.
Importante: in fase di installazione, posizionare il cavo di alimentazione in modo che in nessun punto si raggiungano temperature superiore di 50 °C alla temperatura ambiente. L’apparecchio è conforme ai requisiti di sicurezza previsti dagli istituti normativi. La sicurezza elettrica di questo apparecchio è assicurata soltanto quando lo stesso è correttamente collegato ad un efficace impianto di messa a terra come previsto dalle vigenti norme di sicurezza elettrica, (in caso di dubbio, richiedere un controllo accurato dell’impianto da parte di personale professionalmente qualificato).
Importante: la ditta costruttrice resta sollevata da ogni responsabilita per eventuali danni a persone o cose, derivanti dal mancato allacciamento della linea di terra. ATTENZIONE: la tensione e la frequenza di alimentazione sono indicate in targa matricola (figura in ultima pagina). Verificare che la portata elettrica dell’impianto e delle prese di corrente siano adeguate alla potenza massima dell’apparecchio indicate in targa. In caso di dubbio rivolgersi ad una persona professionalmente qualificata.
1 IT
CONSIGLI UTILI
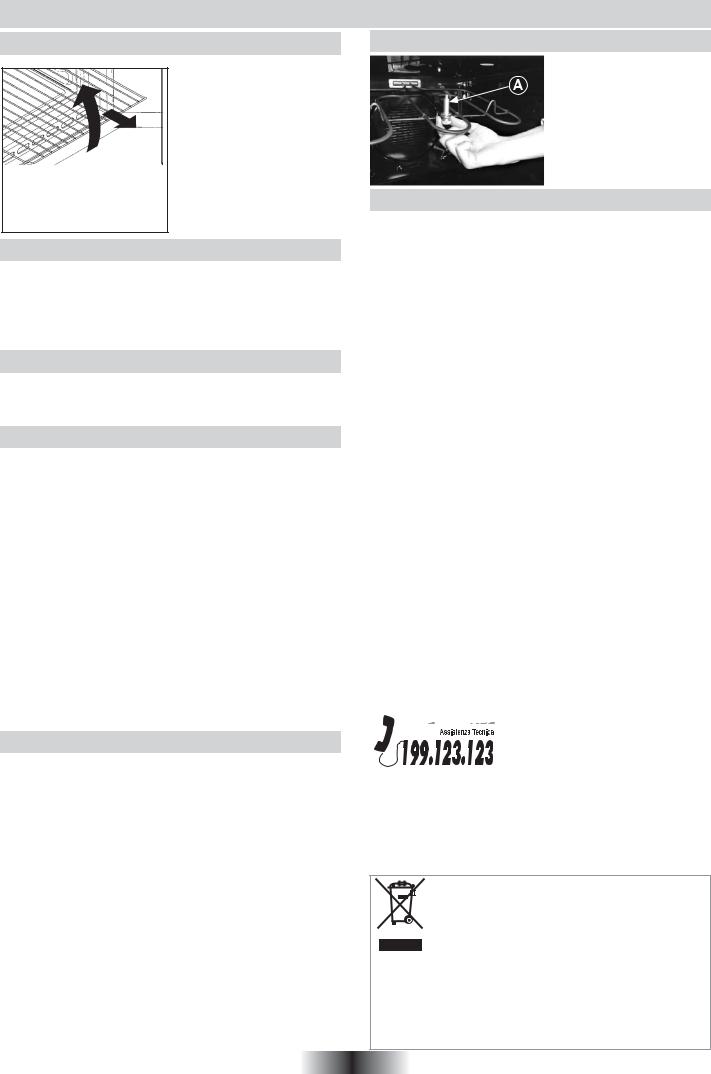
GRIGLIE FORNO - SISTEMA DI ARRESTO
Il forno è dotato di un nuovo sistema di arresto griglie. Questo sistema consente di estrarre le griglie quasi completamente senza che queste fuoriescano dal forno mantenendole perfettamente in piano, consentendo di verificare e mescolare il cibo con la massima tranquillità e sicurezza.
Per estrarre le griglie è sufficiente, come indicato sul disegno, alzarle, prendendole dalla parte anteriore e tirarle.
LA COTTURA AL GRILL
Questo tipo di cottura consente la doratura rapida dei cibi. A questo scopo consigliamo di inserire la griglia generalmente nel 3° o 4° ripiano, secondo le dimensioni dei cibi (Fig. pag. 5). Quasi tutte le carni possono essere cotte al grill, fanno eccezione alcune carni magre di selvaggina ed i polpettoni. La carne ed il pesce da cucinare al grill vanno leggermente unti con olio.
TEMPI DI COTTURA
Alle pagine 5-6 riportiamo una tabella indicativa dove sono indicati tempi e temperature consigliati per le prime cotture. Ad esperienza acquisita potrete variare a vostro piacimento i valori riportati nella tabella stessa.
PULIZIA E MANUTENZIONE
Pulire le superfici in acciaio inox e smaltate con acqua tiepida e sapone, oppure con appositi prodotti in commercio, evitando assolutamente l’uso di polveri abrasive che danneggerebbero le superfici e le parti estetiche.
La pulizia del forno è molto importante e deve essere effettuata ogni volta che questo viene usato. Infatti, sulle pareti si depositano grassi sciolti durante la cottura che potrebbero, alla successiva accensione, produrre odori sgradevoli che nuocerebbero al buon esito della cottura. Per la pulizia usare acqua calda e detersivo, sciacquando accuratamente.
Per eliminare questo fastidioso intervento, su tutti i modelli possono essere inseriti pannelli autopulenti, offerti come accessori opzionali: vedere apposito paragrafo «FORNO AUTOPULENTE CATALITICO».
Usare detersivi e pagliette d’acciaio per le griglie inox. La pulizia delle superfici in cristallo temperato deve essere eseguita quando le superfici sono fredde. Eventuali rotture dovute alla non osservanza di questa regola elementare non rientrano nei termini di garanzia.
La lampada forno può essere sostituita disinserendo elettricamente l’apparecchio e svitando l’ampolla che la racchiude, sostituendo la lampada non funzionante con una analoga resistente alle alte temperature.
FORNO AUTOPULENTE CATALITICO
Speciali pannelli autopulenti ricoperti da uno smalto a struttura microporosa, offerti come accessori opzionali per tutti i modelli, eliminano la pulizia manuale del forno.
I grassi proiettati sulle pareti durante la cottura, vengono decomposti dallo smalto, mediante un processo catalitico di ossidazione e trasformati in prodotti gassosi.
Schizzi eccessivi di grasso possono ostruire i pori e quindi impedire l’autopulizia. Tale caratteristica può essere ripristinata mediante un riscaldamento per circa 10-20 minuti del forno vuoto impostando la manopola forno in corrispondenza della massima temperatura. Non usare prodotti abrasivi, pagliette metalliche, oggetti appuntiti, panni ruvidi, prodotti chimici o detersivi che possono danneggiare irrimediabilmente lo smalto.
Si consiglia inoltre di utilizzare pentole a bordi alti nel caso di cotture di vivande particolarmente grasse (arrosti, ecc.) e di usare la leccarda quando si esegue la cottura al grill.
Qualora, per particolari condizioni di sporco, non fosse sufficiente l’azione precedente, si consiglia di intervenire asportando i grassi con un panno morbido od una spugna inumiditi con acqua calda. La porosità dello smalto è fondamentale per garantire l’azione autopulente.
N.B.: Tutti i pannelli autopulenti in commercio hanno un’efficacia di rendimento di circa 300 ore di funzionamento forno. Dopo tale limite i pannelli dovrebbero essere sostituiti.
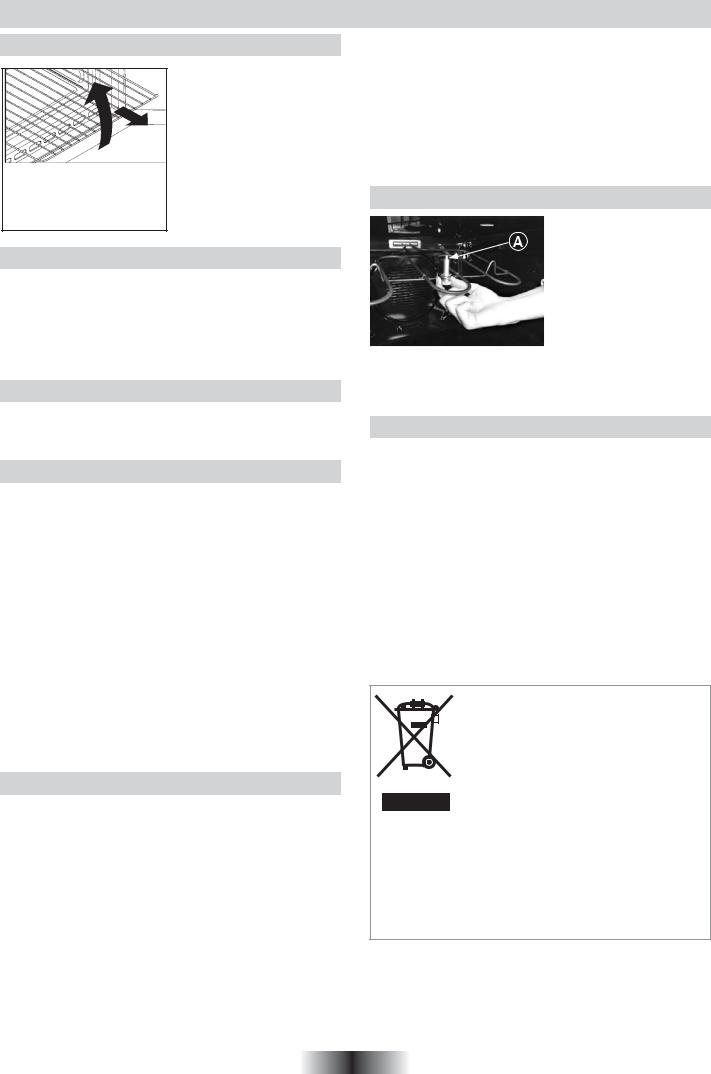
GRILL BASCULANTE
Per facilitare la pulizia della parte superiore del forno svitare la ghiera (A) posta al centro della resistenza del grill ed abbassarla. Terminata la pulizia alzare la resistenza con la ghiera (A) inserita nella sua posizione ed avvitare.
ATTENZIONE: Il forno DEVE funzionare SOLO a resistenza bloccata.
SERVIZIO ASSISTENZA CLIENTI
CERTIFICATO DI GARANZIA CONVENZIONALE: cosa fare?
Il Suo prodotto è garantito, alle condizioni e nei termini riportati sul certificato inserito nel prodotto ed in base alle previsioni del decreto legislativo 24/02, nonché del decreto legislativo 6 settembre 2005, n. 206, per un periodo di 24 mesi decorrenti dalla data di consegna del bene.
Così come riportato nei testi dei Decreti Legislativi citati, il certificato di garanzia dovrà essere da Lei conservato, debitamente compilato, per essere mostrato al Servizio Assistenza Tecnica Autorizzato, in caso di necessità, unitamente ad un documento fiscalmente valido rilasciato dal rivenditore al momento dell’acquisto (bolla di consegna, fattura, scontrino fiscale, altro) sul quale siano indicati il nominativo del rivenditore, la data di consegna, gli estremi identificativi del prodotto ed il prezzo di cessione
Resta pure inteso che, salvo prova contraria, poiché si presume che i difetti di conformità che si manifestano entro sei mesi dalla consegna del bene esistessero già a tale data, a meno che tale ipotesi sia incompatibile con la natura del bene o con la natura del difetto di conformità, il Servizio di Assistenza Tecnica Autorizzato Gias, verificato il diritto all’intervento, lo effettuerà senza addebitare il diritto fisso di intervento a domicilio, la manodopera ed i ricambi. Per contro, nel successivo periodo di diciotto mesi di vigenza della garanzia, sarà invece onere del consumatore che intenda fruire dei rimedi accordati dalla garanzia stessa provare l’esistenza del difetto di conformità del bene sin dal momento della consegna; nel caso in cui il consumatore non fosse in grado di fornire detta prova, non potranno essere applicate le condizioni di garanzia previste e pertanto il Servizio di Assistenza Tecnica Autorizzato Gias effettuerà l’intervento addebitando al consumatore tutti i costi relativi.
ESTENSIONE DELLA GARANZIA FINO A 5 ANNI : come?
Le ricordiamo inoltre che sullo stesso certificato di garanzia convenzionale Lei troverà le informazioni ed i documenti necessari per prolungare la garanzia dell’apparecchio sino a 5 anni e così, in caso di guasto, non pagare il diritto fisso di intervento a domicilio, la manodopera ed i ricambi. Per qualsiasi informazione necessitasse, La preghiamo rivolgersi al numero telefonico del Servizio Clienti 0392086811.
ANOMALIE E MALFUNZIONAMENTI: a chi rivolgersi ?
Per qualsiasi necessità il centro assistenza autorizzato è a Sua completa disposizione per fornirLe i chiarimenti necessari; comunque qualora il Suo prodotto presenti anomalie o mal funzionamenti, prima di rivolgersi al Servizio Assistenza Autorizzato, consigliamo vivamente di effettuare i controlli indicati sopra.
UN SOLO NUMERO TELEFONICO PER OTTENERE ASSISTENZA.
Qualora il problema dovesse persistere, componendo il “Numero Utile” sotto indicato, sarà messo in contatto direttamente con il 


 Servizio Assistenza Tecnica Autorizzato che opera nella Sua zona di residenza.
Attenzione, la chiamata è a pagamento; il costo verrà comunicato, tramite messaggio vocale, dal Servizio clienti
dell’operatore telefonico utilizzato. Dettagli sono presenti sul sito internet www.candy.it
MATRICOLA DEL PRODOTTO. Dove si trova?
E’ indispensabile che comunichi al Servizio Assistenza Tecnica Autorizzato la sigla del prodotto ed il numero di matricola (16 caratteri che iniziano con la cifra 3) che troverà sul certificato di garanzia oppure sulla targa matricola del prodotto (figura in ultima pagina). In questo modo Lei potrà contribuire ad evitare trasferte inutili del tecnico, risparmiando oltretutto i relativi costi.
Questo elettrodomestico è marcato conformemente
alla Direttiva Europea 2002/96/CE sui rifiuti da apparecchiature elettriche ed elettroniche (WEEE).
Assicurandovi che questo prodotto sia smaltito corret-
tamente, aiuterete ad evitare possibili conseguenze negative all’ambiente e alla salute delle persone, che potrebbero verificarsi a causa d’un errato trattamento di
questo prodotto giunto a fine vita. Il simbolo sul prodotto indica che questo apparecchio non può essere trattato come un normale rifiuto domestico; dovrà invece essere consegnato al punto più vicino di raccolta per il riciclo delle apparecchiature elettriche ed elettroniche. Lo smaltimento deve essere effettuato in accordo con le regole ambientali vigenti per lo smaltimento dei rifiuti. Per informazioni più dettagliate sul trattamento, recupero e riciclo di questo prodotto, per favore contattare l’ufficio pubblico di competenza (del dipartimento ecologia e ambiente), o il vostro servizio di raccolta rifiuti a domicilio, o il negozio dove avete acquistato il prodotto.
2 IT

USO DEL PROGRAMMATORE ELETTRONICO
FUNZIONE |
|
COME SI ATTIVA |
COME SI SPEGNE |
COSA FA |
|
A COSA SERVE |
||||||||||||||||||||||
LAMPADA |
• Spostando la manopola |
|
|
|
|
|
|
|
|
|
|
• Questa funzione è utile per |
||||||||||||||||
|
(1) sul simbolo |
viene |
|
|
|
|
|
|
|
|
|
|
ispezionare il forno quando |
|||||||||||||||
FORNO |
|
|
|
|
|
|
|
|
|
|
|
|||||||||||||||||
|
accesa la lampada |
|
|
|
|
|
|
|
|
|
|
spento |
|
|
||||||||||||||
|
|
|
|
|
|
|
|
|
|
|
|
|
|
|
|
|
||||||||||||
OROLOGIO |
|
|
|
|
|
|
|
|
|
|
|
|
|
|
|
|
||||||||||||
• Posizionare il selettore 1 |
• Posizionare il selettore sul |
• Permettedi regolare l’ora |
• Regolare l’ora utilizzando |
|||||||||||||||||||||||||
|
|
|
|
|
sul simbolo |
|
|
|
simbolo |
|
|
|
|
|
indicata dall’orologio del |
i tasti |
e |
durante la re- |
||||||||||
|
|
|
|
• Regolare l’ora con i tasti |
|
|
|
|
|
|
|
forno |
|
|
golazione |
i numeri sul |
||||||||||||
|
|
|
|
|
|
|
e |
|
(durante la regola- |
|
|
|
|
|
|
|
|
|
|
display lampeggiano |
||||||||
|
|
|
|
|
zione i numeri sul display |
|
|
|
|
|
|
|
|
|
|
|
|
|
||||||||||
|
|
|
|
|
lampeggiano) |
|
|
|
|
|
|
|
|
|
|
|
|
|
|
|||||||||
SUONERIA |
• Posizionare il selettore 1 |
• Dopo il tempo impostato |
• Permette di |
avere |
un |
• Viene |
utilizzato come |
|||||||||||||||||||||
|
|
|
|
|
sul simbolo |
|
|
|
la funzione si spegne da |
segnale sonoro (per alcuni |
promemoria |
|||||||||||||||||
|
|
|
|
• Regolare la durata con i |
sola; |
se |
deve |
essere |
secondi) al termine del |
• Il funzionamento della |
||||||||||||||||||
|
|
|
|
|
tasti |
|
|
e |
|
|
(durante la |
fermata prima è necessario |
tempo impostato |
|
funzione è indipendente |
|||||||||||||
|
|
|
|
|
regolazione i numeri sul |
portare il tempo impostato |
|
|
|
dal forno (può essere |
||||||||||||||||||
|
|
|
|
|
display lampeggiano) |
a 0 (selettore 1 su |
e |
|
|
|
utilizzato anche a forno |
|||||||||||||||||
|
|
|
|
|
|
|
|
|
|
|
|
|
|
|
|
utilizzati i tasti |
|
e |
) |
|
|
|
spento) |
|
||||
SICUREZZA |
|
|
|
|
|
|||||||||||||||||||||||
• Posizionare il selettore 1 |
• Premere insieme i tasti |
• Non permette di cambiare |
• Attivata a forno spento non |
|||||||||||||||||||||||||
BAMBINI |
|
sul |
simbolo |
la spia |
e |
per 3 secondi |
|
le impostazioni del forno |
permette |
l’accensione |
||||||||||||||||||
|
|
|
|
|
lampeggia |
|
|
|
|
|
• La spia lampeggia |
|
(neanche girando acciden- |
del forno stesso |
||||||||||||||
|
|
|
|
• Premere insieme i tasti |
|
|
|
|
|
|
|
talmente i selettori) |
|
• Attivata a forno funzionante |
||||||||||||||
|
|
|
|
|
|
|
|
|
|
|
|
non permette di cambiare |
||||||||||||||||
|
|
|
|
|
|
e |
|
per 3 secondi |
|
|
|
|
|
|
|
|
|
|
||||||||||
|
|
|
|
|
|
|
|
|
|
|
|
|
|
|
|
|
le impostazioni del forno |
|||||||||||
|
|
|
|
• Confermato smette di lam- |
|
|
|
|
|
|
|
|
|
|
||||||||||||||
|
|
|
|
|
|
|
|
|
|
|
|
|
|
(spostamento accidentale |
||||||||||||||
|
|
|
|
|
peggiare |
|
|
|
|
|
|
|
|
|
|
|
|
|
|
|
||||||||
|
|
|
|
|
|
|
|
|
|
|
|
|
|
|
|
|
|
|
|
dei selettori) |
||||||||
|
|
|
|
|
|
|
|
|
|
|
|
|
|
|
|
|
|
|
|
|
|
|
|
|
|
Attenzione: il forno può |
||
|
|
|
|
|
|
|
|
|
|
|
|
|
|
|
|
|
|
|
|
|
|
|
|
|
|
essere ancora spento |
||
|
|
|
|
|
|
|
|
|
|
|
|
|
|
|
|
|
|
|
|
|
|
|
|
|
|
girando il selettore 2 |
||
|
|
|
|
|
|
|
|
|
|
|
|
|
|
|
|
|
|
|
|
|
|
|
|
|
|
sulla posizione 0 |
||
DURATA |
• Selezionare una funzione |
• Al termine della durata |
• Permette di memorizzare |
• Al termine della durata di |
||||||||||||||||||||||||
COTTURA |
|
di cottura (selettore 2) |
impostata la funzione si |
l’ora di fine cottura |
|
cottura impostata ferma |
||||||||||||||||||||||
|
|
|
|
• Posizionare il selettore 1 |
spegne da sola; se deve |
• Al termine dell’imposta- |
automaticamente il forno |
|||||||||||||||||||||
|
|
|
|
|
sul simbolo |
|
|
|
essere fermata prima è |
zione posizionare il selet- |
ed avvisa, per alcuni |
|||||||||||||||||
|
|
|
|
|
|
|
|
secondi, |
con segnale |
|||||||||||||||||||
|
|
|
|
• Regolare la durata con i |
necessario fermare il forno |
tore 1 sul simbolo |
per |
|||||||||||||||||||||
|
|
|
|
sonoro |
|
|
||||||||||||||||||||||
|
|
|
|
|
tasti |
|
|
e |
(durante la re- |
oppure portare a 00:00 la |
visualizzare l’ora corrente |
|
|
|||||||||||||||
|
|
|
|
|
|
|
|
|
|
|||||||||||||||||||
|
|
|
|
|
golazione |
|
i |
numeri sul |
durata cottura (selettore 1 |
• Per visualizzare il tempo |
|
|
|
|||||||||||||||
|
|
|
|
|
display lampeggiano) |
su simbolo |
|
ed utilizzare |
programmato posizionare |
|
|
|
||||||||||||||||
|
|
|
|
|
|
|
|
|
|
|
|
|
|
|
|
i tasti |
e |
) |
|
|
|
il selettore 1 sul simbolo |
|
|
|
|||
FINE |
• Selezionare una funzione |
• All’ora impostata la funzione |
• Permette di memorizzare |
• Tipicamente si utilizza que- |
||||||||||||||||||||||||
COTTURA |
|
di cottura (selettore 2) |
si spegne da sola; se deve |
l’ora di fine cottura |
|
sta funzione con la funzio- |
||||||||||||||||||||||
|
|
|
|
• Posizionare il selettore 1 |
essere fermata prima è |
• Al termine dell’impostazione |
ne ‘durata cottura’ - ad |
|||||||||||||||||||||
|
|
|
|
|
sul simbolo |
|
|
|
necessario fermare il forno |
posizionare il selettore 1 |
esempio il cibo desidrato |
|||||||||||||||||
|
|
|
|
• Regolare l’ora di fine cottura |
posizionando il selettore 2 |
sul simbolo |
per visua- |
deve cuocere per 45 minuti |
||||||||||||||||||||
|
|
|
|
e desidero sia pronto per |
||||||||||||||||||||||||
|
|
|
|
|
con i tasti |
|
|
e |
(durante |
sul simbolo |
|
|
|
lizzare l’ora corrente |
|
|||||||||||||
|
|
|
|
|
|
|
|
|
|
|
le ore 12:30; in tal caso |
|||||||||||||||||
|
|
|
|
|
la regolazione i numeri sul |
|
|
|
|
|
|
|
• Per visualizzare il tempo |
|||||||||||||||
|
|
|
|
|
|
|
|
|
|
|
|
selezionare la funzione di |
||||||||||||||||
|
|
|
|
|
display lampeggiano) |
|
|
|
|
|
|
|
programmato posizionare |
|||||||||||||||
|
|
|
|
|
|
|
|
|
|
|
|
cottura desiderata |
||||||||||||||||
|
|
|
|
|
|
|
|
|
|
|
|
|
|
|
|
|
|
|
|
|
|
|
il selettore 1 sul simbolo |
impostare la durata cottura |
||||
|
|
|
|
|
|
|
|
|
|
|
|
|
|
|
|
|
|
|
|
|
|
|
||||||
|
|
|
|
|
|
|
|
|
|
|
|
|
|
|
|
|
|
|
|
|
|
|
|
|
|
a 45 minuti impostare la |
||
|
|
|
|
|
|
|
|
|
|
|
|
|
|
|
|
|
|
|
|
|
|
|
|
|
|
fine cottura alle 12:30 |
||
|
|
|
|
|
|
|
|
|
|
|
|
|
|
|
|
|
|
|
|
|
|
|
|
|
|
la cottura avrà automa- |
||
|
|
|
|
|
|
|
|
|
|
|
|
|
|
|
|
|
|
|
|
|
|
|
|
|
|
ticamente inizio alle ore |
||
|
|
|
|
|
|
|
|
|
|
|
|
|
|
|
|
|
|
|
|
|
|
|
|
|
|
11:45 (12:30 meno 45 mi- |
||
|
|
|
|
|
|
|
|
|
|
|
|
|
|
|
|
|
|
|
|
|
|
|
|
|
|
nuti), all’ora impostata |
||
|
|
|
|
|
|
|
|
|
|
|
|
|
|
|
|
|
|
|
|
|
|
|
|
|
|
come fine cottura il forno |
||
IL PROGRAMMATORE |
|
|
|
|
|
|
|
|
|
|
si spegne automatica- |
|||||||||||||||||
|
|
|
|
|
|
|
|
|
|
mente |
|
|
||||||||||||||||
|
|
|
|
|
|
|
|
|
|
|
|
|
|
|
|
|
|
|
|
|
|
|
|
|
|
Attenzione: impostando |
||
|
|
|
|
Display |
|
|
orologio |
|
|
|
Visualizzazione sicurezza |
|
|
|
|
|
|
solo la fine cottura e non |
||||||||||
|
|
|
|
|
|
|
|
|
|
|
|
|
|
|
||||||||||||||
|
|
|
|
|
|
|
|
|
|
|
|
|
|
|
la durata della cottura la |
|||||||||||||
|
|
|
|
|
|
|
|
|
|
|
|
|
|
|
|
|
|
|
|
|
|
|
|
|
|
cottura inizierà subito e |
||
|
|
|
|
|
|
|
|
|
|
|
|
|
|
|
|
|
|
|
|
|
|
|
|
|
|
terminerà all’ora di fine |
||
|
|
|
|
|
|
|
|
|
|
|
|
|
|
|
|
|
|
|
|
|
|
|
|
|
|
cottura impostata |
||
|
|
|
|
|
|
|
|
|
|
|
|
|
|
|
|
|
|
|
|
|
|
|
|
|
|
|
|
|
|
|
|
|
|
|
|
|
|
|
|
|
|
|
|
|
|
|
|
|
|
|
|
|
|
|
|
|
|
|
|
|
|
|
|
|
|
|
|
|
|
|
|
|
|
|
|
|
|
|
|
|
|
|
|
|
|
|
|
|
|
|
|
|
|
|
|
|
|
|
|
|
|
|
|
|
|
|
|
|
|
|
|
|
|
|
|
|
|
|
|
|
|
|
|
|
|
|
|
|
|
|
|
|
|
|
|
|
|
|
|
|
|
|
|
|
|
|
|
|
|
|
|
|
|
|
|
|
|
|
|
|
|
|
|
|
|
|
|
|
|
|
|
|
|
|
|
|
|
|
|
|
|
|
|
|
|
|
|
|
|
|
|
|
|
|
|
|
|
|
|
|
|
|
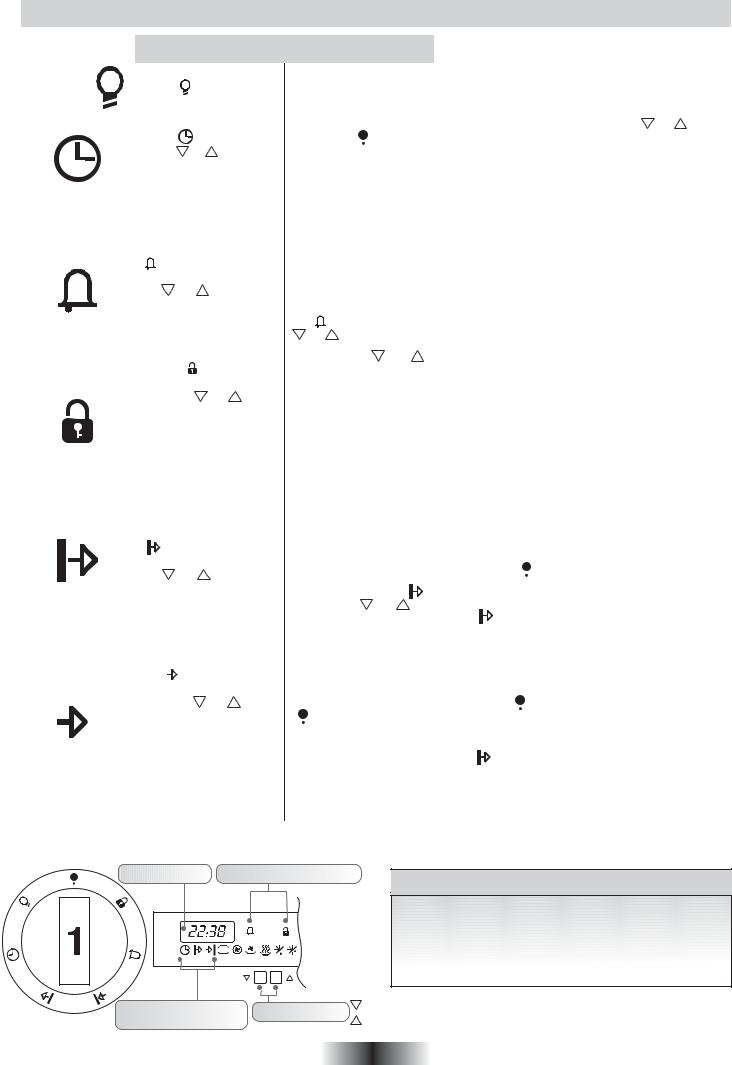
Visualizzazione funzioni Tasti regolazione programmatore
Il programma esegue alcuni controlli ad ogni impostazione e in conseguenza può essere percepito un piccolo ritardo sulla partenza
3 IT

ISTRUZIONI PER L’USO
NB. Alcuni modelli sono dotati di manopole a scomparsa, per poterle ruotare estrarle premendo.
Display orologio |
Visualizzazione sicurezza |
Display temperature |
Impostazioni funzioni |
|
Impostazioni funzioni |
programmatore |
|
forno (cottura) |
Visualizzazione funzioni |
|
Visualizzazione modi |
programmatore |
|
cottura |
|
Tasti regolazione |
|
• Se l’orologio non viene impostato il forno non funziona e sul display lampeggia l’ora 12:00.
Per avviare la cottura è necessario selezionare una funzione con la manopola (2), sul display si illuminerà il simbolo corrispondente e la temperatura automaticamente pre-definita lampeggerà, se si desidera modificare tale temperatura, agire sui tasti o . Dopo qualche secondo il forno entrerà in funzione, ma è possibile regolare il programmatore per l’avvio differito all’ora desiderata (si veda il capitolo “Il programmatore”). Il simbolo della funzione cottura lampeggerà fino a che il forno non avrà raggiunto la temperatura indicata sul display, raggiunta smetterà di lampeggiare e un suono avviserà l’utente.
Nota bene: È possibile interrompere il funzionamento del forno in qualsiasi momento riportando la manopola (2) sullo “ ”.
Simbolo Temperatura Possibile
predefinita regolazione
Funzione
220° C |
50°-240° C |
Convezione naturale |
|||
Sono in funzione la resistenza suola e la resistenza cielo forno. |
|||||
|
|
|
|
È la cottura tradizionale, ottima per arrostire cosciotti, selvaggina, ideale per biscotti, |
|
Programma di prova secondo CENELEC EN 50304 utilizzato |
mele al forno e per rendere i cibi molto croccanti. Si ottengono buoni risultati per |
||||
cotture su un ripiano con regolazione della temperatura da 50 a 240°C. |
|||||
per la definizione della classe energetica. |
|
|
|
||
|
|
|
|
||
|
|
|
|
Forno ventilato |
|
|
|
|
|
È in funzione la resistenza circolare posteriore con l’ausilio della ventola interna al |
|
180° C |
50°-240° C |
forno. L’aria calda viene ripartita sui diversi ripiani; è l’ideale per cuocere |
|||
contemporaneamente diversi tipi di cibo (carne, pesce, senza mescolare sapori e |
|||||
|
|
|
|
odori). Cottura delicata - indicata per pan di Spagna, torte margherita, pasta sfoglia, |
|
|
|
|
|
ecc.). |
|
|
|
|
|
|
|
160° C |
50°-220° C |
Suola ventilata |
|||
Adatta per cotture delicate (torte-soufflè). |
|||||
|
|
|
|
||
|
|
|
|
|
|
|
|
|
|
Mantenimento in caldo |
|
|
|
|
|
Utilizzo intermittente della resistenza di suola e di cielo con l’ausilio della ventola. |
|
60° C |
|
|
|
La temperatura è pre-regolata a 60°C costanti (per questa funzione non è possibile |
|
|
|
|
modificare la temperatura di funzionamento). Ideale per tenere in caldo i cibi appena |
||
|
|
|
|
cotti senza rischio di sovracottura, è molto pratico anche per riscaldare le stoviglie |
|
|
|
|
|
che devono essere servite calde. |
|
|
|
|
|
|
|
|
|
|
|
Scongelamento a temperatura ambiente |
|
20° C |
|
|
|
Questa posizione permette di far circolare l’aria a temperatura ambiente intorno al |
|
|
|
|
cibo surgelato facendolo così scongelare in pochi minuti senza modificare od alterare |
||
|
|
|
|
il contenuto proteico. |
|
|
|
|
|
|
|
|
|
|
|
Scongelamento |
|
40° C |
|
|
|
Utilizzo intermittente della resistenza di suola e di cielo con l’ausilio della ventola. |
|
|
|
|
La temperatura è pre-regolata a 40°C costanti (per questa funzione non è possibile |
||
|
|
|
|||
|
|
|
|
modificare la temperatura di funzionamento). Questa funzione permette di scongelare |
|
|
|
|
|
rapidamente prima della cottura. |
|
|
|
|
|
|
|
230° C |
|
|
|
Funzione pizza |
|
|
|
|
Il calore avvolgente in questa funzione ricrea un ambiente simile a quello dei forni |
||
|
|
|
|||
|
|
|
|
a legna di pizzeria. |
|
|
|
|
|
|
|
210° C |
180°-240° C |
Grigliatura tradizionale a porta chiusa |
|||
In questa posizione viene inserita la resistenza del grill a raggi infrarossi. Ottima nella |
|||||
|
|
|
|
cottura di carni di medie e piccolo spessore (salsicce, costine, bacon). |
|
|
|
|
|
|
|
|
|
|
|
Grill ventilato a porta chiusa |
|
190° C |
50°-200° C |
L’aria, riscaldata dalla resistenza grill, viene aspirata dal ventilatore che la riversa |
|||
sulle vivande alla temperatura desiderata tra 50 e 200°C. Il grill ventilato sostituisce |
|||||
|
|
|
|
egregiamente il girarrosto e garantisce ottimi risultati con pollame, salsicce e carni |
|
rosse, anche in quantità rilevante.
200° C |
50°-230° C |
Programma di prova secondo CENELEC EN 50304.
Forno ventilato
Sono in funzione la resistenza di suola e di cielo con l’ausilio della ventola interna al forno. Questa funzione è indicata per la cottura di pollame, pesce, pane, ecc. Questo sistema di cottura assicura anche una buona distribuzione del calore e quindi è possibile cuocere su ampia superficie qualsiasi pietanza.
4 IT
TABELLA TEMPI DI COTTURA
I tempi suggeriti nelle seguenti tabelle sono indicativi, infatti possono variare secondo la qualità, la freschezza, la dimensione e lo spessore degli alimenti e secondo il vostro gusto. Lasciare sempre riposare per alcuni minuti prima di servire, perché tutti gli alimenti continuano a cuocere dopo averli tolti dal forno.
CONSIGLIO UTILE: Per non rendere le superfici troppo secche |
Posizione ripiani |
|
è consigliato abbassare la temperatura e allungare i tempi di |
|
|
cottura. |
|
|
|
|
|
|
|
|
Forno elettrico statico |
Forno elettrico ventilato |
|
|
||||
|
|
|
|
|
|
|
|
|
|
|
|
Pietanza |
Quantità |
Ripiano |
Tempo |
Tempe- |
Ripiano |
Tempo |
Tempera- |
Osservazioni |
|
|
|
|
|
di cottura |
ratura |
|
di cottura |
tura forno |
|
|
|
|
|
|
in minuti |
forno |
|
in minuti |
|
|
|
|
• Pasta |
|
|
|
|
|
|
|
|
|
|
Lasagne |
Kg 3,5 |
2 |
70 75 |
220 |
2 |
60 65 |
200 |
Inserire le lasagne nel forno freddo |
|
|
|
|
|
|
|
|
|
|
|
|
|
Cannelloni |
Kg 1,8 |
2 |
50 60 |
220 |
2 |
40 50 |
200 |
Inserire i cannelloni nel forno freddo |
|
|
|
|
|
|
|
|
|
|
|
|
|
Pasta al forno |
Kg 2,5 |
2 |
55 60 |
220 |
2 |
45 50 |
200 |
Inserire la pasta al forno nel forno freddo |
|
|
|
|
|
|
|
|
|
|
|
|
|
• Paste salate |
|
|
|
|
|
|
|
|
|
|
|
|
|
|
|
|
|
|
Preparate la pasta a forma di pagnotta e |
|
|
|
Kg 1 |
|
35 |
|
|
30 35 |
|
incidere con un coltello una croce sulla parte |
|
|
Pane |
2 |
200 |
2 |
180 |
superiore della forma. Lasciare lievitare |
||||
|
di pasta |
prerisc.10 |
prerisc.10 |
a temperatura ambiente almeno 2 ore, |
||||||
|
|
|
|
|
|
|||||
|
|
|
|
|
|
|
|
|
ugere la leccarda e posizionate la forma |
|
|
|
|
|
|
|
|
|
|
bene al centro della stessa. |
|
|
|
|
|
|
|
|
|
|
|
|
|
|
|
|
|
|
|
|
|
Preriscaldate per 15 min. il forno preparate |
|
|
Pizze |
Kg 1 |
1 |
25 35 |
190 |
1 |
20 25 |
190 |
le pizze nella leccarda smaltata con pomo- |
|
|
dori, mozzarella e prosciutto, olio, sale, |
|||||||||
|
|
|
|
|
|
|
|
|
||
|
|
|
|
|
|
|
|
|
origano |
|
|
|
|
|
|
|
|
|
|
|
|
|
Pasta sfoglia |
n° 24 |
1 |
30 35 |
220 |
2 |
25 30 |
200 |
Disponete 24 vol au vent nella leccarda |
|
|
Vol au vent |
|||||||||
|
e cuocete. |
|||||||||
|
(Surgelati) |
|
|
|
|
|
|
|
||
|
|
|
|
|
|
|
|
|
|
|
|
|
|
|
|
|
|
|
|
|
|
|
Focaccia |
gr. 200 |
|
|
|
|
|
|
Preriscaldate per 15 min., ungere la teglia |
|
|
2 |
25 30 |
200 |
2 |
20 25 |
180 |
del forno, disporre le 4 focacce oliate e |
|||
|
(n° 4) |
di pasta cad. |
salate prima di infornare, lascire lievitare a |
|||||||
|
|
|
|
|
|
|
||||
|
|
|
|
|
|
|
|
|
temperatura ambiente per almeno 2 ore. |
|
|
• Carne |
|
|
|
|
|
|
|
|
|
|
|
|
|
|
|
|
|
|
|
|
Tutte le carni possono essere cotte in recipiente con bordo basso o bordo alto.
È consigliabile coprire il recipiente a bordo basso con un coperchio per evitare di sporcare il forno con schizzi del condimento. Le carni coperte risultano più morbide e succose, mentre quelle scoperte risultano più croccanti.
I tempi indicati valgono per cotture con recipiente coperto o scoperto.
|
Roastbeef |
Kg 1 |
3 |
70 80 |
220 |
3 |
50 60 |
200 |
Disporre la carne in una teglia Pirex a bordo |
||
|
intero |
alto con sale pepe. Voltare a metà cottura |
|||||||||
|
|
|
|
|
|
|
|
|
|||
|
|
|
|
|
|
|
|
|
|
|
|
|
Arrosto di maiale |
Kg 1 |
2 |
100 |
110 |
220 |
2 |
80 90 |
200 |
Disporre la carne in una teglia Pirex a bordo |
|
|
arrotolato |
alto con sale pepe. Voltare a metà cottura |
|||||||||
|
|
|
|
|
|
|
|
|
|||
|
Arrosto di vitello |
Kg 1,3 |
1 |
90 110 |
220 |
2 |
90 100 |
200 |
Cuocere come sopra |
||
|
arrotolato |
||||||||||
|
|
|
|
|
|
|
|
|
|
|
|
|
|
|
|
|
|
|
|
|
|
|
|
|
Arrosto di manzo |
Kg 1 |
2 |
80 |
90 |
220 |
2 |
80 90 |
200 |
Cuocere come sopra |
|
|
filetto |
||||||||||
|
|
|
|
|
|
|
|
|
|
|
|
|
|
|
|
|
|
|
|
|
|
|
|
|
• Pesci |
|
|
|
|
|
|
|
|
|
|
|
Trota |
3 intere / Kg 1 |
2 |
40 |
45 |
220 |
2 |
35 40 |
200 |
Cuocere le trote coperte con olio, sale e |
|
|
cipolle in teglia Pirex. |
||||||||||
|
|
|
|
|
|
|
|
|
|
||
|
|
|
|
|
|
|
|
|
|
|
|
|
Salmone |
700 g a fette |
2 |
30 |
35 |
220 |
2 |
30 25 |
200 |
Cuocere il salmone non coperto in teglia |
|
|
2,5 cm s.p. |
Pirex con sale, pepe e olio. |
|||||||||
|
|
|
|
|
|
|
|
|
|||
|
Sogliola |
Filetti / Kg 1 |
2 |
40 |
45 |
220 |
2 |
35 40 |
200 |
Cuocete la sogliola con sale e un cucchiaio |
|
|
d’olio. |
||||||||||
|
|
|
|
|
|
|
|
|
|
||
|
|
|
|
|
|
|
|
|
|
|
|
|
Orata |
2 intere |
2 |
40 |
45 |
220 |
2 |
35 40 |
200 |
Cuocere in recipiente coperto le orate con |
|
|
olio e sale |
||||||||||
|
|
|
|
|
|
|
|
|
|
||
|
|
|
|
|
|
|
|
|
|
|
|
5 IT

TABELLA TEMPI DI COTTURA
|
|
|
Forno elettrico statico |
Forno elettrico ventilato |
|
|
|||||
|
|
|
|
|
|
|
|
|
|
|
|
|
Pietanza |
Quantità |
Ripiano |
Tempo |
Tempe- |
Ripiano |
Tempo |
Tempera- |
Osservazioni |
|
|
|
|
|
|
di cottura |
ratura |
|
di cottura |
tura forno |
|
|
|
|
|
|
|
in minuti |
forno |
|
in minuti |
|
|
|
|
|
• Pollame, Coniglio |
|
|
|
|
|
|
|
|
|
|
|
Faraona |
Kg 1-1,3 |
2 |
60 80 |
220 |
2 |
60 70 |
200 |
Sistemare la faraona in teglia Pirex o |
||
|
ceramica a bordo alto condita con aromi |
||||||||||
|
|
|
|
|
|
|
|
|
|
naturali e pochissimo olio. |
|
|
|
|
|
|
|
|
|
|
|
|
|
|
Pollo |
Kg 1,5-1,7 |
2 |
110 120 |
220 |
2 |
100 |
110 |
200 |
Come per la faraona |
|
|
|
|
|
|
|
|
|
|
|
|
|
|
Coniglio a pezzi |
Kg 1-1,2 |
2 |
55 65 |
220 |
2 |
50 |
60 |
200 |
Mettete i pezzi di uguali dimensioni nella |
|
|
leccarda smaltata, condite con aromi |
||||||||||
|
|
|
|
|
|
|
|
|
|
naturali. se necessario voltate i pezzi. |
|
|
|
|
|
|
|
|
|
|
|
|
|
|
• Dolci, Torte |
|
|
|
|
|
|
|
|
|
|
|
Torta cacao |
scatola |
1 |
55 |
180 |
1 |
50 |
160 |
In teglia per torte Ø 22. Prerisc. per 10 min. |
||
|
|
|
|
|
|
|
|
|
|
|
|
|
Torta margherita |
scatola |
1 |
55 |
175 |
1 |
40 |
45 |
160 |
In teglia per torte Ø 22. Prerisc. per 10 min. |
|
|
|
|
|
|
|
|
|
|
|
|
|
|
Torta di carote |
scatola |
1 |
65 |
180 |
1 |
50 |
60 |
160 |
In teglia per torte Ø 22. Prerisc. per 10 min. |
|
|
|
|
|
|
|
|
|
|
|
|
|
|
Torta crostata |
700 gr |
1 |
40 |
200 |
2 |
30 |
35 |
180 |
In teglia per torte Ø 22. Prerisc. per 10 min. |
|
|
albicocca |
||||||||||
|
|
|
|
|
|
|
|
|
|
|
|
|
• Verdura |
|
|
|
|
|
|
|
|
|
|
|
|
|
|
|
|
|
|
|
|
Disponete i finocchi tagliati in 4 parti e |
|
|
Finocchi |
800 gr |
1 |
70 80 |
220 |
1 |
60 |
70 |
200 |
coperti in teglia di Pirex con burro e sale e |
|
|
possibilmente con la parte interna verso |
||||||||||
|
|
|
|
|
|
|
|
|
|
||
|
|
|
|
|
|
|
|
|
|
l’alto |
|
|
Zucchine |
800 gr |
1 |
70 |
220 |
1 |
60 |
70 |
200 |
Affettate le zucchine e cuocete in teglia |
|
|
Pirex coperte con burro e sale |
||||||||||
|
|
|
|
|
|
|
|
|
|
||
|
Patate |
800 gr |
2 |
60 65 |
220 |
2 |
60 |
65 |
200 |
Tagliate le patate in parti uguali e cuocetele |
|
|
coperte con olio, sale e origano o rosmarino |
||||||||||
|
|
|
|
|
|
|
|
|
|
in teglia Pirex. |
|
|
Carote |
800 gr |
1 |
80 85 |
220 |
1 |
70 |
80 |
200 |
Tagliate le carote a fettine, copritele e |
|
|
cuocetele in teglia Pirex. |
||||||||||
|
|
|
|
|
|
|
|
|
|
||
|
• Frutta |
|
|
|
|
|
|
|
|
|
|
|
Mele intere |
Kg 1 |
1 |
45 55 |
220 |
2 |
45 55 |
200 |
Cuocere la frutta in teglia di Pirex o ceramica |
||
|
non coperta. Lasciare raffreddare in forno. |
||||||||||
|
|
|
|
|
|
|
|
|
|
||
|
Pere |
Kg 1 |
1 |
45 55 |
220 |
2 |
45 55 |
200 |
Come sopra |
||
|
|
|
|
|
|
|
|
|
|
||
|
Pesche |
Kg 1 |
1 |
45 55 |
220 |
2 |
45 55 |
200 |
Come sopra |
||
|
|
|
|
|
|
|
|
|
|
|
|
|
• Cottura a grill |
|
|
|
|
|
|
|
|
|
|
|
|
|
|
|
|
|
|
|
|
|
|
La cottura con il grill deve essere eseguita ponendo il cibo sotto il grill elettrico. Attenzione: durante il funzionamento il grill diventa di colore rosso vivo. La leccarda deve essere inserita sotto la griglia per raccogliere i sughi.
|
Pane carrè |
4 fette |
4 |
5 (5 prerisc.) |
grill |
4 |
5 (10 prerisc.) |
grill |
Inserire il pane carrè sulla griglia supporto. |
|||
|
Dopo la 1° cottura capovolgere fino a cottura |
|||||||||||
|
tostato |
|||||||||||
|
|
|
|
|
|
|
|
ultimata. |
|
|
|
|
|
|
|
|
|
|
|
|
|
|
|
|
|
|
|
|
|
|
|
|
|
|
|
|
|
|
|
Toasts farciti |
4 |
3 |
10 (5 prerisc.) |
grill |
3 |
5/8 |
grill |
Inserire i |
toasts |
sulla griglia |
supporto |
|
leccarda; |
dopo |
la prima |
brunitura |
||||||||
|
(10 prerisc.) |
|||||||||||
|
|
|
|
|
|
|
|
capovolgere i toasts fino a brunitura ultimata. |
||||
|
|
|
|
|
|
|
|
|
||||
|
|
|
|
|
|
|
|
|
|
|||
|
|
|
|
|
|
|
|
|
Tagliare le salsiccie a metà e disporle sulla |
|||
|
|
|
|
|
|
|
|
|
griglia, con la parte interna verso l’alto. A |
|||
|
Salsiccie |
n°6 / Kg 0,9 |
4 |
25/30 |
grill |
4 |
15/20 |
grill |
metà cottura capovolgere le salsiccie fino |
|||
|
(5 prerisc.) |
(10 prerisc.) |
a cottura ultimata. Avvertenza: Ogni tanto |
|||||||||
|
|
|
|
|
|
|
controllate visivamente l’uniformità di |
|||||
|
|
|
|
|
|
|
|
|
cottura. Nel caso di disuniformità intercam- |
|||
|
|
|
|
|
|
|
|
|
biare quelle cotte con quelle meno cotte. |
|||
|
Costate di manzo |
n°4 / Kg 1,5 |
4 |
25 |
grill |
4 |
15/20 |
grill |
Disporre le fette bene sotto l’azione del grill |
|||
|
(5 prerisc.) |
(10 prerisc.) |
e voltarle due volte. |
|
||||||||
|
|
|
|
|
|
|
|
|||||
|
Coscie di pollo |
n°4 / Kg 1,5 |
3 |
50/60 |
grill |
3 |
50/60 |
grill |
Condite con aromi naturali e voltatele ogni |
|||
|
(5 prerisc.) |
(10 prerisc.) |
tanto. |
|
|
|
||||||
|
|
|
|
|
|
|
|
|
|
|||
6 IT

GENERAL WARNINGS
Thank you for choosing one of our products. To get the most out of your oven we recommend that you:
•Read the notes in this manual carefully: they contain important instructions on how to install, use and service this oven safely.
•Keep this booklet in a safe place for easy, future reference.
When the oven is first switched on it may give out acrid smelling fumes. This is because the bonding agent for insulating panels around the oven has been heated up for the first time.
This is a completely normal, if it does occur you merely have to wait for the fumes to clear before putting the food into the oven. An oven by its very nature becomes very hot. Especially the glass of the oven door.
Do not allow children to go near the oven when it is hot, especially when the grill is on.
A specially designed protector shield (some models only) which reduces considerably the surface temperature of the oven door can be obtained through our service organization. This shield is recommended for households with young children.
DECLARATION OF COMPLIANCE
•The parts of this appliance that may come into contact with foodstuffs comply with the provisions of EEC Directive 89/109. This appliances complies with Directives 89/336/EEC, 73/23/EEC and following changes.
When you have unpacked the oven, make sure that it has not been damaged in any way. If you have any doubts at all, do not use it: contact a professionally qualified person. Keep packing materials such as plastic bags, polystyrene, or nails out of the reach of children because they are dangerous for children.
SAFETY HINTS
The oven must be used only for the purpose for which it was designed: it must only be used for cooking food.
Any other use, e.g. as a form of heating, is an improper use of the oven and is therefore dangerous.
The manufacturers cannot be held responsible for any damage caused by improper, incorrect or unreasonable use.
When using any electrical appliance you must follow a few basic rules.
–Do not pull on the power cable to remove the plug from the socket.
–Do not touch the oven with wet or damp hands or feet.
–Do not use the oven unless you are wearing something on your feet.
–Do not allow children or irresponsible people to use the oven unless they are carefully supervised.
–It is not generally a good idea to use adapters, multiple sockets for several plugs and cable extensions.
–If the oven breaks down or develops a fault switch it off at the mains and do not touch it.
If the cable is at all damaged it must be replaced promptly. When replacing the cable, follow these instructions. Remove the power cable and replace it with one of the HO5RR- F, H05VV-F, H05V2V2-F type. The cable must be able to bear the electrical current required by the oven. Cable replacement must be carried out by properly qualified technicians. The earthing cable (yellow-green) must be 10 mm longer than the power cable.
Use only an approved service centre for repairs and ensure that only original parts are used. If the above instructions are not adhered to the manufacturers cannot guarantee the safety of the oven.
INSTALLATION
Installation is the customer’s responsibility. The manufacturers have no obligation to carry this out. If the assistance of the manufacturer is required to rectify faults arising from incorrect installation, this assistance is not covered by the guarantee. The installation instructions for professionally qualified personnel must be followed. Incorrect installation may cause harm or injury to people, animals or belongings. The manufacturer cannot be held responsible for such harm or injury.
FITTING THE OVEN INTO THE KITCHEN UNIT
Fit the oven into the space provided in the kitchen unit; it may be fitted underneath a work top or into an upright cupboard. Fix the oven in position by screwing into place, using the four fixing holes in the frame.
To locate the fixing holes, open the oven door and look inside. To allow adequate ventilation, the measurements and distances indicated in the diagram on last page must be adhered to when fixing the oven.
Note: For ovens that are combined with a hob unit the instructions contained in the manual for the hob unit must be followed.
IMPORTANT
If the oven is to work properly, the kitchen housing must be suitable. The panels of the kitchen unit that are next to the oven must be made of a heat resistant material. Ensure that the glues of units made of veneered wood can withstand temperatures of at least 120 °C. Plastics or glues that cannot withstand such temperatures will melt and deform the unit. Once the oven has been lodged inside the unit, the electrical parts must be completely insulated. This is a legal safety requirement. All guards must be firmly fixed into place so that it is impossible to remove them without using special tools.
Remove the back of the kitchen unit to ensure an adequate current of air circulates around the oven. The hob must have a rear gap of at least 45 mm.
CONNECTING TO THE POWER SUPPLY
Plug into the power supply. Ensure first that there is a third contact that acts as earthing for the oven. The oven must be properly earthed.
If the model of oven is not fitted with a plug, fit a standard plug to the power cable. It must be able to bear the power supply indicated on the specifications plate. The earthing cable is yellow-green. The plug must be fitted by a properly qualified person. If the socket and the plug are incompatible the socket must be changed by a properly qualified person. A properly qualified person must also ensure that the power cables can carry the current required to operate the oven.
An ON/OFF switch with a minimum distance of 3 mm between contacts may also be connected to the power supply. The connections must take account of the current supplied and must comply with current legal requirements. The yellow-green earthing cable must not be governed by the ON/OFF switch. The socket or the ON/OFF switch used for connecting to the power supply must be easily accessible when the oven has been installed. Important: During installation, position the power cable in such a way that it will not be subjected to temperatures of above 50°C at any point.
The oven complies with safety standards set by the regulatory bodies. The oven is safe to use only if it has been adequately earthed in compliance with current legal requirements on wiring safety. You must ensure that the oven has been adequately earthed.
The manufacturers cannot be held responsible for any harm or injury to persons, animals or belongings caused by failure to properly earth the oven.
WARNING: the voltage and the supply frequency are showed on the rating plate (fig. on last page).
The cabling and wiring system must be able to bear the maximum electric power required by the oven. This is indicated on the specifications plate.
If you are in any doubt at all, use the services of a professionally qualified person.
7 GB
USEFUL TIPS
SHELF SAFETY SYSTEM
The oven features a new shelf safety system.
This allows you to pull out the oven shelves when inspecting the food without danger of food spillages or shelves falling accidentally out of the oven. To remove the shelves pull out and lift.
GRILLING
Grilling makes it possible to give food a rich brown colour quickly. For browning we recommend that you insert the grill onto the fourth level, depending on the proportions of the food (see fig. page 11).
Almost all food can be cooked under the grill except for very lean game and meat rolls.
Meat and fish that are going to be grilled should first be lightly doused with oil.
COOKING TIME
For recommended cooking times and temperatures the first time you use the oven, refer to the tables on pages 11, 12. You may then wish to vary these times and settings in the light of your own experience.
CLEANING AND MAINTENANCE
Clean the stainless steel and enamelled surfaces with warm, soapy water or with suitable brand products. On no account use abrasive powders that may damage surfaces and ruin the oven’s appearance. It is very important to clean the oven each time that it is used. Melted fat is deposited on the sides of the oven during cooking. The next time the oven is used this fat could cause unpleasant odours and might even jeopardise the success of the cooking. Use hot water and detergent to clean; rinse out thoroughly. To make this chore unnecessary all models can be lined with catalytic self-cleaning panels: these are supplied as an optional extra (see the section SELF-CLEANING OVEN - CATALYTIC LINING).
Use detergents and abrasive metal pads like «brillo pads» for the stainless steel grills.
The glass surfaces as the top, oven door and warming compartment door must be cleaned when they are cold. Damage that occurs to them because this rule was not adhered to are not covered by the guarantee.
To replace the interior light: switch off the mains power supply and unscrew bulb. Replace with an identical bulb that can withstand very high temperatures.
SELF-CLEANING OVEN - CATALYTIC LINING
Special self-cleaning panels covered in a micro-porous coating are available as optional extras for all models. If they are fitted, the oven no longer needs to be cleaned by hand. The fat that is splattered onto the sides of the oven during roasting is eliminated by the microporous coating which breaks the fat down by catalysis and transforms it into gas.
Excessive splattering may nevertheless block the pores and therefore hinder self-cleaning. The self-cleaning capacity may be restored by switching on the empty oven to maximum for about 10-20 minutes.
Do not use abrasive products, metal cleaning wads, sharp objects, rough cloths, or chemical products and detergents that may permanently damage the catalytic lining.
It is a good idea to use deep roasting trays to roast fatty foods such as joints of meat etc. and to put a tray underneath the grill to catch surplus fat.
If the walls of the oven are so thickly coated in grease that the catalytic lining is no longer effective remove surplus grease with a soft cloth or sponge soaked in hot water.
The lining must be porous for self-cleaning to be effective.
N.B.: All catalytic linings currently on the market have a working life of about 300 hours. They should therefore be replaced after about 300 hours.
FOLD DOWN GRILL
For routine cleaning access can be gained to the upper parts of the oven by removing the screw and washer (A) from the middle of the grill element and then gently tilting the element in a downward direction.
Once cleaned the grill can be returned to the correct position by reversing the above procedure.
NB: For cleaning instructions please refer to the section entitled cleaning and maintenance.
WARNING: the oven must only be used when the grill in its correct position.
SERVICE CENTRE
Before calling the Service Centre
If the oven is not working, we recommend that:
 you check that the oven is properly plugged into the power supply.
If the cause of the fault cannot be detected:
disconnect the oven from the mains, do not touch the oven and call the after sales service.
Before calling the Service Centre remember to make a note of the serial number on the serial number specifications plate (see fig. on last page).
The oven is supplied with a guarantee certificate that ensures that it will be repaired free of charge by the Service Centre.
This appliance is marked according to the European directive 2002/96/EC on Waste Electrical and Electronic Equipment (WEEE). By ensuring this product is disposed of correctly, you will help prevent potential negative
consequences for the environment and human health, which could otherwise be caused by inappropriate waste handling of this product. The symbol on the product indicates that this product may not be treated as household waste.
Instead it shall be handed over to the applicable collection point for the recycling of electrical and electronic equipment Disposal must be carried out in accordance with local environmental regulations for waste disposal.
For more detailed information about treatment, recovery and recycling of this product, please contact your local city office, your household waste disposal service or the shop where you purchased the product.
8 GB
USE OF THE PROGRAMMER
FUNCTION |
HOW TO ACTIVATE ITHOWTO SWITCH IT OFF |
WHAT IT DOES |
WAT IT IS FOR |
|||||||||||||||
|
|
|
|
|
|
|
|
|
|
|
|
|
||||||
OVEN |
• When knob (1) is turned |
|
|
|
|
|
|
|
• This function is useful for |
|||||||||
to the |
symbol, the light |
|
|
|
|
|
|
|
checking that the oven is |
|||||||||
LIGH |
|
|
|
|
|
|
|
|||||||||||
comes on |
|
|
|
|
|
|
|
|
|
fully operational. |
|
|||||||
|
|
|
|
|
|
|
|
|
|
|
|
|
||||||
CLOCK |
|
|
|
|
|
|
|
|
||||||||||
• Turn the selector knob (1) |
• Turn the selector knob to |
• Allows you to regulate the |
• Using the |
and |
buttons, |
|||||||||||||
|
|
|
to the |
symbol. |
|
the position |
|
time shown on the oven |
set the time of day (while |
|||||||||
|
|
|
• Using |
the |
and buttons, |
|
|
|
|
clock |
|
|
setting, the numbers on the |
|||||
|
|
|
set the time of day (while |
|
|
|
|
|
|
|
display will flash) |
|
||||||
|
|
|
|
|
|
|
|
|
|
NB: Set the clock imme- |
||||||||
|
|
|
setting, the numbers on |
|
|
|
|
|
|
|
||||||||
|
|
|
|
|
|
|
|
|
|
diately after installing the |
||||||||
|
|
|
the display will flash) |
|
|
|
|
|
|
|
||||||||
|
|
|
|
|
|
|
|
|
|
appliance or after an inter- |
||||||||
|
|
|
|
|
|
|
|
|
|
|
|
|
|
|
||||
|
|
|
|
|
|
|
|
|
|
|
|
|
|
|
ruption to the power sup- |
|||
|
|
|
|
|
|
|
|
|
|
|
|
|
|
|
ply (this is shown by 12:00 |
|||
|
|
|
|
|
|
|
|
|
|
|
|
|
|
|
flashing on the display). |
|||
ALARM |
• Turn selector knob 1 to the |
• When the set cooking time |
• Provides an audible alarm |
• Useful as a reminder |
||||||||||||||
|
|
|
symbol. |
|
|
is up, the oven will auto- |
signal (for a few seconds) |
• This function |
works |
|||||||||
|
|
|
• Set the cooking time using |
matically switch itself off. If |
at the end of cooking time. |
independently |
of the |
|||||||||||
|
|
|
the |
and |
buttons (while |
you need to stop it before |
|
|
|
oven (it can be used |
||||||||
|
|
|
then, you must turn the set |
|
|
|
||||||||||||
|
|
|
setting, the numbers on |
|
|
|
even when the oven is |
|||||||||||
|
|
|
time to 0 (selector knob 1 |
|
|
|
||||||||||||
|
|
|
the display will flash) |
|
|
|
not working) |
|
||||||||||
|
|
|
on |
and then use the |
|
|
|
|
||||||||||
|
|
|
|
|
|
|
|
|
|
|
|
|
|
|
||||
|
|
|
|
|
|
|
|
and |
buttons) |
|
|
|
|
|
|
|
||
CHILD |
|
|
|
|
|
|
||||||||||||
• Turn the selector knob 1 |
• Press buttons |
and |
• The oven settings cannot |
• Operates even when the |
||||||||||||||
SAFETY |
to |
the |
|
symbol. The |
together for three seconds. |
be altered (even when the |
oven is not on preventing |
|||||||||||
|
|
|
indicator light will flash. |
The light flashes. |
knobs |
are accidentally |
it from being inadvertently |
|||||||||||
|
|
|
• Press the |
and |
buttons |
|
|
|
|
adjusted) |
|
switched on. |
|
|||||
|
|
|
|
|
|
|
|
• Is operational when the |
||||||||||
|
|
|
at the same time, for three |
|
|
|
|
|
|
|
||||||||
|
|
|
|
|
|
|
|
|
|
oven is on and prevents |
||||||||
|
|
|
seconds. |
|
|
|
|
|
|
|
|
|
||||||
|
|
|
|
|
|
|
|
|
|
|
|
any alterations |
to the |
|||||
|
|
|
• The setting is confirmed |
|
|
|
|
|
|
|
||||||||
|
|
|
|
|
|
|
|
|
|
settings (through acciden- |
||||||||
|
|
|
when |
the |
light |
stops |
|
|
|
|
|
|
|
|||||
|
|
|
|
|
|
|
|
|
|
tal turning of the knobs) |
||||||||
|
|
|
flashing. |
|
|
|
|
|
|
|
|
|
NB: the oven can still be |
|||||
|
|
|
|
|
|
|
|
|
|
|
|
|
|
|
switched off by turning se- |
|||
|
|
|
|
|
|
|
|
|
|
|
|
|
|
|
lector knob 2 to position 0. |
|||
COOKING |
• To select a cooking fun- • When the cooking time is |
• Allows the end of cooking |
• When the set cooking time |
|||||||||||||||
TIME |
ction use (selector knob 2) |
up, the oven will switch it |
time to be stored in the |
is up the oven switches |
||||||||||||||
|
|
|
• Turn selector knob 1 to the |
self off. |
|
memory. |
|
itself off automatically and |
||||||||||
|
|
|
|
symbol |
|
|
If you need to stop it before |
• When the cooking time |
for a few seconds an alarm |
|||||||||
|
|
|
|
|
|
then, the oven must be |
has been set, turn selector |
sounds. |
|
|
||||||||
|
|
|
• Set the cooking time using |
|
|
|||||||||||||
|
|
|
switched off, or the cooking |
knob 1 to the |
symbol |
|
|
|
|
|||||||||
|
|
|
the |
and |
buttons (while |
|
|
|
|
|||||||||
|
|
|
time must be turned to 00:00. |
to display the time of day. |
|
|
|
|
||||||||||
|
|
|
setting, the numbers on |
|
|
|
|
|||||||||||
|
|
|
(selector 1 to symbol , |
• To display the programmed |
|
|
|
|
||||||||||
|
|
|
the display will flash) |
|
|
|
|
|||||||||||
|
|
|
and use the |
and |
time turn selector knob 1 |
|
|
|
|
|||||||||
|
|
|
|
|
|
|
|
buttons) |
|
to the |
symbol. |
|
|
|
|
|||
END OF |
• Select a cooking func- |
• At the pre-set time the oven |
• Allows the end of cooking |
• This function is used typi- |
||||||||||||||
COOKING |
tion (selector knob 2) |
automatically |
switches |
time to be stored in the |
cally used with ‘cooking |
|||||||||||||
|
|
|
• Turn the selector knob to |
itself off. If you need to stop |
memory. |
|
time’ function. For example |
|||||||||||
|
|
|
the |
|
symbol. |
|
it before then, switch the |
• When the cooking time has |
if the dish has to be |
|||||||||
|
|
|
• Set the end of cooking time |
oven off by turning the |
been |
set, turn |
selector |
cooked for 45 minutes and |
||||||||||
|
|
|
needs |
to |
be ready by |
|||||||||||||
|
|
|
using the |
and |
buttons |
selector knob 2 to the |
knob 1 to the |
symbol to |
||||||||||
|
|
|
12:30, simply select the |
|||||||||||||||
|
|
|
(while setting, the numbers |
symbol. |
|
display the time of day. |
||||||||||||
|
|
|
|
required function, set the |
||||||||||||||
|
|
|
on the display will flash) |
|
|
|
|
• To display the programmed |
||||||||||
|
|
|
|
|
|
|
cooking time to 45 minutes |
|||||||||||
|
|
|
|
|
|
|
|
|
|
|
|
time turn selector knob 1 |
and the end of cooking |
|||||
|
|
|
|
|
|
|
|
|
|
|
|
|||||||
|
|
|
|
|
|
|
|
|
|
|
|
to the |
symbol. |
time to 12:30. |
|
|||
|
|
|
|
|
|
|
|
|
|
|
|
|
|
|
Cooking will start automa- |
|||
|
|
|
|
|
|
|
|
|
|
|
|
|
|
|
tically |
at |
11:45 |
(12:30 |
|
|
|
|
|
|
|
|
|
|
|
|
|
|
|
minus |
45 mins) and |
||
|
|
|
|
|
|
|
|
|
|
|
|
|
|
|
will continue until the pre- |
|||
|
|
|
|
|
|
|
|
|
|
|
|
|
|
|
set end-of-cooking-time, |
|||
|
|
|
|
|
|
|
|
|
|
|
|
|
|
|
when the oven will switch |
|||
THE PROGRAMMER |
|
|
|
|
|
|
|
|
itself off |
automatically. |
||||||||
|
|
|
|
|
|
|
|
|
|
|
|
|||||||
|
|
|
|
|
|
|
|
|
|
|
|
|||||||
|
|
|
|
|
|
|
|
|
|
|
|
|
|
|
|
|
|
|
Clock display |
Safety display |
 WARNING:
The first operation to carry out after the oven has been installed or following the interruption of power supply (this is recognizable the display pulsating and showing 12:00) is setting the correct time.
Programmer function Control buttons |
A slight delay will occour when setting a programme, while the |
display |
oven carries out internal diagnostics. |
9 GB
OPERATING INSTRUCTIONS
NB: Some models are fitted with pop-out controls. To turn the knob, first push inwards to release.
Clock display |
Safety display |
Temperature display |
Programme function |
|
Oven function selector |
selector knob |
|
knob (cooking) |
Programmer function |
|
Cooking function |
display |
|
display |
|
Regulator buttons |
|
• If the clock is not set the oven will not work and 12:00 will flash on the display.
To start cooking a function must be selected using knob (2). The corresponding symbol will appear on the display and the automatically pre-set temperature will flash. If you wish to alter that temperature, press the or buttons.
After a few seconds the oven will start working, but the programme selector can be regulated so that the start is delayed until the required time (see chapter “The Programmer”). The cooking function symbol will flash until the oven reaches the temperature shown on the display. When that temperature is reached it will stop flashing and an audible signal sounds.
The oven can be switched off at any stage by simply turning the selector knob (2) to “ ”.
Symbol |
Pre-set |
Temperature |
|
temperature |
range setting |
||
|
Function
220° C |
50°-240° C |
Tested in accordance with the CENELEC EN 50304 used for definition of energy class.
Natural convection
Both upper and lower elements are working.
Traditional cooking, best for roasting a leg of lamb or game. Ideal for biscuits and baked apples, and for crisping foods.
Best results are obtained by placing on a shelf and regulating the temperature between 50 and 240°C.
|
|
|
|
Fan oven |
|
180° C |
50°-240° C |
An internal fan ensures that the hot air is evenly distributed to all levels in the oven. |
|||
Ideal for cooking different types of food at the same time (fish, meat, without mixing |
|||||
|
|
|
|
flavours or aromas). |
|
|
|
|
|
Delicate cooking - recommended for sponge cakes, puff pastry, etc. |
|
|
|
|
|
|
|
160° C |
50°-220° C |
Lower element & fan |
|||
Recommended for delicate cooking (soufflés) |
|||||
|
|
|
|
||
|
|
|
|
|
|
|
|
|
|
Keeping food warm |
|
60° C |
|
|
|
The upper and lower elements work intermittently with fan assistance. The temperature |
|
|
|
|
is pre-set at a constant 60°C (this function does not allow the working temperature |
||
|
|
|
|||
|
|
|
|
to be regulated). Ideal for keeping food hot that has just been cooked, without |
|
|
|
|
|
overcooking it. It is also useful for warming dishes. |
|
|
|
|
|
|
|
20° C |
|
|
|
Defrosting at room temperature |
|
|
|
|
This function allows air at room temperature to be circulated round the item. In this |
||
|
|
|
|||
|
|
|
|
way the food defrosts in just a few minutes without affecting the content. |
|
|
|
|
|
|
|
|
|
|
|
Defrosting |
|
40° C |
|
|
|
The upper and lower elements work intermittently with fan assistance. The temperature |
|
|
|
|
is pre-set at a constant 40°C (this function does not allow the operating temperature |
||
|
|
|
|
||
|
|
|
|
to be regulated). This function allows rapid defrosting prior to cooking. |
|
|
|
|
|
|
|
230° C |
|
|
|
Pizza function |
|
|
|
|
The intense heat generated when using this function is similar to that produced in |
||
|
|
|
|||
|
|
|
|
traditional wood-fired pizza ovens. |
|
|
|
|
|
|
|
210° C |
180°-240° C |
Traditional grilling with closed door |
|||
In this position, the infrared grill element comes on. Excellent for cooking thin or |
|||||
|
|
|
|
medium slices of meat (sausages, chops, bacon) |
|
|
|
|
|
|
|
|
|
|
|
Fan grilling with closed door |
|
190° C |
50°-200° C |
Hot air from the grill element is circulated around the food by the fan at the required |
|||
temperature, between 50 and 200°C. The fan is an excellent substitute for the rotisserie |
|||||
|
|
|
|
and ensures excellent results with poultry, sausages and red meats, also in large |
|
quantities.
200° C |
50°-230° C |
Tested in accordance with the CENELEC EN 50304.
Fan oven
Both the upper and lower elements are working, assisted by the internal oven fan. This function is recommended for cooking poultry, fish, bread etc. This system ensures an even distribution of heat, making it possible to cook any dish on a large tray.
10 GB
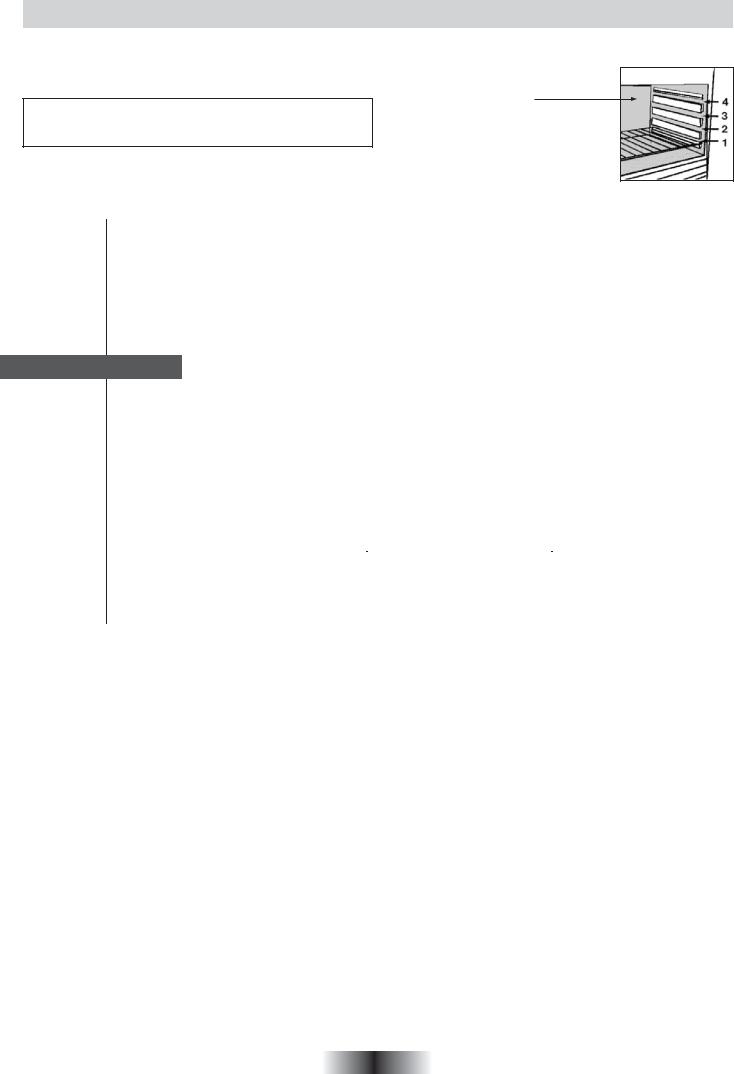
TABLES OF COOKING TIMES
The overall suggested cooking times set out below are intended as a rough guide only. They may in fact vary according to the quality, the freshness, the size and the thickness of the food cooked and of course cooking time is also partly a matter of taste. Let the food stand for a few minutes before serving because the ingredients continue cooking after they
have been removed from the oven.
Shelf position
HANDY TIP: Lower the temperature so as to avoid the surface of the food becoming hard and dry.
|
|
|
Static electric oven |
|
Electric fan oven |
|
|||
|
|
|
|
|
|
|
|
|
|
Food |
Quantity |
Shelf |
|
Time |
Oven |
Shelf |
Time |
Oven |
Remarks |
|
|
|
|
of cooking |
tempe- |
|
of cooking |
tempe- |
|
|
|
|
|
in minutes |
rature |
|
in minutes |
rature |
|
• Pasta |
|
|
|
|
|
|
|
|
|
Lasagne |
Kg 3,5 |
2 |
|
70 75 |
220 |
2 |
60 65 |
200 |
Put the lasagne into an unheated oven |
|
|
|
|
|
|
|
|
|
|
Cannelloni |
Kg 1,8 |
2 |
|
50 60 |
220 |
2 |
40 50 |
200 |
Put the cannelloni into an unheated oven |
|
|
|
|
|
|
|
|
|
|
Oven baked pasta |
Kg 2,5 |
2 |
|
55 60 |
220 |
2 |
45 50 |
200 |
Put the oven baked pasta into an unhea- |
|
ted oven |
||||||||
|
|
|
|
|
|
|
|
|
|
• Baking (not cakes) |
|
|
|
|
|
|
|
|
|
|
|
|
|
|
|
|
|
|
Form the dough into a loaf and make a |
Bread |
Kg 1 |
2 |
|
35 |
200 |
2 |
30 35 |
180 |
cross with a knife on top of the dough leave |
di pasta |
|
10 (pre-heating) |
10 (pre-heating) |
the dought to rise for at least 2 hours. |
|||||
|
|
|
|
|
|
Grease the baking tin and put the dough in |
|||
|
|
|
|
|
|
|
|
|
|
|
|
|
|
|
|
|
|
|
the middle of it. |
|
|
|
|
|
|
|
|
|
|
|
|
|
|
|
|
|
|
|
Warm the oven for 15 minutes and place |
Pizza |
Kg 1 |
1 |
|
25 35 |
190 |
1 |
20 25 |
190 |
the pizzas on the greased baking tray. |
|
Garnish them with tomatoes, mozzarella, |
||||||||
|
|
|
|
|
|
|
|
|
|
|
|
|
|
|
|
|
|
|
ham, oil, salt and origano. |
|
|
|
|
|
|
|
|
|
|
Pastry (frozen) |
n° 24 |
1 |
|
30 35 |
220 |
2 |
25 30 |
200 |
Place 24 vol au vents in the oven and |
vol au vents |
|
bake. |
|||||||
|
|
|
|
|
|
|
|
||
|
|
|
|
|
|
|
|
|
|
|
|
|
|
|
|
|
|
|
Warm the oven for 15 minutes, grease the |
Focaccia |
gr. 200 |
|
|
|
|
|
|
|
baking tray, season the 4 focaccia with oil |
2 |
|
25 30 |
200 |
2 |
20 25 |
180 |
and salt and leave them to |
||
° |
of dough each |
|
rise at room temperature for at least 2 hours |
||||||
(n 4) |
|
|
|
|
|
|
|
|
before putting them in the oven. |
|
|
|
|
|
|
|
|
|
|
• Meat |
|
|
|
|
|
|
|
|
|
|
|
|
|
|
|
|
|
|
|
All meats can be roasted in shallow or deep roasting trays. |
|
|
|
|
|||||
It is advisable to cover the shallow trays to avoid splattering the sides of the oven with grease. |
|
||||||||
The roasting times are the same whether the meat has been covered up or not. |
|
|
|||||||
|
|
|
|
|
|
|
|
|
|
Whole joint of |
|
|
|
|
|
|
|
|
Put the meat into a deep Pyrex dish and |
Kg 1 |
3 |
|
70 80 |
220 |
3 |
50 60 |
200 |
season with salt and pepper; turn the meat |
|
beef |
|
||||||||
|
|
|
|
|
|
|
|
half way through cooking. |
|
|
|
|
|
|
|
|
|
|
|
Joint of |
Kg 1 |
2 |
|
100 110 |
220 |
2 |
80 90 |
200 |
Cook the meat in a covered Pyrex dish with |
deboned |
|
herbs, spice, oil and butter. |
|||||||
|
|
|
|
|
|
|
|
||
Joint of |
Kg 1,3 |
1 |
|
90 110 |
220 |
2 |
90 100 |
200 |
Cook as indicated above. |
deboned veal |
|
||||||||
|
|
|
|
|
|
|
|
|
|
|
|
|
|
|
|
|
|
|
|
Joint of |
Kg 1 |
2 |
|
80 90 |
220 |
2 |
80 90 |
200 |
Cook as indicated above. |
fillet of beef |
|
||||||||
|
|
|
|
|
|
|
|
|
|
|
|
|
|
|
|
|
|
|
|
• Fish |
|
|
|
|
|
|
|
|
|
|
|
|
|
|
|
|
|
|
|
Trout |
3 whole trout |
2 |
|
40 45 |
220 |
2 |
35 40 |
200 |
Cover the trout with salt, oil and onions and |
or / Kg 1 |
|
cook in a Pyrex dish. |
|||||||
|
|
|
|
|
|
|
|
||
Salmon |
700 g |
2 |
|
30 35 |
220 |
2 |
30 25 |
200 |
Cook the salmon in an open Pyrex dish with |
2,5 cm slice |
|
salt, pepper and oil. |
|||||||
|
|
|
|
|
|
|
|
||
Sole |
Kg 1 |
2 |
|
40 45 |
220 |
2 |
35 40 |
200 |
Cook the sole with salt and a spoonful of |
|
oil. |
||||||||
|
|
|
|
|
|
|
|
|
|
Bream |
2 whole ones |
2 |
|
40 45 |
220 |
2 |
35 40 |
200 |
Cook the bream in oil and salt in a covered |
|
dish. |
||||||||
|
|
|
|
|
|
|
|
|
|
11 GB

TABLES OF COOKING TIMES
|
|
|
Static electric oven |
|
Electric fan oven |
|
|||
|
|
|
|
|
|
|
|
|
|
Food |
Quantity |
Shelf |
|
Time |
Oven |
Shelf |
Time |
Oven |
Remarks |
|
|
|
|
of cooking |
tempe- |
|
of cooking |
tempe- |
|
|
|
|
|
in minutes |
rature |
|
in minutes |
rature |
|
• Rabbits and Poultry |
|
|
|
|
|
|
|
|
|
|
|
|
|
|
|
|
|
|
|
Guinea fowl |
Kg 1-1,3 |
2 |
|
60 80 |
220 |
2 |
60 70 |
200 |
Place the guinea fowl in a deep Pyrex or |
|
pottery dish with very little oil and season with |
||||||||
|
|
|
|
|
|
|
|
|
herbs and spices. |
|
|
|
|
|
|
|
|
|
|
chicken |
Kg 1,5-1,7 |
2 |
|
110 120 |
220 |
2 |
100 110 |
200 |
Follow the procedure for cooking the guinea |
|
fowl. |
||||||||
|
|
|
|
|
|
|
|
|
|
Rabbit pieces |
Kg 1-1,2 |
2 |
|
55 65 |
220 |
2 |
50 60 |
200 |
Put all the pieces of the same size in the |
|
glazed tray. Season with herbs and spices. |
||||||||
|
|
|
|
|
|
|
|
|
Turn the pieces as and when required. |
|
|
|
|
|
|
|
|
|
|
• Cakes |
|
|
|
|
|
|
|
|
|
Coconut cake |
|
1 |
|
55 |
180 |
1 |
50 |
160 |
Use a tin that is 22 cm deep. Pre-heat for |
baked in a tin |
|
|
10 mins. |
||||||
|
|
|
|
|
|
|
|
||
Sponge cake |
|
1 |
|
55 |
175 |
1 |
40 45 |
160 |
Use a tin that is 22 cm deep. Pre-heat for |
|
|
|
10 mins. |
||||||
|
|
|
|
|
|
|
|
|
|
Carrot cake baked |
|
1 |
|
65 |
180 |
1 |
50 60 |
160 |
Use a tin that is 22 cm deep. Pre-heat for |
in a tin |
|
|
10 mins. |
||||||
|
|
|
|
|
|
|
|
||
Apricot pie |
700 gr |
1 |
|
40 |
200 |
2 |
30 35 |
180 |
Use a tin that is 22 cm deep. Pre-heat for |
|
10 mins. |
||||||||
|
|
|
|
|
|
|
|
|
|
• Vegetable |
|
|
|
|
|
|
|
|
|
Fennel |
800 gr |
1 |
|
70 80 |
220 |
1 |
60 70 |
200 |
Cut the fennel into four pieces, add butter, |
|
salt and potatoes if required and place in a |
||||||||
|
|
|
|
|
|
|
|
|
Pyrex face up. Cover the dish. |
|
|
|
|
|
|
|
|
|
|
Courgettes |
800 gr |
1 |
|
70 |
220 |
1 |
60 70 |
200 |
Slice the courgettes, place in a Pyrex |
|
dish and add butter and salt. |
||||||||
|
|
|
|
|
|
|
|
|
|
Potatoes |
800 gr |
2 |
|
60 65 |
220 |
2 |
60 65 |
200 |
Cut the potatoes into equal parts and place |
|
in a Pyrex dish. Season with salt, origano |
||||||||
|
|
|
|
|
|
|
|
|
and rosemary. Cook in oil. |
Carrots |
800 gr |
1 |
|
80 85 |
220 |
1 |
70 80 |
200 |
Slice the carrots, place in a Pyrex dish and |
|
cook. |
||||||||
|
|
|
|
|
|
|
|
|
|
• Fruit |
|
|
|
|
|
|
|
|
|
Whole apples |
Kg 1 |
1 |
|
45 55 |
220 |
2 |
45 55 |
200 |
Bake the fruit in an open Pyrex or earthen- |
|
ware dish. Leave it to cool inside the oven. |
||||||||
|
|
|
|
|
|
|
|
|
|
Pears |
Kg 1 |
1 |
|
45 55 |
220 |
2 |
45 55 |
200 |
Follow procedure above. |
|
|
|
|
|
|
|
|
|
|
Peaches |
Kg 1 |
1 |
|
45 55 |
220 |
2 |
45 55 |
200 |
Follow procedure above. |
|
|
|
|
|
|
|
|
|
|
• Grilling |
|
|
|
|
|
|
|
|
|
|
|
|
|
|
|
|
|
|
|
Place the food to be grilled underneath the infra-red grill. Warning: When the grill is on it takes on a bright red colour. Place the tray |
|||||||||
underneath the grill to collect juices and fat from the food being grilled. |
|
|
|
||||||
|
|
|
|
|
|
|
|
|
|
|
|
|
|
|
|
|
|
|
Lay the bread on the grill tray. When one |
Squares of bread |
|
|
|
5 |
|
|
5 |
grill |
side of the bread has been toasted, turn |
4 pieces |
4 |
|
grill |
4 |
over and toast the other side. Remember: |
||||
for toasting |
|
|
|
(5 to heat up grill) |
|
|
(10 to heat up grill) |
|
keep the toast warm at the bottom of the |
|
|
|
|
|
|
|
|
|
oven until you are ready to serve it. |
|
|
|
|
|
|
|
|
|
|
Toasted |
4 |
3 |
|
10 |
grill |
3 |
5/8 |
grill |
Lay the bread on the grill tray. When one |
sandwiches |
|
(10 to heat up grill) |
(10 to heat up grill) |
side of the sandwich has been toasted, turn |
|||||
|
|
|
|
|
|
over and toast the other side. |
|||
|
|
|
|
|
|
|
|
|
|
|
|
|
|
|
|
|
|
|
|
|
|
|
|
|
|
|
|
|
Cut the sausages in half and lay them face |
|
|
|
|
|
|
|
|
|
down on the grill. Half way through grilling |
Sausages |
° |
4 |
|
25/30 |
grill |
4 |
15/20 |
grill |
turn them over. Every so often, check that |
n 6 / Kg 0,9 |
|
(5 to heat up grill) |
(10 to heat up grill) |
|
they are being cooked equally all over. (If |
||||
|
|
|
|
|
|
|
this is not happening, turn and reposition |
||
|
|
|
|
|
|
|
|
|
|
|
|
|
|
|
|
|
|
|
the ones being cooked ether less or more |
|
|
|
|
|
|
|
|
|
than the others. |
Ribs of beef |
n°4 / Kg 1,5 |
4 |
|
25 |
grill |
4 |
15/20 |
grill |
Make sure that the ribs of beef are exposed |
|
(5 to heat up grill) |
(10 to heat up grill) |
to the full effect on the main grill. |
||||||
|
|
|
|
|
|
|
|||
Chicken legs |
n°4 / Kg 1,5 |
3 |
|
50/60 |
grill |
3 |
50/60 |
grill |
Turn them over twice during grilling. |
|
(5 to heat up grill) |
(10 to heat up grill) |
|||||||
|
|
|
|
|
|
|
|
||
|
|
|
|
|
|
|
|
|
|
12 GB

INSTRUCCIONES GENERALES
Le agradecemos que haya elegido uno de nuestros productos. Para obtener de este electrodoméstico las mejores prestaciones aconsejamos:
•Leer atentamente las advertencias contenidas en el presente manual.
•Conservar con cuidado este manual para cualquier consulta posterior.
Durante la primera puesta en funcionamiento del horno puede producirse un humo de olor acre causado por el primer calentamiento del pegamento de los paneles de aislamiento que envuelven el horno. Se trata de un fenómeno absolutamente normal y, en caso de verificarse, es preciso esperar a la extinción del humo antes de introducir los alimentos.
Por su naturaleza el horno es un aparato que se calienta, de modo particular el cristal de la puerta. Es aconsejable pues impedir que los niños puedan acercarse al horno cuando se encuentre en funcionamiento, especialmente cuando está en márcha el grill. Hay disponible un dispositivo suplementario de protección (sólo en los modelos predispuestos) a fin de reducir la temperatura de la superficie frontal de la puerta del horno; este dispositivo debería ser montado en caso de presencia de niños pequeños. Este accesorio puede obtererse a través de nuestro servicio de asistencia técnica.
DECLARACIÓN DE CONFORMIDAD.
•Este aparato, en las partes destinadas a estar en contacto con los alimentos cumple la Directiva CEE 89/109.
Nota: Para los hornos que deban acoplarse a una encimera, resulta indispensable respetar las instrucciones contenidas en el manual adjunto al aparato a acoplar.
Este aparato cumple las Directivas Europeas 89/336/CEE, 73/23/CEE y sucesivas modificationes.
INFORMACIÓN SOBRE SEGURIDAD
•Este aparato deberá destinarse únicamente al uso para el cual ha sido especialmente concebido, es decir, para la cocción de alimentos.
Cualquier otro uso (por ejemplo, calentamiento a temperatura ambiente) debe considerarse impropio, y por lo tanto peligroso. El fabricante declina toda responsabilidad por los posibles daños causados por el uso impropio, erróneo e irracional del
aparato.
El uso de cualquier aparato eléctrico comporta la observación de algunas reglas fundamentales. En particular:
—No tire del cable de alimentación para desenchufar el aparato.
—No toque el aparato con las manos o los pies húmedos o mojados.
—No utilice el aparato si no lleva calzado.
—No deje que los niños o las personas incapacitadas usen el aparato sin vigilancia.
—No utilice adaptadores, ladrones ni alargadores.
—En caso de avería o de mal funcionamiento del aparato,
apáguelo y no lo manipule.
En caso de deterioro del cable, sustitúyalo inmediatamente con arreglo a las siguientes indicaciones:
—saque el cable de alimentación y sustitúyalo por uno (tipo HO5RR-F, H05VV-F, H05V2V2-F) y adecuado a la potencia del aparato.
—esta operación deberá realizarla un técnico especializado. El hilo de tierra (amarillo-verde) debe ser obligatoriamente 10 mm más largo que los conductores de línea.
En caso de que el aparato precise ser reparado, diríjase únicamente a un centro de asistencia técnica autorizado y exija piezas de recambio originales.
No observar todo lo mencionado puede comprometer la seguridad del aparato.
INSTALACIÓN
La instalación corre a cargo del comprador y el Fabricante queda exento de este servicio; eventuales intervenciones requeridas a la Casa Constructora que dependan de una instalación incorrenta no están incluidas en la Garantia.
La instalación debe ser efectuada según las instrucciones por personal profesionalmente cualificado. Una instalación errónea puede causar daños a personas, animales o cosas, de los cuales el fabricante no puede ser considerado responsable.
INTRODUCCIÓN DEL MUEBLE
Introduzca el aparato en el hueco del mueble (bajo encimera o en columna). El horno se fija introduciendo 4 tornillos en los agujeros del marco, visibles al abrir la puerta.
Con el objeto de permitir una mejor ventilación del mueble, empotre el horno respetando las medidas y las distancias indicadas en la última página.
IMPORTANTE
Para garantizar un correcto funcionamiento del aparato encastrable, es necesario que el mueble tenga las características adecuadas. Los paneles de los muebles adyacentes al horno deberán ser de un material resistente al calor. En el caso de los muebles de madera chapada, el encolado deberá resistir una temperatura de 120 °C: los materiales plásticos o encolados que no resistan esta temperatura pueden deformarse o despegarse.
De acuerdo con las normas de seguridad, una vez empotrado el aparato no deben existir contactos con las piezas eléctricas. Todas las piezas protectoras deben fijarse de manera que no puedan sacarse sin la ayuda de un utensilio.
Para garantizar una buena ventilación debe eliminarse la pared posterior del hueco, y el panel de apoyo debe tener una apertura mínima de 45 mm.
CONEXIÓN ELÉCTRICA
Enchufe la clavija en una base provista de un tercer contacto correspondiente a la toma de tierra, la cual deberá conectarse correctamente.
En los modelos desprovistos de clavija, monte una clavija estándar en el cable capaz de soportar la carga indicada en la placa de características. El hilo de tierra es de color amarillo-verde. Esta operación deberá realizarla un técnico especializado. En caso de que la base y la clavija del aparato sean incompatibles, haga que un técnico especializado le cambie la base por otra adecuada.
También puede efectuar la conexión a la red intercalando entre el aparato y la red un interruptor omnipolar con una distancia de apertura de los contactos equivalente a 3 mm, preparado para la carga y con arreglo a las normas vigentes. El hilo de tierra amarilloverde no debe quedar interrumpido por el interruptor.
La base o el interruptor omnipolar utilizados para la conexión deben estar situados en un lugar fácilmente accesible y cerca del electrodoméstico instalado.
Importante: en la fase de instalación, coloque el cable de alimentación de manera que en ningún punto alcance una temperatura superior a los 50 °C a temperatura ambiente.
El aparato cumple los requisitos de seguridad previstos por los institutos normativos. Sólo se garantiza la seguridad eléctrica de este aparato si ha sido conectado correctamente a una instalación de toma de tierra eficaz, con arreglo a lo dispuesto en las normas vigentes de seguridad eléctrica, (en caso de duda, exija un control exhaustivo de la instalación por parte de un técnico especializado). El fabricante declina toda responsabilidad por los posibles daños causados por la falta de conexión a tierra de la instalación. Importante: el fabricante queda exento de cualquier responsabilidad por los posibles daños personales o materiales causados por la falta de conexión a tierra.
ATENCIÓN: La tensión y frecuencia de alimentación están indicadas en la tarjeta de matrícula (er la última página).
Compruebe que la capacidad eléctrica de la instalación de las bases sean adecuadas para la potencia máxima del aparato, indicada en la placa de características. En caso de duda, diríjase a un técnico cualificado.
13 ES
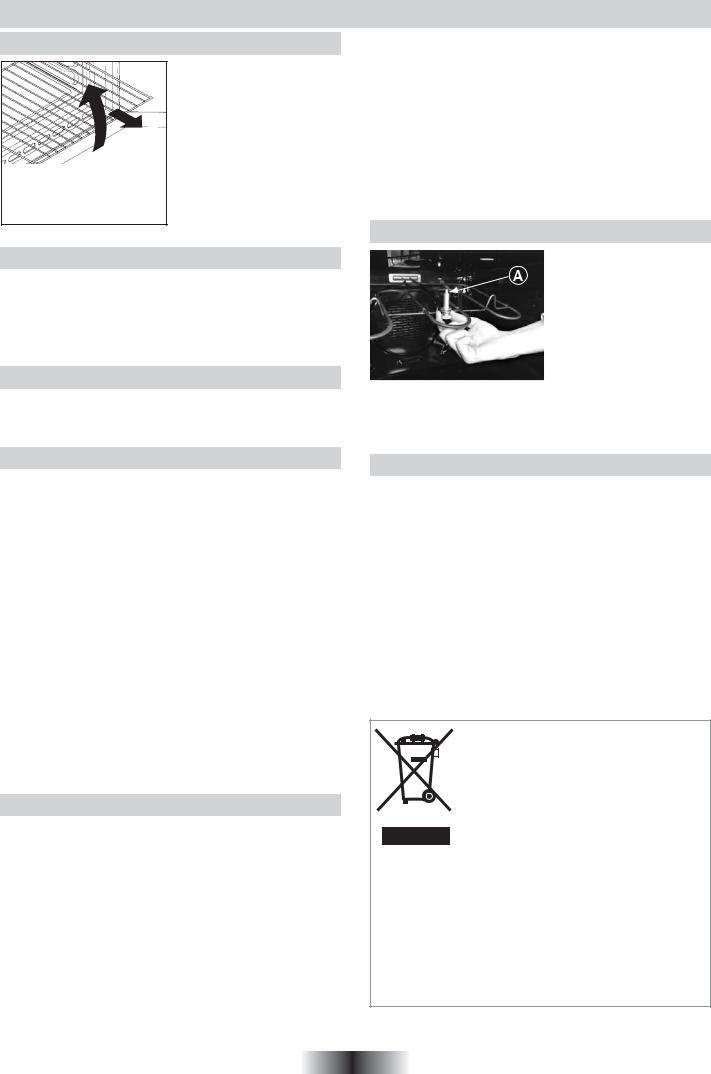
CONSEJOS ÚTILES
REJILLAS HORNO - SISTEMA DE SUJECIÓN
El horno está dotado de un nuevo sistema de sujeción de las rejillas.
Este sistema permite extraer l as rejillas casi por completo sin que caigan y manteniéndo las perfectamente en plano, permitiendo verificar y mezclar los alimentos con la máxima tranquilidad y seguridad. Para extraer las rejillas es suficiente, como se indica en el
dibujo, levantarlas, cogiéndolas por la parte anterior y tirar de ellas.
LA COCCIÓN AL GRILL
Este tipo de cocción permite el dorado rápido de los alimentos. Con este fin, le aconsejamos introducir la rejilla generalmente en el 3° o 4° estante, según las dimensiones de los alimentos. (pág. 17) Casi todas las carnes pueden ser cocidas al grill, excepto algunas carnes tiernas de caza y albóndigas.
La carne y el pescado para cocinar al grill deben ser ligeramente untados con aceite.
TIEMPOS DE COCCIÓN
En las págs. 17 y 18 mostramos una tabla indicativa de los tiempos y temperaturas aconsejados para las primeras cocciones. Con la experiencia podrá variar a su gusto los valores mostrados en la tabla.
LIMPIEZA Y MANTENIMIENTO
Limpiar las superficies de acero inox y esmaltadas con agua templada y jabón, o con productos específicos de comercios especializados, evitando absolutamente el uso de polvos abrasivos que dañarían las superficies y partes estéticas.
La limpieza del horno es muy importante y debe ser efectuada cada vez que éste es utilizado. En las paredes se depositan grasas derretidas durante la cocción que podrían, en el sucesivo encendido, producir olores desagradables que afectarían a la cocción. Para la limpieza utilizar agua caliente y jabón, aclarando cuidadosamente.
Para eliminar esta hardua tarea, las paredes del horno pueden ser revestidas con paneles autolimpiantes especiales, of recidos como accesorios opcionales en algunos modelos: ver párrafo específico «HORNO AUTOLIMPIANTE CATALÍTICO».
Utilizar jabón y barillas de acero para las rejillas inox. La limpieza de las superficies de cristal templado debe ser efectuada cuando las superficies estén frias. Eventuales roturas debidas a la no observación de esta regla elemental no están cubiertos por la garantia.
La bombilla del horno puede ser sustituida desconectando eléctricamente el aparato y destornillando la ampolla que la encierta, sustituyendo la bombilla por una análoga resistente a altas temperaturas.
HORNO AUTOLIMPIANTE CATALÍTICO
Los paneles especiales autolimpiantes recubiertos por un esmalte con estructura microporosa (ofrecidos como accesorios opcionales en unos modelos o de serie en otros) eliminan la limpieza manual del horno.
Las grasas proyectadas sobre las paredes durante la cocción, son descompuestas por el esmalte, mediante un proceso catalítico de oxidación y son transformados en productos gasos. Salpicaduras excesivas de grasa pueden obstruir los poros y por consiguiente impedir la autolimpieza. tal característica puedé ser restablecidá mediante un calentamiento de unos 10-20 minutos del horno vacío programándo el horno a la máxima temperatura. no usar productos abrasivos, barillas metálicas, objetos de punta, paños rugosos, productos químicos o jabones que puedieran dañar irremediablemente el esmalte.
Se aconseja además utilizar fuertes con bordes altos en el caso de cocciones de alimentos particularmente grasos (asados, etc) y utilizar la grasera al realizar la cocción al grill.
Para el caso que, por condiciones particulares de suciedad, no fuera suficiente la acción precedente, se aconseja apartar las grasas con un paño mullido o una esponja humedecidos con agua caliente. La porosidad del esmalte es fundamental para garantizar la acción autolimpiante.
N.B. Todos los paneles autolimpiantes comercializados en el mercado tienen una eficacia de rendimiento de aproximadamente 300 horas de funcionamiento del horno. Pasado dicho límite los paneles deberían ser sustituidos.
GRILL ABATIBLE
Para facilitar la limpieza de la parte superior del horno desenroscar la abrazadera situada en el centro de la resistencia del Grill y abatirla. Una vez finalizada la limpieza alzar la resistencia con lá abrazadera, colocarla en su posición y enroscarla.
NB: Para la limpieza ver el párrafo: “Limpieza y mantenimiento” del libro de instrucciones
ATENCIÓN: El horno únicamente debe funcionar con la resistencia bloqueada.
ASISTENCIA TÉCNICA
En caso de incorrecto funcionamiento del horno le aconsejamos:
— verificar la buena conexión del enchufe en la toma de corriente.
En caso de que no se determine la causa del mal funcionamiento: apagar el aparato sin manipularlo y llamar al Servicio de
Asistencia Técnica. Antes de llamar al Centro de Asistencia recuerde tomar nota del número de matrícula situado en la tarjeta matrícula del producto (Fig. última página).
El aparato está dotado de un certificado de garantía que le permite disponer del Servicio Asistencia Técnica.
Este electrodomestico está marcado conforme a la directiva Europea 2002/96/CE sobre los residuos de aparatos eléctricos y electrónicos
(WEEE).
Asegurándose que este producto ha sido eliminado correctamente, ayudará a evitar posibles consecuencias negativas en el ambiente y la salud de las personas, que pudiera verificarse
por causa de un anómalo tratamiento de este producto
El simbolo sobre el producto indica que este aparato no puede ser tratado como un residuo doméstico normal, en su ligar deberá ser entregado al centro de recogidas para reciclaje de aparatos eléctricos y electrónicos.
La eliminación debe ser efectuada de acuerdo con las reglas medioambientales vigentes para el tratamiento de los residuos. Para informacion más detallada sobre el tratamiento, recuperación y reciclaje de este producto, por favor contacte con la oficina compentente (del departamento de ecología y mediomabiente), o su servicio de recogida a domicilio si lo hubiera o el punto de venta donde compró el producto.
14 ES
 Loading...