


MFC-J430W
Table of contents
 Loading...
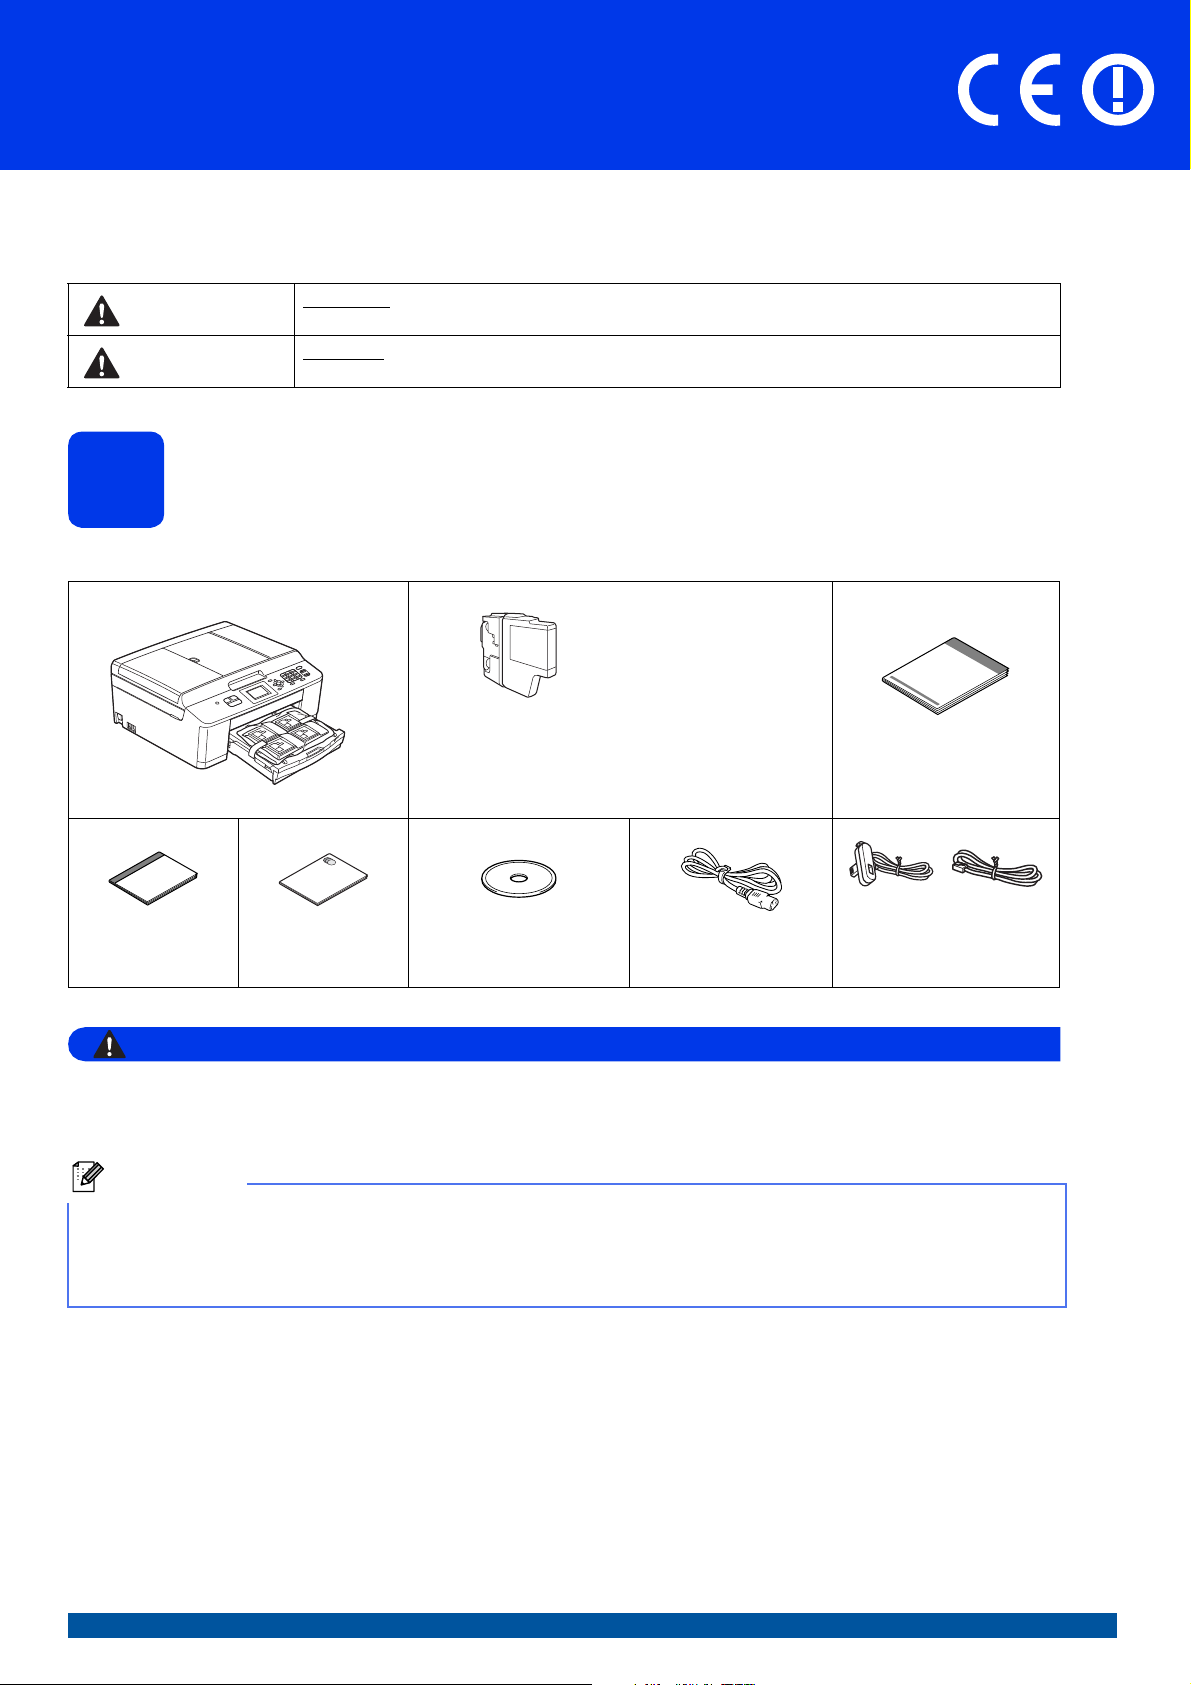
Quick Setup Guide
WARNING
Note
MFC-J430W
Start Here
Please read the Product Safety Guide first before you set up your machine. Then, please read this Quick Setup
Guide for the correct setup and installation.
WARNING
CAUTION
WARNING indicates a potentially hazardous situation which, if not avoided, could result in death
or serious injuries.
CAUTION indicates a potentially hazardous situation which, if not avoided, may result in minor
or moderate injuries.
Unpack the machine and check the components
1
The components included in the box may differ depending on your country.
Black
Yellow
Cyan
Magenta
(Approx. 80% yield of
Introductory Ink
Cartridges
the replacement
cartridge) (uuBasic
User’s Guide:
Consumable items)
Quick Setup Guide
(for UK) (for others)
Basic User’s Guide Product Safety
Guide
Plastic bags are used in the packing of your machine. Plastic bags are not toys. To avoid the danger
of suffocation, keep these bags away from babies and children and dispose of them correctly.
• Save all packing materials and the box in case for any reason you must ship your machine.
• You need to purchase the correct USB cable.
USB cable
It is recommended to use a USB 2.0 cable (Type A/B) that is no more than 2 metres long (cable not included).
CD-ROM Power Cord Telephone Line Cord
UK/IRE/GEN Version A
1
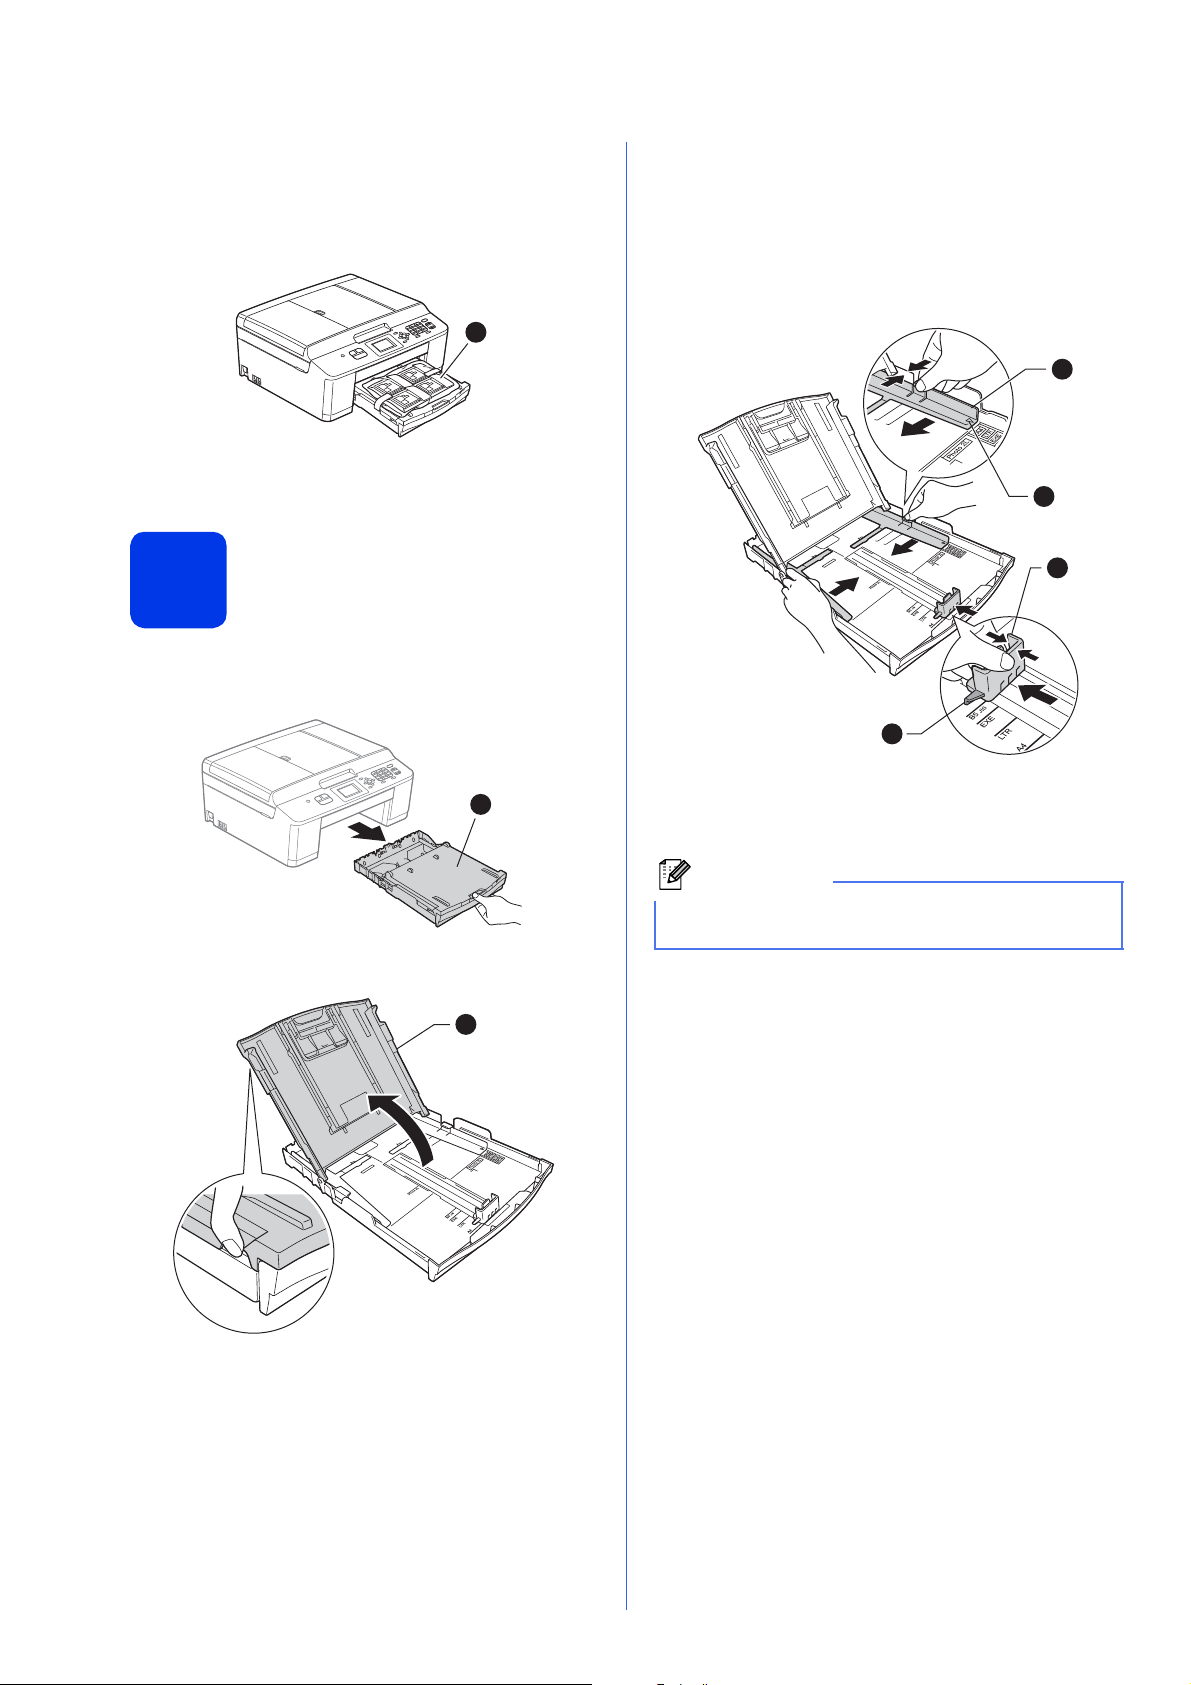
a Remove the protective tape and film covering
1
1
Note
the machine, and also from the LCD.
b Remove the plastic bag a containing the ink
cartridges from on top of the paper tray.
c Make sure you have all the components.
c With both hands, gently press and slide the
paper side guides a and then the paper length
guide b to fit the paper size.
Make sure that the triangular marks c on the
paper side guides a and paper length guide b
line up with the mark for the paper size you are
using.
1
3
Load plain A4 paper
2
a Pull the paper tray a completely out of the
machine.
1
b Open the output paper tray cover a.
2
3
d Fan the stack of paper well to avoid paper jams
and misfeeds.
Always make sure that the paper is not curled or
wrinkled.
2
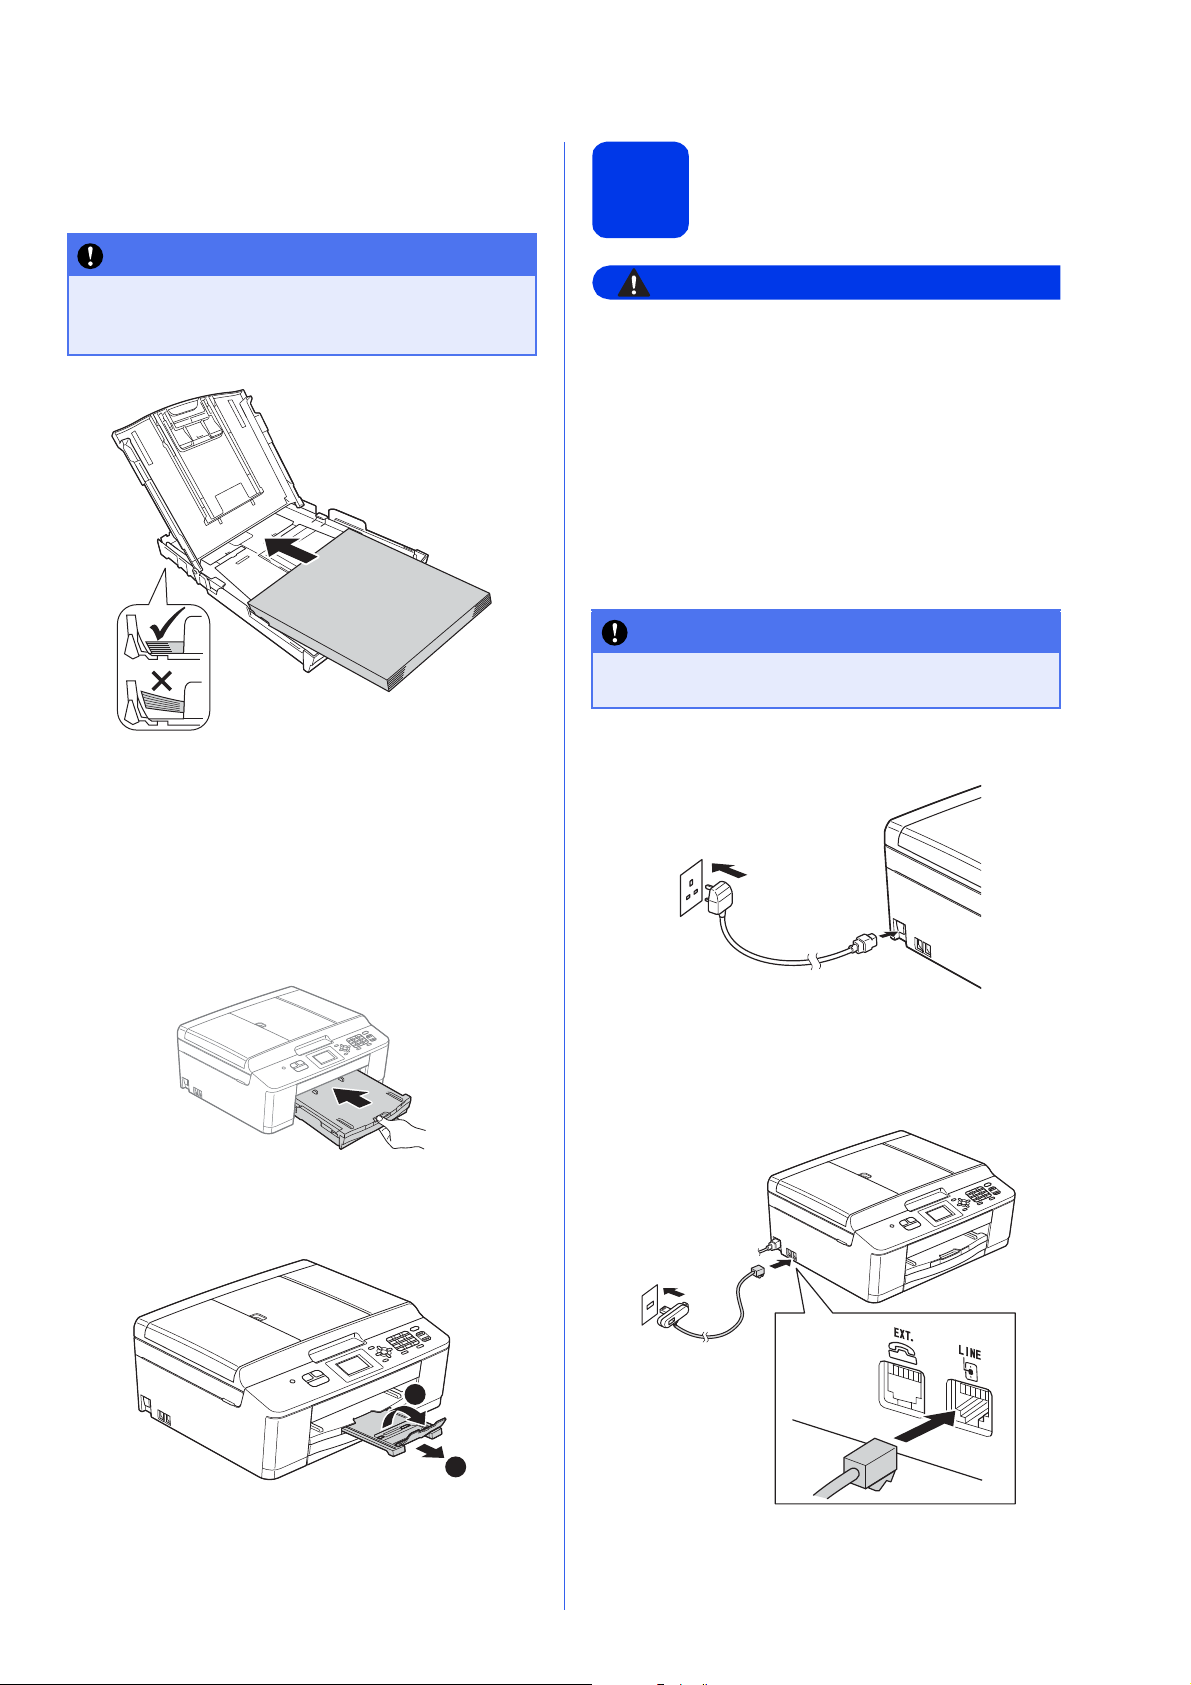
e Gently put the paper into the paper tray print
WARNING
IMPORTANT
IMPORTANT
side down and top edge first. Check that the
paper is flat in the tray.
Be careful that you do not push the paper in
too far; it may lift at the back of the tray and
cause paper feed problems.
Connect the power cord
3
• The machine must be fitted with an earthed
plug.
• Since the machine is grounded through the
power outlet, you can protect yourself from
potentially hazardous electrical conditions on
the telephone network by keeping the power
cord connected to your machine when you
connect it to a telephone line. Similarly, you
can protect yourself when you want to move
your machine by disconnecting the telephone
line first and then the power cord.
DO NOT connect the USB cable yet (if you are
using a USB cable).
and telephone line
f Gently adjust the paper side guides to the
paper with both hands. Make sure that the
paper side guides touch the edges of the
paper.
g Close the output paper tray cover.
h Slowly push the paper tray completely into the
machine.
i While holding the paper tray in place, pull out
the paper support a until it clicks, and then
unfold the paper support flap b.
a Connect the power cord.
b Connect the telephone line cord. Connect one
end of the telephone line cord to the socket on
the machine marked LINE and the other end to
a telephone wall socket.
(Example for UK)
2
1
3
CAUTION
IMPORTANT
The telephone line cord MUST be connected
Note
Note
1
2
Note
Note
to the socket on the machine marked LINE.
Install the ink cartridges
4
If you are sharing one telephone line with an
external telephone, connect it as shown below.
1 Extension telephone
2 External telephone
Please make sure you use an external telephone
with a cable no more than 3 metres long.
If you are sharing one telephone line with an
external telephone answering machine, connect it
as shown below.
If ink gets in your eyes, wash it out with water at
once and call a doctor if you are concerned.
Make sure you install the Introductory ink
cartridges included with your machine first.
a Make sure that the power is turned on.
The LCD will show No Ink Cartridge.
b Open the ink cartridge cover a.
1
c Remove the orange protective part a.
Set the receive mode to External TAD if you
have an external answering machine. See
Choose a Receive Mode on page 7. (Detailed
information uuBasic User’s Guide: Connecting
an external TAD (telephone answering device))
Do not throw away the orange protective part.
You will need it if you transport the machine.
1
4
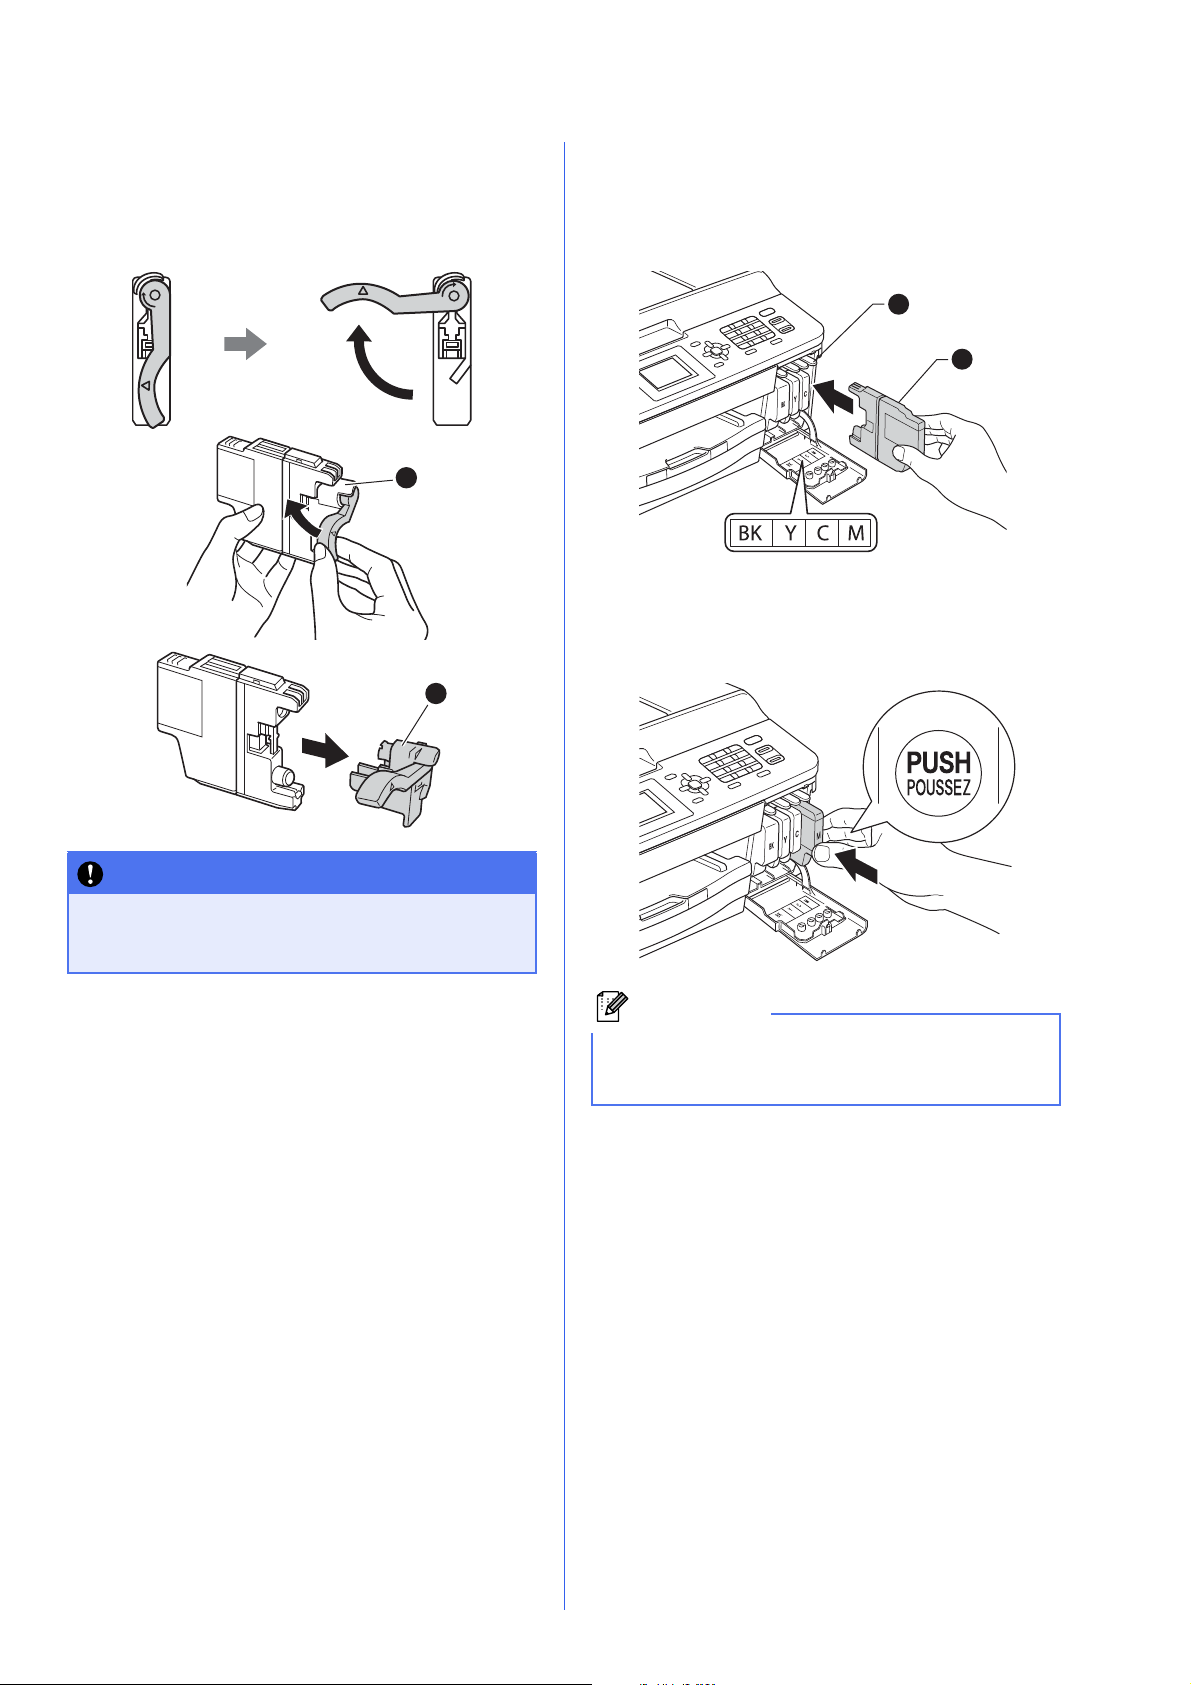
d Unpack the ink cartridge.
IMPORTANT
1
11
Note
Turn the green release lever on the orange
protective packing a clockwise until it clicks to
release the vacuum seal. Then remove the
orange protective packing a as shown.
e Take care to match the colour of the lever a
with the cartridge colour b, as shown in the
diagram below.
Install each ink cartridge in the direction of the
arrow on the label.
1
2
f Gently push the back of the ink cartridge
marked “PUSH” until it clicks. After all the ink
cartridges are installed close the ink cartridge
cover.
DO NOT shake the ink cartridges. If ink stains
your skin or clothing, wash with soap or
detergent at once.
The machine will prepare the ink tube system for
printing. This process will take approximately four
minutes. Do not turn off the machine.
5
5
Note
Check the print quality
6
Wireless setup (if needed)
a When the preparation process has finished, the
LCD shows Set Paper and Press Start.
Press Colour Start.
b Check the quality of the four colour blocks on
the sheet. (black/yellow/cyan/magenta)
c If all lines are clear and visible, press 1 (Yes) to
finish the quality check and go to step 6.
OK
If you can see missing short lines, press 2 (No)
and follow the steps on the LCD.
Poor
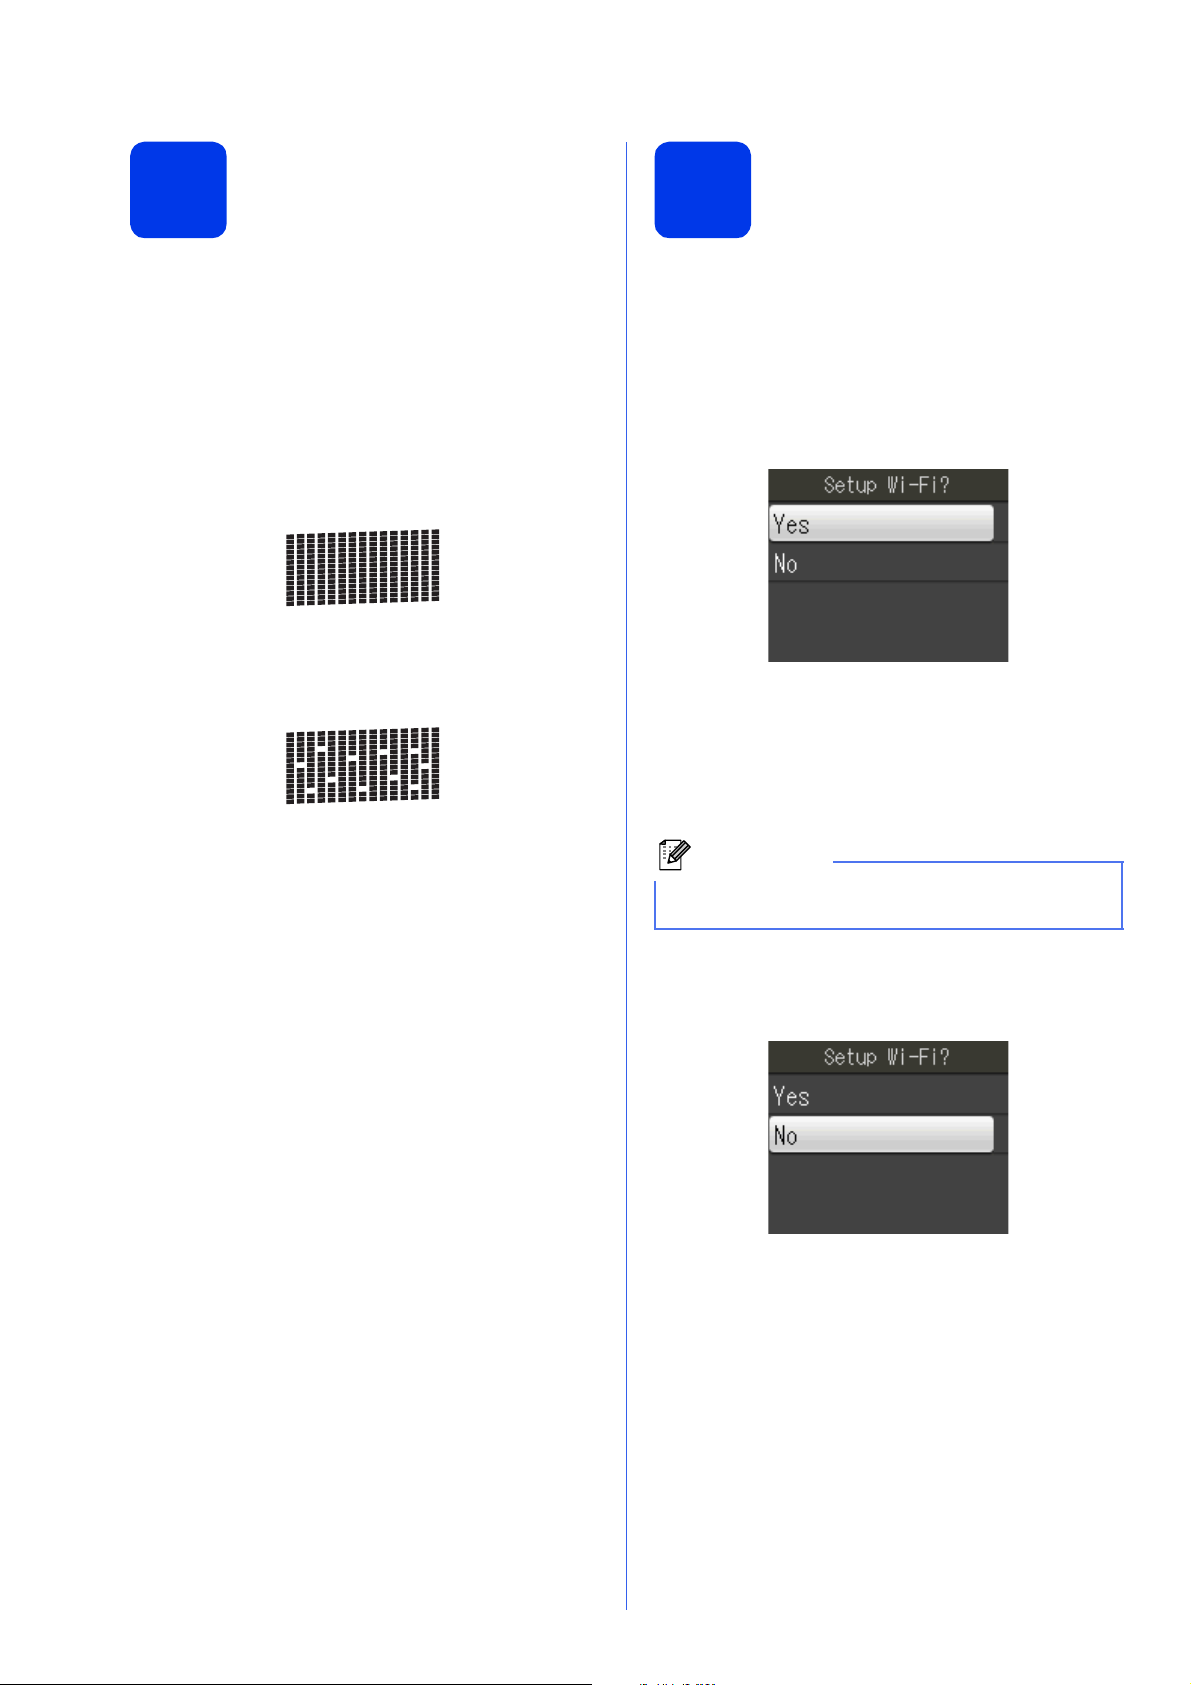
For wireless setup using a Macintosh computer or
mobile device, go to a.
For Windows users (all connections) and Macintosh
USB connections, go to b.
a If you are using a Macintosh computer or a
mobile device on a wireless network, press
OK.
Press a or b to choose Yes.
Press OK.
Then go to step 16 on page 19 to continue the
wireless setup.
After finishing the wireless setup you will need
to return to step 7 to finish the machine setup.
You can choose No to configure the wireless
settings later.
b If you are using a Windows
to connect your Macintosh using USB, press
OK.
Press a or b to choose No.
Press OK.
Then go to step 7.
The wireless setup for Windows
covered in later steps.
®
computer or want
®
users will be
6

7
Do you want to use the telephone features of your
machine (if available) or an external telephone or
external telephone answering device connected on the
same line as the machine?
Your machine
automatically answers
every call as a fax.
Your machine controls
the line and
automatically answers
every call. If the call is
not a fax, the telephone
will ring for you to pick
up the call.
Your external telephone
answering device (TAD)
automatically answers
every call. Voice
messages are stored
on the external TAD.
Fax messages are
printed.
You control the
telephone line and must
answer every call
yourself.
Do you want the machine to
answer fax and telephone calls
automatically?
Manual
Fax Only
Fax/Tel
External TAD
No
Yes
Yes
No
No
Yes
Are you using the voice message
function of an external telephone
answering device?
Choose a Receive Mode
8
Set the LCD contrast (if needed)
There are four possible receive modes: Fax Only,
Fax/Tel, Manual and External TAD.
uuBasic User’s Guide: Using Receive Modes
If you are having difficulty reading the LCD, try
changing the contrast setting.
a Press Menu.
b Press a or b to choose General Setup.
Press OK.
c Press a or b to choose LCD Settings.
Press OK.
d Press a or b to choose LCD Contrast.
Press OK.
e Press d or c to choose the contrast level.
Press OK.
f Press Stop/Exit.
a Press Menu.
b Press a or b to choose Initial Setup.
Press OK.
c Press a or b to choose Receive Mode.
Press OK.
d Press a or b to choose Fax Only, Fax/Tel,
External TAD or Manual.
Press OK.
e Press Stop/Exit.
7
9
Note
Note
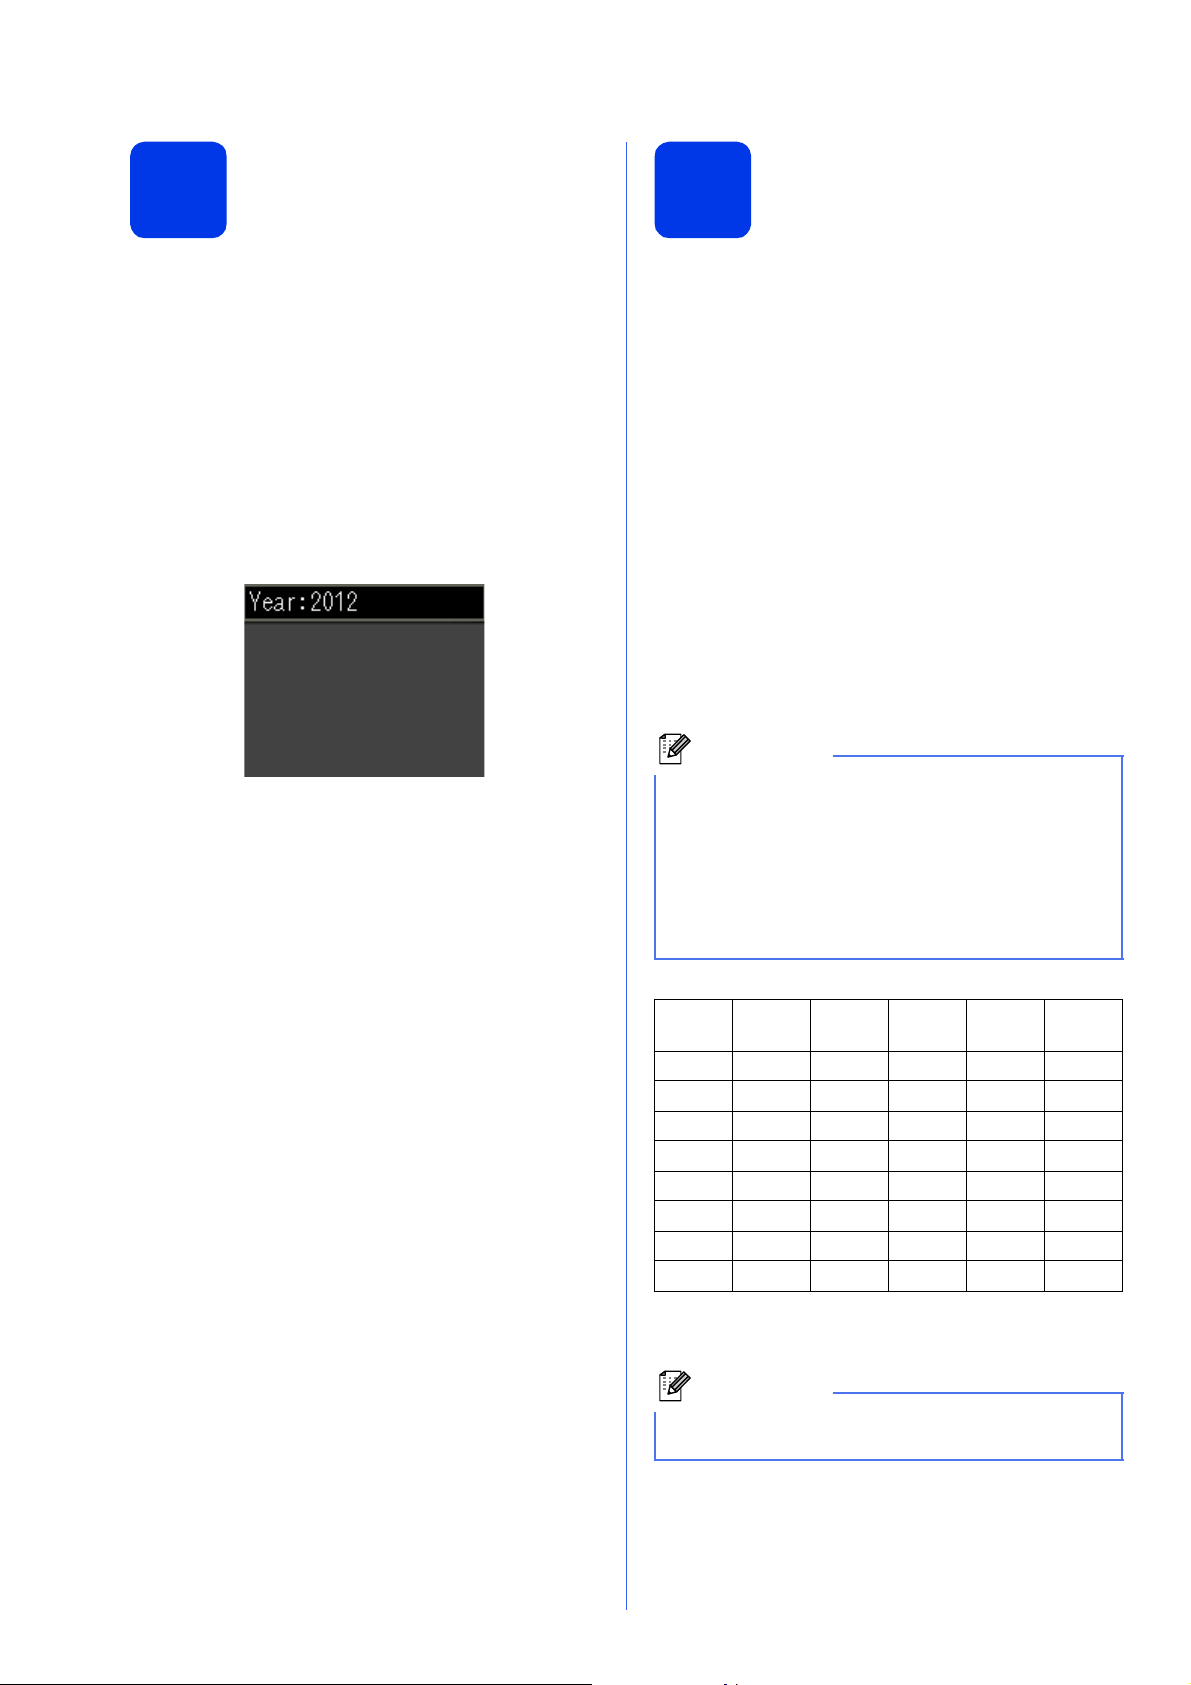
Set the date and time
10
Enter personal information (Station ID)
The machine displays the date and time, and if you
set up the station ID, it will add it to each fax you send.
a Press Menu.
b Press a or b to choose Initial Setup.
Press OK.
c Press a or b to choose Date&Time.
Press OK.
d Enter the last two digits of the year on the dial
pad, and then press OK.
(e.g. Enter 1 2 for 2012.)
e Repeat for month/day/time in 24-hour format.
f Press Stop/Exit.
You should store your name and fax number to be
printed on all fax pages that you send.
Information on how to enter text uuBasic User’s
Guide: Entering Text
a Press Menu.
b Press a or b to choose Initial Setup.
Press OK.
c Press a or b to choose Station ID.
Press OK.
d Enter your fax number (up to 20 digits) on the
dial pad, and then press OK. To enter a “+” for
international codes, press l.
e Enter your name (up to 20 characters) using
the dial pad, and then press OK.
• See the following chart for entering your name.
• If you need to enter a character that is on the
same key as the character before, press c to
move the cursor to the right.
• If you entered a character incorrectly and want
to change it, press d or c to move the cursor to
the incorrect character, and then press Clear.
Press
key
2 ABC2A
3 DEF3D
4 GH I 4 G
5 JKL5J
6 MNO6M
7 PQRS 7
8 TUV8T
9 WXY Z 9
One
time
Two
times
Three
times
Four
times
Five
times
f Press Stop/Exit.
If you make a mistake and want to start again,
press Stop/Exit and go back to a.
8

11
Fax Transmission Report
13
Set the telephone line type
Your Brother machine is equipped with a
Transmission Verification Report that can be used as
confirmation that you sent a fax. This report lists the
name or fax number of the receiving party, the date,
time, and duration of the transmission, the number of
pages transmitted, and whether or not the
transmission was successful.
Instructions on using this feature uuBasic User’s
Guide: Transmission Verification Report
Set Tone or Pulse dialling
12
Your machine comes set for Tone dialling service. If
you have Pulse dialling service (rotary), you need to
change the dialling mode.
mode
a Press Menu.
b Press a or b to choose Initial Setup.
Press OK.
c Press a or b to choose Tone/Pulse.
Press OK.
d Press a or b to choose Pulse (or Tone).
Press OK.
If you are connecting the machine to a line that
features PBX or ISDN to send and receive faxes, it is
necessary to change the telephone line type
accordingly by completing the following steps.
a Press Menu.
b Press a or b to choose Initial Setup.
Press OK.
c Press a or b to choose Phone Line Set.
Press OK.
d Press a or b to choose Normal, PBX or ISDN.
Press OK.
e Press Stop/Exit.
PBX and TRANSFER
The machine is initially set to Normal, which lets the
machine connect to a standard PSTN (Public
Switched Telephone Network) line. However, many
offices use a central telephone system or Private
Branch Exchange (PBX). Your machine can be
connected to most types of PBX. The machine’s
recall feature supports timed break recall only (TBR).
TBR will work with most PBX systems allowing you to
gain access to an outside line, or transfer calls to
another extension. The feature works when the Tel/R
key is pressed.
e Press Stop/Exit.
9

Set the telephone line
Note
14
If you are connecting the machine to a VoIP service
(over the Internet) you need to change the
compatibility setting.
If you are using an analogue telephone line you
can skip this step.
compatibility (VoIP)
a Press Menu.
b Press a or b to choose Initial Setup.
Press OK.
c Press a or b to choose Compatibility.
Press OK.
d Press a or b key to choose
Basic(for VoIP).
Press OK.
e Press Stop/Exit.
10
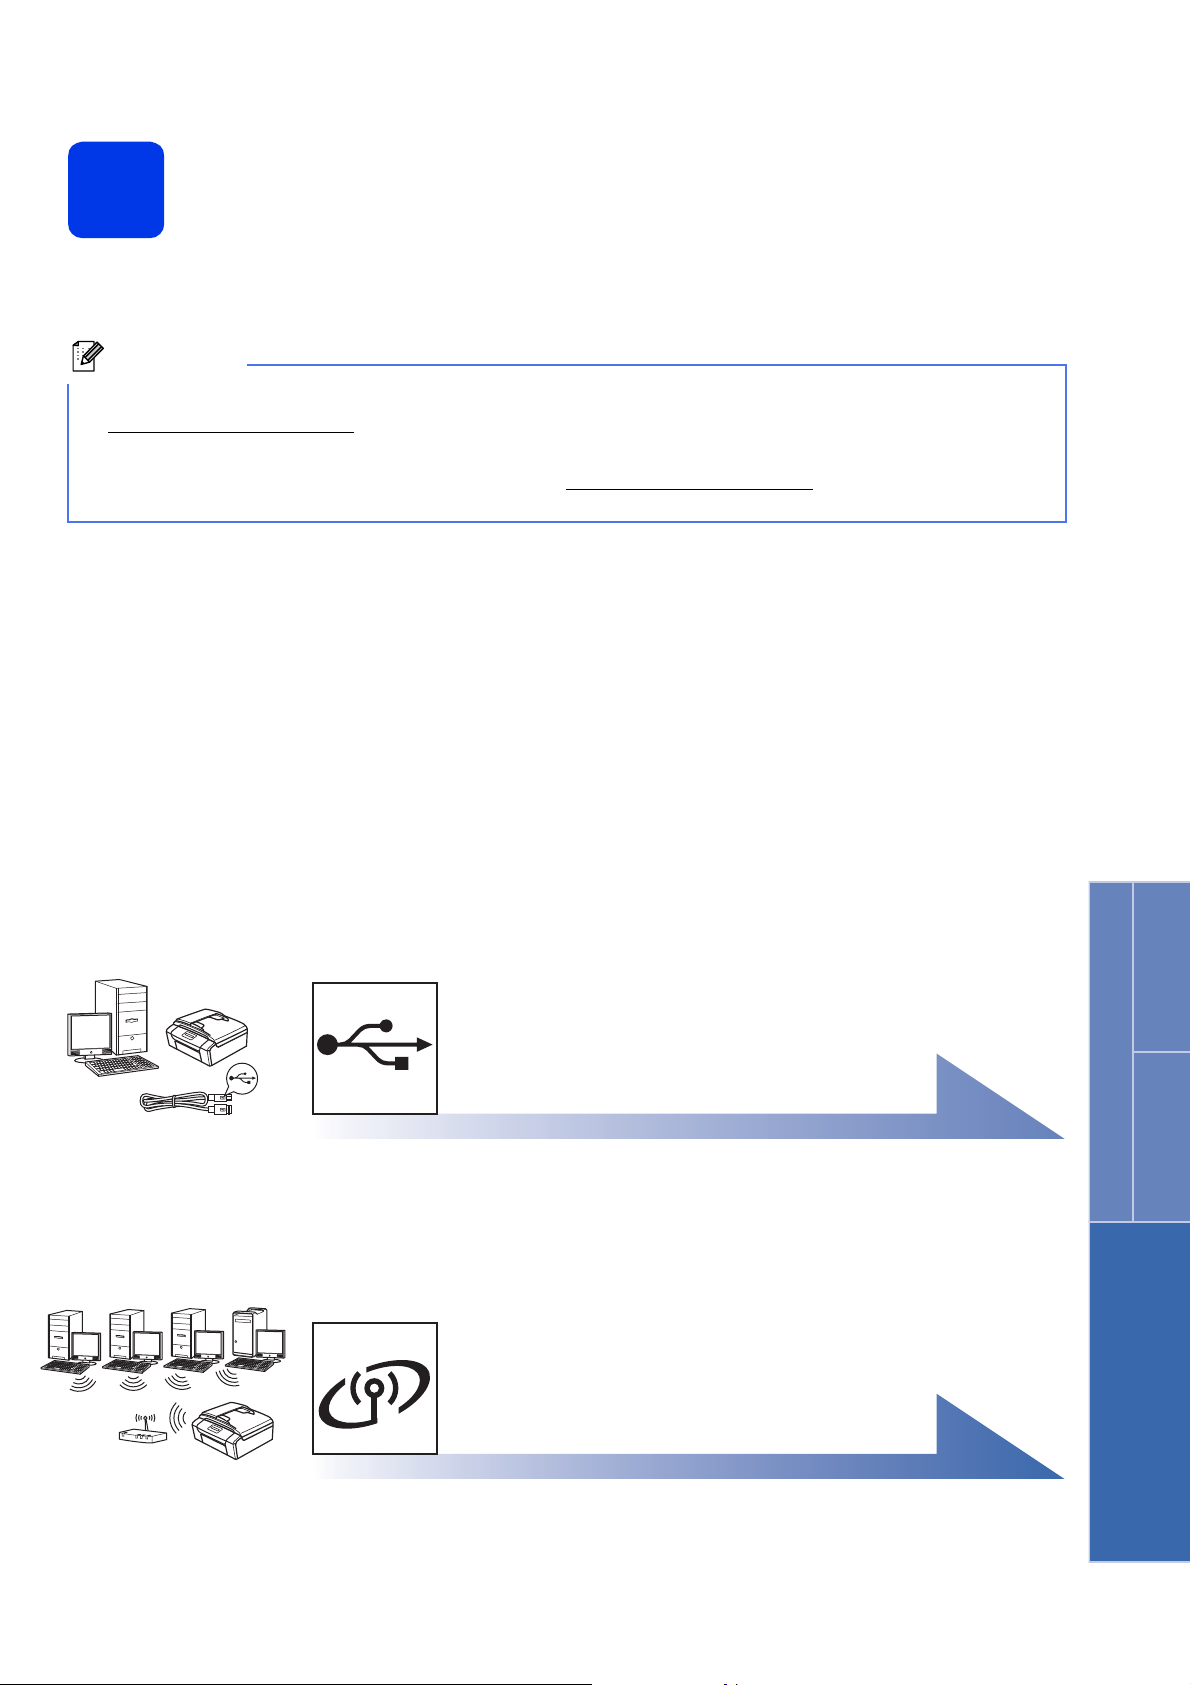
Choose your connection type
Note
15
These installation instructions are for Windows®XP/XP Professional x64 Edition, Windows Vista®, Windows®7,
and Mac OS X (versions 10.4.11, 10.5.x and 10.6.x).
• For Windows Server® 2003/2008/2008 R2, the drivers can be found from your model’s download page at
http://solutions.brother.com/
• If your computer does not have a CD-ROM drive you can download the latest drivers, manuals and utilities
for your model from the Brother Solutions Center at http://solutions.brother.com/
applications included on the CD-ROM may not be available as a download.
.
. Some software
For USB interface cable
Windows®, go to page 12
Macintosh, go to page 16
For Wireless Network
Windows® and Macintosh,
go to page 19
Windows
®
USB
Macintosh
Wireless Network
11
Loading...