


Care and Cleaning
of Bowl and Its Accessories
The mixing bowl, whisks, dough hook, dough deflector and anti-splash cover are dishwasher safe.
To facilitate cleaning:
The power unit of the kitchen machine should be cleaned using a clean, damp cloth only. Never use coarse or caustic cleaning products to clean this appliance. Never immerse the power unit in water.
Blender with Unbreakable Plastic Jar (MUZ 4 MX2)
 WARNING
1.There is a risk of injury from sharp blades when using the blender attachment.
2.Keep hands and utensils out of the blender jar while it is attached to the power unit.
3.Blades are sharp. Handle carefully.
4.To avoid injury, never place blade assembly on power unit without blender jar properly attached.
5.Always operate the blender with the cover in place. Always hold the cover in place when in operation to prevent the cover from being knocked off.
6.The use of attachments, including canning jars, not recommended by the manufacturer, may cause a risk of personal injury.
7.When blending hot and/or frothing liquids, process a maximum of 18 fluid ounces (0.5 litres) at a time.
The MUM 4635 UC, MUM 4620 UC and the MUM 4420 UC Bosch Compact Series Kitchen Machines include the MUZ 4 MX2 blender accessory. The blender accessory consists of, figure 5:
Figure 5. |
|
5a. |
Cover closure/funnel |
5b. |
Cover |
5c. |
Blender jar |
5d. |
Blade/base assembly with |
|
gasket and locking ring. |
1.Before using the blender for the first time, it is recommended that the blender jar cover, closure/funnel and blade/base assembly, gasket and locking ring be washed. All components, except the blade/base assembly, are dishwasher safe. Remove the blade/base assembly from the blender:
First remove the locking ring, as shown in figure 6a and 6b. Then turn the blender over so that the base is facing upward, as shown in figure 7, and remove the blade assembly by turning
13

the blade assembly counterclockwise until it stops and then lift up see figures 7c and 7e.
Figure 6.
CAUTION
Blade/base assembly is very sharp. Handle with care.
Figure 7.
If the blade assembly is too tight to turn by hand, the locking ring may be used to loosen the blade assembly, as shown in figure 7d. After loosening, turn the blade assembly counterclockwise until it stops and then lift up. The gasket may be removed for cleaning, as shown in figure 7f.
Wash the blade/base assembly under running water. Do not place the blade/ base assembly in the dishwasher or allow it to stand in water. This will tend to wash out the lubricant. After cleaning, rinse thoroughly and dry before using.
2.To assemble or reassemble blade/base assembly into the blender, reverse the steps that were used in the above to remove it.
3.The blender is used in mode 3, see table 1. To place the blender on the power unit the arm must be rotated to the down position. Depress the release button, see 4a, and lower the arm so that the arm is vertical and the highspeed drive is straight up. If you have not already done so, remove the motor drive cover from the high-speed drive and place the blender on the high-speed drive and turn counterclockwise to lock the blender in place.
Placing Blender into Operation
Make sure that the power unit’s rotary switch is in the off position, “O/Off.” Pull the electrical cord or unwind it to the necessary length and then plug into the wall outlet. The blender is now ready for operation.
Normally when blending, the blender jar should be filled with the entire amount of material to be blended, if possible, before switching the appliance to On. The cover and cover closure should always be in place after filling the blender jar and before switching the power unit to On. Any subsequent additions to the blended material should be made through the cover opening, see figure 8. For solids and/or granular material, remove the cover closure/ funnel to add the material, as shown in figure 8a. For liquids, the closure/funnel may be left in place and the liquids can be added by pouring them into the closure/ funnel, see figure 8b.
14
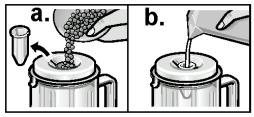
Figure 8.
Example of Use of Blender
To familiarize you with the operation of the blender, a sample recipe for mayonnaise is provided below:
Mayonnaise Recipe 1 whole egg
1/3 cup of vegetable oil
2tablespoons lemon juice or light vinegar
1 teaspoon sugar
1/2 teaspoon dry mustard 1/2 teaspoon of salt
2/3 cup of vegetable oil
Mix all ingredients, except final 2/3’s cup of oil, for a few seconds at speed 1, then quickly pour the oil in through the opening in the cover in a uniformly thick stream, as shown in figure 8b. Operate the blender at speeds 1 or 4 until mixture is thick and smooth (approximately 10–20 seconds). Makes 1 1/4 cups.
Tips:
The blender should be operated with careful consideration as to what is required and/or desired. The speed at which the blender is operated and the length of operation for a given job will depend upon the degree of fineness desired or the amount being blended.
When the blender is being used on dry materials, such as nuts or bread, the best results will be obtained when the blender jar is filled with approximately 1/2 cup of material to be blended. If the blender does not start (even after trying the highest speed), the blade has become blocked by the contents. The power unit should be:
1.Switched to off, “O/Off,” and unplugged.
2.The mixture should be removed and the contents at the bottom of the jar loosened.
Removing Contents
Before beginning to remove the contents from the blender, make sure that the power unit has been turned to off position “O/Off.” Remove the blender from the power unit by turning the blender clockwise while lifting. With the blender removed from the power unit, the contents of the blender may now be poured into a suitable container or bowl, as desired. Replace the cover on the highspeed drive.
Care and Cleaning of Blender
All components of the blender, except the blade/base assembly, are dishwasher safe. It is recommended that the blade/base assembly be cleaned only under flowing water rather than in the dishwasher. Soap and detergent will tend to wash out the bearing lubricant of the blade/base assembly. Do not use scouring cleaners on any of the blender parts.
The power unit of the kitchen machine should be cleaned with a clean, damp cloth only. Never use coarse or caustic cleaning products to clean this appliance. Never immerse the power unit in water.
15
Continuous Shredder (MUZ 4 DS2)
 WARNING
1.Blades on discs are sharp. Handle carefully. Do not grip the discs by the blades.
2.When operating continuous shredder, keep hands clear of filling and discharge tubes. Only work with pusher.
3.The continuous shredder must be completely assembled before placing on the power unit.
4.Always operate the continuous shredder fully assembled and with cover in place.
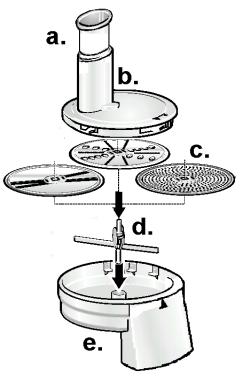
The MUM 4635 UC and the MUM 4420 UC Bosch Compact Series Kitchen Machines include the MUZ 4 DS2 continuous shredder attachment. The continuous shredder attachment consists of, figure 9:
Figure 9.
a.Cover closure/pusher
b.Cover
c.3 slicer/shredder discs:
•reversible slicing disc
•reversible shredding disc
•grating disc
d.disc holder/slinger
e.Housing
Continuous shredder, intended use
The continuous shredder attachment has been designed for slicing, shredding and/ or grating of vegetables, as well slicing/ shredding of soft cheeses and sausages or meat and grating of vegetables and hard cheese.
Use of Slicer/Shredder
Before beginning to use this or any other attachment, make sure that the power unit is on a smooth, clean, suitable work surface and switched to Off position, “O/Off,” and that you have removed the motor drive cover.
1.Before using the continuous shredder for the first time, it is recommended that the cover closure/pusher, cover, discs, disc holder/slinger and housing be washed. All components of the continuous shredder are dishwasher safe. After washing, rinse well and dry before using.
 WARNING
The blades on the discs are very sharp. Handle with care.
2.The continuous shredder is used in mode 2, see table 1. To place the continuous shredded on the power unit, the arm must be rotated to the horizontal position. Depress the release button, see 4a, and move the arm as necessary so that the arm is horizontal. If you have not already done so, remove the motor drive cover from the midspeed drive, as shown in figure 10.
16
 Loading...