


 Loading...
HBC86K7.3S
Compact oven with microwave
[en] Instruction manual

ÚTable of contentsnstrctionaumI]e[l |
|
Important safety information .................................................... |
3 |
Causes of damage ............................................................................. |
5 |
Your new appliance ................................................................... |
5 |
Control panel ....................................................................................... |
5 |
Buttons.................................................................................................. |
5 |
Rotary selector .................................................................................... |
6 |
Display .................................................................................................. |
6 |
Temperature indicator........................................................................ |
6 |
Cooking compartment ....................................................................... |
6 |
Your accessories ....................................................................... |
6 |
Inserting accessories ......................................................................... |
7 |
Optional accessories ......................................................................... |
7 |
After-sales service products ............................................................. |
7 |
Before using the appliance for the first time........................... |
7 |
Initial setup ........................................................................................... |
8 |
Heating up the cooking compartment............................................ |
8 |
Cleaning the accessories.................................................................. |
8 |
Door lock.............................................................................................. |
8 |
Switching the oven on and off.................................................. |
8 |
Switching on ........................................................................................ |
8 |
Switching off......................................................................................... |
8 |
Setting the oven ......................................................................... |
8 |
Types of heating.................................................................................. |
8 |
Setting the type of heating and temperature................................. |
9 |
Recommended settings..................................................................... |
9 |
Setting rapid heating ....................................................................... |
10 |
The microwave ......................................................................... |
10 |
Notes regarding ovenware............................................................. |
10 |
Microwave power settings.............................................................. |
10 |
Setting the microwave..................................................................... |
11 |
MicroCombi .............................................................................. |
11 |
MicroCombi, gentle ........................................................................ |
11 |
MicroCombi, intensive..................................................................... |
11 |
Setting MicroCombi......................................................................... |
11 |
Combination ............................................................................. |
11 |
Suitable microwave power settings.............................................. |
12 |
Setting a combination ..................................................................... |
12 |
Series of operations ................................................................ |
12 |
Ovenware ......................................................................................... |
12 |
Setting a series of operations ....................................................... |
12 |
Time-setting options................................................................ |
13 |
Setting the cooking time................................................................. |
13 |
Setting a later end time .................................................................. |
13 |
Setting the timer............................................................................... |
14 |
Setting the clock .............................................................................. |
14 |
Memory ..................................................................................... |
14 |
Storing settings in the memory ..................................................... |
14 |
Starting the memory........................................................................ |
14 |
Sabbath mode .......................................................................... |
15 |
Starting Sabbath mode................................................................... |
15 |
The cooking time has elapsed...................................................... |
15 |
Setting a later end time .................................................................. |
15 |
Cancelling Sabbath mode.............................................................. |
15 |
Childproof lock......................................................................... |
15 |
Basic settings ........................................................................... |
15 |
Changing the basic settings.......................................................... |
16 |
Automatic switch-off ................................................................ |
16 |
Care and cleaning..................................................................... |
16 |
Cleaning agents ............................................................................... |
17 |
Cleaning the glass cover ............................................................... |
17 |
Cleaning the glass panels ............................................................. |
18 |
Malfunction table ...................................................................... |
19 |
Malfunction table.............................................................................. |
19 |
Replacing the oven light bulb ....................................................... |
19 |
Replacing the door seal ................................................................. |
20 |
After-sales service.................................................................... |
20 |
E number and FD number ............................................................. |
20 |
Energy and environment tips .................................................. |
20 |
Saving energy................................................................................... |
20 |
Environmentally-friendly disposal.................................................. |
21 |
Automatic programmes ........................................................... |
21 |
Selecting a programme.................................................................. |
21 |
Individually adjusting the cooking result: .................................... |
21 |
Defrosting and cooking with the automatic programmes ....... |
21 |
Tested for you in our cooking studio ...................................... |
26 |
Defrosting, heating up and cooking with the microwave......... |
26 |
Microwave tips ................................................................................. |
29 |
Cakes and pastries ......................................................................... |
29 |
Baking tips ........................................................................................ |
31 |
Roasting and grilling ....................................................................... |
31 |
Tips for roasting and grilling.......................................................... |
34 |
Bakes, gratins, toast with toppings .............................................. |
35 |
Convenience products.................................................................... |
35 |
Slow cooking............................................................................. |
36 |
Setting the Slow cook option ........................................................ |
36 |
Tips for slow cooking...................................................................... |
36 |
Test dishes ................................................................................ |
37 |
Baking................................................................................................ |
37 |
Grilling................................................................................................ |
38 |
Acrylamide in foodstuffs ......................................................... |
38 |
Produktinfo
Additional information on products, accessories, replacement parts and services can be found at www.bosch-home.com and in the online shop www.bosch-eshop.com
2

:Important safety information
Read these instructions carefully. Only then will you be able to operate your appliance safely and correctly. Retain the instruction manual and installation instructions for future use or for subsequent owners.
This appliance is only intended to be fully fitted in a kitchen. Observe the special installation instructions.
Check the appliance for damage after unpacking it. Do not connect the appliance if it has been damaged in transport.
Only a licensed professional may connect appliances without plugs. Damage caused by incorrect connection is not covered under warranty.
This appliance is intended for domestic use only. The appliance must only be used for the preparation of food and drink. The appliance must be supervised during operation. Only use this appliance indoors.
This appliance may be used by children over the age of 8 years old and by persons with reduced physical, sensory or mental capacity or by persons with a lack of experience or knowledge if they are supervised or are instructed by a person responsible for their safety how to use the appliance safely and have understood the associated hazards.
Children must not play with the appliance. Children must not clean the appliance or carry out general maintenance unless they are at least 8 years old and are being supervised.
Keep children below the age of 8 years old at a safe distance from the appliance and power cable.
Always slide accessories into the cooking compartment correctly. See "Description of accessories in the instruction manual.
Risk of fire!
■Combustible items stored in the cooking compartment may catch fire. Never store combustible items in the cooking compartment. Never open the appliance door if there is smoke inside. Switch off the appliance and unplug it from the mains or switch off the circuit breaker in
the fuse box.
Risk of fire!
■ A draught is created when the appliance door is opened. Greaseproof paper may come into contact with the heating
element and catch fire. Do not place greaseproof paper loosely over accessories during preheating. Always weight down the greaseproof paper with a dish or a baking tin. Only cover the surface required with greaseproof paper. Greaseproof paper must not protrude over the accessories.
Risk of fire!
■ Using the appliance for anything other than its intended purpose is dangerous and may cause damage, e.g. heated slippers and grain or cereal pillows may catch fire, even several hours later. The appliance must only be used for the preparation of food and drink.
Risk of fire!
■ Food may catch fire. Never heat food in heat-retaining packages.
Do not leave food heating unattended in containers made of plastic, paper or other combustible materials.
Do not select a microwave power or time setting that is higher than necessary. Follow the information provided in this instruction manual.
Never use the microwave to dry food. Never defrost or heat food with a low water content, e.g. bread, at too high a microwave power or for too long.
Risk of fire!
■ Cooking oil may catch fire. Never use the microwave to heat cooking oil on its own.
Risk of fire!
■ The appliance becomes very hot. If the appliance is installed in a fitted unit with a decorative door, heat will accumulate when the decorative door is closed. Only operate the appliance when the decorative door is open.
Risk of explosion!
Liquids and other food may explode when in containers that have been tightly sealed. Never heat liquids or other food in containers that have been tightly sealed.
Risk of serious damage to health!
■The surface of the appliance may become damaged if it is not cleaned properly. Microwave energy may escape. Clean the appliance on a regular basis, and remove any food residue immediately. Always keep the cooking compartment, door seal, door and door stop clean; see also
section Care and cleaning.
Risk of serious damage to health!
■ Microwave energy may escape if the cooking compartment door or the door
3
seal is damaged. Never use the appliance if the cooking compartment door or the door seal is damaged. Contact the aftersales service.
Risk of seriousMicrowavedamage to health! energy will escape from
■
appliances that do not have any casing. Never remove the casing. For any maintenance or repair work, contact the after-sales service.
Risk of electric shock!
■Incorrect repairs are dangerous. Repairs may only be carried out and damaged power cables replaced by one of our trained after-sales technicians. If the appliance is defective, unplug the appliance from the mains or switch off the circuit breaker in the fuse box. Contact the
after-sales service.
Risk of electric shock!
■ The cable insulation on electrical appliances may melt when touching hot parts of the appliance. Never bring electrical appliance cables into contact with hot parts of the appliance.
Risk of electric shock!
■ Penetrating moisture may cause an electric shock. Do not use any highpressure cleaners or steam cleaners.
Risk of electricWhenshock! replacing the cooking compartment
■
bulb, the bulb socket contacts are live. Before replacing the bulb, unplug the appliance from the mains or switch off the circuit breaker in the fuse box.
Risk of electric shock!
■ A defective appliance may cause electric shock. Never switch on a defective appliance. Unplug the appliance from the mains or switch off the circuit breaker in the fuse box. Contact the after-sales service.
Risk of electric shock!
■ The appliance is a high-voltage appliance. Never remove the casing.
Risk of electric shock!
■ The insulation of an incompatible meat thermometer may be damaged. Only use the meat thermometer which is recommended for this appliance.
Risk of burns!
■The appliance becomes very hot. Never touch the interior surfaces of the cooking compartment or the heating elements. Always allow the appliance to cool down.
Keep children at a safe distance.
Risk of burns!
■ Accessories and ovenware become very hot. Always use oven gloves to remove
accessories or ovenware from the cooking compartment.
Risk of burns!
■ Alcoholic vapours may catch fire in the hot cooking compartment. Never prepare food containing large quantities of drinks with a high alcohol content. Only use small quantities of drinks with a high alcohol content. Open the appliance door with care.
Risk of burns!
■ Foods with peel or skin may burst or explode during, or even after, heating. Never cook eggs in their shells or reheat hard-boiled eggs. Never cook shellfish or crustaceans. Always prick the yoke when baking or poaching eggs. The skin of foods that have a peel or skin, such as apples, tomatoes, potatoes and sausages, may burst. Before heating, prick the peel or skin.
Risk of burns!
■ Heat is not distributed evenly through baby food. Never heat baby food in closed containers. Always remove the lid or teat. Stir or shake well after the food has been heated. Check the temperature of the food before it is given to the child.
Risk of burns!Heated food gives off heat. The ovenware
■
may become hot. Always use oven gloves to remove ovenware or accessories from the cooking compartment.
Risk of burns!
■ Airtight packaging may burst when food is heated. Always observe the instructions on the packaging. Always use oven gloves to remove dishes from the cooking compartment.
Risk of scalding!
■When you open the appliance door, hot steam may escape. Open the appliance door with care. Keep children at a safe
distance.
Risk of scalding!
■ Water in a hot cooking compartment may create hot steam. Never pour water into the hot cooking compartment.
Risk of scalding!There is a possibility of delayed boiling
■
when a liquid is heated. This means that the liquid reaches boiling temperature without the usual steam bubbles rising to the surface. Even if the container only vibrates a little, the hot liquid may suddenly boil over and spatter. When heating, always place a spoon in the container. This will prevent delayed boiling.
Risk of injury!
■Scratched glass in the appliance door may develop into a crack. Do not use a
4
glass scraper, or sharp or abrasive cleaning aids or detergents.
Risk of injury!
■ Unsuitable ovenware may crack. Porcelain or ceramic ovenware can have small perforations in the handles or lids. These perforations conceal a cavity below. Any moisture that penetrates this cavity could cause the ovenware to crack. Only use microwave-safe ovenware.
Causes of damage
Caution!
■Creation of sparks: Metal e.g. a spoon in a glass must be kept at least 2 cm from the oven walls and the inside of the door. Sparks could irreparably damage the glass on the inside of the door.
■Baking tray, greaseproof paper, aluminium foil or ovenware on the cooking compartment floor: Do not place baking trays or ovenware on the cooking compartment floor. Do not line the cooking compartment floor with aluminium foil. This will cause heat accumulation. The baking and roasting times will no longer be correct and the enamel will be damaged.
■Foil containers: Do not use foil containers in the appliance. They damage the appliance by producing sparks.
■Water in the hot cooking compartment: Never pour water into the hot cooking compartment. This will cause steam. The temperature change can cause damage to the enamel.
■Moist food: Do not store moist food in the closed cooking compartment for long periods. This will damage the enamel.
Do not use the appliance to store food. This can lead to corrosion.
■Fruit juice: When cooking very moist fruit flans, do not fill the universal pan too generously. Fruit juice which runs out of the universal pan leaves behind stains which cannot be removed.
■Cooling with the appliance door open: Only leave the cooking compartment to cool with the door closed. Do not trap anything in the appliance door. Even if the door is only slightly ajar, the fronts of adjacent units may be damaged over time.
■Heavily soiled seal: If the seal is very dirty, the appliance door will no longer close properly during operation. The fronts of adjacent units could be damaged. Always keep the seal clean.
■Using the appliance door for standing on or placing objects on: Do not stand or place anything on the open appliance door. Do not place ovenware or accessories on the appliance door.
■Transporting the appliance: Do not carry or hold the appliance by the door handle. The door handle cannot support the weight of the appliance and could break.
■Operating the microwave without food: Operating the appliance without food in the cooking compartment may lead to overloading. Never switch on the appliance unless there is food in the cooking compartment. An exception to this rule is a short crockery test (see the section "Microwave, suitable crockery").
■Microwave popcorn: Never set the microwave power too high. Use a power setting no higher than 600 watts. Always place the popcorn bag on a glass plate. The disc may jump if overloaded.
Your new appliance
Use this section to familiarise yourself with your new appliance. The control panel and the individual operating controls are
explained. You will find information on the cooking compartment and the accessories.
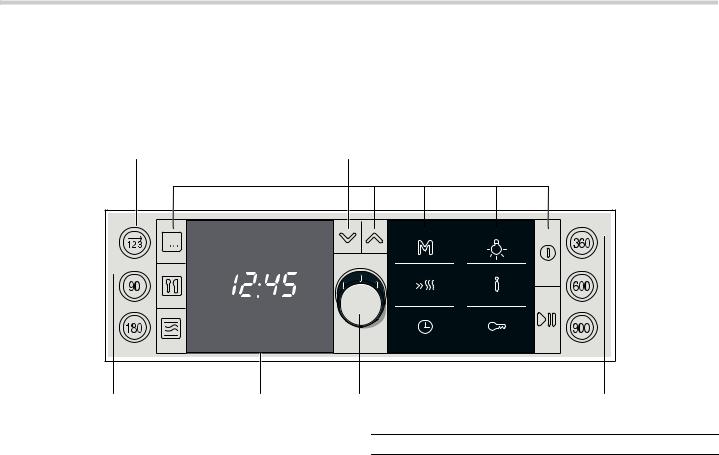
Control panel |
|
|
|
Here, you will see an overview of the control panel. Depending |
|
|
|
on the appliance model, individual details may differ. |
|
|
|
|
|
|
|
|
|
|
|
|
|
|
|
Buttons |
|
Buttons |
|
The sensors are located under the individual buttons. They must not be pressed too firmly. Only touch the corresponding symbol.
Exception: the button for the series of operations and the buttons for the microwave power settings are normal push buttons.
Symbol |
Button function |
2 |
Selects a series of operations |
90 |
Selects 90 watt microwave power |
|
|
180 |
Selects microwave power 180 watt |
5
Symbol |
Button function |
|
|
360 |
Selects microwave power 360 watt |
|
|
600 |
Selects 600 watt microwave power |
|
|
900 |
Selects 900 watt microwave power |
! |
Selects the type of heating |
` |
Selects automatic programmes |
Þ |
Selects MicroCombi |
X |
Moves one row down in the display |
Y |
Moves one row up in the display |
f |
Selects the memory |
c |
Switches on rapid heating |
0 |
Opens and closes the time-setting options menu |
B |
Switches the oven light on and off |
° |
Press briefly = calls up information Press and hold |
D |
= opens and closes the basic settings menu |
Activates/deactivates childproof lock |
|
% |
Switches the oven on and off |
n |
Press briefly = starts/pauses operation |
|
Press and hold = cancels operation |
|
|
Rotary selector
[The rotary selector is used to alter the default values and setting values.
The rotary selector is retractable. Press on the rotary selector to pop it in or out.
Display
The display is divided into different sections:
■Heading, only appears prior to starting
■Settings area
■Status bar
Heading
The function selected is shown in the top line, e.g. types of heating, programmes, time-setting options, etc..To the right of this, arrowsXindicateYthe direction in which you can navigate using the and buttons. The heading disappears after starting.
Settings area
Suggested values appear in the settings range, which you canX changeY. You can change from one line to the next using the and navigation buttons. Brackets are displayed around the line you are currently in. You can use the rotary selector to change the value in the brackets.
Status bar
The status bar is at the bottom of the display. It displays the current time, time-setting options which are running down or the childproof lock setting. You are given short instruction texts on setting if required.
Temperature indicator
The temperature indicator bars show the heating phases or residual heat in the cooking compartment.
Heating indicator
The heating indicator displays the rising temperature in the cooking compartment. When all bars are filled, the optimum time for placing the dish in the oven has been reached.
|
The bars do not appear when grill settings or the microwave are used.
You can use the ° button to check the current heating temperature while the oven is heating up. Due to thermal inertia, the temperature displayed may differ slightly from the actual temperature in the cooking compartment.
Residual heat
The temperature indicator shows the residual heat in the cooking compartment when the appliance is switched off. The cooking compartment has reached the maximum temperature when the last bar is full. Once the temperature has dropped to approximately 60 °C, the display goes out.
Cooking compartment
Your appliance has a cooling fan.
Cooling fan
The cooling fan switches on and off as required. The hot air escapes above the door.
Caution!
do not cover the ventilation slots. Otherwise the oven will overheat.
Notes
■The cooling fan continues to run for a certain time after operation.
■The appliance remains cool during microwave operation. The cooling fan will still switch on. The fan may run on even when microwave operation has ended.
■Condensation may appear on the door window, interior walls and floor. This is normal and does not adversely affect microwave operation. Wipe away the condensation after cooking.
Oven light
During operation, the oven light in the cooking compartment is on.
The oven light switches on when you open the oven door. You can use the B button to switch the light on and off.
Your accessories
The accessories supplied with your appliance are suitable for making many meals. Ensure that you always insert the accessories into the cooking compartment the right way round.
There is also a selection of optional accessories, with which you can improve on some of your favourite dishes, or simply to make working with your oven more convenient.
6
Inserting accessories
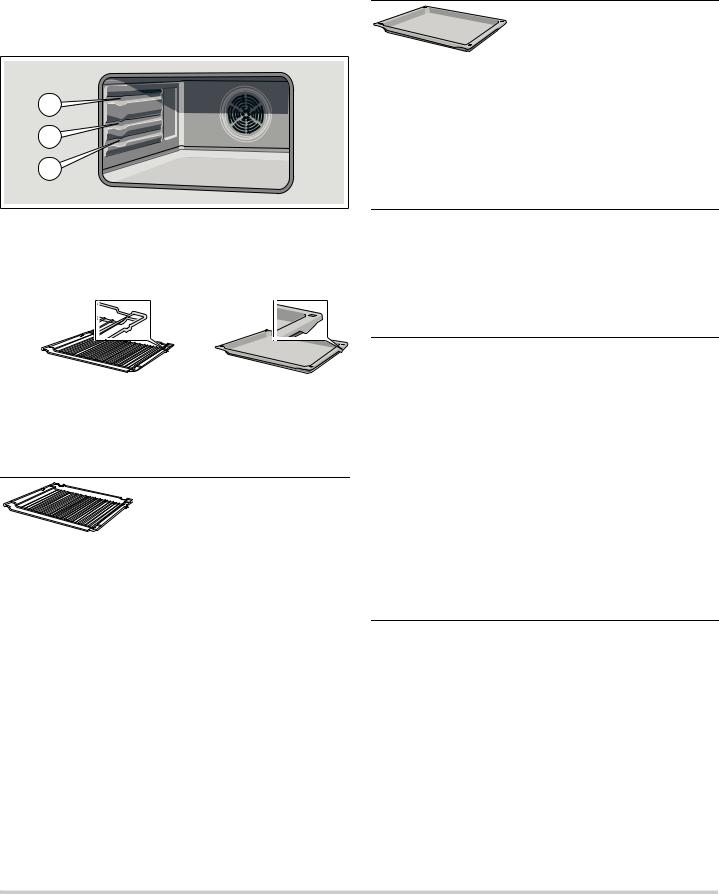
You can insert the accessories into the cooking compartment at 3 different positions.
Notes
■The accessories can be pulled out approximately halfway without tipping. This allows dishes to be removed easily.
■When sliding in the accessories, ensure that the projection on the wire rack and on the universal pan is at the back.
■The accessories can become deformed when they become hot. As soon as they have cooled down, the deformation disappears with no effect on the function.
You can buy accessories from the after-sales service, from specialist retailers or online. Please specify the HEZ number.
Wire rack
For ovenware, cake dishes, roasts and grilled food.
Notes
■Insert the wire rack into the cooking compartment with the projection at the back.
■Insert the wire rack with the open side facing the cooking compart-
ment door and the elbow¾ rail pointing downwards .
Universal pan HEZ862000
For large joints, dry and moist cakes, bakes and gratins. It can also act as a splash guard if you are grilling meat directly on the wire rack. For this, slide the universal pan in at position 1.
Notes
■Insert the universal pan into the cooking compartment with the projection at the back.
■Slide the universal pan into the oven with the tapered edge facing the cooking compartment door.
Optional accessories
You can purchase optional accessories from the after-sales service or specialist retailers. You will find a comprehensive range of products for your oven in our brochures and on the Internet. The availability of optional accessories and the option for ordering these online varies from country to country. Please check the sales brochures.
Optional acces- |
HEZ number |
Use |
sories |
|
|
|
|
|
Enamel baking |
HEZ861000 |
For cakes and biscuits. |
tray |
|
Slide the baking tray as far |
|
|
|
|
|
as possible into the oven |
|
|
with the tapered edge fac- |
|
|
ing the cooking compart- |
|
|
ment door. |
|
|
|
Glass roasting |
HEZ915001 |
For stews and bakes that |
dish |
|
you prepare in the oven. It is |
|
|
particularly suitable for the |
|
|
automatic programmes. |
|
|
|
After-sales service products
You can obtain suitable care and cleaning agents and other accessories for your domestic appliances from the after-sales service, specialist retailers or (in some countries) online via the eShop. Please specify the relevant product number.
Cleaning cloths for |
Article no. |
Reduces the build-up of dirt. |
stainless steel sur- |
311134 |
Impregnated with a special oil |
faces |
|
for perfect maintenance of |
|
|
your appliance's stainless- |
|
|
steel surfaces. |
|
|
|
Oven/grill cleaning |
Article no. |
For cleaning the cooking |
gel |
463582 |
compartment. The gel is |
|
|
odourless. |
|
|
|
Microfibre cloth with |
Article no. |
Especially suitable for clean- |
honeycomb struc- |
460770 |
ing delicate surfaces, such as |
ture |
|
glass, glass ceramic, stain- |
|
|
less steel or aluminium. The |
|
|
microfibre cloth removes liq- |
|
|
uid and grease deposits in |
|
|
one go. |
|
|
|
Before using the appliance for the first time
This section tells you everything you need to do before using the appliance for the first time.
■Set the clock
■Change the language for the text display if required
■Heat up the cooking compartment
■Clean the accessories
■Read the safety information at the start of the instructions for use. This is very important.
7
Initial setup
Once your new appliance has been connected to the power supply, the "Basic settings" heading appears in the top line of the display. Set the clock, and also the text display language, if required. German is the default language.
|
|
Setting the clock and changing the language
1.Turn the rotary selector to set the current time.
2.Press the X button.
"Sprache wählen: deutsch" appears.
3.Select the desired language using the rotary selector. 30 different languages are available.
4.Press the 0 button.
The language and time are applied. The current time is shown in the display.
Note: You can change the language at any time. See the Basic settings section.
Heating up the cooking compartment
To get rid of the new appliance smell, heat up the cooking compartment when it is empty and the oven door closed.
Make sure that the cooking compartment contains no leftover packaging, e.g. polystyrene pellets.
Keep the kitchen ventilated the whole time the oven is on.
Heat up the cooking compartment to 240 °C using Top/bottom heating.
1. Press the % button.
The initial display including descriptions of the buttons appears.
2. Immediately press the ! button.
The heading "Types of heating" appears in the top line. 3D hot air and a temperature of 160 °C are suggested in the settings area. Brackets appear around the type of heating.
3. Turn the rotary selector to change the type of heating to Top/ bottom heating.
4. Press the X button to switch to the temperature. The brackets now appear around the temperature.
5. Use the rotary selector to set 240 °C.
6. Press the n button.
Operation starts. The "Types of heating" heading disappears.
7. Switch the oven off after 60 minutes using the % button.
The temperature indicator bars show the residual heat in the cooking compartment.
Cleaning the accessories
Before you use the accessories for the first time, clean them thoroughly with hot soapy water and a soft dish cloth.
Door lock
Your appliance comes with a door lock. It can be attached to the oven. Please observe the assembly instructions.
To open the door, press the door lock upwards. The locks on different types of appliance door are screwed in differently. See the information sheet supplied with the door lock. When closing the oven door, make sure that the door engages.
Switching the oven on and off
You can switch the oven on and off with the % button.
Switching on
Press the % button. The initial display with the description of the buttons appears.
! " |
#$ $ |
%$ |
Select the function you require:
■90, 180, 360, 600 or 900 W button = microwave
■! button = types of heating
■` button = programmes
■Þ button = MicroCombi
■2 button = series of operations
■f button = saved memory settings
If you do not select an operating mode in the next few seconds, the heading “Select function” appears.
A detailed description of how to make settings is provided in the individual sections.
Switching off
Press the % button. The oven switches off.
Setting the oven
In this section, you will find information about
■which types of heating are available in your oven
■how you set a type of heating and a temperature
■how you select a dish from the recommended settings
■and how you set rapid heating
Types of heating
A large number of types of heating are available for your oven. You can therefore select the best method for preparing any meal.
8
Types of heating |
Application |
and temperature |
|
ranges |
|
|
|
3D hot air |
For baking cakes and small baked |
30-250 °C |
items on two levels. |
|
|
Hot air |
For baking sponge cakes in baking tins |
30-250 °C |
on one level. |
|
|
Top/bottom heating |
For baking and roasting on one level. |
30-270 °C |
Especially suitable for cakes with moist |
|
toppings (e.g. cheesecake) or for cakes |
|
on a baking sheet. |
|
|
Intensive heat |
For recipes with a crispy base (e.g. |
100-270 °C |
quiche). The heat is emitted from above |
|
and more intensively from below. |
|
|
Bottom heating |
For food and baked goods which |
30-200 °C |
should form a crust or which need more |
|
browning on the underside. Only switch |
|
on the Bottom heating for a short time at |
|
the end. |
|
|
Hot air grilling |
For poultry and larger pieces of meat. |
100-250 °C |
|
|
|
Grill, large area |
For grilling steaks, sausages, bread or |
low (1) |
fish in large quantities. |
medium (2) |
|
high (3) |
|
|
|
Grill, small area |
For grilling steaks, sausages, bread or |
low (1) |
fish in small quantities. |
medium (2) |
|
high (3) |
|
|
|
Slow cooking |
For tender pieces of meat, that are to be |
70-100 °C |
cooked medium, medium rare or “à |
|
point”. |
|
|
Plate warming |
For warming porcelain tableware. |
30-70 °C |
|
|
|
Keep warm |
For keeping food warm. |
60-100 °C |
|
|
|
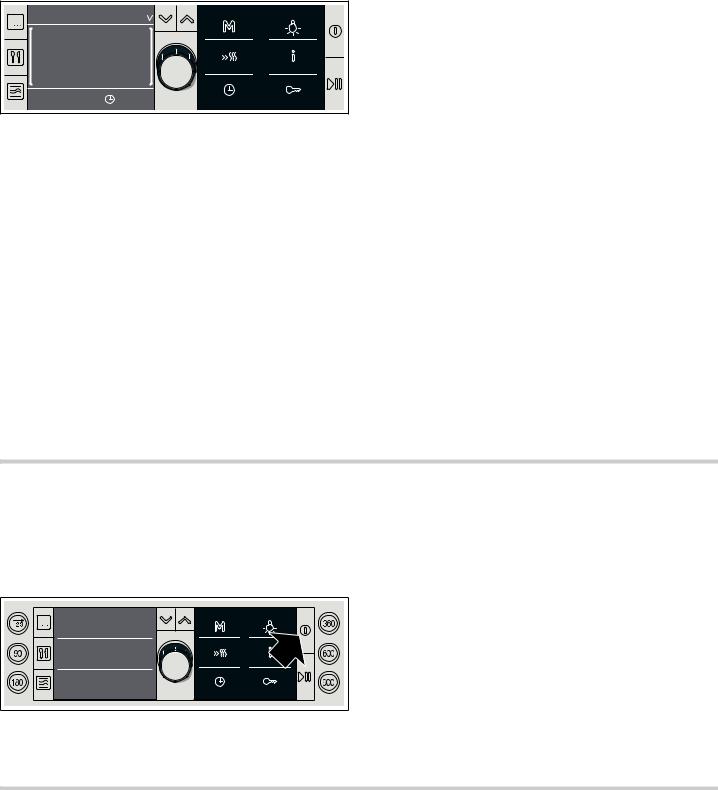
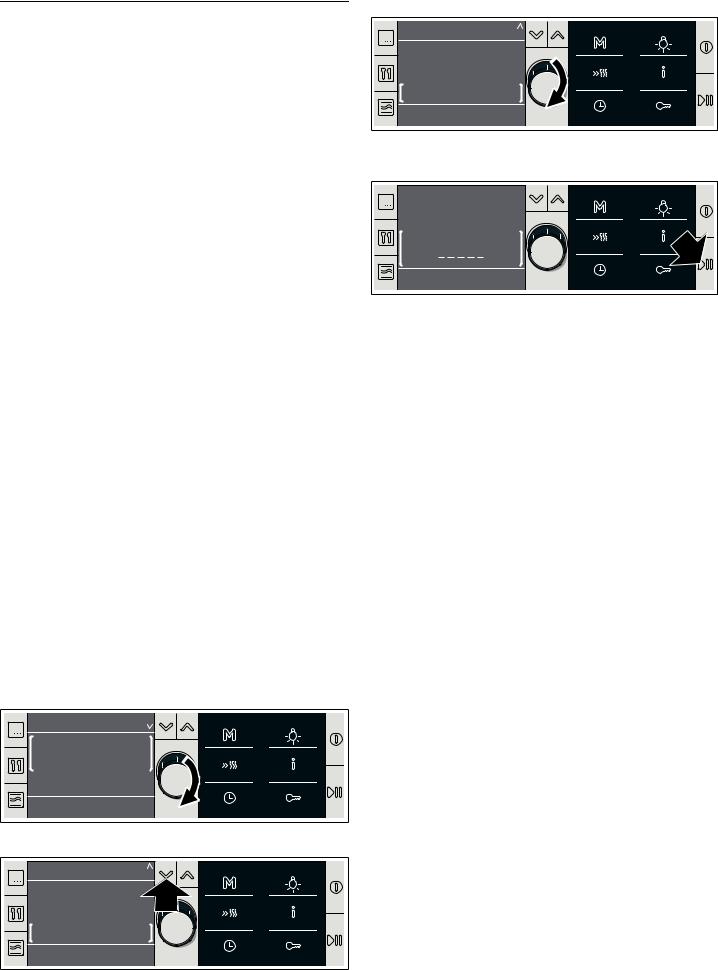
Setting the type of heating and temperature
Switch on the oven with the % button and press the ! button. 3D hot air and 160 °C are suggested in the display.
You can apply this setting immediately with the n button.
Example in the picture: Top/bottom heating setting, 200 °C
If you would like to set a different type of heating and temperature, proceed as follows:
1. Turn the rotary selector to set the desired type of heating.
! " |
|
|
|
2. Press the X button to switch to the temperature.
! " |
|
|
|
3. Turn the rotary selector to set the desired temperature.
! " |
|
|
& |
4.Press the n button. Appliance operation begins.
|
|
& |
' |
When the food is ready, switch the oven off with the % button or select and apply a new operating mode.
Operation is suspended. The oven is paused. The n symboln flashes on the status bar. Close the door and press the button again. The programme will then continue.
Pausing operation
Press thenbuttonnbriefly. The oven is paused. The symboln flashes. Press the button again, operation continues.
Changing the temperature or grill setting
This can be done at any time. Turn the rotary selector to change the temperature or grill setting.
Cancelling operation
Press and hold the n button until the intervention display appears. You can now change the settings.
Calling up information
Press the ° button briefly. The first item of information[ appears. Check each further item of information using the rotary selector. You will find information on the heating temperature, types of heating, shelf position and accessories.
Setting the cooking time
See section Time-setting options, setting the cooking time.
Setting a later end time
See the section entitled Time-setting options, Setting a later end time.
Recommended settings
If you choose a dish from the recommended settings, the ideal setting values are already specified. You can choose from many different categories. You will find recommended settings for a large number of dishes – from cake, bread, poultry, fish, meat and game through to bakes and pre-prepared products. You can change the temperature and cooking time. The type of heating is fixed.
You can access the various dishes by navigating through several selection levels. Try it out and see the range of dishes for yourself.
Selecting a dish
1.Press the ! button.
3D hot air, 160 °C are suggested in the display.
9

2.Turn the rotary selector anticlockwise to Recommended settings.
The first food category appears.
3.Press the Xbutton to switch to the food category and select
the required category by turning the rotary selector.
Use the X button to switch successively to the next level. Turn the rotary selector to find the next selection.
The setting for the selected dish now appears. You can change the temperature, but not the type of heating.
4.Press the n button.
Operation starts. The cooking time is shown counting down in the status bar.
The cooking time has elapsed
A signal sounds. The oven stops heating. The status bar shows0 00:00:00. You can cancel the signal early by pressing the button.
Changing the temperature or grill setting
Turn the rotary selector to change the temperature or grill setting.
Changing the cooking time
Press the 0 button and 0turn the rotary selector to change the cooking time. Press the button.
Calling up information
Press the ° button and check the information using the rotary selector.
Setting a later end time
See the section entitled Time-setting options, Setting a later end time.
Setting rapid heating
Rapid heating is not suitable for all types of heating.
Suitable types of heating
■3D hot air
■Hot air
■Top/bottom heating
■Intensive heat
Suitable temperatures
Rapid heating will not work if the temperature is set to less than 100 °C. If the temperature in the cooking compartment is only slightly less than the temperature you have set, rapid heating is not necessary. It will not switch on.
Setting rapid heating
Press the c button to activate rapid heating. The c symbol appears next to the temperature you have set. The temperature indicator bars start filling in.
Once all the bars are filled,crapid heating is complete. You will hear a short signal. The symbol goes out. Place your dish in the cooking compartment.
Notes
■Rapid heating is cancelled if you change the type of heating.
■If a cooking time has been set, this runs independently of rapid heating and counts down immediately when operation is started.
■You can use the ° button to check the current cooking compartment temperature during rapid heating.
■To ensure an even cooking result, do not place your dish in the cooking compartment until rapid heating is complete.
Cancelling rapid heating
Press the c button. The symbol goes out.
The microwave
Microwaves are converted to heat in foodstuffs. The microwave can be used solo, i.e. on its own, or in combination with a different type of heating. You will find information about ovenware and how to set the microwave.
Note:
In the Tested for you in our cooking studio section, you will find examples for defrosting, heating and cooking with the microwave oven.
Ovenware test
Do not switch on the microwave unless there is food inside. The following ovenware test is the only exception to this rule.
Perform the following test if you are unsure whether your ovenware is suitable for use in the microwave:
1.Heat the empty ovenware at maximum power for ½ to 1 minute.
2.Check the temperature occasionally during that time.
Notes regarding ovenware
Suitable ovenware
Suitable dishes are heat-resistant ovenware made of glass, glass ceramic, porcelain, ceramic or heat-resistant plastic. These materials allow microwaves to pass through.
You can also use serving dishes. This saves you having to transfer food from one dish to another. You should only use ovenware with decorative gold or silver trim if the manufacturer guarantees that they are suitable for use in microwaves.
Unsuitable ovenware
Metal ovenware is unsuitable. Metal does not allow microwaves to pass through. Food in covered metal containers will remain cold.
Caution!
Creation of sparks: metal – e.g. a spoon in a glass – must be kept at least 2 cm from the oven walls and the inside of the door. Sparks could destroy the glass on the inside of the door.
The ovenware should still be cold or warm to the touch.
The ovenware is unsuitable if it becomes hot or sparks are generated.
Microwave power settings
Use the button to set the desired microwave power.
90 W |
for defrosting delicate foods |
|
|
180 W |
for defrosting and continued cooking |
|
|
360 W |
for cooking meat and heating delicate foods |
|
|
600 W |
for heating and cooking food |
|
|
900 watts |
for heating liquids |
|
|
Notes
■When you press a button, the selected power lights up.
■The microwave power can be set to 900 watts for a maximum of 30 minutes. With all other power settings a maximum cooking time of 1 hour 30 minutes is possible.
10
Setting the microwave
Example in diagram: microwave power setting 360 W, cooking time 17 minutes.
1.Press the button for the microwave power setting you require.
The button lights up. The heading “Microwave” appears in the display. A suggested cooking time is displayed.
%$ ( |
|
2. Set the cooking time using the rotary selector.
3. Press the n button.
Appliance operation begins. The cooking time starts counting down.
The cooking time has elapsed
A signal sounds. Microwave operation has finished. The cooking time shows 00:00 min:sec. You can cancel0the audible signal before it finishes sounding by pressing the button.
Operation is suspended. After closing the door, press the n button briefly. The programme will then continue.
Pausing operation
Press thenbuttonnbriefly. The oven is paused. The symboln flashes. Press the button again, operation continues.
Changing the cooking time
%$ ( |
) |
This can be done at any time. Change the cooking time using the rotary selector.
Cancelling operation
Press and hold the n button until the intervention display appears. You can now change the settings.
MicroCombi
A microwave power setting is switched on automatically. You simply need to set the temperature specified in the recipe and halve the cooking time.
MicroCombi, gentle
MicroCombi, gentle is suitable for cakes in tins, such as
■Sponge cake, e.g. marble cake, fruit loaf, fruit flan
■Short-crust pastry with moist filling, e.g. apple pie, cheesecake
■Cakes made from baking mixtures
■Yeast cake, e.g. with currants
■For roasting, the cooking time can also be halved with this type of heating.
Note: Use dark metal baking tins or else plastic "FlexiForm" bakeware. For joints, a heat-resistant glass dish with or without a lid is suitable.
MicroCombi, intensive
This type of heating is suitable for
■poultry, e.g. chicken
■baked casseroles, e.g. pasta bake
■gratins, e.g. potato gratin
■grilled fish, fresh and frozen
Note: Use heat-resistant containers made of glass or ceramic.
Setting MicroCombi
If there is information in the recipe for different types of heating, take the setting for Top/bottom heating. The cooking time specified in the recipe should not be less than 30 minutes.
Place your dish in the cold cooking compartment. Place the ovenware in the centre of the wire rack at level 1.
1.Press the Þ button.
The display suggests “MicroCombi, gentle”, 180 °C. If you require “MicroCombi, intensive”, turn the rotary selector. “MicroCombi, intensive, 200 °C” appears.
2.Use the X button to switch to the temperature and set the temperature using the rotary selector.
3.Press the 0 button and set a cooking time using the rotary selector.
A cooking time of 20:00 minutes is suggested.
4.Press the 0 button.
5.Start with the n button.
You can see the cooking time counting down in the status bar.
The cooking time has elapsed
A signal sounds. Operation has finished. The status bar shows 00:00:00. You can cancel0the signal before it has finished sounding by pressing the button.
Combination
This involves the simultaneous operation of one type of heating with the microwave. Using the microwave makes your meals ready more quickly, and they are still nicely browned. You can set a cooking time of up to 1 hour 30 minutes.
Suitable types of heating
■ 3D hot air
■Hot air
■Top/bottom heating
■Hot air grilling
■Grill, large area
■Grill, small area
11

Suitable microwave power settings
Except for 900 watts, you can combine any microwave power setting with a heating type.
Setting a combination
Example in diagram: Top/bottom heating setting 200 °C and microwave setting 360 W, 17 minutes.
1.Press the ! button.
“Types of heating” appears as the heading. 3D hot air and 160 °C are suggested in the display.
2.Turn the rotary selector to set the desired type of heating.
|
|
& |
3.Press the X button to switch to the temperature.
4.Use the rotary selector to change the temperature.
! " |
|
|
& |
& |
5. Press the button for the microwave power setting you require.
The selected button lights up. The heading changes to “Combination”.
|
|
& |
|
6. Set the cooking time using the rotary selector.
|
|
|
& |
* |
) |
7. Press the n button.
|
|
& |
* |
' * |
Appliance operation begins. You can see the cooking time counting down in the status bar.
The cooking time has elapsed
A signal sounds. Operation has finished. The status bar shows 00:00:00. You can cancel0the signal before it has finished sounding by pressing the button.
Changing the temperature or grill setting
This can be done at any time. Turn the rotary selector to change the temperature or grill setting.
Changing the cooking time
Press the 0 button and0turn the rotary selector to change the cooking time. Press the button.
Operation is suspended. The oven is paused. The n symboln flashes on the status bar. Close the door and press the button again. The programme will then continue.
Pausing operation
Press the n button briefly. The oven is paused. Press the n button again to continue operation.
Cancelling operation
Press and hold the n button until the intervention display appears. You can now change the settings.
Setting a later end time
See the section entitled Time-setting options, Setting a later end time.
Series of operations
You can use the SeriesOperations function to set up to three operating modes and then start.
Requirement: you must set a cooking time for each step.
Ovenware
Always use microwave-safe, heat-resistant ovenware.
Setting a series of operations
Note: Always set a cooking time for each step in the series of operations.
1.Press the 2 button.
The button lights up. "SeriesOperations 1" appears in the display as the heading.
2. Select and set the desired operating mode.
12
Loading...