


HBE5452UC
Table of contents
 Loading...
Built-in oven
Use and Care Manual
HBE5452UC


Table of Contents
Use and care manual
9 Safety Definitions ..................................................... 4
IMPORTANT SAFETY INSTRUCTIONS ........................ 5
Proper Installation and Maintenance ................................ 5
Fire Safety .............................................................................. 5
Burn Prevention .................................................................... 6
Child Safety ........................................................................... 6
Cleaning Safety ..................................................................... 6
Cookware Safety .................................................................. 6
Proposition 65Warning ...................................................... 7
Causes of Damage ........................................................ 8
Protecting the environment .......................................... 8
Saving energy ....................................................................... 8
Getting to know the appliance ..................................... 9
Parts ........................................................................................ 9
Control panel ...................................................................... 10
Operating controls ............................................................ 10
Display ................................................................................. 11
Operating modes .............................................................. 11
Heating modes .................................................................. 12
Further information ............................................................ 12
Cooking compartment functions .................................... 13
Accessories ........................................................................ 13
Before using the appliance for the first time ............ 14
Initial use ............................................................................. 14
Cleaning the cooking compartment and accessories 14
Operation ...................................................................... 15
Switching the appliance on and off ............................... 15
Starting the operation ....................................................... 15
Setting an operating mode .............................................. 15
Setting the heating mode and temperature ................. 15
Fast preheat ....................................................................... 16
Time-setting options ................................................... 16
Setting the cooking time .................................................. 16
Setting the end time .......................................................... 17
Setting the timer ................................................................ 18
Child lock ..................................................................... 18
Activating and deactivating ............................................. 18
Basic Settings .............................................................. 18
Changing the basic settings ........................................... 18
List of basic settings ......................................................... 19
Power failure ....................................................................... 19
Changing the time ............................................................. 19
Sabbath mode .............................................................. 20
Starting Sabbath mode .................................................... 20
Home Connect ............................................................. 21
Setting Up ........................................................................... 21
Remote Start ...................................................................... 22
Home Connect Settings ................................................... 23
Information on Data Protection ....................................... 24
Declaration of Conformity ................................................ 24
®
Module ................................................................... 24
Wi-Fi
Cleaning and maintenance ......................................... 25
Suitable cleaning agents ................................................. 25
Surfaces in the cooking compartment .......................... 26
Keeping the appliance clean .......................................... 26
Cleaning function .............................................................. 26
Rails ..................................................................................... 27
Appliance door .................................................................. 28
Troubleshooting .......................................................... 30
Eliminating faults yourself ................................................ 30
Maximum operating time ................................................. 31
Replacing the cooking compartment bulb on
the ceiling ........................................................................... 32
Glass cover ........................................................................ 32
Customer Service ........................................................ 33
Before Calling Service ..................................................... 33
Data Plate ........................................................................... 33
Service ................................................................................ 33
Parts and Accessories ..................................................... 33
STATEMENT OF LIMITED PRODUCT WARRANTY .. 34
What this Warranty Covers & Who it Applies to ......... 34
How Long the Warranty Lasts ........................................ 34
Repair/Replace as Your Exclusive Remedy ................ 34
Out of Warranty Product .................................................. 34
Warranty Exclusions ......................................................... 34
Dishes .......................................................................... 35
Information on the settings .............................................. 35
Selecting a dish ................................................................. 35
Applying settings for dishes ............................................ 36
Tested for You in Our Cooking Studio ...................... 37
Cakes and Small Baked Items ....................................... 37
Bread and Rolls ................................................................ 40
Pizza, Quiche, and Savoury Pastries ............................. 42
Casseroles and Soufflés .................................................. 44
Poultry ................................................................................. 44
Meat ..................................................................................... 46
Fish ...................................................................................... 48
Vegetables and Side Dishes .......................................... 49
Slow Cooking ..................................................................... 50
Drying .................................................................................. 51
Proofing Dough ................................................................. 52
Defrosting ........................................................................... 52
Keeping Food Warm ........................................................ 53
Pr odukt i nf o.
Additional information on products, accessories,
replacement parts and services can be found at
www.bosch-home.com and in the online shop
www.bosch-home.com/us/store
3

9 Safety Definitions
9 WARNING
Safety Definitions
This indicates that death or serious injuries may
occur as a result of non-observance of this warning.
9 CAUTION
This indicates that minor or moderate injuries may
occur as a result of non-observance of this warning.
NOTICE: This indicates that damage to the appliance or property may occur as a result of non-compliance with this advisory.
Note: This alerts you to important information and/or tips.
4

9 IMPORTANT SAFETY INSTRUCTIONS
READ AND SAVE THESE INSTRUCTIONS
IMPORTANT SAFETY I NS TRU CTI ONSRE AD AND SAVE THESE INSTRUCTIONS
WARNING
When properly cared for, your new appliance has been
designed to be safe and reliable. Read all instructions
carefully before use. These precautions will reduce the
risk of burns, electric shock, fire, and injury to persons.
When using kitchen appliances, basic safety precautions
must be followed, including those in the following pages.
This appliance is intended for use at an elevation of no
more than 2000 meters above sea level.
Proper Installation and Maintenance
Have the installer show you the location of the circuit
breaker or fuse. Mark it for easy reference.
This appliance must be properly installed and grounded
by a qualified technician. Connect only to properly
grounded outlet. Refer to Installation Instructions for
details.
This appliance is intended for normal family household
use only. It is not approved for outdoor use. See the
Statement of Limited Product Warranty. If you have any
questions, contact the manufacturer.
Do not store or use corrosive chemicals, vapors,
flammables or nonfood products in or near this
appliance. It is specifically designed for use when
heating or cooking food. The use of corrosive chemicals
in heating or cleaning will damage the appliance and
could result in injury.
Do not operate this appliance if it is not working properly,
or if it has been damaged. Contact an authorized
servicer.
Do not obstruct oven vents.
Do not repair or replace any part of the appliance unless
specifically recommended in this manual. Refer all
servicing to an authorized servicer.
In the event of an error the display flashes and beeps
continuously. Disconnect appliance from the power
supply and call an authorized servicer.
WARNING
When removing the door make sure oven is cool and
power to the oven has been turned off before removing
the door. Failure to do so could result in burns.
WARNING
To avoid injury from hinge bracket snapping closed, be
sure that both levers are securely in place before
removing door. Also, do not force door open or closed the hinge could be damaged and injury could result.
WARNING
Make sure the appliance and lights are cool and power
to the appliance has been turned off before replacing the
light bulb(s). Failure to do so could result in electrical
shock or burns. The lenses (if equipped) must be in
place when using the appliance. The lenses (if equipped)
serve to protect the light bulb from breaking. The lenses
(if equipped) are made of glass. Handle carefully to
avoid breaking. Broken glass can cause an injury.
WARNING
Light socket is live when door is open if main power
supply is not turned off.
Fire Safety
WARNING
NEVER cover any slots, holes or passages in the oven
bottom or cover an entire rack with materials such as
aluminum foil. Doing so blocks air flow through the oven.
Aluminum foil linings may also trap heat, causing a fire
hazard.
If materials inside an oven or warming drawer should
ignite, keep door closed. Turn off the appliance and
disconnect the circuit at the circuit breaker box.
WARNING
Use this appliance only for its intended use as described
in this manual. NEVER use this appliance as a space
heater to heat or warm the room. Doing so may result in
overheating the appliance. Never use the appliance for
storage.
The oven door is heavy and fragile. Use both hands to
remove the oven door. The door front is glass. Handle
carefully to avoid breaking.
Grasp only the sides of the oven door. Do not grasp the
handle as it may swing in your hand and cause injury or
damage.
Failure to grasp the oven door firmly and properly could
result in personal injury or product damage.
Lay the door on a flat smooth surface so that the door
cannot fall over. Failure to do so may result in personal
injury or damage to the appliance.
Always have a working smoke detector near the kitchen.
In the event that personal clothing or hair catches fire,
drop and roll immediately to extinguish flames.
Have an appropriate fire extinguisher available, nearby,
highly visible and easily accessible near the appliance.
Smother flames from food fires other than grease fires
with baking soda. Never use water on cooking fires.
5

9 IMPORTANT SAFETY INSTRUCTIONS
READ AND SAVE THESE INSTRUCTIONS
WARNING
TO REDUCE THE RISK OF INJURY TO PERSONS IN THE EVENT OF A GREASE FIRE, OBSERVE THE FOLLOWING:
a.
SMOTHER FLAMES with a close-fitting lid, cookie
sheet, or metal tray, then turn off the burner. BE
CAREFUL TO PREVENT BURNS. If the flames do not
go out immediately, EVACUATE AND CALL THE FIRE
DEPARTMENT.
b.
NEVER PICK UP A FLAMING PAN – You may be
burned.
c.
DO NOT USE WATER, including wet dishcloths or
towels – a violent steam explosion will result.
d.
Use an extinguisher ONLY if:
- You know you have a Class ABC extinguisher, and
you already know how to operate it.
- The fire is small and contained in the area where it
started.
- The fire department is being called.
- You can fight the fire with your back to an exit.
Burn Prevention
DO NOT TOUCH HEATING ELEMENTS OR INTERIOR
SURFACES OF OVEN - Heating elements may be hot
even though they are dark in color. Interior surfaces of an
oven become hot enough to cause burns. During and
after use, do not touch, or let clothing, potholders, or
other flammable materials contact heating elements or
interior surfaces of oven until they have had sufficient
time to cool. Other surfaces of the appliance may
become hot enough to cause burns. Among these
surfaces are oven vent openings, surfaces near these
openings and oven doors.
Exercise caution when opening the appliance. Standing
to the side, open the door (or drawer) slowly and slightly
to let hot air and/or steam escape. Keep your face clear
of the opening and make sure there are no children or
pets near the unit. After the release of hot air and/or
steam, proceed with your cooking. Keep doors shut
unless necessary for cooking or cleaning purposes. Do
not leave open doors unattended.
Do not heat or warm unopened food containers. Build-up
of pressure may cause the container to burst and cause
injury.
Use caution when cooking foods with high alcohol
content (e.g. rum, brandy, bourbon) in the oven. Alcohol
evaporates at high temperatures. There is a risk of
burning as the alcohol vapors may catch fire in the oven.
Use only small quantities of alcohol in foods, and open
the oven door carefully.
Always place oven racks in desired location while oven is
cool. Always use oven mitts, when the oven is warm. If a
rack must be moved while oven is hot, do not let
potholder contact the heating elements.
CAUTION
To avoid possible injury or damage to the appliance,
ensure rack is installed exactly per installation
instructions and not backwards or upside down.
Always use dry potholders. Moist or damp potholders on
hot surfaces may result in burns from steam. Do not let
potholder touch hot heating elements. Do not use a towel
or other bulky cloth.
Secure all loose garments, etc. before beginning. Tie
long hair so that it does not hang loose, and do not wear
loose fitting clothing or hanging garments, such as ties,
scarves, jewelry, or dangling sleeves.
Child Safety
When children become old enough to use the appliance,
it is the responsibility of the parents or legal guardians to
ensure that they are instructed in safe practices by
qualified persons.
Do not allow anyone to climb, stand, lean, sit, or hang on
any part of an appliance, especially a door, warming
drawer, or storage drawer. This can damage the
appliance, and the unit may tip over, potentially causing
severe injury.
Do not allow children to use this appliance unless closely
supervised by an adult. Children and pets should not be
left alone or unattended in the area where the appliance
is in use. They should never be allowed to play in its
vicinity, whether or not the appliance is in use.
CAUTION
Items of interest to children should not be stored in an
appliance, in cabinets above an appliance or on the
backsplash. Children climbing on an appliance to reach
items could be seriously injured.
Cleaning Safety
Keep oven free from grease build up.
WARNING
RISK OF BURNS
; The appliance will become very hot on the outside
during the cleaning function. Never touch the appliance
door. Allow the appliance to cool down. Keep children
away from the appliance.
Cookware Safety
NOTICE: Do not place food directly on oven bottom. Follow the manufacturer’s directions when using cooking
or roasting bags.
6

9 IMPORTANT SAFETY INSTRUCTIONS
READ AND SAVE THESE INSTRUCTIONS
Proposition 65Warning:
This product may contain a chemical known to the State
of California, which can cause cancer or reproductive
harm. Therefore, the packaging of your product may
bear the following label as required by California:
67$7(2)&$/,)251,$352326,7,21:$51,1*
:$51,1*
&DQFHUDQG5HSURGXFWLYH+DUPZZZ3:DUQLQJVFDJRY
Note: IMPORTANT SAFETY NOTICE: The California Safe Drinking and Toxic Enforcement Act requires the Governor of California to publish a list of substance known to the state to cause cancer, birth defect or other reproductive harm, and requires businesses to warn customers of potential exposure to such substances. The burning of gas cooking fuel and the elimination of soil during self-cleaning can generate small amounts of carbon monoxide. The fiberglass insulation in Self Clean ovens gives off very small amounts of formaldehyde during the first several cleaning cycles. California lists formaldehyde as a potential cause of cancer. Carbon monoxide is a potential cause of reproductive toxicity. Exposure to these substances can be minimized by:
1.
Providing good ventilation when cooking with gas.
2.
Providing good ventilation during and immediately after self-cleaning the oven.
3.
Operating the unit according to the instructions in this manual.
7

Causes of Damage
NOTICES
▯ Accessories, foil, greaseproof paper or ovenware on
the cooking compartment floor:
▯ Do not place accessories on the cooking
compartment floor.
▯ Do not cover the cooking compartment floor with
any sort of foil or greaseproof paper.
▯ Do not place ovenware on the cooking
compartment floor if a temperature of over 122° F
(50°C) has been set.
This will cause heat to accumulate. The baking and
roasting times will no longer be correct and the
enamel will be damaged.
▯ Aluminum foil: Aluminum foil in the cooking
compartment must not come into contact with the door
glass. This could cause permanent discoloration of the
door glass.
▯ Water in a hot cooking compartment: do not pour
water into the cooking compartment when it is hot.
This will cause steam. The change in temperature can
cause damage to the enamel.
▯ Moisture in the cooking compartment: Over an
extended period of time, moisture in the cooking
compartment may lead to corrosion. Allow the cooking
compartment to dry after use. Do not keep moist food
in the closed cooking compartment for extended
periods of time. Do not store food in the cooking
compartment.
▯ Cooling with the appliance door open: Following
operation at high temperatures, only allow the cooking
compartment to cool down with the door closed. Do
not trap anything in the appliance door. Even if the
door is only left open a crack, the front of nearby
furniture may become damaged over time.
Only leave the cooking compartment to dry with the
door open if a lot of moisture was produced during
operation.
▯ Fruit juice: when baking particularly juicy fruit pies, do
not pack the baking tray too generously. Fruit juice
dripping from the baking tray leaves stains that cannot
be removed. If possible, place on a baking sheet lined
with aluminum foil.
▯ Dirty seal: If the seal is very dirty, the appliance door
will no longer close properly during operation. The
fronts of adjacent cabinets could be damaged. Always
keep the seal clean.
▯ Appliance door as a seat, shelf or worktop: Do not sit
on the appliance door, or place or hang anything on it.
Do not place any cookware or accessories on the
appliance door.
▯ Inserting accessories: depending on the appliance
type, accessories can scratch the door glass when
closing the door. Always slide accessories into the
cooking compartment as far as they will go.
▯ Transporting the appliance: Do not carry or hold the
appliance by the door handle. The door handle cannot
support the weight of the appliance and could break.
Protecting the environment
Your new appliance is energy-efficient. Here you can find
tips on how to save even more energy when using the
appliance, and how to dispose of your appliance
properly.
Unpack the appliance and dispose of the packaging in
an environmentally friendly manner.
Saving energy
▯ Only preheat the appliance if this is specified in the
recipe or in the tables in the operating instructions.
▯ Use baking tins that are dark-colored, painted black or
have an enamel coating. They absorb the heat
particularly well.
▯ Open the appliance door as infrequently as possible
when the appliance is in use.
▯ It is best to bake several cakes one after the other.
The cooking compartment is still warm. This reduces
the baking time for the second cake. You can place
two cake tins next to each other in the cooking
compartment.
▯ For longer cooking times, you can switch the
appliance off 10 minutes before the end of the
cooking time and use the residual heat to finish
cooking.
8
Getting to know the appliance
L
L
L
L
L
L
In this section, we will explain the indicators and controls.
You will also find information on the various functions of
your appliance.
Parts
+HL]DUW
+HDWLQJPRGHV
PHQX
2EHU8QWHUKLW]H
RQ
+HL]DUW
$VVLVW
2EHU8QWHUKLW]H
RII
+HL]DUW
(FR&OHDQ
_
2EHU8QWHUKLW]H
Note: Depending on the appliance model, individual details and colors may differ.
+RPH&RQQHFW
*UXQGHLQVWHOOXQJHQ
0DLQPHQX
6HOHFW
PV
&
$VVLVWDQW
8POXIWJULOOHQ
VHWWLQJV
6FKQHOOYRUKHL]HQ
*ULOOJURH)OlFKH
VWDUW
%DVLF
(QGH
VWRS
DXV
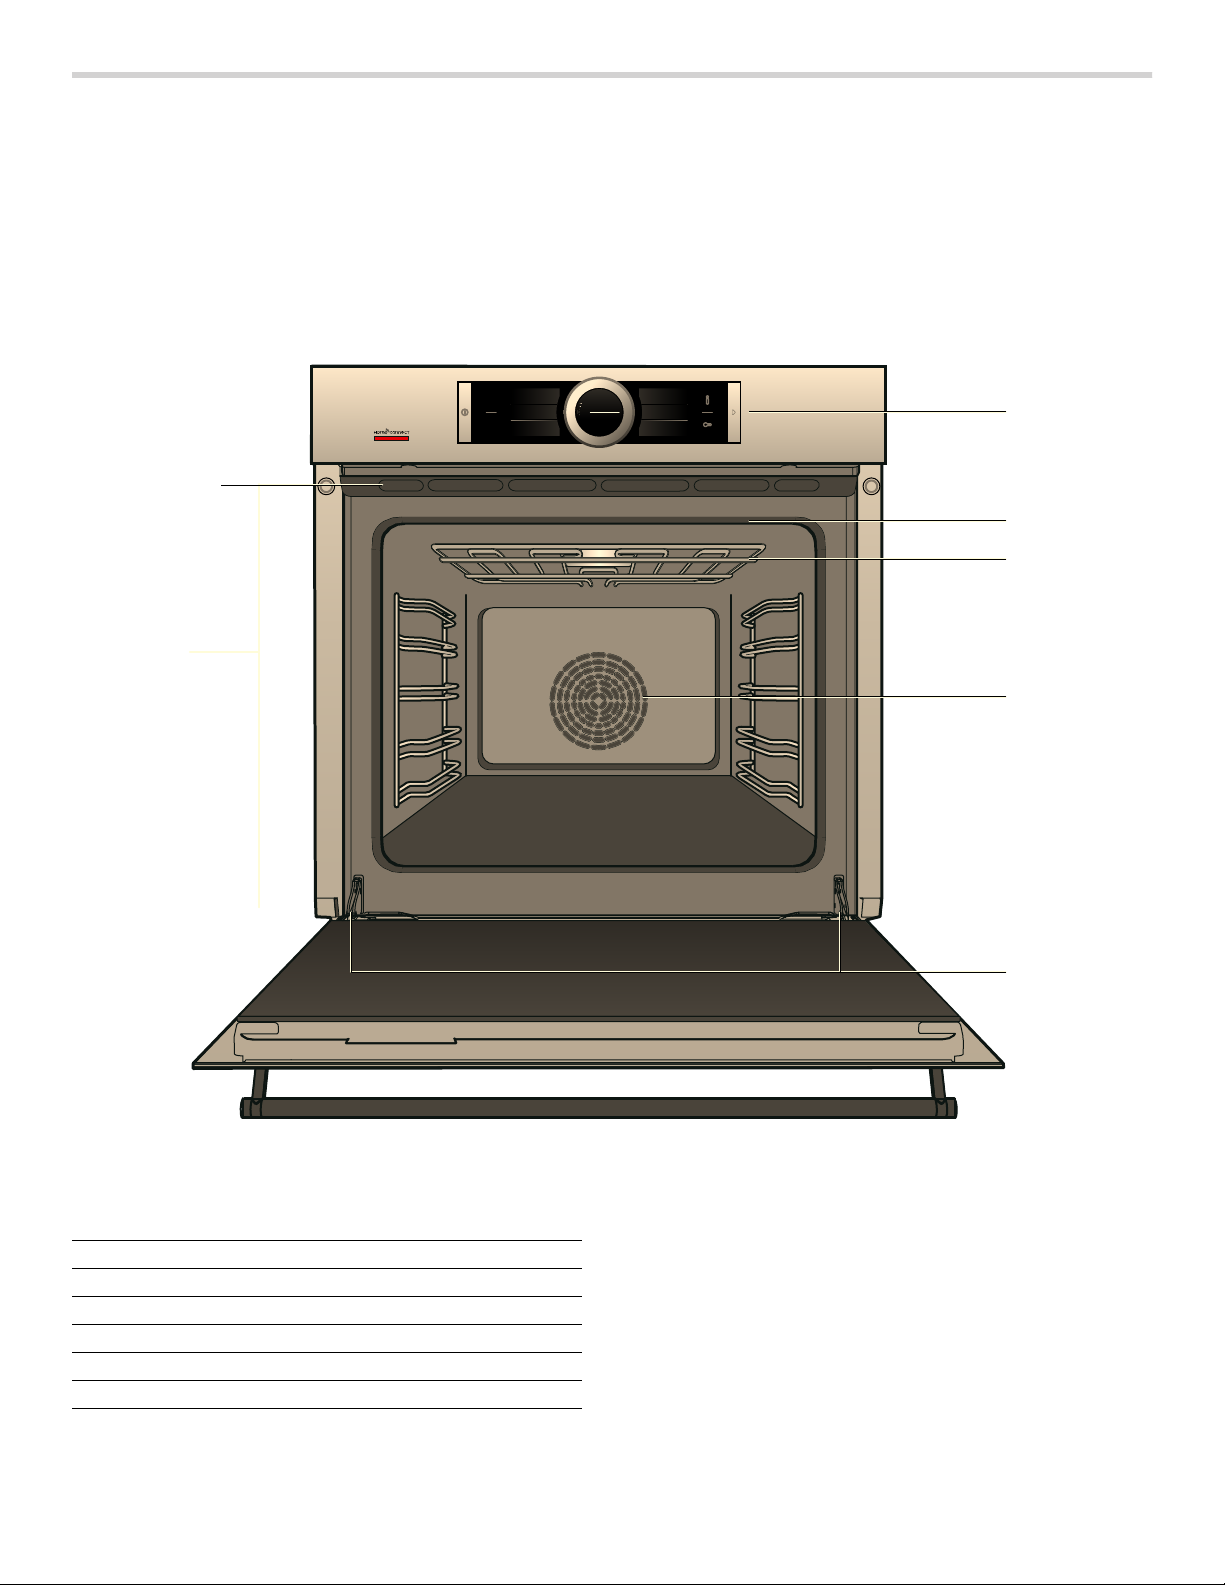
1 Control panel
2 Door seal
3 Broil element
4 Convection fan
5 Door hinges
6 Oven vents
NOTICE: Do not place food directly on oven bottom. Do not obstruct oven vents.
9
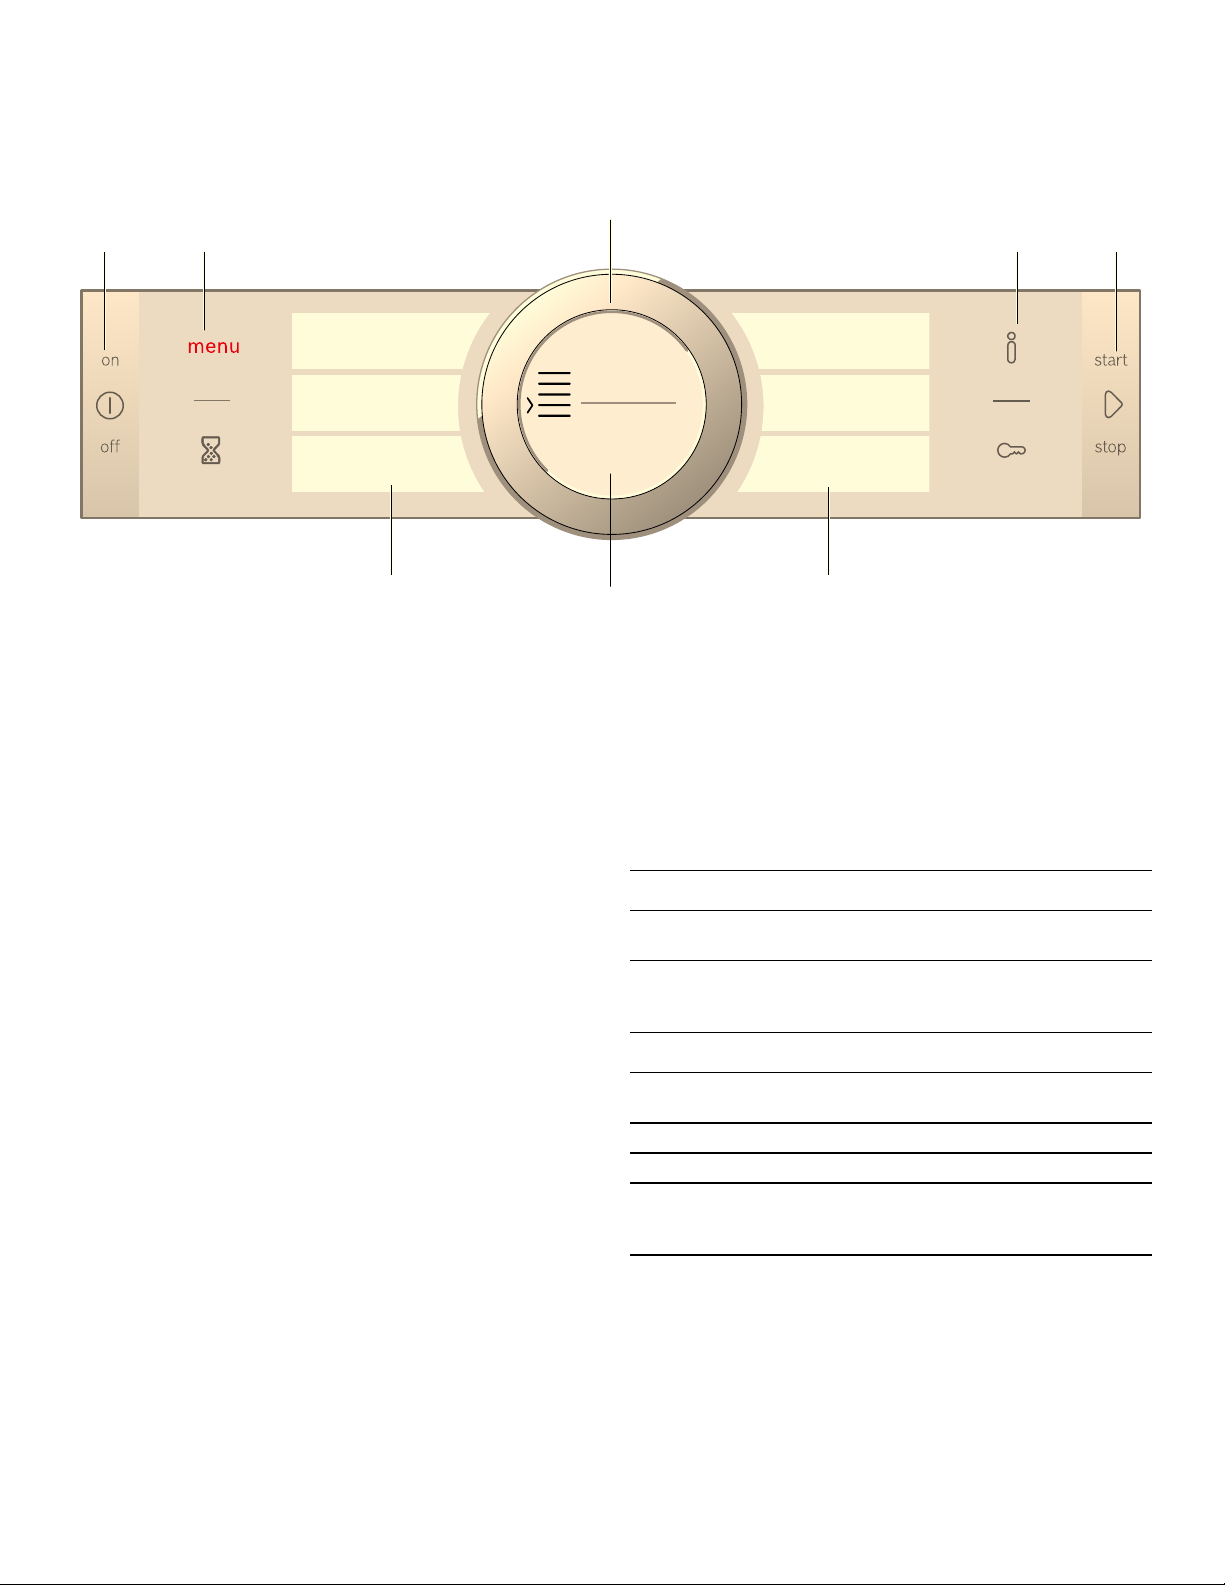
Control panel
In the control panel, you can use the various buttons,
touch fields, touch-screen displays and the rotary
selector to set the different appliance functions. The
current settings are shown on the display.
The overview shows the control panel when the
appliance is switched on with the menu display.
+HDWLQJPRGHV
$VVLVW
(FR&OHDQ
+ +
Buttons
(
The buttons on the left- and right-hand side of the
control panel have a pressure point. Press these
buttons to activate them.
For appliances that do not have a stainless steel
front, these two button touch fields do not have a
pressure point.
Touch fields
0
There are sensors under the touch fields. Simply
touch the respective symbol to select the function.
Rotary selector
8
The rotary selector is fitted so that you can turn it
indefinitely to the left or right. Press it lightly and
move it in the direction required using your finger.
Display
@
You can see the current adjustment values,
options or notes in the display.
Touch-screen displays
H
You can see the current selection options in the
touch-screen displays. You can select these here
directly by touching the appropriate text field. The
text fields change depending on the selection.
+RPH&RQQHFW
$VVLVWDQW
0DLQPHQX
6HOHFW
#
%DVLF
VHWWLQJV
Operating controls
The individual controls are adapted for the various
functions of your appliance. You can set your appliance
simply and directly.
Buttons and touch fields
Here you can find a short explanation of the various
buttons and touch fields.
Symbol Meaning
Buttons
ÿ
l
Touch fields
menu Menu Opens the "Operating modes"
|
°
D
--------
on/off Switching the appliance on and
off
start/stop Starting, pausing or cancelling
(hold down for approx. 3secs)
an operation
menu
Timer Selects the timer
Information Displays information
Child lock Activating and deactivating
(hold down for approx. 4secs)
the childproof lock
10
Rotary selector
You can use the rotary selector to change the setting
values shown on the display.
You can also use the rotary selector to scroll through the
selection lists on the touch-screen displays.
In most selection lists, you have to turn the rotary
selector in the opposite direction once you reach the
beginning or the end of the list.
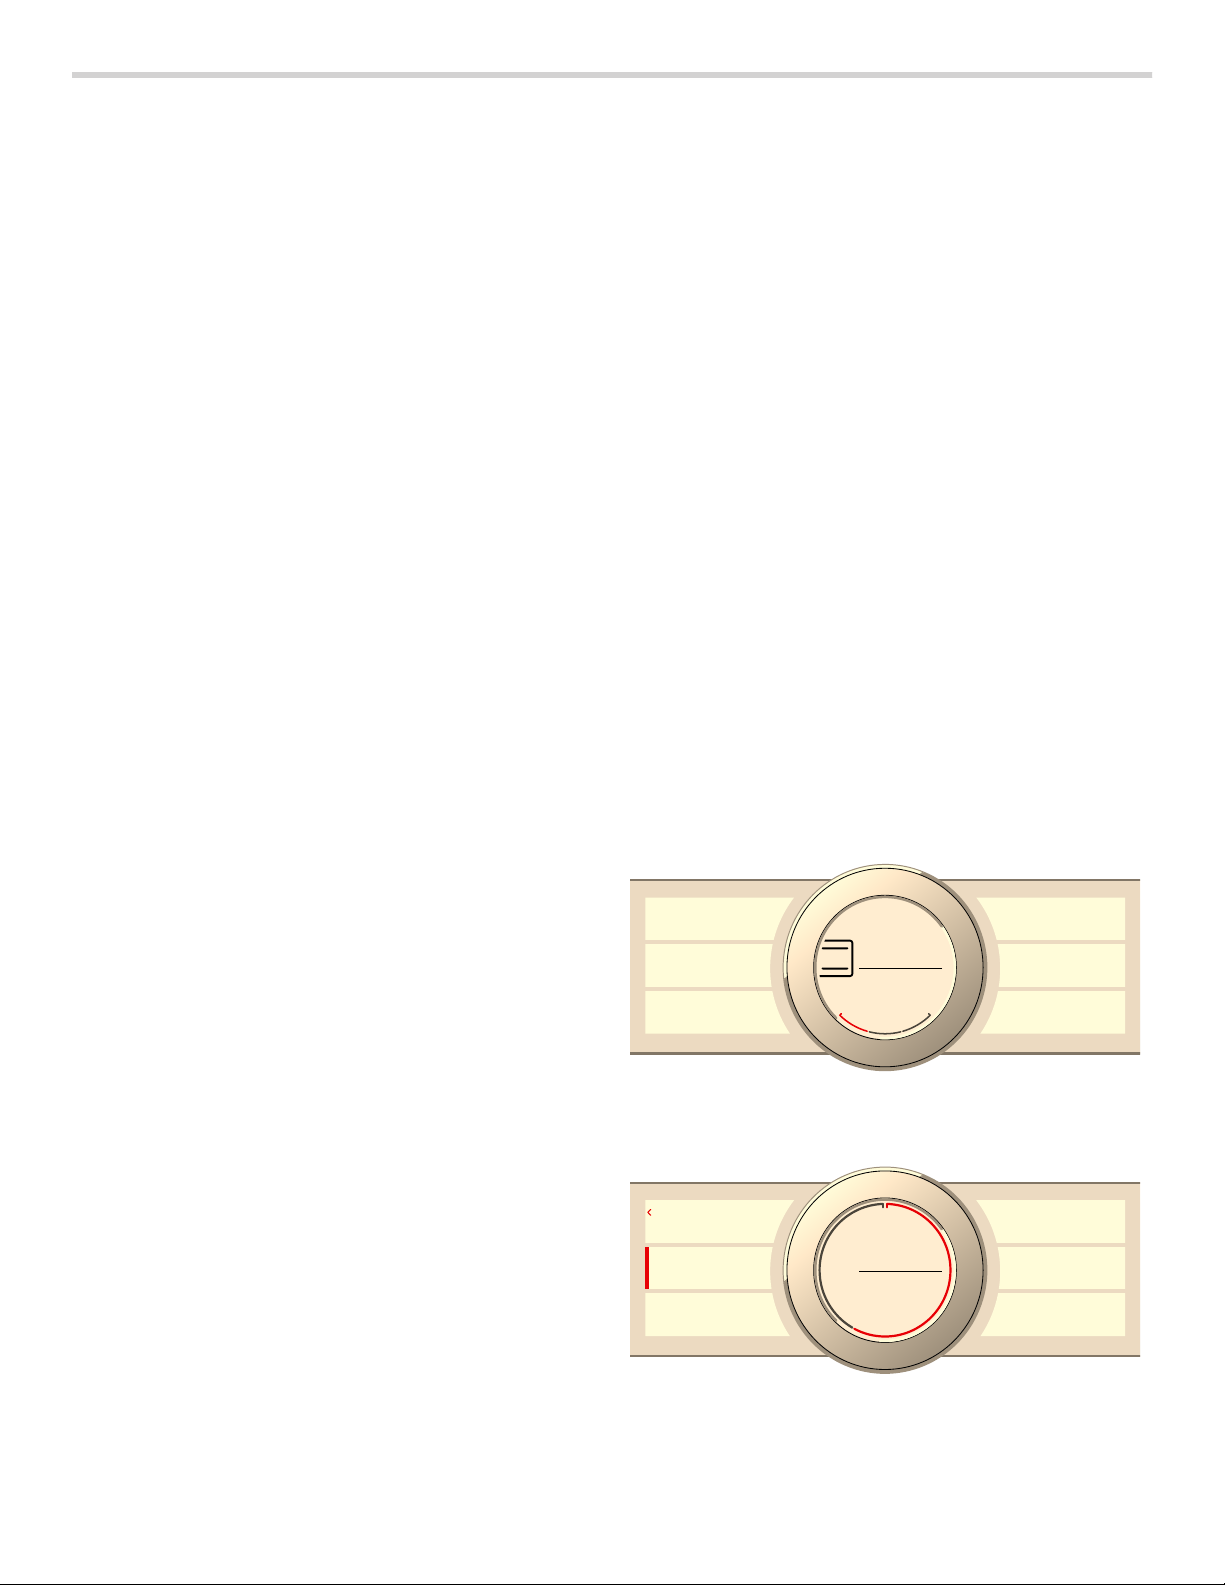
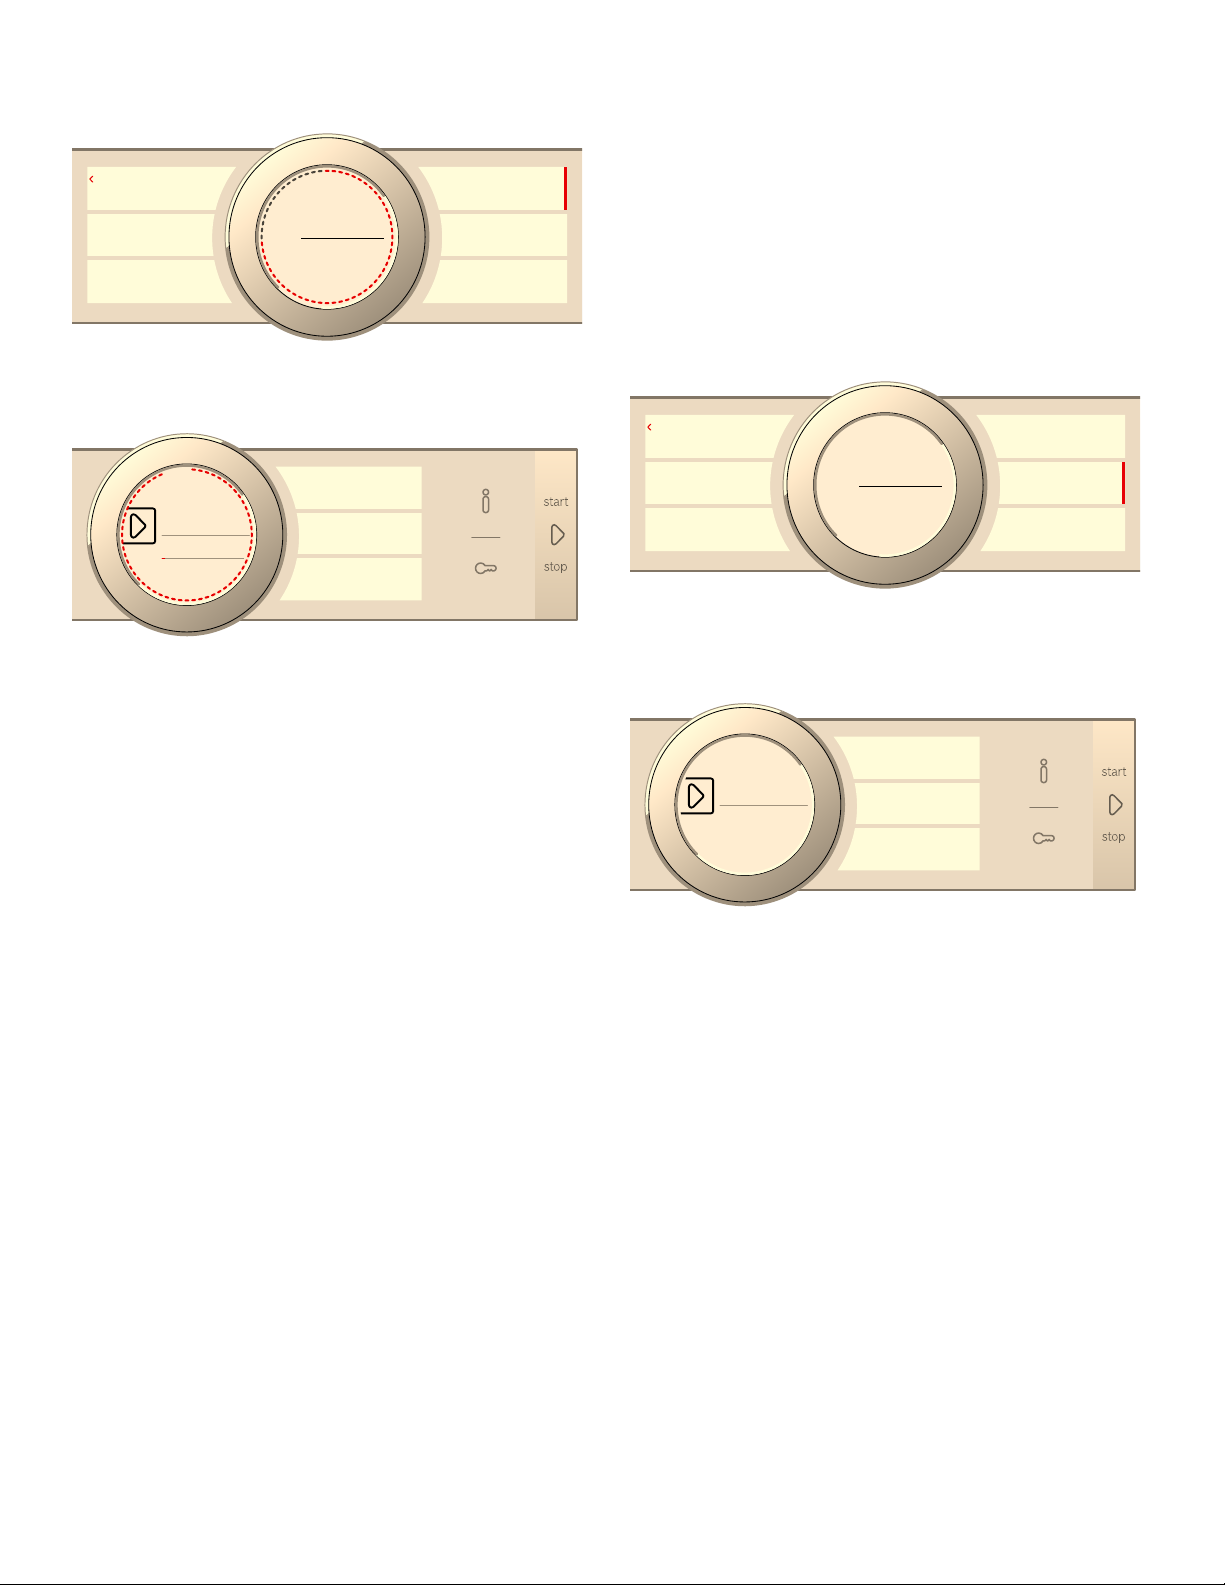
Display
The display is structured so that the information can be
read at a glance in any situation.
The value that you can currently set is highlighted in
white text in the display. The value in the background is
displayed in gray text.
Focus The highlighted value can be changed
immediately without first being selected.
After starting an operation, either the
temperature or level remains highlighted. The white line also serves as the
heating line and gradually turns red.
Enlargement As long as you use the rotary selector to
change the highlighted value, only this
value will be displayed larger.
P
a
V
7HPSH
UDWXUH
Note: Due to thermal inertia, the temperature displayed may be slightly different to the actual temperature inside the oven.
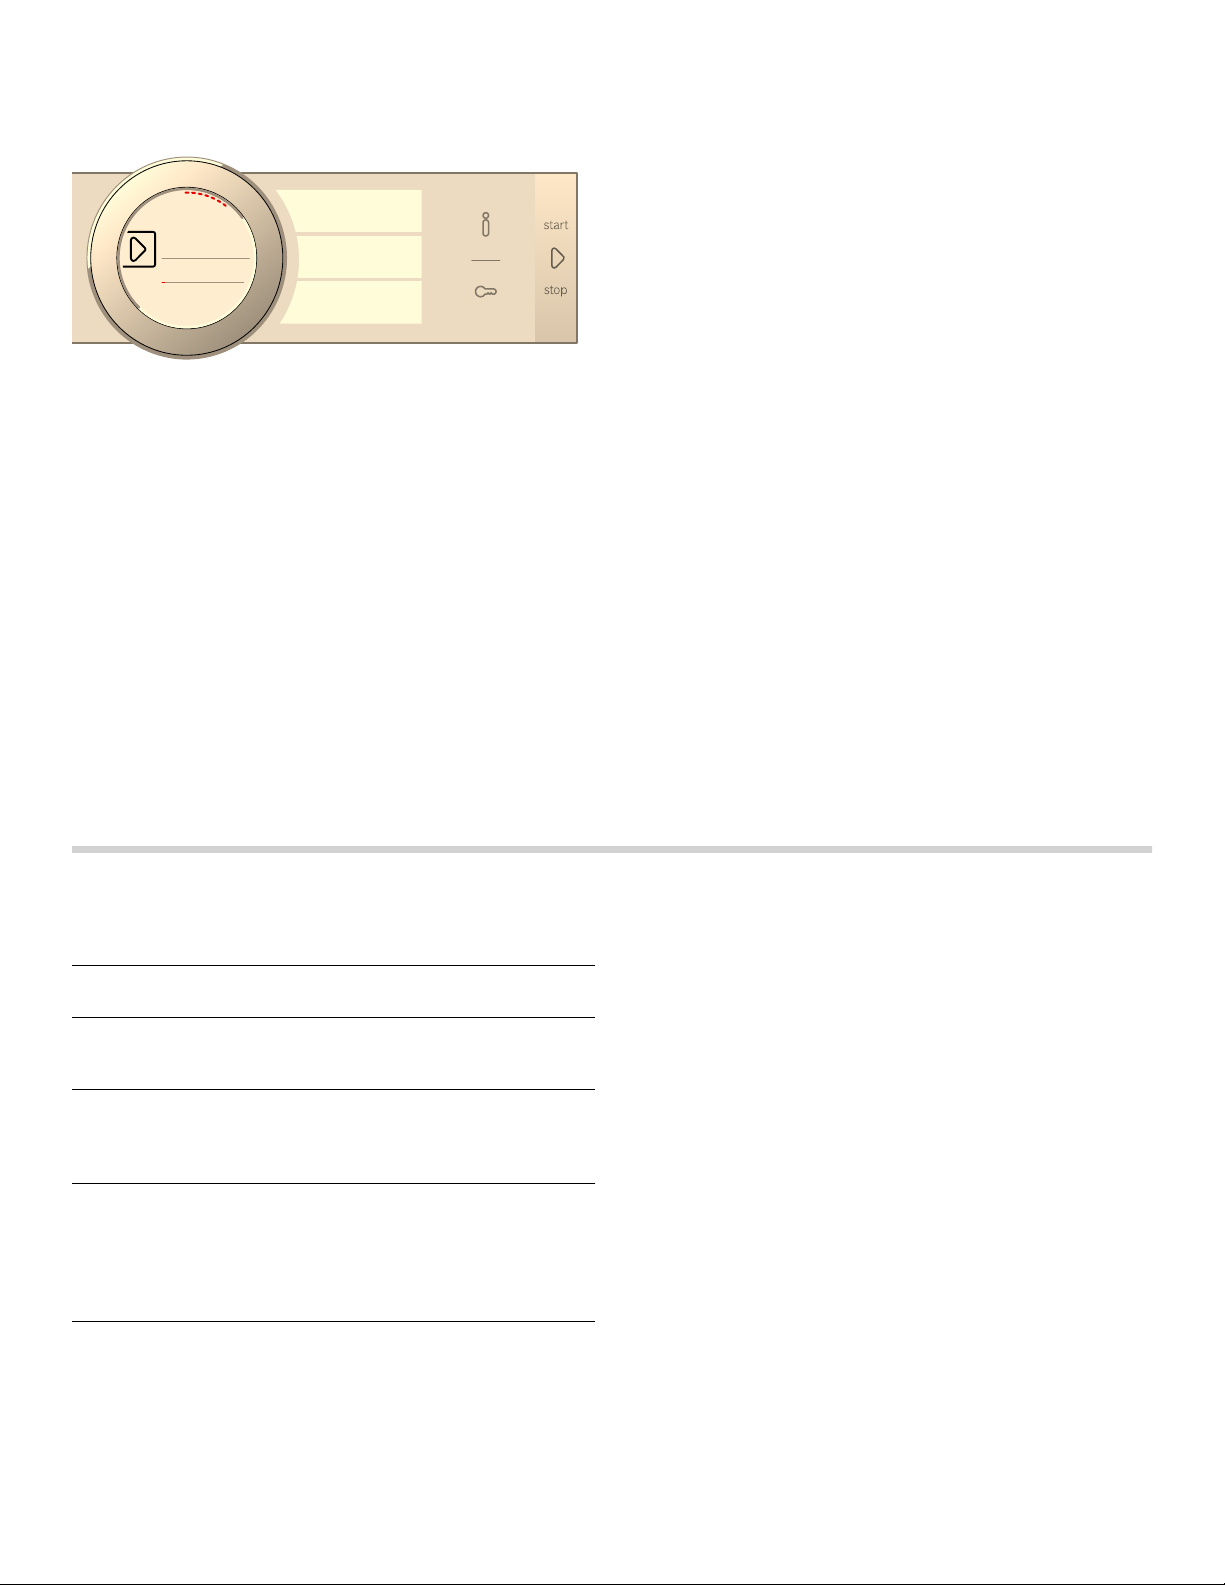
Touch-screen displays
The touch-screen displays are both a display medium
and control element at the same time. They show the
options that you can select for a function and the current
setting. To select a function, simply touch the text field
directly.
The function currently selected is identified by a red
vertical bar next to it. Its corresponding value is
highlighted in white on the display.
The small red arrow next to the text field shows the
functions to which you can scroll forwards or backwards.
+HDWLQJPRGH
7HPSHUDWXUH
&RQY0XOWL5DFN
Operating modes
Your appliance has various operating modes that make
your appliance easier to use.
You can find more precise descriptions of these in the
corresponding sections.
You can open the "Operating modes" menu by pressing
the menu field.
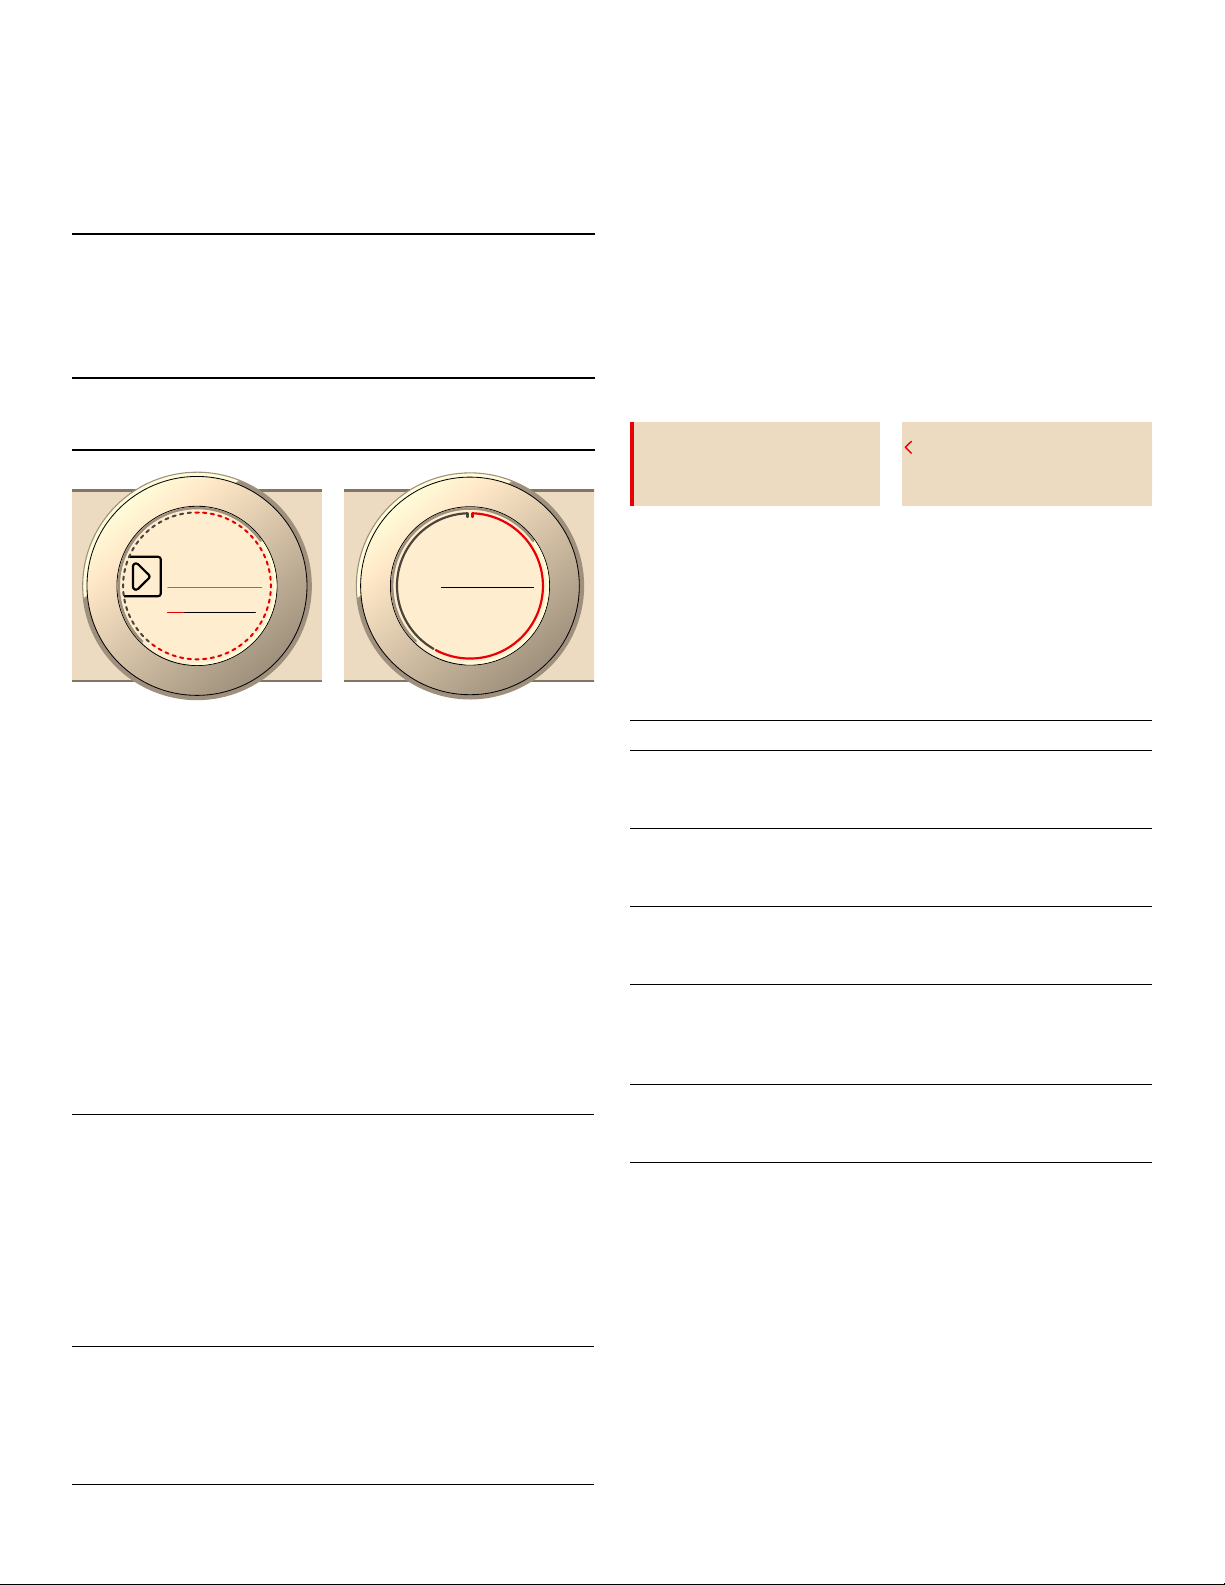
Display ring
The display ring can be found around the outside of the
display.
If you change a value, the display ring shows you where
you are in the selection list. Depending on the settings
area and length of the selection list, the display ring may
be continuous or divided into segments.
During operation, the display ring turns red at secondlong intervals. After every full minute, the segments turn
red again from the beginning. As the cooking time
counts down, one segment disappears every second.
Temperature display
After the operation has started, the current cooking
compartment temperature is displayed graphically on the
display.
Heating line The white line under the temperature
turns red from left to right as the cooking
compartment heats up. When you are
preheating the appliance, the optimal time
to place the food in the cooking compartment is when the line has completely
turned red, and a beep indicates that preheating is complete.
For set levels, e.g. the broil setting, the
heating line turns red immediately.
Residual
heat
indicator
When the appliance is switched off, the
display ring shows the residual heat in the
cooking compartment. As the residual
heat cools down, the display ring
becomes darker and disappears completely at some point.
Operating mode Use
Heating modes
~ "Operation"
on page 15
Assist
~ "Dishes"
on page 35
EcoClean
~ "Cleaning function"
on page 26
Home Connect Assistant
~ "Home Connect"
on page 21
Basic settings
~ "Basic Settings"
on page 18
--------
There are various finely tuned
heating types for the optimal
preparation of your food.
For many dishes, there are
preprogrammed setting values.
The cleaning function cleans
the cooking compartment
almost by itself.
This function allows you to
connect your oven with a
mobile device.
You can change your appliance's basic settings to suit
your needs.
11

Heating modes
To enable you to find the correct type of heating for your
dish, we have explained the differences and scopes of
application here.
Type of heating Temperature Use
%
(
&
<
7
$
.
$
O
P
B
--------
Bake 150-550° F
(65-285)
Broil Broil settings:
1= low
2= medium
3= high
Roast 150-550° F
(65-285)
Convection MultiRack
Convection Broil 450-550° F
Pizza setting 150-525° F
Slow Cook 100-250° F
Proof 80-110° F
Warming 140-220° F
Plate warming 100-150° F
Defrost 100-140° F
150-525° F
(65-275°C)
(230-285°C)
(65-275°C)
(35-120°C)
(25-45°C)
(60-105°C)
(35-65°C)
(35-60°C)
For traditional baking and roasting on one level. Especially suitable for cakes with moist toppings.
Heat is emitted evenly from the top and bottom.
For broiling flat items, such as steaks or sausages, for making
toast, and for browning food.
The whole area below the broiler element becomes hot.
For less tender cuts of meat and poultry.
The heat is emitted from above and more intensively from below.
For baking and roasting on one or more levels.
The fan distributes the heat from the ring heating element in the
back panel evenly around the cooking compartment.
For roasting poultry, whole fish and larger pieces of meat.
The grill heating element and the fan switch on and off alternately.
The fan circulates the hot air around the food.
For preparing pizza and dishes that require a lot of heat from
underneath.
The bottom heating element and the ring heating element in the
back panel heat up.
For gentle and slow cooking of seared, tender pieces of meat in
ovenware without a lid.
The heat is emitted evenly from the top and bottom at low temperatures.
For the rising of dough or yeast.
Heat is emitted from below.
For keeping cooked food warm.
For preheating plates.
For gently defrosting frozen food.
The symbols for each type of heating help you to
remember them.
When cooking at very high temperatures, the appliance
lowers the temperature slightly after an extended period.
Default values
For each type of heating, the appliance specifies a
default temperature or level. You can accept this value or
change it in the appropriate area.
Further information
In most cases, the appliance provides notes and further
information on the action just carried out.
Touch the ° field. The note is shown in the display for a
few seconds. Use the rotary selector to scroll to the end
of longer notes.
Some notes are displayed automatically, for example as
confirmation, or to provide an instruction or warning.
12
Cooking compartment functions
The functions in the cooking compartment make your
appliance easier to use. These functions include, for
example, that the cooking compartment is well lit and
that a cooling fan prevents the appliance from
overheating.
9 CAUTION
Do not place anything on the cooking compartment
floor. Do not cover it with aluminium foil. A build-up
of heat could damage the appliance or cause injury.
Opening the appliance door
If you open the appliance door during an operation, the
operation is paused. The operation continues to run
when you close the door.
Interior lighting
When you open the appliance door, the interior lighting
switches on. If the door remains open for longer than
15 minutes, the lighting switches off again.
For most operating modes, the interior lighting switches
on as soon as the operation is started. When the
operation has finished, the lighting switches off.
Note: You can set the interior lighting not to come on during the operation in the basic settings. ~ "Basic
Settings" on page 18
Cooling fan
The cooling fan switches on and off as required. The hot
air escapes above the door.
9 CAUTION
Do not cover the ventilation slots. Otherwise, the
appliance may overheat.
Accessories
Your appliance is accompanied with a variety of
accessories. Here, you can find an overview of the
accessories included and information on how to use
them correctly.
9 CAUTION
Do not slide any accessories between the rack
positions, or they may tip.
Accessories Included
Your appliance is equipped with the following
accessories:
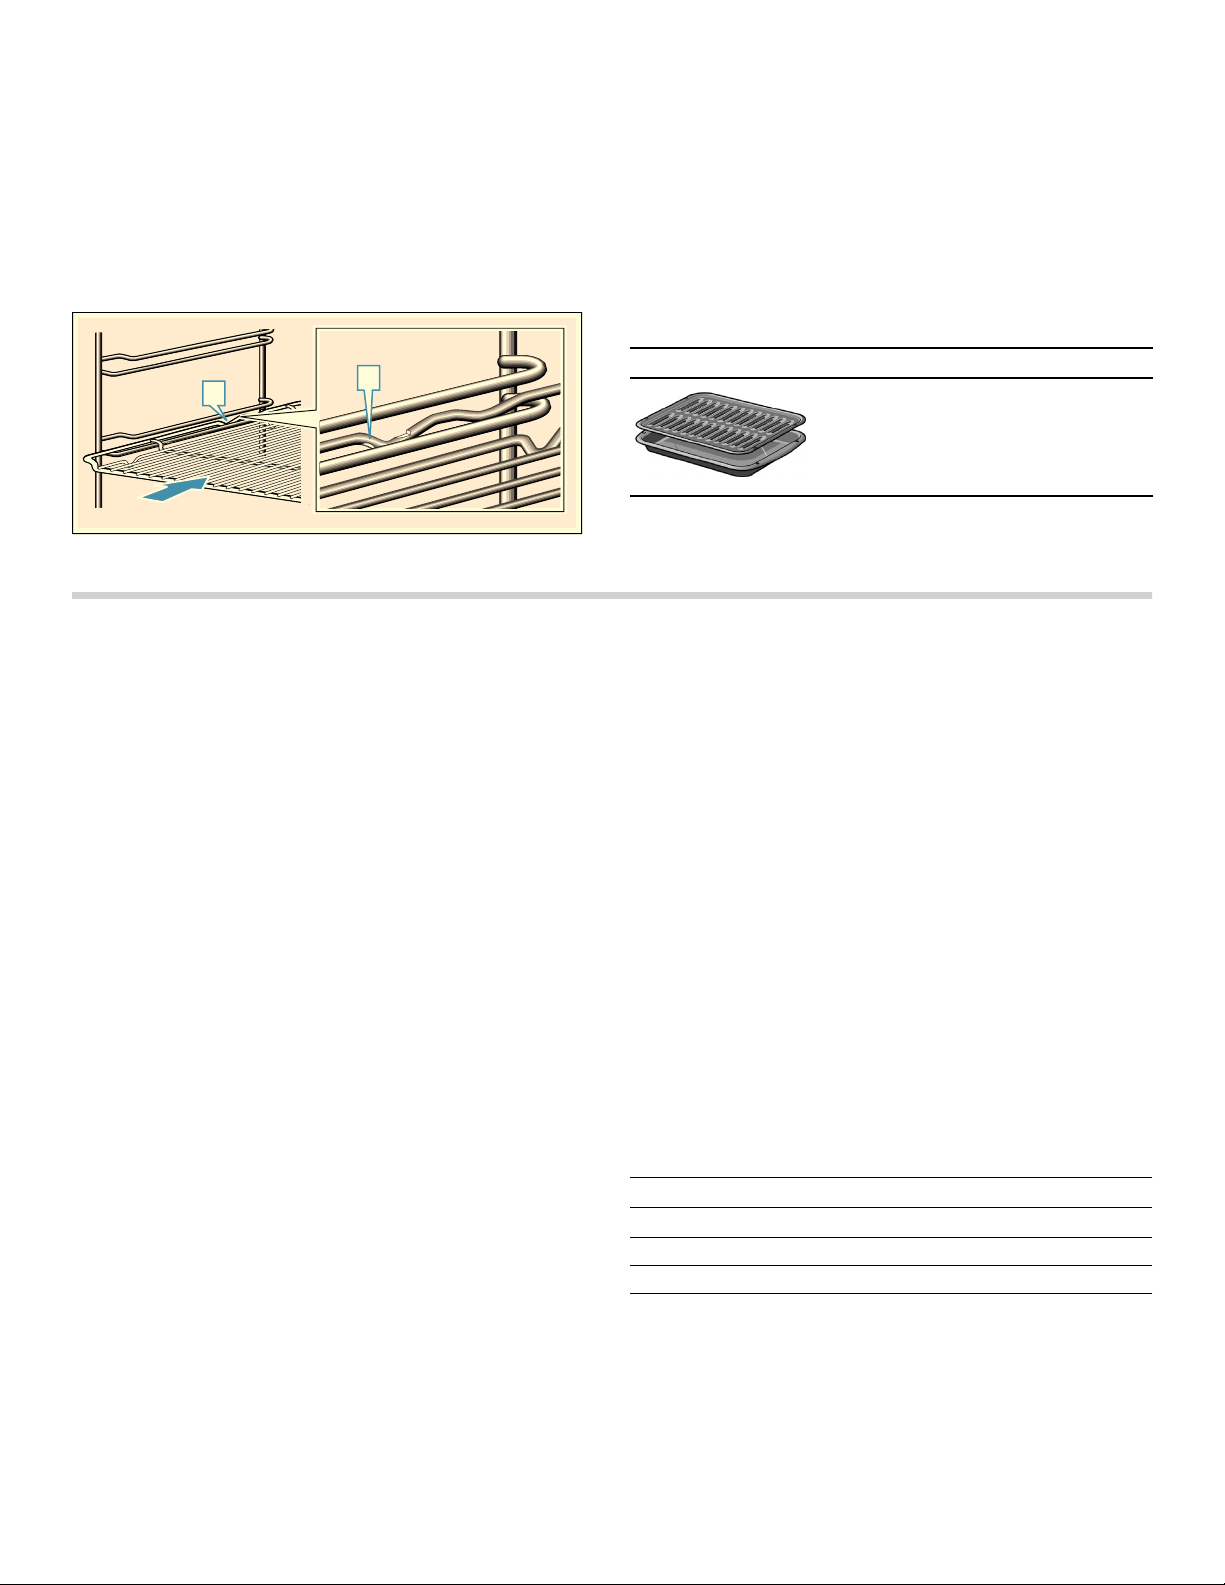
Wire rack (3x)
For ovenware, cake tins and
ovenproof dishes, roasts, grilled
items and frozen meals.
--------
Only use original accessories. They are specially
designed for your appliance.
You can buy accessories from customer service or
online.
Note: The accessories may slightly flex when they become hot. This does not affect the function of the accessory. Once they have cooled down, they will regain their original shape.
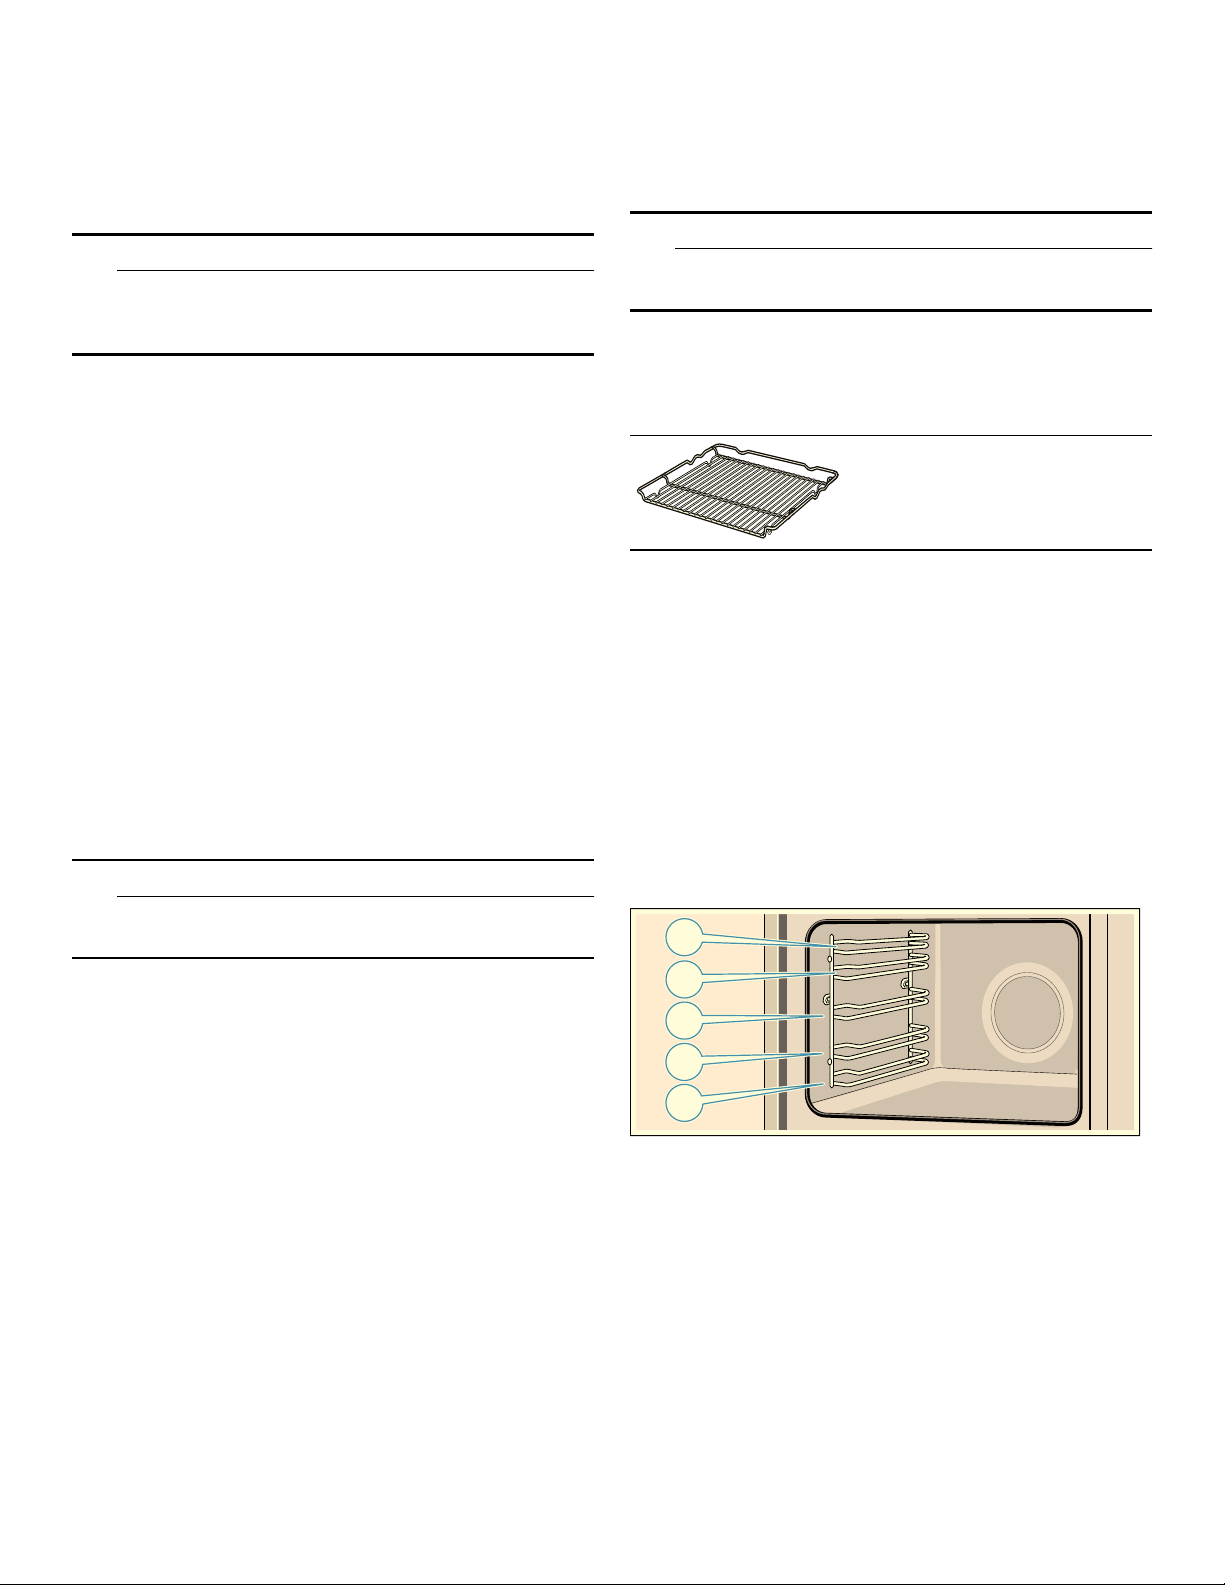
Inserting accessories
The cooking compartment has five rack positions. The
rack positions are counted from the bottom up.
In some appliances, the highest rack position is marked
on the cooking compartment with the grill symbol.
So that the cooking compartment cools down more
quickly after the operation, the cooling fan continues to
run for a certain period afterwards.
Note: You can change how long the cooling fan continues to run in the basic settings. ~ "Basic
Settings" on page 18
Always insert the accessory between the two guide rods
for a rack position.
The accessories can be pulled out approximately halfway
without tipping.
Notes
▯ Ensure that you always insert the accessories into the
cooking compartment facing the correct way.
▯ Always insert the accessories fully into the cooking
compartment so that they do not touch the appliance
door.
13
Locking function
The accessories can be pulled out approximately halfway
until they lock in place. The locking function prevents the
accessories from tilting when they are pulled out. The
accessories must be inserted into the oven cavity
correctly for the tilt protection to work properly.
When inserting the wire rack, ensure that the locking
‚ is at the rear and is facing downwards. The open
catch
side must be facing towards the appliance door and the
curvature must be facing downwards
¾.
Special accessories
You can buy optional accessories from customer service
or online. *You will find a list of products for your
appliance in our brochures and online.
Availability of products differ by country and whether
available for order online. Please see your sales
brochures for more details.
Note: Not all optional accessories are suitable for every appliance. When purchasing, please always use the exact identification number (E-no.) of your appliance.
~ "Customer Service" on page 33
D
D
Special accessories
Before using the appliance for the first time
Before you can use your new appliance, you must enter
certain settings. You must also clean the cooking
compartment and accessories.
Initial use
After connecting the appliance to the power or following
a power failure, the settings for initial use are shown in
the display. It may take a few seconds for the instruction
to appear.
Note: You can change these settings again at any time in the basic settings. ~ "Basic Settings" on page 18
With HomeConnect
You can apply the initial settings on the appliance or with
Home Connect on your mobile device.
1.
Touch the "With Home Connect" text field.
2.
Follow the instructions in the "Home Connect" section.
On the appliance
Make the following initial settings on your appliance:
A note appears in the display confirming that the initial
use has been completed.
Cleaning the cooking compartment and accessories
Before using the appliance to prepare food for the first
time, you must clean the cooking compartment and
accessories.
Cleaning the cooking compartment
To eliminate the new-appliance smell, heat up the
cooking compartment when it is empty and with the oven
door closed.
Make sure that there is no leftover packaging, such as
polystyrene pellets, in the cooking compartment. Before
heating the appliance, wipe the smooth surfaces in the
cooking compartment with a soft, damp cloth. Keep the
kitchen ventilated while the appliance is heating.
Apply the settings indicated below. You can find out how
to set the heating function and the temperature in the
next section. ~ "Operation" on page 15
Broiling Pan
(available via eShop)
Pan: #00449757
Grill(top): #00449756
Setting the language
The language is the first setting displayed. "English" is
the preset language.
1.
Turn the rotary selector to set the required language.
2.
Touch the next text field to confirm.
The next setting appears.
Setting the time
The time starts at "12:00."
1.
Touch the "Clock" text field.
2.
Set the time using the rotary selector.
3.
Touch the "Finish settings" text field to confirm.
14
Settings
Heating mode
Temperature maximum
Cooking time 1 hour
Switch off the appliance after the indicated cooking time
using the ÿ On/Off button.
Once the cooking compartment has cooled down, clean
the smooth surfaces with soapy water and a dish cloth.
Cleaning the accessories
Clean the accessories thoroughly using soapy water and
a dish cloth or soft brush.
Convection Multi-Rack <
Operation
You have already learned about the controls and how
they work. Now we will explain how to apply settings on
your appliance. You will learn about what happens when
you switch the appliance on and off, and how to select
the operating mode.
Switching the appliance on and off
Before you are able to set the appliance, you must switch
it on.
Note: The childproof lock and the timer can also be set when the appliance is switched off. Certain displays and notes, such as those relating to the residual heat in the cooking compartment, remain visible on the display after the appliance has been switched off.
Switch off your appliance when you do not need to use it.
If no settings are applied for a long time, the appliance
switches itself off automatically.
Switching on the appliance
Press the ÿ On/Off button to switch on the appliance.
The Bosch logo appears on the display, followed by the
selection list for the heating modes.
Note: In the basic settings, you can specify which operating mode should appear after the appliance is switched on.
Switching off the appliance
Press the ÿ On/Off button to switch off the appliance.
Any functions that may be running are cancelled.
The time, or if applicable, the residual heat indicator,
appears on the display.
Note: You can set whether or not the time should be displayed when the appliance is switched off in the basic settings.
Starting the operation
You must press the l Start/Stop button to start each
operation.
After starting the appliance, the time display is shown on
the display along with the settings. The display ring and
the heating line also appear.
Pausing the operation
You can also interrupt and then continue an operation
using the l Start/Stop button.
If you press and hold the l Start/Stop button for approx.
3seconds, the operation is cancelled and all settings are
reset.
Note: The fan may continue to run after an operation has been paused or cancelled.
Setting an operating mode
Once the appliance is switched on, the default operating
mode is displayed.
If you would like to select a different operating mode, you
can do so using the menu. You can find detailed
descriptions of the individual operating modes in the
corresponding sections.
The following always applies:
1.
Touch the appropriate text field.
The function is highlighted.
2.
Turn the rotary selector to change the highlighted selection.
3.
If necessary, apply other settings.
To do this, touch the appropriate text field and change
the value using the rotary selector.
4.
Press the Start/Stop button l to start.
The appliance starts the operation.
Setting the heating mode and temperature
If the "Heating modes" operating mode has not been
selected, touch the "Heating modes" text field in the
menu. The selection list for the heating modes appears
on the touch-screen displays.
Example in the picture: Bake % at 350° F (195 °C).
1.
Touch the text field with the required heating mode. If necessary, scroll though the selection list using the rotary selector.
%DNH
+HDWLQJ
%URLO
,QWHQVLYHKHDW
PRGHV
6HOHFW
The temperature is highlighted white.
2.
Turn the rotary selector to set the temperature.
+HDWLQJPRGH
%DNH
)
7HPSHUDWXUH
7HPSH
UDWXUH
&RQYHFWLRQ
0XOWL5DFN
&RQYHFWLRQ
%URLO
3L]]D
&RRNWLPH
PV
(QG
15
3.
Press the Start/Stop button l to start.
The time in the display shows how long the operation
has already been running.
&RRNWLPH
PV
PV
a
)
(QG
The appliance begins to heat up.
When your dish is ready, use the ÿ On/Off button to
switch off the appliance.
Note: You can also set the cooking time and an end time for the operation on the appliance.
Changing
After starting the appliance, the temperature remains
highlighted. When you move the rotary selector, the
temperature is changed and applied immediately.
To change the type of heating, first use the l Start/Stop
button to interrupt the operation and then touch the "Type
of heating" text field. The selection list is displayed.
Touch the required type of heating. The corresponding
default temperature appears on the display.
Note: When you change the type of heating, the other settings are also reset.
Fast preheat
With Fast preheat, you can shorten the heat-up time for
some heating types.
The heating types suitable for Fast preheat are:
▯ < Convection Multi-Rack
▯ % Bake
To achieve an even cooking result, do not place your
food or accessories into the cooking compartment until
"Fast preheat" is complete.
Setting
Ensure you have selected a suitable type of heating and
set a temperature of at least 200° F (95°C). Otherwise,
rapid heating cannot be activated.
1.
Set the type of heating and temperature.
2.
Touch the "Rapid heating" text field.
"On" is displayed in the text field. A confirmation
message appears on the display.
When rapid heating comes to an end, an audible signal
sounds and a message appears on the display. "Off" is
displayed in the text field.Place your food in the cooking
compartment.
Note: The "Cooking time" time-setting option starts at the same time as rapid heating. Therefore, only set a cooking time when rapid heating has come to an end.
Cancelling
To cancel the fast preheat, touch the "Fast preheat" text
field again. "Off" is displayed in the text field.
Time-setting options
Your appliance has different time-setting options.
Time-setting
option
Cooking
q
time
End Enter a cooking time and the
r
Timer The timer functions like an egg timer.
t
You can call up the cooking time and the end time after
setting an operation using the touch-screen displays. The
timer has a separate field | and can be adjusted at any
time.
An audible signal will sound once the cooking time or
timer duration has elapsed. You can cancel the audible
signal early by touching a field or touch-screen display.
Use
Once the set cooking time has
elapsed, the appliance will automatically stop heating.
required end time. The appliance will
start up automatically so that it finishes cooking at the required time.
It runs independently of the operation
and the other time-setting options.
After the set time has elapsed, the
appliance does not switch on or off
automatically.
Note: You can change how long the audible signal sounds for in the basic settings.
Setting the cooking time
You can set the cooking time for your food on the
appliance. This prevents the food from accidentally being
cooked for too long, and means that you do not have to
stop what you are doing to switch off the oven.
Setting
Depending on which direction you turn the rotary selector
first, the cooking time starts at a particular default value:
Left = 10minutes, right = 30minutes.
The cooking time can be set in one-minute increments
up to one hour, and then in five-minute increments.
The maximum time that can be set is 23hours and
59minutes.
Example in the picture: It is 10:00, cooking time of
45minutes.
1.
Set the operating mode and temperature or level.
2.
Before starting the operation, touch the "Cooking time" text field.
The cooking time is highlighted in white in the display.
16
3.
Turn the rotary selector to set the cooking time.
The end time is calculated automatically.
+HDWLQJPRGH
%DNH
7HPSHUDWXUH
)
4.
Press the Start/Stop button l to start.
P
&RRNWLPH
V
&RRNWLPH
(QG
The cooking time counts down.
&RRNWLPH
PV
PV
a
)
(QG
The appliance begins to heat up.
Once the cooking time has elapsed, an audible signal
sounds. The appliance stops heating up. The cooking
time 00m 00s is shown in the display.
You can reset the cooking time using the "Cooking time"
text field or you can press the l Start/Stop button to
continue the operation without a cooking time.
When your dish is ready, use the ÿ On/Off button to
switch off the appliance.
Setting
The end of the cooking time can be delayed by up to
23hours and 59minutes.
Example in the picture: It is 10:00, the set cooking time is
45minutes and the dish should be ready at 12:00.
1.
Set the operating mode and temperature or level.
2.
Set the cooking time.
3.
Before starting the operation, touch the "End" text field.
The projected end time is highlighted white in the
display.
4.
Turn the rotary selector to set a later end time.
+HDWLQJPRGH
%DNH
7HPSHUDWXUH
)
5.
Press the Start/Stop button l to start.
(QG
&RRNWLPH
PV
(QG
The time at which the appliance will start is shown in
the display.
&RRNWLPH
PV
6WDUW
(QG
Changing and cancelling
To change the cooking time, touch the "Cooking time"
text field. The cooking time is highlighted, and can be
changed using the rotary selector. The change is applied
immediately.
If you want to cancel the cooking time, reset the cooking
time to zero. After the change has been adopted,
operating continues without a cooking time.
Setting the end time
You can delay the time at which cooking is due to finish.
You can, for example, put your food in the cooking
compartment in the morning and set the cooking time so
that it is ready at lunch time.
Notes
▯ Ensure that food is not left in the cooking compartment
for too long, as it may spoil. PLEASE OBSERVE ALL
SAFE FOOD HANDLING PRACTICES TO ENSURE
FOOD SAFETY.
▯ Do not adjust the end time once the operation has
started. The cooking result would no longer be correct.
The appliance is in standby mode. When the appliance
starts, the cooking time counts down in the display.
Once the cooking time has elapsed, an audible signal
sounds. The appliance stops heating up. The cooking
time 00m 00s is shown in the display.
You can reset the cooking time using the "Cooking time"
text field or you can press the l Start/Stop button to
continue the operation without a cooking time.
When your dish is ready, use the ÿ On/Off button to
switch off the appliance.
Changing and cancelling
After starting the appliance, the end time can no longer
be changed.
If you want to cancel the cooking time and end time,
interrupt the operation by pressing the l Start/Stop
button. You can continue the operation without a cooking
time or end time.
17
Loading...