


 Loading...
Built-in oven
Installation Manual
HBE5452UC

Table of Contents |
|
Safety Definitions .......................................................... |
3 |
IMPORTANT SAFETY INSTRUCTIONS ........................ |
4 |
Appliance Handling Safety ................................................. |
4 |
Safety Codes and Standards ............................................. |
4 |
Electric Safety ....................................................................... |
4 |
Related Equipment Safety .................................................. |
4 |
State of California Proposition 65 Warnings ................... |
4 |
Transport ................................................................................ |
5 |
Before you begin ........................................................... |
6 |
Tools and parts needed ...................................................... |
6 |
Parts included ....................................................................... |
6 |
Power Requirements ........................................................... |
6 |
Preparing the units ............................................................... |
6 |
Removing Packaging .................................................... |
6 |
Dimensions and Cabinet Requirements |
..................... 7 |
Appliance Dimensions ........................................................ |
7 |
Cabinet Dimensions ............................................................ |
7 |
Install Appliance ............................................................ |
8 |
Electrical Installation ............................................................ |
8 |
Mount to cabinet .................................................................. |
9 |
Check the Installation .......................................................... |
9 |
Customer Service ........................................................ |
10 |
Before Calling Service ...................................................... |
10 |
Data Plate ........................................................................... |
10 |
Service ................................................................................ |
10 |
Parts and Accessories ..................................................... |
10 |
7KLV %RVFK $SSOLDQFH LV PDGH E\ %6+ +RPH $SSOLDQFHV &RUSRUDWLRQ
0DLQ 6WUHHW 6XLWH ,UYLQH &$
4XHVWLRQV"
ZZZ ERVFK KRPH FRP XV
:H ORRN IRUZDUG WR KHDULQJ IURP \RX
Safety Definitions
9WARNING
This indicates that death or serious injuries may occur as a result of non-observance of this warning.
9CAUTION
This indicates that minor or moderate injuries may occur as a result of non-observance of this warning.
NOTICE: This indicates that damage to the appliance or property may occur as a result of non-compliance with this advisory.
Note: This alerts you to important information and/or tips.
3

9 IMPORTANT SAFETY INSTRUCTIONS
READ AND SAVE THESE INSTRUCTIONS
WARNING
When properly cared for, your new appliance has been designed to be safe and reliable. Read all instructions carefully before use. These precautions will reduce the risk of burns, electric shock, fire, and injury to persons.
When using kitchen appliances, basic safety precautions must be followed, including those in the following pages.
WARNING
If the information in this manual is not followed exactly, fire or shock may result causing property damage or personal injury.
WARNING
Do not repair, replace or remove any part of the appliance unless specifically recommended in the manuals. Improper installation, service or maintenance can cause injury or property damage. Refer to this manual for guidance. All other servicing should be done by an authorized servicer.
This appliance is intended for use at an elevation of no more than 2000 meters above sea level.
Appliance Handling Safety
Unit is heavy and requires at least two people or proper equipment to move.
Do not lift appliance by door handle.
Hidden surfaces may have sharp edges. Use caution when reaching behind or under appliance.
Safety Codes and Standards
This appliance complies with the latest version of one or more of the following standards:
CAN/CSA C22.2 No. 61 - Household Cooking Ranges
UL 858 - Household Electric Ranges
CAN/CSA C22.2 No. 150 - Microwave Ovens
UL 923 - Microwave Cooking Appliances
CSA C22.2 No. 64 - Household Cooking and LiquidHeating Appliances
UL 1026 - Electric Household Cooking and Food Serving Appliances
It is the responsibility of the owner and the installer to determine if additional requirements and/or standards apply to specific installations.
Electric Safety
WARNING
Before you plug in an electrical cord or turn on power supply, make sure all controls are in the OFF position.
If required by the National Electrical Code (or Canadian Electrical Code), this appliance must be installed on a separate branch circuit.
Installer – show the owner the location of the circuit breaker or fuse. Mark it for easy reference.
INSTALLER: LEAVE THESE INSTRUCTIONS WITH THE APPLIANCE AFTER INSTALLATION IS COMPLETE.
IMPORTANT: SAVE THESE INSTRUCTIONS FOR THE LOCAL ELECTRICAL INSPECTOR'S USE.
Before installing, turn power OFF at the service panel. Lock service panel to prevent power from being turned ON accidentally.
Refer to data plate for more information. See “Data Plate” under “Service” for data plate location.
Be sure your appliance is properly installed and grounded by a qualified technician. Installation, electrical connections and grounding must comply with all applicable codes.
Related Equipment Safety
Remove all tape and packaging before using the appliance. Destroy the packaging after unpacking the appliance. Never allow children to play with packaging material
Never modify or alter the construction of the appliance. For example, do not remove leveling legs, panels, wire covers or anti-tip brackets/screws.
Before starting up the appliance, remove any packaging material and adhesive film from the cooking compartment and the door.
State of California Proposition 65 Warnings
WARNING
This product contains chemicals known to the State of California to cause cancer, birth defects or other reproductive harm.
4
9 IMPORTANT SAFETY INSTRUCTIONS
READ AND SAVE THESE INSTRUCTIONS
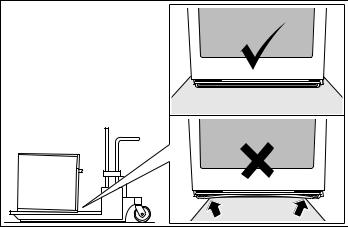
Transport
To avoid damage to the oven vent, use the transport method shown in the picture below.
5

Before you begin
Tools and parts needed
Philips head screwdriver
1/8" drill bit and drill
Measuring tape
Parts included
Built-in oven
Power Requirements
The outlet must be properly grounded in accordance with all applicable codes.
The electrical outlet for the appliance must either be located in the shaded area A or outside of the area where the appliance is installed.
Secure any unsecured units to the wall using a standard bracket B.
|
% |
|
|
|
ʌ¼ʚ |
|
|
|
|
|
|
|
|
|
ç¼ʚ |
|
|
|
|
è¼ʓʘ |
|
|
|
|
|
|
|
|
|
$ |
ê |
|
|
|
|
|
|||
|
|
|
||
|
|
|
|
PP |
Preparing the units
This unit must be installed according to all installation instructions to ensure its safe operation.
Check the appliance for damage after unpacking it. Do not connect the appliance if it has been damaged in transit.
Proceed in accordance with the installation sheets for installing accessories.
Before starting up the appliance, remove any packaging material and adhesive film from the cooking compartment and the door.
The cabinet into which the appliance is built in must be heat-resistant up to 195° F (90 °C), and adjacent cabinet fronts up to 160° F (70 °C).
Do not install the appliance behind a decorative panel. There is a risk of overheating.
Any cut-outs that need to be made in the units should be made before the appliance is installed. Remove any shavings, as they may prevent the electrical components from working properly.
Wear protective gloves to prevent cuts. Parts that are accessible during installation may have sharp edges.
Secure any unsecured units to the wall using a standard bracket.
The dimensions in the figures are in inches (mm).
Removing Packaging
NOTICE: To prevent damage to your floor keep the unit in its packaging base until ready to be placed in the cabinet opening. Do not slide the unit across the flooring.
1.Cut straps on outside of box.
2.Remove cardboard box.
3.Remove all top and side cardboard and Styrofoam braces.
4.Place oven in front of cabinets where it is to be installed.
6

Dimensions and Cabinet Requirements
Appliance Dimensions |
Wall mounted unit |
|
|
|
è¼ʚ |
|
|
|
|
|
|
|
è¼ʓʘ |
|
ʎ¼ʓʘ |
|
|
ë |
|
|
ê |
|
|
||
|
|
|
|
|
|
|
ë ê |
|
|
|
|
èç¼ʓʘ |
ʎ¼ʓʘ |
|
|
|
|
|
|
|
|
|
|
|
PP |
|
PP |
Cabinet Dimensions |
|
|
|
|
* for wall installations, the junction box may be located |
||
General Cabinet Requirements |
|
||
|
above or below the unit within reach of the power cable. |
||
The cabinet base must be flat, level and capable of supporting a weight of at least 110 lbs (50 kg).
Unit under the counter
|
|
|
|
|
|
|
|
|
|
ê |
|
|
|
|
|
|
|
|
è¼ʓʘ |
|
|
|
|
|
|
|
|
è¼ʚ |
|
ë |
|
|
|
|
|
|
|
PP |
|
Secure the countertop to the cabinet.
For installation with cooktop, reference cooktop installation drawing.
7
Flush installation
ʌ¼ʚ
èç¼ʓʘ
*Flush installation requires a 3/16" (5 mm) high x 221/16" (560 mm) wide x 227/8" (581 mm) deep baseplate underneath the unit body.
PP
6LGH 9LHZ
ë
UHYHDO FOHDWV 


 ʌ¼ʚ
ʌ¼ʚ
IOXVK FXW RXW
KHLJKW
 ʌ¼ʚ
ʌ¼ʚ 
PP
Install Appliance
Electrical Installation
The ovens is dual rated, designed to be connected to either 208/240V AC, 60 Hz, 4 wire, single-phase power supply.
Model |
Dedicated circuit required |
HBE5452UC |
20 AMP |
The electrical supply should be a 4-wire single-phase AC. Install a suitable conduit box (not furnished). An appropriately-sized, UL-listed conduit connector must be used to correctly attach the conduit to the junction box.
NOTICE: Local Codes may vary; installation, electrical connections and grounding must comply with all applicable local codes.
If local codes permit grounding through the electrical supply neutral, connect both the white neutral wire and the bare ground wire from the oven to the white neutral electrical supply wire.
9CAUTION
The appliance must be disconnected from the power supply during all installation work.
The appliance must only be connected with the power cable provided.
Protection against contact must be ensured by the installation.
8

Electrical Connection
The four-wire connection is preferred, but where local codes permit, the three wire connection is also acceptable.
Four-wire Connection
Ungrounded Neutral
SRZHU VXSSO\ |
|
|
MXQFWLRQ ER[ |
EODFN ZLUHV |
|
UHG ZLUHV |
||
|
||
JUHHQ RU EDUH |
|
|
ZLUH |
|
|
JUHHQ ZLUH |
ZKLWH ZLUH |
|
8/ OLVWHG |
|
|
FRQQHFWRU |
FDEOH IURP |
|
|
RYHQ |
Connect the red oven wire to the red electrical supply wire (hot wire).
Connect the black oven wire to the black electrical supply wire (hot wire).
Connect the green ground oven wire to the bare or green ground electrical supply wire.
Three-wire Connection
Grounded Neutral
SRZHU VXSSO\ |
|
|
MXQFWLRQ ER[ |
EODFN ZLUHV |
|
UHG ZLUHV |
||
|
||
ZKLWH EDUH RU |
8/ OLVWHG |
|
JUHHQ ZLUH |
||
FRQQHFWRU |
||
|
||
JUHHQ ZLUH |
FDEOH IURP |
|
|
RYHQ |
Connect red wire from oven to red wire in junction box.
Connect black wire from oven to black wire in junction box.
Connect green ground wire from oven to white, green or bare neutral wire in junction box.
The conduit cable, where connected at the oven, swivels. Rotate conduit cable upward (or downward) and direct through hole prepared in cabinet to attach to junction box.
To maintain serviceability, the flex conduit must not be shortened and should be routed to permit temporary removal of the oven.
Mount to cabinet
NOTICE: Before installing the appliance, be sure to verify the cabinet dimensions and electrical connections.
Note: The appliance is heavy. It is advisable to install it with a second person.
1.Fully insert the appliance and center it.
NOTICE: Connection lines and cables must not kink or come into contact with sharp edges.
PLQ |
ç¼ʓʘ |
|
|
|
|
|
|
|
|
PP |
|
2. Secure the appliance to the cabinet using 2 screws.
The gap between the countertop and appliance may not be sealed by additional strips.
Thermal insulation strips may not be fitted to the side panels of the surround unit.
Check the Installation
9WARNING
Before you plug in an electrical cord or turn on power supply, make sure all controls are in the OFF position.
Switch on the circuit breaker.
Verify that elements function properly.
9
Loading...