


DS160/DS161 Installation Guide |
High Performance Request-to-Exit Sensors |
1.0Description
The DS160/161 is a passive-infrared (PIR) detector designed for Request to Exit (REX) interior applications.
The DS160/161 is UL Listed as an access control device under the UL 294 Standard and is listed for Class I for UL Canada under ULC-S319 when it is connected to a UL approved access control system. For C-UL listed installation applications, the REX detector shall be connected to ULC-S319 listed compatible devices (i.e. control units, power supply and locks).
The technology designed into the DS160/161 is based on the principal that all objects emit infrared energy. The warmer an object is, the more infrared energy emitted. Its PIR technology allows the DS160/161 to detect the change in infrared energy that occurs when a person passes through its field of view.
The DS160/161 has features such as Sequential Logic Input (SLI) to eliminate unauthorized entry. SLI allows you to arm the detector using any dry contact device, such as a second detector, card reader, or the access control system. This provides better control for this type of application.
A built-in sounder can be automatically activated if the door is propped open. The sounder can be controlled from any dry contact device. The DS160/161 detection pattern provides dense C-shaped coverage ideal for most REX applications. In addition, complete pattern control allows it to be adjusted to a single zone or placed over a doorknob, for example. There are fifteen possible coverage patterns to accommodate most applications. This, combined with the ability to monitor the door and intelligently control the lock, adds considerable security to these types of applications.
The DS160/161 uses Motion Analyzer II signal processing to help prevent false activation due to environmental conditions. The relay output consists of two Form “C” contacts that can be adjusted to latch from approximately 0.5 to 64 sec. The latch time features two modes of operation, resettable (where the relay timer will not time out as long as someone is in the field of view) and non-resettable (where the relay will remain latched for a fixed period of time). The relay can also be programmed to fail safe or fail secure in the event of power loss.
The DS160/161 provides one set of relay contacts specially protected from EMF (voltage) spikes caused by connecting to inductive loads.
The DS160/161 may either be ceiling or wall mounted, and its pattern may be aimed and/or masked for more effective use based upon installation needs. It is not designed as a primary means of exit for emergency egress applications.
The DS160/161 is available in a light grey (DS160) or a black (DS161) enclosure along with an optional trim plate (light gray TP160 or black TP161) that can cover a single gang box. Panic hardware must be used with this or any other egress device.
Figure 1: Detector Component Locations |
|
||||
Sounder |
DIP Switches |
|
LED |
||
|
|
O N |
|
|
|
|
|
|
1 |
|
|
|
|
|
2 |
|
|
|
|
|
3 |
|
|
Wire |
|
|
4 |
|
|
|
|
|
|
||
Terminals |
|
|
6 5 |
|
|
|
|
|
7 |
|
|
|
|
|
8 |
|
|
|
|
|
9 |
|
|
|
|
|
10 |
|
|
Sounder Volume Control |
Tamper Switch |
Lens |
|||
Lock-Down Screw |
|||||
|
|
||||
2.0Installation
1.Remove the cover using a small flat blade screwdriver.
Figure 2: Cover Removal |
Insert screwdriver |
here |
Bottom |
of |
unit |
2.Rotate the detector clockwise to remove it from the base.
Figure 3: Detector Removal
R o t a
t
e
3.Select a mounting location.
Figure 4: Mounting Locations
Push to Exit |
Push to Exit |
Push to Exit |
Alarm will Sound |
Alarm will Sound |
Alarm will Sound |
|
Push to Exit |
|
|
Alarm will Sound |
|
Above the |
On the Ceiling |
Above |
|
Door |
Double Doors |
||
|
Before you mount the unit, review Section 6.0 Coverage Patterns on page 6 for more information on the placement and location of the DS160/161.
4.Route the wiring through the base before mounting the base to the wall or ceiling. Refer to Step 5 on page 2 when using the optional trim plate (TP160 or TP161).
Figure 5: Wire Routing |
5.When using the optional trim plate (TP160 or TP161), run the wiring through the trim plate and into the base before mounting the base and trim plate onto a single gang electrical box.
Figure 6: Optional Trimplate |
|
DS160i/DS161i |
|
|
Optional Trimplate |
DOOR |
(TP160/TP161) |
|
|
|
Gang box |
DOOR |
|
The arrows on the base indicate its correct mounting orientation relative to the door.
3.0Wiring
3.1Power, Remote Input, Door Contacts, and Tamper
Refer to Table 1 to wire the detector.
Table 1: Terminal Labels and Descriptions
Label Description
-Connect to the negative side of the power supply.
+Connect to the positive side of the power supply. The voltage must be between 12-30 Volts DC or AC.
RTerminal R is for Sequential Logic Input (SLI), the keycard input or for remote control of the sounder. The contact must be Normally Closed (NC).
Refer to Figure 7 and Section 3.3.5 Sequential Logic Input on page 4 for more information.
DTerminal D allows the detector to monitor door contacts. Refer to Sections 3.3.6 and 3.3.7 on page 4 for more information. If used, these contacts must be Normally Closed (NC) door contacts. Do not share these contacts with any alarm systems.
T |
Normally Closed (NC) tamper contacts. |
Figure 7: Sequential Logic Input (SLI)
R D T T
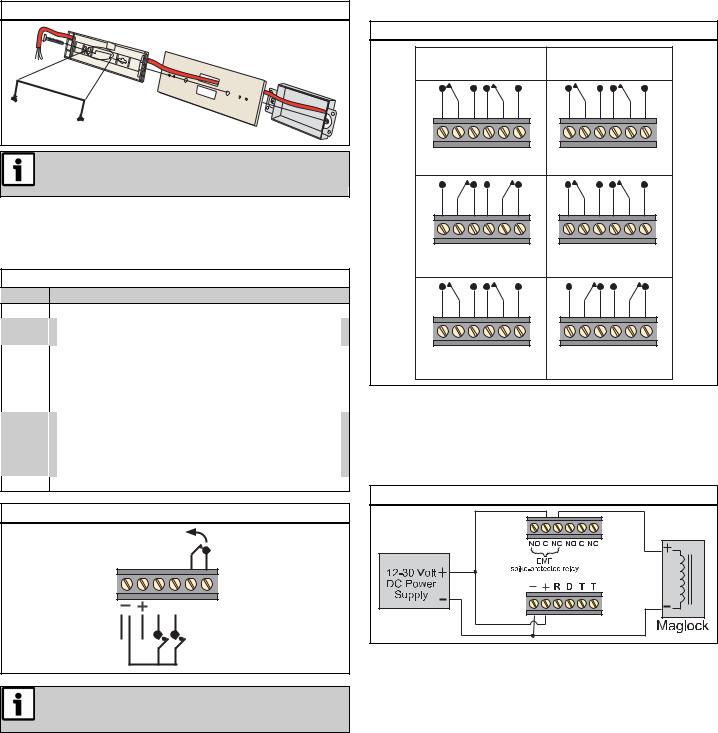
3.2Contact Output Wiring
The normal settings of the contact outputs change depending on the setting of the Relay Mode Switch (S3). Refer to Section 4.3 Relay Mode (DIP Switch 3) on page 5.
Figure 8: Contact Output Wiring
Fail Safe |
Fail Secure |
(Switch 3 On) |
(Switch 3 Off) |
NO C NC NO C NC |
NO C NC NO C NC |
Power Off |
Power Off |
NO C NC NO C NC |
NO C NC NO C NC |
Normal (No Motion) |
Normal (No Motion) |
NO C NC NO C NC |
NO C NC NO C NC |
Motion Detected |
Motion Detected |
3.3Wiring Examples
3.3.1Basic Connection
The basic connection includes the DS160/161, a power supply, and a magnetic lock. When the sensor sees motion, power is removed from the magnetic lock. Relay contacts shown with Switch 3 ON (Failsafe Mode) and Power On.
Figure 9: Basic Connection |
Before wiring the unit, review Section 3.3 Wiring Examples on page 2 for more information on the wiring of the DS160/161.
2 | F01U252567-01 | 9/11 |
DS160/DS161 Installation Guide |
© 2011 Bosch Security Systems, Inc. |

3.3.2Spike Protection
EMF (Voltage) Spike-Protected Relay: Use this relay when connecting inductive loads to the detector. This relay protects the detector from inductive loads that might deliver damaging EMF spikes. No additional spike protection is needed.
Non-EMF (Voltage) Spike-Protected Relay: This relay is best used for non-inductive loads. When connecting an inductive load that is not spike-protected, such as a magnetic door lock, to the detector, use either a bridge rectifier (such as a KBL01) or a diode (such as a 1N4007). Refer to Figure 10 and Figure 11.
UL listed magnetic locks typically are already EMF spikeprotected, and therefore do not require the bridge rectifier or diode as shown in Figure 10 and Figure 11. Refer to the magnetic lock’s documentation for more information.
Figure 10: Diode Connection |
Figure 11: Bridge Rectifier Connection |
Failure to spike-protect the detector can shorten the life of the relay contacts.
3.3.3DS160/161 and a Keycard Reader
Normally, this setup is used when a keycard reader is on one side of the door and the DS160/161 is on the other side. Either swiping a keycard or a motion detected by the DS160/161 removes power from the magnetic lock.
For DIP switch settings, refer to Section 4.7 Remote Input Function (DIP Switches 2, 9, and 10) on page 6.
Figure 12: Keycard Reader Configuration |
3.3.4Direct Sounder Enable
The Direct Sounder Enable setting can be used to activate the DS160/161 sounder from a remote contact. The DS160/161 internal sounder remains on as long as the external contacts remain open. The sounder input can come from devices such as a door controller or door contacts. Turning the sounder on does not affect the relay or relay timer. The direct sounder input does not remove power from the magnetic lock.
Turning the sounder on does not affect the relay or relay timer. The direct sounder input does not remove power from the magnetic lock.
Figure 13: Direct Sounder Enable Configuration |
To ensure the best sound quality from the sounder, tighten all unused terminals on the terminal strip.
© 2011 Bosch Security Systems, Inc. |
DS160/DS161 Installation Guide |
9/11 | F01U252567-01 | 3 |
 Loading...