


DUS 20 plus

EURO • Printed in Germany • BA 1 609 929 C10 • DUS 20 plus • Titel • OSW
09/00
DUS 20 - Bildseite.book Seite 1 Donnerstag, 5. Oktober 2000 11:27 11
Bedienungsanleitung
Operating Instructions
Instructions d’emploi
Instrucciones de
servicio
Manual de instruções
Istruzioni d’uso
Gebruiksaanwijzing
Betjeningsvejledning
Bruksanvisning
Brukerveiledningen
Käyttöohje
O‰ЛБ›· ¯ВИЪИЫМФ‡
Kullanım kılavuzu
DUS 20 plus
Deutsch
English
Français
Español
Português
Italiano
Nederlands
Dansk
Svenska
Norsk
Suomi
EППЛУИО¿
Türkçe

DUS 20 - Bildseite.book Seite 2 Donnerstag, 5. Oktober 2000 11:27 11
4
3
2
1
8 9
7
6
5
10
EURO • Printed in Germany • BA 1 609 929 C10 • DUS 20 plus • GB • OSW
09/00
DUS 20 - Bildseite.book Seite 1 Donnerstag, 5. Oktober 2000 11:27 11
Tool Specifications
Digital Ultrasonic
Measuring Tool
Part number 0 603 096 202
Measuring range 0.6...20 m
Measuring accuracy
(+10 up to +40 °C)
(-5 up to +50 °C)
Smallest unit of measurement 1 cm
Ultrasonic emergence-angle
approx.
Battery 9 V, alkaline-manganese,
Laser class 2
Temperature range for
operation
Temperature range for
storage
DUS 20 plus
± 0.5 %
± 1 %
± 5°
6LR61
-5...+50 °C
-20...+85 °C
Machine Elements
1 Pushbutton “Measuring operation” (length, surface,
volume)
2 Pushbutton “Measure”
3 Push button “on/off”
4 LCD Display
5 Push button “Memory recall” (MR)
6 Pushbutton “Add to memory” (M+)
7 Pushbutton “Delete” (C/MC)
8 Ultrasonic emergence-opening
9 Laser emergence-opening
10 Battery compartment cover
For Your Safety
Working safely with this machine is possible only when the operating and safety information are read completely and the instructions contained therein are strictly
followed.
Laser radiation of laser class 2.
2
630 - 675 nm, < 1,5 mW (α = 25 mrad)
according to EN 60825 - 1:1997
Do not look into the laser beam.
1 609 929 C10 • TMS • 25.09.00
English - 1
EURO • Printed in Germany • BA 1 609 929 C10 • DUS 20 plus • GB • OSW
09/00
DUS 20 - Bildseite.book Seite 2 Donnerstag, 5. Oktober 2000 11:27 11
■ Do not point the laser beam at persons or animals.
■ The laser viewing glasses (optional extra) are not protec-
tive glasses against laser radiation. Do not use as protective glasses against solar radiation and do not wear while
driving.
■ Due to the pointed laser beam, also pay attention to its
path over larger distances.
■ Children may only use the machine under the supervision of adults.
■ Do not remove the warning sign from the unit.
■ Repairs must be carried out only by a Bosch Service De-
partment.
■ Bosch is only able to ensure perfect functioning of the
machine if the original accessories intended for it are
used.
Before Putting into Operation
Open the battery-compartment lid 10 (press on the -
symbol and slide the lid back) and insert the battery. Ensure
correct polarity. Use only alkaline-manganese batteries.
Initial Operation
Switching on: Press the "on/off" pushbutton 3. The dis-
play appears.
Switching off: Press the "on/off" pushbutton 3 again.
If not being used for approx. 5 minutes the unit switches off
automatically, in order to save the batteries.
Operating Instructions
– Do not move the unit during measuring.
– The unit measures from its rear edge, meaning the
length of the measuring tool is included in the measuring
result.
– In case of severe temperature variations, the unit must
adjust to the ambient temperature.
– Taking measurements through glas are not possible.
– Taking measurements on sound-absorbing surfaces are
not possible. In such cases, place a piece of solid mate-
rial such as cardboard or plywood on the target surface.
– Wind can lead to faulty measurements.
– Do not operate the measuring tool in rain.
– If the measuring tool is not used for extended periods of
time, remove the batteries.
1 609 929 C10 • TMS • 25.09.00
English - 2
EURO • Printed in Germany • BA 1 609 929 C10 • DUS 20 plus • GB • OSW
09/00
DUS 20 - Bildseite.book Seite 3 Donnerstag, 5. Oktober 2000 11:27 11
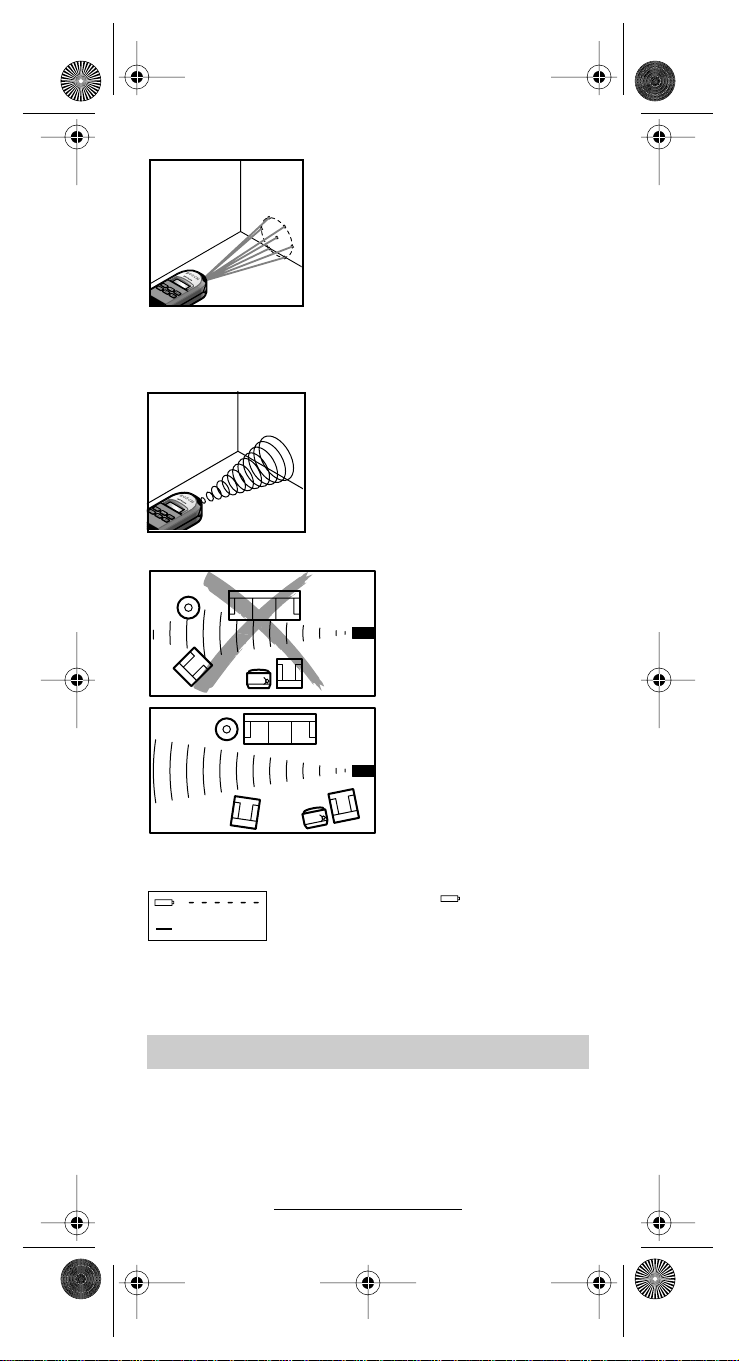
Laser Indicator
During the measuring procedure, a
laser indicator (7-point laser) is also
activated, which indicates if the unit
is pointed at the desired target surface. The laser points are arranged
circular and outline the measured
surface. If the ambient light conditions are too bright, the visibility can
be increased by using the laserspectacles (accessories).
Measuring
The running period of the conical expanding ultrasonic waves is used for
the measurement of distances. The
respective measuring surface is
marked by the laser indicator. The
measurements can only be carried
out on targets with an even and
smooth surface.
Pay attention to obstructions within the sound
field, between the measuring tool and the target
surface. Objects near the
target surface (e. g. projections, furniture) can
lead to measuring errors
or faulty measurements.
Replacing the Battery
Note: If the symbol “ ” appears on the
display 4, the battery is run-down and
must be replaced, otherwise measuring
errors can occur.
Open battery lid 10 and replace battery,
observing correct polarity.
Measuring Operations
The measuring tool can carry out several measuring operations, which can be chosen by repeated pressing of the
“Measuring operation” push button 1. Sequence of the
types of measurement: Length, Surface, Volume. Upon
switching on the unit, it is automatically in the operation
mode "Length measurement".
1 609 929 C10 • TMS • 25.09.00
English - 3

EURO • Printed in Germany • BA 1 609 929 C10 • DUS 20 plus • GB • OSW
09/00
DUS 20 - Bildseite.book Seite 4 Donnerstag, 5. Oktober 2000 11:27 11
Length Measurement
In the “Length Measurement” operation
mode, a line is indicated in the lower left
m
corner of the display.
Place the bottom side of the unit on the
starting-point of the measurement (e. g.
against a wall). Aim the unit towards the
target surface at a right angle.
To measure, press the “Measure” push
button 2. The completion of the meas-
urement is indicated by an acoustic signal and the measured value appears on
the bottom right side of the display. The
maximum possible length per measurement is 20 meters.
Surface Measurement
To access the surface measurement
m
mode, repeatedly press the “Measuring
2
m
operation” push button 1, until a square
appears in the lower left corner of the display.
Carry out the measurement by pressing
the “Measure” push button 2. The measured value appears on the upper right
side of the display. With the next measurement, the surface is immediately calculated and the result appears on the
bottom right side of the display 4. At the
same time, the last length measurement
is indicated on the upper right side of the
display. The flashing bars of the unit indicate which measured length value it expects. The maximal possible surface
value per measurement is 400 m
2
.
Volume Measurement
To access the volume measurement
m
mode, repeatedly press the “Measuring
3
m
operation“ push button 1, until a cuboid
appears in the lower left corner of the display. Carry out the measurement by
pressing the “Measure” push button 2.
The measured value appears on the upper right side of the display. With the next
measurement, the surface is immediately
calculated. To receive the volume, a third
measurement must be carried out. The
result of the volume appears on the bottom right side of the display 4, while the
last length measurement is indicated on
the upper right side. The flashing bars of
the unit indicates which measured length
value it expects. The maximal possible
volume per measurement is 8000 m
1 609 929 C10 • TMS • 25.09.00
English - 4
3
.

EURO • Printed in Germany • BA 1 609 929 C10 • DUS 20 plus • GB • OSW
09/00
DUS 20 - Bildseite.book Seite 5 Donnerstag, 5. Oktober 2000 11:27 11
Memorizing the Measured Value,
“Add to” Function
By pushing the (M+) “Add to memory” push button 6, the
value on the bottom right side of the display – depending on
the current measuring operation a length-, surface- or volumetric value – is memorized and an “M” appears on the bottom left side of the display. If another value has already
been memorized, the new value is added to the contents of
the memory, however only if the units of measurement correlate. For example: If a square value is in the memory and
the current measured value is volumetric, the addition can
not be carried out. In this case “ERROR” will blink on the upper right of the display.
Memory Recall
By pressing the (MR) “Memory recall” push button 5, the
memorized contents can be checked on the display at any
time for a duration of three seconds. When doing so, the
memory symbol “M” blinks together with the length-, surface- or volumetric symbol, depending on the type of measured value in the memory. Afterwards the display automatically switches back to the current measuring value.
The memorized value remains memorized even when the
unit is switched off.
Clearing Measured Values (C/MC)
Repeated pressing of the (C/MC) “Clearing” push button 7,
clears in succession:
m
M
2
m
the last measured value,
m
M
m
all measured values,
the memorized value, in case
M
m
the “M” symbol is indicated on
the display 4.
If only the memorized value “M” is to be cleared, press the
(MR) “Memory recall” push button, which will indicate the
value on the display, and then clear the indicated value by
pressing the (C/MC) “Clearing” push
button 7.
1 609 929 C10 • TMS • 25.09.00
English - 5
 Loading...