


 Loading...
Bosch ventilation use and care manual DKE94

Table of Contents |
|
About This Manual .................................................................................................. |
1 |
How This Manual Is Organized ............................................................................................... |
1 |
Safety ...................................................................................................................... |
1 |
Getting Started ........................................................................................................ |
3 |
Operation ................................................................................................................ |
3 |
About the Appliance ................................................................................................................ |
3 |
Cleaning and Maintenance ..................................................................................... |
4 |
Care and Cleaning .................................................................................................................. |
4 |
Maintenance............................................................................................................................ |
6 |
Service .................................................................................................................... |
7 |
Self Help.................................................................................................................................. |
7 |
Warranty.................................................................................................................................. |
8 |
Questions?
1-800-944-2904
www.boschappliances.com
5551 McFadden Ave.
Huntington Beach, CA 92649
We look forward to hearing from you!

About This Manual
How This Manual Is Organized
This manual contains several sections:
•The Safety section describes important procedures that can ensure your safety while using the appliance.
•The Getting Started section describes the features and functionality of the appliance, including a description of how to set it up and operate it.
•The Operation section describes how to operate and get the best performance out of each component.
•The Cleaning and Maintenance section describes how to clean and maintain the appliance.
•The Service section includes troubleshooting tips and your warranty.
Before using your appliance, be sure to read this manual. Pay special attention to the Important Safety Instructions located at the beginning of the manual.
Safety
 Important Safety Instructions
READ AND SAVE THESE INSTRUCTIONS
Important Safety
Instructions
WARNING
Read all instructions before using this appliance. If the information in this manual is not followed exactly, a fire or explosion may result causing property damage, personal injury or death. To reduce the risk of fire, electric shock, or injury to persons, take these precautions:
Installation |
• Have the installer show you the location of the circuit breaker or fuse. Mark it |
|
for easy reference. |
|
• This appliance must be properly installed and grounded by a qualified techni- |
|
cian. Connect only to properly grounded outlet. Refer to Installation Instruc- |
|
tions for details. |
Intended Use |
WARNING - TO REDUCE THE RISK OF FIRE, ELECTRIC SHOCK, OR INJURY |
|
TO PERSONS, OBSERVE THE FOLLOWING: |
|
1) Use this unit only in the manner intended by the manufacturer. If you have |
|
questions, contact the manufacturer (800-944-2904). |
English 1
2) Before servicing or cleaning the unit, switch power off at service panel and lock service panel. This will prevent power from being switched on accidentally. When the service panel cannot be locked, securely fasten a prominent warning device, such as a tag, to the service panel.
|
FOR GENERAL RESIDENTIAL KITCHEN VENTILATING USE ONLY. TO AVOID |
|
A FIRE OR EXPLOSION HAZARD DO NOT USE TO EXHAUST HAZARDOUS |
|
OR EXPLOSIVE MATERIALS OR VAPOR. |
|
For indoor use only. |
|
To reduce the risk of fire or electric shock, do not use the fan with any solid-state |
|
speed control device. |
Cooking Safety |
• When children become old enough to use the appliance, it is the legal |
|
responsibility of the parents or legal guardians to ensure that they are |
|
instructed in safe practices by qualified persons. |
Cleaning Safety |
• CAUTION - Grease left on filters can remelt and move into the vent. |
Work Space / Environment |
WARNING - TO REDUCE THE RISK OF A RANGE TOP GREASE FIRE: |
|
a) Never leave surface units unattended at high settings. Boilovers cause |
|
smoking and greasy spillovers that may ignite. Heat oils slowly on low or |
|
medium settings. |
|
b) Always turn hood ON when cooking at high heat or when flambéing food |
|
(i.e. Crepes Suzette, Cherries Jubilee, Peppercorn Beef Flambé). |
|
c) Clean ventilating fans frequently. Grease should not be allowed to accu- |
|
mulate on blower or filter. |
|
d) Use proper pan size. Always use cookware appropriate for the size of the |
|
surface element. |
In Case of Fire |
WARNING - TO REDUCE THE RISK OF INJURY TO PERSONS, IN THE EVENT |
|
OF A RANGE TOP GREASE FIRE, OBSERVE THE FOLLOWING: |
|
a) SMOTHER FLAMES with a close-fitting lid, cookie sheet, or other metal |
|
tray, then turn off the gas burner or the electric element. BE CAREFUL |
|
TO PREVENT BURNS. If the flames do not go out immediately, EVACU- |
|
ATE AND CALL THE FIRE DEPARTMENT. |
|
b) NEVER PICK UP A FLAMING PAN, you may be burned. |
|
c) DO NOT USE WATER, including wet dishcloths or towels - a violent |
|
steam explosion may result. |
|
d) Use an extinguisher ONLY if: |
|
1) You know you have a class ABC extinguisher, and you already know |
|
how to operate it. |
|
2) The fire is small and contained in the area where it started. |
|
3) The fire department is being called. |
|
4) You can fight the fire with your back to an exit. |
|
Smother grease fire with pan lid or baking soda. |
|
WARNING - In case of cooktop fire, do not operate blower. |
English 2
Getting Started
Before You Begin
The blower should be turned on for about five minutes before cooking in order to establish air currents upward through the hood. Thus when heat, smoke, moisture, grease and cooking odors are produced, they will be carried outside instead of drifting into other rooms. Use the low speeds for normal use and the higher speeds for strong odors or fumes.
A Note about Drafts: Drafts across the range or cooktop will reduce the effectiveness of the hood. Such drafts should be prevented when possible. The best job of ventilation in the kitchen is done when the only air currents are those created by the blower itself.
Operation
About the Appliance
Features
Operation
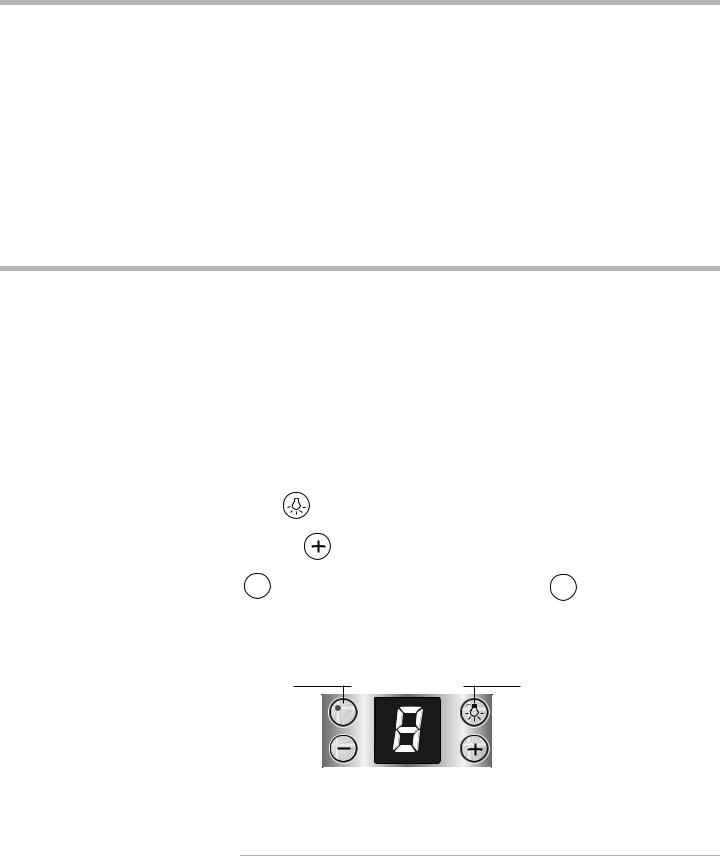
The hood uses push buttons to activate the controls.
Light |
Press |
|
to turn lights on or off. |
|
||
Fan |
Press the |
button to turn the fan on or to increase the fan speed. Press the |
||||
|
|
|
button to decrease the fan spread. Press the 0 button to turn the fan |
|||
|
|
|
||||
|
off. |
|
|
|||
|
|
|
|
|
|
|
|
|
|
Fan OFF |
Light |
||
|
|
|
ON / OFF |
|||
 0
0
|
|
|
|
|
|
|
|
|
|
|
|
|
|
|
|
|
|
|
|
Reduce fan |
|
Fan ON and |
|||||||
speed |
|
increase speed |
|||||||
|
|
|
|
|
|
|
|
|
|
Display for fan setting
Figure 1: Controls
English 3

Cleaning and Maintenance
Care and Cleaning
Cleaning
WARNING: Be sure the entire hood (including the filters and light bulbs) has cooled and grease has solidified before attempting to clean any part of the appliance.
DO NOT use the following!
•Abrasive Pads such as those made from steel wool SOS , Brillo or plastic mesh.
•Abrasive cleaners such as Comet , Ajax and Zud .
•Flammable products such as gasoline or kerosene.
Hood Surface |
Stainless Steel Surfaces: Wipe and dry stainless steel in the same direction as |
|
the grain. Avoid using too much pressure, which may mar the surface. To remove |
|
fingerprints and give added shine, use cleaners such as Stainless Steel Magic . |
|
Do not allow any cleaning compounds to remain in contact with stainless steel for |
|
extended periods. |
Filters |
CAUTION: To avoid fire hazard, keep filters clean. Grease left on fil- |
|
ters can remelt and migrate along the vent path. |
|
Aluminum Filter |
|
The hood has a removable aluminum filter that must be cleaned when it collects |
|
grease. Filters can be cleaned with soap and water or in the dishwasher. When |
|
used over a wok or other high grease application, more frequent cleaning may be |
|
required. |
English 4
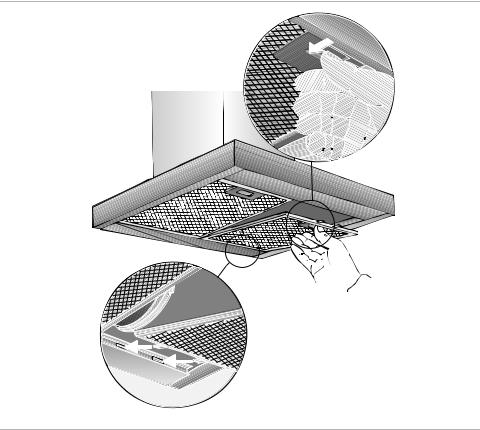
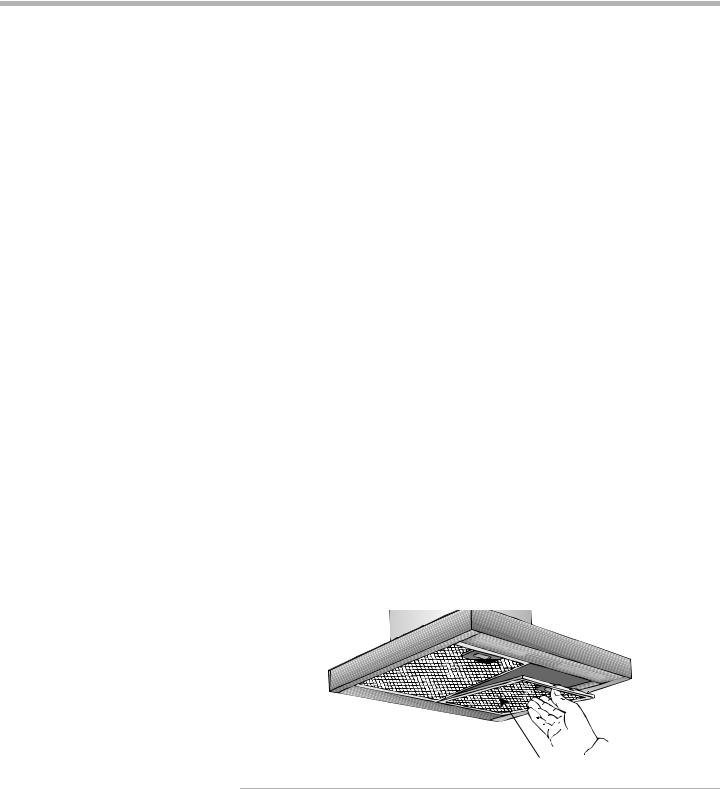
Remove the filter for cleaning: push the handle in and pull down. The front will come out first. Then pull the back down and out.
Figure 2: Filter
To replace the filters: insert the back ends first, then while holding the handles, push in and up until the filters are secured in place.
Carbon Filter
A carbon filter is used only with a recirculation unit. It is in addition to the aluminum filter explained previously. Carbon filters are disposable; They cannot be cleaned or reused. With normal use (1 to 2 hours per day), the carbon filter should be replaced once per year. Contact your dealer to order replacement carbon filters.
Do not use cooktop while hood is disassembled, to ensure adequate ventilation.
English 5
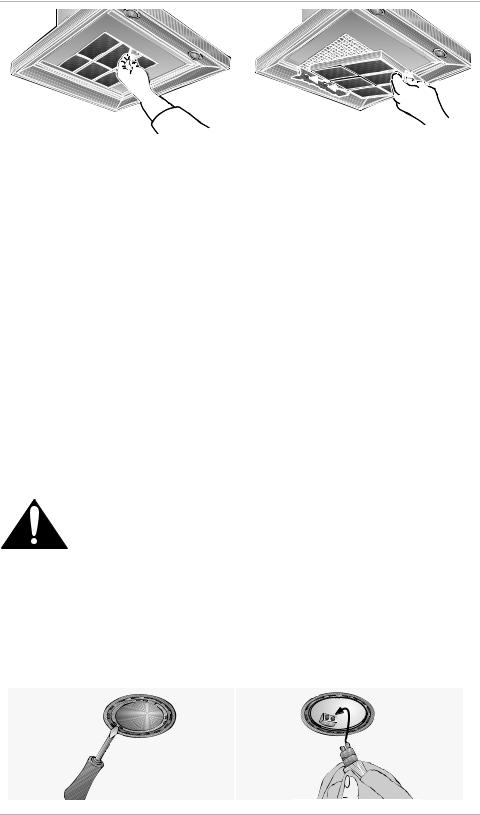
Remove the filter for replacement: Remove the aluminum filter and set aside.
Then remove the carbon filter. Push in on the latch in the front of the carbon filter.
Pull down and out. Dispose of filter.
|
Remove Carbon Filter |
Install Carbon Filter |
|
|
|
|
|
Figure 3: Carbon Filter |
|
Install the replacement filter: Insert notches in holes on back wall of hood. Holding |
|
|
the latch in, push front up into place. Release latch. |
|
Buttons |
Wipe with sudsy water or household cleaners such as Fantastic or Formula |
|
|
409 , rinse well and dry with a clean soft cloth to avoid water marks. |
|
Maintenance
Maintenance |
The following maintenance procedures can be performed without the aid of a ser- |
|
vicer. Always contact a servicer for other repairs. |
Lights |
Use a 12V halogen bulb (max. 20Watt) with a two pin, G4 base. |
|
NOTE: Turn off the lights and fan and allow lights to cool before handling. If lights do |
|
not operate upon installation, check for proper insertion. |
|
CAUTION: TURN POWER OFF AT BREAKER BEFORE REMOV- |
|
ING A DAMAGED BULB. DO NOT TOUCH THE BULBS IMMEDI- |
|
ATELY AFTER USE. THE BULBS WILL REMAIN HOT FOR |
|
SEVERAL MINUTES. |
Light Bulb Replacement |
Note: DO NOT touch a new halogen bulb with your fingertips. Grasp the bulb |
|
through a clean paper towel or facial tissue. The oils from your skin can reduce |
|
the longevity of the bulb. |
|
Use a small flathead screwdriver (or your fingernail) to remove the lens. |
|
|
Figure 4: Light Bulb Replacement
Pull damaged bulb straight out from the socket to remove. Press pins in bulb base straight into socket until fully seated. Snap lens back into place.
English 6
Service
Self Help
Troubleshooting |
Use these suggestions before calling for service to avoid service charges. When |
|||
|
calling service, please have your serial number and model number ready. |
|||
|
Table 1: Troubleshooting |
|
|
|
|
|
|
|
|
|
Problem |
|
|
Possible Explanations |
|
|
|
|
|
|
Noise During Operation |
Some noise is normal due to vibration and air |
||
|
|
movement. Excessive noise indicates one of |
||
|
|
the following: |
||
|
|
• Ductwork is too small/undersized. |
||
|
|
• Ductwork is too large/oversized. |
||
|
|
• Ductwork is loose. |
||
|
|
• Transition is too small or too loose. |
||
|
|
• Screws in trim parts, etc. are loose. |
||
|
|
|
|
|
|
Fan Motor Does Not Work |
• Power supply to hood is not sufficient. |
||
|
|
• Wires are not completely connected. |
||
|
|
|
|
|
|
Lights Under Hood Hum |
A slight hum is normal. |
||
|
|
|
|
|
|
Operation of Hood Trips |
• Wiring is not correct. |
||
|
Breaker |
• Circuit is not correct. |
||
|
|
|
|
|
Product Data Plate |
The data plate shows the model and serial number. It is located behind the filter. |
|||
|
Keep your invoice or escrow papers for warranty validation if service is needed. |
|||
|
|
|
|
|
|
|
|
|
|
|
|
|
|
|
Data Plate Behind Filter
Figure 5: Data Plate Location
English 7
Warranty
General Information
Standard Limited
Warranty
Other Conditions of the
Limited Warranties
How to Obtain Warranty Service
Notice To California
Owners
English 8
The warranties provided by BSH Home Appliances Corp. in this Statement of Limited Warranty apply only to the BSH Ventilation Hood (“hood”) and Internal Blower sold to you, the first using purchaser, provided that the hood and blower were purchased (1) for your use and not for resale and (2) in the United States or Canada and is located in the country of purchase. As used in this Statement of Limited Warranty, the term “Date of Installation” shall refer to the earlier of the date the hood and internal blower are installed or ten (10) business days after the date the hood and internal blower are sold to the first using purchaser, the warranties stated herein apply only to the first using purchaser and are not transferable.
Standard Limited Warranty BSH warrants that its hood and internal blower are free from defects in materials and workmanship for a period of twelve (12) months from the Date of Installation. During the warranty period, BSH or its authorized service center will repair or replace, at its sole option, any hood or internal blower that proves to have been defective under conditions of normal use without charge. All removed parts and components shall become the property of BSH, at BSH’s option. All replaced and/or repaired parts shall assume the identity of the original part for purposes of this warranty and this warranty shall not be extended with respect to such parts.
Other Conditions of the Limited Warranties The warranties provided in this Statement of Limited Warranty exclude defects or damage resulting from (1) use of the hood or internal blower in other than its normal and customary manner (commercial use of the hood or internal blower shall not be deemed normal or customary), (2) misuse, abuse, accidents or neglect, (3) improper operation, maintenance, installation or unauthorized service, (4) adjustment or alteration or modification of any kind, (5) a failure to comply with applicable state, local, city, and county electrical and/or building codes and (6) external forces such as floods, fires, acts of God or other circumstances beyond BSH’s control. Also excluded from this warranty are scratches and damages on external surfaces and exposed parts of the hood and internal blower on which the serial numbers have been altered, defaced of removed. To the extent allowed by law, this warranty sets out your exclusive remedies with respect to products covered by it, whether the claim arises in contract or tort (including strict liability and negligence) or otherwise. BSH will not be liable for consequential or incidental damages, losses, or expenses. THIS WARRANTY IS IN LIEU OF ALL OTHER EXPRESS WARRANTIES. ANY WARRANTY IMPLIED BY LAW, WHETHER FOR MERCHANTABILITY OR FITNESS FOR A PARTICULAR PURPOSE OR OTHERWISE, SHALL BE EFFECTIVE ONLY FOR THE PERIOD THAT THIS EXPRESS WARRANTY IS EFFECTIVE. No attempt to alter, modify, or amend this warranty shall be effective unless authorized in writing by an officer of BSH.
How to Obtain Warranty Service To obtain warranty service for the hood or internal blower, you should contact the nearest BSH authorized service center or the BSH Customer Support Call Center, 5551 McFadden Avenue, Huntington Beach, CA 92649, 800/944-2904. Please have your model number and serial number when you call. They are printed on the inside left panel of the hood and the bottom of the internal blower.
NOTICE TO CALIFORNIA OWNERS If your hood or internal blower needs warranty service and there is no authorized BSH service center reasonably close to you, you may notify the BSH reseller from whom you purchased the hood or internal blower. If the BSH reseller fails to repair or replace the defective parts, or partially refund your purchase price (where applicable), you may have the hood or internal blower repaired at any large appliance repair shop or center and you will be reimbursed for all reasonable expenses provided the costs are substantiated in writing and the work performed is covered by this warranty. BSH shall not reimburse any repair costs hereunder which exceed the depreciated value of the hood or internal blower.
Loading...