


OBJ_BUCH-2328-002.book Page 1 Thursday, January 15, 2015 3:25 PM
Robert Bosch GmbH
Power Tools Division
70764 Leinfelden-Echterdingen
GERMANY
www.bosch-pt.com
1 609 92A 10F (2015.01) PS / 173 EURO
Drill
|
|
|
|
|
|
|
|
|
|
|
|
|
|
|
|
|
|
|
|
|
|
|
|
|
|
|
|
|
|
|
|
|
|
|
|
|
|
|
|
|
|
|
|
|
|
|
|
|
|
|
|
|
|
|
|
|
|
|
de |
Originalbetriebsanleitung |
ru |
Оригинальное руководство по |
|
|
|||||
|
|
|
en |
Original instructions |
|
эксплуатации |
|
|
|||||
|
|
|
fr |
Notice originale |
uk |
Оригінальна інструкція з |
|
|
|||||
|
|
|
es |
Manual original |
|
експлуатації |
|
|
|||||
|
|
|
pt |
Manual original |
kk |
Пайдалану нұсқаулығының |
|
|
|||||
|
|
|
it |
Istruzioni originali |
|
түпнұсқасы |
|
|
|||||
|
|
|
nl |
Oorspronkelijke |
ro |
Instrucţiuni originale |
|
|
|||||
|
|
|
|
gebruiksaanwijzing |
bg |
Оригинална инструкция |
|
|
|||||
|
|
|
da |
Original brugsanvisning |
mk |
Оригинално упатство за работа |
|
|
|||||
|
|
|
sv |
Bruksanvisning i original |
sr |
Originalno uputstvo za rad |
|
|
|||||
|
|
|
no |
Original driftsinstruks |
sl |
Izvirna navodila |
|
|
|||||
|
|
|
fi |
Alkuperäiset ohjeet |
hr |
Originalne upute za rad |
|
|
|||||
|
|
|
el |
Πρωτότυπο οδηγιών χρήσης |
et |
Algupärane kasutusjuhend |
|
|
|||||
|
|
|
tr |
Orijinal işletme talimatı |
lv |
Instrukcijas oriģinālvalodā |
|
|
|||||
|
|
|
pl |
Instrukcja oryginalna |
lt |
Originali instrukcija |
|
|
|||||
|
|
|
cs |
Původní návod k používání |
ar |
ςТЎϩХʉ ЌТϾϦφЍʉ |
|
|
|||||
|
|
|
sk |
Pôvodný návod na použitie |
|
ʌμВТЎϺυ |
|
|
|||||
|
|
|
hu |
Eredeti használati utasítás |
|
|
|
|
|
|
|
|
|
|
|
|
|
|
|
|
|
|
|
|
|
|
|
|
|
|
|
|
|
|
|
|
|
|
|
|
|
|
|
|
|
|
|
|
|
|
|
|
|
|
|
|
|
|
|
|
|
|
|
|
|
|
|
|
|
|
|
|
|
|
|
|
|
|
|
|
|
|
|
|
|
|
|
|
|
|
|
|
|
|
|
|
|

OBJ_BUCH-2328-002.book Page 2 Thursday, January 15, 2015 3:25 PM
2 |
Deutsch . . . . . . . . . . . . . . . . . . . . . . . . . . . . . . |
. Seite |
9 |
English . . . . . . . . . . . . . . . . . . . . . . . . . . . . . . . |
. Page |
15 |
Français . . . . . . . . . . . . . . . . . . . . . . . . . . . . . . |
. Page |
21 |
Español. . . . . . . . . . . . . . . . . . . . . . . . . . . . . . . |
Página |
27 |
Português. . . . . . . . . . . . . . . . . . . . . . . . . . . . . |
Página |
33 |
Italiano . . . . . . . . . . . . . . . . . . . . . . . . . . . . . . . |
Pagina |
39 |
Nederlands. . . . . . . . . . . . . . . . . . . . . . . . . . . . |
Pagina |
44 |
Dansk . . . . . . . . . . . . . . . . . . . . . . . . . . . . . . . . |
. .Side |
50 |
Svenska . . . . . . . . . . . . . . . . . . . . . . . . . . . . . . |
. .Sida |
54 |
Norsk . . . . . . . . . . . . . . . . . . . . . . . . . . . . . . . . |
. .Side |
59 |
Suomi . . . . . . . . . . . . . . . . . . . . . . . . . . . . . . . . |
. .Sivu |
64 |
Ελληνικά . . . . . . . . . . . . . . . . . . . . . . . . . . . . . . |
Σελίδα |
68 |
Türkçe . . . . . . . . . . . . . . . . . . . . . . . . . . . . . . . |
.Sayfa |
74 |
Polski . . . . . . . . . . . . . . . . . . . . . . . . . . . . . . . . |
Strona |
81 |
Česky . . . . . . . . . . . . . . . . . . . . . . . . . . . . . . . . |
Strana |
86 |
1 609 92A 10F | (15.1.15) |
Bosch Power Tools |

OBJ_BUCH-2328-002.book Page 3 Thursday, January 15, 2015 3:25 PM
|
|
| 3 |
Slovensky . . . . . . . . . . . . . . . . . . . . . . . . . |
. . . Strana |
92 |
Magyar. . . . . . . . . . . . . . . . . . . . . . . . . . . . |
. . . . Oldal |
97 |
Русский. . . . . . . . . . . . . . . . . . . . . . . . . . . |
Страница 102 |
|
Українська . . . . . . . . . . . . . . . . . . . . . . . . . |
Сторінка 109 |
|
Қазақша . . . . . . . . . . . . . . . . . . . . . . . . . . . |
. . . . . Бет 114 |
|
Română . . . . . . . . . . . . . . . . . . . . . . . . . . . . |
. . Pagina 120 |
|
Български. . . . . . . . . . . . . . . . . . . . . . . . . |
Страница 125 |
|
Македонски . . . . . . . . . . . . . . . . . . . . . . . . |
. . Страна 131 |
|
Srpski . . . . . . . . . . . . . . . . . . . . . . . . . . . . . |
. . Strana 136 |
|
Slovensko . . . . . . . . . . . . . . . . . . . . . . . . . . |
. . . Stran 141 |
|
Hrvatski . . . . . . . . . . . . . . . . . . . . . . . . . . . . |
. Stranica 146 |
|
Eesti. . . . . . . . . . . . . . . . . . . . . . . . . . . . . . . |
Lehekülg 151 |
|
Latviešu . . . . . . . . . . . . . . . . . . . . . . . . . . . . |
.Lappuse 156 |
|
Lietuviškai . . . . . . . . . . . . . . . . . . . . . . . . . . |
. Puslapis 162 |
|
. . . . . . . . . . . . . . . . . . . . . . . . . . |
. . |
172 |
Bosch Power Tools |
1 609 92A 10F | (15.1.15) |
OBJ_BUCH-2328-002.book Page 4 Thursday, January 15, 2015 3:25 PM
4 |
5
1 4
2 3
6
Drill
1 609 92A 10F | (15.1.15) |
Bosch Power Tools |

OBJ_BUCH-2328-002.book Page 5 Thursday, January 15, 2015 3:25 PM
| 5
A1
7
A2 1
 click!
4
Bosch Power Tools |
1 609 92A 10F | (15.1.15) |
OBJ_BUCH-2328-002.book Page 6 Thursday, January 15, 2015 3:25 PM
6 |
B1
1
2
4
B2
7
1 609 92A 10F | (15.1.15) |
Bosch Power Tools |
OBJ_BUCH-2328-002.book Page 7 Thursday, January 15, 2015 3:25 PM
C
D1
| 7
2 3
5
6
Bosch Power Tools |
1 609 92A 10F | (15.1.15) |

OBJ_BUCH-2328-002.book Page 8 Thursday, January 15, 2015 3:25 PM
8 |
D2
5 6 


1 609 92A 10F | (15.1.15) |
Bosch Power Tools |

OBJ_BUCH-2328-002.book Page 9 Thursday, January 15, 2015 3:25 PM
Deutsch | 9
Deutsch
Sicherheitshinweise
Allgemeine Sicherheitshinweise
Lesen Sie alle dem Bohraufsatz und dem verwendeten Elektrowerkzeug beigefügten Warnhinweise und Anweisungen. Versäumnisse bei der Einhaltung der Sicherheitshinweise und Anweisungen können elektrischen Schlag, Brand und/oder schwere Verletzungen verursachen.
Bewahren Sie alle Sicherheitshinweise und Anweisungen für die Zukunft auf.
Sicherheitshinweise für Schrauber mit Bohraufsatz
Halten Sie das Gerät an den isolierten Griffflächen, wenn Sie Arbeiten ausführen, bei denen das Einsatzwerkzeug verborgene Stromleitungen treffen kann. Der Kontakt mit einer spannungsführenden Leitung kann auch metallene Geräteteile unter Spannung setzen und zu einem elektrischen Schlag führen.
Verwenden Sie geeignete Suchgeräte, um verborgene Versorgungsleitungen aufzuspüren, oder ziehen Sie die örtliche Versorgungsgesellschaft hinzu. Kontakt mit Elektroleitungen kann zu Feuer und elektrischem Schlag führen. Beschädigung einer Gasleitung kann zur Explosion führen. Eindringen in eine Wasserleitung verursacht Sachbeschädigung.
Schalten Sie das Elektrowerkzeug sofort aus, wenn das Einsatzwerkzeug blockiert. Seien Sie auf hohe Reaktionsmomente gefasst, die einen Rückschlag verursachen. Das Einsatzwerkzeug blockiert, wenn:
–das Elektrowerkzeug überlastet wird oder
–es im zu bearbeitenden Werkstück verkantet.
Sichern Sie das Werkstück. Ein mit Spannvorrichtungen oder Schraubstock festgehaltenes Werkstück ist sicherer gehalten als mit Ihrer Hand.
Bosch Power Tools |
1 609 92A 10F | (15.1.15) |

OBJ_BUCH-2328-002.book Page 10 Thursday, January 15, 2015 3:25 PM
10 | Deutsch
Bringen Sie vor allen Arbeiten am Schrauber mit Bohraufsatz (z.B. Wartung etc.) sowie bei dessen Transport und Aufbewahrung den Drehrichtungsumschalter in Mittelstellung. Bei unbeabsichtigtem Betätigen des Ein-/Ausschalters besteht Verletzungsgefahr.
Vermeiden Sie ein versehentliches Einschalten. Das Tragen des Elektrowerkzeugs mit Ihrem Finger am Ein-/Ausschalter kann zu Unfällen führen.
Beaufsichtigen Sie Kinder. Damit wird sichergestellt, dass Kinder nicht mit dem Bohraufsatz oder mit dem Schrauber mit montiertem Bohraufsatz spielen.
Produktund Leistungsbeschreibung
Bestimmungsgemäßer Gebrauch
Der Bohraufsatz ist in Verbindung mit dem Akku-Schrauber IXO bestimmt zum Eindrehen und Lösen von Schrauben in Weichholz sowie zum Bohren in Weichholz, Kunststoff, Gips und ähnliche Materialien.
Der Bohraufsatz ist nur für den privaten Gebrauch im Haushalt bestimmt und darf nur in Verbindung mit folgenden Elektrowerkzeugen benutzt werden:
–Bosch IXO (3 603 J81 0.., 3 603 J59 1.., 3 603 J59 3.., 3 603 JA8 0..)
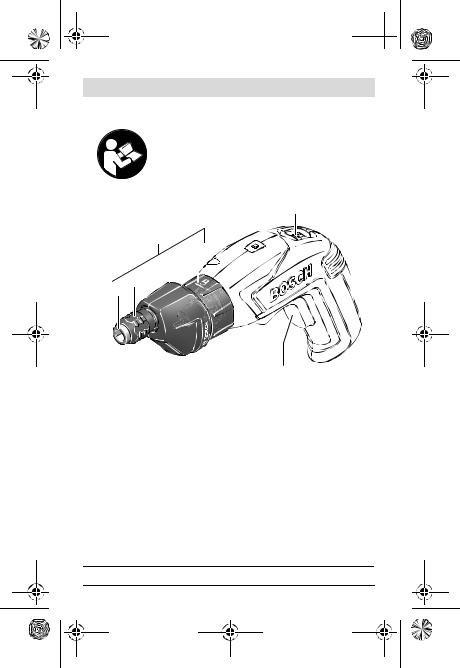
Abgebildete Komponenten
Die Nummerierung der abgebildeten Komponenten bezieht sich auf die Darstellungen auf den Grafikseiten.
1 Bohraufsatz
2 Werkzeugaufnahme
3 Verriegelungshülse
4 Entriegelungsring
5 Drehrichtungsumschalter
6 Ein-/Ausschalter
7 Gummikappe
Abgebildetes oder beschriebenes Zubehör gehört nicht zum Standard-Liefer- umfang. Das vollständige Zubehör finden Sie in unserem Zubehörprogramm.
1 609 92A 10F | (15.1.15) |
Bosch Power Tools |
OBJ_BUCH-2328-002.book Page 11 Thursday, January 15, 2015 3:25 PM
|
|
Deutsch | 11 |
|
Technische Daten |
|
|
|
|
|
|
|
Bohraufsatz |
|
Drill |
|
Sachnummer |
|
1 600 A00 4ZB |
|
Gewicht, ca. |
kg |
0,12 |
|
Maximales Drehmoment |
Nm |
1,7 |
|
max. Drehzahl |
min-1 |
440 |
|
max. Schrauben-Ø |
mm |
4 |
|
max. Bohr-Ø |
mm |
5 |
|
Konformitätserklärung
Wir erklären in alleiniger Verantwortung, dass das unter „Technische Daten“ beschriebene Produkt allen einschlägigen Bestimmungen der Richtlinie 2006/42/EG einschließlich ihrer Änderungen entspricht.
Technische Unterlagen (2006/42/EG) bei: Robert Bosch GmbH, PT/ETM9,
70764 Leinfelden-Echterdingen, GERMANY
Henk Becker |
Helmut Heinzelmann |
Executive Vice President |
Head of Product Certification |
Engineering |
PT/ETM9 |
Robert Bosch GmbH, Power Tools Division
70764 Leinfelden-Echterdingen, GERMANY
Leinfelden, 16.12.2014
Montage
Bringen Sie vor allen Arbeiten am Schrauber mit Bohraufsatz (z.B. Wartung etc.) sowie bei dessen Transport und Aufbewahrung den Drehrichtungsumschalter in Mittelstellung. Bei unbeabsichtigtem Betätigen des Ein-/Ausschalters besteht Verletzungsgefahr.
Bosch Power Tools |
1 609 92A 10F | (15.1.15) |

OBJ_BUCH-2328-002.book Page 12 Thursday, January 15, 2015 3:25 PM
12 | Deutsch
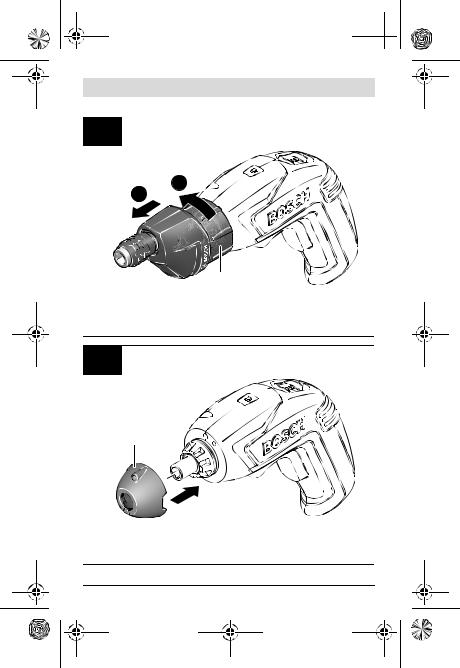
Bohraufsatz aufstecken (siehe Bilder A1–A2)
–Vor der Montage des Bohraufsatzes 1 müssen Sie die Gummikappe 7 des Schraubers nach vorne abziehen.
–Anschließend stecken Sie den Bohraufsatz 1 auf den Schrauber. Sie können den Bohraufsatz mit dem Schloss-Symbol am Entriegelungsring 4 nach oben oder um 45° versetzt montieren.
Der Bohraufsatz muss hörbar einrasten.
Demontage (siehe Bilder B1–B2)
–Drehen Sie den Entriegelungsring 4 in Drehrichtung und ziehen Sie den Bohraufsatz nach vorne () ab.
–Stecken Sie anschließend die Gummikappe 7 wieder auf den Schrauber.
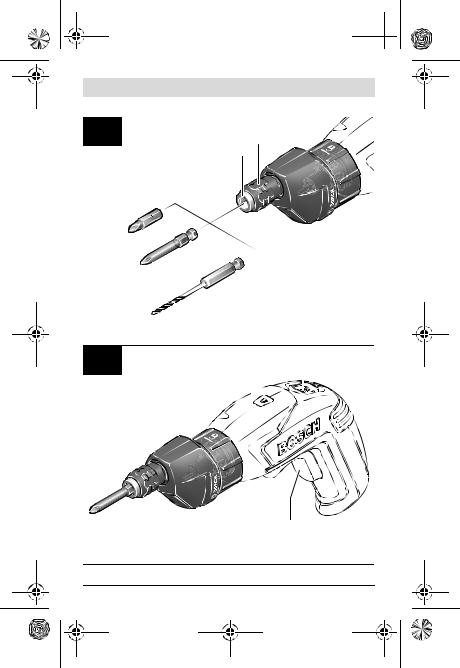
Einsatzwerkzeug montieren (siehe Bild C)
–Ziehen Sie die Verriegelungshülse 3 nach vorn, führen das Einsatzwerkzeug bis zum Anschlag in die Werkzeugaufnahme 2 und lassen die Verriegelungshülse 3 wieder los, um das Einsatzwerkzeug zu arretieren.
Betrieb
Inbetriebnahme
Um Energie zu sparen, schalten Sie das Elektrowerkzeug nur ein, wenn Sie es benutzen.
Drehrichtung einstellen
IXO (3 603 JA8 0..) (siehe Bild D1)
–Rechtslauf: Zum Bohren und Eindrehen von Schrauben schieben Sie den Drehrichtungsumschalter 5 bis zum Anschlag nach vorn.
–Linkslauf: Zum Lösen bzw. Herausdrehen von Schrauben schieben Sie den Drehrichtungsumschalter 5 nach hinten.
IXO (3 603 J81 0.., 3 603 J59 1.., 3 603 J59 3..) (siehe Bild D2)
Rechtslauf: Zum Bohren und Eindrehen von Schrauben drücken Sie den Drehrichtungsumschalter 5 nach links bis zum Anschlag durch.
Linkslauf: Zum Lösen bzw. Herausdrehen von Schrauben drücken Sie den Drehrichtungsumschalter 5 nach rechts bis zum Anschlag durch.
1 609 92A 10F | (15.1.15) |
Bosch Power Tools |

OBJ_BUCH-2328-002.book Page 13 Thursday, January 15, 2015 3:25 PM
Deutsch | 13
Ein-/Ausschalten
–Drücken Sie zur Inbetriebnahme des Elektrowerkzeugesden Ein-/Aus- schalter 6 und halten Sie ihn gedrückt.
–Um das Elektrowerkzeug auszuschalten, lassen Sie den Ein-/Ausschal- ter 6 los.
Arbeitshinweise
Setzen Sie das Elektrowerkzeug nur ausgeschaltet auf die Schraube auf. Sich drehende Einsatzwerkzeuge können abrutschen.
Wartung und Service
Wartung und Reinigung
Halten Sie den Bohraufsatz sauber, um gut und sicher zu arbeiten.
Demontieren Sie zur Reinigung den Bohraufsatz vom Schrauber.
Bei unbeabsichtigtem Betätigen des Ein-/Ausschalters besteht Verletzungsgefahr.
Kundendienst und Anwendungsberatung
Geben Sie bei allen Rückfragen und Ersatzteilbestellungen bitte unbedingt die 10-stellige Sachnummer laut Typenschild des Bohraufsatzes an.
Der Kundendienst beantwortet Ihre Fragen zu Reparatur und Wartung Ihres Produkts sowie zu Ersatzteilen. Explosionszeichnungen und Informationen zu Ersatzteilen finden Sie auch unter:
www.bosch-pt.com
Das Bosch-Anwendungsberatungs-Team hilft Ihnen gerne bei Fragen zu unseren Produkten und deren Zubehör.
www.bosch-do-it.de, das Internetportal für Heimwerker und Gartenfreunde.
www.1-2-do.com
In der Heimwerker-Community 1-2-do.com können Sie Produkttester werden, Ideen sammeln oder sich mit anderen Heimwerkern austauschen.
www.diy-academy.eu, das komplette Service-Angebot der DIY Academy.
Bosch Power Tools |
1 609 92A 10F | (15.1.15) |

OBJ_BUCH-2328-002.book Page 14 Thursday, January 15, 2015 3:25 PM
14 | Deutsch
Deutschland
Robert Bosch GmbH Servicezentrum Elektrowerkzeuge Zur Luhne 2
37589 Kalefeld – Willershausen
Unter www.bosch-pt.com können Sie online Ersatzteile bestellen oder Reparaturen anmelden.
Kundendienst: Tel.: (0711) 40040480 Fax: (0711) 40040481
E-Mail: Servicezentrum.Elektrowerkzeuge@de.bosch.com Anwendungsberatung: Tel.: (0711) 40040480
Fax: (0711) 40040482
E-Mail: Anwendungsberatung.pt@de.bosch.com
Österreich
Unter www.bosch-pt.at können Sie online Ersatzteile bestellen. Tel.: (01) 797222010
Fax: (01) 797222011
E-Mail: service.elektrowerkzeuge@at.bosch.com
Schweiz
Unter www.bosch-pt.com/ch/de können Sie online Ersatzteile bestellen. Tel.: (044) 8471511
Fax: (044) 8471551
E-Mail: Aftersales.Service@de.bosch.com
Luxemburg
Tel.: +32 2 588 0589
Fax: +32 2 588 0595
E-Mail: outillage.gereedschap@be.bosch.com
Entsorgung
Bohraufsatz, Zubehör und Verpackungen sollen einer umweltgerechten Wiederverwertung zugeführt werden.
Änderungen vorbehalten.
1 609 92A 10F | (15.1.15) |
Bosch Power Tools |
OBJ_BUCH-2328-002.book Page 15 Thursday, January 15, 2015 3:25 PM
English | 15
English
Safety Notes
General Safety Rules
Read all precautions and instructions enclosed with the drilling adapter and the power tool you are using. Failure to follow the warnings and instructions may result in electric shock, fire and/or serious injury.
Save all safety warnings and all instructions for future reference.
Safety Warnings for Screwdriver with Drilling Adapter
Hold power tool by insulated gripping surfaces, when performing an operation where the cutting accessory may contact hidden wiring.
Cutting accessory contacting a “live” wire may make exposed metal parts of the power tool “live” and could give the operator an electric shock.
Use appropriate detectors to determine if utility lines are hidden in the work area or call the local utility company for assistance.
Contact with electric lines can lead to fire and electric shock. Damaging a gas line can lead to explosion. Penetrating a water line causes property damage.
Switch off the power tool immediately when the tool insert jams. Be prepared for high reaction torque that can cause kickback. The tool insert jams when:
—the power tool is subject to overload or
—it becomes wedged in the workpiece.
Secure the workpiece. A workpiece clamped with clamping devices or in a vice is held more secure than by hand.
Before any work on the screwdriver with drilling adapter (e.g. maintenance etc.) as well as during transport and storage, set the rotational direction switch to the middle position. There is danger of injury when unintentionally actuating the On/Off switch.
Prevent unintentional switching on. Carrying power tools with your finger on the On/Off switch can lead to accidents.
Supervise children. This will ensure that children do not play with the drilling adapter or with the screwdriver with mounted drilling adapter.
Bosch Power Tools |
1 609 92A 10F | (15.1.15) |
OBJ_BUCH-2328-002.book Page 16 Thursday, January 15, 2015 3:25 PM
16 | English
Product Description and Specifications
Intended Use
In conjunction with the IXO cordless screwdriver, the drilling adapter is intended for driving and loosening screws in softwood and for drilling in softwood, plastic, plaster and similar materials.
The drilling adapter is only intended for private household use and must be used only in conjunction with the following power tools:
–Bosch IXO (3 603 J81 0.., 3 603 J59 1.., 3 603 J59 3.., 3 603 JA8 0..)
Product Features
The numbering of the product features refers to the illustrations on the graphics pages.
1 Drilling adapter
2 Tool holder
3 Locking sleeve
4 Release ring
5 Rotational direction switch
6 On/Off switch
7 Rubber cap
Accessories shown or described are not part of the standard delivery scope of the product. A complete overview of accessories can be found in our accessories program.
Technical Data
Drilling adapter |
|
Drill |
Article number |
|
1 600 A00 4ZB |
Weight, approx. |
kg |
0.12 |
Maximum torque |
Nm |
1.7 |
Max. speed |
min-1 |
440 |
Max. screw dia. |
mm |
4 |
Max. drilling dia. |
mm |
5 |
|
|
|
1 609 92A 10F | (15.1.15) |
|
Bosch Power Tools |

OBJ_BUCH-2328-002.book Page 17 Thursday, January 15, 2015 3:25 PM
English | 17
Declaration of Conformity
We declare under our sole responsibility that the product described under “Technical Data” complies with all applicable provisions of the directive 2006/42/EC including its amendments.
Technical file (2006/42/EC) at: Robert Bosch GmbH, PT/ETM9,
70764 Leinfelden-Echterdingen, GERMANY
Henk Becker |
Helmut Heinzelmann |
Executive Vice President |
Head of Product Certification |
Engineering |
PT/ETM9 |
Robert Bosch GmbH, Power Tools Division
70764 Leinfelden-Echterdingen, GERMANY
Leinfelden, 16.12.2014
Assembly
Before any work on the screwdriver with drilling adapter (e.g. maintenance etc.) as well as during transport and storage, set the rotational direction switch to the middle position. There is danger of injury when unintentionally actuating the On/Off switch.
Mounting the drilling adapter (see figures A1 – A2)
–Before mounting the drilling adapter 1, you have to pull the rubber cap 7 of the screwdriver off toward the front.
–Then attach the drilling adapter 1 to the screwdriver.
You can mount the drilling adapter with the padlock symbol on the release ring 4 pointing upward or offset by 45°.
The drilling adapter must audibly engage.
Dismounting (see figures B1–B2)
–Turn the release ring 4 in rotation direction and pull the drilling adapter off toward the front ().
–Afterwards, mount the rubber cap 7 onto the screwdriver again.
Bosch Power Tools |
1 609 92A 10F | (15.1.15) |

OBJ_BUCH-2328-002.book Page 18 Thursday, January 15, 2015 3:25 PM
18 | English
Mounting application tools (see figure C)
–Pull the locking sleeve 3 forward, push the insert tool to the stop into the tool holder 2 and release the locking sleeve 3 to lock the insert tool.
Operation
Starting Operation
To save energy, only switch the power tool on when using it.
Reversing the rotational direction
IXO (3 603 JA8 0..) (see figure D1)
–Right rotation: To drill and to drive in screws, slide the rotational direction switch 5 forward to the stop.
–Left rotation: To loosen or unscrew screws, slide the rotational direction switch 5 to the back.
IXO (3 603 J81 0.., 3 603 J59 1.., 3 603 J59 3..) (see figure D2)
Right Rotation: For drilling and driving in screws, push the rotational direction switch 5 left to the stop.
Left Rotation: For loosening or unscrewing screws, push the rotational direction switch 5 right to the stop.
Switching On and Off
–To start the machine, press the On/Off switch 6 and keep it pressed.
–To switch off the machine, release the On/Off switch 6.
Working Advice
Apply the power tool to the screw only when it is switched off. Rotating tool inserts can slip off.
Maintenance and Service
Maintenance and Cleaning
Keep the drilling adapter clean to ensure good, safe operation.
Remove the drilling adapter from the screwdriver to clean it. There is danger of injury when unintentionally actuating the On/Off switch.
1 609 92A 10F | (15.1.15) |
Bosch Power Tools |
OBJ_BUCH-2328-002.book Page 19 Thursday, January 15, 2015 3:25 PM
English | 19
After-sales Service and Application Service
In all correspondence and spare parts orders, please always include the 10-digit article number given on the type plate of the drilling adapter.
Our after-sales service responds to your questions concerning maintenance and repair of your product as well as spare parts. Exploded views and information on spare parts can also be found under: www.bosch-pt.com
Bosch’s application service team will gladly answer questions concerning our products and their accessories.
Great Britain
Robert Bosch Ltd. (B.S.C.) P.O. Box 98
Broadwater Park
North Orbital Road Denham
Uxbridge
UB 9 5HJ
At www.bosch-pt.co.uk you can order spare parts or arrange the collection of a product in need of servicing or repair.
Tel. Service: (0344) 7360109
E-Mail: boschservicecentre@bosch.com
Ireland
Origo Ltd.
Unit 23 Magna Drive
Magna Business Park
City West
Dublin 24
Tel. Service: (01) 4666700
Fax: (01) 4666888
Bosch Power Tools |
1 609 92A 10F | (15.1.15) |

OBJ_BUCH-2328-002.book Page 20 Thursday, January 15, 2015 3:25 PM
20 | English
Australia, New Zealand and Pacific Islands
Robert Bosch Australia Pty. Ltd.
Power Tools
Locked Bag 66
Clayton South VIC 3169
Customer Contact Center
Inside Australia:
Phone: (01300) 307044
Fax: (01300) 307045
Inside New Zealand:
Phone: (0800) 543353
Fax: (0800) 428570
Outside AU and NZ:
Phone: +61 3 95415555
www.bosch.com.au
Republic of South Africa
Customer service
Hotline: (011) 6519600
Gauteng – BSC Service Centre
35 Roper Street, New Centre Johannesburg
Tel.: (011) 4939375
Fax: (011) 4930126 E-Mail: bsctools@icon.co.za
KZN – BSC Service Centre
Unit E, Almar Centre
143 Crompton Street Pinetown
Tel.: (031) 7012120
Fax: (031) 7012446
E-Mail: bsc.dur@za.bosch.com
Western Cape – BSC Service Centre
Democracy Way, Prosperity Park
Milnerton
Tel.: (021) 5512577
Fax: (021) 5513223
E-Mail: bsc@zsd.co.za
1 609 92A 10F | (15.1.15) |
Bosch Power Tools |
OBJ_BUCH-2328-002.book Page 21 Thursday, January 15, 2015 3:25 PM
Français | 21
Bosch Headquarters
Midrand, Gauteng
Tel.: (011) 6519600
Fax: (011) 6519880
E-Mail: rbsa-hq.pts@za.bosch.com
Disposal
The drilling adapter, accessories and packaging should be sorted for environmentally friendly recycling.
Subject to change without notice.
Français
Avertissements de sécurité
Indications générales de sécurité
Lisez tous les avertissements et toutes les instructions de sécurité joints à l’embout de perçage et à l’outil électroportatif utilisé. Le non-respect des instructions et consignes de sécurité peut provoquer un choc électrique, un incendie et/ou entraîner de graves blessures.
Conserver tous les avertissements et toutes les instructions pour pouvoir s’y reporter ultérieurement.
Consignes de sécurité pour la visseuse avec embout de perçage
Tenir l’outil par les surfaces de préhension isolées, lors de la réalisation d’une opération au cours de laquelle l’organe de coupe peut entrer en contact avec un câblage non apparent. Le contact avec un fil « sous tension » peut également mettre « sous tension » les parties métalliques exposées de l’outil électrique et provoquer un choc électrique sur l’opérateur.
Bosch Power Tools |
1 609 92A 10F | (15.1.15) |

OBJ_BUCH-2328-002.book Page 22 Thursday, January 15, 2015 3:25 PM
22 | Français
Utiliser des détecteurs appropriés afin de déceler des conduites cachées ou consulter les entreprises d’approvisionnement locales. Un contact avec des conduites d’électricité peut provoquer un incendie ou un choc électrique. Un endommagement d’une conduite de gaz peut provoquer une explosion. La perforation d’une conduite d’eau provoque des dégâts matériels.
Arrêtez immédiatement l’appareil électrique lorsque l’outil coince. Attendez-vous à des couples de réaction importants causant un contrecoup. L’outil se bloque lorsque :
–l’appareil électrique est surchargé ou
–lorsqu’il coince dans la pièce à travailler.
Bloquer la pièce à travailler. Une pièce à travailler serrée par des dispositifs de serrage appropriés ou dans un étau est fixée de manière plus sûre que tenue dans les mains.
Avant d’effectuer des travaux sur la visseuse munie de l’embout de perçage (travaux d’entretien, etc.) ainsi que pour la transporter ou la ranger, placez le sélecteur de sens de rotation en position médiane. Il y a sinon risque de blessure lorsqu’on appuie par mégarde sur l’interrupteur Marche/Arrêt.
Eviter tout démarrage intempestif. Porter l’outil électroportatif ayant le doigt sur l’interrupteur Marche/Arrêt est source d’accidents.
Ne laissez pas les enfants sans surveillance. Vous éviterez ainsi qu’ils puissent jouer avec l’embout de perçage ou avec la visseuse munie de l’embout de perçage.
Description et performances du produit
Utilisation conforme
L’embout de perçage est conçu, en combinaison avec la visseuse sans fil IXO, pour le vissage et le dévissage de vis dans le bois tendre ainsi que pour le perçage dans le bois tendre, les plastiques, le plâtre ou autres matériaux similaires.
L’embout de perçage n’est destiné qu’à un usage privé et il doit être utilisé exclusivement avec les outils électroportatifs suivants :
–Bosch IXO (3 603 J81 0.., 3 603 J59 1.., 3 603 J59 3.., 3 603 JA8 0..)
1 609 92A 10F | (15.1.15) |
Bosch Power Tools |

OBJ_BUCH-2328-002.book Page 23 Thursday, January 15, 2015 3:25 PM
Français | 23
Eléments de l’appareil
La numérotation des éléments de l’appareil se réfère aux représentations sur les pages graphiques.
1 Embout de perçage
2 Porte-outil
3 Bague de verrouillage
4 Bague de déverrouillage
5 Commutateur du sens de rotation
6 Interrupteur Marche/Arrêt
7 Capot en caoutchouc
Les accessoires décrits ou illustrés ne sont pas tous compris dans la fourniture. Vous trouverez les accessoires complets dans notre programme d’accessoires.
Déclaration de conformité
Nous déclarons sous notre propre responsabilité que le produit décrit sous « Caractéristiques techniques » est en tous points conforme aux exigences de la directive 2006/42/CE et ses modifications ultérieures.
Dossier technique (2006/42/CE) auprès de : Robert Bosch GmbH, PT/ETM9,
70764 Leinfelden-Echterdingen, GERMANY
Henk Becker |
Helmut Heinzelmann |
Executive Vice President |
Head of Product Certification |
Engineering |
PT/ETM9 |
Robert Bosch GmbH, Power Tools Division
70764 Leinfelden-Echterdingen, GERMANY
Leinfelden, 16.12.2014
Bosch Power Tools |
1 609 92A 10F | (15.1.15) |

OBJ_BUCH-2328-002.book Page 24 Thursday, January 15, 2015 3:25 PM
24 | Français
Caractéristiques techniques
Embout de perçage |
|
Drill |
N° d’article |
|
1 600 A00 4ZB |
Poids, env. |
kg |
0,12 |
Couple maximal |
Nm |
1,7 |
Vitesse de rotation max. |
tr/min |
440 |
Ø max. de vis |
mm |
4 |
Ø perçage max. |
mm |
5 |
Montage
Avant d’effectuer des travaux sur la visseuse munie de l’embout de perçage (travaux d’entretien, etc.) ainsi que pour la transporter ou la ranger, placez le sélecteur de sens de rotation en position médiane. Il y a sinon risque de blessure lorsqu’on appuie par mégarde sur l’interrupteur Marche/Arrêt.
Mise en place de l’embout de perçage (voir figures A1 – A2)
–Avant de monter l’embout de perçage 1, retirez le capot en caoutchouc 7 de la visseuse.
–Placez ensuite l’embout de perçage 1 sur la visseuse.
Vous pouvez monter l’embout de perçage avec le pictogramme « Cadenas » de la bague de déverrouillage 4 orienté vers le haut ou placé à 45°.
L’embout de perçage doit s’encliqueter de manière audible.
Démontage (voir figures B1–B2)
–Tournez la bague de déverrouillage 4 dans le sens et retirez l’embout de perçage vers l’avant ().
–Ensuite montez à nouveau le capot en caoutchouc 7 sur la visseuse.
Montage de l’outil de travail (voir figure C)
–Tirez la douille de verrouillage 3 vers l’avant, enfoncez l’outil de travail à fond dans le porte-outil 2 et relâchez la douille de verrouillage 3 afin de bloquer l’outil de travail.
1 609 92A 10F | (15.1.15) |
Bosch Power Tools |

OBJ_BUCH-2328-002.book Page 25 Thursday, January 15, 2015 3:25 PM
Français | 25
Fonctionnement
Mise en service
Afin d’économiser l’énergie, ne mettez l’outil électroportatif en marche que quand vous l’utilisez.
Sélection du sens de rotation
IXO (3 603 JA8 0..) (voir figure D1)
–Rotation droite : Pour percer et visser des vis, poussez le sélecteur de sens de rotation 5 jusqu’en butée vers l’avant.
–Rotation gauche : Pour desserrer ou dévisser des vis, poussez le sélecteur de sens de rotation 5 vers l’arrière.
IXO (3 603 J81 0.., 3 603 J59 1.., 3 603 J59 3..) (voir figure D2)
Rotation droite : Pour percer et visser, tournez le commutateur du sens de rotation 5 à fond vers la gauche.
Rotation gauche : Pour desserrer ou dévisser des vis, tournez le commutateur du sens de rotation 5 à fond vers la droite.
Mise en Marche/Arrêt
–Pour mettre l’outil électroportatif en marche, appuyez sur l’interrupteur Marche/Arrêt 6 et maintenez-le appuyé.
–Pour arrêter l’outil électroportatif, relâchez l’interrupteur Marche/Arrêt 6.
Instructions d’utilisation
Ne posez l’outil électroportatif sur la vis que lorsqu’il est arrêté.
Les outils de travail en rotation peuvent glisser.
Entretien et Service Après-Vente
Nettoyage et entretien
Seul un embout de perçage propre permet de travailler de manière correcte et en toute sécurité.
Pour nettoyer l’embout de perçage, retirez-le de la visseuse. Il y a sinon risque de blessure lorsqu’on appuie par mégarde sur l’interrupteur Marche/Arrêt.
Bosch Power Tools |
1 609 92A 10F | (15.1.15) |

OBJ_BUCH-2328-002.book Page 26 Thursday, January 15, 2015 3:25 PM
26 | Français
Service Après-Vente et Assistance
Pour toute demande de renseignement ou commande de pièces de rechange, précisez-nous impérativement la référence à 10 chiffres indiquée sur l’étiquette signalétique de l’embout de perçage.
Notre Service Après-Vente répond à vos questions concernant la réparation et l’entretien de votre produit et les pièces de rechange. Vous trouverez des vues éclatées ainsi que des informations concernant les pièces de rechange également sous :
www.bosch-pt.com
Les conseillers techniques et assistants Bosch sont à votre disposition pour répondre à vos questions concernant nos produits et leurs accessoires.
France
Passez votre commande de pièces détachées directement en ligne sur notre site www.bosch-pt.fr.
Vous êtes un utilisateur, contactez :
Le Service Clientèle Bosch Outillage Electroportatif Tel. : 0811 360122
(coût d’une communication locale) Fax : (01) 49454767
E-Mail : contact.outillage-electroportatif@fr.bosch.com
Vous êtes un revendeur, contactez : Robert Bosch (France) S.A.S. Service Après-Vente Electroportatif 126, rue de Stalingrad
93705 DRANCY Cédex
Tel. : (01) 43119006
Fax : (01) 43119033
E-Mail : sav.outillage-electroportatif@fr.bosch.com
Belgique, Luxembourg
Tel. : +32 2 588 0589
Fax : +32 2 588 0595
E-Mail : outillage.gereedschap@be.bosch.com
1 609 92A 10F | (15.1.15) |
Bosch Power Tools |
OBJ_BUCH-2328-002.book Page 27 Thursday, January 15, 2015 3:25 PM
Español | 27
Suisse
Passez votre commande de pièces détachées directement en ligne sur notre site www.bosch-pt.com/ch/fr.
Tel. : (044) 8471512
Fax : (044) 8471552
E-Mail : Aftersales.Service@de.bosch.com
Élimination des déchets
Prière de rapporter l’embout de perçage, les accessoires associés et les emballages dans un Centre de recyclage respectueux de l’environnement.
Sous réserve de modifications.
Español
Instrucciones de seguridad
Instrucciones generales de seguridad
Lea todas las indicaciones de advertencia e instrucciones que se adjuntan al suplemento para taladrar y a la herramienta eléctrica utilizada. Las faltas de observación de las indicaciones de seguridad y de las instrucciones pueden causar descargas eléctricas, incendios y/o lesiones graves.
Guarde todas las indicaciones de seguridad e instrucciones para posibles consultas futuras.
Indicaciones de seguridad para atornilladoras con suplemento para taladrar
Sujete la herramienta eléctrica por las superficies de agarre aisladas al realizar trabajos en los que el útil pueda llegar a tocar conductores eléctricos ocultos. El contacto con conductores bajo tensión puede hacer que las partes metálicas de la herramienta eléctrica le provoquen una descarga eléctrica.
Bosch Power Tools |
1 609 92A 10F | (15.1.15) |

OBJ_BUCH-2328-002.book Page 28 Thursday, January 15, 2015 3:25 PM
28 | Español
Utilice unos aparatos de exploración adecuados para detectar conductores o tuberías ocultas, o consulte a sus compañías abastecedoras. El contacto con conductores eléctricos puede provocar un incendio o una electrocución. Al dañar una tubería de gas puede producirse una explosión. La perforación de una tubería de agua puede causar daños materiales.
Desconecte inmediatamente la herramienta eléctrica si el útil se bloquea. Esté preparado para soportar la elevada fuerza de reacción. El útil se bloquea:
—si la herramienta eléctrica se sobrecarga, o
—si éste se ladea en la pieza de trabajo.
Asegure la pieza de trabajo. Una pieza de trabajo fijada con unos dispositivos de sujeción, o en un tornillo de banco, se mantiene sujeta de forma mucho más segura que con la mano.
Antes de realizar cualquier trabajo en la atornilladora con suplemento para taladrar (p.ej. mantenimiento, etc.), así como al transportarla y guardarla, poner el selector de sentido de giro en la posición central. En caso contrario podría accidentarse al accionar fortuitamente el interruptor de conexión/desconexión.
Evite una puesta en marcha fortuita. Podría accidentarse, si transporta la herramienta eléctrica sujetándola por el gatillo del interruptor de conexión/ desconexión.
Vigile los niños. Merced a ello se asegura, que los niños no jueguen con el suplemento para taladrar o con la atornilladora con el suplemento para taladrar montado.
Descripción y prestaciones del producto
Utilización reglamentaria
El suplemento para taladrar, en combinación con la atornilladora accionada por acumulador IXO, está destinado para enroscar y soltar tornillos en madera blanda así como para taladrar en madera blanda, plástico, yeso y materiales semejantes.
El suplemento para taladrar sólo está destinado para el uso particular doméstico y sólo debe utilizarse en combinación con las siguientes herramientas eléctricas:
–Bosch IXO (3 603 J81 0.., 3 603 J59 1.., 3 603 J59 3.., 3 603 JA8 0..)
1 609 92A 10F | (15.1.15) |
Bosch Power Tools |

OBJ_BUCH-2328-002.book Page 29 Thursday, January 15, 2015 3:25 PM
Español | 29
Componentes principales
La numeración de los componentes está referida a las imágenes en las páginas ilustradas.
1 Suplemento para taladrar
2 Alojamiento del útil
3 Casquillo de enclavamiento
4 Anillo de extracción
5 Selector de sentido de giro
6 Interruptor de conexión/desconexión
7 Capuchón de goma
Los accesorios descritos e ilustrados no corresponden al material que se adjunta de serie. La gama completa de accesorios opcionales se detalla en nuestro programa de accesorios.
Declaración de conformidad
Declaramos bajo nuestra exclusiva responsabilidad, que el producto descrito en los “datos técnicos” cumple con todas las disposiciones correspondientes de la directiva 2006/42/CE inclusive sus modificaciones.
Expediente técnico (2006/42/CE) en: Robert Bosch GmbH, PT/ETM9,
70764 Leinfelden-Echterdingen, GERMANY
Henk Becker |
Helmut Heinzelmann |
Executive Vice President |
Head of Product Certification |
Engineering |
PT/ETM9 |
Robert Bosch GmbH, Power Tools Division
70764 Leinfelden-Echterdingen, GERMANY
Leinfelden, 16.12.2014
Bosch Power Tools |
1 609 92A 10F | (15.1.15) |

OBJ_BUCH-2328-002.book Page 30 Thursday, January 15, 2015 3:25 PM
30 | Español
Datos técnicos
Suplemento para taladrar |
|
Drill |
Nº de artículo |
|
1 600 A00 4ZB |
Peso, aprox. |
kg |
0,12 |
Par de giro máximo |
Nm |
1,7 |
Revoluciones máx. |
min-1 |
440 |
Ø máx. de tornillos |
mm |
4 |
Ø máx. de perforación |
mm |
5 |
Montaje
Antes de realizar cualquier trabajo en la atornilladora con suplemento para taladrar (p.ej. mantenimiento, etc.), así como al transportarla y guardarla, poner el selector de sentido de giro en la posición central. En caso contrario podría accidentarse al accionar fortuitamente el interruptor de conexión/desconexión.
Calar el suplemento para taladrar (ver figuras A1 – A2)
–Antes de montar el suplemento para taladrar 1, retire hacia delante el capuchón de goma 7 de la atornilladora.
–Luego cale el suplemento para taladrar 1 sobre la atornilladora.
El suplemento para taladrar se puede montar con el símbolo de candado del anillo de desenclavamiento 4 hacia arriba o desplazado en 45°. El suplemento para taladrar debe encastrar perceptiblemente.
Desmontaje (ver figuras B1–B2)
–Gire el anillo de desenclavamiento 4 en sentido de giro y retire hacia delante el suplemento para taladrar ().
–Seguidamente, vuelva a montar el capuchón de goma 7 en la atornilladora.
Montaje del útil (ver figura C)
–Empuje hacia delante el casquillo de enclavamiento 3 e inserte hasta el tope el útil en el alojamiento 2, y suelte entonces el casquillo 3 para retener el útil.
1 609 92A 10F | (15.1.15) |
Bosch Power Tools |
 Loading...