


 Loading...
Compact oven with microwave function CMG656R.1A
[en] Instruction manual
Table of contents
8 Intended use . . . . . . . . . . . . . . . . . . . . . . . . . . . . . 4
( Important safety information . . . . . . . . . . . . . . . 5
General information . . . . . . . . . . . . . . . . . . . . . . . . . . . 5 Microwave . . . . . . . . . . . . . . . . . . . . . . . . . . . . . . . . . . 6 Meat thermometer . . . . . . . . . . . . . . . . . . . . . . . . . . . . 7 Cleaning function . . . . . . . . . . . . . . . . . . . . . . . . . . . . . 7
] Causes of damage . . . . . . . . . . . . . . . . . . . . . . . . 7
General information . . . . . . . . . . . . . . . . . . . . . . . . . . . 7 Microwave . . . . . . . . . . . . . . . . . . . . . . . . . . . . . . . . . . 8
7 Environmental protection . . . . . . . . . . . . . . . . . . 8
Saving energy . . . . . . . . . . . . . . . . . . . . . . . . . . . . . . . 8 Environmentally-friendly disposal . . . . . . . . . . . . . . . . . 8
* Getting to know your appliance . . . . . . . . . . . . . 9
Control panel . . . . . . . . . . . . . . . . . . . . . . . . . . . . . . . . 9 Controls . . . . . . . . . . . . . . . . . . . . . . . . . . . . . . . . . . . . 9 Display . . . . . . . . . . . . . . . . . . . . . . . . . . . . . . . . . . . . 10 Operating modes . . . . . . . . . . . . . . . . . . . . . . . . . . . . 10 Types of heating. . . . . . . . . . . . . . . . . . . . . . . . . . . . . 11 Microwave . . . . . . . . . . . . . . . . . . . . . . . . . . . . . . . . . 12 Further information . . . . . . . . . . . . . . . . . . . . . . . . . . . 12 Cooking compartment functions . . . . . . . . . . . . . . . . 12
_ Accessories . . . . . . . . . . . . . . . . . . . . . . . . . . . . 13
Accessories included . . . . . . . . . . . . . . . . . . . . . . . . . 13 Inserting accessories . . . . . . . . . . . . . . . . . . . . . . . . . 13 Optional accessories . . . . . . . . . . . . . . . . . . . . . . . . . 14
K Before using for the first time. . . . . . . . . . . . . . 15
Initial use . . . . . . . . . . . . . . . . . . . . . . . . . . . . . . . . . . 15 Cleaning the cooking compartment and accessories 15
1 Operating the appliance . . . . . . . . . . . . . . . . . . 16
Switching the appliance on and off . . . . . . . . . . . . . . 16 Starting the operation. . . . . . . . . . . . . . . . . . . . . . . . . 16 Selecting an operating mode . . . . . . . . . . . . . . . . . . . 16 Setting the type of heating and temperature . . . . . . . 16 Rapid heating. . . . . . . . . . . . . . . . . . . . . . . . . . . . . . . 17
O Time-setting options . . . . . . . . . . . . . . . . . . . . . 17
Setting the cooking time . . . . . . . . . . . . . . . . . . . . . . 17 Setting the end time . . . . . . . . . . . . . . . . . . . . . . . . . . 18 Setting the timer . . . . . . . . . . . . . . . . . . . . . . . . . . . . . 19
^ Microwave . . . . . . . . . . . . . . . . . . . . . . . . . . . . . . 19
Cookware. . . . . . . . . . . . . . . . . . . . . . . . . . . . . . . . . . 19 Microwave power settings . . . . . . . . . . . . . . . . . . . . . 20 Setting the microwave . . . . . . . . . . . . . . . . . . . . . . . . 20 Setting MicroCombi . . . . . . . . . . . . . . . . . . . . . . . . . . 20 Drying. . . . . . . . . . . . . . . . . . . . . . . . . . . . . . . . . . . . . 21
en
@ Meat thermometer . . . . . . . . . . . . . . . . . . . . . . . 21
Heating types . . . . . . . . . . . . . . . . . . . . . . . . . . . . . . .21 Inserting the meat thermometer into the food. . . . . . .22 Setting the core temperature . . . . . . . . . . . . . . . . . . .22 Core temperatures of different foods . . . . . . . . . . . . .23
A Childproof lock. . . . . . . . . . . . . . . . . . . . . . . . . . 23
Activating and deactivating. . . . . . . . . . . . . . . . . . . . .23
Q Basic settings. . . . . . . . . . . . . . . . . . . . . . . . . . . 24
Changing the basic settings . . . . . . . . . . . . . . . . . . . .24 List of basic settings. . . . . . . . . . . . . . . . . . . . . . . . . .24 Power cut . . . . . . . . . . . . . . . . . . . . . . . . . . . . . . . . . .24 Changing the time . . . . . . . . . . . . . . . . . . . . . . . . . . .25
F Sabbath mode . . . . . . . . . . . . . . . . . . . . . . . . . . 25
Starting Sabbath mode. . . . . . . . . . . . . . . . . . . . . . . .25
D Cleaning agent . . . . . . . . . . . . . . . . . . . . . . . . . . 26
Suitable cleaning agents . . . . . . . . . . . . . . . . . . . . . .26 Surfaces in the cooking compartment . . . . . . . . . . . .27 Keeping the appliance clean . . . . . . . . . . . . . . . . . . .27
. Cleaning function. . . . . . . . . . . . . . . . . . . . . . . . 27
EcoClean Direct . . . . . . . . . . . . . . . . . . . . . . . . . . . . .27 Drying . . . . . . . . . . . . . . . . . . . . . . . . . . . . . . . . . . . . .28
p Rails. . . . . . . . . . . . . . . . . . . . . . . . . . . . . . . . . . . 29
Detaching and refitting the rails . . . . . . . . . . . . . . . . .29
q Appliance door . . . . . . . . . . . . . . . . . . . . . . . . . . 30
Removing the door cover . . . . . . . . . . . . . . . . . . . . . .30 Removing and fitting the door panels. . . . . . . . . . . . .30
3 Trouble shooting . . . . . . . . . . . . . . . . . . . . . . . . 32
Rectifying faults yourself . . . . . . . . . . . . . . . . . . . . . . .32 Maximum operating time . . . . . . . . . . . . . . . . . . . . . .32 Cooking compartment bulbs . . . . . . . . . . . . . . . . . . .32
4 Customer service . . . . . . . . . . . . . . . . . . . . . . . . 33
E number and FD number . . . . . . . . . . . . . . . . . . . . .33
P Dishes . . . . . . . . . . . . . . . . . . . . . . . . . . . . . . . . . 33
Information on the settings . . . . . . . . . . . . . . . . . . . . .33 Selecting a dish . . . . . . . . . . . . . . . . . . . . . . . . . . . . .34 Baking sensor . . . . . . . . . . . . . . . . . . . . . . . . . . . . . .34 Applying settings for dishes . . . . . . . . . . . . . . . . . . . .34
3

en Intended use
J Tested for you in our cooking studio . . . . . . . . 35
Do not use silicone moulds . . . . . . . . . . . . . . . . . . . .35 Cakes and small baked items . . . . . . . . . . . . . . . . . .35 Bread and rolls. . . . . . . . . . . . . . . . . . . . . . . . . . . . . .39 Pizza, quiche and savoury cakes . . . . . . . . . . . . . . . .40 Bakes and soufflés. . . . . . . . . . . . . . . . . . . . . . . . . . .42 Poultry . . . . . . . . . . . . . . . . . . . . . . . . . . . . . . . . . . . .43 Meat . . . . . . . . . . . . . . . . . . . . . . . . . . . . . . . . . . . . . .45 Fish . . . . . . . . . . . . . . . . . . . . . . . . . . . . . . . . . . . . . .48 Vegetables and side dishes . . . . . . . . . . . . . . . . . . . .50 Dessert. . . . . . . . . . . . . . . . . . . . . . . . . . . . . . . . . . . .52 Save energy with Eco heating types . . . . . . . . . . . . .53 Acrylamide in foodstuffs . . . . . . . . . . . . . . . . . . . . . . .54 Slow cook . . . . . . . . . . . . . . . . . . . . . . . . . . . . . . . . .55 Drying. . . . . . . . . . . . . . . . . . . . . . . . . . . . . . . . . . . . .56 Preserving . . . . . . . . . . . . . . . . . . . . . . . . . . . . . . . . .56 Prove dough. . . . . . . . . . . . . . . . . . . . . . . . . . . . . . . .57 Defrosting. . . . . . . . . . . . . . . . . . . . . . . . . . . . . . . . . .58 Heating food in a microwave . . . . . . . . . . . . . . . . . . .59 Keeping warm . . . . . . . . . . . . . . . . . . . . . . . . . . . . . .60 Test dishes. . . . . . . . . . . . . . . . . . . . . . . . . . . . . . . . .61
Additional information on products, accessories, replacement parts and services can be found at www.bosch-home.com and in the online shop
www.bosch-eshop.com
8Intended use
Read these instructions carefully. Only then will you be able to operate your appliance safely and correctly. Retain the instruction manual and installation instructions for future use or for subsequent owners.
This appliance is only intended to be fully fitted in a kitchen. Observe the special installation instructions.
Check the appliance for damage after unpacking it. Do not connect the appliance if it has been damaged in transport.
Only a licensed professional may connect appliances without plugs. Damage caused by incorrect connection is not covered under warranty.
This appliance is intended for domestic use only. The appliance must only be used for the preparation of food and drink. The appliance must be supervised during operation. Only use this appliance indoors.
This appliance is intended for use up to a maximum height of 2000 metres above sea level.
This appliance may be used by children over the age of 8 years old and by persons with reduced physical, sensory or mental capabilities or by persons with a lack of experience or knowledge if they are supervised or are instructed by a person responsible for their safety how to use the appliance safely and have understood the associated hazards.
Children must not play with, on, or around the appliance. Children must not clean the appliance or carry out general maintenance unless they are at least 8 years old and are being supervised.
Keep children below the age of 8 years old at a safe distance from the appliance and power cable.
Always slide accessories into the cooking compartment the right way round.
~ "Accessories" on page 13
4

(Important safety information
General information :Warning – Risk of fire!
■Combustible items stored in the cooking compartment may catch fire. Never store combustible items in the cooking compartment. Never open the appliance door if there is smoke inside. Switch off the appliance and unplug it from the mains or switch off the circuit breaker in the fuse box.
■A draught is created when the appliance door is opened. Greaseproof paper may come into contact with the heating element and catch fire. Do not place greaseproof paper loosely over accessories during preheating. Always weight down the greaseproof paper with a dish or a baking tin. Only cover the surface required with greaseproof paper. Greaseproof paper must not protrude over the accessories.
:Warning – Risk of burns!
■The appliance becomes very hot. Never touch the interior surfaces of the cooking compartment or the heating elements. Always allow the appliance to cool down. Keep children at a safe distance.
■Accessories and ovenware become very hot. Always use oven gloves to remove accessories or ovenware from the cooking compartment.
■Alcoholic vapours may catch fire in the hot cooking compartment. Never prepare food containing large quantities of drinks with a high alcohol content. Only use small quantities of drinks with a high alcohol content. Open the appliance door with care.
:Warning – Risk of scalding!
■The accessible parts become hot during operation. Never touch the hot parts. Keep children at a safe distance.
■When you open the appliance door, hot steam can escape. Steam may not be visible, depending on its temperature. When opening, do not stand too close to the appliance. Open the appliance door carefully. Keep children away.
■Water in a hot cooking compartment may create hot steam. Never pour water into the hot cooking compartment.
Important safety information |
en |
:Warning – Risk of injury!
■Scratched glass in the appliance door may develop into a crack. Do not use a glass scraper, sharp or abrasive cleaning aids or detergents.
■The hinges on the appliance door move when opening and closing the door, and you may be trapped. Keep your hands away from the hinges.
:Warning – Risk of electric shock!
■Incorrect repairs are dangerous. Repairs may only be carried out and damaged power cables replaced by one of our trained after-sales technicians. If the appliance is defective, unplug the appliance from the mains or switch off the circuit breaker in the fuse box. Contact the aftersales service.
■The cable insulation on electrical appliances may melt when touching hot parts of the appliance. Never bring electrical appliance cables into contact with hot parts of the appliance.
■Do not use any high-pressure cleaners or steam cleaners, which can result in an electric shock.
■A defective appliance may cause electric shock. Never switch on a defective appliance. Unplug the appliance from the mains or switch off the circuit breaker in the fuse box. Contact the after-sales service.
:Warning – Hazard due to magnetism!
Permanent magnets are used in the control panel or in the control elements. They may affect electronic implants, e.g. heart pacemakers or insulin pumps. Wearers of electronic implants must stay at least 10 cm away from the control panel.
5
en Important safety information
Microwave
:Warning – Risk of fire!
■Using the appliance for anything other than its intended purpose is dangerous and may cause damage.
The following is not permitted: drying out food or clothing, heating slippers, grain or cereal pillows, sponges, damp cleaning cloths or similar.
For example, heated slippers and grain or cereal pillows may catch fire, even several hours after they have been heated.The appliance must only be used for the preparation of food and drinks.
■Food may catch fire. Never heat food in heat-retaining packages.
Do not leave food heating unattended in containers made of plastic, paper or other combustible materials.
Do not select a microwave power or time setting that is higher than necessary. Follow the information provided in this instruction manual.
Never use the microwave to dry food. Never defrost or heat food with a low water content, e.g. bread, at too high a microwave power or for too long.
■Cooking oil may catch fire. Never use the microwave to heat cooking oil on its own.
:Warning – Risk of explosion!
Liquids and other food may explode when in containers that have been tightly sealed. Never heat liquids or other food in containers that have been tightly sealed.
:Warning – Risk of burns!
■Foods with peel or skin may burst or explode during, or even after, heating. Never cook eggs in their shells or reheat hard-boiled eggs. Never cook shellfish or crustaceans. Always prick the yolk when baking or poaching eggs. The skin of foods that have a peel or skin, such as apples, tomatoes, potatoes and sausages, may burst. Before heating, prick the peel or skin.
■Heat is not distributed evenly through baby food. Never heat baby food in closed containers. Always remove the lid or teat. Stir or shake well after the food has been heated. Check the temperature of the food before it is given to the child.
■Heated food gives off heat. The ovenware may become hot. Always use oven gloves to remove ovenware or accessories from the cooking compartment.
■Airtight packaging may burst when food is heated. Always observe the instructions on the packaging. Always use oven gloves to remove dishes from the cooking compartment.
:Warning – Risk of scalding!
There is a possibility of delayed boiling when a liquid is heated. This means that the liquid reaches boiling temperature without the usual steam bubbles rising to the surface. Even if the container only vibrates a little, the hot liquid may suddenly boil over and spatter. When heating, always place a spoon in the container. This will prevent delayed boiling.
:Warning – Risk of injury!
Unsuitable ovenware may crack. Porcelain or ceramic ovenware can have small perforations in the handles or lids. These perforations conceal a cavity below. Any moisture that penetrates this cavity could cause the ovenware to crack. Only use microwave-safe ovenware.
:Warning – Risk of electric shock!
The appliance is a high-voltage appliance. Never remove the casing.
:Warning – Risk of serious damage to
health!
■ The surface of the appliance may become
damaged if it is not cleaned properly. Microwave energy may escape. Clean the appliance on a regular basis, and remove any food residue immediately. Always keep the cooking compartment, door seal, door and door stop clean.
■Microwave energy may escape if the cooking compartment door or the door seal is damaged. Never use the appliance if the cooking compartment door, the door seal or the plastic door frame is damaged. Call the after-sales service.
■Microwave energy will escape from appliances that do not have any casing. Never remove the casing. For any maintenance or repair work, contact the after-sales service.
6

Meat thermometer
:Warning – Risk of electric shock!
The insulation of an incompatible meat thermometer may be damaged. Only use the meat thermometer which is recommended for this appliance.
Cleaning function
:Warning – Risk of burns!
; The appliance will become very hot on the outside during the cleaning function. Never touch the appliance door. Allow the appliance to cool down. Keep children away from the appliance.
Causes of damage |
en |
]Causes of damage
General information
Caution!
■Accessories, foil, greaseproof paper or ovenware on the cooking compartment floor: do not place accessories on the cooking compartment floor. Do not cover the cooking compartment floor with any sort of foil or greaseproof paper. Do not place ovenware on the cooking compartment floor if a temperature of over 50 ºC has been set. This will cause heat to accumulate. The baking and roasting times will no longer be correct and the enamel will be damaged.
■Aluminium foil: Aluminium foil in the cooking compartment must not come into contact with the door glass. This could cause permanent discolouration of the door glass.
■Silicone pans: Do not use any silicone pans, or any mats, covers or accessories that contain silicone. The oven sensor may be damaged.
■Water in a hot cooking compartment: do not pour water into the cooking compartment when it is hot. This will cause steam. The temperature change can cause damage to the enamel.
■Moisture in the cooking compartment: Over an extended period of time, moisture in the cooking compartment may lead to corrosion. Allow the cooking compartment to dry after use. Do not keep moist food in the closed cooking compartment for extended periods of time. Do not store food in the cooking compartment.
■Cooling with the appliance door open: Following operation at high temperatures, only allow the cooking compartment to cool down with the door closed. Do not trap anything in the appliance door. Even if the door is only left open a crack, the front of nearby furniture may become damaged over time. Only leave the cooking compartment to dry with the door open if a lot of moisture was produced whilst the oven was operating.
■Fruit juice: when baking particularly juicy fruit pies, do not pack the baking tray too generously. Fruit juice dripping from the baking tray leaves stains that cannot be removed. If possible, use the deeper universal pan.
■Extremely dirty seal: If the seal is very dirty, the appliance door will no longer close properly during operation. The fronts of adjacent units could be damaged. Always keep the seal clean.
■Appliance door as a seat, shelf or worktop: Do not sit on the appliance door, or place or hang anything on it. Do not place any cookware or accessories on the appliance door.
■Inserting accessories: depending on the appliance model, accessories can scratch the door panel when closing the appliance door. Always insert the accessories into the cooking compartment as far as they will go.
■Carrying the appliance: do not carry or hold the appliance by the door handle. The door handle cannot support the weight of the appliance and could break.
7

en Environmental protection
Microwave
Caution!
■Creation of sparks: Metal – e.g. a spoon in a glass – must be kept at least 2 cm from the cooking compartment walls and the inside of the door. Sparks can irreparably damage the glass on the inside of the door.
■Combining accessories: Do not combine the wire rack with the universal pan. Sparks may be created if they are inserted directly on top of one another. Only insert them into their own shelf level.
■Microwave only: The universal pan and baking tray are unsuitable when using the microwave only. If you use either of these, this may create sparks, which may damage the cooking compartment. Place cookware on the wire rack provided, or place it in the microwave and set a type of heating.
■Foil containers: Do not use foil containers in the appliance. They damage the appliance by producing sparks.
■Operating the microwave without food: Operating the appliance without food in the cooking compartment may lead to overloading. Never switch on the microwave unless there is food inside. The short crockery test is the exception to this rule.
~ "Microwave" on page 19
■Microwave popcorn: Never set the microwave output too high. Use a maximum microwave output of 600 watts. Always place the popcorn bag on a glass plate. The door panels may jump if overloaded.
7Environmental protection
Your new appliance is particularly energy-efficient. Here you can find tips on how to save even more energy when using the appliance, and how to dispose of your appliance properly.
Saving energy
■Only preheat the appliance if this is specified in the recipe or in the tables in the operating instructions.
■Use dark, black lacquered or enamelled baking tins. They absorb heat particularly well.
■Open the appliance door as infrequently as possible during operation.
■It is best to bake several cakes one after the other. The cooking compartment is still warm. This reduces the baking time for the second cake. You can place two cake tins next to each other in the cooking compartment.
■For longer cooking times, you can switch the appliance off 10 minutes before the end of the cooking time and use the residual heat to finish cooking.
Environmentally-friendly disposal
Dispose of packaging in an environmentally-friendly manner.
This appliance is labelled in accordance with European Directive 2012/19/EU concerning used electrical and electronic appliances (waste electrical and electronic equipment - WEEE). The guideline determines the framework for the return and recycling of used appliances as applicable throughout the EU.
8

Getting to know your appliance |
en |
*Getting to know your appliance
In this chapter, we will explain the displays and controls. You will also find out about the various functions of your appliance.
Note: Depending on the appliance model, individual details and colours may differ.
Control panel
In the control panel, you can use the various buttons, touch fields, touch-screen displays and the rotary selector to set the different appliance functions. The current settings are shown on the display.
The overview shows the control panel when the appliance is switched on with the menu display.
|
|
7\SH RI KHDWLQJ |
|
0LFUR&RPEL |
RQ |
0HQX |
7\SHV RI KHDWLQJ |
0DLQ |
|
|
|
|||
|
|
|
||
|
|
7\SH RI KHDWLQJ |
PHQX |
(QG |
|
|
$VVLVW |
2SWLRQV |
&OHDQLQJ |
|
|
|
|
|
RII |
|
7\SH RI KHDWLQJ |
P V |
%DVLF |
|
|
|||
|
|
0LFURZDYH |
|
VHWWLQJV |
|
|
|
|
VWDUW
VWRS
+ |
|
+ |
|
# |
|
( Buttons
The buttons on the leftand right-hand side of the control panel have a pressure point. Press these buttons to activate them.
For appliances that do not have a stainless steel front, these two button touch fields do not have a pressure point.
0Touch fields
There are sensors under the touch fields. Simply touch the respective symbol to select the function.
8Rotary selector
The rotary selector is fitted so that you can turn it indefinitely to the left or right. Press it lightly and move it in the direction required using your finger.
@Display
You can see the current adjustment values, options or notes in the display.
HTouch-screen displays
You can see the current selection options in the touch-screen displays. You can select these here directly by touching the appropriate text field. The text fields change depending on the selection.
Controls
The individual controls are adapted for the various functions of your appliance. You can set your appliance simply and directly.
Buttons and touch fields
Here you can find a short explanation of the various buttons and touch fields.
Symbol |
Meaning |
|
Buttons |
|
|
|
|
|
ÿ |
on/off |
Switching the appliance on and off |
l |
Start/Stop |
Starting, pausing or cancelling (hold down |
|
|
for approx. 3 secs) an operation |
Touch fields |
|
|
|
|
|
Menu |
Menu |
Opens the "Operating modes" menu |
t |
Timer |
Selects the timer |
° |
Information |
Displays information |
D |
Childproof lock |
Activating and deactivating (hold down for |
|
|
approx. 4 secs) the childproof lock |
|
|
|
Rotary selector
You can use the rotary selector to change the setting values shown on the display.
You can also use the rotary selector to scroll through the selection lists on the touch-screen displays.
In most selection lists, you have to turn the rotary selector in the opposite direction once you reach the beginning or the end of the list.
9

en Getting to know your appliance
Display
The display is structured so that the information can be read at a glance in any situation.
The value that you can currently set is highlighted in white text in the display. The value in the background is displayed in grey text.
Highlighted inforThe highlighted value can be changed immedi-
mation |
ately without first being selected. |
|
After starting an operation, either the temperature |
|
or level remains highlighted. The white line also |
|
serves as the heating line and gradually turns red. |
|
Note: When using the Microwave operating |
|
mode, the cooking time is highlighted. The heating |
|
line does not appear. |
|
|
Enlargement |
As long as you use the rotary selector to change |
|
the highlighted value, only this value will be dis- |
|
played larger. |
|
|
_ |
_ |
7H[W |
7H[W |
+HL]DUWHQ7 [WP V |
7H[W & |
a & |
7HPSH |
|
UDWXUH |
|
|
Display ring
The display ring can be found around the outside of the display.
If you change a value, the display ring shows you where you are in the selection list. Depending on the settings area and length of the selection list, the display ring may be continuous or divided into segments.
During operation, the display ring turns red at secondlong intervals. After every full minute, the segments turn red again from the beginning. As the cooking time counts down, one segment disappears every second.
Temperature display
After the operation has started, the current cooking compartment temperature is displayed graphically on the display.
Heating line |
The white line under the temperature turns red from |
|
left to right as the cooking compartment heats up. |
|
When you are preheating the appliance, the optimal |
|
time to place the food in the cooking compartment |
|
is when the line has completely turned red. |
|
For set levels, e.g. the grill setting, the heating line |
|
turns red immediately. |
Residual heat |
When the appliance is switched off, the display ring |
indicator |
shows the residual heat in the cooking compart- |
|
ment. As the residual heat cools down, the display |
|
ring becomes darker and disappears completely at |
|
some point. |
|
|
Note: Due to thermal inertia, the temperature displayed may be slightly different to the actual temperature inside the oven.
Touch-screen displays
The touch-screen displays are both a display medium and control element at the same time. They show the options that you can select for a function and the current setting. To select a function, simply touch the text field directly.
The function currently selected is identified by a red vertical bar next to it. Its corresponding value is highlighted in white on the display.
The small red arrow next to the text field shows the functions to which you can scroll forwards or backwards.
7HPSHUDWXUH
 7\SH RI KHDWLQJ' KRW DLU
Operating modes
Your appliance has various operating modes which make your appliance easier to use.
You can find more precise descriptions of these in the corresponding sections.
Operating mode |
Use |
Heating types |
There are various finely tuned heating |
~"Operating the appliance" |
types for the optimal preparation of |
on page 16 |
your food. |
Assist |
For many dishes, there are prepro- |
~"Dishes" on page 33 |
grammed setting values. |
Microwave |
You can use the microwave to cook, |
~"Microwave" on page 19 |
heat up or defrost your dishes more |
|
quickly. |
MicroCombi |
You can use the microwave combina- |
~"Microwave" on page 19 |
tion function to switch on the micro- |
|
wave and a type of heating. |
Cleaning |
There are several cleaning functions |
~"Cleaning function" |
available: EcoClean Direct and Drying. |
on page 27 |
|
Basic settings |
You can change your appliance's |
~"Basic settings" |
basic settings to suit your needs. |
on page 24 |
|
|
|
10
Getting to know your appliance |
en |
Types of heating
To enable you to find the correct type of heating for your dish, we have explained the differences and scopes of application here.
The symbols for each type of heating help you to remember them.
When cooking at very high temperatures, the appliance lowers the temperature slightly after an extended period.
Heating type |
Temperature |
Use |
|
< |
4D hot air |
30-275 °C |
For baking and roasting on one or more levels. |
|
|
|
The fan distributes heat from the ring heating element in the back panel evenly |
|
|
|
around the cooking compartment. |
% |
Top/bottom heating |
30-300 °C |
For traditional baking and roasting on one level. Especially suitable for cakes with |
|
|
moist toppings. |
|
|
|
|
Heat is emitted evenly from the top and bottom. |
. |
Hot air eco |
30-275 °C |
For energy-optimised cooking of selected dishes on one level without preheating. |
|
|
|
The fan distributes the energy-optimised heat from the ring heating element in the |
|
|
|
back wall evenly around the cooking compartment. |
# |
Top/bottom heating eco |
30-300 °C |
For energy-optimised cooking of selected dishes. |
|
|
|
Heat is emitted evenly from the top and bottom. |
7 |
Hot air grilling |
30-300 °C |
For roasting poultry, whole fish and larger pieces of meat. |
|
|
|
The grill element and the fan switch on and off alternately. The fan circulates the |
|
|
|
hot air around the food. |
( |
Grill, large area |
Grill settings: |
For grilling flat items for grilling, such as steaks and sausages, for making toast, |
|
|
1 = low |
and for cooking au gratin. |
|
|
2 = medium |
The whole area below the grill element becomes hot. |
|
|
3 = high |
|
* |
Grill, small area |
Grill settings: |
For grilling small amounts of steaks or sausages, for making toast, and for cook- |
|
|
1 = low |
ing au gratin. |
|
|
2 = medium |
The centre area under the grill heating element becomes hot. |
|
|
3 = high |
|
$ |
Pizza setting |
30-275 °C |
For preparing pizza and dishes which require a lot of heat from underneath. |
|
|
|
The bottom heating element and the ring heating element in the back panel heat |
|
|
|
up. |
. |
Slow cooking |
70-120 °C |
For gentle and slow cooking of seared, tender pieces of meat in ovenware without |
|
|
a lid. |
|
|
|
|
The heat is emitted evenly from the top and bottom at low temperatures. |
$ |
Bottom heating |
30-250 °C |
For cooking in a bain marie and for the final baking stage. |
|
|
|
The heat is emitted from below. |
O |
Keeping warm |
60-100 °C |
For keeping cooked food warm. |
|
|
|
|
P |
Preheating ovenware |
30-70 °C |
For preheating ovenware. |
|
|
|
|
Default values
For each heating type, the appliance specifies a default temperature or level. You can accept this value or change it in the appropriate area.
11

en Getting to know your appliance
Microwave
To ensure that you always use the correct microwave power setting, we have provided a general overview of what the different power settings can be used for below.
Microwave power setting |
Maximum cooking time |
Use |
90 watts |
1 hour 30 mins |
For defrosting delicate foods. |
180 watts |
1 hour 30 mins |
For defrosting and continued cooking. |
360 watts |
1 hour 30 mins |
For cooking meat and for heating delicate foods. |
600 watts |
1 hour 30 mins |
For heating and cooking food. |
1000 watts |
30 minutes |
For heating liquids. |
MicroCombi
Various types of heating can be combined with the Microwave operating mode. The appliance heats up and the microwave is switched on at the same time. As a result, the food is ready in a much shorter time.
Microwave power settings between 90 and 360 watts are suitable for this.
Further information
In most cases, the appliance provides notes and further information on the action just carried out.
Touch the ° field. The note is shown in the display for a few seconds. Use the rotary selector to scroll to the end of longer notes.
Some notes are displayed automatically, for example as confirmation, or to provide an instruction or warning.
Cooking compartment functions
The functions in the cooking compartment make your appliance easier to use. This, for example, enables the cooking compartment to be well lit and a cooling fan to prevent the appliance from overheating.
Opening the appliance door
If you open the appliance door during an operation, the operation is paused. The operation continues to run when you close the door.
Note: When using the Microwave operating mode, you must touch the l Start/Stop button once the door has been closed to resume the operation. You can change the basic setting for this. ~ "Basic settings"
on page 24
Interior lighting
When you open the appliance door, the interior lighting switches on. If the door remains open for longer than around 15 minutes, the lighting switches off again.
For most operating modes, the interior lighting switches on as soon as the operation is started. When the operation has finished, the lighting switches off.
Note: You can set the interior lighting not to come on during the operation in the basic settings. ~ "Basic settings" on page 24
Cooling fan
The cooling fan switches on and off as required. The hot air escapes above the door.
Caution!
Do not cover the ventilation slots. Otherwise, the appliance may overheat.
So that the cooking compartment cools down more quickly after the operation, the cooling fan continues to run for a certain period afterwards.
Note: You can change how long the cooling fan continues to run in the basic settings. ~ "Basic settings" on page 24
12
_Accessories
Your appliance is accompanied by a range of accessories. Here, you can find an overview of the accessories included and information on how to use them correctly.
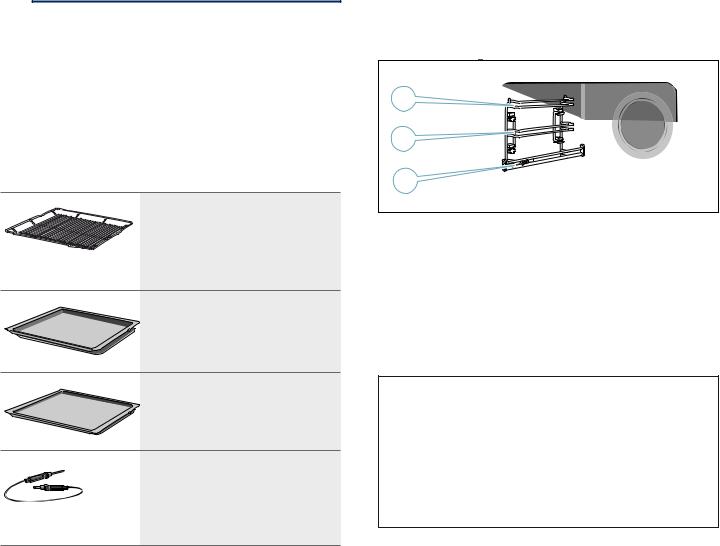
Accessories included
Your appliance is equipped with the following accessories:
Wire rack
For ovenware, cake tins and ovenproof dishes.
For roasts and grilled food.
The wire rack is suitable for use in the microwave.
Universal pan
For moist cakes, pastries, frozen meals and large roasts.
It can be used to catch dripping fat when you are grilling directly on the wire rack.
Baking tray
For tray bakes and small baked products.
Meat thermometer
Enables precision roasting to your exact requirements.
Its use is described in the relevant section. ~"Meat thermometer"
on page 21
Only use original accessories. They are specially adapted for your appliance.
You can buy accessories from the after-sales service, from specialist retailers or online.
Note: The accessories may deform when they become hot. This does not affect their function. Once they have cooled down again, they regain their original shape.
Microwave
Only the wire rack provided is suitable when using the microwave only. If you use the universal pan or the baking tray, this may create sparks, which may damage the cooking compartment.
When using the appliance in combination with the microwave or "Dishes" mode, you can use the universal pan, baking tray or any other accessories that have been included with the appliance.
Accessories en
Inserting accessories
The cooking compartment has three shelf positions. The shelf positions are counted from the bottom up.
|
|
|
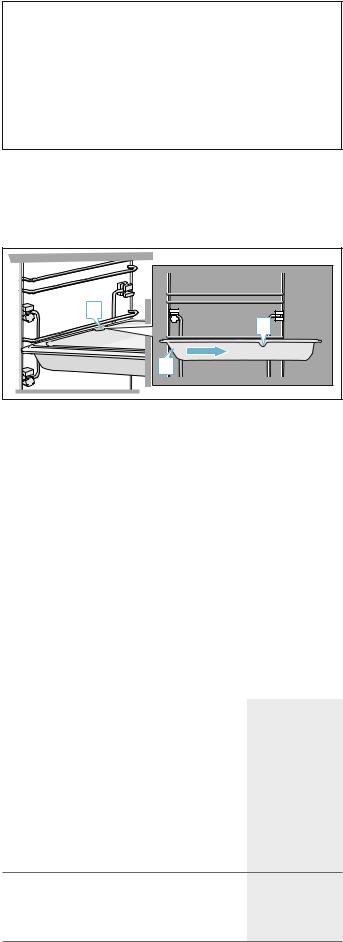
When using positions 2 and 3, always insert the accessory between the two guide rods for a shelf position.
The accessories can be pulled out approximately halfway without tipping. With the pull-out rails at level 1, you can pull the accessories out further.
Ensure that the accessory is placed behind the catch tappet ‚ on the pull-out rail.
Example in the picture: Universal pan
D |
The pull-out rails lock in place when they are fully pulled out. This makes it easy to place the accessories in position. To unlock, push the pull-out rails back into the cooking compartment with a certain amount of force.
Notes
■Ensure that you always insert the accessories into the cooking compartment the right way round.
■Always insert the accessories fully into the cooking compartment so that they do not touch the appliance door.
Locking function
The accessories can be pulled out approximately halfway until they lock in place. The locking function prevents the accessories from tilting when they are pulled out. The accessories must be inserted into the cooking compartment correctly for the tilt protection to work properly.
When inserting the wire rack, ensure that the catch tappet ‚ is at the rear and is facing downwards. The lettering "microwave" must be at the front and the outer rail must face downwards ¾.
13
en |
Accessories |
|
D |
|
D |
When inserting baking trays, ensure that the catch tappet ‚ is at the rear and is facing downwards. The sloping edge of the accessory ƒ must be facing forwards towards the appliance door.
Example in the picture: Universal pan
D |
D |
E |
Optional accessories
You can buy optional accessories from the after-sales service, from specialist retailers or online. *You will find a comprehensive range of products for your appliance in our brochures and online.
Both availability and whether it is possible to order online differ between countries. Please see your sales brochures for more details.
When purchasing, please always quote the exact order number of the optional accessory.
Note: Not all optional accessories are suitable for every appliance. When purchasing, please always quote the exact identification number (E-no.) of your appliance.
~ "Customer service" on page 33
Special accessories |
Order number |
Wire rack |
HEZ634080 |
For ovenware, cake tins and ovenproof dishes, |
|
and for roasts and grilled food. |
|
|
|
Universal pan |
HEZ632070 |
For moist cakes, pastries, frozen meals and large |
|
roasts. |
|
It can be used to catch dripping fat when you are |
|
grilling directly on the wire rack. |
|
|
|
Baking tray |
HEZ631070 |
For tray bakes and small baked products.
Wire insert |
HEZ324000 |
For meat, poultry and fish.
For inserting into the universal pan to catch dripping fat and meat juices.
Universal pan, non-stick |
HEZ632010 |
For moist cakes, pastries, frozen meals and large |
|
roasts. |
|
Pastries and roasts can be removed more easily |
|
from the universal pan. |
|
Baking tray, non-stick |
HEZ631010 |
For tray bakes and small baked products. |
|
The pastries can be removed more easily from the |
|
baking tray. |
|
Profi pan |
HEZ633070 |
For preparing large quantities. |
|
Lid for the Profi pan |
HEZ633001 |
The lid turns the Profi pan into a Profi roasting |
|
dish. |
|
Pizza tray |
HEZ617000 |
For pizzas and large round cakes. |
|
Grill tray |
HEZ625071 |
Use for grilling in place of the wire rack or as a |
|
splatter guard.Only use in the universal pan. |
|
Bread-baking stone |
HEZ327000 |
For home-made bread, bread rolls and pizzas that |
|
require a crispy base. |
|
The baking stone must be preheated to the rec- |
|
ommended temperature. |
|
Glass roasting dish (5.1 litres) |
HEZ915001 |
For stews and bakes. |
|
Particularly suitable for the "Meals" operating |
|
mode. |
|
Glass tray |
HEZ864000 |
For large roasts, moist cakes and bakes. |
|
Glass tray |
HEZ636000 |
For bakes, vegetable dishes and baked goods. |
|
Decorative trims |
HEZ660060 |
For concealing the lower shelf of the unit and the |
|
base of the appliance. |
|
|
|
14

KBefore using for the first time
Before you can use your new appliance, you must make some settings. You must also clean the cooking compartment and accessories.
Initial use
After connecting the appliance to the power or following a power cut, the settings for initial use are shown on the display. It may take a few seconds for the instruction to appear.
Note: You can change these settings at any time in the basic settings. ~ "Basic settings" on page 24
Setting the language
The language is the first setting displayed. "German" is the preset language.
1.Turn the rotary selector to set the required language.
2.Touch the next text field to confirm. The next setting appears.
Setting the time
The time starts at "12:00".
1.Touch the "Clock" text field.
2.Set the time using the rotary selector.
3.Touch the "Complete the settings" text field to confirm.
A message appears on the display to confirm that the initial use has been completed.
Cleaning the cooking compartment and accessories
Before using the appliance to prepare food for the first time, you must clean the cooking compartment and accessories.
Cleaning the cooking compartment
To remove the new-appliance smell, heat up the cooking compartment when empty and with the oven door closed.
Ensure that the cooking compartment does not contain any leftover packaging, such as polystyrene pellets. Before heating up the appliance, wipe the smooth surfaces in the cooking compartment with a soft, wet cloth. Keep the kitchen ventilated while the appliance is heating up.
Adjust the settings indicated. You can find out how to set the heating type and the temperature in the next section. ~ "Operating the appliance" on page 16
Settings |
|
Heating type |
Top/bottom heating % |
Temperature |
240 °C |
Cooking time |
1 hour |
|
|
Before using for the first time |
en |
Switch off the appliance after the indicated cooking time using the ÿ On/Off button.
After the cooking compartment has cooled down, clean the smooth surfaces with soapy water and a dish cloth.
Cleaning the accessories
Clean the accessories thoroughly using soapy water and a dish cloth or soft brush.
15

en Operating the appliance
1Operating the appliance
You have already learnt about the controls and how they work. Now we will explain how to set your appliance. You will learn about what happens when you switch the appliance on and off, and how to select the operating mode.
Switching the appliance on and off
Before you are able to set the appliance, you must switch it on.
Note: The childproof lock and the timer can also be set when the appliance is switched off. Certain displays and notes, such as those relating to the residual heat in the cooking compartment, remain visible on the display after the appliance has been switched off.
Switch off your appliance when you do not need to use it. If no settings are applied for a long time, the appliance switches itself off automatically.
Switching on the appliance
Press the ÿ On/Off button to switch on the appliance.
The Bosch logo appears on the display, followed by the selection list for the types of heating.
Note: In the basic settings, you can specify which operating mode should appear after the appliance is switched on. ~ "Basic settings" on page 24
Switching off the appliance
Press the ÿ On/Off button to switch off the appliance. Any functions that may be running are cancelled.
The time, or if applicable, the residual heat indicator, appears on the display.
Note: You can set whether or not the time should be displayed when the appliance is switched off in the basic settings. ~ "Basic settings" on page 24
Starting the operation
You must press the l Start/Stop button to start each operation.
After starting the appliance, the time display is shown on the display along with the settings. The display ring and the heating line also appear.
Pausing the operation
You can also interrupt and then continue an operation using the l Start/Stop button.
If you press and hold the l Start/Stop button for approx. 3 seconds, the operation is cancelled and all settings are reset.
Note: The fan may continue to run after an operation has been paused or cancelled.
Selecting an operating mode
Once the appliance is switched on, the default operating mode is displayed.
If you would like to select a different operating mode, you can do so using the menu. You can find detailed descriptions of the individual operating modes in the corresponding sections.
The following always applies:
1.Touch the appropriate text field. The function is highlighted.
2.Turn the rotary selector to change the highlighted selection.
3.If necessary, apply other settings.
To do this, touch the appropriate text field and change the value using the rotary selector.
4.Press the l Start/Stop button to start.
The appliance starts the operation.
Setting the type of heating and temperature
If the "Types of heating" operating mode has not been selected, touch the "Types of heating" text field in the menu. The selection list for the types of heating appears on the touch-screen displays.
Example in the picture: Hot air eco . at 195 °C.
1.Touch the text field with the required type of heating. If necessary, scroll though the selection list using the rotary selector.
7\SH RI KHDWLQJ |
|
7RS |
' KRW DLU |
|
ERWWRP KHDWLQJ (FR |
|
|
|
7\SH RI KHDWLQJ |
7\SHV RI KHDWLQJ |
(QG |
7RS ERWWRP KHDWLQJ |
2SWLRQV |
+RW DLU JULOOLQJ |
|
|
|
7\SH RI KHDWLQJ |
P V |
*ULOO |
+RW DLU HFR |
|
ODUJH DUHD |
|
|
The temperature is highlighted white.
2. Set the temperature using the rotary selector.
7\SH RI KHDWLQJ |
|
&RRNLQJ WLPH |
' KRW DLU |
|
+\GUR%DNLQJ |
+RW DLU HFR |
|
P V |
7\SH RI KHDWLQJ |
& |
(QG |
7HPSHUDWXUH |
7HPSH |
*ULOO ODUJH DUHD |
7RS ERWWRP KHDWLQJ |
|
|
7\SH RI KHDWLQJ |
UDWXUH |
5DSLG KHDWLQJ |
|
||
+RW DLU HFR |
|
*ULOO VPDOO DUHD |
7RS ERWWRP KHDWLQJ |
|
)RII |
3.Press the l Start/Stop button to start.
The time on the display shows how long the operation has already been running.
16

|
&RRNLQJ WLPH |
|
|
P V |
VWDUW |
|
|
|
7\SHV RI KHDWLQJ |
(QG |
|
P V |
|
|
a & |
|
|
P V |
5DSLG KHDWLQJ |
VWRS |
|
||
|
) |
|
The appliance begins to heat up.
When your dish is ready, switch off the appliance using the ÿ On/Off button.
Note: You can also set the cooking time and an end time for the operation on the appliance. ~ "Timesetting options" on page 17
Changing
After starting the appliance, the temperature is highlighted. When you move the rotary selector, the temperature is changed and applied immediately.
To change the type of heating, first use the l Start/Stop button to interrupt the operation and then touch the "Type of heating" text field. The selection list is displayed. Touch the required type of heating. The corresponding default temperature appears on the display.
Note: When you change the type of heating, the other settings are also reset.
Rapid heating
With Rapid heating, you can shorten the heat-up time for some heating types.
Heating types suitable for Rapid heating are:
■< 4D hot air
■% Top/bottom heating
To ensure an even cooking result, do not place your food in the cooking compartment until Rapid heating is complete.
Applying settings
Ensure you have selected a suitable type of heating and set a temperature of at least 100 °C. Otherwise, rapid heating cannot be activated.
1.Set the type of heating and temperature.
2.Touch the "Rapid heating" text field.
"On" is displayed in the text field. A confirmation message appears on the display.
When rapid heating comes to an end, an audible signal sounds and a message appears on the display. "Off" is displayed in the text field. Place your dish in the cooking compartment.
Note: The "Cooking time" time-setting option starts at the same time as rapid heating. Therefore, only set a cooking time when rapid heating has come to an end.
Cancelling
To cancel the rapid heating, touch the "Rapid heating" text field again. "Off" is displayed in the text field.
Time-setting options |
en |
OTime-setting options
Your appliance has different time-setting options.
Time-setting option |
Use |
|
q |
Cooking time |
After the set cooking time has elapsed, the |
|
|
appliance ends the operation automatically. |
r |
End |
Enter a cooking time and the required end |
|
|
time. The appliance starts automatically so |
|
|
that the operation ends at the required time. |
t |
Timer |
The timer functions like an egg timer. It runs |
|
|
independently of the operation and the other |
|
|
time-setting options. After the set time has |
|
|
elapsed, the appliance does not switch on or |
|
|
off automatically. |
|
|
|
You can call up the cooking time and the end time after setting an operation using the touch-screen displays. The timer has a separate field t and can be adjusted at any time.
An audible signal sounds after a cooking time or timed period has elapsed. You can cancel the audible signal early by touching a field or touch-screen display.
Note: You can change how long the audible signal sounds for in the basic settings. ~ "Basic settings" on page 24
Setting the cooking time
You can set the cooking time for your dish on the appliance. This means that the cooking time is not unintentionally exceeded and you do not need to interrupt other work in order to end the operation.
Applying settings
Depending on which direction you turn the rotary selector first, the cooking time starts at a particular default value: Left = 10 minutes, right = 30 minutes.
The cooking time can be set in one-minute increments up to one hour, and then in five-minute increments.
The maximum setting is 23 hours and 59 minutes.
Example in the picture: It is 10:00, cooking time of 45 minutes.
1.Set the operating mode, and temperature or level.
2.Before starting the operation, touch the "Cooking time" text field.
The cooking time is highlighted white in the display.
3.Turn the rotary selector to set the cooking time. The end time is calculated automatically.
7\SH RI KHDWLQJ |
|
7RS ERWWRP KHDWLQJ |
|
' KRW DLU |
|
&RRNLQJ WLPH |
|
+RW DLU HFR |
& |
(FR |
|
7HPSHUDWXUH |
(QG |
||
7\SHVPRI KHDWLQJ |
|||
7RS ERWWRP KHDWLQJ |
&RRNLQJ WLPH |
+RW DLU JULOOLQJ |
|
& |
|
||
7\SH RI KHDWLQJ |
P V |
5DSLG SUHKHDWLQJ |
|
+RW DLU HFR |
|
*ULOO ODUJH DUHD |
|
7RS ERWWRP KHDWLQJ |
|
RII |
17

en Time-setting options
4.Press the l Start/Stop button to start. The cooking time counts down.
|
&RRNLQJ WLPH |
|
|
P V |
VWDUW |
|
|
|
7\SHV RI KHDWLQJ |
(QG |
|
P V |
|
|
a & |
|
|
P V |
5DSLG SUHKHDWLQJ |
VWRS |
|
The appliance begins to heat up.
Once the cooking time has elapsed, an audible signal sounds. The appliance stops heating. The cooking time 00 m 00 s is shown on the display.
You can reset the cooking time using the "Cooking time" text field or you can press the l Start/Stop button to continue the operation without a cooking time.
When your dish is ready, switch the appliance off using the ÿ On/Off button.
Changing and cancelling
To change the cooking time, touch the "Cooking time" text field. The cooking time is highlighted, and can be changed using the rotary selector. The change is adopted immediately.
If you want to cancel the cooking time, reset the cooking time to zero. After the change has been adopted, operating continues without a cooking time.
Setting the end time
You can delay the time that the cooking time ends. You can, for example, put your dish in the cooking compartment in the morning and set the cooking time so that it is ready at lunch time.
Notes
■Ensure that food is not left in the cooking compartment for too long as it may spoil.
■Do not adjust the end time once the operation has started. The cooking result would no longer be satisfactory.
Applying settings
The end of the cooking time can be delayed by a maximum of 23 hours and 59 minutes.
Example in the picture: It is 10:00, the set cooking time is 45 minutes and the dish should be ready at 12:00.
1.Set the operating mode, and temperature or level.
2.Set the cooking time.
3.Before starting the operation, touch the "End" text field.
The projected end time is highlighted white in the display.
4.Set a later end time using the rotary selector.
7\SH RI KHDWLQJ |
|
&RRNLQJ WLPH |
|
' KRW DLU |
|
&RRNLQJ WLPH |
|
+RW DLU HFR |
|
P V |
|
7HPSHUDWXUH |
(QG |
||
|
& |
|
|
7RS ERWWRP KHDWLQJ |
7\SHV RI KHDWLQJ |
(QG |
|
(QG |
|||
& |
|
||
7\SH RI KHDWLQJ |
P V |
5DSLG SUHKHDWLQJ |
|
+RW DLU HFR |
|
*ULOO ODUJH DUHD |
|
7RS ERWWRP KHDWLQJ |
|
RII |
5.Press the l Start/Stop button to start.
The time at which the appliance will start is shown in the display.
|
&RRNLQJ WLPH |
|
|
P V |
VWDUW |
|
|
|
7\SHV RI KHDWLQJ |
(QG |
|
|
|
|
6WDUW |
|
|
P V |
5DSLG SUHKHDWLQJ |
VWRS |
|
The appliance is in standby mode. When the appliance starts, the cooking time counts down on the display.
Once the cooking time has elapsed, an audible signal sounds. The appliance stops heating. The cooking time 00 m 00 s is shown on the display.
You can reset the cooking time using the "Cooking time" text field or you can press the l Start/Stop button to continue the operation without a cooking time.
When your dish is ready, switch the appliance off using the ÿ On/Off button.
Changing and cancelling
After starting the appliance, the end time can no longer be changed.
If you want to cancel the cooking time and end time, interrupt the operation by pressing the l Start/Stop button. You can continue the operation without a cooking time or end time.
18

Setting the timer
The timer runs alongside other settings. You can set it at any time, even if the appliance is switched off. It has its own audible signal so that you can tell whether it is the timer or a cooking time which has elapsed.
Adjusting settings
The timer duration always starts at zero minutes.
The higher the value, the greater the time steps when setting the timer.
The maximum setting is 24 hours.
1.Touch the t field.
The symbol lights up red. On the display, the timer duration is shown in white and in focus.
2.Set the timer duration using the rotary selector.
3.Press the t field to start.
Note: After a few seconds, the timer also starts automatically.
The timer duration counts down.
The timer remains visible on the display if the appliance is switched off. When an operation is running, the settings for this operation are shown in the foreground. When you touch the t field, the timer duration is displayed for a few seconds.
When the timer duration comes to an end, an audible signal sounds and a note appears on the display. The symbol is no longer lit up.
Tip: If the set timer duration relates to the appliance operation, use the cooking time. The time is visible in the foreground and the appliance switches off automatically.
Changing and cancelling
To change the timer duration, touch the t field. The timer duration is displayed in white and in focus, and can be changed by using the rotary selector.
If you want to cancel the timer, reset the timer duration to zero. Once the change has been applied, the symbol is no longer lit up.
Microwave en
^Microwave
You can use the microwave to cook, heat up or defrost food quickly. The microwave can be used on its own, or in combination with a type of heating.
To ensure optimum use of the microwave, please observe the notes on cookware and familiarise yourself with the data in the application tables at the end of the instruction manual.
Cookware
Not all cookware is suitable for microwaves. To ensure that your food is heated and the appliance is not damaged, only use cookware that is suitable for microwaves.
Heat-resistant cookware made of glass, glass ceramic, porcelain or heat-resistant plastic is suitable. These materials allow microwaves to pass through. You can also use ceramic if it has been fully glazed and has no cracks.
You can also use serving dishes. This saves you having to transfer food from one dish to another. You should only use cookware with decorative gold or silver trim if the manufacturer guarantees that they are suitable for use in microwaves.
To bake in combined operation, you can use ordinary metal baking tins. This means that the cake is also browned from below.
Metal dishes are not suitable for other applications. Metal does not allow microwaves to pass through. Food in covered metal containers will remain cold.
Caution!
Creation of sparks: Metal (e.g. a spoon in a glass) must be kept at least 2 cm from the cooking compartment walls and the inside of the door. Sparks may irreparably damage the glass on the inside of the door.
Cookware test
Never switch on the microwave unless there is food inside. The short cookware test is the only exception to this rule.
Perform the following test if you are unsure whether your cookware is suitable for use in the microwave.
1.Heat the empty cookware at maximum power for ½ to 1 minute.
2.Check the temperature of the cookware during this time.
The cookware should remain cold or warm to the touch.
The cookware is unsuitable if it becomes hot or sparks are generated.
In this case, stop the test.
19
en Microwave
:Warning – Risk of burns!
The accessible parts become very hot when in operation. Never touch hot parts. Keep children at a safe distance.
Accessories included
Only the wire rack provided is suitable when using the microwave only. If you use the universal pan or the baking tray, this may create sparks, which may damage the cooking compartment.
When using the appliance in combination with the microwave or "Dishes" mode, you can use the universal pan, baking tray or any other accessories that have been included with the appliance.
When using the microwave, it is best to insert accessories at level 1, unless otherwise specified.
Microwave power settings
A variety of microwave power settings that are suitable for different types of food and food preparation are available.
In order to operate the microwave, a cooking time must always be provided. You can either apply the default cooking time or adjust it in the display.
Power |
Use |
Maximum cook- |
setting |
|
ing time |
90 W |
For defrosting delicate foods |
1 hr 30 mins |
180 W |
For defrosting and continued cooking |
1 hr 30 mins |
360 W |
For cooking meat and for heating deli- |
1 hr 30 mins |
|
cate foods |
|
600 W |
For heating and cooking food |
1 hr 30 mins |
1000 W |
For heating liquids |
30 mins |
|
|
|
Setting the microwave
Before setting the microwave, observe the information regarding suitable ovenware.
1.Touch the Menu field.
The list of operating modes is displayed.
2.Touch the "Microwave" text field.
3.Touch the text field for the required microwave power setting.
The cooking time is highlighted in white in the display.
4.Turn the rotary selector to set the cooking time.
5.Press the l Start/Stop button to start.
The cooking time counts down in the display. The heating line does not appear when using the microwave operating mode.
The appliance starts.
Once the cooking time has elapsed, an audible signal sounds. The appliance finishes the operation. The cooking time 00 m 00 s is shown in the display.
When your dish is ready, use the ÿ On/Off button to switch off the appliance.
Changing and cancelling
After starting the appliance, the cooking time remains highlighted. When you move the rotary selector, the cooking time is changed and applied immediately.
Use the l Start/Stop button to pause the operation in order to change the microwave power setting. Touch the text field for the required power setting and use the l Start/Stop button to resume the operation. The cooking time is maintained.
If you want to cancel the microwave operating mode, use the l Start/Stop button to pause the operation and select another operating mode.
Setting MicroCombi
With some types of heating, it is possible to switch on the microwave.
Suitable types of heating include:
■< 4D hot air
■% Top/bottom heating
■7 Hot air grilling
■( Grill, large area
■* Grill, small area
The 90-watt, 180-watt and 360-watt microwave power settings can be used with MicroCombi.
Before setting MicroCombi, observe the information regarding suitable ovenware.
1.Touch the Menu field.
The list of operating modes is displayed.
2.Touch the "MicroCombi" text field.
3.Touch the text field for the required type of heating.
4.Touch the text field for the required microwave power setting.
The temperature or level is highlighted in white in the display.
5.Turn the rotary selector to set the temperature or level.
6.Touch the "Cooking time" text field.
The cooking time is highlighted in white in the display.
7.Turn the rotary selector to set the cooking time.
8.Press the l Start/Stop button to start.
The cooking time counts down in the display.
The appliance starts.
Once the cooking time has elapsed, an audible signal sounds. The appliance finishes the operation. The cooking time 00 m 00 s is shown in the display.
When your dish is ready, use the ÿ On/Off button to switch off the appliance.
Changing and cancelling
After starting the appliance, the temperature remains highlighted. When you move the rotary selector, the temperature and/or level is changed and applied immediately.
Change the cooking time by touching the "Cooking time" text field and turning the rotary selector. The change is applied immediately.
20
Loading...