


IMPORTANT: |
IMPORTANT : |
IMPORTANTE: |
Read Before Using |
Lire avant usage |
Leer antes de usar |
|
|
|
Operating/Safety Instructions
Consignes de fonctionnement/sécurité
Instrucciones de funcionamiento y seguridad
CET3-10
CET4-20
CET4-20W
|
|
|
|
|
|
|
|
|
|
|
|
Call Toll Free for |
Pour obtenir des informations |
Llame gratis para |
|||
Consumer Information |
et les adresses de nos centres |
obtener información |
|||
& Service Locations: |
de service après-vente, |
para el consumidor y |
|||
|
|
|
|
appelez ce numéro gratuit |
ubicaciones de servicio |
|
|
|
|
||
1-877-BOSCH99 (1-877-267-2499) www.boschtools.com |
|||||
For English Version |
Version française |
Versión en español |
|||
See page 2 |
Voir page 17 |
Ver la página 32 |
|||
|
|
|
|
|
|
-E/F/S-1906091

General Safety Rules
All users and employers/owners must read and understand all instructions in this manual before
 DANGER operating or maintaining this compressor. Failure to follow all instructions listed below may result in electric shock, fire, serious personal injury or death.
SAVE THESE INSTRUCTIONS
Work Area
Keep your work area clean and well lit. Cluttered benches and dark areas increase the risks of accidents, electric shock, fire, and injury to persons.
Do not operate compressor in explosive atmospheres, such as in the presence of flammable liquids, gases, or dust. Keep work area well ventilated. Always locate the compressor at least 20 ft. (6.1 m) away from work area if spraying flammable materials. DO NOT SMOKE if spraying flammable materials. The compressor is able to create sparks which may ignite the dust or fumes. Never use the compressor in sites containing lacquer, paint, benzene, thinner, gasoline, gases, adhesive agents, and other materials which are combustible or explosive. A longer hose may be required.
Always operate the compressor in a well ventilated area. Follow all safety instructions and use a respirator as directed in the safety instructions provided with the material to be sprayed. Some sprayed materials such as paint, paint solvents, paint remover, insecticides, weed killers, etc contain harmful vapors and poisons.
Keep bystanders, children, and visitors away while operating a compressor. Do not allow children to operate compressor. Distractions may cause loss of control of the tools which may cause injury to bystanders.
Never engage in horseplay with the compressor.
Respect the compressor as a working implement.
Always operate the compressor from a stable secure position. Never operate the compressor from a roof or table. Use additional air hose to allow tools to reach high locations.
Equip the work area with a suitable fire extinguisher.
Personal Safety
Do not remove, tamper with, or otherwise cause the tool operating controls to become disabled or inoperable. This will cause the tool to work irregularly and may result in the risk of injury.
Dress properly. Do not wear loose clothing or jewelry. Contain long hair. Keep your hair, clothing, and gloves away from moving parts. Loose clothes, jewelry, or long hair can be caught in moving parts
and increases the risk of injury.
Always wear eye and ear protection when using this tool. Use additional personal protective equipment as appropriate when operating this tool. Operators and others in work area must wear safety glasses. Prolonged exposure to high intensity noise is able to cause hearing loss. Dust mask, non-skid safety shoes, hard hat and other personal protective equipment, must be used for appropriate conditions.
Do not operate the compressor unless you are familiar with controls. Users unfamiliar with controls may operate compressor in an unsafe manner, injuring themselves or others.
Keep handles and controls dry, clean and free from oil and grease. Slippery hands cannot safely control the tool.
Stay alert. Watch what you are doing, and use common sense when operating a compressor. Do not use compressor while tired or under the influence of drugs, alcohol, or medication. A moment of inattention while operating the compressor may result in serious personal injury.
Do not direct air stream at people or animals. High pressure air can propel dust and debris at high speed. Compressed air from a compressor can contain water, oil, metal particles or other contaminants which can cause serious injury.
Do not use compressed air for breathing or respiration. Never inhale air directly from compressor orfrombreathingapparatusconnectedtocompressor.
Compressed air stream may contain carbon monoxide, toxic vapors or solid particles from air tank which if inhaled could cause serious injury or death.
Use care when touching exposed metal surfaces of compressor. Many components such as compressor head, engine/motor, and tubing will remain hot even after the air compressor has been shut down. Allow compressor to cool before moving or attempting maintenance.
Do not stand on compressor. Keep proper footing and balance at all times. Proper footing and balance enable better control of tools in unexpected situations.
Make sure air hose is free of snags and obstructions. Do not attach an air hose or tool to your body.
2

Entangled or snarled hoses can cause a loss of balance or footing in addition to unintentional tool operation. Attach the hose to the structure to reduce the risk of loss of balance if the hose shifts.
Do not abuse the air hose. Protect all hoses from kinks, restrictions, solvents or sharp objects. Keep air hose away from heat, oil, sharp edges or moving parts.
Replace damaged hoses immediately. Damaged hoses can burst or whip around work area.
Only use hoses with a minimum rating of 200 PSI. Use of hoses with a high pressure rating reduce the risk of injury from a hose bursting.
Firmly grasp hose in hand when installing hoses. If hose is not held firmly or correctly installed, hose may whip and injure personnel in the operating area.
Use care when lifting and carrying the compressor.
Some compressors are too heavy to be lifted by one person. Get assistance before attempting to lift a compressor to reduce the risk of injury.
Whenmovingorloadingawheeledcompressorensure that the compressor is always on a level surface. If the compressor is placed on a sloped surface, it may move unexpectedly and result in personal injury.
This product contains chemicals, including lead, known to the State of California to cause birth defects and other reproductive harm. Wash hands after using.
Tool Use and Care
Use this compressor and all accessories in accordance with the instructions. Compressor and accessories must be used for the purpose for which they are designed. Use of the compressor for operations other than what is described in this manual can result in a hazardous situation.
Use only accessories that are recommended by BOSCH for your particular model. Accessories that may be recommended for a particular model tool may not be suitable on other model tools and may result in personal injury.
Before each use, inspect all fittings, hoses, pipes, connections of the compressor. Do not operate if any portion of the compressor is loose, missing, damaged, malfunctioning, disconnected or altered. Never use a compressor that appears damaged or is operating abnormally. If the compressor appears to be operating unusually and/or making strange noises, stop using it immediately and contact your local BOSCH service center. There is a risk of bursting if the compressor is damaged.
Before each use inspect compressor for signs of leaks or damage. If leaks are found in the compressor pump, air tanks or tubing, replace compressor immediately.
Never attempt repair leaks, weld or make modifications to the air tank or other fluid confining parts as there is a risk of bursting.
Do not attempt to operate this air compressor without first verifying the oil level in the crankcase. This compressor is shipped with oil in the crankcase.
Serious damage of the compressor can result from even momentary operation without proper lubrication.
Never operate the compressor without the safety valve. Verify operation of the safety valve on a daily basis. Do not use the safety valve for complete tank drainage. The safety valve is designed to relieve tank pressure to reduce the risk of bursting.
Never operate compressor without all guards and other safety features in place and performing intended function. If maintenance or servicing requires removal of guard or safety feature, be sure to replace the guard or safety feature before resuming operation of the compressor. Replace damaged guards or safety features immediately.
Never touch moving parts. Do not place any part of your body near compressor moving parts. Do not reach around guards to reduce the risk of injury.
Do not operate compressor without the air filter.
Filters prevent large particles from entering the air stream and damaging compressor internal components.
Do not allow particulates such as sawdust to fall into crankcase when crankcase is open for inspection.
Particulates in oil may reduce compressor life.
Do not use a detergent oil in crankcase. Detergent oils will leave deposits on internal compressor components reducing compressor life and components.
Do not use compressor for unattended operation.
Always remain in area when compressor is operating and turn off compressor when not in use to reduce the risk of fire.
Never place objects on top or next to compressor.
Locate compressor at least 12 in. (30 cm) away from all obstructions. Restricting any of the compressor’s ventilation openings can cause overheating and could cause a fire.
Do not operate the compressor with any power source other than that specified in the tool operating/safety instructions. Use of alternative power sources may result in malfunctions of the compressor and the power source which may lead to serious injury of you or others in your surroundings.
Follow all recommendations for sizes of hoses, fittings
3

and other compressed air accessories. Improperly sized fitting or components may result in the risk of injury or property damage
Nevermovethecompressorbypullingonahose. The compressor, air fittings and the air hose may become damaged and burst.
Check air supply lines for restrictions before adjusting tool. Air volume is as important as air pressure.
Restricted air flow will prevent the tools from operating as designed.
Never exceed the maximum allowable pressure rating marked on tools and attachments. Do not use compressor to inflate low pressure objects such as toys. Exceeding the maximum recommended pressure of tools and attachments can cause them to burst. The correct pressure is the lowest pressure that will do the job.
Drain condensate from air tanks daily with drain valve.
Draining water from the air compressor reduces the risk of air tank corrosion. Corroded air tanks increase the risk of bursting.
Stop the compressor, drain air tanks and allow it to cool before making adjustments, moving the compressor, leaving the work area, performing maintenance or storing the compressor. Such precautionary safety measures reduce a risk of injury.
Do not modify this compressor or operate compressor at pressures or speeds greater than designed. Any alteration or modification is a misuse and may result in a dangerous condition such as fire or bursting.
When transporting compressor, keep level and place on a protective mat. Do not place compressor on its side. Such precautions reduce the risk of fire or danger to personnel from oil fumes.
Service
Maintenance performed by unauthorized personnel may result in misplacing of the internal components which could cause serious hazard. We recommend that all compressor service be performed by a BOSCH factory service center or authorized BOSCH service station.
Develop a periodic maintenance schedule for your tool. When cleaning a compressor be careful not to disassemble any portion of the tool since internal components may be misplaced or safety components may be improperly mounted. Certain cleaning agents such as gasoline, carbon tetrachloride, ammonia, etc. may damage plastic parts and o-rings.
When servicing the compressor, use only recommended BOSCH replacement parts. Follow instructions in the Maintenance section of this manual. Use of unauthorized parts or failure to follow
Maintenance Instructions can cause a risk of injury.
Replace missing or damaged warning labels. Refer to schematic for correct placement and part number.
Maintain compressor with care. Keep the compressor clean and lubricated. Properly maintained tools are less likely to break and cause injury. Any alteration or modification is a misuse and may result in a dangerous condition. Clean the tool at least daily and lubricate as required.
When not in use, store the compressor out of reach of children and other personnel unfamiliar with compressor operation. When not in use, the tool should be disconnected and stored in a dry place. Vent the air tank. Keep out of reach of children. Lock the storage area. Compressor can be dangerous in the hands of users unfamiliar with its operation.
4

Safety Rules for Electric Compressors
Power cord plugs must match the outlet. Never modify the plug in any way. Do not use any adapter plugs with earthed (grounded) power tools. Unmodified plugs and matching outlets will reduce risk of electric shock.
Avoid body contact with earthed or grounded surfaces such as pipes, radiators, ranges and refrigerators. There is an increased risk of electric shock if your body is earthed or grounded.
Do not abuse the cord. Never use the cord for carrying, pulling or unplugging the power tool. Keep cord away from heat, oil, sharp edges or moving parts. Replace damaged cord immediately. Damaged or entangled cords increase the risk of electric shock.
Do not expose this compressor to rain. Do not use in damp or wet locations. Moisture increases the risk of electric shock with this equipment.
Do not touch plug with wet hands. Moisture increases the risk of electric shock with this equipment.
Keep all electrical connections dry and off the ground. Do not allow electrical connections to lay in water or in such a position where water could come into contact with cord and connection. Moisture increases the risk of electric shock with this equipment.
When operating a power tool outdoors, use an extension cord suitable for outdoor use and with correct amperage capacity. Use of a cord rated for outdoor use reduces the risk of electric shock.
Always disconnect compressor from power supply, vent air tanks, and allow compressor to cool before servicing. Compressors with automatic pressure controls can restart at any time.
Always turn off the motor when not in use and before moving compressor. Stopping the motor prevents unintentional starting of the compressor.
Some dust created by power sanding, sawing, grinding, drilling, and other construction activities contains chemicals known to cause cancer, birth defects or other reproductive harm. Some examples of these chemicals are:
•Lead from lead-based paints,
•Crystalline silica from bricks and cement and other masonry products, and
•Arsenic and chromium from chemically treated lumber.
Your risk from these exposures varies, depending on how often you do this type of work. To reduce your exposure to these chemicals: work in a well ventilated area, and work with approved safety equipment, such as those dust masks that are specially designed to filter out microscopic particles.
SAVE THESE INSTRUCTIONS
5

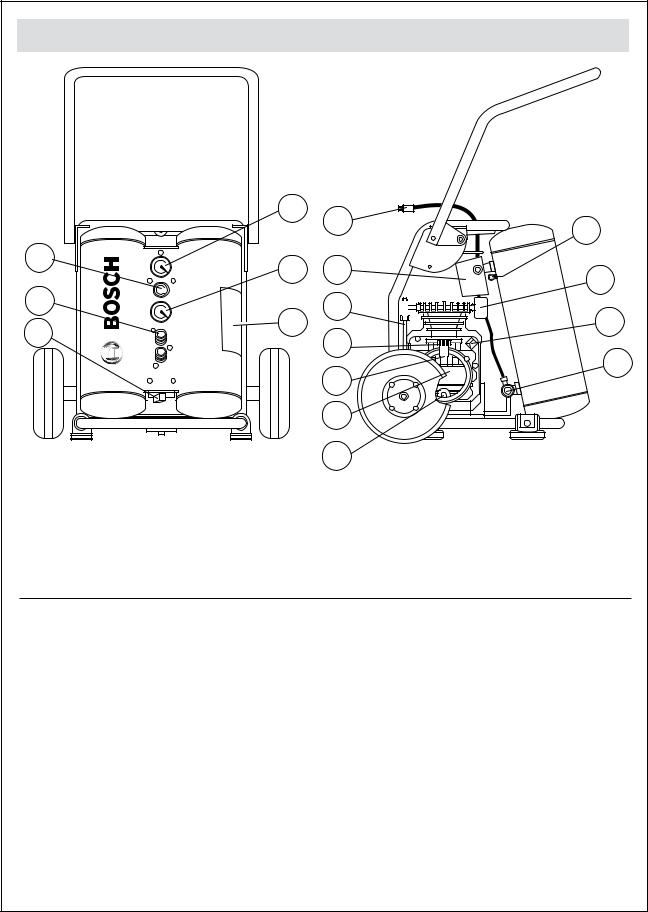
Functional Description and Specifications
14 
16
17
Specifications: CET3-10
Product Size: |
16” x 18” x 16.25” |
Weight: |
57.3 lbs. |
HP: |
1 |
CFM @ 100 psi: |
2.6 |
RPM: |
1700 |
11 |
12 |
|
2 |
3 |
|
13 |
||
9 |
6 |
|
15 |
|
|
4 |
10 |
|
1 |
||
|
||
7 |
|
|
5 |
|
|
8 |
|
|
dBA: |
72 |
|
Recovery Time: |
14 seconds |
|
Motor: |
4-Pole Induction |
|
Drive Type: |
Direct |
|
Maintenance: |
Oil |
|
11 |
12 |
|
|
2 |
9 |
|
|
13 |
||
14 |
3 |
|
|
|
6 |
||
16 |
15 |
|
|
4 |
10 |
||
|
|||
|
1 |
||
|
|
||
|
7 |
|
|
17 |
5 |
|
|
|
8 |
|
Specifications: CET4-20 |
|
|
|
Product Size: |
16.25” x 17.75” x 19.75” |
dBA: |
80 |
Weight: |
72.7 lbs. |
Recovery Time: |
12 sec. |
HP: |
2 |
Motor: |
2-Pole Induction |
CFM @ 100 psi: |
4.2 |
Drive Type: |
Direct |
RPM: |
3400 |
Maintenance: |
Oil |
6
Functional Description and Specifications
|
13 |
11 |
|
|
|
12 |
|
|
|
|
|
14 |
15 |
2 |
|
|
9 |
||
|
|
|
|
16 |
|
3 |
|
|
1 |
6 |
|
17 |
|
||
|
4 |
|
|
|
|
|
|
|
|
7 |
10 |
|
|
|
|
|
|
5 |
|
|
|
8 |
|
Specifications: CET4-20W |
|
|
|
Product Size: |
22” x 21.5” x 19.75” |
dBA: |
80 |
|
(handle down) |
Recovery Time: |
10 sec. |
Weight: |
84.9 lbs. |
Motor: |
2-Pole Induction |
HP: |
2 |
Drive Type: |
Direct |
CFM @ 100 psi: |
4.9 |
Maintenance: |
Oil |
RPM: |
3400 |
|
|
1. |
Warning Label |
10. |
Check Valve |
2. |
Pressure Switch |
11. |
Electric Power Cord |
3. |
Pump Discharge Line |
12. |
Safety Release Valve |
4. |
Oil Dipstick |
13. |
Pressure Gauge - Tank Psi |
5. |
Air Compressor Pump |
14. |
Pressure Regulator |
6. |
Thermal Overload |
15. |
Pressure Gauge - Outlet Psi |
7. |
Pump Oil Fill Port |
16. |
Outlet Fittings |
8. |
Pump Oil Drain |
17. |
Tank Drain Valve |
9. |
Air Filter |
|
|
7
Assembly / Installation
Lubrication and Oil
CAUTION Do not attempt to operate this air compressor without first verifying the oil level in the crankcase. This compressor is
shipped with oil in the crankcase. Serious damage of the compressor can result from even momentary operation without proper lubrication.
Prior to each use, verify the crankcase oil level. An oil sight gauge with minimum and maximum oil level marks is provided with this compressor.
Always verify that the oil level is at the maximum mark in the oil sight gauge before operating this unit. Do not operate the pump with an inadequate or excessive amount of oil. The cost of failures which occur due to incorrect oil levels will not be covered under warranty.
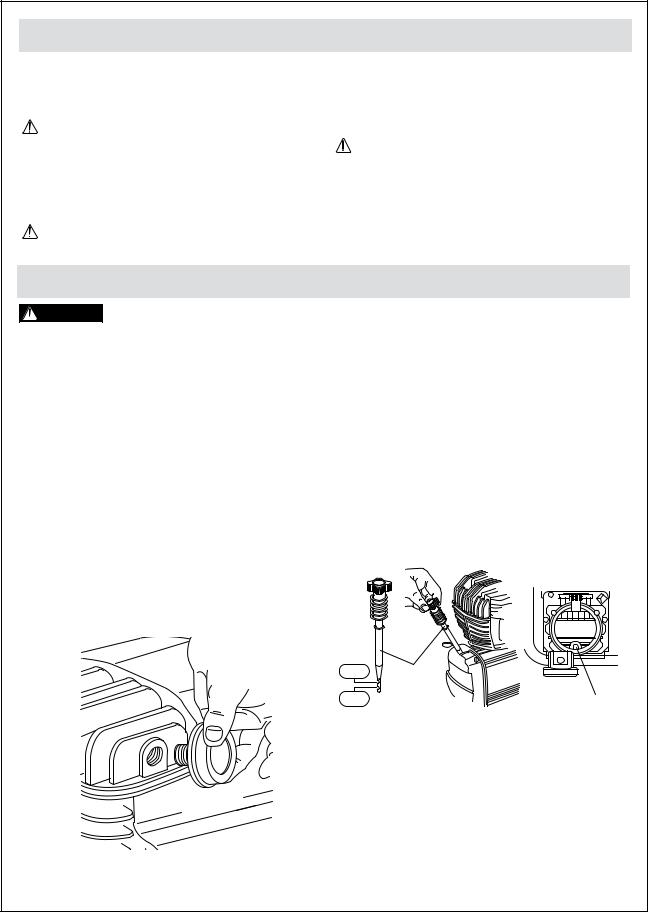
To check the oil level: (see Fig. 1)
1.Place unit on a level surface.
2.Remove dipstick, wipe with a clean rag, replace in crankcase, then remove dipstick to inspect oil level.
3.If oil level is low, add as required, but do not exceed maximum oil level.
MAX
MIN
Fig. 1
CAUTION Do not allow particulates such as sawdusttofallintocrankcasewhen
crank case is open for inspection. Particulates in oil may reduce compressor life.
CAUTION Do not use a detergent oil in crankcase. Detergent oils will leave
deposits on internal compressor components reducing compressor life and performance.
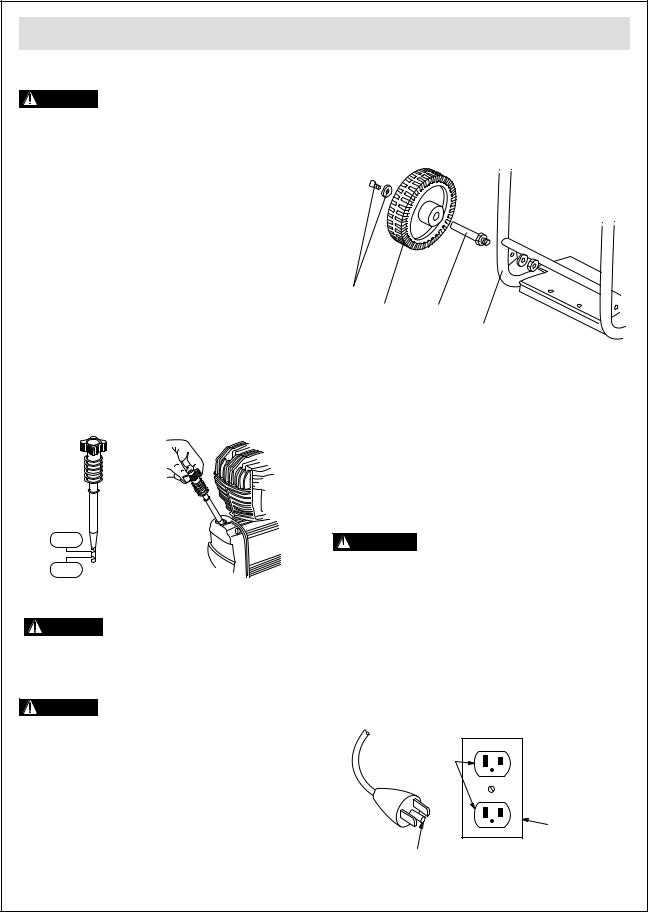
DIRECTIONS FOR INSTALLING WHEELS
(CET4-20W ONLY See Fig. 2)
1.Take wheel spindle (A) and thread into wheel bracket (B), which is welded to compressor frame. Tighten spindle with wrench to secure to frame.
2.Slide wheel onto wheel spindle. Inflation stem for wheelassemblyshouldfacetowardthecompressor
frame.
3.Place screw through washer (D) and thread screw into end of wheel spindle (C). Tighten screw to secure to spindle.
4.Repeat these steps for second wheel.
(D)
(C)(A)
(B)
Fig. 2
Grounding
This product must be grounded. In the event of an electrical short circuit, grounding reduces the risk of electric shock by providing an escape wire for the electric current. This product is equipped with a cord having a grounding wire with an appropriate grounding plug. The plug must be inserted into an outlet that is properly installed and grounded in accordance with all local codes and ordinances (see
Fig. 3).
WARNING Improper installation of the
 grounding plug is able to result in a risk of electric shock. When repair or replacement
of the cord or plug is required, do not connect the grounding wire to either flat blade terminal. The wire with insulation having an outer surface that is green with or without yellow stripes is the grounding wire.
Check with a qualified electrician or serviceman
when the grounding instructions are not completely understood, or when in doubt as to whether the product is properly grounded. Do not modify the plug provided; if it does not fit the outlet, have the proper outlet installed by a qualified electrician.
GROUNDED
OUTLET
GROUNDED
OUTLET BOX
GROUNDING
PIN
Fig. 3
8
Assembly / Installation
This product is for use on a nominal 120-V circuit and has a grounding plug similar to the plug illustrated on page 8. Only connect the product to an outlet having the same configuration as the plug. Do not use an adapter with this product.
Extension Cords
Use only a 3-wire extension cord that has a 3-blade grounding plug, and a 3-slot receptacle that accepts the plug on the product. Make sure your extension cord is not damaged. When using an extension cord, be sure to use one heavy enough to carry the current your product draws.
|
Extension Cord Table |
|
0 – 25 ft |
|
25 – 50 ft. |
14 ga. |
|
12 ga. |
Recommended Sizes of Extension Cords
The maximum recommend cord length is 50 feet with a 12 gauge cord rating.
Preparation for Use
WARNING Use this compressor and all accessories in accordance with the instructions. Compressor and accessories
must be used for the purpose for which they are designed. Use of the compressor for operations other than what is described in this manual can result in a hazardous situation.
ELECTRIC MOTOR
Initial Set-Up – Break-in Procedure
Before first use of this air compressor or after the compressor pump/motor has been replaced, perform the following:
1. Ensure the power switch is in the OFF position.
This air compressor has an integrated power and pressure switch. When the power is ON the pressure switch will automatically start the compressor motor any time the tank pressure drops below the factory set cut-in pressure and stop the motor when the tank pressure stops at the factory set cut-out pressure.
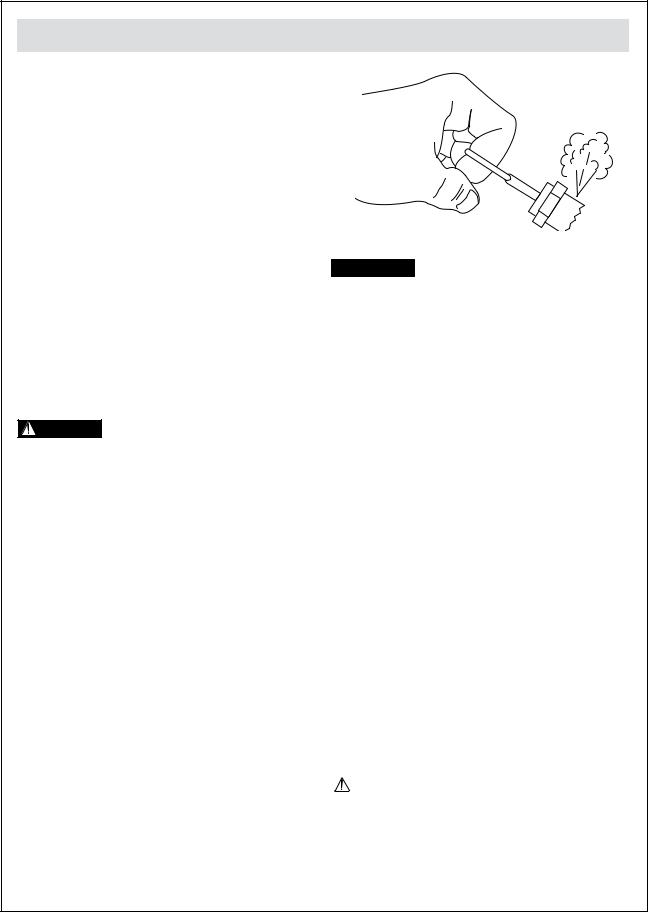
2.Ensuresafetyvalveisfunctioningproperlybypulling on the valve ring and allow the valve to reset (see Fig. 4).
The safety valve is designed to protect against high pressure by releasing high pressure air from the air tank when its factory set pressure (slightly higher than the pressure switch cut-out setting) is exceeded.

 WARNING
conditions,
immediately. Send your compressor for service. If the safety release valve is venting the tanks the pressure switch may need factory adjustment.
3.Plug the power cord into the correct branch circuit receptacle.
See the “Grounding Section” for more information on the correct receptacle.
4.Open the drain valve to permit air to escape the tank and prevent air pressure build up during the break-in period.
The drain valve is located on the control panel and is used to drain condensation from the tanks at the end of each use. Tank pressure is used to expel the water.
5.Move the power switch to the ON position. The compressor will start.
6.Run the compressor for 20 minutes.
7.After 20 minutes, close the drain valve. The tank will fill to cut-out pressure and the compressor motor will stop.
8.Move the power switch to the OFF position and unplug the compressor.
9.Pull the safety valve and allow to vent until tank pressure is under 20 psi.
10.Open the drain valve to permit air to escape the tank and to drain any moisture or particles from tank. When tank is empty, close drain.
11.Compressor is now ready for first use.
|
Change the crankcase oil after the |
|
CAUTION |
||
first 50 hours of operation and as |
||
|
recommended in the maintenance section of this manual. Failure to change oil according to
maintenance schedule will reduce compressor life and performance.
9
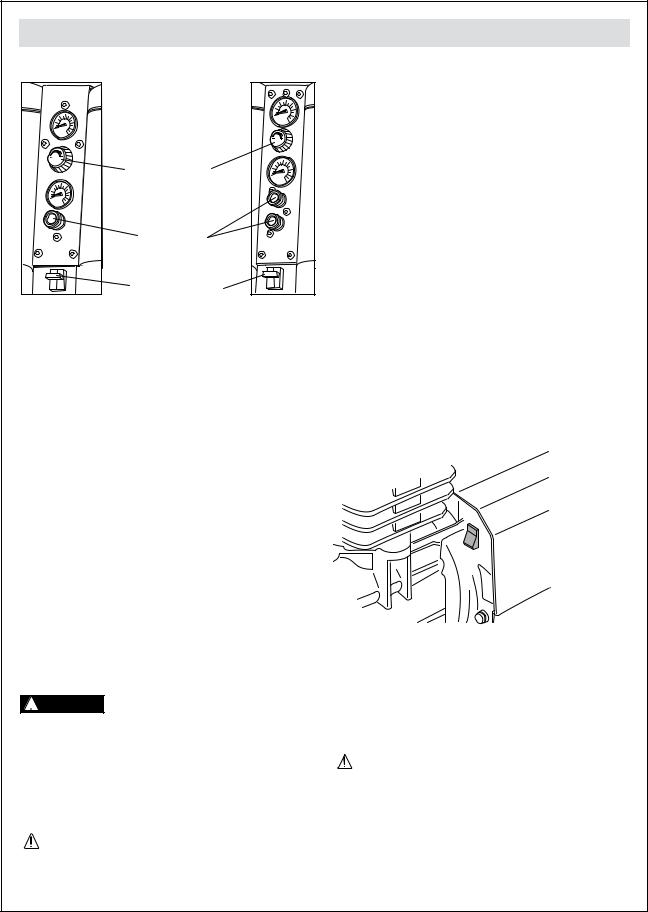
Operation
Starting the compressor
|
Regulator (C) |
|
1/4” Outlet |
|
fittings (B) |
|
Drain Valve (A) |
CET3-10 |
CET4-20 and |
|
CET4-20W |
|
Fig. 5 |
1.Position compressor on a flat surface or one with an inclination of 10° or less, in a well ventilated area away from vapors.
2.Ensure all covers and labels are in place, legible (for labels) and securely mounted. Do not use compressor until all items have been verified.
3.Ensure the power switch is in the OFF position.
4.Plug the power cord into the correct branch circuit receptacle. See the “Grounding Section” for more information on the correct receptacle.
5.Ensure drain valve is closed in the horizontal position (A).
The drain valve is located at the base of the control panel and is used to drain condensation from the tanks at the end of each use. Tank pressure is used to expel the water.
6.Ensuresafetyvalveisfunctioningproperlybypulling on the valve ring and allow the valve to reset.
 WARNING If the safety valve vents under normal operating conditions, stop
using the compressor immediately and send your compressor for service. If the safety valve is venting the tanks the pressure switch may need factory adjustment.
7. Check pump oil level.
|
Do not operate without oil or with |
|
CAUTION |
||
inadequate oil. Low oil levels may |
||
|
damage the compressor pump.
8.Attach hoses to compressor (B).
9.TurnthepowertoON,andverifythatthecompressor is functioning. Adjust the air pressure the desired level for the accessory as described in adjusting regulator (C). Verify that the compressor motor stops when cut out pressure is reached.
Motor Thermal Cut Out
The thermal protector operates to stop the motor when a problem such as a motor overload, etc. occurs. If the motor should stop during operation, proceed as follows:
1.Turn the pressure switch lever to the OFF position and disconnect the plug from the receptacle.
2.If the extension cord does not conform to the specifications given on page 9, replace with an extensioncordsuchasthatshownonpage9.Ifthe capacityofthepowersupplyisinsufficient,increase
the power supply capacity to remove the cause of a flow of excessive current (over-current).
3.Waitapproximately5minutes,thenpressthereset switch (A) of the thermal protector (see Fig. 6).
 Reset
Reset
Switch (A)
Fig. 6
4.Start the compressor. If the motor still stops during operation, please contact the service center.
|
Hot Surfaces |
|
Use care when touching exposed |
WARNING |
|
|
metal surfaces of compressor. |
Many components such as compressor head, engine/motor, and tubing will remain hot even after the air compressor has been shut down. Allow compressor to cool before moving or attempting maintenance.
10
Operation
Adjusting regulator
This compressor is provided with an internal regulator that controls the output pressure of two female quick connect couplers. Regulated pressure will be equal to or less than tank pressure depending on user setting.
Regulator (A)
Pressure
(B)
Fig. 7
To adjust regulated pressure (see Fig. 7):
1.Pull regulator knob out (A).
2.To increase pressure, turn clockwise.
3.To decrease pressure, turn counter clockwise.
4.When desired pressure is set, push regulator knob in to lock pressure.
5.Regulated pressure gauge is displayed as (B).
Connecting Air Supply
WARNING Firmly grasp the hose in hand when installing hoses. If hose is
not held firmly or correctly installed hose may whip and injure personnel in the operating area.
Installing Hoses (See Fig. 8):
1.Grasp the hose at the quick connect plug and push the plug into the quick connect body. Coupler will snap into place.
2.Grasp the hose and pull to ensure coupler is seated.
Fig. 8
Operating Temperatures
Operating temperatures are between 32°F and 104°F (0°C and 40°C). If operating outside recommended temperatures, unit may have difficulity starting and will cause additional wear on components.
WARNING Disconnect the compressor from the power source, drain air tanks and allow it to cool before making adjustments,
moving the compressor, leaving the work area, performing maintenance or storing the compressor. Such precautionary safety measures
reduce the risk of injury.
Shutting down the compressor
1.Move On/Off switch to the OFF position.
2.Turn regulator until outlet pressure gauge reads 0 psi.
3.Remove hose and assembly. See disconnecting air supply below.
4.Drainairfromtheairtanksbyreleasingairbypulling the safety release valve.
5.Oncetheairtankpressureisunder20psi,openthe drain valve on the control panel to drain moisture from the tanks (See draining tanks on page 12).
6.Allow the compressor to cool down before storing.
Disconnecting Air Supply
Disconnecting Hoses (See Fig. 8)
1.Ensure regulated pressure gauge reads 0 psi (0 kPa).
2.Pull coupler on quick connect body back to release quick connect plug on hose.
11
operation
|
Draining Tanks |
1. Place the compressor on a level surface. |
|
|
Ensure that the compressor is on |
WARNING |
|
|
a level surface. If compressor is not |
level, water will not drain from tanks causing corrosion, which may cause the tanks to burst.
2.Ifpressureisgreaterthan20psi,usesafetyrelease valve to reduce tank pressure.
|
Do not |
open drain |
valve with |
WARNING |
|||
|
pressure |
greater than |
20 psi in |
tanks. Such precautionary measures reduce the risk of injury.
3.Ensurethatnopersonnelareinthedraindischarge area in front of compressor.
|
Do not direct air stream at people |
WARNING |
|
|
or animals. High pressure air can |
propel dust and debris at high speed. Compressor air from the compressor can contain water, oil, metal particles, or other contaminants which can cause serious injury.
4.Turn drain valve on control panel 90° counterclockwise. When empty, close valve.
Maintenance
WARNING Maintenance performed by
 unauthorized personnel may result in misplacing of the internal components which could cause serious hazard. We recommend that all compressor service be performed by a BOSCH factory service center or authorized BOSCH service station.
Your air compressor requires periodic maintenance according to the maintenance schedule outlined on the next page, in order to keep your compressor in peak condition.
Use a soapy water solution to inspect compressor for leaks. If leaks are found in the compressor pump, air tanks or tubing, replace compressor immediately. Never attempt repair leaks, weld or make modifications to the air tank or other fluid confining parts as there is a risk of bursting.
To check the air filter, unscrew the air filter from the compressor and visually inspect. If the filter appears to be clogged, replace the filter. After inspection screw the air filter back on the compressor (See Fig. 9).
Service
CHANGING OIL (See Fig. 10):
1.Make sure the pump is cool to avoid burn risk.
2.Take out the oil dipstick (A).
3.Prepare a suitable container to capture the oil from the crankcase.
4.Remove crankcase drain plug (B) and allow used oil to drain in the container.
5.Replace drain plug.
6.Return oil to recycling center or dispose of in accordance with local regulations.
7.Refill crankcase with fresh oil. Fill oil until it reads to maximum level of oil dipstick.
8.Replace oil dipstick (A).
MAX (A)
MIN |
(B) |
Fig. 10
Contact your BOSCH service center for instructions and user replaceable parts. For all other repairs contact your BOSCH service center.
Fig. 9
12

Maintenance
Cleaning
WARNING When cleaning a compressor be careful not to disassemble any portion of the tool since internal components
may be misplaced or safety components may be improperly mounted.
Certain cleaning agents such as gasoline, carbon tetrachloride, ammonia, etc. may damage plastic parts and o-rings.
Periodically clean the compressor tool with soapy water and a damp cloth.
Storage
When not in use, the compressor should be disconnected and stored in a warm and dry place.
Coil the electric cord and place within frame for protection.
WARNING When not in use, store the compressor out of reach of children and other personnel unfamiliar with
compressor operation. Lock the storage area. Compressor can be dangerous in the hands of users unfamiliar with its operation.
Loading/unloading
|
Use care when lifting and carrying |
||
WARNING |
|||
|
the |
compressor. |
Some |
compressors are too heavy to be lifted by one person. Get assistance before attempting to liff compressor to reduce the risk of injury.
If unit is operated in an excessively dirty or dusty area, increase the frequency of all scheduled maintenance items.
Recommendation |
Daily |
Weekly |
Every 200 hours |
Check for proper oil level(s) and oil leaks |
X |
|
|
Drain moisture from tanks daily or after each use |
X |
|
|
Ensure all safety guards are correctly and securely attached |
X |
|
|
Clean the cooling surfaces of the compressor |
|
X |
|
Inspect air intake filter |
|
X |
|
|
|
|
|
Check safety valves by pulling on rings |
|
X |
|
Check system for air leaks |
|
X |
|
Change pump oil |
|
|
X |
Replace air filter |
|
|
X |
13

Trouble shooting
This section provides a list of the more frequently encountered malfunctions, their causes and corrective actions. The operator or maintenance personnel can perform some corrective actions, and others may require the assistance of a qualified Bosch technician or your dealer.
PROBLEM |
SYMPTOMS |
RESOLUTION |
||
|
|
|
|
|
Excessive air tank |
• |
Pressure switch does not |
• |
Set the On/Off switch to Off, if the unit |
pressure – safety |
|
shut of motor when com- |
|
does not shut off contact a Bosch fac- |
valve pops off |
|
pressor reaches cut-out |
|
tory service center or a Bosch authorized |
|
|
pressure |
|
service center |
|
• |
Pressure switch cut-out |
• |
Contact a Bosch factory service center or |
|
|
too high |
|
a Bosch authorized service center |
|
|
|
|
|
Air leaks |
• |
Tube fittings are not tight |
• |
Tighten fittings where air can be heard |
|
|
enough |
|
escaping. Check fittings with soapy water |
|
|
|
|
solution. Do not overtighten. |
Air leaks in air tank or |
• |
Defective air tank |
• |
Air tank must be replaced. Do not repair |
at air tank welds |
|
|
|
the leak |
|
|
|
• Warning: Risk of bursting. Do not drill |
|
|
|
|
|
into, weld or otherwise modify air tank or |
|
|
|
|
it will weaken. The air tank can rupture or |
|
|
|
|
explode. |
Air leaks between |
• |
Leaking seals |
• |
Contact a Bosch factory service center or |
head and valve plate |
|
|
|
a Bosch authorized service center |
Air leaks from safety |
• |
Defective safety valve |
• |
Operate safety valve manually by pull- |
valve |
|
|
|
ing on ring. If valve still leaks, it must be |
|
|
|
|
replaced. |
Knocking noise |
• |
Defective safety valve |
• |
Operate safety valve manually by pull- |
|
|
|
|
ing on ring. If valve still leaks, it must be |
|
• |
Pump oil is low |
|
replaced. |
|
• |
Add no-detergent oil to pump. |
||
|
• |
Carbon build-up in pump |
• |
Contact a Bosch factory service center or |
|
|
|
|
a Bosch authorized service center |
Pressure reading on |
• |
Regulator is not adjusted |
• |
It is normal for some pressure drop to |
the regulated pressure |
|
correctly for accessory |
|
occur when an accessory is used, adjust |
gauge drops when an |
|
being used |
|
the regulator. |
accessory is used |
|
|
• |
Note: Adjust the regulated pressure |
|
|
|
|
under flow conditions while accessory is |
|
|
|
|
being used. |
14

Trouble shooting
Compressor is not |
• |
Prolonged excessive use of |
• |
Decrease amount of air usage. |
supplying enough |
|
air |
• |
Check the accessory air requirement. If |
air to operate |
• |
Compressor is not large |
|
it is higher than the SCFM or pressure |
accessories |
|
enough for accessory |
|
supplied by your air compressor, a larger |
|
|
|
|
compressor is needed to operate acces- |
|
|
|
|
sory. |
|
• |
Hole in air hose |
• |
Replace air hose. |
|
• |
Check valve restricted |
• |
Remove, clean or replace |
|
• |
Air leaks |
• |
Tighten fittings. |
|
• |
Restricted air intake filter |
• |
Clean or replace air intake filter. |
|
|
|
|
|
Regulator knob |
• |
Regulator is damaged |
• |
Replace. |
has continuous air |
|
|
|
|
leak |
|
|
|
|
|
|
|
|
|
Regulator will not |
• |
Regulator is damaged |
• |
Replace. |
shut off air outlet |
|
|
|
|
Moisture in pump |
• |
Unit operating in damp or |
• |
Move unit to a dry well-ventilated area. |
crankcase |
|
humid conditions |
|
|
|
• |
Detergent type oil being used |
• |
Drain oil and refill with non detergent oil. |
|
|
in pump |
|
|
15
 Loading...