


Radio CD SD/MMC |
MP3 |
Bremen MP76 |
7 646 829 310 |
Operating and installation instructions Mode d’emploi et de montage Instrucciones de manejo e instalación Instruções de serviço e de montagem Инструкция по эксплуатации и установке
http://www.blaupunkt.com

2
1 |
3 |
4 |
5 |
6 |
7 |
13 |
12 |
11 |
10 |
9 |
8 |
14
2

|
|
|
|
Controls |
|
1 Button to switch the device on and off |
: AUDIO button for setting bass, tre- |
||||
|
Muting the device |
ble, balance, fader and X-BASS (short |
|||
2 Volume control |
press) |
||||
Calling up DSA Max equalizer (long |
|||||
3 |
|
|
button to unlock the detachable |
||
|
|
press) |
|||
|
control panel |
; Display |
|||
4 NEXT button to display additional pag- |
|||||
< SOURCE button to start the CD or CD |
|||||
|
es of a menu |
changer playback or Compact Drive |
|||
|
Changing the memory bank in radio |
||||
|
MP3 (only if connected) or to start the |
||||
|
mode |
||||
|
radio mode |
||||
5 Softkeys, the function of the softkeys |
|||||
or |
|||||
|
is dependent upon the respective con- |
Playback of an external audio source |
|||
|
tent of the display |
(only if connected) |
|||
6 DIS•ESC button to change the display |
= TUNER button for direct selection of |
||||
|
and exit menus |
radio mode |
|||
7 |
|
button to open the foldable and de- |
Calling up the radio function menu |
||
|
|||||
|
tachable control panel |
(only possible in radio mode) |
|||
8 Joystick and OK button |
> Slot for MMC/SD |
||||
9 MENU button to call up the menu for |
|
||||
the basic settings (short press) Switching demo mode on/off (long press)
ENGLISH
3

Contents
Notes and accessories........................ |
6 |
International telephone information.... |
6 |
Road safety..................................... |
6 |
Safety note ..................................... |
6 |
Installation...................................... |
6 |
Accessory....................................... |
7 |
Optional equipment (not part of the |
|
scope of delivery) ............................ |
7 |
Activating/deactivating demo mode.... |
7 |
Theft protection ................................ |
7 |
Detachable control panel .................. |
7 |
Detaching the control panel............... |
7 |
Attaching the control panel................ |
8 |
Switching on/off................................ |
8 |
Switching on/off using button 1 ..... |
8 |
Switching on/off using the vehicle igni- |
|
tion................................................ |
8 |
Volume ............................................. |
9 |
Setting the power-on volume ............. |
9 |
Risk of injury! .................................. |
9 |
Mute .............................................. |
9 |
Telephone audio .............................. |
9 |
Navigation audio ............................ |
10 |
Sound and volume relationship ......... |
11 |
Adjusting the bass ......................... |
11 |
Adjusting the treble........................ |
11 |
Setting the left/right volume ratio |
|
(balance)...................................... |
12 |
Adjusting the front/rear volume ratio |
|
(fader) ......................................... |
12 |
X-BASS ........................................... |
12 |
Display............................................ |
13 |
Adjusting the viewing angle ............. |
13 |
Adjusting the display brightness....... |
13 |
Setting the button illumination colour .. |
13 |
Setting the display illumination colour.. |
14 |
Adjusting the spectrum analyser ...... |
15 |
Inverting display contents ............... |
15 |
Radio mode ..................................... |
15 |
Adjusting the tuner......................... |
15 |
Setting the number of antennas ....... |
16 |
Switching to radio mode ................. |
16 |
Selecting static/dynamic radio mode |
|
(FM only)...................................... |
16 |
Convenient RDS functions (AF, REG).. |
17 |
Selecting the waveband/ |
|
memory bank ................................ |
18 |
Tuning into a station ....................... |
19 |
Setting the sensitivity of |
|
station seek tuning......................... |
19 |
Scanning receivable stations (SCAN) 20 |
|
Setting the scanning time................ |
20 |
Storing stations ............................. |
20 |
Storing stations automatically (Travel- |
|
store) .......................................... |
21 |
Listening to stored stations ............. |
21 |
Programme type (PTY) .................. |
21 |
Optimising radio reception .............. |
22 |
Activating/deactivating the radio text |
|
display ......................................... |
23 |
TIM – Traffic Information Memory..... |
23 |
Switching TIM on/off ...................... |
24 |
Playing stored traffic announcements24 |
|
Recording traffic announcements..... |
25 |
Setting the timer............................ |
25 |
Selecting timers ............................ |
26 |
Traffic information........................... |
26 |
Switching traffic information priority |
|
on/off .......................................... |
26 |
Setting the volume for traffic announce- |
|
ments .......................................... |
27 |
CD mode ......................................... |
27 |
Risk of severe damage to |
|
the CD drive! ................................ |
27 |
Starting CD mode, inserting a CD ..... |
27 |
Ejecting a CD................................. |
28 |
Selecting tracks............................. |
28 |
Fast searching (audible).................. |
28 |
4

Contents
Random track play (MIX) ................. |
28 |
Repeating tracks (REPEAT) ............. |
28 |
Scanning tracks (SCAN).................. |
28 |
Displaying CD text.......................... |
29 |
Adjusting the scrolling text .............. |
29 |
Traffic announcements in CD mode .. |
29 |
MP3 mode....................................... |
30 |
Preparing an MP3 CD ..................... |
30 |
Inserting/removing MMCs/SDs ........ |
31 |
Inserting an MMC/SD ..................... |
31 |
Removing an MMC/SD .................... |
31 |
Switching to MMC/SD mode ............ |
31 |
Activating the MP3 mode of CD........ |
32 |
Operation during the MP3 mode ...... |
32 |
Selecting tracks............................. |
32 |
Fast searching (audible).................. |
33 |
Scanning tracks (SCAN).................. |
33 |
Random track play (MIX) ................. |
33 |
Repeating individual tracks or |
|
whole directories (REPEAT)............. |
33 |
Configuring the display ................... |
34 |
CD changer mode (optional)............. |
35 |
Switching to CD-changer mode ........ |
35 |
Selecting CDs................................ |
35 |
Selecting tracks............................. |
35 |
Fast searching (audible).................. |
35 |
Scanning tracks (SCAN).................. |
35 |
Repeating individual tracks or |
|
whole CDs (REPEAT) ...................... |
36 |
Random track play (MIX) ................. |
36 |
Naming CDs .................................. |
36 |
Clock – time .................................... |
38 |
Setting the time ............................. |
38 |
Permanent time display .................. |
39 |
DSA Max –Digital Sound Adjustment .. |
39 |
Switching DSA on/off ..................... |
39 |
Automatically calibrating |
|
the equalizer ................................. |
40 |
Viewing vehicle acoustics with/without |
|
equalizer ...................................... |
41 |
Manually changing the graphical |
|
equalizer ...................................... |
41 |
Selecting the Equalizer ................... |
42 |
Resetting the equalizer ................... |
42 |
Selecting a sound presetting |
|
(Preset)........................................ |
42 |
Adjusting the stage effect................ |
43 |
Selecting a sound effect.................. |
43 |
DNC ................................................ |
44 |
Calibrating DNC............................. |
44 |
Switching DNC off.......................... |
44 |
Selecting a DNC increase ................ |
45 |
Subwoofer and centre speaker ......... |
45 |
Adjusting the subwoofer increase..... |
45 |
Adjusting the subwoofer phase |
|
position........................................ |
46 |
Setting the low-pass filter................ |
46 |
Setting the subsonic filter ............... |
46 |
Adjusting the centre speaker ........... |
47 |
Adjusting high-pass filters for |
|
front/rear ..................................... |
47 |
Crossover ..................................... |
48 |
TMC for dynamic navigation systems... |
48 |
Amplifier/Sub-Out ........................... |
49 |
Switching the internal amplifier |
|
on/off .......................................... |
49 |
External audio sources ..................... |
49 |
Switching the AUX input on/off ........ |
50 |
Naming the AUX input..................... |
50 |
Miscellaneous ................................. |
51 |
Entering a switch-on message.......... |
51 |
Displaying the serial number............ |
51 |
Resetting the device ....................... |
51 |
Specifications ................................. |
52 |
Installation instructions ................. |
362 |
ENGLISH
5

Notes and accessories
Thank you for choosing a Blaupunkt prod- |
|
|
uct. We hope you enjoy using this new piece |
Only operate your car sound system |
|
of equipment. |
if the road and traffic conditions |
|
Please read these operating instructions |
||
allow you to do so. |
||
before using the equipment for the first |
Familiarise yourself with the device |
|
time. |
before setting off on your journey. |
|
|
||
International telephone |
You should always be able to hear po- |
|
information |
lice, fire and ambulance sirens in good |
|
time from inside your vehicle. |
||
If you have any questions regarding the op- |
||
For this reason, listen to your car |
||
eration of your car radio or if you require |
||
further information, please do not hesitate |
sound system at a suitable volume |
|
level during your journey. |
||
to call us! |
||
|
||
The information hotline numbers are print- |
|
|
ed on the last page of these instructions. |
Safety note |
|
Notes and accessories |
The car sound system and the |
|
control panel of the device (flip-release |
||
panel) warm up during operation. |
||
For this reason, touch the flip-re- |
||
lease panel only at non-metallic sur- |
||
faces for removal purposes. |
||
If you want to uninstall the car sound |
||
system, let it cool down first. |
||
|
||
Installation |
||
If you want to install your car sound system |
||
yourself, please read the installation and |
||
connection instructions that follow these |
||
operating instructions. |
||
Road safety |
||
|
Road safety has absolute priority. |
6

Notes and accessories |
Theft protection |
Accessory
Remote control
Remote control RC-12H included. You can operate all basic functions of your car radio safely and comfortably by means of the remote control.
You cannot switch the device on or off with the remote control.
Optional equipment
(not part of the scope of delivery)
Use only accessories approved by Blaupunkt.
Amplifiers
You can use all Blaupunkt and Velocity amplifiers.
CD changers
The following CD changers are available as accessories for the devices: CDC A 03, CDC A 08 and IDC A 09.
Activating/deactivating demo mode
The device is supplied from the factory with demo mode activated. The various functions of the device are displayed graphically as animations in the display during demo mode. You can also deactivate demo mode.
Theft protection |
ENGLISH |
|
Detachable control panel |
||
|
The device is equipped with a detachable control panel (flip-release panel) as a way of protecting your equipment against theft. The device is worthless to a thief without this control panel.
Protect your device against theft by taking the control panel with you whenever you leave your vehicle. Do not leave the control panel inside your vehicle - not even in a hiding place.
The control panel has been designed to be easy to use.
Notes:
•Never drop the control panel.
•Never expose the control panel to direct sunlight or other heat sources.
•Store the control panel in the supplied case.
•Avoid direct contact with the control panel’s electrical contacts. If necessary, clean the contacts with a lintfree cloth and some alcohol.
Detaching the control panel
3
7
Theft protection |
Switching on/off |
Press the 
 button 3.
The locking mechanism of the control panel is unlocked.
Pull the control panel straight out of the device and to the left.
Notes:
•After removing the control panel from the device, the device switches off.
•All the current settings are saved.
•Any CD already inserted in the device remains there.
Switching on/off
There are various ways of switching the device on/off:
Switching on/off using button 1
To switch on the device, press button
1.
The device switches on.
To switch off the device, press and hold down button 1 for longer than two seconds.
The device is switched off.
Attaching the control panel
Push the control panel into the guides of the device from the left to the right.
Carefully push the left side of the control panel into the device until it clicks into place.
Note:
When attaching the control panel, make sure you do not push on the display.
Switching on/off using the vehicle ignition
The device will switch on/off simultaneously with the ignition if the device is correctly connected to the vehicle’s ignition and you did not switch the device off by pressing button 1.
The device can also be switched on with switched-off ignition.
Press the button 1.
Note:
To protect the vehicle battery, the device will switch off automatically after one hour if the ignition is off.
8

Volume
Volume
You can adjust the volume in steps from 0 (off) to 50 (maximum).
To increase the volume,
turn the volume control 2clockwise. To decrease the volume,
turn the volume control 2 counterclockwise.
Setting the power-on volume
You can set the default volume level at which the device plays when it is switched on.
Press the MENU button 9.
Press the softkey 5 with the display label "VOLUME".
Press the softkey 5 with the display label "ON VOL".
Adjust the desired volume with volume control 2.
Press the OK joystick 8or the MENU button 9to exit the menu.
The settings are saved.
Note:
The volume played last before switchoff can also be selected as the poweron volume. For this purpose, press the softkey with the display label "LAST VOL" in the Volume menu
Risk of injury!
If the power-on volume is set to maximum, the volume level can be very high when the device is switched on!
If the volume was set to maximum before the device was switched off and the power-on volume is set to "LAST VOL", the volume level can be very high when the device is switched on again!
Severe damage to your hearing can be caused in both cases!
Mute
You can decrease the volume abruptly.Briefly press button 1.
The display shows "MUTE".
Cancelling mute
Briefly press button 1again
or
turn the volume control 2.
Telephone audio
If your car sound system is connected withacellphone,"picking"upthephoneautomaticallymutesthecarsoundsystemandthe call is layed back via the loudspeakers of the card sound system. For this purpose, the cell phone must be connected to the device as described in the installation instructions.
If the sound system receives a traffic announcement during a telephone call, you will only be able to hear the traffic announcement after the call is finished (in so far as the traffic announcement is still being broadcast).
ENGLISH
9

Volume
If the sound system receives a call during a traffic announcement, the playback of the traffic announcement is interrupted and the call is answered.
You can adjust the volume with which the telephone calls are answered.
Press the MENU button 9.
Press the softkey 5 with the display label "VOLUME".
Press the softkey 5 with the display label "PHONE" to set the volume.
Adjust the desired volume with volume control 2.
Press the OK joystick 8or the MENU button 9to exit the menu.
The settings are saved.
Note:
During the phone call, you can always change the volume by means of the volume control 2.
Navigation audio
Instead of a second external audio source ("AUX2", see "External audio sources"), you can also connect a navigation system.
If your car sound system is connected to navigation system, the voice output of the navigation is "mixed" in with the current audio source and played back using the loudspeakers of the car sound system.
For this purpose, the navigation system be connected to the car sound system as described in the installation instructions and switched on in the menu.
You can find out from your Blaupunkt dealer which navigation systems can be used with your car sound system.
Activating the navigation audio
You can connect either a second external audio source or a navigation system to this device. For this purpose, you must define in the menu which device has been connected.
Press the MENU button 9.
Press the softkey 5 with the display label "AUX".
The AUX menu is displayed.
If you connected a navigation system, press the softkey 5 with the display label "NAV/AUX2" repeatedly until the setting "NAVIGATION ON" appears.
Press the OK joystick 8or the MENU button 9to exit the menu.
The settings are saved.
10
Volume |
Sound and volume relationship |
Adjusting the navigation minimum volume
You can set the volume level at which the navigation announcements are mixed in.
Note:
Adjust the volume at the navigation system to the maximum value. If interferences occur during playback, slightly reduce the volume at the navigation system.
Press the MENU button 9.
Press the softkey 5 with the display label "VOLUME".
Press the softkey 5 with the display label "NAVI DIFF" to set the volume.
Adjust the desired volume with volume control 2.
Press the OK joystick 8or the MENU button 9to exit the menu.
The settings are saved.
Note:
During the voice output, you can always change the volume by means of the volume control 2. This setting applies to the current voice output and is not stored.
Sound and volume |
ENGLISH |
|
relationship |
||
|
||
Note: |
|
|
|
|
You can perform separate adjustments for bass and treble for each audio source.
Adjusting the bass
Press the AUDIO button :. "AUDIO MENU" appears on the display.
Press the softkey 5 with the display label "BASS".
Move the joystick 8up or right to increase the bass or down or left to decrease the bass.
When you have finished making your changes,
press the OK joystick 8or the AUDIO button :.
Adjusting the treble
Press the AUDIO button :. "AUDIO MENU" appears on the display.
Press the softkey 5 with the display label "TREBLE".
Move the joystick 8up or right to increase the treble or down or left to decrease the treble.
When you have finished making your changes,
press the OK joystick 8or the AUDIO button :.
11

Sound and volume relationship |
X-BASS |
Setting the left/right volume ratio (balance)
To adjust the balance, press the AUDIO button :.
"AUDIO MENU" appears on the display.
Press the softkey 5 with the display label "BALANCE".
Move the joystick 8 up or right or down or left to adjust the right/left volume distribution.
When you have finished making your changes,
press the OK joystick 8or the AUDIO button :.
Adjusting the front/rear volume ratio (fader)
To adjust the fader, press the AUDIO button :.
"AUDIO MENU" appears on the display.
Press the softkey 5 with the display label "FADER".
Move the joystick 8 up or right or down or left to adjust the front/rear volume distribution.
When you have finished making your changes,
press the OK joystick 8or the AUDIO button :.
X-BASS
X-Bass allows for boosting the bass at low volume levels. The X-Bass boost (Level) can be set in steps ranging from 0 to 6 for one of the following frequencies: 32 Hz, 40 Hz, 50 Hz, 63 Hz or 80 Hz. Selecting 0 deactivates the X-Bass function.
Press the AUDIO button :. "AUDIO MENU" appears on the display.
Press the softkey 5 with the display label "X-BASS".
Move the joystick 8to the left or the right to select the frequency to be increased.
Move the joystick 8 up to increase the X-BASS or down to decrease the X-BASS.
When you have finished making your changes,
press the OK joystick 8or the AUDIO button :.
12

|
Display |
|
Display |
Set the desired value by moving the joy- |
|
You can adjust the display to suit the instal- |
stick 8up or down. |
|
Press the OK joystick 8or the MENU |
||
lation position in your vehicle and to suit |
||
your needs. |
button 9to exit the menu. |
|
The settings are saved. |
||
|
Adjusting the viewing angle
Press the MENU button 9.
Press the softkey 5 with the display label "DISPLAY".
Press the softkey 5 with the display label "ANGLE".
Move the joystick 8 up or right or down or left to adjust the viewing angle.
Press the OK joystick 8or the MENU button 9to exit the menu.
The settings are saved.
Adjusting the display brightness
If your car sound system is connected as described in the installation instructions, the display brightness switches with the headlights. The display brightness can be adjusted separately for day and night in increments from 1-16.
Display brightness
Press the MENU button 9.
Press the softkey 5 with the display label "DISPLAY".
Press the softkey 5 with the display label "BRIGHT".
The top line of the display shows "DAY" and "NIGHT" together with the current values.
Setting the button illumination colour
You can set the colour in which the buttons of the device are illuminated.
16 colours are available.
Press the MENU button 9.
Press the softkey 5 with the display label "DISPLAY".
Press the softkey 5 with the display label "KEYCOLOR".
Move the joystick 8 up or right or down or left to adjust a colour. Every movement of the joystick selects a different colour.
Press the OK joystick 8or the MENU button 9to exit the menu.
The settings are saved.
ENGLISH
13

Display
Setting the display illumination colour
When setting the display illumination, you can choose one of four preset colours or you can mix a colour yourself from the RGB spectrum (red-green-blue) or you can select a colour during a colour scan.
Selecting a preset colour
Four different colours are already stored in the device. "Ocean" (blue), "Amber", "Sunset" (red-orange) and "Nature" (green) are available. Select a colour that best suits your vehicle interior.
Press the MENU button 9.
Press the softkey 5 with the display label "DISPLAY".
Press the softkey 5 with the display label "COLOR".
Press the softkey 5 with the display label of the desired colour.
Press the OK joystick 8or the MENU button 9to exit the menu.
The settings are saved.
Mixing a colour for the display illumination
To customise the display illumination to suit your taste, you can mix a colour yourself using the three primary colours red, green and blue.
Press the MENU button 9.
Press the softkey 5 with the display label "DISPLAY".
Press the softkey 5 with the display label "COLOR".
Press the softkey 5 with the display label "USER".
The following menu allows you to define the components of the three colours red, green and blue. For this purpose,
repeatedly press the corresponding softkey 5 until the colour displayed corresponds to your taste.
Press the OK joystick 8or the MENU button 9to exit the menu.
The settings are saved.
Selecting a display illumination colour during a colour scan
Press the MENU button 9.
Press the softkey 5 with the display label "DISPLAY".
Press the softkey 5 with the display label "COLOR".
Press the softkey 5 with the display label "COL-SCAN".
The device starts changing the display illumination colour.
If you want to select one of the colours, press the softkey 5 with the display label "SAVE".
If you want to return to the previous menu without changing the colour, press the softkey with the display label "BREAK".
Press the OK joystick 8or the MENU button 9to exit the menu.
The settings are saved.
14

Display |
Radio mode |
Adjusting the spectrum analyser
The spectrum analyser on your display shows the output level of the car sound system. If the spectrum analyser is switched on, it is automatically displayed if you do not press a key for a while during the playback of an audio source.
You can also deactivate the spectrum analyser.
Switching the spectrum analyser on/off
Press the MENU button 9.
Press the softkey 5 with the display label "DISPLAY".
Press the softkey 5 with the display label "SPECTRUM" repeatedly until the desired setting "SPECTRUM OFF" or "SPECTRUM ON" appears in the top line of the display.
Press the OK joystick 8or the MENU button 9to exit the menu.
The settings are saved.
Inverting display contents
You can invert the display representation.
Press the MENU button 9.
Press the softkey 5 with the display label "DISPLAY".
Press the softkey 5 with the display label "INVERT".
Press the OK joystick 8or the MENU button 9to exit the menu.
The settings are saved.
Radio mode |
ENGLISH |
|
This device is equipped with an RDS radio |
||
|
||
receiver. Many of the receivable FM stations |
|
|
broadcast a signal that not only carries the |
|
|
programme but also additional information |
|
|
such as the station name and programme |
|
|
type (PTY). |
|
|
The station name appears on the display |
|
|
as soon as the tuner receives it. The pro- |
|
|
gramme type can be displayed upon re- |
|
|
quest. For further information, please |
|
|
read the section entitled "Programme type |
|
|
(PTY)". |
|
|
Adjusting the tuner |
|
|
To ensure proper functioning of the tuner, |
|
|
the device must be set for the region in |
|
|
which you are located. You can select be- |
|
|
tween Europe and America (USA). The tun- |
|
|
er is factory-set to the region in which it was |
|
|
sold. If you experience problems with your |
|
|
radio reception, please check this setting. |
|
Press the MENU button 9.
Press the softkey 5 with the display label "TUNER".
Press the softkey 5 with the display label for the desired region, "AREA EUR" or "AREA USA".
Press the OK joystick 8or the MENU button 9to exit the menu.
The settings are saved.
15

Radio mode
Setting the number of antennas
This device is equipped with two RDS radio receivers (TwinCeiver). You can connect one or two antennas to the device. If two antennas are used (strongly recommended, the second antenna is part of the scope of delivery) a directional receiption of the station being received is possible in DDA radio mode. In most cases, the directional receiption significantly improves the reception quality.
Note:
To ensure proper functioning of the tuner, the main antenna must be connected to the bottom antenna socket.
To set the number of antennas,
press the MENU button 9.
Press the softkey 5 with the display label "TUNER".
Press the softkey 5 with the display label "ONE ANTE" if one antenna is connected to the device.
Or
Press the softkey 5 with the display label "TWO ANTE" if two antennas are connected to the device.
Press the OK joystick 8or the MENU button 9to exit the menu.
The settings are saved.
Switching to radio mode
If the device is in the operating modes CD/ MP3 or CD changer/Compact Drive,
press the TUNER button =.
The basic radio menu for selecting the station is displayed. The functions of the radio mode are controlled via the radio function menu. You reach the radio function menu by pressing the TUNER button =again in radio mode.
Selecting static/dynamic radio mode (FM only)
You can select from two modes for FM radio mode:
Static radio mode ("PRESETS" and "DDA")
In the static radio mode, four memory banks (FM1, FM2, FM3 and FMT) are available in FM mode. You can store six stations in each of these memory banks. The receiving unit automatically adjusts the best receivable frequency of the station for each of the stored stations.
PRE mode (static)
If you connected only one antenna to the device and set it up in the setup menu (see "Setting the number of antennas"), the device plays back the configured station with one tuner and searches for the best frequency of the adjusted station with the second tuner (with activated RDS function).
16

Radio mode
Digital Directional Antenna mode – DDA (static)
If you connected two antennas to the device and set them up in the setup menu (see "Setting the number of antennas"), the adjusted station is received with both antennas in DDA radio mode. In the process, the TwinCeiver continuously analyses the signals of both antennas and calculates a "clean signal" from them to reduce reception interferences. This process developed by Blaupunkt corresponds to a directional aerial with respect to its mode of operation. Particularly in areas with reception interferences due to reflections from buildings, mountains, etc., the reception quality is significantly improved. In exceptional cases, e.g. reception of two different stations on the same frequency, it may lead to an undesirable reception behaviour. In such a case, you should select the dynamic radio mode (see "Selecting the radio mode" below).
Dynamic radio mode
In dynamic radio mode, five levels (DL1 - DL5) are available. While the adjusted station is being played back, the second reception searches for receivable stations in the background and displays all receivable stations with short name next to the softkeys on the memory bank. The station are constantly updated so that you can always access receivable stations.
Selecting the radio mode
To select between the modes static and dynamic,
press the TUNER button = in radio mode.
The display shows the radio function menu.
Press the NEXT button 4.
The display shows the second page of the radio function menu.
Press the softkey 5 with the display label "TUNER 2".
Press the softkey 5 with the display label "DYN LIST" for the dynamic radio mode.
Press the softkey 5 with the display label "DDA" or "PRESETS" for one of the static radio modes.
Press the OK joystick 8or the MENU button 9to exit the menu.
The settings are saved.
Convenient RDS functions (AF, REG)
The convenient RDS functions AF (Alternative Frequency) and REG (Regional) extend your radio’s range of functions (in FM mode only).
•AF: If the RDS function is activated, the radio automatically tunes into the best receivable frequency for the station that is currently set.
ENGLISH
17

Radio mode
•REG: At certain times, some radio stations divide their programme into regional programmes providing different content. You can use the REG function to prevent the car radio from switching to alternative frequencies that are transmitting a different regional programme content.
Note:
REG must be activated/deactivated separately in the radio functions menu.
Switching the RDS function on/off
If you want to use the convenient RDS functions (AF and REG),
press the TUNER button = in radio mode.
The display shows the radio function menu.
Press the softkey 5 with the display label "RDS" repeatedly until the desired setting "RDS ON" or "RDS OFF" appears.
To change back to the basic radio menu,
press the TUNER button =or the OK joystick 8.
The settings are saved.
Switching REG on/off
To use the convenient RDS function REG,
press the TUNER button = in radio mode.
Press the NEXT button 4 to display the second page of the radio function menu.
The display shows the radio function menu.
Press the softkey 5 with the display label "REGIONAL" repeatedly until "REGIONAL ON" or "REGIONAL OFF" appears.
press the TUNER button =or the OK joystick 8.
The settings are saved.
Selecting the waveband/memory bank
This device can receive programmes broadcast over the FM frequency range as well as the MW, LW and SW (AM) wavebands. Four memory banks are available for the FM waveband and one memory bank each for the wavebands MW, LW and SW.
In dynamic radio mode, up to five levels are available.
Six stations can be stored in each memory bank.
Note:
If your device is set to the region USA, you can select between the wavebands FM and AM. In addition, the memory banks AM1, AM2, and AMT are available for the AM waveband.
Selecting a waveband
To select an FM, MW, LW or SW waveband,
press the TUNER button = in radio mode.
The display shows the radio function menu.
18

|
Radio mode |
|
Press the softkey 5 with the display |
Tuning into stations manually |
|
label "BAND". |
You can also tune into stations manually. |
|
Press the softkey 5 with the display |
Note: |
|
label "FM" for the FM waveband. |
||
You can only tune into stations manu- |
||
Press the softkey 5 with the display |
||
ally if the RDS function is deactivated. |
||
label "MW" for the MW waveband. |
||
Move the joystick 8to the left or the |
||
Press the softkey 5 with the display |
||
label "LW" for the LW waveband. |
right. |
|
|
||
Press the softkey 5 with the display |
Browsing through broadcasting |
|
label "SW" for the SW waveband. |
||
networks (FM only) |
||
|
The basic radio menu of the selected waveband is displayed.
Selecting the FM memory bank
To switch between the FM memory banks FM1, FM2, FM3 and FMT,
press the NEXT button 4repeatedly until the display shows the desired memory bank.
The memory banks are called in sequence from FM1 to FM2, FM3 and FMT.
Note:
If your device is set to the region USA and you selected the AM waveband, you can use the NEXT button 4to select from the AM memory banks AM1, AM2 and AMT.
Tuning into a station
There are various ways of tuning into a station.
Automatic station seek tuning
Move the joystick 8up or down.
The radio tunes into the next receivable station.
If a radio station provides several programmes, you have the option of browsing through its so-called "broadcasting network".
Note:
The convenient RDS function must be activated before you can use this feature. When using this feature, you will only be able to switch to stations that you have received once before already.
Move the joystick 8to the left or the right.
Setting the sensitivity of station seek tuning
You can choose whether the radio should only tune into stations providing good reception or whether it can also tune into those with a weak reception.
press the TUNER button = in radio mode.
The display shows the radio function menu.
Press the NEXT button 4.
ENGLISH
19

Radio mode
Note:
If you call up the radio function menu in the MW or LW radio mode, the softkey with the display label "SENS" is on the first page.
Press the softkey 5 with the display label "SENS".
Press the softkey 5 with the display label "FM" or "AM" to set the sensitivity for "FM" or "AM".
Move the joystick 8 up or right or down or left to set the sensitivity.
You can adjust the sensitivity in increments from 1 to 6. "Sensitivity 1" is the lowest, "Sensitivity 6" the highest sensitivity for very remote stations.
Press the OK joystick 8or the MENU button 9to exit the menu.
The settings are saved.
Scanning receivable stations (SCAN)
You can use the scan function to play all the receivable stations briefly. You can set the scanning time in the menu to between 5 and 30 seconds.
Starting SCAN
Press and hold down the OK joystick 8for longer than two seconds.
Scanning begins. "SCAN" appears briefly on the display followed by a flashing display of the current station name or the frequency of the station.
Cancelling SCAN and continuing listening to a station
Press the OK joystick 8.
Scanning stops and the radio continues playing the station that it tuned into last.
Setting the scanning time
Press the MENU button 9.
Press the softkey 5 with the display label "VARIOUS".
Press the softkey 5 with the display label "SCANTIME".
Move the joystick 8 up or right or down or left to set the scan time.
Press the OK joystick 8or the MENU button 9to exit the menu.
The settings are saved.
Note:
The defined scanning time is also applied by the system to scanning carried out in CD/MP3 and CD-changer mode.
Storing stations
Storing stations manually
Select the desired FM memory bank (FM1, FM2, FM3, FMT) or one of the wavebands (MW, LW or SW).
Tune into the desired station as described under "Tuning into a station".
Press and hold down one of the six softkeys for longer than two seconds to which you want to assign the station.
20
Radio mode
Storing stations automatically (Travelstore)
You can automatically store the six stations offering the strongest reception in the region (FM only). The stations are stored in the FMT memory bank.
Notes:
•If your device is set to the region USA, you can also start the Travelstore in the AM radio mode. The stations are then stored on the AMT level.
•Any stations that were previously stored in this memory bank are deleted in the process.
Starting the Travelstore function
Press the TUNER button = in radio mode.
The display shows the radio function menu.
Press the softkey 5 with the display label "T-STORE".
The storing procedure begins. "TRAVEL STORE" appears on the display. After the process has completed, the radio will play the station that is stored in memory location one of the FMT (or AMT) memory bank.
Listening to stored stations
Select the memory bank or waveband.
Press the softkey 5 with the display label of the station name or the frequency of the desired station.
Programme type (PTY)
Besides transmitting the station name, some FM stations also provide information on the type of programme that they are broadcasting. Your car radio can receive and display this information.
For example, the programme types can be:
CULTURE |
TRAVEL |
JAZZ |
SPORT |
NEWS |
POP |
ROCK |
CLASSICS |
|
You can use the PTY function to select stations of a particular programme type.
PTY-EON
If you specify the programme type and start seek tuning, the radio will switch from the current station to a station of the selected programme type.
Notes:
•If the tuner does not find a station that corresponds to the selected programme type, you will hear a beep and "NO PTY" appears briefly in the display. The radio will then retune to the station that it received last.
•If the tuned radio station or another station on the broadcasting network broadcastsyourselectedprogramme type at a later point in time, the radio will automatically switch from the currently tuned station or from CD/ MP3 mode or CD-changer mode to the station whose programme type matches the one you selected.
ENGLISH
21

Radio mode
Activating PTY
To use the PTY function,
press the TUNER button = in radio mode.
The display shows the radio function menu.
Press the NEXT button 4.
Press the softkey 5 with the display label "PROG TYP".
If PTY is activated, the display shows the current programme type. PTY is illuminated on the display. The programme types are shown next to the softkeys 5.
Deactivating PTY
To deactivate the PTY function,
press the softkey 5 with the display label "PTY OFF" while the programme types are displayed.
Selecting a programme type and starting seek tuning
The PTY menu has several pages on which the known programme types are displayed. To scroll through the individual pages of the PTY menu,
press the NEXT button 4until the desired programme type is displayed next to one of the softkeys.
Press the softkey 5with the desired programme type.
Move the joystick 8 up or right or down or left to start the seek tuning.
The radio will then tune into the next receivable station that it finds that corresponds to your selected programme type.
If the tuner does not find a station that corresponds to the selected programme type, you will hear a beep and "NO PTY" appears briefly in the display. The radio will then retune to the station that it received last.
If you want to return to the display of the programme types,
call up the second page of the ra-
dio function menu again and press the softkey 5 with the display label "PROG TYP".
Optimising radio reception
Treble reduction feature during interference (HiCut)
The HiCut function causes a reduction of the interferences during poor radio reception. If interference occurs, the system automatically reduces the treble thus reducing the interference level.
Adjusting HiCut
press the TUNER button = in radio mode.
The display shows the first page of the radio function menu.
Press the NEXT button 4.
Press the softkey 5 with the display label "HIGH CUT" repeatedly until the desired setting appears.
"HICUT 0" means that no automatic reduction of the treble and interference level will be made; "HICUT 2" means that a maximum reduction will be made.
Press the OK joystick 8or the TUNER button =to exit the menu.
The settings are saved.
22

Radio mode |
TIM – Traffic Information Memory |
Activating/deactivating the radio text display
Some stations use the RDS signal to broadcast scrolling texts known as radio texts. You can allow radio texts to be displayed or you can block them.
Press the TUNER button = in radio mode.
The display shows the radio function menu.
Press the softkey 5 with the display label "R-TEXT" repeatedly until the desired setting "RADIO TEXT ON" or "RADIO TEXT OFF" appears.
press the TUNER button =or the OK joystick 8.
The settings are saved.
TIM – Traffic Information Memory
The device features a digital voice memory which allows for automatically recording up to four traffic announcements. The maximum length for recorded messages is four minutes.
If the TIM function is activated, all traffic announcements that are received two hours after the last switch-off of the device are recorded. In addition, you can also set two fixed times (Timer). All traffic announcements that are broadcast 30 minutes before and 90 minutes after the specified time on the selected traffic announcement program are recorded. This function is particularly useful if you are using your car at fixed times.
If the last message is older than six hours, all messages are deleted.
If a new traffic announcement arrives during the TIM playback, the playback is interrupted and the new message is recorded.
Risk of damage to the motorised antenna in a car wash. An automatic motorised antenna remains ex-
tended if TIM is activated and you switch off the device. In a car wash, the extended motorised antenna may cause damages. For further information, please read the section entitled "Switching TIM off".
ENGLISH
23

TIM – Traffic Information Memory
Switching TIM on/off
If the car sound system is switched on, you can switch the TIM functions on or off.
In radio mode, hold the TUNER button = pressed for longer than two seconds.
The TIMPLAY menu is displayed.
If traffic announcements were recorded, the last message is played. The most current message has the number "TIM1". The station name/frequency appears in the top line of the display and the time of the recording in the bottom line.
"TIM" and the number of the message appear next to the top two softkeys on both sides of the display.
If no messages are recorded, "NO TIM" briefly appears on the display.
Switching TIM off
If you want to switch TIM off,
In radio mode, hold the TUNER button = pressed for longer than two seconds.
The TIMPLAY menu is displayed.
Press the NEXT button 4. The TIMSET menu again.
Press the softkey 5 with the display label "TIM ON" repeatedly until "TIM RECORD OFF" appears on the display.
press the TUNER button =or the OK joystick 8.
The settings are saved.
Note:
If you do not switch on the device for more than 72 hours, the TIM function is automatically switched off.
Switching TIM on
If you want to switch TIM on again,
in radio mode, hold the TUNER button = pressed for longer than two seconds.
The TIMPLAY menu is displayed.
Press the NEXT button 4. The TIMSET menu again.
Press the softkey 5 with the display label "TIM ON" repeatedly until "TIM RECORD ON" appears on the display.
Press the TUNER button =or the OK joystick 8.
The settings are saved.
Note:
After switching off the device with the vehicle ignition or the button 1, the current status "TIM ON" or "TIM OFF" briefly appears on the display.
Playing stored traffic announcements
To play the stored traffic announcements,
in radio mode, hold the TUNER button = pressed for longer than two seconds.
The TIMPLAY menu is displayed.
If traffic announcements were recorded, the last message is played. The most current message has the number "TIM1". The
24

TIM – Traffic Information Memory
station name/frequency appears in the top line of the display and the time of the recording below it. After the first message, all additional messages are played in ascending order.
If no messages are recorded, "NO TIM AVAILABLE" briefly appears on the display.
After the last message, the system switches back to the previous operating mode.
If you want to return to the radio mode without first listening to all messages,
press the TUNER button =or the OK joystick 8.
Setting the timer
If TIM is switched off, the traffic announcements of a set traffic information station are recorded for 2 hours after switching off the device. In addition, you can set two timers that record all traffic announcements 30 minutes before and 90 minutes after the adjusted time. The timer is based on the system time. How to set the system time is described in the chapter "Clock - Time".
To adjust one of the timers,
in radio mode, hold the TUNER button = pressed for longer than two seconds.
Selecting the TIM message
"TIM" and the number of the message appear next to the top two softkeys on both sides of the display.
If you want to listen to one of the displayed messages without playing the other messages:
Press the softkey 5 with the corresponding display label "TIM1", "TIM2", "TIM3" or "TIM4".
Recording traffic announcements
If the device is switched on, traffic announcements are automatically recorded if a traffic information station is received and the priority for traffic announcements is switched on.
If you are listening to a station that does not broadcast traffic information and you switch off the device while the TIM function is switched on, the device automatically searches for a traffic information station.
The TIMPLAY menu is displayed.
Press the NEXT button 4. The TIMSET menu again.
Press the softkey 5 with the display label "TIMER1" for the first timer or "TIMER2" for the second timer.
The display shows the adjusted time, the hours are flashing.
Move the joystick 8up or down and adjust the hour.
Move the joystick 8right and change the entry position.
The minutes flash.
Move the joystick 8up or down and adjust the minutes.
To save the settings,
press the TUNER button =or the OK joystick 8.
The settings are saved.
ENGLISH
25

TIM – Traffic Information Memory |
Traffic information |
During the TIM readiness, a connected motorised antenna is extended.
Note:
It is absolutely necessary to switch off TIM before entering a car wash. For instructions, please read the section "Switching TIM off" in this chapter.
Selecting timers
After you have set the timers, you can select between the two timers. The timer which you adjusted last is always active.
To select a timer,
in radio mode, hold the TUNER button = pressed for longer than two seconds.
The TIM PLAY menu is displayed.
Press the NEXT button 4. The TIMSET menu again.
Press the softkey 5 with the display label "TIMER1" to select the first timer or "TIMER2" to select the second timer.
press the TUNER button =or the OK joystick 8.
The settings are saved.
Traffic information
Your device is equipped with an RDS-EON receiver. EON (Enhanced Other Network) is the transmission of station information within a broadcasting network.
Whenever a traffic announcement (TA) is broadcast, the system switches automatically from a station that does not provide traffic reports to the appropriate traffic information station within the broadcasting network that does.
Once the traffic report has been played, the system will switch back to the programme that you were listening to before.
Switching traffic information priority on/off
Press the TUNER button = in radio mode.
The display shows the radio function menu.
Press the softkey 5 with the display label "TRAFFIC" repeatedly until the desired setting "TRAFFIC INFO ON" or "TRAFFIC INFO OFF" appears.
Note:
The TA menu is displayed during a traffic announcement.
To interrupt the current traffic announcement,
press the softkey 5 with the display label "TA EXIT".
If you want to switch off the priority for traffic announcements in general,
press the softkey 5 with the display label "TA OFF".
26

Traffic information
Notes:
You will hear a warning beep:
•If you leave the reception area of a traffic information station that you are currently listening to.
•If you leave the reception area of a traffic information station that the system is tuned into while listening to a CD, and the subsequent automatic seek tuning cannot find a new traffic information station.
•If you retune the radio from a traffic information station to a station that does not broadcast traffic information.
CD mode
You can use this device to play standard audio CDs with a diameter of 12 cm.
CD-Rs and CD-RWs ("self-burned" CDs) can usually be played. Due to the varying quality of CD blanks, however, Blaupunkt cannot guarantee a faultless function.
To ensure proper functioning, use only CDs with the Compact-Disc logo. Copy-pro- tected CDs can cause playback problems. Blaupunkt cannot guarantee the proper functioning of copy-protected CDs!
Risk of severe damage to the CD drive!
If you hear the warning beep, you can either switch off traffic information priority or tune into a station that broadcasts traffic information.
Setting the volume for traffic announcements
CD singles with a diameter of 8 cm and noncircular contoured CDs (shape CDs) must not be used.
We accept no responsibility for any damage to the CD drive that may occur as a result of the use of unsuitable CDs.
Press the MENU button 9.
Press the softkey 5 with the display label "VOLUME".
Press the softkey 5 with the display label "TRAFFIC".
Adjust the desired volume with volume control 2.
Press the OK joystick 8or the MENU button 9to exit the menu.
Starting CD mode, inserting a CD
If there is no CD inserted in the device, |
|
press the |
button 7. |
The control panel opens out towards you.
Push the CD into the CD tray with the printed side facing up.
The drive draws in the CD.
You must not hinder or assist the drive as it draws in the CD.
The control panel automatically closes.
The CD menu is displayed and the CD playback starts.
ENGLISH
27

CD mode
If a CD is already inserted in the device,
press the SOURCE button <repeatedly until CD mode is displayed.
The CD menu is displayed, the playback starts at the point where it was interrupted.
Ejecting a CD
press the 
 button 7.
The control panel opens to the front, the CD is ejected.
Carefully remove the CD.
Press the 
 button 7. The control panel closes.
Selecting tracks
Move the joystick 8 in one direction (up and right for the next or down and left for the previous track) until the number of the desired track appears on the display.
Pressing the joystick 8once down or left restarts the current track.
Random track play (MIX)
Press the softkey 5 with the display label "MIX".
"MIX CD" briefly appears on the display. The next track being played is randomly selected.
Cancelling MIX
Press the softkey 5 with the display label "MIX" again.
"MIX OFF" briefly appears on the display.
Repeating tracks (REPEAT)
Press the softkey 5 with the display label "REPEAT".
"REPEAT TRACK" briefly appears on the display. The track is repeated continuously until you deactivate REPEAT.
Cancelling Repeat
Press the softkey 5 with the display label "REPEAT" again.
"REPEAT OFF" briefly appears on the display. Normal playback is then resumed.
Fast searching (audible)
To fast search backwards or forwards,
hold the joystick 8 pressed in one direction (up and right for forwards or down and left for backwards) until fast searching starts.
Scanning tracks (SCAN)
You can scan (briefly play) all the tracks on the CD.
Press and hold down the OK joystick 8for longer than two seconds.
The next titles of the CD are scanned in ascending order.
Note:
You can set the scanning time. For further information, please read the section entitled "Setting the scanning time" in the "Radio mode" chapter.
28

CD mode
Cancelling Scan and continuing listening to a track
To end the scanning process,press the OK joystick 8.
The currently scanned track will then continue to be played normally.
Traffic announcements in CD mode
Press the softkey 5 with the display label "TRAFFIC" repeatedly until the desired setting "TRAFFIC INFO ON" or "TRAFFIC INFO OFF" appears.
ENGLISH
Displaying CD text
Some CDs include CD text. The CD text might contain the names of the artist, album and tracks.
You can allow the CD text to be displayed as scrolling text in the bottom line every time you switch to another track.
If the inserted CD does not contain CD text, "NO TEXT" is briefly shown on the display with CD text switched on.
Switching CD text on/off
Press the softkey 5 with the display label "TEXT" repeatedly until "CD TEXT ON" or "CD TEXT OFF" appears.
Adjusting the scrolling text
You can allow the CD text to be displayed as scrolling text in the bottom line of the display.
Switching CD scrolling text on/off
Press the softkey 5 with the display label "SCROLL" repeatedly until "SCROLL ON" (scrolling text is switched on) or "SCROLL OFF" appears.
29
MP3 mode
MP3 mode
You can play MP3 files stored on an MMC/ SD (Multimedia Card/Secure Digital) or on a CD-R/CD-RW. You can write data onto the MMC/SD that you want to use with the Bremen MP76 with the help of a standard MMC/SD read and write device and your PC.
Preparing an MP3 CD
The various combinations of CD burners, CD burning software and CD blanks may lead to problems arising with the device’s ability to play certain CDs. If problems occur with your own burned CDs, you should try another brand of CD blank or choose another colour of CD blank.
The format of the CD must be ISO 9660 Level 1 or Level 2 or Joliet. Other formats cannot be played reliably.
Avoid multi-sessions. If you write more than one session onto the CD, only the first session is recognised.
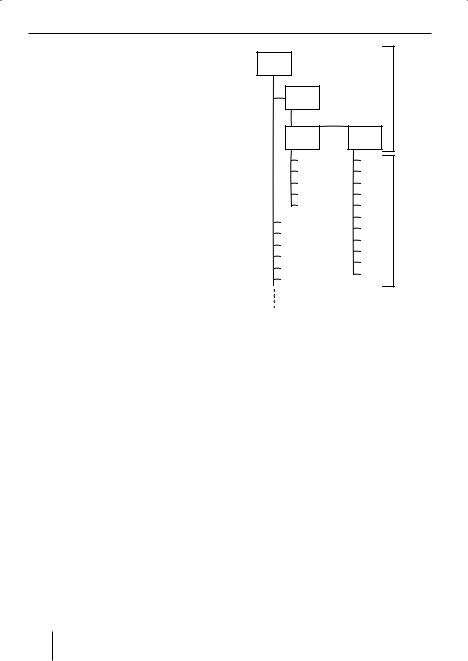
You can create a maximum of 127 directories on a CD. You can use this device to access each of these directories.
Each directory can contain up to 254 individual titles (tracks) and subdirectories which can be selected individually. The directory depth may contain up to 8 levels.
D01
D02 |
|
A |
D03 |
D04 |
|
T001 |
T001 |
|
T002 |
T002 |
|
T003 |
T003 |
|
T004 |
T004 |
|
T005 |
T005 |
|
T001 |
T006 |
B |
T007 |
|
|
T002 |
|
|
T008 |
|
|
T003 |
|
|
T009 |
|
|
T004 |
|
|
T010 |
|
|
T005 |
|
|
T011 |
|
|
T006 |
|
|
|
|
A Directories
B Tracks · Files
You can name each directory using a PC. The device is capable of displaying the directory name. Name the directories and tracks using your CD burner software. The software’s instruction manual will provide details on how to do this.
Note:
When naming directories and tracks, you should avoid using accents and special characters.
If you like your files to be in the correct order, you should use burner software that places files in alphanumerical order. If your software does not provide this feature you also have the option of sorting the files manually. For this purpose, you must enter a number in front of each file name, e.g.
30
 Loading...