


BLUEBOT XBOOST
GEBRUIKERSHANDLEIDING |
|
|
EN |
USER MANUAL |
01 |
DE |
BENUTZERHANDBUCH |
18 |
FR |
MANUEL D'UTILISATION |
35 |
IT |
MANUALE D'USO |
52 |
ES |
MANUAL DEL USUARIO |
69 |
NL |
HANDLEIDING |
86 |

Safety Regulations Before using this product, please read carefully the following safety instructions and follow all routine safety precautions. Keep these instructions in a safe place.
Any operation inconsistent with this instructions manual may cause damage to this product.
 Note !
1.Only authorized technicians can disassemble this product. It is not recommended to disassemble this product by yourselves.
2.This product can only be used with the power adapter provided. If other adapters are used, the product may cause damage.
3.Do not touch wires, sockets or power adapters when your hands are wet.
4.Prevent contact of fabric or body parts with the product’s drive wheels.
5.Do not place this product near cigarette(butts), lighters or other smoldering objects.
6.Please clean the product after charging.
7.Do not bend wires excessively or place heavy objects and sharp objects on the machine.
8.This product is an indoor household product and not to be used outdoors.
9.Do not sit on the product.
10.Do not use this product in a wet environment (e.g. bathroom).
11.Before using this product, please remove all vulnerable items (e.g. glasses, lamps, etc.) from the ground as well as items (e.g. wires, paper sheets, curtains) that may get stuck in the side brushes and air suction passages.
12.Do not put this product in a place where it is easy to fall (e.g. on desks and chairs).
13.Please carefully check whether the power adapter is connected to the socket before use, otherwise it may cause battery damage.
14.To prevent tripping, please inform other people in the house when the product is working.
15.Please empty the dust container before every use especially when the dust container is full.
16.The product can be used in a temperature between 0 to 40 degrees Celsius.
17.Do not use this product in high temperature environment.
18.Please remove the battery from the machine before disposing.
19.Please switch off power before removing the battery.
20.Please recycle the discarded batteries safely.
Awarning:
1.Only authorized technicians can disassemble this product. It is not recommended to disassemble this product by yourselves.
2.This product can only be used with the power adapter provided by the factory. If other adapters are used, the product may cause damage.
3.Do not touch wires, sockets or power adapters when your hands are wet.
4.Prevent contact of fabric or body parts with the product’s drive wheels.
5.Do not place this product near cigarette(butts), lighters or other smoldering objects.
6.Please clean the product after charging.
7.Do not bend wires excessively or place heavy objects and sharp objects on the machine.
8.This product is an indoor household product and not to be used outdoors.
9.Do not sit on the product.
10.Do not use this product in a wet environment (e.g. bathroom).
11.Before using this product, please remove all vulnerable items (e.g. glasses, lamps, etc.) from the ground as well as items (e.g. wires, paper sheets, curtains) that may get stuck in the side brushes and air suction passages.
12.Do not put this product in a place where it is easy to fall (e.g. on desks and chairs).
13.Please carefully check whether the power adapter is connected to the socket before use, otherwise it may cause battery damage.
14.To prevent tripping, please inform other people in the house when the product is working.
15.Please empty the dust container before every use especially when the dust container is full.
16.The product can be used in a temperature between 0 to 40 degrees Celsius.
17.Do not use this product in high temperature environment.
18.Please remove the battery from the machine before disposing.
19.Please switch off power before removing the battery.
20.Please recycle the discarded batteries safely.
01
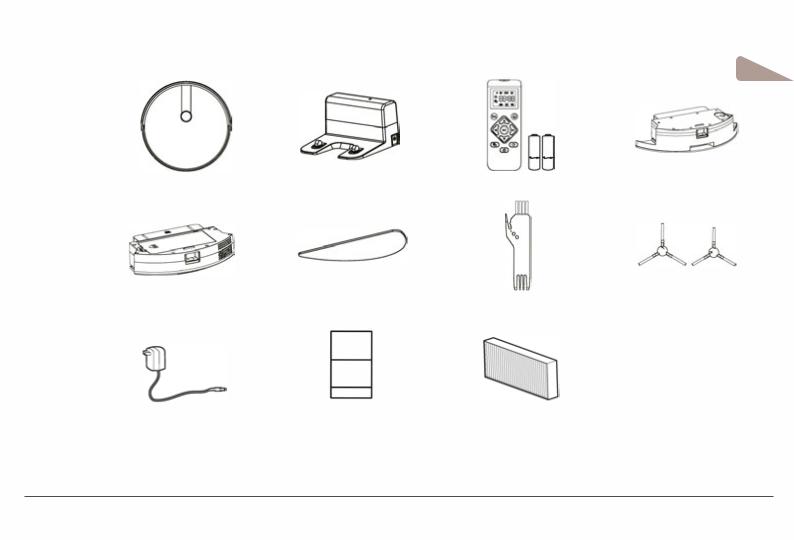
Product Composition / Package Contents
EN
Robot |
Charging Station |
Romote Control (incl. battery x2) |
WaterTank |
Dust Box |
Mopping Cloth |
Cleaning Brush |
Side Brush x2 |
lnstruction manual
Adapter |
lnstruction manual |
Hepa filter |
02
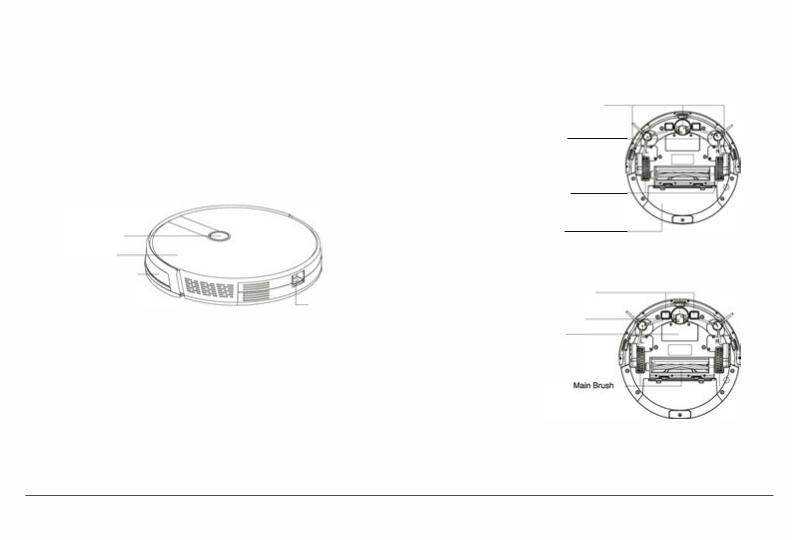
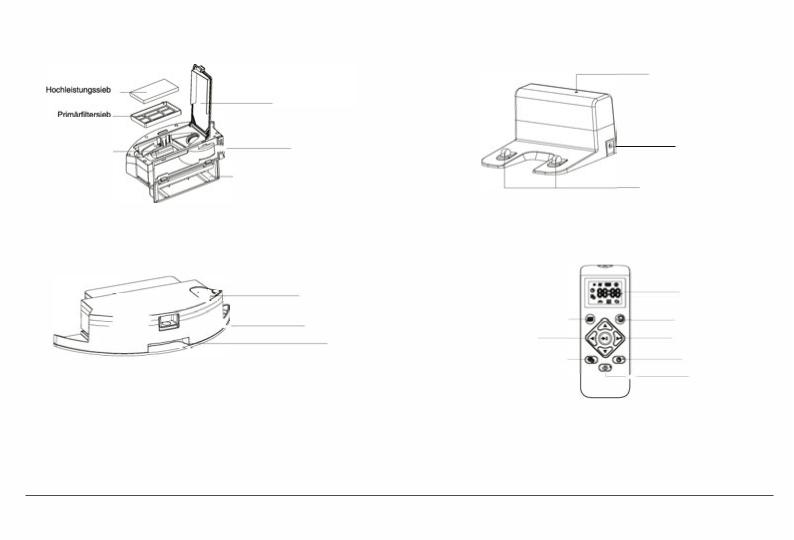
Product Composition / Part Name
Front Robot
Start/Pause Button
Main Cover
Omnidirectional Lens
Back Robot
Downsense Sensor
Side Brush
DriveWheel
Dust box
Charging Poles
Dust Box/Water Tank Button
UniversalWheel
Battery
03
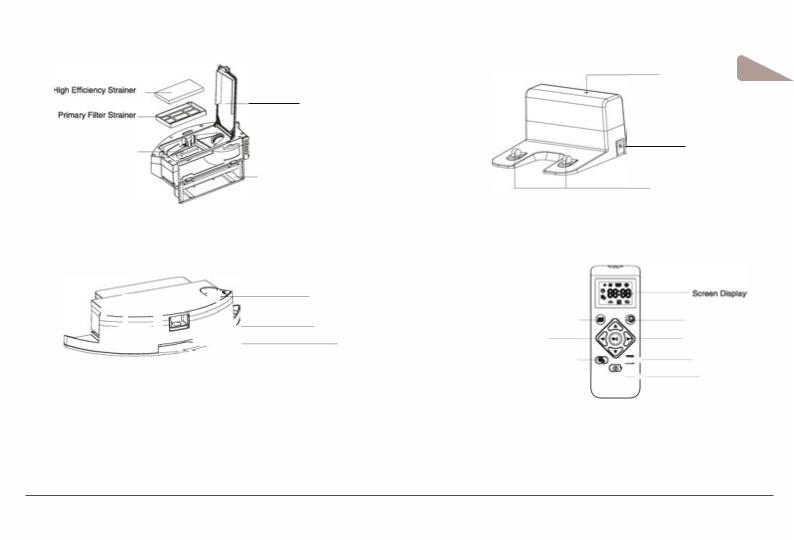
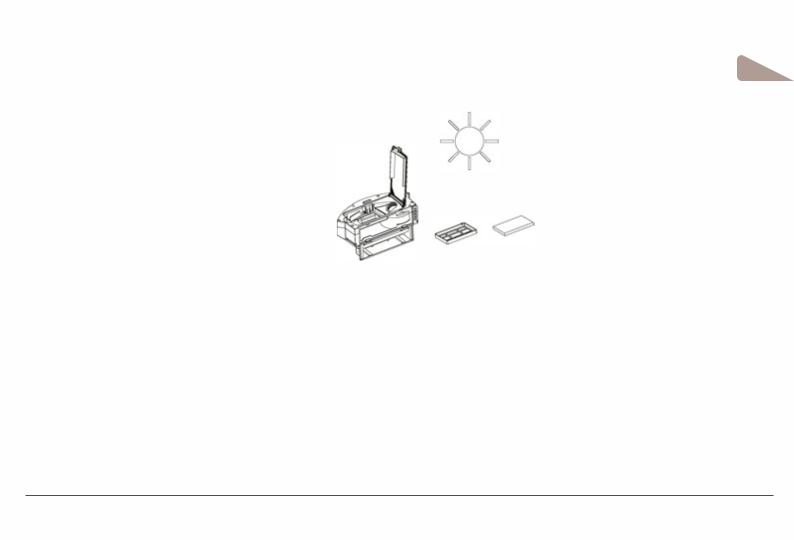
Dust Container |
Charging Station |
High Efficiency Net Cover
Dust Box Metal Sheet |
|
Dust Box Side Cover |
|
Dust Box/Water Tank Conductive Sheet
Waier Tank and Mopping Cloth
: |
; |
|
|
- -- |
7 |
|
|||
: |
|
|
Water lnjection Port |
|
-----=-- - - - - - - |
Water Tank |
|||
|
|
|
|
Mopping Cloth |
Remote Control
Auto Cleaning mode
Start/Pause
Time Scheduling Settings
Signal lndicator |
EN |
|
Dc Plug
Charging Dock Pins
Mode Switching
Direction Button
r111,t |
t- - - |
Clock Settings |
+- |
- - - |
Recharging |
04
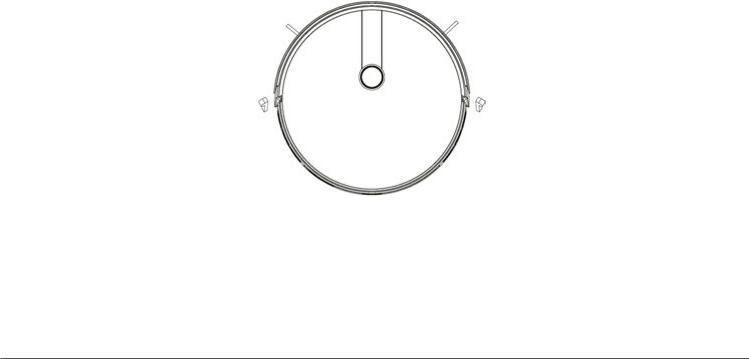
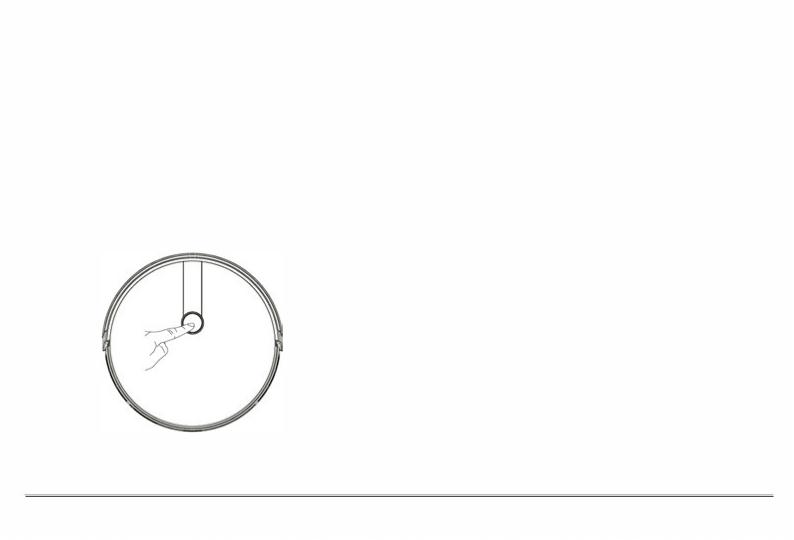
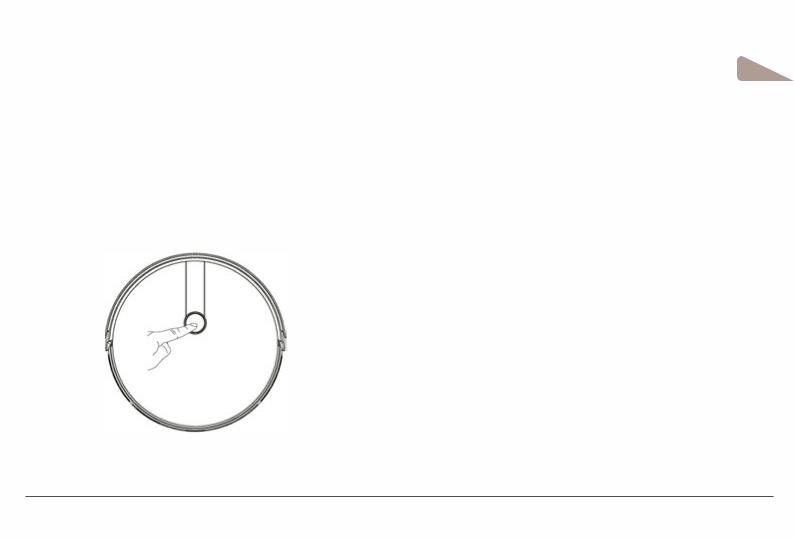
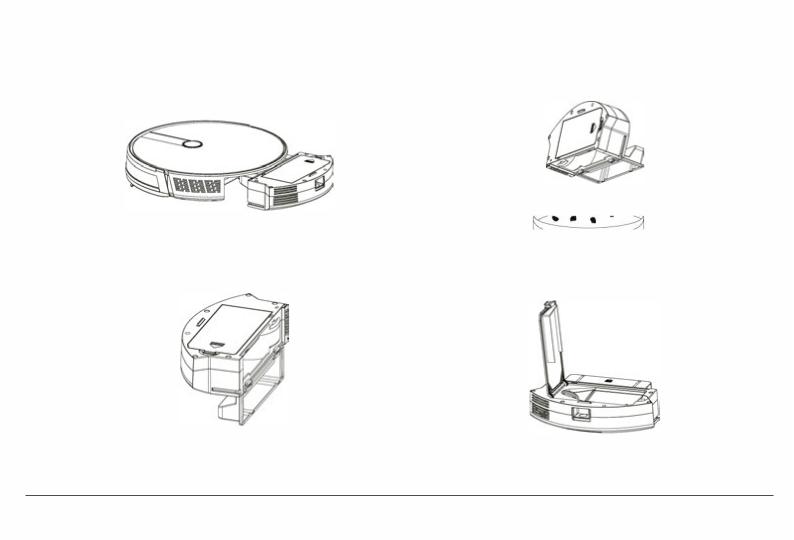
Product Usage / Preparation
Remove Protection
Before using the Robot, remove the protective strip on the Robot and remove the protective film on the charging station.
Direction Control
05
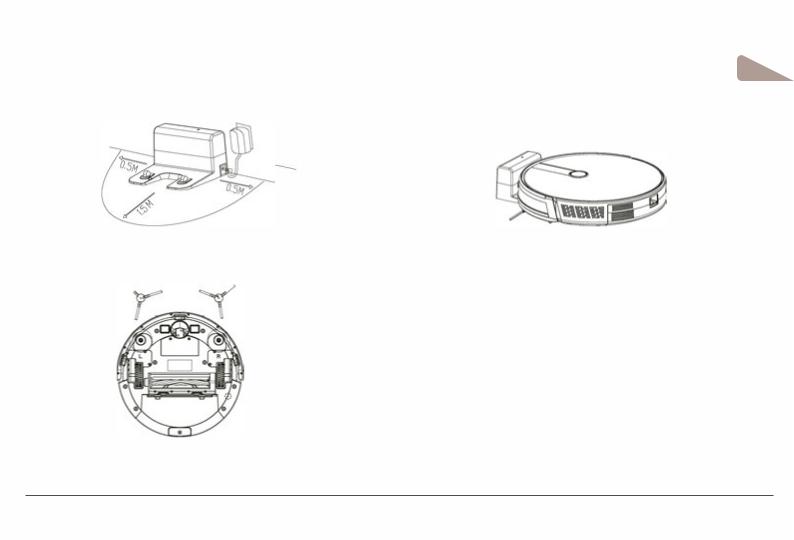
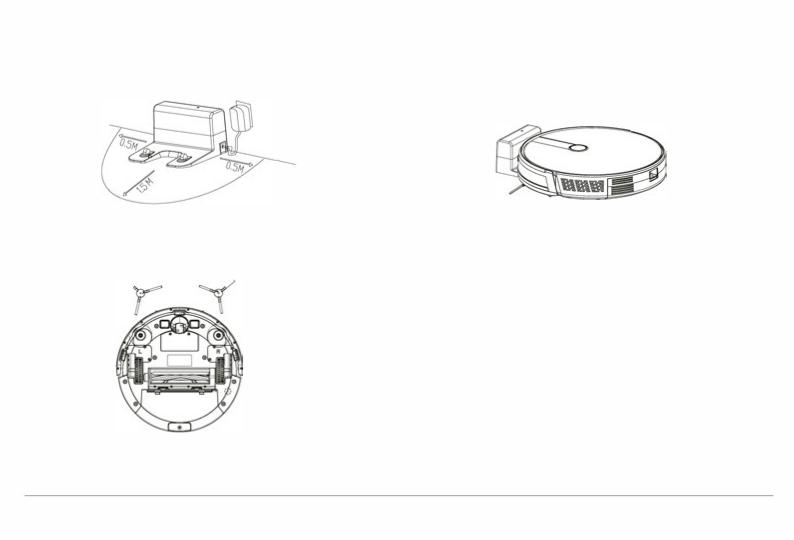
Product Use / Robot Charging
1.Placing and charging :Place charging station against the wall and on a flat ground. Do not place items within the range of 0.5m left and right and 1.5m in front.
2.Connect the power supply.
3.lnstalling side brush: lnstall the side brush according to the left and right (UR).
EN
4. Charging: Place the Robot on the charging station for charging During charging, the indicator light flashes. When the charging is over, the light remains on. The charging time is about 5 hours.
During the cleaning process, the Robot will automatically switch “Rechargingto” mode when the battery is low and automatically finds the charging station to
charge. You can |
also command the Robot to switch “Rechargingto” mode through |
the “Recharging” |
button on the remote control.@ |
0 Charging attention:
1.The charging station cannot be used in environments with streng refleclion such as direct sunlight and nearby mirrors.
lf there is any object with streng reflection, please cover it 7 cm from the bottom.
2.In order to ensure that the Robot operates in full, please fully charge it before use. The charging time is about 5 hours.
3.When charging, do not attach the water tank to ensure the safety of charging and prevent wet rags from damaging the floor.
06
Product Use / Start Cleaning
According to different cleaning needs, this product has a variety of cleaning mode to choose from. You can start various cleaning mode through a Robot, remote control or app.
Auto Cleaning
Applicable scenario: The most commonly used cleaning method is that the main engine uses a bow-shaped path to plan and clean the whole hause according to the actual harne environment.
Setting method: In the shutdown state, press and hold the start/pause button. When the indicator light of the Robot is on, this indicates that the Robot is powered on. When the
button is pressed for a short time, or you use the automatic cleaning bottom @) on the remote control, the Robot starts automalic cleaning.
For enter the Robot super sunction mode, Press the {§vone more time again.
Single Room Cleaning:
Applicable scenario: Used to cleaning the single room Setting method :Click the remote control mode switch button to select the single room cleaning mode to start the single room cleaning.
Friendly reminder: When one single room is in need of cleaning, please close the door and the Robot will do centralized cleaning in the room. If this room does not have a charging station, the Robot will return to the starting point after cleaning.
Single room cleaning mode is always the super sunction cleaning model.
Edge Cleaning
Applicable scenario: For indoor corners cleaning, the Robot cleans along |
the |
|
perimeter of fixed objects (such |
as walls), and returns to the charging |
station |
after the edge cleaning is finished. |
|
|
Setting method: Click the“Mode |
Switch” button@ on the remote control to select |
|
the Edge cleaning mode to start the edge cleaning. |
|
|
Manual Control
Applicable scenario: Suitable for manual control cleaning.
Setting method: Click the“Direction” button on the remote control(:), to control the robot to move forward and backward and turn etc.
07

Product use / Pause, Start and Shutdown
|
EN |
Pause: |
During the operation of the Robot, press the Robot start/pause button“Pauseor ” button on the remote controle to pause the operation of the Robot. |
Start: If the Robot stops working for more than ten minutes, it will automatically switch to sleep mode (all the Robot lights are off). You can wake up the Robot by clicking the Robot start/pause button first; then click the Robot button again or any keys on the remote control and APP to restart.
Shutdown: After the Robot stops working, press the Robot start/pause button for a long time. When the indicator light of the Robot is off, it means the Robot is shut down.
*Recommendation: after the Robot finishes its work, do not shut down but keep it in charging state in order to perform better next time.
Product Usage / Time Scheduling Setting
Scheduling settings: |
Press the“Scheduling” button (!i) ton remote control for a short time to set the Robot time scheduling. |
After you have set the time scheduling, the Robot will automatically start cleaning at the scheduled time.
PS: Before scheduling setting, you need to set the Robot time through timing setting button@on the remote control.
08
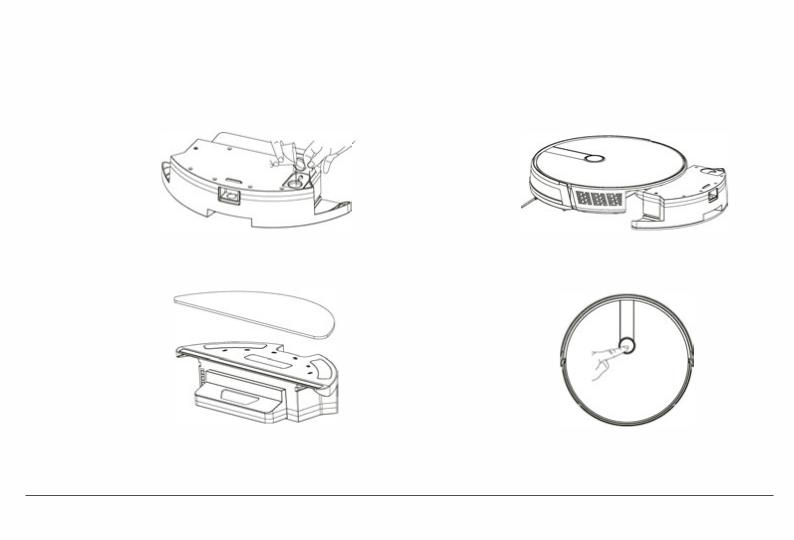
Product Use / Water Tank Use
Do not use the floor mopping function on carpets.
After mopping the floor, please empty the water tank in time and remove the mopping cloth.
A. Add water
B. lnstall Mopping Cloth
C. lnstall the Waier Tank Assembly
D. Start Mopping the Floor
09
Component maintenance / Dust Container
A. Press the dust box button to take out the dust box |
C. Empty dust container |
EN |
|
B. Open the dust box side cover |
D. Open the lid of the high efficiency filter |
10
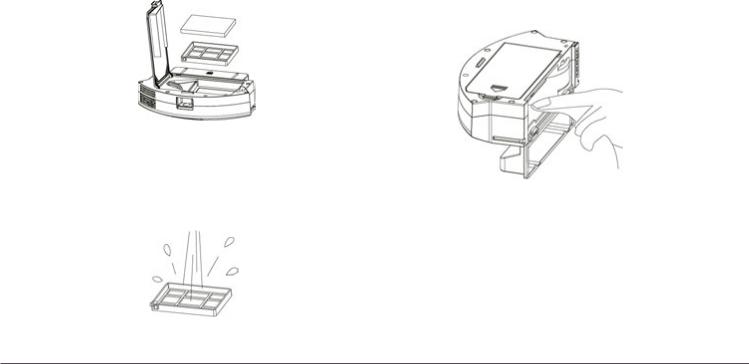
E.Take out the high-efficiency filter and the primary filter. Tap gently on the high-efficiency filter to remove dust.
! Attention: Do not clean the high-efficiency filter with water.
F.Rinse the primary filter screen
dJ
G. The dust container can be cleaned with a dishcloth.
! Attention: Do not wash the dust container with water
11
EN
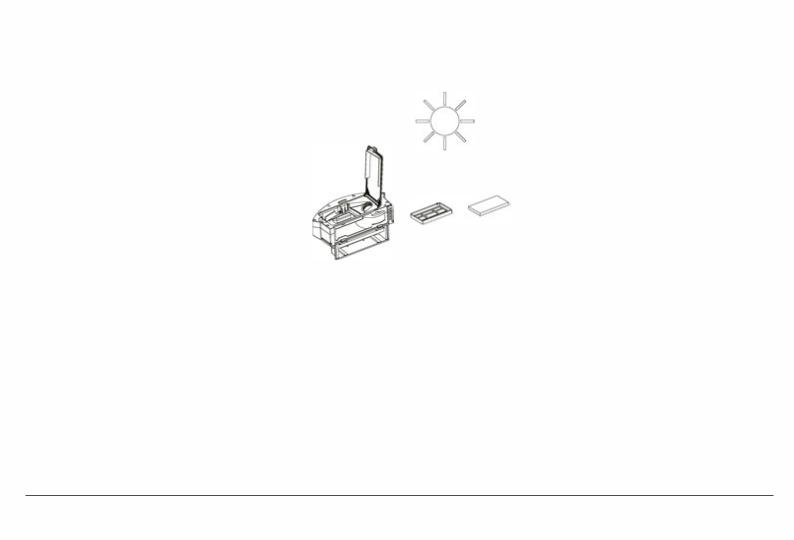
H. Air dry the dust container and filters; keep them dry to ensure its service life. Recommendation: wash the primary filter with water after use of approx. 15 - 30 days. The maximum service life of the high efficiency filter is 3 months.
II. Place the primary filter and the high efficiency filter back into the dust container
Attention:
1.Before installing the filter, please ensure that the high efficiency filter and the primary filter are in a dry state.
2.Do not expose the high efficiency filter and primary filter to direct sunlight.
J.Close the dust conainer cover and install the dust container in the Robot.
0Note: Do not allow water to seep into the fan port when cleaning.
12
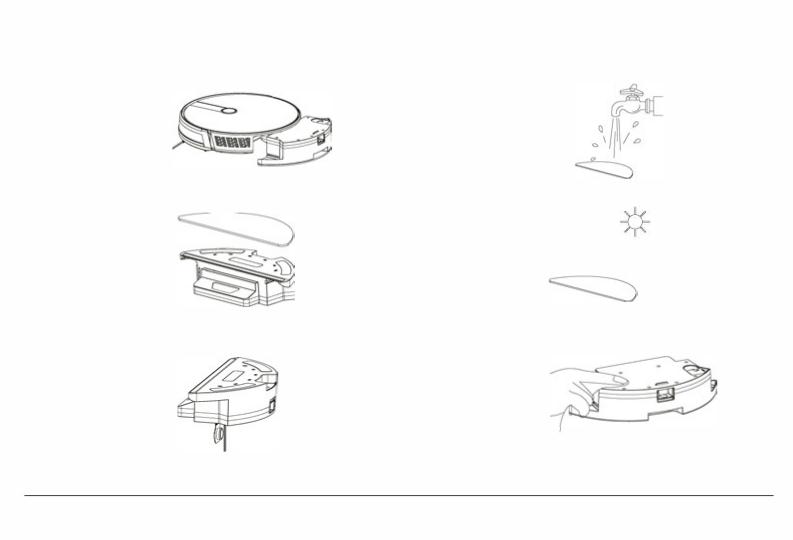
Component Maintenance / Water Tank and Mopping Cloth
A. Take out the water tank |
D. Rinse Cloth |
|
E. Air dry
B. Remove the mopping cloth
C. Empty the Waier Tank |
F. Dry or air dry the water tank |
|
13
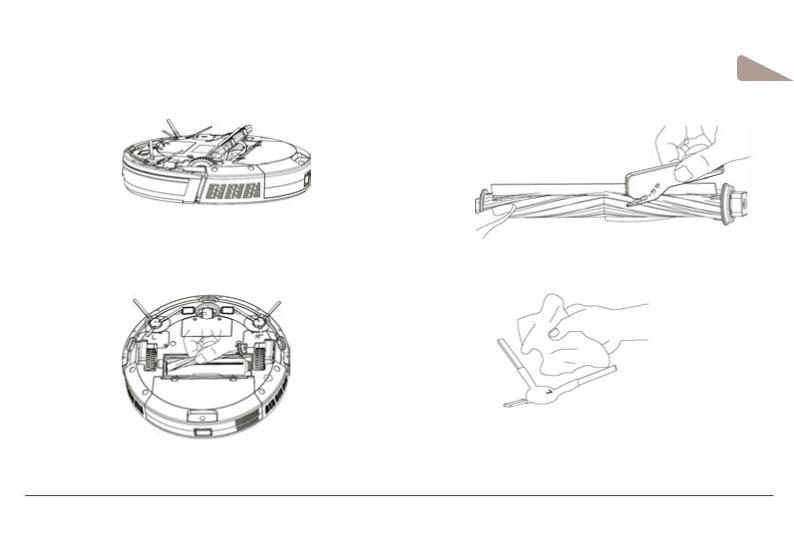
Component maintenance / main brush and side brush
EN
A.Open the main brush cover |
C.Thread removal tool |
B.Take out the main brush shaft |
D.Cleaning main brush |
14
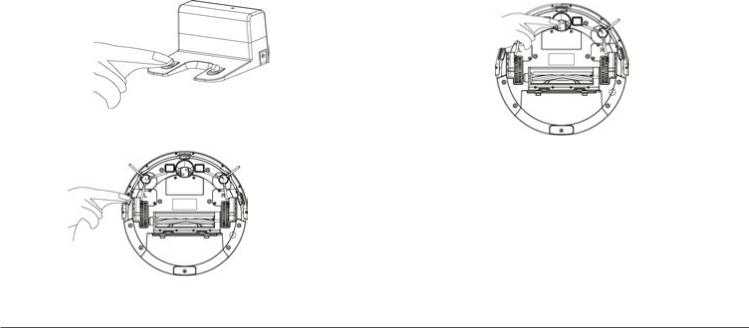
Component maintenance / charging dock pins, down view sensor, drive wheel and universal wheel
Attention: The interior of the charging station pins, the down-view sensor and the bumper all contain sensitive Electronic components. Please use at all times a dry dishcloth when cleaning! Do not use any wet cloths in order to prevent damage caused by water inflow.
Clean charging station pins |
Clean drive wheels and universal wheel |
Clean the down-view sensor
If the product will not be used for a longtime, you need to fully charge it and turn it off before storing. The robot must be re-supplied with power every 3 months to maintain the life of the battery. If the battery is discharged or is not used for a longtime, the product may not be able to be charged. Please contact us for after-sales maintenance and do not disassemble it yourself.
15
Troubleshooting
No. Message
Wheels off the ground
2Dust box not installed
3Battery failure
4Please check if the wheel is stuck
5Please check if the front collision is stuck
6Robot connection failed
7The battery is low, please charge the machine
8Please check whether the side brush is tangled or jammed
Please move the machine to the open area.
Cause
Robot suspended
Dust box removed and not installed
Abnormal battery charging
Wheel jammed
Front impact bracket stuck
Machine failed to connect to server
Battery power less than 20 %
Abnormal edge brushing
The machine failed to get out of trouble.
EN
Solution
Please put the Robot back to the ground and press the cleaning key again.
Place the dust container back into the Robot and press cleaning button again.
Contact after-sales for battery test.
Remove any possible objects which causes the jammed wheel.
Check whether the front collision can rebound normally .
Check connectivity of the wireless network with the internet.
The machine automatically enters to the recharge mode,
Remove any possible objects which causes the jammed side brush.
Please move the Robot to an empty place and press the cleaning button again.
16

Product Parameter
Classification
Structural class
Battery
Parameter
Rabat
Projects
Diameter
Height
Net weight
Voltage
Battery
Dust box capacity
Waier tank capacity Charging type
Cleaning mode Primary charging time Working time
Rated power (w)
Operating voltage ( v )
Parameter
330 mm
76 mm
2.7kg
14.4volls
2500 mAh rechargeable lithium battery pack
600 ml
350 ml
Automatic charging/ manual charging Auto/si ngle room/ edge/ mop floor Apprx. 5hours
Apprx. 10 0 minutes
28
14.4
* Due to the continuous improvement of the product, this information is subject to the physical object. We reserve the right to update the product at any time.
17
Sicherheitsbestimmungen
Bevor Sie dieses Produkt verwenden, lesen Sie bitte die folgenden Sicherheitshinweise und befolgen Sie alle üblichen Sicherheitsvorkehrungen.
Bitte lesen Sie die Anweisungen sorgfältig durch und bewahren Sie die Anweisungen auf.
Jeder Betrieb, der nicht mit dieser Bedienungsanleitung übereinstimmt, kann zu Schäden am Produkt führen.
0Hinweis:
1.Nur autorisierte Techniker können dieses Produkt zerlegen. Benutzern wird nicht empfohlen, dieses Produkt selbst zu zerlegen.
2.Dieses Produkt kann nur das vom Hersteller mitgelieferte Netzteil verwenden. Wenn andere Adapter verwendet werden, kann das Produkt beschädigt werden.
3.Berühren Sie keine Kabel, Steckdosen oder Netzteile, wenn Ihre Hände nass sind. 4.Stellen Sie sicher, dass keine Stoffe und Körperteile in die Antriebsräder des Produkts gelangen.
5.Stellen Sie dieses Produkt nicht in der Nähe von Zigarettenkippen, Feuerzeugen und anderen schwelenden Bränden auf.
6.Bitte reinigen Sie das Produkt nach dem Laden.
7.Biegen Sie die Drähte nicht zu stark und platzieren Sie keine schweren und scharfen Gegenstände auf der Maschine.
8.Dieses Produkt ist ein Haushaltsprodukt für den Innenbereich. Verwenden Sie es nicht im Freien.
9.Setzen Sie sich nicht auf das Produkt.
10.Verwenden Sie dieses Produkt nicht in feuchter Umgebung (z. B. Badezimmer).
11.Bevor Sie dieses Produkt verwenden, entfernen Sie bitte alle anfälligen Gegenstände (z. B. Gläser, Lampen usw.) auf dem Boden sowie Gegenstände (z. B. Drähte, Päckchen, Vorhänge), die die Seitenbürsten und die Luftansaugkanäle verhaken könnten.
12.Stellen Sie dieses Produkt nicht an einem Ort auf, an dem es leicht fallen kann (z. B. auf Schreibtische und Stühle).
13.Prüfen Sie vor dem Gebrauch sorgfältig, ob das Netzteil an die Steckdose angeschlossen ist. Andernfalls kann der Akku beschädigt werden.
14.Um ein Stolpern zu vermeiden, informieren Sie bitte andere Mitglieder Ihres Haushaltes, wenn dieses Produkt in Betrieb ist.
15.Bitte leeren Sie die Staubbox, wenn sie voll ist,bevor Sie das Produkt wieder verwenden. 16.Die für dieses Produkt verwendete Temperatur beträgt 0 bis 40 Grad Celsius. 17.Verwenden Sie dieses Produkt nicht in Umgebungen mit hohen Temperaturen.
18.Bitte nehmen Sie den Akku aus dem Gerät, bevor das Produkt verschrottet wird. 19.Stellen Sie sicher, dass dieses Produkt beim Herausnehmen des Akkus nicht eingeschaltet ist.
20.Bitte entsorgen Sie die verbrauchten Batterien ordnungsgemäß.
Awarnung:
1.Verwenden Sie nur den vom Hersteller mitgelieferten Original-Akku und die Ladestation. Nicht aufladbare Batterien sind strengstens verboten. Informationen zu den Batteriespezifika tionen finden Sie unter "Produktparameter".
2.Es ist verboten das Produkt in Umgebungen mit offenen Flammen oder empfindlichen Objekten zu verwenden.
3.Es ist verboten das Produkt bei extrem heißen (über 40°C) oder extrem kalten (unter 0°C) Temperaturen zu verwenden.
4.Es ist verboten, dass sich menschliches Haar, Kleidung, Finger und andere Teile der Öffnung und den Betriebsteilen des Produkts nähern.
5.Es ist verboten das Produkt auf nassem oder wasserbedecktem Boden zu verwenden. 6.Es ist verboten, dass das Produkt Gegenstände wie Steine und Altpapier aufnimmt, die das Produkt verstopfen könnten.
7.Es ist verboten, dass das Produkt entzündbare Substanzen wie Benzin, Toner und Toner für Drucker oder Fotokopien aufnehmen. Verbieten Sie die Verwendung des Produkts in sauberen Bereichen mit brennbaren Gegenständen.
8.Es ist verboten, dass das Produkt brennende Gegenstände wie Zigaretten, Streichhölzer, Asche und andere Gegenstände, die einen Brand verursachen können, aufnimmt.
9.Es ist verboten, Gegenstände an der Absaugöffnung zu platzieren. Verwenden Sie das Produkt nicht, wenn der Sauganschluss verstopft ist. Reinigen Sie Staub, Watte, Haare usw. an der Saugöffnung, um eine reibungslose Luftzirkulation an der Saugöffnung sicherzustellen. 10. Verwenden Sie das Netzkabel vorsichtig, um Beschädigungen zu vermeiden. Es ist verboten, das Produkt und die Ladestation des Produkts mit dem Netzkabel zu ziehen. Es ist verboten, das Netzkabel als Griff zu verwenden. Es ist verboten, das Netzkabel im Schlitz der Tür festzuklemmen. Das Ziehen des Netzkabels an scharfen Ecken ist verboten. Das Produkt darf nicht am Netzkabel laufen, solange sich das Netzkabel nicht in der Nähe der Wärmequelle befindet.
11.Verwenden Sie keinen beschädigten Ladestation.
12.Auch wenn das Produkt schwer beschädigt wurde, ist das Verbrennen des Produkts verboten, da es zu einer Explosion der Batterie des Produkts führen kann.
18

Produktzusammensetzung / Packungsinhalt
Roboter |
Ladestation |
Fernbedienung (mit Batterien x2) |
Wassertank |
Staubbox |
Wischpad |
Reinigungsbürste |
Seitenbürste x2 |
lnstruction manual
Adapter |
Bedienungsanleitung |
HEPA-Filter |
19
Produktzusammensetzung/ Namen der Teile
Vorderer Roboter
Oberflächenabdeckung
Omnidirektionale Linse
Staubbox/ Wassertank-Taste
Hinterer Roboter
DE
Boden-/Abgrundsensor
Seitenbürste
Lenkrad
Staubbox
Ladekontakte
Universalrad
Batterie
Hauptbürstenbaugruppe
20
Staubbox |
Ladestation |
obere Filterabdeckung
Staubkastenblech |
lllll-- - - - - |
Staubkastenseitenabdeckung |
Staubbox/Wassertank-Leitfolie
Wassertank und Wischpad |
|
|
|
Fernbedienung |
|||
_ |
|
_ -.-:'. |
- |
Wassereinfüllung |
Automatischer Reinigungsmodus |
||
|
|
|
|
- - - - - - - |
Wassertank |
||
|
|
|
|
|
|
Wischpad |
Start/ Pause |
Zeitplanungseinstellungen
Signalanzeige
Stromversorgung
Ladekontakte
Bildschirmanzeige
Modusumschaltung
Richtungssteuerung
Uhreinstellungen
----i - - - - -Aufladen
21

Produktverwendung / Vorbereitung
Entfernen Sie vor dem Einsatz des Roboters den Schutzstreifen am Roboter! |
DE |
|
|
Entfernen Sie den Schutzstreifen! |
|
22
Produktnutzung /Aufladen des Roboters
1.Aufstellen und Laden: Die Ladestation muss auf einem flachen Boden an einer Wand stehen. Legen Sie keine Gegenstände im Bereich von 0,5 m links und rechts neben und 1,5 m vor die Ladestation.
2.Schließen Sie die Stromversorgung an.
3.Seitenbürsten installieren: Die Seitenbürsten links und rechts einbauen (L / R)
4.Aufladen: Stellen Sie den Roboter zum Aufladen auf die Ladestation (während des Ladevorgangs blinkt die Kontrollleuchte. Der Ladevorgang ist beendet, wenn die Kontrollleuchte dauerhaft leuchtet). Die Ladezeit beträgt ca. 5 Stunden.
Während des Reinigungsvorgangs kann der Roboter feststellen, dass die Stromversorgung unzureichend ist, und der Roboter startet automatisch den Auflademodus. Sie können dem Roboter auch den Befehl geben, den Auflademodus zu starten, indem Sie die Taste der Fernbedienung drücken.
OAchtung:
1.Die Ladestation darf nicht in Umgebungen mit starker Reflexion wie direktem Sonnenlicht und Spiegeln in der Nähe verwendet werden.
Bei stark reflektierenden Objekten decken Sie diese bitte 7 cm hoch vom Boden ab. 2.Um die normalen Arbeitszeiten des Roboters sicherzustellen, laden Sie diesen vor der Verwendung vollständig auf. Die Ladezeit beträgt ca. 5 Stunden.
3. Beim Laden muss der Wassertank entfernt werden, um die Ladesicherheit zu gewährleisten und Wasserflecken auf dem Boden durch austretendes Wasser zu verhindern.
23
Produktverwendung: Reinigung beginnen
Dieses Produkt hat eine Auswahl an verschiedenen Reinigungsmodi. Diese können über den Roboter, die Fernbedienung oder die App starten.
Automatische Reinigung
Anwendbares Szenario: Die am häufigsten verwendete Reinigungsmethode ist, dass der Hauptmotor einen bogenförmigen Pfad verwendet, um das gesamte Haus entsprechend der tatsächlichen häuslichen Umgebung zu planen und zu reinigen.
Einstellmethode: Drücken Sie im heruntergefahrenen Zustand die Taste für längere Zeit.
Wenn die Kontrollleuchte des Roboters leuchtet, ist der Roboter eingeschaltet. Wenn die Taste kurz gedrückt wird oder die Taste für die automatische Reinigung @ der
Fernbedienung gedrückt wird, beginnt der Roboter mit der automatischen Reinigung. Drücken Sie zum Aufrufen des Supersaugmodus erneut @
DE
Einzelzimmerreinigung:
Anwendbares Szenario: Klicken Sie auf die Schaltfläche für den Fernbedienungsmodus, um den Einzelraum-Reinigungsmodus auszuwählen und um die Einzelraumreinigung zu starten. Tipp: Wenn nur ein einziges Zimmer gereinigt werden muss, schließen Sie bitte die Tür. Der Roboter führt eine zentrale Reinigung in diesem Zimmer durch. Wenn dieses Zimmer keinen Ladesitz hat, kehrt die Reinigung zum ursprünglichen Punkt zurück.
Der Einzelraumreinigungsmodus erfolgt immer immer imSuper SunctionReinigungsmodus.
Kantenreinigung
Anwendbares Szenario: Für die Reinigung von Innenecken reinigt der Roboter entlang des Umfangs fester Objekte (z. B. Wände) und kehrt nach Beendigung der Kantenreini gung zur Ladestation zurück.
Einstellmethode: Klicken Sie auf den Fernbedienungsmodus-Schalter @ , um den Kantenreinigungsmodus auszuwählen, um die Kantenreinigung zu starten.
Manuelle Kontrolle
Anwendbares Szenario: Geeignet für die manuelle Kontrolle.
Einstellmethode: KlickenSie auf die Schallfläche der Fernbedienung , um den Roboter so zu steuern, dass er sich vorwärts und rückwärts bewegt und dreht.
24

Pause: Drücken Sie während des Betriebs des Roboters die Robotertaste oder die Pausetaste der Fernbedienung 0 ,um den Betrieb des Roboters zu unterbrechen.
Aufwecken: Nach 10 Minuten Inaktivität, wechselt der Roboter automatisch in den Schlafmodus (alle Lampen des Roboters sind aus). Sie können den Roboter wieder aktivieren, indem Sie zuerst auf die Robotertaste klicken und dann auf die Robotertaste oder eine beliebige Taste der Fernbedienung oder App.
Ausschalten: Wenn der Roboter nicht mehr funktioniert, drücken Sie die Robotertaste lange. Wenn die Kontrollleuchte des Roboters erlischt ist er augeschaltet.
* Nachdem der Roboter seine Arbeit beendet hat, wird empfohlen, ihn nicht abzuschalten, um beim nächsten Reinigungsvorgang ausreichend geladen zu sein.
Produktnutzung: Start-Zeitplanung
Terminplanung: Drücken Sie die Fernbedienungstaste (!) |
, um die Startzeitplanung einzustellen. Drücken Sie die Taste @ und drücken Sie dann die Taste |
, um |
die Planungszeit einzustellen. Nachdem Sie die Schaltfläche |
{!) gedrückt haben, ist die Einstellung abgeschlossen. Der Roboterwird täglich zur eingestellten Zeit starten. |
|
HINWEIS: Vor der Einstellung der Zeitplanung müssen Sie mit der Taste @ zuerst die Uhr des Roboters einstellen. Drücken Sie die Taste@ und anschließend die Taste um die Uhrzeit des Roboters einzustellen Drücken Sie anschließend@ , um die Einstellung abzuschließen.
25

Produktverwendung: Bodenwisch-Funktion |
|
|
ACHTUNG: Verwenden Sie die Bodenwisch-Funktion nicht für Teppiche. |
DE |
|
Nachdem Sie den Boden gewischt haben, leeren Sie den Wassertank rechtzeitig und entfernen Sie das Wischpad. |
||
|
||
1. Füllen Sie zu erst Wasser in den Tank |
2. Installieren Sie den Wassertank. |
3. Stecken sie den Wischmop an.
4. Starten Sie den Wischvorgang.
26
Komponentenwartung: Staubbox
A. Drücken Sie die Staubbox-Taste, um die Staubbox herauszunehmen. |
C. Entleeren Sie den Inhalt |
B. Öffnen Sie die seitliche Abdeckung des Staubbox.
D. Öffnen Sie die obere Netzabdeckung .
27

E. Entnehmen Sie die Filter und Einlagen. Diese dürfen nicht mit Wasser gereinigt werden. Statt dessen klopfen Sie diese vorsichtig mit der Hand aus, um Staub zu entfernen.
DE
G. Die Staubbox bitte mit einem Geschirrtuch reinigen.
Lassen Sie bei der Reinigung kein Wasser in den Lüfleranschluss gelangen.
F. Spülen Sie das Hauptfiltersieb ab.
dr
28
H. Trocknen Sie den Staubbehälter und die Filterbaugruppe und bewahren Sie sie trocken auf, um die Lebensdauer sicherzustellen.
Hinweis: Es wird empfohlen, das Primärsieb 15 bis 30 Tage nach seiner Verwendung mit Wasser zu waschen. Die maximale Lebensdauer des Hochleistungsfiltersiebs beträgt 3 Monate.
1. Setzen Sie das Hauptfiltersieb und das Hochleistungsfiltersieb in den Staubbehälter ein.
Hinweis: 1. Stellen Sie vor der Installation des Filtersiebs sicher, dass das Hochleistungsfiltersieb und das Hauptfiltersieb trocken sind. 2. Setzen Sie das Hochleistungssieb und das Primärsieb der Sonne nicht aus.
J, Decken Sie den Staubbehälterdeckel ab und installieren Sie den Staubbehälter am Roboter
0Hinweis: Lassen Sie bei der Reinigung kein Wasser in den Lüfteranschluss gelangen.
29
 Loading...