


G-Sensor
Built-in GPS
140°Wide Angle Lens
Support up to 64 GB SDHC
BP 3.0 FHD GPS
1131 599 130 001

Index
English------------------------------------------------------------ |
1—18 |
Deutsch--------------------------------------------------------- |
19—36 |
Français--------------------------------------------------------- |
37—54 |
Polski------------------------------------------------------------ |
55—72 |
Español---------------------------------------------------------- |
73—90 |
Português ----------------------------------------------------- |
91—108 |
Nederlands -------------------------------------------------- |
109—126 |
Italiano------------------------------------------------------- |
127—144 |
Suomi--------------------------------------------------------- |
145—162 |
čeština ------------------------------------------------------- |
163—180 |
Român-------------------------------------------------------- |
181—198 |
Русский------------------------------------------------------ |
199—216 |

User manual
1

Before using the product, please read this manual carefully.
The manual is to guide your usage of this product specially.
Caution:
1.Please strictly abide by the relevant national law. This product can not be used for illegal purposes; otherwise take the responsibility by yourself.
2.Please insert the micro SD card in right direction to avoid damage the card or DVR. If DVR writes'Please Insert SD Card Again', please enter into setting menu and format micro SD card. If it is still the same, please change another micro SD card.
Note: Format micro SD card will delete all files. Please backup the important files before format it.
3.Recommend to use CLASS 6 or above micro SD card. Owing to 64GB micro SD card doesn't have unified standard in the market, not all 64GB micro SD card can be compatible to this DVR.Please test it on DVR before purchase.
4.It is suggested to backup files in micro SD card once a week. This product is not the exclusive storage device, so please backup the important files timely to avoid files is missing.
5.Please check the bracket carefully after installation to avoid damage.
6.The working time of the built-in battery will shrink with the using time increased. If the DVR will not work for a long time, please charge it every two months to avoid over-discharged which shortens lifespan of battery.
7.Please do not take the product under the moist environment. It is not waterproof.
8.Please do not take pictures or movie directly to the sun.
9.Please do not use this product in excessive dust environment in case of the lens and other components to be contaminated and affect the video quality. Please keep lens clean with soft cloth or exclusive wipes.
10.This product belongs to precision electronic products which can not bear heavy hit and do not use it in high magnetic and electronic working environment.
11.Working temperature for this device is -10 -50 and storage temperature is -20 -70 . Continuous exposure to direct sunlight for an extended period of time, may cause the device to malfunction, color change, housing and image distortion, especially in locked cars where cabin temperature exceeds 70 .
2

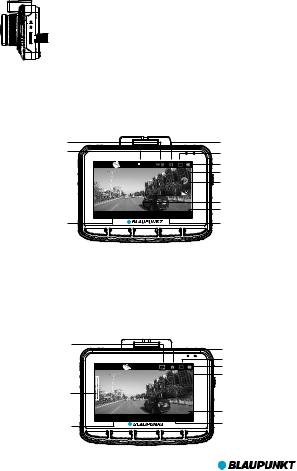
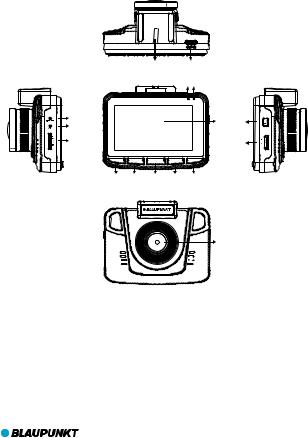
1. Structure
|
|
1 |
|
2 |
|
|
|
|
12 13 |
3 |
|
|
|
|
4 |
|
|
|
|
5 |
|
|
|
|
UP |
MENU |
OK |
MODE |
DOWN |
6 7 8 9 10
11 |
14 |
|
15 |
/ F
2
.
2
;
.0mm 3 f=
1
4
0°Wid e
A
n
g
l e
16

 17
17
1. |
Bracket Hole |
7. |
MENU Key |
13.Power Indicator Light |
2. |
USB Port |
8. |
OK Key |
14.ON/OFF Key |
3. |
RESET |
9. |
MODE Key |
15.HDMI Output |
4. |
Microphone |
10.DOWN Key |
16.Lens |
|
5. |
Micro SD Card Slot |
11.LCD |
17.Speaker |
|
6. |
UP Key |
12.Working Indicator Light |
||
3
2.Features
1.Support multiple video resolutions, such as 1080P, 720P and etc with superior video and image quality;
2.Support 60fps for high-speed recording;
3.High definition CMOS lens module with wide viewing angle;
4.Built-in microphone/speaker;
5.With Voice/Mute Recording shortcut Key;
6.With LCD OFF shortcut Key;
7.Support high capacity micro SD card;
8.Support seamless loop recording and as recording as charging;
9.Automatically take video when car engines on and turn off when car engines off; 10.Support motion detection;
11.Support SOS and G-Sensor to prevent important files from being overwritten; 12.Support HDMI output;
13.Support parking monitoring function; 14.Support GPS tracking function; 15.Support driver ID;
16.Support multi-language.
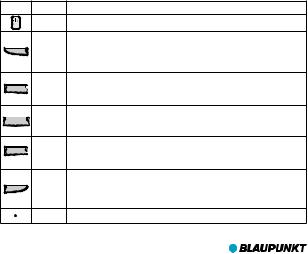
3.Key Definition and Function
Picture |
Definition |
Function |
|
|
ON/OFF |
Long press to power on/off. |
|
|
|
In Movie or standby mode, short press UP key to turn on/off voice recording; |
|
UP |
UP |
In Still Capture mode, short press UP key to zoom in; In setting mode and |
|
preview mode, short press UP key to select; In video playing or pause status, |
|||
|
|
||
|
|
short press UP key to fast backward. |
In standby mode, short press MENU key to enter into setting mode and press
MENU 

 MENU it again to quit when setting is completed; In recording, short press MENU key to activate SOS function, and press it again to deactivate.
|
|
|
In Movie mode, short press OK key to pause or record; In Still Capture mode, |
OK |
|
OK |
short press OK key to take photo; In Playback mode, short press OK key to play |
|
|
|
video/pause; In setting mode, short press OK key to confirm. |
In standby mode,short press MODE key to switch Movie/Still Capture/Playback
MODE  MODE mode; In setting mode, short press MODE key to switch different mode menu; In playback mode, short press MODE key to back to preview mode.
|
In Movie mode, short press DOWN key to turn on/off LCD OFF; In Still Capture |
|
mode, short press DOWN key to zoom out; In setting mode and preview mode, |
DOWN |
DOWN |
|
short press DOWN key to select; In video playing or pause status, short press |
|
DOWN key to fast forward. |
|
RESET Pock it when DVR software crashes down. |
4

4. Indicator Light Definition
Indicator Light |
Definition |
Red |
Long steady on means DVR is charging; After full charge, red light is off. |
|
|
Green |
Long steady on means DVR is in standby mode; flicking means DVR is recording. |
|
|
5. Function
I.ON/OFF
(1)Power on
A.In off state, long press ON/OFF key for 3 seconds to power on and start recording automatically with green light flashing.
B.DVR is connecting with car charger to start recording.
Note: If there is a pop-up window to show 'SD card is not inserted', please insert micro SD card before use. When micro SD card is inserted in power on status, DVR will automatically power off.
(2)Power OFF
A.In working status, long press ON/OFF key for 3 seconds to power off.
B.In working status, DVR will automatically save the current file and power off automatically when unplug the car charger.
C.In low battery status, DVR will automatically save the current file and power off automatically.
II.Battery Charging
(1)Two ways to charge
A.with USB cable |
B.with car charger(suggested) |
(2)Battery Status Definition
|
Full |
|
Medium |
|
|
|
|
|
Low |
|
Empty |
|
|
|
|
III.Micro SD Card Insertion
Straightly insert micro SD card into the slot as indicated below until hearing 'click' sound.
5
Pop up Micro SD Card: Push forward micro SD card first and then take it
out(it is suggested to do it with DVR off )
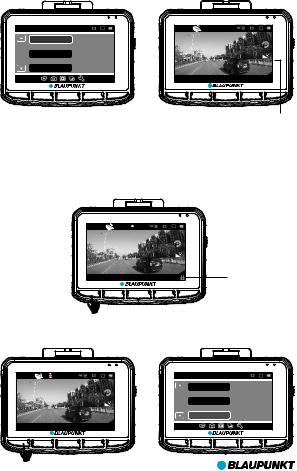
IV.Movie Mode
Power on DVR to enter into movie mode directly with green light flashing. Short press OK key to saved the current file and stop recording. The DVR enters into standby mode with green indicator light steady on. In standby mode, short press OK key to restart recording.
Resolution&Frame
Recording
Time & Date
|
|
REC |
|
|
|
|
|
EV:0.00 |
|
|
BP 3.0 FHD GPS |
0 KM/H |
ACD 1010 |
|
|
2015/09/08 |
15:12:45 |
0:01:44 |
|
UP |
MENU |
OK |
MODE |
DOWN |
Movie Mode
Micro SD Card in
Battery Status
Exposure
Movie Clip Time
Speed
Driver ID
Movie Time
V.Still Capture Mode
In standby mode, short press MODE key to enter into still capture mode and press OK key
to take photos.
In still capture mode, short press UP or DOWN key to zoom in or zoom out (Max. x 4).
Image Size
T |
EV:0.00 |
Digital Zoom |
|
|
W |
|
|
1X |
|
ACD 1010 |
2015/09/08 |
15:12:45 |
1819 |
Time & Date
Still Capture Mode
Micro SD Card in
Battery Status
Exposure
Driver ID
Photo Left
UP |
MENU |
OK |
MODE |
DOWN |
6
VI.Playback and Preview Mode
A.In standby mode,short press MODE key twice to enter into preview mode.Short press UP or DOWN key to select the video file and then press OK key to play. In video playing status, short press UP key to fast reverse and DOWN key to fast forward (max. x8). Press OK key to pause in video playing status. Short press MODE key to stop playing and go back to preview mode.
In preview mode, short press MODE key to preview photos. Short press UP or DOWN key to select the photos. OK key is pressed for full-screen preview and press UP or DOWN key to go to next or previous photo.
B.In preview mode, short press MENU key to enter into playback mode to adjust volume, delete or protect files. Short press UP or DOWN key to select 'Volume', 'Delete' or 'Protect', and press OK key to enter into submenu. Short press UP or DOWN key to select and OK key for confirmation. Then short press MENU key to quit and go back to preview mode.
Movie Preview |
|
|
|
|
|
|
Current Movie |
Photo Preview |
|
|
|
|
|
Current Photo |
||||||||||||||||
|
|
|
|
|
|
|
|
|
|
|
||||||||||||||||||||
|
|
|
|
|
|
|
|
|
|
|
|
|
|
|
|
|
|
|
|
|
|
|
|
|
|
|
|
|
|
|
|
|
|
|
|
|
|
|
|
|
|
|
|
|
|
|
|
|
|
|
|
|
|
|
|
|
|
|
|
|
|
|
|
|
|
|
|
|
|
|
|
|
|
|
|
|
|
|
|
|
|
|
|
|
|
|
|
|
|
|
|
|
|
|
|
|
|
|
|
|
|
|
|
|
|
|
|
|
|
|
|
|
|
|
|
|
|
|
|
|
|
|
|
|
|
|
|
|
|
|
|
|
|
|
|
|
|
|
|
|
|
|
|
|
|
|
|
|
|
|
|
|
|
|
|
|
|
|
|
|
|
|
|
|
|
|
|
|
|
|
|
|
|
|
|
|
|
|
|
|
|
|
|
|
|
|
100_DSC/PICT0011.AVI |
|
|
|
3 |
|
|
|
|
/ |
|
|
|
|
3 |
|
|
|
|
2015/09/08 |
15:12:45 |
[00:01:44] |
|
|
UP |
MENU |
OK |
MODE |
DOWN |
Playback |
|
|
|
|
|
Volume |
5 |
|
|
1/1 Delete
Protect
|
100_DSC/PICT0011.JPG |
|
|
|
3 |
|
|
|
|
/ |
|
|
|
|
3 |
|
|
|
|
2015/09/08 |
15:12:45 |
|
|
|
UP |
MENU |
OK |
MODE |
DOWN |
UP |
MENU |
OK |
MODE |
DOWN |
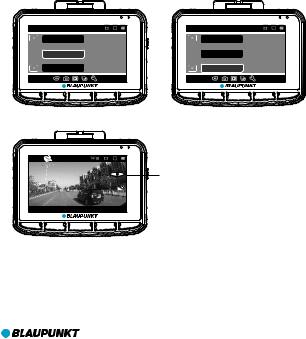
VII. G-SENSOR
In movie mode, the car brakes suddenly or is hit heavily, G-sensor will be activated to prevent the current video clip from being overwritten. Three-step sensitivity (high, medium, low) are to cater for different car owners and can be set in 'Protect Level' in General Settings.
Note: If G-sensor is activated to work in the first 10seconds of the video clip,the current and previous video clip are saved. If in the last 10seconds of the video clip,the current and the next video clip are saved. If in the middle of video clip, only the current video clip is saved.
7
General Settings |
|
|
|
|
|
Protect Level |
Middle |
|
|
4/6 |
Parking Monitoring |
Off |
|
|
|
Motion Detection |
Off |
|
|
UP |
MENU |
OK |
MODE |
DOWN |
 REC
REC
EV:0.00
|
BP 3.0 FHD GPS |
0 KM/H |
ACD 1010 |
|
|
2015/09/08 |
15:12:45 |
0:01:44 |
|
UP |
MENU |
OK |
MODE |
DOWN |
G-sensor Sensitivity
VIII.SOS
In movie mode, short press MENU key to lock the current file manually in case of the important file is overwritten in loop recording. Press MENU key again to unlock the current file.
Note: If SOS is activated to work in the first 10 seconds of the video clip, the current and previous video clip are saved. If in the last 10 seconds of the video clip, the current and the next video clip are saved. If in the middle of video clip, only the current video clip is saved.
|
|
REC |
|
|
|
|
|
EV:0.00 |
|
|
BP 3.0 FHD GPS |
0 KM/H |
ACD 1010 |
SOS ON |
|
2015/09/08 |
15:12:45 |
0:01:44 |
|
UP |
MENU |
OK |
MODE |
DOWN |
IX.Voice/Mute Recording
In standby or movie mode, short press UP shortcut key to be voice recording or mute recording, or press MENU key to go to Movie Mode to set up.
STBY
EV:0.00
BP 3.0 FHD GPS |
0 KM/H |
ACD 1010 |
2015/09/08 15:12:45 0:01:44
Movie Mode |
|
Movie Off Time |
1min |
2/3 Motion event REC |
5sec |
Sound Record |
On |
UP |
MENU |
OK |
MODE |
DOWN |
UP |
MENU |
OK |
MODE |
DOWN |
8

X.Parking Monitoring
Enter into General Setting to turn on parking monitoring function and there are three-step settings(High, Middle and Low).Middle is suggested when parking monitoring turning on. When parking monitoring is at work, DVR will show 'P' on the top left.
A. After the car engines off, DVR will be automatically power off too, but once DVR detects vibration, it will power on automatically and record 10 seconds and then turn off again. If other functions are working at same time,parking monitoring is top priority.
B.When parking monitoring turning on while driving, DVR will power on automatically once it detects vibration and record circlely with the first file locked.
Note: Saved file will be saved until users delete from micro SD card.
Go to General Setting to turn off parking monitoring and 'P' will disappear.
Parking Monitoring ON
General Settings |
|
Protect Level |
High |
4/6 Parking Monitoring |
Middle |
Motion Detection |
Off |
P |
REC |
EV:0.00
BP 3.0 FHD GPS |
0 KM/H |
ACD 1010 |
2015/09/08 15:12:45 0:01:44
UP |
MENU |
OK |
MODE |
DOWN |
UP |
MENU |
OK |
MODE |
DOWN |
XI.GPS Tracking
This DVR is built in GPS module and can record the driving track, longitude and latitude information as well as real-time speed, which are very important driving information. When DVR is on, it will position automatically. There is GPS status icon on the top left. When it turns green, GPS positions successfully; when it is red, GPS is still in positioning status. Please go to GPS status in Gerneral Settings to view detailed GPS information. Please select correct time zone before use this function. Please enter into General Settings to set it up. After GPS positions successfully, GPS satellite time will synchronize to show on the screen.
Note: Please position outdoor. GPS is hard to position indoor because of weak GPS signal. Driving track can be reviewed with exclusive GPS player. Please refer to 'Part 7 BP GPS VP 3.0 Instruction'.
9

GPS Status Icon
|
|
REC |
|
|
|
|
|
EV:0.00 |
|
|
BP 3.0 FHD GPS |
0 KM/H |
ACD 1010 |
|
|
2015/09/08 |
15:12:45 |
0:01:44 |
|
UP |
MENU |
OK |
MODE |
DOWN |
GPS Status
LAT : N 22 36' 35"
LON: E 113 51' 7"
USE: 4
43 30 26 26 26 00 09 00 00 00 00 00
02 05 06 09 12 20 20 00 00 00 00 00
UP |
MENU |
OK |
MODE |
DOWN |
Speed Unit
XII.Driver ID
In standby mode, short press MENU key to enter into settings, and press MODE key to go to General Settings. Select 'Driver ID Settings' and press OK key to input numbers. There are total 9 characters available and press UP/DOWN key to select '0-9', 'A-Z', '.' and space. After confirmation, press OK key to go to next character or back to General Settings.
General Settings
Driver ID Settings
Driver ID Settings
2/6 |
Date Format |
YYYY MM DD |
A C |
D |
1 0 1 |
0 |
. |
||
|
Language |
|
English |
|
|
|
|
|
|
|
|
|
|
|
|
|
OK |
|
|
UP |
MENU |
OK |
MODE |
DOWN |
UP |
MENU |
OK |
MODE |
DOWN |
10
XIII.Motion Detection
In standby mode, press MENU key to enter into setting in Movie Mode and select 'Motion Event REC' to choose recording time of every movie clip in motion detection.
After confirmation, press OK key to quit 'Motion Event REC' and then press MODE key to go to General Settings. Select 'Motion detection' and press OK key to select the sensitivity. Here are 3 steps sensitivity, 'High', Middle' and 'Low'. Middle is suggested when motion detection turning on. Press OK key to confirm and then press MENU key to quit. DVR starts to automatically countdown from 9 second to activate motion detection. If there is any movement detected, DVR will record automatically in preseted recording time of movie clip. In motion detection mode, press any key to quit and go back to standby mode. Press MODE key 4 times can go back to mode detection mode again.
To turn off motion detection, please go to General Settings.
Movie Mode |
|
|
|
General Settings |
|
|
|
||
|
Movie Off Time |
5sec |
|
|
Protect Level |
Middle |
|
||
2/3 |
Motion Event REC |
1min |
|
4/6 |
Parking Monitoring |
Off |
|
||
|
Sound Record |
On |
|
|
Motion Detection |
Middle |
|
||
UP |
MENU |
OK |
MODE |
DOWN |
UP |
MENU |
OK |
MODE |
DOWN |
|
P |
STBY |
|
|
|
|
|
EV:0.00 |
|
|
|
|
|
Motion Detection Icon |
|
BP 3.0 FHD GPS |
0 KM/H |
ACD 1010 |
|
|
2015/09/08 |
15:12:45 |
0:01:44 |
|
UP |
MENU |
OK |
MODE |
DOWN |
11

XIV.Video and Photo Management
Please go to General Settings to select USB Function before connecting with the computer via USB cable in the package. Here are two options, 'MSDC' and 'PC Cam'.
1)MSDC is for video and photo backup and delete. 2)PC Cam is for video call.
USB Function |
|
|
|
|
|
MSDC |
|
PC Cam |
|
USB Function |
|
|
|
|
UP |
MENU |
OK |
MODE |
DOWN |
12

6. System setting Table
|
Mode |
Category |
Sub-Category |
Remark |
|
|
|
|
|
|
|
|
|
|
|
1920X1080 30fps |
Default: |
|
|
|
|
1280x720 30fps |
|
|
|
|
Resolution |
1920X1080 |
|
|
|
|
1280x720 60fps |
||
|
|
|
|
30fps |
|
|
|
|
|
640x480 30fps |
|
|
|
|
|
|
|
|
|
|
|
|
|
|
|
|
Movie Quality |
Super Fine/Fine |
Default: |
|
|
|
Super Fine |
||
|
|
|
|
|
|
|
Movie |
Movie Clip Time |
Off/1min/3min/5min |
Default:1min |
|
|
Mode |
|
|
|
|
|
Movie Off Time |
0min/5sec/30sec/1min/3min |
Default: 5sec |
||
|
|
|
|||
|
|
|
|
|
|
|
|
|
Motion event REC |
5sec/10sec/30sec/1min |
Default:1min |
|
|
|
|
|
|
|
|
|
Sound Record |
On/Off |
Default:On |
|
|
|
|
|
|
|
|
|
Exposure |
-2~+2 |
Default:0 |
|
|
|
|
|
|
|
|
|
Still Image Size |
12M/8M/5M/3M/2M/1.2M/VGA |
Default:12M |
|
|
|
|
|
|
|
|
|
Still Quality |
Super Fine/Fine |
Default: |
|
|
|
Super Fine |
||
|
|
|
|
|
|
|
Still |
|
Exposure |
-2~+2 |
Default:0 |
|
|
|
|
||
Setting |
Capture |
|
Auto/Daylight/Cloudy/Fluoresc./ |
|
|
|
|
White Balance |
Default: Auto |
||
Menu |
|
|
Fluoresc.1/ Fluoresc.2/Incandesc. |
||
|
|
|
|
||
|
|
|
|
|
|
|
|
|
ISO Sensitivity |
Auto/ISO100/ISO200/ISO400 |
Default: Auto |
|
|
|
|
|
|
|
|
|
Color |
Natural/Vivid/Pale |
Default: Natural |
|
|
|
|
|
|
|
|
|
Volume |
1~10 |
Default: 5 |
|
|
|
|
|
|
|
Playback |
Delete |
Delete One/Delete All |
|
|
|
|
|
|
|
|
|
|
|
Protect |
Protect One/Protect All/Unprotect |
|
|
|
|
One/Unprotect All |
|
|
|
|
|
|
|
|
|
|
|
|
|
|
|
|
|
Format SD card |
YES/NO |
|
|
Media Tool |
|
|
|
|
|
|
SD Card INFO |
Time/Photo Left |
|
|
|
|
|
|
||
|
|
|
|
|
|
|
|
|
Beep |
On/Off |
|
|
|
|
|
|
|
|
|
|
Power Off |
Never/1min/5min |
Default:Never |
|
|
|
|
|
|
|
General |
|
Clock Settings |
YYYY MM DD HH MM SS |
|
|
|
|
|
||
|
Settings |
Driver ID Settings |
0~9/A~Z/'.'/space |
|
|
|
|
|
|
||
|
|
|
|
|
|
|
|
|
Date Format |
None/YYYY MM DD/MM DD YYYY/ |
Default: DD |
|
|
|
DD MM YYYY |
MM YYYY |
|
|
|
|
|
||
13

|
|
|
English/Français/Deutsch/Italiano/ |
Default: |
|
|
Language |
Polski/Português/Español/ |
|
|
|
English |
||
|
|
|
Nederlands/Suomi |
|
|
|
|
|
|
|
|
|
|
|
|
|
Frequency |
50HZ/60HZ |
|
|
|
|
|
|
|
|
USB Function |
MSDC/PC Cam |
Default: MSDC |
|
|
|
|
|
|
|
LCD Power Save |
Off/1min/3min |
Default:Off |
|
|
|
|
|
|
|
Protect Level |
Off/High/Middle/Low |
Default: Middle |
|
|
|
|
|
|
|
Parking Monitoring |
Off/High/Middle/Low |
Default: Off |
|
|
|
|
|
|
|
Motion Detection |
Off/Low/Middle/High |
Default: Off |
|
|
|
|
|
Setting |
General |
GPS Status |
GPS Positioning Information |
|
Menu |
Settings |
|
|
|
Speed Unit |
KM/H MPH |
|
||
|
|
|
||
|
|
|
|
|
|
|
Daylight Saving |
On/Off |
Default: Off |
|
|
Time |
||
|
|
|
|
|
|
|
|
GMT-12:00/GMT-11:00/GMT-10:00/ |
|
|
|
|
GMT-09:00/GMT-08:00/GMT-07:00/ |
|
|
|
|
GMT-06:00/GMT-05:00/GMT-04:00/ |
|
|
|
|
GMT-03:30/GMT-03:00/GMT-02:00/ |
|
|
|
|
GMT-01:00/GMT/GMT+01:00/ |
|
|
|
|
GMT+02:00/GMT+03:00/ |
|
|
|
Time Zone Select |
GMT+03:30/GMT+04:00/ |
|
|
|
|
GMT+04:30/GMT+05:00/ |
|
|
|
|
GMT+05:30/GMT+05:45/ |
|
|
|
|
GMT+06:00/GMT+06:30/ |
|
|
|
|
GMT+07:00/GMT+08:00/ |
|
|
|
|
GMT+09:00/GMT+09:30/ |
|
|
|
|
GMT+10:00/GMT+11:00/ |
|
|
|
|
GMT+12:00/GMT+13:00 |
|
|
|
|
|
|
|
|
Reset Setup |
YES/NO |
|
|
|
|
|
|
|
|
FW Version |
Current Software Version |
|
7. BP GPS VP 3.0 Instruction
I. Installation
Install GPS player-”BP GPS VP 3.0” on MAC OS
Double click 'BP GPS VP 3.0.zip' to install automatically.
Install GPS player-”BP GPS VP 3.0” on WINDOWS OS
Copy 'BP GPS VP 3.0.zip' to desktop and unzip to 'BP GPS VP 3.0'.
II. How to Start
In MAC OS, double click “BP GPS VP 3.0” to start.
In WINDOWS OS, double click ‘BP GPS VP 3.0.exe’ to start.
III.User Interface Definition
Here's user interface of BP GPS VP 3.0 WINDOWS version. MAC version is almost same.
14

|
|
23 |
1 |
|
22 |
|
|
|
|
Plane Map Satellite Map 3D Map |
21 |
20
2
19
3
4
5
6 |
7 |
8 |
9 |
10 |
11 12 13 14 |
15 |
16 17 18 |
Driving Speed: show real-time driving speed; double click to switch KM/H and MPH
Video Play Window: double click any place in this window to view in full screen mode; double click again, it will be back to the current mode
Scroll Bar: show the current point of the video; drag it to move forward or backward
Real-time G-sensor Information
Video Group: Videos taken in sequence will be one group
Select Video to Play
Image Capture: capture the current point of the video
Save to: select one video from Video List to save it into one folder on PC
Delete: select one video from Video List to delete
Settings: select language
1 Fast Backward: 0.9/0.8/0.7/0.6/0.5/0.4/0.3 times2 Stop
3 Play/Pause
4 Fast Forward: 1.2/1.4/1.6/1.8/2.0/2.4/2.8/3.2/3.6/4.0 times
5 Volume
6 Autoplay: click to play next video automatically after finish; click again to turn it off
7 Save to KML Format: select one video from Video List to save it in KML format
8 Unlock Video: select one locked video from Video List to unlock it
9 Video List: show video size, length and etc.; double click the video to play
20 Map Window: show real-time movement track of vehicle with internet
21 MapType: plane map/satellite map/3D map
22 Map Scroll Bar: drag it to zoom in and out
23 Direction Navigation
Note: all windows can be dragged to adjust
15

8. Product Specification
Specification may change due to upgrade without prior notice. Please take the objects as
standard.
LCD Size |
2.7” HD TFT screen 16:9 |
|
|
|
|
CMOS Sensor |
OV2710 |
|
|
|
|
Viewing Angle |
140° diagonal ultra wide viewing angle |
|
|
|
|
Video Resolution |
1920X1080 30fps/1280x720 30fps/1280x720 60fps/640x480 30fps |
|
|
|
|
Image Resolution |
12M/8M/5M/3M/2M/1.2M/VGA |
|
|
|
|
Minimum Illumination |
1 LUX |
|
|
|
|
Video Format |
AVI/H.264 |
|
|
|
|
Image Format |
JPG |
|
|
|
|
Memory Card |
Micro SD Card |
|
|
|
|
Memory Card Capacity |
Max. 64GB |
|
|
|
|
Digital zoom |
X4 |
|
|
|
|
Frequency |
50HZ/60HZ |
|
|
|
|
Output |
HDMI |
|
|
|
|
Power Port |
USB 5V 1000mA |
|
|
|
|
Battery Capacity |
600mAH |
|
|
|
|
Microphone/Speaker |
Built-in |
|
|
|
|
Loop Recording |
Off/1min/3min/5min |
|
|
|
|
LCD Off |
Support |
|
|
|
|
Parking Monitoring |
Support |
|
|
|
|
G-Sensor&SOS |
Support |
|
Motion Detection |
Support |
|
|
|
|
Parking Monitoring |
Support |
|
|
|
|
GPS Tracking |
Support |
|
|
|
|
Driver ID |
Support |
|
|
|
|
Language |
English/Français/Deutsch/Italiano/Polski/Português/Español/ |
|
Nederlands/Suomi |
||
|
||
DVR N.W. |
105g |
|
DVR Size |
81.4(L)X64.7(W)X41.0(H)mm |
16
9. Cabling Instruction
10. Accessories
The following accessories are for reference only. Please take objects as standard. The right
to change without prior notice is reserved.
4
0
Wid e
A
n g l e
GPS Player DVD
17

18

Bedienungsanleitung
19

Lesen Sie diese Bedienungsanleitung sorgfältig durch, bevor Sie das
Produkt in Betrieb nehmen.
Die Bedienungsanleitung führt Sie durch den Gebrauch der speziellen
Funktionen dieses Produkts.
Achtung:
1.Halten Sie sich strikt an die entsprechenden gesetzlichen Vorschriften in Ihrem Land. Dieses Produkt darf nicht für illegale Zwecke eingesetzt werden, andernfalls übernehmen Sie allein die Verantwortung.
2.Setzen Sie die microSD-Karte richtig herum ein, um ein Beschädigung der Karte oder der Autokamera zu vermeiden. Wenn die Autokamera die Meldung„ Bitte setzen Sie die SD-Karte erneut ein“ anzeigt, rufen Sie das Menü„Einstellungen“ auf
und formatieren Sie die microSD-Karte. Wenn die Meldung immer noch angezeigt wird, verwenden Sie eine andere microSD-Karte.
Hinweis: Das Formatieren der microSD-Karte löscht alle Dateien. Bitte sichern Sie vor dem
Formatieren alle wichtigen Dateien.
3.Wir empfehlen die Verwendung von microSD-Karten der Klasse 6 oder höher. Da es auf dem Markt keinen einheitlichen Standard für 64 GB microSD-Karten gibt, sind nicht alle 64 GB microSD-Karten mit dieser Autokamera kompatibel. Bitte testen Sie sie mit dieser Autokamera vor dem Kauf.
4.Es ist ratsam, die Dateien auf der microSD-Karte einmal pro Woche zu sichern. Dieses Produkt ist nicht ausschließlich ein Speichergerät. Sichern Sie deshalb wichtige Dateien rechtzeitig, um Dateiverluste zu vermeiden.
5.Überprüfen Sie die Halterung nach der Installation sorgfältig, um Schäden zu vermeiden.
6.Die Betriebsdauer des integrierten Akkus nimmt im Laufe der Zeit ab. Wenn die Autokamera
längere Zeit nicht benutzt wird, laden Sie sie alle zwei Monate auf, um eine übermäßige
Entladung zu vermeiden, welche die Lebensdauer des Akkus verkürzt.
7.Setzen Sie das Produkt nicht einer feuchten Umgebung aus. Es ist nicht wasserdicht.
8.Bitte bei der Aufnahme von Bildern oder Filmen das Objektiv nicht direkt auf die Sonne richten.
9.Nehmen Sie dieses Produkt nicht in übermäßig staubigen Umgebungen in Betrieb. Dies kann das Objektiv und andere Komponenten verunreinigen und die Videoqualität negativ beeinflussen. Reinigen Sie das Objektiv mit einem weichen Tuch oder speziellen Reinigung stüchern.
10.Dieses Produkt ist ein elektronisches Präzisionsprodukt. Setzen Sie es keinen kräftigen Stößen aus und benutzen Sie es nicht in der Nähe von starken magnetischen und elektrischen Feldern.
11.Arbeitstemperatur für dieses Gerät ist -10 -50 und Lagertemperatur beträgt -20 -70 . Kontinuierlich direkter Sonneneinstrahlung über einen längeren Zeitraum, kann das Gerät zu Fehlfunktionen führen, Farbwechsel , Gehäuse und Bildverzerrungen , insbesondere in verschlossenen Autos, bei denen Kabinentemperatur 70 übersteigt.
20
1. Aufbau
|
|
1 |
|
2 |
|
|
|
|
12 13 |
3 |
|
|
|
|
4 |
|
|
|
|
5 |
|
|
|
|
UP |
MENU |
OK |
MODE |
DOWN |
6 7 8 9 10
11 |
14 |
|
15 |
/ F
2
.
2
;
.0mm 3 f=
1
4
0°Wid e
A
n
g
l e
16

 17
17
1.Öffnung für Halterung |
7. |
Taste MENU (Menü) |
13. |
Betriebsanzeige |
2.USB-Port |
8. |
Taste OK |
14. |
Taste EIN/AUS |
3.Taste RESET |
9. Taste MODE (Modus) |
15. HDMI-Ausgang |
||
4.Mikrofon |
10. Taste DOWN (Abwärts) |
16. |
Objektiv |
|
5.microSD-Kartenschlitz |
11. LCD |
17. |
Lautsprecher |
|
6.Taste UP (Aufwärts) |
12. Aktivitätsanzeige |
|
|
|
21

2.Merkmale
1.Unterstützt mehrere Videoauflösungen mit hervorragender Videound Bildqualität, wie zum Beispiel 1080P, 720P usw;
2.Unterstützt 60 Fps für die Aufzeichnungen mit hoher Geschwindigkeit;
3.Hochauflösendes CMOS-Objektivmodul mit weitem Blickwinkel;
4.Integriertes Mikrofon/Lautsprecher;
5.Mit Tastenkombination Sprachaufnahme/Stummschaltung;
6.Mit Tastenkombination LCD AUS;
7.Unterstützt microSD-Karten mit hoher Kapazität;
8.Unterstützt nahtlose Endlosvideoaufzeichnung und Aufzeichnung während des Aufladens;
9.Automatische Videoaufnahme bei laufendem Motor und automatisches Ausschalten nach Abstellen des Motors;
10.Unterstützt Bewegungserkennung;
11.Unterstützt SOS (Notfall) und G-SENSOR, um da Überschreiben wichtiger Dateien zu verhindern;
12.Unterstützt HDMI-Ausgang;
13.Unterstützt Parkplatz-Überwachungsfunktion;
14.Unterstützt GPS-Tracking-Funktion;
15.Unterstützt Fahrer-ID;
16.Unterstützt mehrere Sprachen.
3.Tastendefinitionen und -funktionen
Bild |
Definition |
Funktion |
|
|
EIN/AUS |
Halten Sie zum Einoder Ausschalten die Taste länger gedrückt. |
|
|
|
Drücken Sie im Filmoder Standby-Modus kurz die Taste UP, um die Sprachaufzeichnung |
|
|
UP |
einoder auszuschalten. Drücken Sie zum Einzoomen im Fotoaufnahmemodus kurz |
|
UP |
die Taste UP. Drücken Sie zur Auswahl im Einstellund Vorschaumodus kurz die Taste |
||
(Aufwärts) |
|||
|
UP. Drücken Sie für den schnellen Rücklauf während der Videowiedergabe oder im |
||
|
|
Pausezustand kurz die Taste UP. |
|
|
|
Drücken Sie im Standby-Modus kurz die Taste MENU, um den Einstellmodus aufzurufen |
|
MENU |
MENU |
und drücken Sie die Taste erneut, um ihn wieder zu verlassen, wenn die Einstellungen |
|
|
(Menü) |
abgeschlossensind. Drücken Sie während der Aufzeichnung kurz die Taste MENU, um |
|
|
die SOS-Funktion zu aktivieren. Erneutes Drücken deaktiviert die Funktion wieder. |
||
|
|
||
|
|
Drücken Sie im Filmmodus kurz die Taste OK, um die Aufzeichnung vorübergehend anzuhalten |
|
OK |
OK |
oder fortzusetzen. Drücken Sie im Aufzeichnungsmodus kurz die Taste OK, um Foto |
|
aufzunehmen. Drücken Sie im Wiedergabemodus kurz die Taste OK, um ein Video abspielen/ |
|||
|
|||
|
|
vorübergehend anzuhalten. Drücken Sie im Einstellmodus zur Bestätigung kurz die Taste OK. |
|
|
MODE |
Drücken Sie im Standby-Modus kurz die Taste MODE, um zwischen dem Modus Film/ |
|
MODE |
Fotoaufnahme/Wiedergabe zu wechseln. Drücken Sie im Einstellmodus kurz die Taste |
||
|
(Modus) |
MODE, um die unterschiedlichenModusmenüs zu wechseln. Drücken Sie im |
|
|
|
Wiedergabemodus kurz die Taste MODE, um zum Vorschaumodus zurückzukehren. |
|
|
|
Drücken Sie im Filmmodus kurz die Taste DOWN, um das LCD einoder auszuschalten. |
|
|
DOWN |
Drücken Sie zum Herauszoomen im Fotoaufnahmemoduskurz die Taste DOWN. |
|
DOWN |
Drücken Sie zur Auswahl im Einstellund Vorschaumodus kurz die Taste DOWN. |
||
(Abwärts) |
|||
|
Drücken Sie für den schnellenVorlauf während der Videowiedergabe oder im |
||
|
|
Pausezustand kurz die Taste DOWN. |
RESET Drücken Sie diese Taste, wenn die Software der Autokamera abgestürzt ist.
22

4. Definition der Anzeigelampen
Anzeigelampe Definition
Leuchtet während des Aufladens der Autokamera. Nach dem vollständigen
Rot
Aufladen erlischt die rote Lampe.
Grün |
Leuchtet im Standby-Modus der Autokamera.Wenn sie blinkt, zeichnet die Autokamera auf. |
5. Funktion
I.EIN/AUS
(1)Einschalten
A.Drücken Sie im ausgeschalteten Zustand die Taste EIN/AUS für 3 Sekunden,um die Autokamera einzuschalten und die Aufzeichnung automatisch zu starten. Die grüne Anzeigelampe blinkt.
B.Die Autokamera wurde an ein KFZ-Ladegerät angeschlossen, um die Aufzeichnung zu starten. Hinweis: Wenn sich ein Popup-Fenster mit der Meldung„SD-Karte nicht eingelegt öffnet“ öffnet, setzen Sie vor der Inbetriebnahme eine microSD-Karte ein. Wenn die microSD-Karte bei eingeschalteter Autokamera eingesetzt wird, schaltet sich diese automatisch aus.
(2) Ausschalten
A.Drücken Sie im eingeschalteten Zustand die Taste EIN/AUS für 3 Sekunden, um die
Autokamera auszuschalten.
B.Die Autokamera speichert im eingeschalteten Zustand automatisch die aktuelle Datei und schaltet beim Trennen des KFZ-Ladegeräts automatisch aus.
C.Bei niedrigem Akkustand speichert die Autokamera die aktuelle Datei und schaltet sich automatisch aus.
II.Akku aufladen
(1)Zwei Auflademöglichkeiten
A.Mit USB-Kabel |
B.Mit KFZ-Ladegerät (empfohlen) |
(2)Definition des Akkuladestands
|
Voll |
|
Halbvoll |
|
|
|
|
|
Niedrig |
|
Leer |
|
|
|
|
III.Einsetzen der microSD-Karte
Stecken Sie die microSD-Karte in der angegebenen Richtung gerade in den Schlitz, bis Sie
ein„Klickgeräusch“ hören.
23

Entnehmen der microSD-Karte: Drücken Sie zuerst auf die microSD-
Karte und nehmen Sie sie anschließend heraus (Es ist ratsam, zuvor die
Autokamera auszuschalten).
IV.Filmmodus:
Schalten Sie die Autokamera direkt in den Filmmodus. Die Anzeigelampe blinkt grün. Drücken Sie zum Speichern der aktuellen Datei und zum Beenden der Aufzeichnung kurz die Taste OK. Die Autokamera ruft den Standby-Modus auf. Die grüne Anzeigelampe leuchtet durchgehend. Drücken Sie im Standby-Modus die Taste OK, um die Aufzeichnung erneut zu starten.
Auflösung&Rahmen
Aufnahme
Zeit & Datum
|
|
REC |
|
|
|
|
|
EV:0.00 |
|
|
BP 3.0 FHD GPS |
0 KM/H |
ACD 1010 |
|
|
2015/09/08 |
15:12:45 |
0:01:44 |
|
UP |
MENU |
OK |
MODE |
DOWN |
Filmmodus
Micro SD-Karte in
Batteriestatus
Belichtung
Filmclipdauer
Geschwindigkeit
Fahrer-ID
Filmzeit
V. Foto-Aufnahmemodus
Drücken Sie im Standby-Modus kurz die Taste MODE, um den Foto-Aufnahmemodus aufzurufen. Drücken Sie die Taste OK, um Fotos aufzunehmen.
Drücken Sie im Foto-Aufnahmemodus kurz die Taste UP oder DOWN, um die Ansicht zu vergrößern oder zu verkleinern (max. 4-fach).
Fotogröße |
|
|
|
|
Foto |
|
|
|
|
|
|
|
|
|
|
|
Micro SD-Karte in |
|
|
|
|
|
Batteriestatus |
T |
|
|
EV:0.00 |
Belichtung |
|
Digitaler Zoom |
|
|
|
|
|
W |
|
|
|
|
Fahrer-ID |
1X |
|
|
ACD 1010 |
|
|
2015/09/08 |
15:12:45 |
1819 |
|
Foto Left |
|
Zeit & Datum |
|
|
|
|
|
|
|
|
|
|
|
UP |
MENU |
OK |
MODE |
DOWN |
|
24

VI.Wiedergabeund Vorschaumodus
A. Drücken Sie im Standby-Modus kurz zweimal die Taste MODE, um den Vorschaumodus aufzurufen. Drücken Sie zur Auswahl der Videodatei kurz die Taste UP oder DOWN und dann die Taste OK, um die Wiedergabe zu starten. Drücken Sie während der Videowiedergabe kurz die Taste UP, um den schnellen Rücklauf zu starten und starten Sie den schnell Vorlauf mit der Taste DOWN (max. 8-fach). Drücken Sie die Taste OK für die Wiedergabe oder zum vorübergehenden Anhalten. Drücken Sie kurz die Taste MODE, um die Wiedergabe zu beenden und zum Vorschaumodus zurückzukehren.
Drücken Sie im Vorschaumodus kurz die Taste MODE, um die Foto-Vorschau zu starten. Wählen Sie mit der Taste UP oder DOWN die Fotos aus. Durch Drücken der Taste OK wird die Vorschau im Vollbildmodus und durch Drücken der Taste UP oder DOWN wird das vorige oder nächste Foto angezeigt.
B.Drücken Sie im Vorschaumodus kurz die Taste MENU, um den Wiedergabemodus zum Anpassen der Lautstärke, Löschen oder Schützen der Dateien aufzurufen. Drücken Sie kurz die Taste UP oder DOWN. Wählen Sie„Lautstärke“,„Löschen“ oder„Schützen“ aus und drücken Sie die Taste OK, um das Untermenü aufzurufen. Drücken Sie zum Auswählen kurz die Taste UP oder DOWN und bestätigen Sie mit der Taste OK. Drücken Sie anschließend zum Verlassen und zur Rückkehr zum Vorschaumodus kurz die Taste MENU.
Filmvorschau |
|
|
Aktuelle Film |
Fotovorschau |
|
|
Aktuelle Foto |
||||||||||
|
|
|
|
|
|
|
|
|
|
|
|
|
|
|
|
|
|
|
|
|
|
|
|
|
|
|
|
|
|
|
|
|
|
|
|
|
100_DSC/PICT0011.AVI |
|
|
|
3 |
|
|
|
|
/ |
|
|
|
|
3 |
|
|
|
|
2015/09/08 |
15:12:45 |
[00:01:44] |
|
|
UP |
MENU |
OK |
MODE |
DOWN |
Playback |
|
|
|
|
|
Volume |
5 |
|
|
1/1 |
Delete |
|
|
|
|
Protect |
|
|
|
|
100_DSC/PICT0011.JPG |
|
|
|
3 |
|
|
|
|
/ |
|
|
|
|
3 |
|
|
|
|
2015/09/08 |
15:12:45 |
|
|
|
UP |
MENU |
OK |
MODE |
DOWN |
UP |
MENU |
OK |
MODE |
DOWN |
VII. G-SENSOR
Wenn das Auto im Filmmodus plötzlich bremst oder es zu einem schweren Aufprall kommt, wird der G-Sensor aktiviert, um zu verhindern, dass der aktuelle Videoclip überschrieben wird.
Die dreistufige Empfindlichkeitseinstellung (hoch, mittel, niedrig) ist für unterschiedliche PKWBesitzer gedacht und kann unter „Schutzstufe“ in „Allgemeine Einstellungen“ eingestellt werden.
Hinweis: Wenn der G-Sensor während der ersten 10 Sekunden des Videoclips aktiviert wird, werden der aktuelle und der vorige Videoclip gespeichert. Während der letzten 10 Sekunden des Videoclips werden der aktuelle und der nächste Videoclip gespeichert. In der Mitte des Videoclips wird nur der aktuelle Videoclip gesichert.
25

General Settings |
|
|
|
|
|
Protect Level |
Middle |
|
|
4/6 |
Parking Monitoring |
Off |
|
|
|
Motion Detectio |
Off |
|
|
UP |
MENU |
OK |
MODE |
DOWN |
 REC
REC
EV:0.00
|
BP 3.0 FHD GPS |
0 KM/H |
ACD 1010 |
|
|
2015/09/08 |
15:12:45 |
0:01:44 |
|
UP |
MENU |
OK |
MODE |
DOWN |
|
|
G-Sensor-Empfindlichkeit |
||
VIII.SOS
Drücken Sie im Filmmodus kurz die Taste MENU, um die aktuelle Datei manuell zu sperren, damit während der Endlosaufzeichnung diese möglicherweise wichtige Datei nicht überschrieben wird. Drücken Sie zum Entsperren der aktuellen Datei erneut die Taste MENU.
Hinweis: Wenn SOS während der ersten 10 Sekunden des Videoclips aktiviert wird, werden der aktuelle und der vorige Videoclip gespeichert. Während der letzten 10 Sekunden des Videoclips werden der aktuelle und der nächste Videoclip gespeichert. In der Mitte des Videoclips wird nur der aktuelle Videoclip gesichert.
|
|
REC |
|
|
|
|
|
EV:0.00 |
|
|
BP 3.0 FHD GPS |
0 KM/H |
ACD 1010 |
SOS auf |
|
2015/09/08 |
15:12:45 |
0:01:44 |
|
UP |
MENU |
OK |
MODE |
DOWN |
IX.Sprachaufzeichnung/Stummschaltung
Drücken Sie im Standbyoder Filmmodus für die Sprachaufzeichnung oder Stummschaltung kurz die Schnelltaste UP oder drücken Sie die Taste MENU, um den Filmmodus einzurichten.
STBY
EV:0.00
BP 3.0 FHD GPS |
0 KM/H |
ACD 1010 |
2015/09/08 15:12:45 0:01:44
Movie Mode |
|
Movie Off Time |
1min |
2/3 Motion event REC |
5sec |
Sound Record |
On |
UP |
MENU |
OK |
MODE |
DOWN |
UP |
MENU |
OK |
MODE |
DOWN |
26
 Loading...