


Table of Contents
1 Your mobile 5
1.1 Keys and connectors 5
1.2 Getting started 8
1.3 Home screen 13
2 Phone 15
2.1 Making a call 15 2.2 Answer or decline a call 16 2.3 Calling your voicemail 17
3 Contacts 17
3.1 Consult your Contacts 17
3.2 Adding a contact 18
3.3 Editing your contacts 18
3.4 Deleting a contact 19
3.5 Sharing your contacts 20
3.6 Additional options 20
4 Messages 21
4.1 Write message 21
1
|
4.2 |
Send a multimedia message |
22 |
|
|
4.3 |
How to type a message |
|
22 |
|
4.4 |
Settings |
|
23 |
5 |
|
24 |
||
6 |
Camera |
|
25 |
|
|
6.1 |
Camera.............................................................. |
|
25 |
|
6.2 |
Video.................................................................. |
|
26 |
7 |
Gallery |
|
27 |
|
8 |
Video |
|
29 |
|
9 |
Music |
|
30 |
|
10 |
Browser |
|
30 |
|
11 |
Calendar |
|
31 |
|
|
11.1 |
Multimode view |
|
31 |
|
11.2 |
To create new events |
|
31 |
|
11.3 |
Event reminder |
|
32 |
12 |
Alarm |
|
33 |
|
|
12.1 |
Alarm |
33 |
|
|
12.2 |
Timer |
34 |
|
|
12.3 |
Stopwatch |
|
34 |
2
13 Calculator 35
14 FM Radio 36
15 Settings 37
15.1 Network & connectivity 37
15.2 Personalization 41
|
15.3 |
Privacy & security.............................................. |
44 |
|
15.4 |
Storage .............................................................. |
45 |
|
15.5 |
Device ............................................................... |
45 |
|
15.6 |
Account manager ............................................. |
48 |
16 |
Making the most out of your phone . .. .49 |
||
|
16.1 |
Upgrade ............................................................ |
49 |
17 |
Safety information .. |
50 |
|
18 |
General information |
57 |
|
19Warranty .. 60
20Trouble shooting .. 62
3

|
This product meets applicable national |
|
SAR limits of 2.0 W/kg. The specific |
|
maximum SAR values can be found on |
www.sar-tick.com |
Radio waves section. |
|
|
|
When carrying the product or using it |
|
while worn on your body, either use an |
|
approved accessory such as a holster or |
|
otherwise maintain a distance of 15 mm |
|
from the body to ensure compliance with |
|
RF exposure requirements. Note that the |
|
product may be transmitting even if you |
|
are not making a phone call. |
|
|
|
PROTECT YOUR HEARING |
|
To prevent possible hearing damage, do |
|
not listen at high volume levels for long |
|
periods. Exercise caution when holding |
|
your phone near your ear while the |
|
loudspeaker is in use. |
|
|
4
1 Your mobile...................................
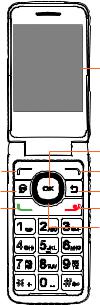
1.1Keys and connectors
Main screen
|
OK |
Left Menu |
Right Menu |
Messages |
Back/Clear |
Call/Answer |
End/Power |
|
Navigation |
|
(up, down, left, |
|
right) |
5
|
|
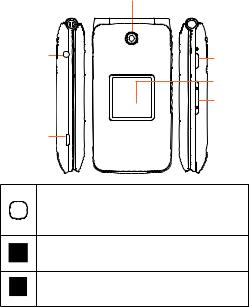
Camera |
|
Headset |
Camera |
||
|
Jack |
key |
|
|
|
Sub |
|
|
|
screen |
|
|
|
Volume |
|
Charging |
|
||
|
Port |
|
|
|
OK |
||
OK |
• |
Confirm an option (press the middle of the key) |
|
• |
Press: Access app list (Home screen) |
||
|
|||
Navigation
• Press up, down, left or right to navigate
Messages
• Press: Access Messages app
6
Back/Clear
•Let's you return to the previous screen, close a dialog box, or exit options menu
•Delete character (In Edit mode)
Call/Answer
•Press to dial call or to answer incoming call.
•Press: Enter call log (From Idle screen)
End/Power
• Press: End a call
Return to the Idle screen
•Long press: Power on/off
Camera key
•Press: Access Camera app
In camera screen, press to capture picture or shoot video
•Press and hold the Camera key and Volume down key to capture a screenshot
Volume
•In call mode, adjusts the earpiece or headset volume
•In Music/Video/Streaming mode, adjusts the media volume
•In general mode, adjusts the ringtone volume
•Mutes the ringtone of an incoming call
7
1.2Getting started
1.2.1Set-up
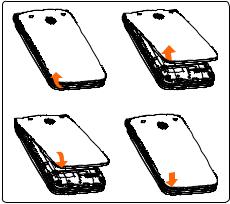
Removing or attaching back cover
8
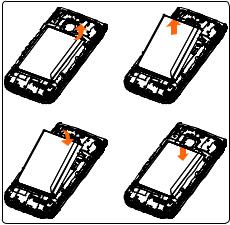
Removing or installing battery
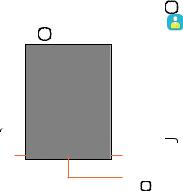
Inserting or removing the Nano SIM card and microSD
You must insert your Nano SIM card to make phone calls using your network.
9

SIM card


Plastic 
 clips
clips 


To insert Nano SIM or microSD card, push the Nano SIM or microSD card into the corresponding card slot with the gold-connectors facing down. To remove the SIM or microSD card, push down on the plastic clip located under card and push the SIM or pull microSD card out.
Your phone only supports Nano SIM card. Do not attempt to insert Mini or Micro SIM card sizes or you may damage your phone.
10
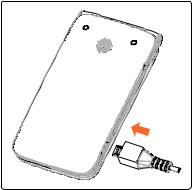
Charging battery
Insert the smaller end of the charger into the device charging port, and plug the charger into an electrical outlet.
1.2.2Power on your phone
Long press the End/Power key until the phone powers on, Home screen will be displayed. If screen lock is set up, enter pass code to access Home screen.
If you don't know your pass code or if you have forgotten it, contact your service provider. Do not store pass code within your phone, instead store pass code in a location that is accessible without using phone.
11

Set up your phone for the first time
• Use the Navigation key |
to select a language and press |
the OK key OK . |
|
•Welcome page will be displayed, press the Right Menu key
 to select Next.
•Keypad Introduction, Softkeys and Change Text Input Method tip pages will be displayed, press the Right Menu key to select Next and continue to next screen.
• Use the Navigation key to select Wi-Fi, if applicable. You can skip selecting a Wi-Fi by pressing the
Right Menu key  to selectNext.
•Press the OK key OK to select network and enter password, if needed.
•Setup KaiOS Account to remotely lock the device or wipe all personal information in event of loss or theft. Select Create Account and press the OK key OK to continue, follow prompts to finish account set up. Press the Right Menu key  to Skip.
•Press the Right Menu key  to Accept KaiOS License Terms.
•You will next be taken to the Home screen, your phone is then ready for use.
Note: If SIM card is not installed, your phone will still power On and you will be able to connect to a Wi-Fi network and use some of the phone's features.
12

1.2.3Power off your phone
Long press the End/Power key.
1.3Home screen
Notices 
•Displays all Notices, press the
Left Menu key to access.
Status/Notifications Bar
•Displays Status and Notification indicators.
Time
Date
Speed Dial
•1-button dial assigned contacts, press the Right Menu key to access.
Apps (Applications) List
• Displays all apps, press the OK key to access.
OK Key
•Press to access AppsList or any option displayed.
13

1 3 1 Status bar
From the status bar, you can view both the phone status (to the right side) and the notification information (to the left side).
Icon |
Status |
|
Bluetooth® active |
|
Wi-Fi® active |
|
Vibrate |
|
|
|
Silent |
|
|
|
Network (full signal) |
|
|
|
Network (roaming) |
|
|
|
4G LTE data service |
|
|
|
3G data service |
|
|
|
Airplane mode |
|
|
|
Alarm set |
|
|
|
Battery (charging) |
|
|
|
Battery (full charge) |
|
|
|
Missed call |
|
|
|
New email |
|
|
|
New message |
|
|
14

1.3.2Change home screen wallpaper
•From the Home screen, press the OK key OK , select
Settings icon  and then press the Navigation key to the right to select Personalization.
•Press the Navigation key and select Display > Wallpaper.
Select Wallpaper, Gallery or Camera and press theOK key
OK to enter option.
• When browsing Wallpaper or Gallery options, select |
|
an image and press the OK key OK or the Right Menu |
|
key |
to Save. |
•When using Camera option, press the OK key OK to
take photo, then press the Right Menu key  to Save. To Retake pictures press the Left Menu key
  .
.
•Press the Back/Clear key to exit out, the new image will be displayed on the Home screen.
2 |
Phone................................... |
|
|
|
|
|
|
2 1 Making a call |
|
|
|
|
|||
Dial the desired number, press the Call/Answer key |
to |
||||||
place call, or select the Phone app |
, press the Right |
||||||
Menu key |
to |
access |
Contacts. Press up or |
down |
on |
||
the |
Navigation |
key |
to select the |
desired |
contact |
||
and press theCall/Answer key to place call If you make a mistake, you can delete the incorrect digits by pressing the Back/Clear key
  . To hang up the call, press the End/Power key
  .
.
15

International call
To dial an international call, select the Phone app  , then press and hold
  to enter “+” in dial screen, then enter the international country prefix followed by the full phone number and finally press the Call/Answer key
  .
.
Emergency call
To make an emergency call, dial the emergency number and press the Call/Answer key  . This works even without a SIM card, requires network coverage.
2 2 Answer or decline a call
When you receive a call:
• Press the Left Menu key |
or the Call/Answer key |
to answer. |
|
•Press the Right Menu key  or the End/Power key
  to decline.
To mute the ringtone volume of an incoming call, press the
Volume key.
16
2 3 Calling your voicemail(1)
•Press and hold the key to set up voicemail or review voicemail messages.
•Follow the prompts to set up your voicemail account or once set up, to listen to voicemail messages.
3 Contacts................................
3.1Consult your Contacts
Contacts app provides quick and easy access to your stored contacts.
You can access this app by pressing the OK key OK |
from |
the Home screen, then selecting the Contacts app |
and |
pressing the OK key OK . |
|
Press the Left |
Press the Right |
Menu key |
|
in the contact |
Menu key |
list to create a |
to access more |
new contact. |
contact options. |
|
Press the OK |
|
key OK to view a |
|
contact's details. |
(1)Contact your network operator to check service availability.
17

3 2 Adding a contact
In contacts list screen, press the Left Menu key  to access New Contact screen and enter contact details.
Press the Navigation key |
down to access next |
||
contact information category. |
|
|
|
|
|
|
|
|
|
|
|
When finished, press the Right Menu key  to save.
3.3 Editing your contacts
In contacts list screen, select contact and press the Right Menu key  to access Options, select Edit Contact, and press the OK key OK to edit.
18

When finished editing, press the Right Menu key  to save.
To cancel edit mode, press Left Menu key  to cancel and exit.
3.4 Deleting a contact
In contacts list screen, press the Right Menu key  to access Options, then select Delete contact, and press the OK key OK . A confirmation page will be displayed, press the Right Menu key
  to delete.
19
3 5 Sharing your contacts
You can share a single contact with others by sending the contact's vCard via E-mail, Messages, or Bluetooth.
Select a contact you want to share, press the Right Menu key  to access Options, then select Share and press the OK key OK . Select Share with option: E-mail, Messages, or Bluetooth and follow the option prompts.
3 6 Additional options
From the contact list, you can access the following options:
Call
Make a call to the selected contact.
Send message
Send an SMS/MMS to the selected contact.
Settings
• Sort contacts |
Press the OK key OK to choose contacts |
|
sorted by first name or by last name. |
• Import contacts Import contacts from SIM card, memory card, Gmail, or outlook.
• Export contacts Export contacts to SIM card, memory card, or Bluetooth.
• Set ICE contacts Add two contacts for making "In Case of Emergency" calls.
• Delete contacts Delete one or more contacts at once.
20
 Loading...