


User’s manual
993
Two-line speakerphone with caller ID/call waiting
Congratulations
on purchasing your new AT&T product.
Before using this AT&T product, please read the Important product information on pages 63-64 of this manual.
Please thoroughly read the user’s manual for all the feature operation
and troubleshooting information necessary to install and operate your new
AT&T product. You can also visit our website at www.telephones.att.com or call 1 (800) 222-3111.
In Canada, dial 1 (866) 288-4268.
Model #: |
993 |
Type: |
Two-line speakerphone with caller ID/call waiting |
Serial #: |
|
|
(found on the bottom of the telephone base) |
Purchase date: |
|
Place of purchase: |
|
|
|
|
|
© 2008-2009 Advanced American Telephones. All Rights Reserved. AT&T and the AT&T logo are trademarks of AT&T Intellectual Property licensed to Advanced American Telephones, San Antonio, TX 78219. Printed in China.

telephone. |
STOP! |
|
You must install the power |
|
See page 11 |
adapter before using the |
|
for easy instructions. |
|
|
For customer service or product information, visit our website at www.telephones.att.com or call 1 (800) 222-3111. In Canada, dial 1 (866) 288-4268.
 CAUTION: To reduce the risk of fire or injury to persons or damage to the telephone, read and follow these instructions carefully:
•Use only alkaline 9V batteries (purchased separately).
•Do not dispose of the battery in a fire. Like other batteries of this type, it could explode if burned. Check with local codes for special disposal instructions.
•Do not open or mutilate the battery. Released electrolyte is corrosive and may cause damage to the eyes or skin. It may be toxic if swallowed.
•Exercise care in handling batteries in order not to create a short circuit. Do not allow conductive materials such as rings, bracelets, or keys to touch the battery. The battery or conductor may overheat and cause harm.
•Observe proper polarity orientation between the battery and metallic contacts.
Do not disassemble your telephone. There are no user-serviceable parts inside. Refer to qualified service personnel for servicing.

User’s manual
993
Two-line speakerphone with caller ID/call waiting
Table of contents |
|
Getting started |
|
Product overview...................................................... |
3 |
Quick reference guide............................................ |
4 |
Parts checklist............................................................ |
6 |
Glossary......................................................................... |
7 |
Telephone location................................................... |
8 |
Optional spare battery........................................... |
9 |
Telephone installation.......................................... |
10 |
Data port.................................................................... |
12 |
Wall mounting......................................................... |
13 |
Optional headset.................................................... |
16 |
Telephone operation |
|
Menu operation....................................................... |
17 |
Menu structure........................................................ |
18 |
Feature setup........................................................... |
19 |
Turn auto speaker on or off........................ |
19 |
Set the primary line........................................ |
19 |
Turn automatic line selection on |
|
or off ................................................................. |
20 |
Set preferred mode......................................... |
21 |
Set the time and date.................................... |
22 |
Turn screen backlight on or off................. |
23 |
Set the scroll rate............................................. |
23 |
Turn the central office voicemail |
|
(COVM) indicator on or off...................... |
24 |
Turn NEW CALL light off............................... |
25 |
Program home and local area codes..... |
26 |
Set call history................................................... |
28 |
Choose how to store repeat calls in |
|
call history....................................................... |
28 |
Turn caller ID with call waiting on |
|
or off.................................................................. |
29 |
Language.............................................................. |
29 |
Basic operation....................................................... |
30 |
Make, answer or end a call......................... |
30 |
Switch between handset, headset |
|
and speakerphone....................................... |
31 |
Timer....................................................................... |
32 |
Volume................................................................... |
32 |
Redial...................................................................... |
33 |
Display dial ......................................................... |
33 |
Auto redial............................................................ |
34 |
Options while on calls........................................ |
35 |
Hold ........................................................................ |
35 |
Switch between lines during a call.......... |
35 |
Mute........................................................................ |
36 |
Flash........................................................................ |
36 |
Conference calls............................................... |
36 |
Low battery indicator...................................... |
37 |
Lights and what they mean......................... |
37 |
One-touch operation (speed dial)
One-touch (speed dial)....................................... |
38 |
Store a number in one-touch....................... |
39 |
Store a pause in a one-touch entry........... |
40 |
Store a flash in a one-touch entry............. |
40 |
Store a wait in a one-touch entry.............. |
40 |
View a one-touch entry................................... |
40 |
Dial a one-touch number............................... |
41 |
Edit a one-touch number............................... |
42 |
Erase a one-touch number........................... |
42 |
Chain dialing........................................................ |
43 |
Directory |
|
Directory operation............................................... |
44 |
Menu structure................................................... |
44 |
Store a name and number in the |
|
directory.......................................................... |
45 |
Store a wait in a directory number.......... |
46 |
Review directory entries................................ |
47 |
Edit a directory entry .................................... |
47 |
Dial a number from the directory............. |
49 |
Remove a name and number from |
|
the directory................................................... |
49 |
Table of contents
Caller ID |
|
Caller ID operation................................................ |
50 |
Information about caller ID with call |
|
waiting.............................................................. |
50 |
How caller ID works........................................ |
51 |
Call waiting.......................................................... |
52 |
Message waiting and |
|
NEW CALL lights.......................................... |
52 |
Call history |
|
Call history operation.......................................... |
53 |
View call history summary........................... |
53 |
Review records in call history in the |
|
order received............................................... |
53 |
Review records in call history by line ... |
54 |
Remove calls from call history................... |
54 |
Dial a number from call history................. |
55 |
Dial options ........................................................ |
55 |
Save a call history entry to the |
|
directory........................................................... |
56 |
Save a number from call history in |
|
a one-touch location................................. |
57 |
Display screen messages.............................. |
57 |
Appendix |
|
Troubleshooting...................................................... |
58 |
Important product information....................... |
63 |
Safety information............................................ |
63 |
Especially about corded telephones....... |
64 |
FCC and ACTA information............................... |
65 |
Part 15 of FCC rules............................................. |
67 |
Limited warranty..................................................... |
68 |
Default settings....................................................... |
71 |
General product care........................................... |
72 |
Technical specifications..................................... |
73 |
Index............................................................................ |
74 |
Getting started
Product overview
This AT&T 993 two-line speakerphone with caller ID/call waiting can be used with one or two incoming telephone lines and features a speakerphone for hands-free use. It is hearing-aid compatible and can also be used hands-free with a two-band 2.5 mm headset (purchased separately). This telephone can be used on a desk or mounted on a wall and does not require AC power for basic operation when a fresh 9V alkaline battery (purchased separately) is installed.
The 993 has a data port for connecting the telephone to another device such as a fax machine or modem. It has a caller ID feature which supports caller ID with call waiting service. (Caller ID services are subscriber services available from many local telephone companies for a fee). The backlit screen display allows you to view information on the screen even in low light conditions. The 993 also features a 24-number memory for fast dialing and has a directory which can store up to 100 additional numbers with names.
This user’s manual contains detailed instructions for installing, programming and operating your AT&T 993 two-line speakerphone with caller ID/call waiting. Please follow the directions carefully.

Getting started
Quick reference guide
Press to scroll up, down, left or right while in menus.
CALL HISTORY
Press to display caller ID information (page 53).
DIR
Press to store or display directory entries (page 44).
(AUTO) REDIAL
Press to activate the auto-redial (page 34).
ENTER
Press to display a menu, select a displayed item from the menu, or save an entry.
 REMOVE
Press to delete the
displayed directory or
caller ID entry (page 49).
Dial pad keys
Press to start a quick name search while in the directory (page 47).
LOWER
Press to dial the telephone number stored in the lower locations of the onetouch keys (page 40).

Getting started
Quick reference guide
NEW CALL LINE 1, LINE 2 |
HOLD |
|
Indicates new calls |
Press to place a call |
|
and/or voice messages |
on hold (page 35). |
|
for line 1 and line 2 |
|
|
(page 52). |
|
|
|
PAUSE |
|
|
Press to insert a pause |
|
|
in the dialing sequence |
|
|
of a number stored in |
|
|
the memory (page 40). |
|
LINE 1, LINE 2 |
|
|
Press, then lift |
SPEAKER |
|
handset to make or |
||
Press to turn the base |
||
answer a call on line |
||
speakerphone on or |
||
1 or 2 (page 30). |
||
off (page 31). |
||
|
|
MUTE |
|
CONFERENCE |
Press to silence the |
|
microphone; press |
||
Press to enter a three- |
again to resume |
|
way conference call |
the telephone |
|
(page 36). |
conversation (page |
|
|
36). |
|
|
HEADSET |
|
|
Press to activate the |
|
FLASH |
headset (page 31). |
|
|
||
During a call, press to |
|
|
receive an incoming |
VOLUME |
|
call if call waiting is |
During a call, press |
|
activated (page 36). |
||
to adjust the listening |
||
|
||
|
volume. |
|
|
While the telephone |
|
|
is not in use, press to |
|
|
adjust ringer volume |
|
|
(page 32). |
Getting started
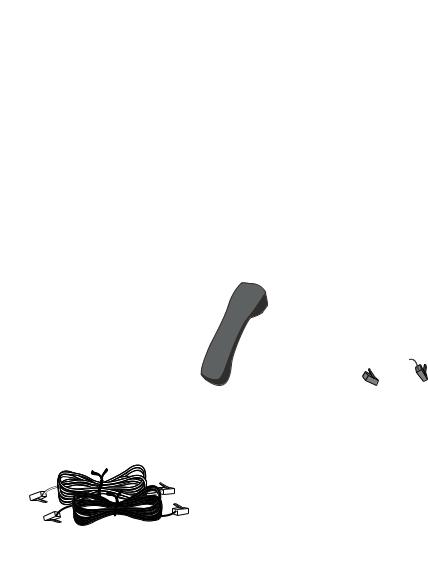
Parts checklist
Save your sales receipt and original packaging in case it is necessary to ship your telephone for warranty service.
Check to make sure the telephone package includes the following:
|
|
|
|
|
|
|
|
|
|
|
|
|
|
|
|
|
|
|
|
|
|
|
|
|
|
|
|
|
|
|
|
|
|
|
|
|
|
|
|
|
|
|
|
|
|
|
|
|
|
|
|
|
|
|
|
|
|
|
|
|
|
|
|
|
|
|
|
|
|
|
|
|
|
|
|
|
|
|
|
|
|
|
|
|
|
|
|
|
|
|
|
|
|
|
|
|
|
|
|
|
|
|
|
|
|
|
|
|
|
|
|
|
|
|
|
|
|
|
|
|
|
|
|
|
|
|
|
|
|
|
|
|
|
|
|
|
|
|
|
|
|
|
|
|
|
|
|
|
|
|
|
|
|
|
|
|
|
|
|
|
|
|
|
|
|
|
|
|
|
|
|
|
|
|
|
|
|
|
|
|
|
|
|
|
|
|
|
|
|
|
|
|
|
|
|
|
|
|
|
|
|
|
|
|
|
|
|
|
|
|
|
|
|
|
|
|
|
|
|
|
|
|
|
|
|
|
|
|
|
|
|
|
|
|
|
|
|
|
|
|
|
|
|
|
|
|
|
|
|
|
|
|
|
|
|
|
|
|
|
|
|
|
|
|
|
|
|
|
|
|
|
|
|
|
|
|
|
|
|
|
|
|
|
|
|
|
|
|
|
|
|
|
|
|
|
|
|
|
|
|
|
|
|
|
|
|
|
|
|
|
|
|
|
|
|
|
|
|
|
|
|
|
|
|
|
|
|
|
|
|
|
|
|
|
|
|
|
|
|
|
|
|
|
|
|
|
|
|
|
|
|
|
|
|
|
|
|
|
|
|
|
|
|
|
|
|
|
|
|
|
|
|
|
|
|
|
|
|
|
|
|
|
|
|
|
|
|
|
|
|
|
|
|
|
|
|
|
|
|
|
|
|
|
|
|
|
|
|
|
|
|
|
|
|
|
|
|
|
|
|
|
|
|
|
|
|
|
|
|
|
|
|
|
|
|
|
|
|
|
|
|
|
|
|
|
|
|
|
|
|
|
|
|
|
|
|
|
|
|
|
|
|
|
|
|
|
|
|
|
|
|
|
|
|
|
|
|
|
|
|
|
|
|
|
|
|
|
|
|
|
|
|
|
|
|
|
|
|
|
|
|
|
|
|
|
|
|
|
|
|
|
|
|
|
|
|
|
|
|
|
|
|
|
|
|
|
|
|
|
|
|
|
|
|
|
|
|
|
|
|
|
|
|
|
|
|
|
|
|
|
|
|
|
|
|
|
|
|
|
|
|
|
|
|
|
|
|
|
|
|
|
|
|
|
|
|
|
|
|
|
|
|
|
|
|
|
|
|
|
|
|
|
|
|
|
|
|
|
|
|
|
|
|
|
|
|
|
|
|
|
|
|
|
|
|
|
|
|
|
|
|
|
|
|
|
|
|
|
|
|
|
|
|
|
|
|
|
|
|
|
|
|
|
|
|
|
|
|
|
|
|
|
|
|
|
|
|
|
|
|
|
|
|
|
|
|
|
|
|
|
|
|
|
|
|
|
|
|
|
|
|
|
|
|
|
|
|
|
|
|
|
|
|
|
|
|
|
|
|
|
|
|
|
|
|
|
|
|
|
|
|
|
|
|
|
|
|
|
|
|
|
|
|
|
|
|
|
|
|
|
|
|
|
|
|
|
|
|
|
|
|
|
|
|
|
|
|
|
|
|
|
|
|
|
|
|
|
|
|
|
|
|
|
|
|
|
|
|
|
|
|
|
|
|
|
|
|
|
|
|
|
|
|
|
|
|
|
|
|
|
|
|
|
|
|
|
|
|
|
|
|
|
|
|
|
|
|
|
|
|
|
|
|
|
|
|
|
|
|
|
|
|
|
|
|
|
|
|
|
|
|
|
|
|
|
|
|
|
|
|
|
|
|
|
|
|
|
|
|
|
|
|
|
|
|
|
|
|
|
|
|
|
|
|
|
|
|
|
|
|
|
|
|
|
|
|
|
|
|
|
|
|
|
|
|
|
|
|
|
|
|
|
|
|
|
|
|
|
|
|
|
|
|
|
|
|
|
|
|
|
|
|
|
|
|
|
|
|
|
|
|
|
|
|
|
|
|
|
|
|
|
|
|
|
|
|
|
|
|
|
|
|
|
|
|
|
|
|
|
|
|
|
|
|
|
|
|
|
|
|
|
|
|
|
|
|
|
|
|
|
|
|
|
|
|
|
|
|
|
|
|
|
|
|
|
|
|
|
|
|
|
|
|
|
|
|
|
|
|
|
|
|
|
|
|
|
|
|
|
|
|
|
|
|
|
|
|
|
|
|
|
|
|
|
|
|
|
|
|
|
|
|
|
|
|
|
|
|
|
|
|
|
|
|
|
|
|
|
|
|
|
|
|
|
|
|
|
|
|
|
|
|
|
|
|
|
|
|
|
|
|
|
|
|
|
|
|
|
|
|
|
|
|
|
|
|
|
|
|
|
|
|
|
|
|
|
|
|
|
|
|
|
|
|
|
|
|
|
|
|
|
|
|
|
|
|
|
|
|
|
|
|
|
|
|
|
|
|
|
|
|
|
|
|
|
|
|
|
|
|
|
|
|
|
|
|
|
|
|
|
|
|
|
|
|
|
|
|
|
|
|
|
|
|
|
|
|
|
|
|
|
|
|
Replacement |
|||||||||||||
|
|
User's manual |
|
|
Quick start guide |
|
|||||||||||||||||||||||||||||||||||||||||||||||
|
|
|
|
directory card |
|||||||||||||||||||||||||||||||||||||||||||||||||
|
|
|
|
|
|
|
|
|
|
|
|
|
|
|
|
|
|
|
|
|
|
|
|
|
|
|
|
|
|
|
|
|
|
|
|
|
|
|
|||||||||||||||
|
|
|
|
|
|
|
|
|
|
|
|
|
|
|
|
|
|
|
|
|
|
|
|
|
|
|
|
|
|
|
|
|
|
|
|
|
|
|
|
|
|
|
|
|
|
|
|
|
|
|
|
|
|
|
|
|
|
|
|
|
|
|
|
|
|
|
|
|
|
|
|
|
|
|
|
|
|
|
|
|
|
|
|
|
|
|
|
|
|
|
|
|
|
|
|
|
|
|
|
|
|
|
|
|
|
|
|
|
|
|
|
|
|
|
|
|
|
|
|
|
|
|
|
|
|
|
|
|
|
|
|
|
|
|
|
|
|
|
|
|
|
|
|
|
|
|
|
|
|
|
|
|
|
|
|
|
|
|
|
|
|
|
|
|
|
|
|
|
|
|
|
|
|
|
|
|
|
|
|
|
|
|
|
|
|
|
|
|
|
|
|
|
|
|
|
|
|
|
|
|
|
|
|
|
|
|
|
|
|
|
|
|
|
|
|
|
|
|
|
|
|
|
|
|
|
|
|
|
|
|
|
|
|
|
|
|
|
|
|
|
|
|
|
|
|
|
|
|
|
|
|
|
|
|
|
|
|
|
|
|
|
|
|
|
|
|
|
|
|
|
|
|
|
|
|
|
|
|
|
|
|
|
|
|
|
|
|
|
|
|
|
|
|
|
|
|
|
|
|
|
|
|
|
|
|
|
|
|
|
|
|
|
|
|
|
|
|
|
|
|
|
|
|
|
|
|
|
|
|
|
|
|
|
|
|
|
|
|
|
|
|
|
|
|
|
|
|
|
|
|
|
|
|
|
|
|
|
|
|
|
|
|
|
|
|
|
|
|
|
|
|
|
|
|
|
|
|
|
|
|
|
|
|
|
|
|
|
|
|
|
|
|
|
|
|
|
|
|
|
|
|
|
|
|
|
|
|
|
|
|
|
|
|
|
|
|
|
|
|
|
|
|
|
|
|
|
|
|
|
|
|
|
|
|
|
|
|
|
|
|
|
|
|
|
|
|
|
|
|
|
|
|
|
|
|
|
|
|
|
|
|
|
|
|
|
|
|
|
|
|
|
|
|
|
|
|
|
|
|
|
|
|
|
|
|
|
|
|
|
|
|
|
|
|
|
|
|
|
|
|
|
|
|
|
|
|
|
|
|
|
|
|
|
|
|
|
|
|
|
|
|
|
|
|
|
|
|
|
|
|
|
|
|
|
|
|
|
|
|
|
|
|
|
|
|
|
|
|
|
|
|
|
|
|
|
|
|
|
|
|
|
|
|
|
|
|
|
|
|
|
|
|
|
|
|
|
|
|
|
|
|
|
|
|
|
|
|
|
|
|
|
|
|
|
|
|
|
|
|
|
|
|
|
|
|
|
|
|
|
|
|
|
|
|
|
|
|
|
|
|
|
|
|
|
|
|
|
|
|
|
|
|
|
|
|
|
|
|
|
|
|
|
|
|
|
|
|
Telephone base with |
Handset |
Coiled handset cord |
mounting bracket |
||
already installed |
|
|
Seven-foot clear telephone |
|
line cord (2-conductor) |
|
Seven-foot black telephone |
Power adapter |
line cord (4-conductor) |
Getting started
Glossary
Caller ID: Caller identification is a subscriber service available from most local telephone companies for a fee. When you subscribe to caller identification, you can see the name and telephone number of the caller before answering the telephone, if you and the caller are both in areas offering caller ID service with compatible equipment.
Caller ID with call waiting: This is a single, combined subscriber service which may be available from your local telephone company. If you subscribe to
this service, you can use your 993 telephone to see the name and telephone number of the caller even while on another call (as long as the caller is in an area with caller ID service and both telephone companies use compatible equipment).
COVM: Central office voicemail is a subscriber voice message service which may be available from the local telephone company. This service may be called by another name in your area (e.g., call answering or voicemail).
Home area code: This is the area code for your telephone number. Most users simply dial the seven digits of a telephone number to make a call within their own area code and 11 digits outside of their area code. If this applies
to you, enter your own area code into the unit as the home area code. After programming, if there is a call from within your home area code, the screen will display the seven digits of the telephone number.
You may, however, live in a region where you are required to dial 10 digits for calls within your area code (area code and telephone number). If this applies to you, enter 000 for the home area code and enter your area code as a local area code. After programming, if there is a call from within your area code, the screen displays the 10 digits of the telephone number. Be sure to follow the directions under Program home and local area codes on page 26 during feature setup.
Local area code: Most users dial 11 digits to make calls outside their own area codes. If this applies to you, you do not need to program any local area codes.
However, if you dial only 10 digits to make calls to areas outside your own area code (without dialing 1), then program these local area codes into the telephone. Up to four local area codes can be programmed. After
programming, if there is an incoming call from one of these local area codes, the screen displays the 10 digits of the telephone number. See Program home and local area codes on page 26 for instructions.
Navigation buttons: These are the buttons used when setting up your 993 telephone and for scrolling through the feature options (ENTER,  ,
,  ,
,  ,
,  ).
).
Primary Line: This is the line on your telephone designated to be selected automatically when you lift the handset, press SPEAKER, or press HEADSET.
Getting started
Telephone location
Choose a central location close to a telephone jack and an electrical outlet not controlled by a wall switch. The telephone can be placed on a flat surface or mounted on a standard wall plate.
Avoid placing the telephone too close to:
•Communication devices such as: personal computers, computer routers, television sets, VCRs, wireless routers (wireless broadband, wi-fi, or 802.11) or cordless telephones.
•Excessive heat sources.
•Noise sources such as a window with traffic outside, motors, microwave ovens, refrigerators, or fluorescent lighting.
•Excessive dust sources such as a workshop or garage.
•Excessive moisture.
•Extremely low temperature.
•Mechanical vibration or shock such as on top of the washing machine or work bench.
Getting started
Optional spare battery
You can purchase a 9V alkaline battery and keep it in the spare battery compartment of the telephone base at all times. In the event of a power failure and with the optional spare battery installed in the telephone, all the telephone functions will work normally until the battery needs to be replaced.
. Remove the mounting bracket from the underside of the telephone base. Press the tabs in the direction of the arrows and pull the mounting bracket away from the telephone base.
2.Press the tab and pull to remove the battery compartment cover. Insert one new 9V alkaline battery (purchased separately) following the polarity markings in the battery compartment.


 Polarity
markings
3.Replace the battery compartment cover.
4.Pull the mounting bracket up to the upside of the telephone base.
5.If the telephone is to be mounted on a wall, turn to Wall mounting on page 13.
— OR —
If you are using the telephone on a table or desk, turn to Telephone installation on page 10.
 NOTE: If you do not have a spare battery (optional) already installed during a power failure, you will only be able to make and receive calls from the handset. The ringer will not work until the power is restored.

Getting started
Telephone installation
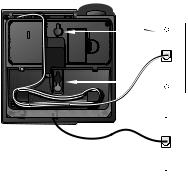
1.Connect the telephone line cord(s) to the telephone and the modular wall jack(s).
If there is a single two-line modular wall jack, use only the black telephone line cord (4-conductor). Plug one end into the jack labeled L1 or L1/L2 on the back of the telephone. Plug the other end into the
wall jack. Make sure the telephone line cord snaps firmly into place at both ends.
Two-line modular |
wall jack |
Black telephone line |
cord (4-conductor) |
If there are two one-line wall jacks, use both telephone line cords. Insert one end of the clear telephone line cord into the jack labeled L1 or L1/L2 on the back of the telephone. Plug the other end into the modular wall jack for Line 1. Insert one end of the black telephone line cord into the jack on the back of the telephone labeled L2. Then, plug the other end into the modular wall jack for Line 2. Make sure the telephone line cords snap firmly into place at both ends.
Modular  wall jack for
  Line 1
Modular wall |
jack for Line 2 |
Black telephone line cord (4-conductor)
Clear telephone line cord
10

Getting started
Telephone installation
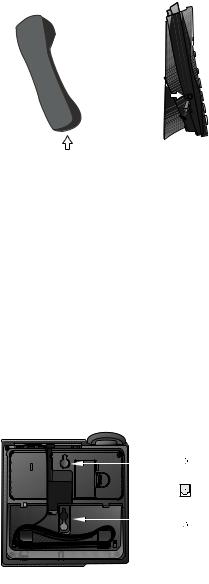
2. Connect the handset to the telephone.
Plug the coiled handset cord into the handset jack on the left side of the telephone. Plug the other end of the coiled handset cord into the handset, then hang up. 
3.Connect the power adapter.
Thread the power adapter cord behind the slot at the back of the telephone base. Then plug the smaller end of the power adapter into the jack labeled 9V AC POWER on the back of the telephone. Plug the power adapter into an electrical outlet not controlled by a wall switch.
 Electrical outlet not controlled by a wall switch
Power adapter
POWER jack
Slot
4.Check for a dial tone.
Press LINE 1, then lift the handset or press SPEAKER and listen for a dial tone. Then press LINE 2 and listen for a dial tone. If there is no dial tone, see Troubleshooting on page 58.
5.Confirm Lines 1 and 2.
Press LINE 1 and dial one of the telephone numbers. If there is a busy signal, line 1 is the number you called. If line 2 rings, line 2 is the number you called.
11

Getting started
Data port
If you want to connect another device (such as a modem or a fax machine) to the wall jack, use the jack labeled DATA on the telephone. The data port uses line 2 only.
Data port
 NOTES:
. Use only the power adapter supplied or equivalent with this product. To order a replacement power adapter, visit our website at www.telephones.att.com, or call
1 (800) 222-3111. In Canada, dial 1 (866) 288-4268.
2.Be sure to use an electrical outlet not controlled by a wall switch.
3.The power adapters are intended to be correctly oriented in a vertical or floor mount position. The prongs are not designed to hold the plug in place if it is plugged into a ceiling, under- the-table or cabinet outlet.
12

Getting started
Wall mounting
A wall jack with mounting studs is required for wall mounting. This wall jack with mounting studs may be available for purchase from a hardware store or consumer electronics retailer and may require professional installation.
1.Rotate the mounting bracket.
The mounting bracket should be set into the downward position as shown below.
2.Reverse the handset tab.
Hold down the switchhook, and slide the tab up and out of its slot. Turn the tab so that the end with the hook points up, then insert the tab back into its slot.
The handset can now be held securely in place when the telephone is wall mounted.
3.Connect the power cord to the telephone.
Plug the smaller end of the power adapter into the jack labeled 9V AC POWER on the back of the telephone. Route the cord through the slot, bundle the cord and secure it with a twist tie if necessary. Plug the other end of the power adapter into an electrical outlet not controlled by a wall
switch.
POWER jack
 Electrical outlet not controlled by a wall switch
slot
13
Getting started
Wall mounting
4.Connect the handset to the telephone.
Plug the coiled handset cord into the handset jack on the left side of the telephone. Plug the other end of the coiled handset cord into the handset, then hang up.
5.Connect the telephone line cord(s) to the telephone and the modular wall jack(s).
•If there is a single two-line modular wall jack, use only the black telephone line cord (4-conductor). Plug one end of the telephone line cord into the jack labeled L1 or L1/L2 on the back of the telephone. Route the cord through the channel, bundle the cord, and store it inside the bracket. Lift the bracket and put the cord through the hole in the bracket. Route the cord through the channel so it comes out at the bottom of the phone and return the bracket to the wall mount position. Press the mounting bracket until it securely clicks into place. Plug the other end of the telephone line cord into the modular wall jack. Make sure the telephone line cord snaps firmly into place at both ends. Place the telephone on the wall mounting plate and pull down until it is held securely.
Two-line modular wall jack
L1/L2
14
Getting started
Wall mounting
•If there are two separate one-line wall jacks, use both telephone line cords. Plug one end of the clear telephone line cord into the jack labeled L1 or L1/L2 on the back of the telephone. Plug one end of the black telephone line cord into the jack labeled L2 on the back of the telephone. Route the cords through the channel, bundle the cords, and store them inside the bracket. For line 2, you will need to lift up the bracket and put the cord through the hole in the bracket. Route the cord through the channel so it comes out at the bottom of the
phone and return the bracket to the wall mount position. Make sure the bracket clicks securely into place. Plug the free end of the telephone
line cord for Line 1 into the Line 1 modular wall jack. Plug the free end of the telephone line cord for Line 2 into the Line 2 modular wall jack. Make sure the telephone line cords snap firmly into place at both ends. Place the telephone on the wall mounting plate and pull it down until it is held securely. 
|
Modular |
|
wall jack |
|
for Line 1 |
|
L1 |
|
Modular |
|
wall jack |
|
for Line 2 |
6. Check for a dial tone. |
L2 |
|
Press LINE 1 then lift the handset, or press SPEAKER and listen for a dial tone. Then press LINE 2 and listen for a dial tone. If there is no dial tone, see Troubleshooting on page 58.
7.Confirm Lines 1 and 2.
Press LINE 1 and dial one of the telephone numbers. If there is a busy signal, line 1 is the number you called. If line 2 rings, line 2 is the number you called.
 NOTES:
. Use only the power adapter supplied with this product. To order a replacement power adapter, visit our website at www.telephones.att.com, or call
1 (800) 222-3111. In Canada, dial 1 (866) 288-4268.
2.Be sure to use an electrical outlet not controlled by a wall switch.
3.The power adapters are intended to be correctly oriented in a vertical or floor mount position. The prongs are not designed to hold the plug in place if it is plugged into a ceiling or under-the-table/cabinet outlet.
15

Getting started
Optional headset
Make sure the headset is firmly plugged into the headset jack under the rubber flap on the right side of the telephone. There is a low pitch (error) tone if you press HEADSET when the headset is not plugged in.
For hands-free telephone conversations, use any industry standard 2.5 mm headset (purchased separately). For best results, use an AT&T 2.5 mm headset. To order an AT&T 2.5 mm headset, visit our website at www.telephones.att.com or call 1 (800) 222-3111. In Canada, dial 1 (866) 288-4268.
Plug 2.5 mm headset into the jack on the right side of the telephone base (beneath the small rubber flap).
 NOTE: If the sound quality of the headset is poor, try unplugging it, and firmly plugging it in again.
16
Menu topic or data
FEATURE SETUP
ONE TOUCH
Menu scroll Menu item indicator
Menu
PHONE SETTINGS
 LINE 1 PRIMARY LINE
Feature
Current Setting
Telephone operation
Menu operation
Feature setup, memory programming and a few individual feature operations for this telephone use the menus shown in the screen display. Use the navigation buttons
( ,
,  ,
,  ,
,  , and ENTER) to begin, end and move through menu operations (for example, FEATURE SETUP).
. Press ENTER to activate a menu operation. The first menu item for this topic or data will appear in line four of the screen.
2.When  is displayed on screen, press
  or
or  repeatedly to move through the menu.
3.Press ENTER to choose the menu item currently displayed. This may be a lower level menu, an action, or a feature settings screen.
4.When 
 is displayed on screen, press
  or
or  to scroll through the setting options.
5.Press  or ENTER to store the current setting and show the next option for the feature currently
displayed. When you successfully change a setting, there is a high pitch tone to indicate confirmation.
6.To return to the main menu, press  or
or  until the screen displays MAIN MENU and then press ENTER.
7.To exit FEATURE SETUP, press and hold ENTER.
 NOTES:
. If you do not press a key to continue menu operations within approximately 30 seconds, the telephone automatically exits the menu.
2.If there is a low pitch (error) tone, repeat the steps to program the feature.
17
Telephone operation
Menu structure
Use the menu to customize the feature settings for your 993 telephone. Press ENTER when the phone is in idle mode to access the menu.
ONE TOUCH
PROGRAM
WAIT
EXIT PROGRAM
VIEW
DONE
AUTO SPEAKER
MAIN MENU
PHONE SETTINGS
PRIMARY LINE
ALS ON/OFF
PREFERRED MODE
SET TIME/DATE
LCD BACKLIGHT
SCROLL RATE
MAIN MENU
VOICE MESSAGE
L1 COVM ON/OFF
L2 COVM ON/OFF
L1 LIGHT OFF
L2 LIGHT OFF
MAIN MENU
CALLER ID
AREA CODES
CALL HISTORY
REPEAT CALLS
CID-CALL WAIT
MAIN MENU
LANGUAGE
(English, Francais, and Espanol)
18
ONE TOUCH
 ON
ON
AUTO SPEAKER
ONE TOUCH
MAIN MENU
PHONE SETTINGS
 LINE 1 PRIMARY LINE
Telephone operation
Feature setup
Turn auto speaker on or off
Choose whether pressing a one-touch key while the telephone is on hook automatically initiates a speed dial call or displays the speed dial number without dialing. If you want to automatically dial the speed dial numbers by pressing a one-touch key without taking the handset off hook first, set auto speaker to ON. To view the speed dial numbers on screen, press a one-touch key while the
handset is on hook, and set the auto speaker to OFF. This telephone comes with the auto speaker set to OFF. See One-touch operation on page 38 for details about speed dial.
 NOTE: Auto speaker dials the desired number in the preferred mode (see page 21). If the headset is not connected, the call is dialed using the speakerphone.
. Press ENTER to begin feature setup.
2.Press ENTER again. The screen displays ONE TOUCH and PROGRAM.
3.Press  until the screen display shows AUTO SPEAKER and the current setting.
4.Press  or
or  to toggle between OFF and ON.
5.When the desired setting is shown, press  or ENTER to save your choice.
6.When the screen displays MAIN MENU, press and hold ENTER to return to the idle screen.
Set the primary line
. Press ENTER to begin feature setup.
2.Press  until the screen displays PHONE SETTINGS.
3.Press ENTER. The screen displays PRIMARY LINE and the current setting.
4.Press  or
or  to toggle between LINE 1 and LINE 2.
5.When the desired line is displayed, press  or ENTER to save the setting. The screen displays ALS ON/OFF.
6.Proceed to step 5 of Turn automatic line selection on or off on page 20 to set the next feature (Automatic line selection).
— OR —
Press and hold ENTER to return to the idle screen.
 NOTE: When the telephone is off-hook, the primary line setting is disabled.
19
PHONE SETTINGS
 ON
ON
ALS ON/OFF
Telephone operation
Feature setup
Turn automatic line selection on or off
When this feature is turned on and the telephone is off hook, it automatically connects to a pre-selected line. Lines are prioritized in the following order: ringing primary, ringing non-primary, idle primary, idle non-primary, and busy primary.
Ringing primary: When the primary line is set to Line 1 and Line 1 is ringing, Line 1 is automatically connected. Ringing non-primary: When the primary line is set to Line 1 and Line 1 is idle while Line 2 is ringing, Line 2 is automatically connected.
Idle primary: When the primary line is set to Line 1 and both lines are idle, Line 1 is automatically connected. Idle non-primary: When the primary line is set to
Line 1 and Line 1 is busy while Line 2 is idle, Line 2 is automatically connected.
Busy primary: When the primary line is set to Line 1 and Line 1 and Line 2 are busy, Line 1 is automatically connected.
 NOTE: The same logic applies if the primary line is set to Line 2.
. Press ENTER to begin feature setup.
2.Press  until the screen displays PHONE SETTINGS.
3.Press ENTER. The screen displays PRIMARY LINE.
4.Press  until the screen displays ALS ON/OFF and the current setting.
5.Press  or
or  to toggle between ON and OFF.
6.When the correct setting is shown, press  or ENTER to save the setting. The screen displays PREFERRED MODE.
7.Proceed to step 5 of Set preferred mode on page 21 to set the next feature (Preferred mode).
— OR —
Press and hold ENTER to return to the idle screen.
 NOTE: If you press a LINE button before pressing SPEAKER, that line will be used instead of the automatic line selection already programmed. Automatic line selection will resume for the next call.
20

PHONE SETTINGS
 Speakerphone
PREFERRED MODE 
Telephone operation
Feature setup
Set preferred mode
Choose the mode (headset or speakerphone) which will be used automatically when dialing a number from the directory, speed dial or call history without lifting the handset. The preferred mode will also be used when auto speaker is set to ON, and you dial a speed dial number without lifting the handset. For information about the auto speaker setting, see Turn auto speaker on or off on page 19.
. Press ENTER to begin feature setup.
2.Press  until the screen displays PHONE SETTINGS.
3.Press ENTER. The screen displays PRIMARY LINE.
4.Press  until the screen displays PREFERRED MODE and the current setting.
5.Press  or
or  to select between Speakerphone and
Headset.
6.When the desired mode is displayed, press  or ENTER to save the setting. The screen displays SET TIME/ DATE.
7.Proceed to step 5 of Set the time and date on page 22 to set the next feature (Time and date).
— OR —
Press and hold ENTER to return to the idle screen.
21
 Loading...