


1718

User’s manual
1856
Speakerphone/
answering system with
caller ID/call waiting

Model #: 1856
Product name: Speakerphone/answering system
Serial #:
(found on the bottom of the telephone base)
Purchase date:
Place of purchase:
Congratulations
on purchasing your
new AT&T product.
Before using this AT&T product, please
read the Important product information
on pages 36-37 of this manual.
Please thoroughly read the user’s
manual for all the feature operations
and troubleshooting information necessary to install
and operate your new
AT&T product. You can also visit our
website at www.telephones.att.com
or call 1 (800) 222-3111.
In Canada, dial 1 (866) 288-4268.
© 2008-2009 Advanced American Telephones. All Rights Reserved. AT&T and
the AT&T logo are trademarks of AT&T Intellectual Property licensed to
Advanced American Telephones, San Antonio, TX 78219.
Message guard™ is a trademark of Advanced American Telephones.

For customer service or product information, visit our website at
www.telephones.att.com or call 1 (800) 222-3111.
In Canada, dial 1 (866) 288-4268.
CAUTION: To reduce the risk of fire or injury to persons or damage to
the telephone, read and follow these instructions carefully:
• Read and understand all instructions in the user’s manual.
• Avoid using a telephone during a thunderstorm.
• Do not use a telephone in the vicinity of a gas leak.
• Do not use this product near water, or when you are wet.
• Install this product in a protected location where no one can trip over any line or
power cords. Protect cords from damage or abrasion.
STOP!
You must install the
power adapter before
using the telephone
.
See page 5
for easy instructions.

Getting started
Quick reference guide .........................2
Parts checklist
.........................................3
Before you install
..................................4
Telephone base installation
.............5
Installation options
...............................6
Telephone operation
Telephone settings................................8
Telephone operation
.........................10
Options while on calls
.....................11
Directory
Directory ..................................................12
Speed dialing
........................................13
One-touch dialing...............................14
Caller ID history
Caller ID history ...................................15
To review the call history
...............17
Delete or copy an entry
..................18
Answering system operation
Answering system operation ........19
Answering system mode
.............. 20
Day & time announcements
.........21
Outgoing announcements
.............22
Announce only mode
.......................23
Changing feature options
..............24
Message playback............................26
To record & play memos
...................27
To record & play a phone
conversation
................................... 28
Message counter displays
........... 29
Remote access
.................................. 30
Appendix
Display screen messages, tones
& lights ..................................................31
Troubleshooting
................................ 32
Important product information
..... 36
FCC and ACTA information
......... 38
Part 15 of FCC rules
....................... 40
Limited warranty
.............................. 41
Technical specifications
................ 44
Index
....................................................... 45
Remote access wallet card
............46
1
Table of contents
User’s manual
1856
Speakerphone/
answering system with
caller ID/call waiting

Getting started
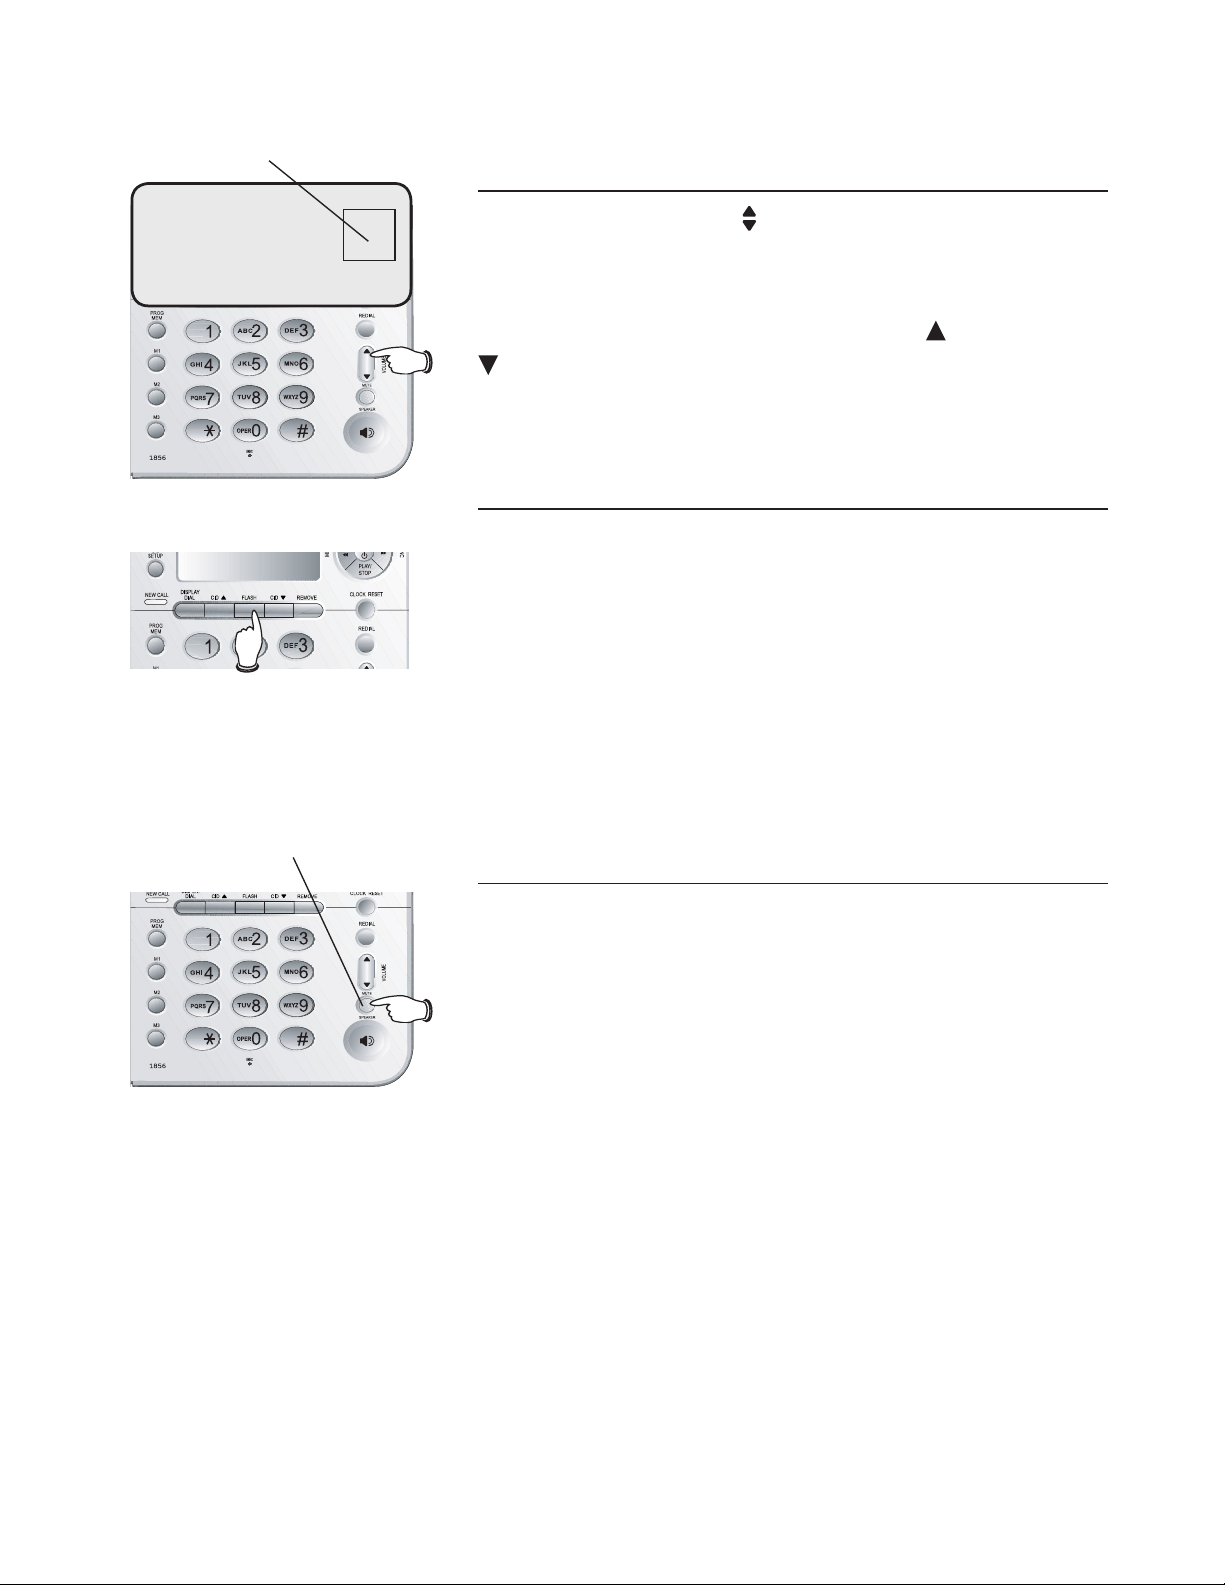
VOLUME
During a call, press
VOLUME
or
VOLUME to adjust
listening volume (page 11).
MUTE
Press to silence the microphone.
Press again to resume
conversation (page 11).
SPEAKER
Press to turn the speakerphone
on or off (begin or end a call)
(page 10).
Quick reference guide
CID
When the telephone is idle,
press to display caller ID
information (page 17).
While entering numbers, press
twice to insert a three-second
dialing pause (page 13).
DISPLAY DIAL
Press to dial the number
currently displayed (page 17).
FLASH
During a call, press to receive
an incoming call if call waiting is
activated (page 11).
TAS SETUP
Press to hear setup options.
Press and hold to change
answering system options
(page 24).
CID SETUP
Press to customize the
telephone's operation (page 8).
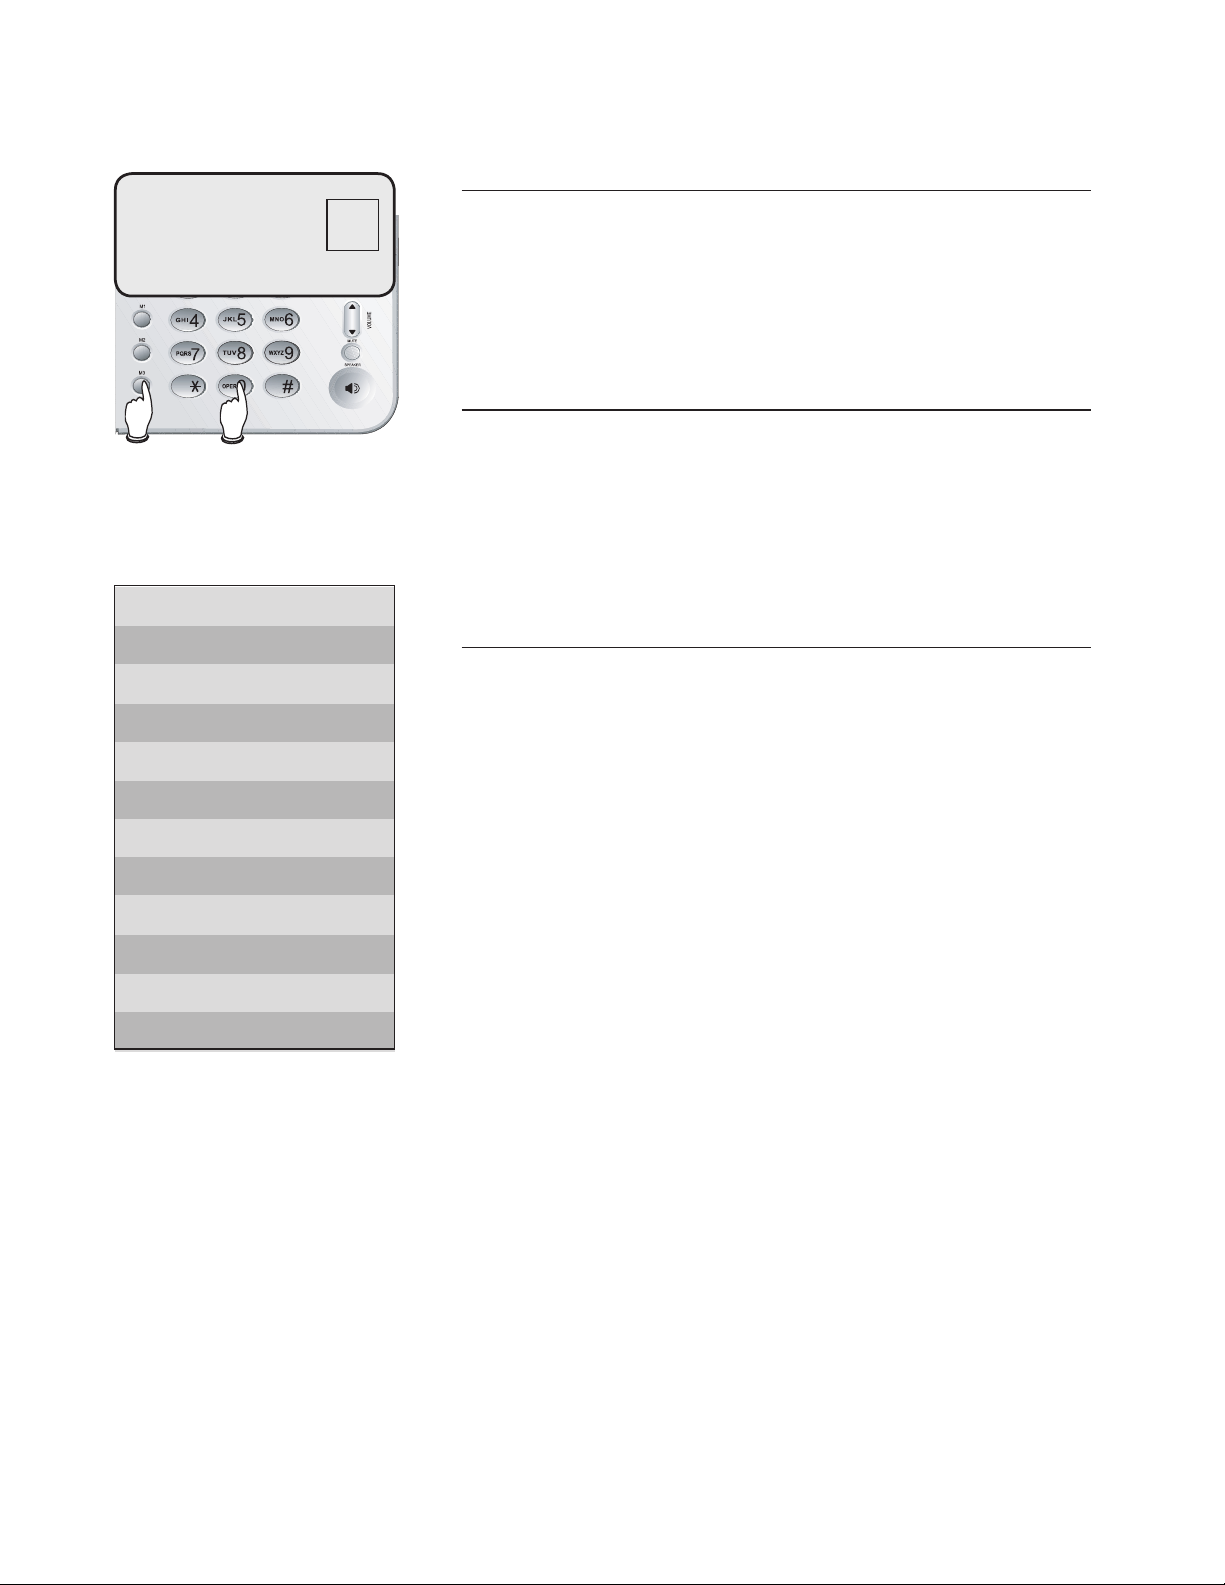
PROG/MEM
Press to program a number
(pages 13-14).
M1/M2/M3
Press to dial a one-touch
number (page 14).
CLOCK RESET
Press to review. Press and hold
to set the clock (page 21).
REMOVE
Press to delete caller ID currently
displayed (page 18).
REDIAL
Press to redial last number
dialed (page 10).
DELETE
Press to delete a message currently playing.
When phone is not in use,
press and hold to delete all old
messages (page 26).
REPEAT/MEMO
Press once to repeat a message
currently playing, and press
twice to listen to the previous
messages (page 26).
Press to record a memo (page
27) or change a menu setting
(page 24).
ON/OFF
Press to turn answering system
on or off (page 20).
SKIP /ANNC
Press to skip a message (page
26) or change a menu setting.
Press and hold to record an
announcement (page 22).
PLAY/STOP
When the telephone is idle, if
you have new messages, press to
play. Press again to stop message
playback.
Press and hold to play all messages (the oldest first) (page 26).
CID
When the telephone is idle,
press to display caller ID
information (page 17).
While entering numbers, press
to delete the last number
entered (page 13).
2
Getting started
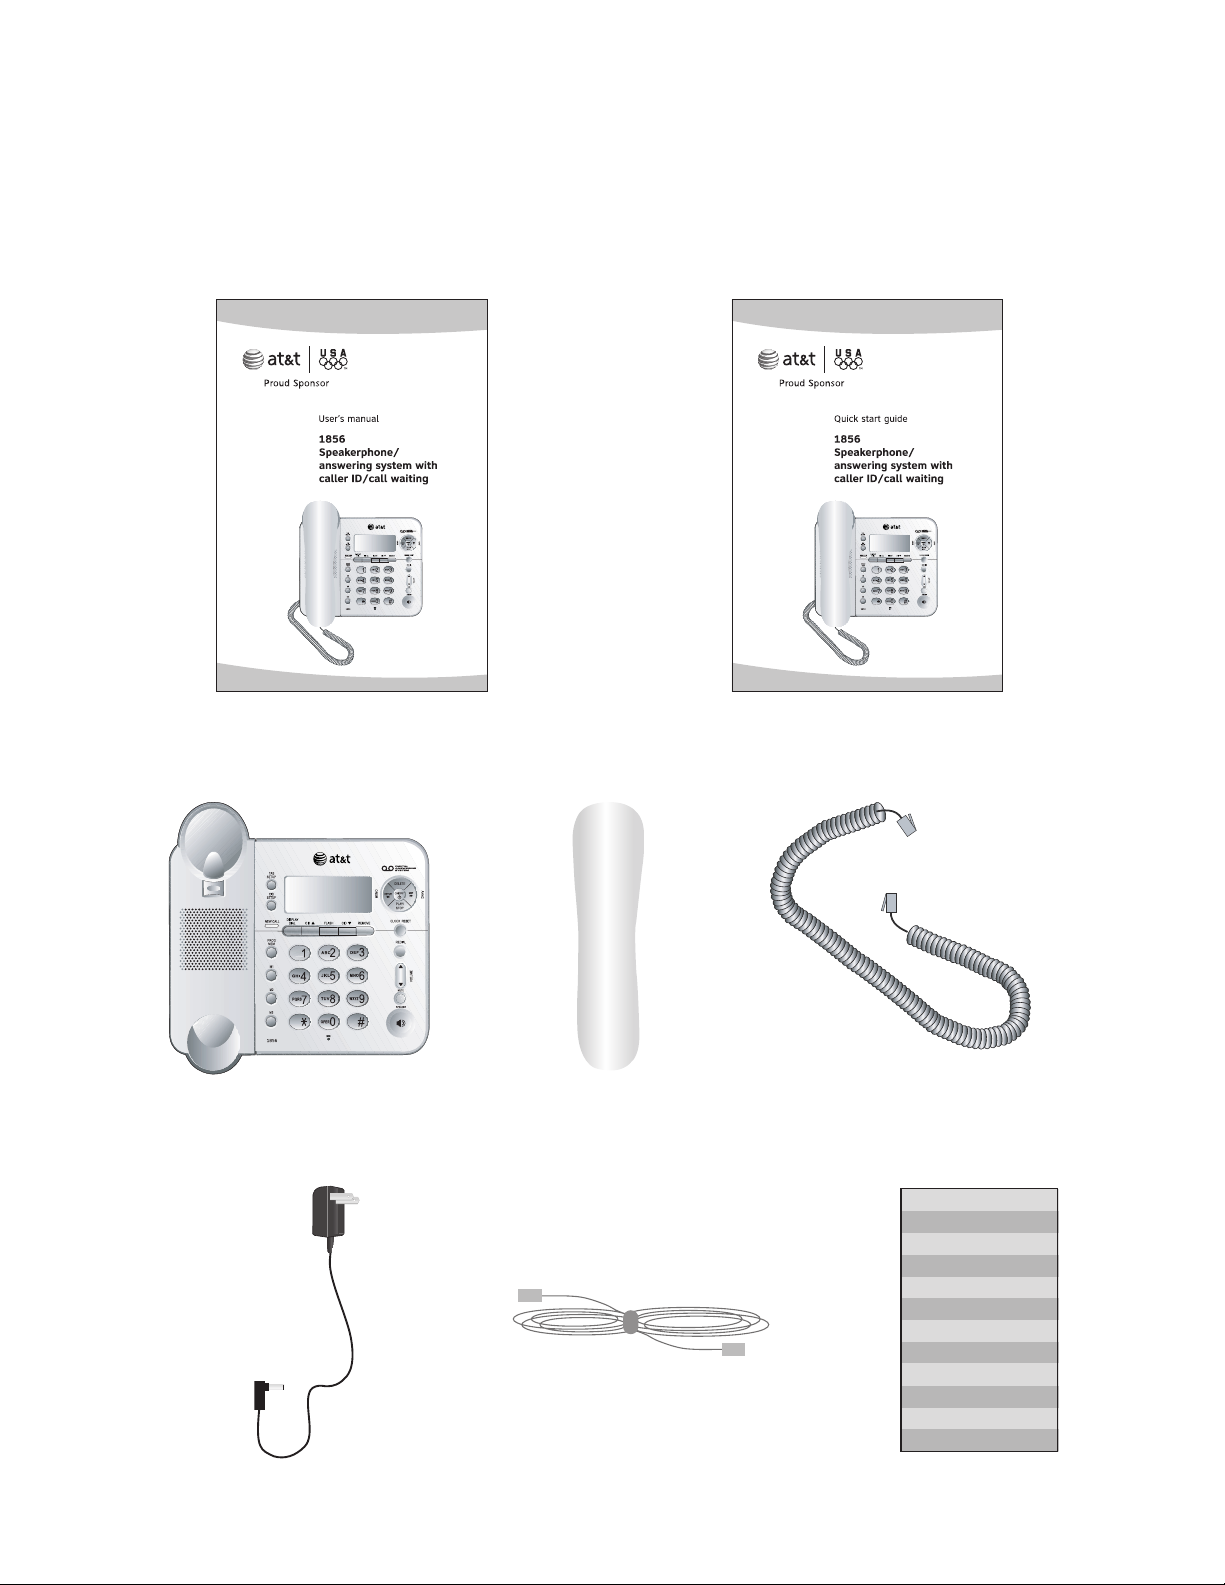
Parts checklist
Save your sales receipt and original packaging in case it is necessary to ship
your telephone for warranty service.
Check to make sure the telephone package includes the following:
User's manual Quick start guide
Telephone base with wall
mount bracket attached
Handset Handset cord
Telephone line cord
Power adapter Directory card
3

Getting started
Choose a central location close to a telephone jack and an electrical outlet not
controlled by a wall switch. The telephone can be placed on a flat surface or
mounted on a standard wall plate.
Avoid placing the telephone base too close to:
• Excessive heat sources.
• Excessive dust sources such as a workshop or garage.
• Excessive moisture.
• Extremely low temperature.
• Mechanical vibration or shock such as on top of the washing machine or
work bench.
Before you install
4

Getting started
4
5
2
1
3
Telephone base installation
NOTES:
• Use only the power adapter supplied with this product or equivalent. To order a
replacement power adapter, visit our website at www.telephones.att.com,
or call 1 (800) 222-3111. In Canada, dial 1 (866) 288-4268.
• Be sure to use an electrical outlet not controlled by a wall switch.
• The power adapter is intended to be correctly oriented in a vertical or floor
mount position. The prongs are not designed to hold the plug in place if it is
plugged into a ceiling or under-the-table/cabinet outlet.
Install the telephone as shown below. Choose a location where the telephone
is not exposed to excessive heat, cold, dust or moisture.
If you subscribe to high-speed Internet service (digital subscriber line - DSL)
through your telephone lines, you must install a DSL filter between the
telephone base and the telephone wall jack. The filter prevents noise and
caller ID problems caused by DSL interference. Please contact your DSL
service provider for more information about DSL filters.
5
1. Plug one end of the telephone
line cord into the telephone
jack at the back of the
telephone.
2.
The small end of the power
adapter has been plugged into
the power jack in the back of
the telephone at the factory.
Double check that it has been
plugged in firmly.
3.
Route the cord through the
slot as shown to the right.
4.
Plug the other end of the
telephone line cord into a
telephone jack.
5.
Plug the large end of the
power adapter into an
electrical outlet not controlled
by a wall switch.
DSL filter (not included)
for DSL users.
Telephone line cord
Getting started
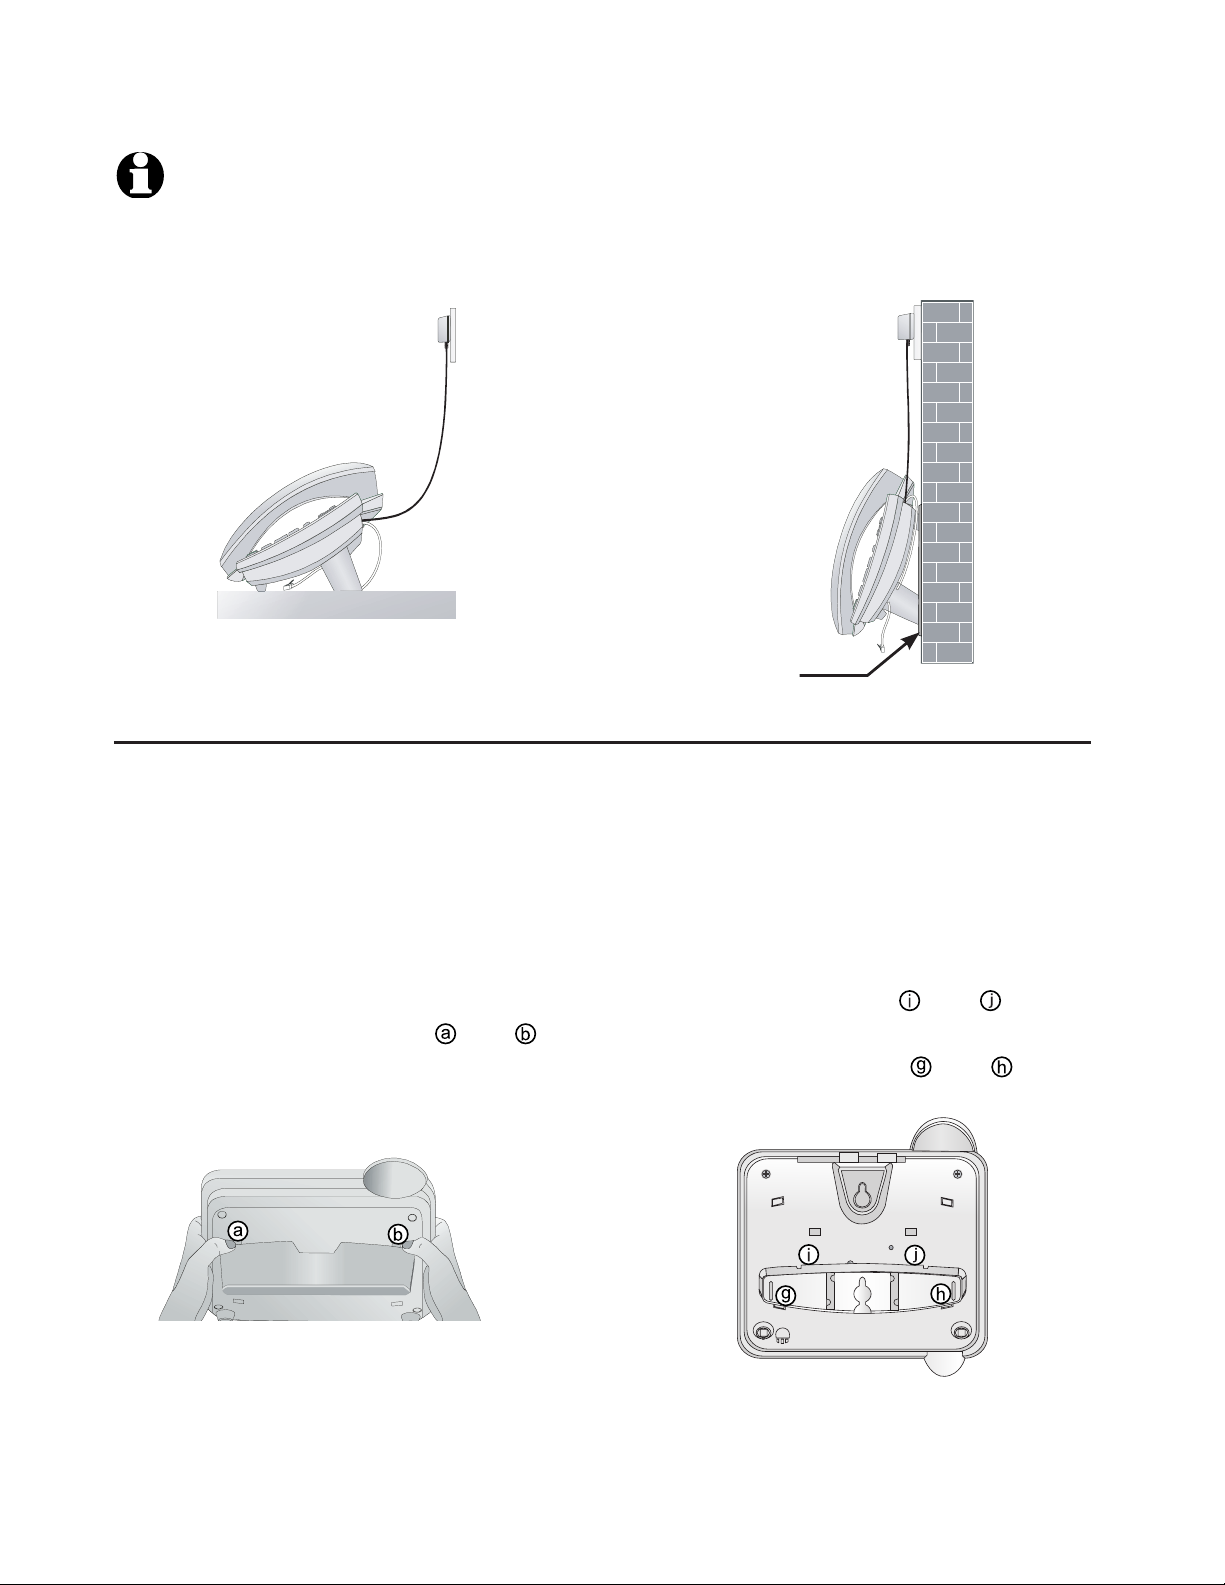
Installation options
Tabletop installation
position
Wall installation position
NOTE: The mounting bracket must be used for both tabletop use and wall
installation positions.
Telephone outlet mounting
plate with mounting studs.
1. To remove the bracket, hold the
telephone base in both hands, press
the two bracket tabs and lift the
bracket away from slots
and .
2. Rotate the bracket to the wall
installation position, insert the tabs of
the bracket into slots
and on the
telephone base, then press the other
bracket tabs into slots
and as
shown below.
Wall installation
The telephone base comes with the bracket mounted for tabletop use. If wall
installation is desired, a telephone outlet wall installation plate with mounting studs
is required. This mounting plate with studs may be available for purchase from many
hardware or consumer electronics retailers and may require professional installation.
6
Getting started
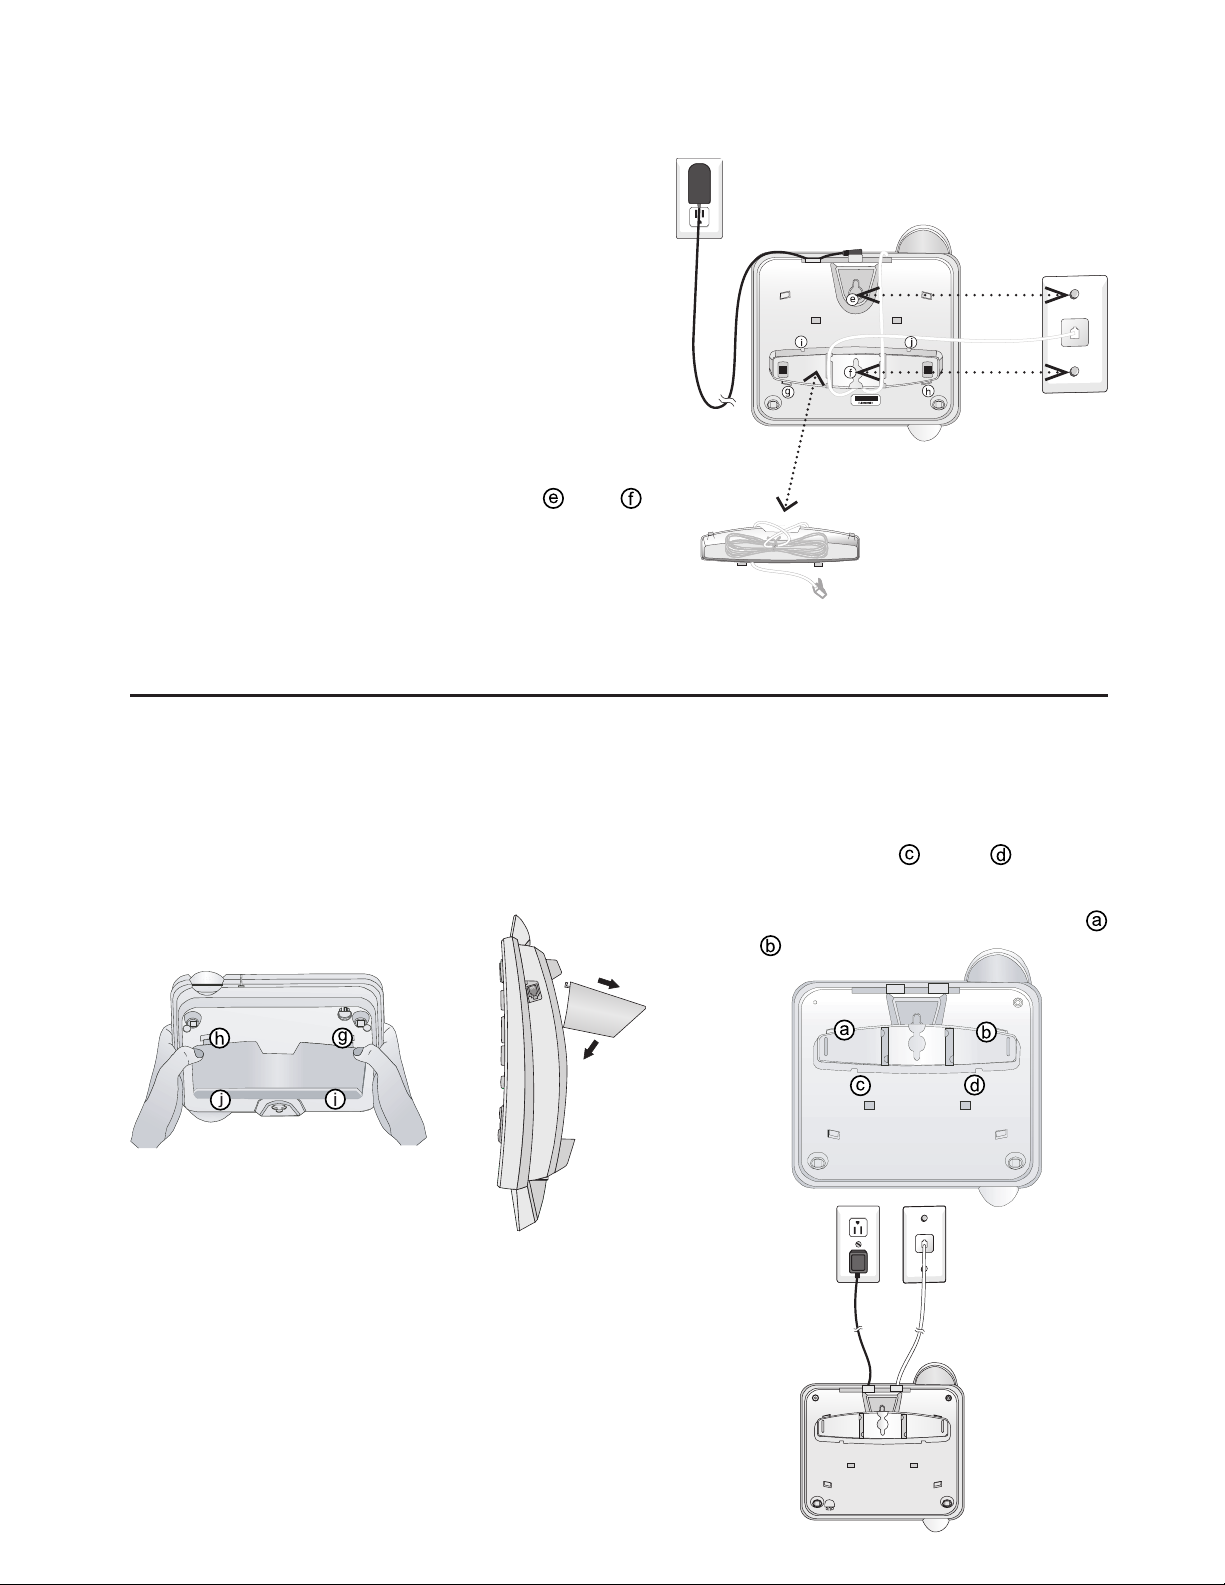
Installation options
3. Connect the telephone line cord and
power adapter to the jacks on the back of
the telephone base. Bundle the telephone
line cord, and secure it with a twist tie
before placing it inside the bracket. Please
see the picture on the right.
4.
Plug the power adapter into an electrical
outlet not controlled by a wall switch. Plug
the telephone line cord into a telephone
wall jack. To mount the telephone on the
wall, position the mounting holes
and
over the telephone outlet mounting studs.
Press and slide the bracket down firmly
so the telephone is held securely on the
telephone outlet mounting studs.
Tabletop installation
To return the bracket from the wall installation to tabletop position, follow the
directions below.
1. Remove the telephone base from the
wall. Unplug the cords from the wall
jacks. Remove the bracket from the
telephone base.
2
. Rotate the bracket to tabletop
position, insert the bracket
tabs into slots
and
on the
telephone base, then press the
other bracket tabs into slots
and
.
3. Route cords through slots. Plug the
other end of the telephone line cord
into a telephone wall jack. Plug the
large end of the power adapter into
an electrical outlet not controlled by
a wall switch.
7
Place the bundled telephone
line cord inside the bracket.

Telephone operation
Telephone settings
You can change settings to program how the
telephone works.
Press
CID SETUP repeatedly until the feature you
want is displayed. Press CID or CID to change
settings. Press CID SETUP again to accept the new
setting and move to next feature. Press FLASH at
any time to exit.
Contrast
There are five contrast levels (1-5). Press CID
or CID to adjust screen contrast to maximize
readability in different lighting conditions.
Call history
Press CID
or CID to turn the caller ID history
on or off:
•
All calls: Each incoming call is logged.
•
No calls: No caller ID information is kept.
Repeated calls
The caller ID history notifies you when multiple
calls are received from the same caller. Press
CID
or CID to turn this feature on or off:
•
Combined: Only the most recent call from each
number is kept. A REP icon is displayed if more
than one call is received from the same caller.
•
Separate: Each call is logged, even if the same
person calls more than once.
Caller ID with call waiting
If you subscribe to caller ID with call waiting, press
CID
or CID to turn this feature on or off. If
there is an incoming call while you are already on
a call:
• When this feature is on, the telephone will
display and log the call waiting caller ID
information.
•
When this feature is off, the telephone will
not display and log the call waiting caller ID
information.
For more details on receiving call by using FLASH,
see page 11.
SET CONTRAST
0
MSG#
4
CALL HISTORY
0
MSG#
REPEATED CALLS
0
MSG#
CID-CALL WAIT
0
MSG#
8
Telephone operation
Telephone settings
Language
Press CID
or CID to select the language used
in all menus and screen displays. You can choose
ENGLISH, ESPANOL or FRANCAIS.
Home area code/local area codes
You can program this phone to recognize one
home area code and up to four local area codes.
If you simply dial the last seven digits of a
telephone number to make a call within your own
area code, you should enter your own area code
into the telephone as the home area code. Then
if you receive a call from within your home area
code, the screen will display the seven digits of the
telephone number.
If you make a call within your own home area
code, you must dial 10 digits (the area code and
telephone number), enter 000 for the home area
code and enter your area code as a local area
code. Then if you receive a call from within your
area code, the screen displays the 10 digits of the
telephone number.
If you ever have to dial 10-digit phone numbers, (the area code with the seven-digit phone
number), for other nearby area codes, enter those
area codes as local area codes.
To set the home area code
1.
Press
CID SETUP until you see HOME AREA
CODE?
2. Press the dial pad keys to enter a three-digit
home area code.
To set the local area codes
1. Press
CID SETUP until you see LOCAL AREA
CODE.
2. Press the dial pad keys to enter the first threedigit local area code.
3. Press CID SETUP, then the dial pad keys to set
the second, the third and the fourth local area
code.
WHICH LANGUAGE?
0
MSG#
HOME AREA CODE?
0
MSG#
LOCAL AREA CODE
0
MSG#
HAC----
LAC1----
9

Telephone operation
Telephone operation
Making and answering calls
To make a call, lift the handset or press SPEAKER,
then dial a number. Replace the handset or press
SPEAKER to hang up.
To answer a call, lift the handset, or press
SPEAKER
to use the speakerphone.
Last number redial
The most recently dialed number is displayed when
you lift the handset or press
SPEAKER. Press
REDIAL to dial it.
To adjust ringer volume
To adjust the ringer volume, press the
VOLUME
button while the telephone is not in use. Press
VOLUME or VOLUME once to increase or lower
the ringer volume by one level. You can turn the ringer
off, or select one of the seven volume levels.
REDIAL
0
MSG#
5550100
0 CALLS 0 NEW
4
MSG#
Volume level.
10
Telephone operation
Options while on calls
To adjust listening volume
While on calls, press
VOLUME to adjust the
listening volume.
There are eight volume levels for the speakerphone,
and four levels for the handset. Press
VOLUME or
VOLUME once to increase or lower the listening
volume by one level.
FLASH
If you subscribe to a call waiting service with
your local telephone service provider and the
CID-CALL WAIT feature is on, you will hear a
beep and the screen will display call information
for the incoming call while you are already on a
call. Press FLASH to put your current call on hold
and take the new call. You can press FLASH at
any time to switch back and forth between calls.
MUTE
You can press MUTE to silence the microphone
during a conversation. You will be able to hear
the person at the other end, but that person
cannot hear you until you press MUTE again to
resume conversation.
4
MSG#
5550100
Volume level.
Light is on when the
telephone is muted.
11
Directory
Directory
Memory capacity
The telephone can store up to 12 (three onetouch and nine speed dial) numbers in memory
locations for quick dialing. Each memory location
can store a number up to 24 digits.
Timeouts and error messages
If you pause for too long while creating an
entry, the procedure will time out and it will be
necessary to start again. If you store a number in
a memory location that is already in use, the old
number will be overwritten with the new number.
Directory card
The directory card provided with your telephone
can be used to record names or numbers stored
in memory locations. The back peels off to expose
an adhesive surface so you can attach it to the
underside of the handset if desired.
0
MSG#
5550100
Directory card:
M1- M
M2- B r
M3- J St
1- By J
2- P Talr
3- Crs Wis
12
 Loading...