


957_book_2ATT ill at margins 11/16/00 1:39 PM Page i
USER’S MANUAL
Part 2
Telephone with
Caller ID 957
Please read
Part 1 — Important
Product Information
AT&T and the globe symbol are registered trademarks of AT&T Corp. licensed to Advanced American Telephones.

957_book_2ATT ill at margins 11/16/00 1:39 PM Page ii
© 2000 Advanced American Telephones. All rights reserved. Printed in China. 850003955 Issue 2AT&T 12/00

957_book_2ATT ill at margins 11/16/00 1:39 PM Page 1
BEFORE YOU BEGIN . . . . . . . . . 3
About Caller Identification
(Caller ID) . . . . . . . . . . . . . . . 3
About Call History . . . . . . . . . . . 3
About Home Area Code and
Local Area Codes . . . . . . . . . . 3
INSTALLATION . . . . . . . . . . . . . 4
Table/Desk Installation . . . . . . . 4
Wall Installation . . . . . . . . . . . . 6
FEATURE SETTINGS . . . |
. . . . . . 8 |
Language Selection . . . . . |
. . . . . 8 |
Set Home Area Code . . . . |
. . . . . 8 |
Set Local Area Codes . . . . |
. . . . . 9 |
Set Contrast . . . . . . . . . . |
. . . . . 9 |
Set Time/Date . . . . . . . . . |
. . . . . 9 |
Set Remaining Features . . |
. . . . 10 |
Feature Summary . . . . . . |
. . . . 10 |
TELEPHONE OPERATION |
. . . . 12 |
Flash/Call Waiting . . . . . . |
. . . . 12 |
Mute . . . . . . . . . . . . . . . . |
. . . . 12 |
Hold . . . . . . . . . . . . . . . . |
. . . . 12 |
Ringer Volume . . . . . . . . . |
. . . . 13 |
Redial . . . . . . . . . . . . . . . |
. . . . 13 |
Adjust Handset or |
|
Speaker Volume . . . . . . |
. . . . 13 |
Using the Speakerphone |
. . . . . 13 |
Temporary Tone Dialing |
. . . . . 13 |
CONTENTS
TELEPHONE DIRECTORY . . . . . 14 Storing Directory Numbers
& Names . . . . . . . . . . . . . . . 14 Storing a Pause or Flash in a
Directory Number . . . . . . . . 15 Storing Call History Numbers
in Directory . . . . . . . . . . . . . 15 Viewing Directory Numbers . . 15 Dialing Directory Numbers . . . 15 Deleting Directory Numbers . . 15
CALLER ID OPERATION . . . . . 16
Message Waiting and
NEW CALL Light . . . . . . . . . 16
Removing Call Records . . . . . . 16
Call Display . . . . . . . . . . . . . . . 17
Reviewing Call History . . . . . . 17
Display Dial . . . . . . . . . . . . . . . 17
Display Dial Options . . . . . . . . 17
Setting Display Screen Options . 18
Display Screen Messages . . . . . 18
IN CASE OF DIFFICULTY . . . . . 19
1

957_book_2ATT ill at margins 11/16/00 1:39 PM Page 3
BEFORE YOU BEGIN
About Caller Identification (Caller ID)
This product has a Caller ID with Call Waiting feature that works with service from your local phone service provider.
Caller ID with Call Waiting lets you see who’s calling before you answer the phone, even when you’re on another call.
You may need to change your phone service to use this feature. Contact your phone service provider if:
•You have both Caller ID and Call Waiting, but as separate services (you may need combined service)
•You have only Caller ID service, or only Call Waiting service
•You don’t subscribe to any Caller ID or Call Waiting services.
You can use this product with regular Caller ID service, and you can use this product’s other features without subscribing to either Caller ID or combined Caller ID with Call Waiting service.
There are fees for Caller ID services, and they may not be available in all areas.
This product can provide information only if both you and the caller are in areas offering Caller ID service, and if both telephone companies use compatible equipment.
About Call History
This phone assigns each incoming call a number from 1 to 99. The most recent call will have the highest number. When the memory is full, the oldest call information is deleted to make room for new incoming call information.
If you answer a call before call information appears on the screen, it will not be in the call history.
About Home Area Code and Local Area Codes
Always program your home area code, and, if you need them, up to four local area codes (see “Set Home Area Code” and “Set Local Area Codes” on pages 8 and 9). Programming these area codes will change how numbers are displayed in the call history, and will allow for correct operation of the Display Dial feature.
3
957_book_2ATT ill at margins 11/16/00 1:39 PM Page 4
INSTALLATION
Table/Desk Installation
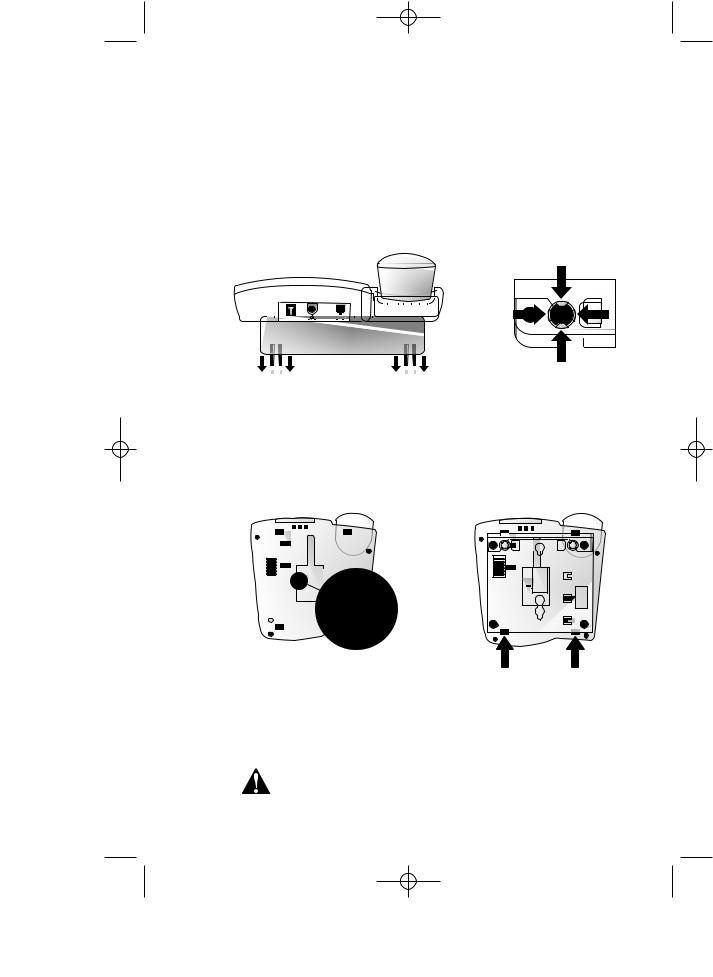
1(Optional) You can adjust how much the phone tilts by pushing outward with your thumbs on the recessed “feet.” Push the feet out from the inside of the base, until they snap into place. If a foot comes out, align the arrow on the foot with the arrow on the base, and squeeze the foot back in from the inside of the base.
2Set the dial mode.
This phone comes set for touch tone dialing (TT). If you have dial pulse (rotary) service, set the swich on the underside of the phone to DP.
3Attach the base to the telephone.
Turn the base so that the smaller end is toward the bottom of the telephone, then attach.
4Connect the line cord to the telephone.
5Thread the power cord through the strain-relief tab, then plug it into the jack labeled POWER.
(Make sure the plug is vertically oriented.)
Use only the power cord supplied with this product. If you need a replacement, call 1 800 222-3111.
4
957_book_2ATT ill at margins 11/16/00 1:39 PM Page 5
INSTALLATION
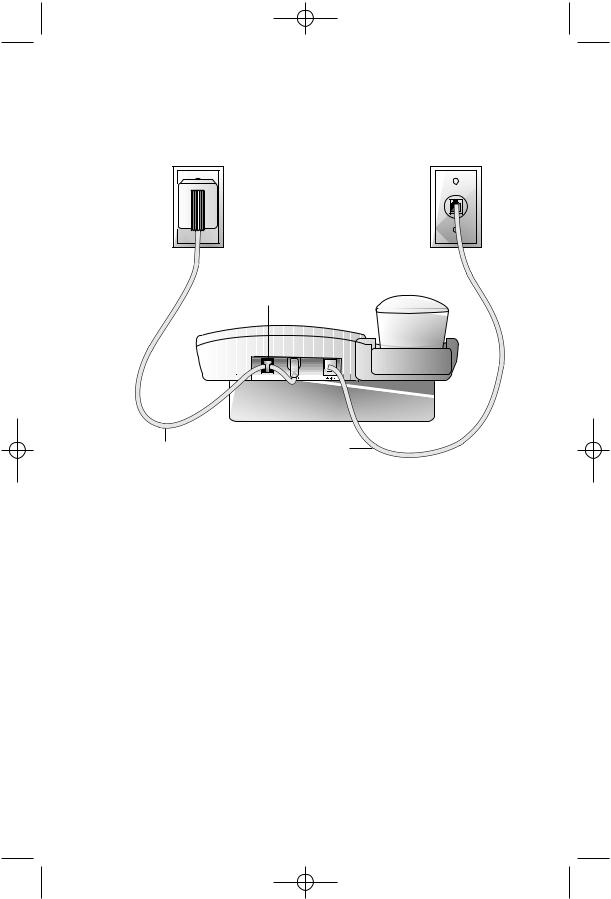
Standard |
Modular |
electrical |
telephone |
outlet |
wall jack |
Strain-relief
tab
Power cord |
Telephone |
|
line cord |
6Connect the line cord to a modular jack.
7Connect the power cord to a standard electrical outlet not controlled by a wall switch.
NOTE: When you first plug in the power cord, the screen displays WHICH LANGUAGE?. Follow the programming steps on page 8 after installation is complete.
8Connect the handset to the telephone.
Plug the coiled cord into the handset jack on the side of the phone. Plug the other end of the coiled cord into the handset, then hang up.
9Check for dial tone.
Lift the handset and listen for a dial tone. If you cannot hear
a dial tone, press VOLUME +. If you still do not hear a dial tone, see the IN CASE OF DIFFICULTY section of this manual.
Your phone will work immediately after installation using the default feature settings (see “Feature Summary” on page 10).
NOTE: If you subscribe to Caller ID services from your local telephone service provider, you must follow the instructions in “Set Home Area
Code” for your phone to properly recognize and dial calls (see page 8) . You may also need to “Set Local Area Codes” (see page 9).
5
957_book_2ATT ill at margins 11/16/00 1:39 PM Page 6
INSTALLATION
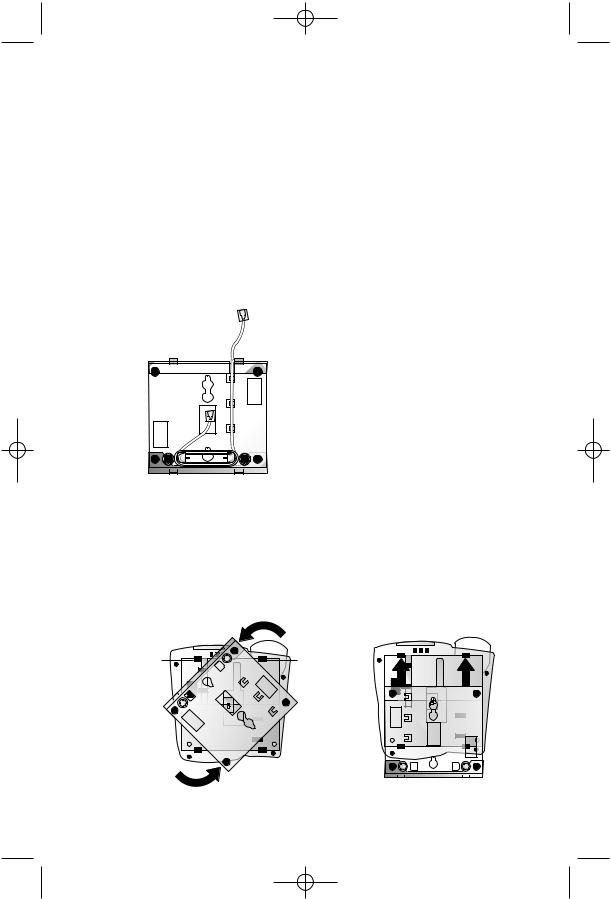
Wall Installation
1Set the dial mode.
This phone comes set for tone dialing. If you have pulse dialing service, you cannot dial numbers with the phone set to tone. Set the switch on the underside of the base to TT (touch tone) or DP (dial pulse/rotary), depending on your service.
2Connect the line cord to the telephone
Plug the short line cord into the jack labeled TEL LINE, then thread it through the channel on the bottom of the set.
3Attach the base to the telephone.
Make sure the pull-out feet are not extended. Turn the base so that the larger end is toward the bottom of the telephone. Attach the base by inserting the tabs into the slots. Push down on the large end of the base so the tabs are in the slots, and the base locks in place. Pull the loose end of the line cord through the rectangular opening on the bottom of the base.
Slot |
Slot |
3a |
3b |
6
 Loading...