


Printedin.ChinaIssue2.1AT&T03/07 AdvancedAmerican.Telephones AT&TandtheAT&TlogoaretrademarksofAT&TKnowledgeVentures,licensedto ©2007AdvancedAmerican.TelephonesAllrights.reserved
User’s manual part 2
1739 Digital answering system
This manual contains information about this product's installation and operation.
please also read Part 1 - Important product information
For customer service or product information, visit our website at www. telephones.att.com or call 1 (800) 222-3111. In Canada dial 1 (866) 288-4268.
Installation
Parts list
•Telephone line cord
•1739 answering system
•Wallet card
•Part 1 Important product information
•Part 2 User’s manual
 Use only the power adapter supplied with this product. To obtain a replacement, visit our website at www.telephones.att.com or call 1 (800) 222-3111. In Canada dial 1 (866) 288-4268.
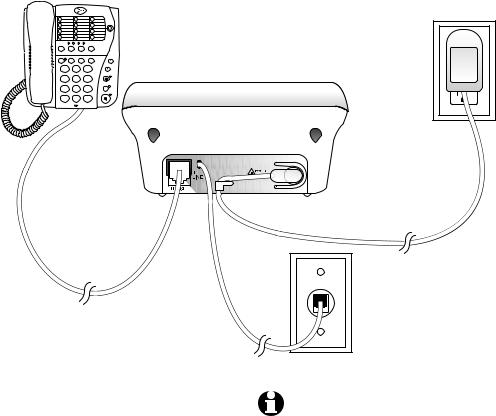
Before you install
Choose a location for the answering system near a modular telephone jack and a standard electrical outlet not controlled by a wall switch.
|
|
2 LINE |
1. |
Connect the |
1 |
2 |
3 |
|
power adapter. |
|
ABC |
DEF |
|
|
GHI |
JKL |
MNO |
|
|
4 |
5 |
6 |
|
|
PQRS |
TUV |
WXYZ |
|
|
7 |
8 |
9 |
|
|
TONE |
OPER |
|
|
|
* |
0 |
# |
|
|
Standard electrical  outlet not controlled
by a wall switch
 Strain-relief tab
3.Connect a telephone (optional).
2. Connect the telephone line cord.
Modular telephone jack
Turn system on/off
Before proceeding to feature setup, press ON/OFF to turn the system on. To turn the system off, press ON/OFF again.
When the system is off, the ON/OFF indicator light will be off and the message window will be blank.
NOTES: 1. If you do not want to connect this answering system to a telephone, skip to step 3.
2.Power adapter Input: 120VAC, 60 Hz, 4.5W. Output: 6VAC, 350 mA.
3.If the message window is blank, make sure the power adapter is securely connected to both the answering system and an electrical outlet not controlled by a wall switch. Press ON/OFF to make sure the system is on.
Feature setup
Feature setup
1.To enter feature setup mode, press and hold SETUP until the system announces “Voice is...”
2.Press SETUP repeatedly to hear each feature.
3.When you hear the feature you want to modify, press ANNC/SKIP or MEMO/REPEAT to change the setting.
4.Press PLAY/STOP to exit feature setup. The new settings will be saved.
When any feature is on, the message window displays  .
.
When any feature is off, the message window displays  .
.
Feature summary |
|
|
FEATURE |
SYSTEM |
OPTIONS |
|
ANNOUNCE |
|
LANGUAGE |
“Voice is…” |
• Choose English to have the system announce |
|
|
voice prompts in English. |
|
|
Choose Francais to have the system announce |
|
|
voice prompts in French. |
|
|
• During setup, the message window will display |
|
|
the current language setting (E for English and |
|
|
F for French). |
|
|
|
RING SELECT |
“Number of ring is…” |
• Choose the number of times the telephone will |
|
|
ring before the system answers a call. You can |
|
|
set it between 2 and 7 rings, toll saver 2/4 or |
|
|
toll saver 4/6. |
|
|
• When set to toll saver 2/4, the system |
|
|
answers after four rings when there are no |
|
|
new messages, and after two rings when there |
|
|
are new messages. Toll saver 4/6 causes the |
|
|
system to answer after six rings when there |
|
|
are no new messages and after four rings |
|
|
when there are new messages. |
|
|
• D uring setup, the message window will |
|
|
display the number of rings (8 for toll saver |
|
|
2/4, or 9 for toll saver 4/6). |
|
|
|
REMOTE |
“Remote access code is…” |
• Change the remote access code to any three |
ACCESS CODE |
|
digit number between 500 and 999. |
|
|
• The remote access code is preset to 500 and |
|
|
allows you to access many features of this |
|
|
answering system remotely from a touch tone |
|
|
telephone. |
|
|
• The three digits of the remote access code are |
|
|
set separately. The system will prompt you to |
|
|
set the second and third digits after setting the |
|
|
first digit. See Feature setup, above. |

Feature setup
FEATURE |
SYSTEM |
OPTIONS |
|
|
ANNOUNCE |
|
|
ANNOUNCEMENT |
“Announcement |
• Choose ON to listen to the announcement |
|
MONITOR |
|
monitor is…” |
when the system answers a call. Choose OFF |
|
|
|
to silence your end of the call. (The callers will |
|
|
|
still hear the announcement.) |
|
|
|
NOTE: Volume must be set to an audible level |
|
|
|
to use the announcement monitor. |
|
|
|
|
NUMBER |
|
“Number |
• When this feature is on, the system will |
ANNOUNCE |
|
announce is…” |
announce the incoming telephone number |
(Please see |
|
|
between the second and third rings. |
NOTE below) |
|
|
|
|
|
|
NOTE: When the number announce feature is |
|
|
|
on and ring select is set for two rings, the unit |
|
|
|
will answer after three rings to allow enough |
|
|
|
time for the system to announce the caller’s |
|
|
|
telephone number. |
|
|
|
|
STORE NUMBER |
|
“Store number is…” |
• When this feature is on, the system announces |
(Please see |
|
|
the incoming telephone number when it plays |
NOTE below) |
|
|
back a message. |
|
|
|
|
ACCEPT BLOCK |
|
“Accept block |
• Choose ON to have the system accept all |
CALLS |
|
calls is…” |
calls. Choose OFF to have the system respond |
(Please see |
|
|
to blocked calls with the pre-recorded |
NOTE below) |
|
|
announcement, “We’re sorry, blocked calls to |
|
|
|
this number cannot be accepted,” and hang up |
|
|
|
without recording a message. |
|
|
|
|
AUDIBLE MESSAGE |
“Message alert is…” |
• When this feature is on, the system beeps |
|
ALERT |
|
|
every 15 seconds when there are new |
|
|
|
messages. |
NOTE: For this feature to work, you must subscribe to the caller ID service from your local telephone company. There may be a fee for this service, and it may not be available in all areas.
 Loading...