

Aprilia ETV MILLE CAPONORD User Manual Part2 02-2001
).3425#4)/.3&/253%
1
o
2
o
1
o
2
o
NO!
NO!
NO!
NO!
OK!
OK!
OK!
OK!
OK!
NO!
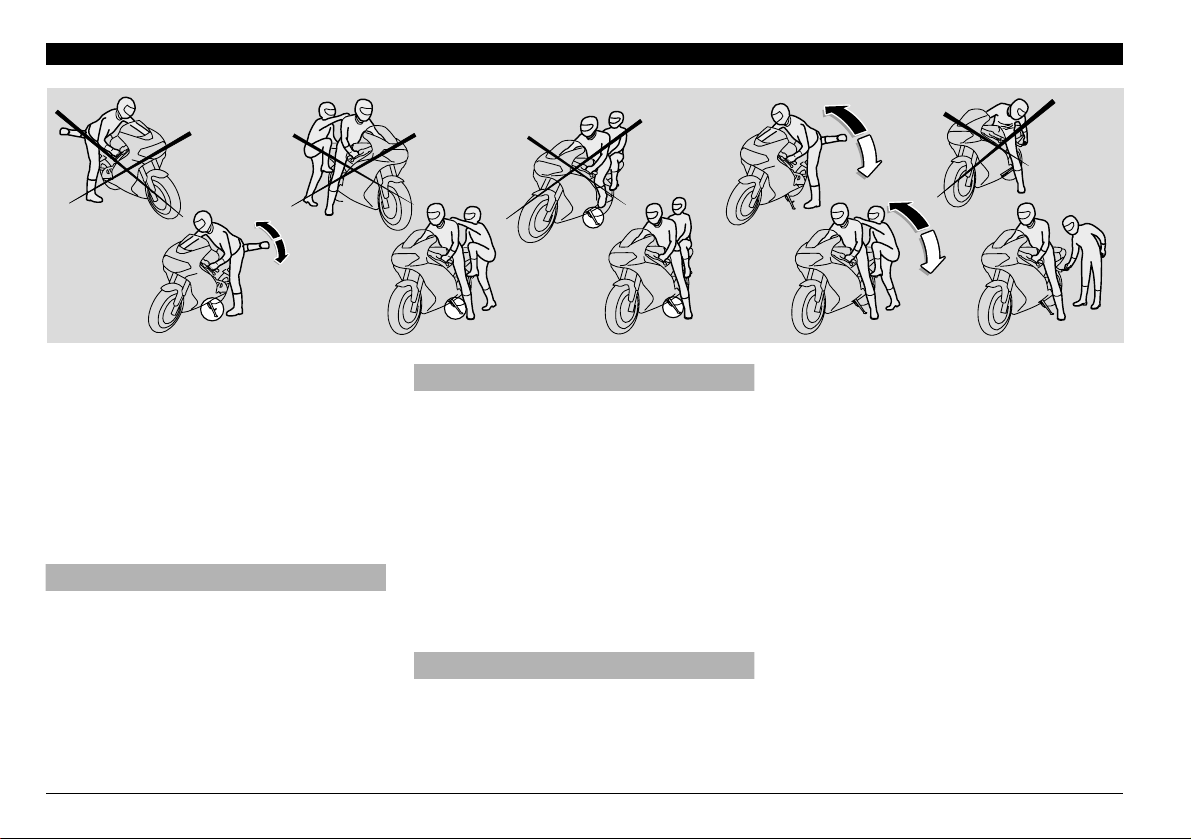
'%44).'/.!.$/&&4(%
6%()#,%
The instructions below must be followed
with the maximum care in order to avoid
any injury to persons and damage to property and to the vehicle, caused by the falling of the rider or the passenger from the
vehicle and/or the falling or overturning of
the vehicle itself.
aWARNING
Risk of falling and overturning.
Proceed with care.
The operations and movements required to
get on and off the vehicle must be performed with complete freedom of movement and with the hands free from obstruction caused by holding objects, the helmet,
gloves or glasses.
use and maintenance ETV mille Caponord
44
NO!
OK!
NO!
OK!
aCAUTION
m Do not start the engine with the vehicle positioned on the centre stand.
Engaging the gears may make you lose
control of the vehicle.
Do not get on or let the passenger get
on the vehicle if this is positioned on
the centre stand.
It is forbidden to position the vehicle on
the centre stand while seated astride
the vehicle in riding position.
Get on and off the vehicle only from the left
side and always with extended side stand.
Do not apply the load of your weight or
of the passenger’s weight onto the side
stand.
aCAUTION
o
1
o
NO!
2
o
2
o
1
The stand has been designed to support
the weight of the vehicle and a minimum
load, without the rider and the passenger.
Getting on the vehicle into the riding position with extended side stand is permitted
only for the purpose of preventing the vehicle from falling or overturning and does not
envision the loading of the weight of the
rider and passenger onto the side stand.
While getting on and off, the weight of the
vehicle may cause an unbalance and the
consequent loss of equilibrium, and the vehicle may fall or overturn.
NOTE The rider must always be the first
person to get on the vehicle and the last to
get off and it is the rider who controls the
balance and stability of the vehicle when
the passenger gets on and off.
When getting on and off the vehicle, the
passenger must make careful movements,
OK!

in order to maintain the balance of the vehicle and the rider.
NOTE The rider is responsible for in-
structing the passenger how to safely get
on and off the vehicle.
The vehicle is equipped with special passenger footrests to make it easier to get on
and off the vehicle. The passenger must always use the left footrest to get on and off
the vehicle.
Neither get off, nor try to get off the vehicle
by jumping or stretching your leg down to
the ground. In both cases this would compromise the stability and balance of the vehicle.
NOTE Bags or objects strapped to the
rear of the vehicle can represent an obstacle while getting on and off.
In any case, perform a controlled movement with your right leg, which must avoid
striking and safely pass the rear part of the
fairing or the luggage without creating unbalance.
GETTING ON THE VEHICLE
U Grasp the handlebar correctly and get on
the vehicle without loading your weight
onto the side stand.
NOTE If it is impossible for you to place
both feet on the ground, place the right foot
on the ground (in case of unbalance, the
left side of the vehicle is prevented from
falling over by the side stand) and keep the
left foot ready to rest on the ground.
U Place both feet on the ground and
straighten the vehicle into riding position
while keeping it in balance.
NOTE The rider must not extract or at-
tempt to extract the passenger footrest
while seated astride the vehicle, b ecause
this might compromise the stability and balance of the vehicle.
U Have the passenger extract the two pas-
senger footrests.
U Instruct the passenger how to safely get
on the vehicle.
U Kick the side stand completely back us-
ing your left foot.
GETTING OFF THE VEHICLE
U Choose a suitable parking area, see p.
55 (PARKING).
U Stop the vehicle, see p. 55 (STOPPING).
aWARNING
Make sure that the parking surface is
free from obstacles, firm and flat.
U With the left shoe heel, extend the side
stand completely by acting on the appropriate lever.
NOTE If it is impossible for you to place
both feet on the ground, place the right foot
on the ground (in case of unbalance, the
left side of the vehicle is prevented from
falling over by the side stand) and keep the
left foot ready to rest on the ground.
U Place both feet on the ground, keeping
the vehicle in balance in riding position.
U Instruct the passenger how to safely get
off the vehicle.
aCAUTION
Risk of falling and overturning.
Make sure that the passenger has got
off the vehicle.
Do not load your weight onto the side
stand.
U Incline the vehicle until the stand rests
on the ground.
U Grasp the handlebar correctly and get off
the vehicle.
U Rotate the handlebar completely left-
wards.
U Lift the passenger footrests.
aCAUTION
Make sure that the vehicle is stable.
use and maintenance ETV mille Caponord
45
1
TAIR
EFI
SERVICE
2
02%,)-).!29#(%#+).'
/0%2!4)/.3
aWARNING
Before departure, always carry out a
preliminary checking of the vehicle to
make sure that it functions correctly
and safely, see the following table (PRELIMINARY CHECKING OPERATIONS).
The non-performance of these checking
operations can cause severe personal
injuries or damages to the vehicle.
Do not hesitate to consult your aprilia Official Dealer in case there is something you
do not understand about the functioning of
some controls or in case you suspect or
discover some irregularities.
It does not take long to carry out a checkup and this operation ensures you much
more safety.
6
5
7
4
3
140
160
180
/h
200
220
240
2
1
0
8
9
10
-1
min
x1000
MAGNETI
MARELLI
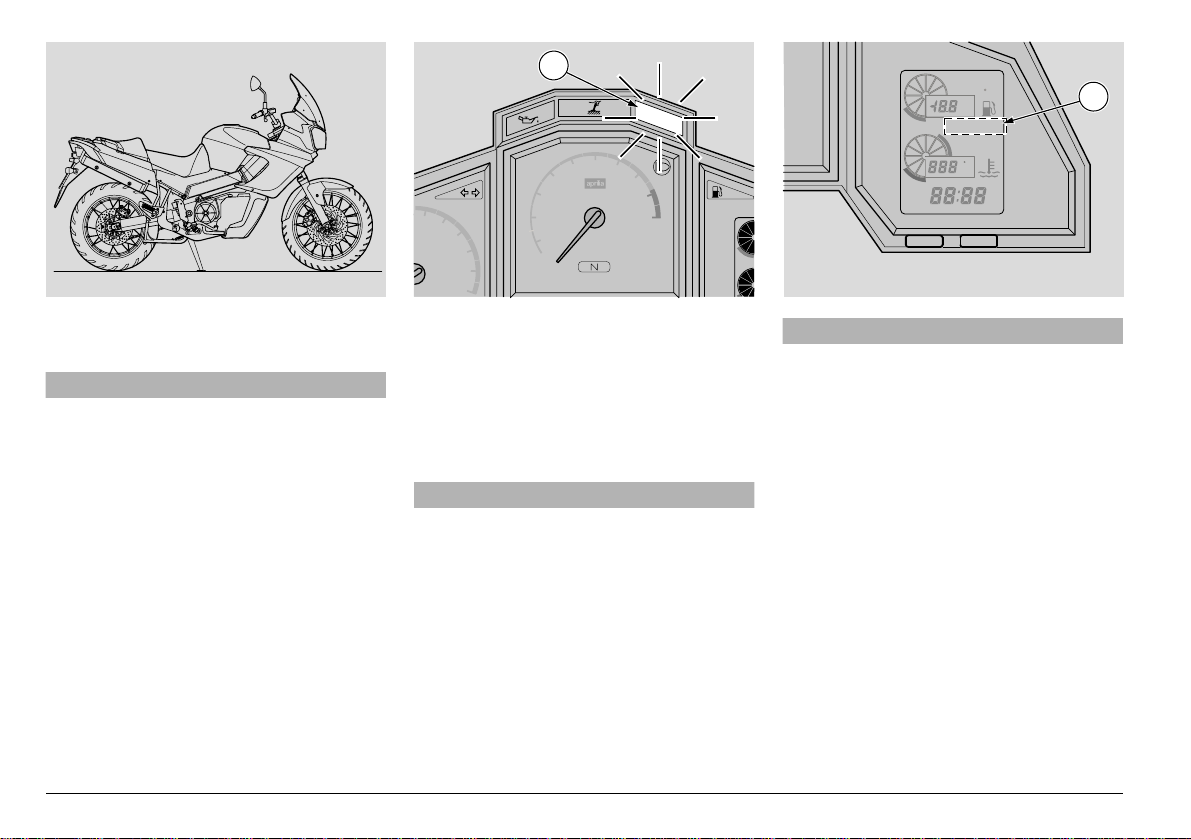
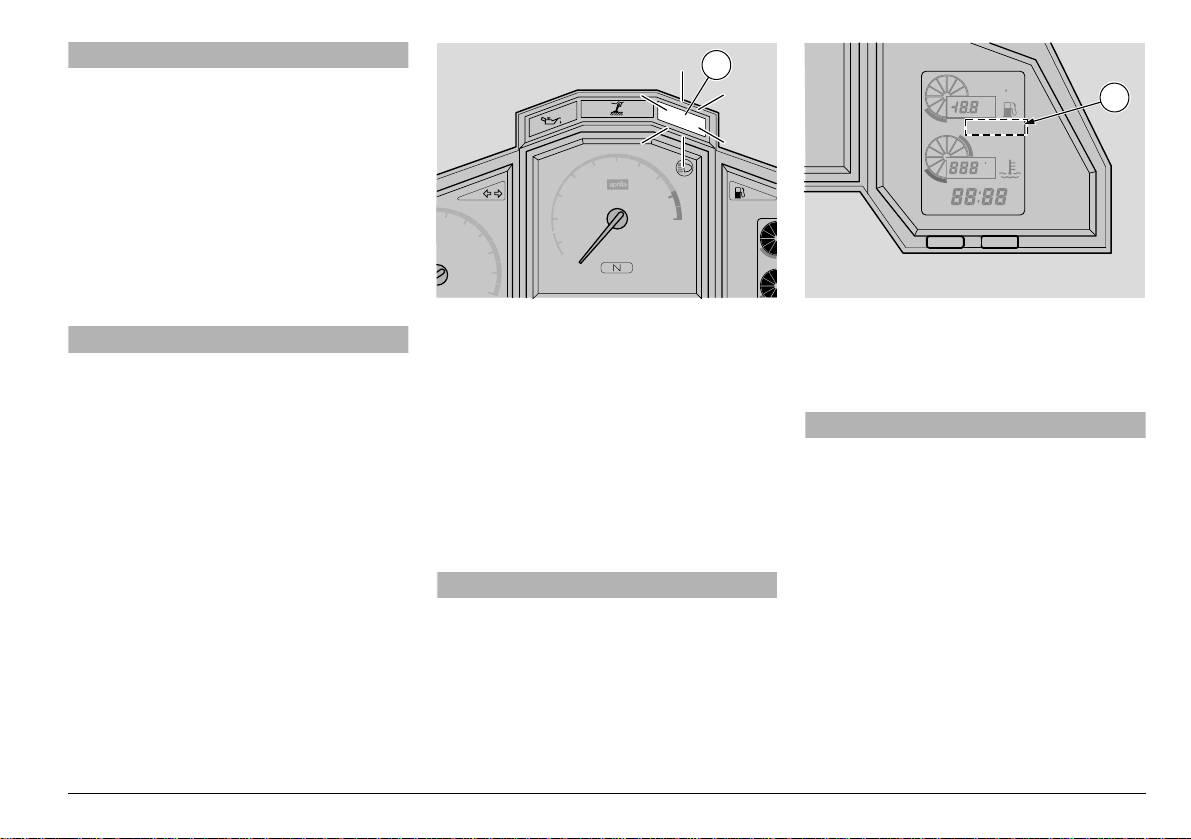
NOTE This vehicle is set so that any
anomaly can be detected in real time and
stored by the electronic unit.
Whenever the ignition switch is turned to
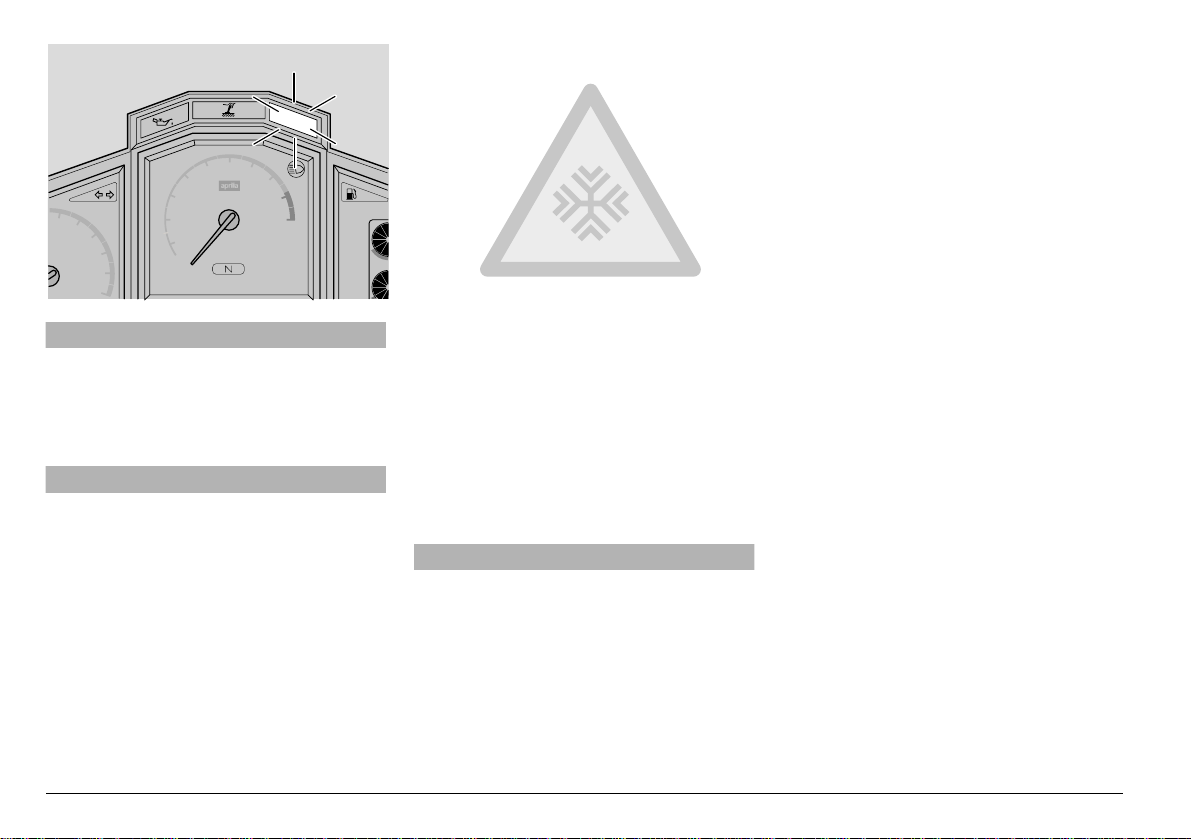
position “2”, the diagnostic warning light
LED “EFI” (1) comes on on the dashb oard
for approximately three seconds.
aCAUTION
If the diagnostic warning light LED
“EFI” (1) comes on and blinks when the
engine is started or starts blinking during the normal operation of the engine,
this means that the electronic unit has
detected an anomaly.
In many cases, the engine keeps running with reduced performance levels;
immediately contact an APRILIA Official
Dealer.
C
TIME
MODE
SET
ENGINE
CONTROL
DIAGNOSIS
aCAUTION
After the first 1000 km (625 mi) and successively every 7500 km (4687 mi), the
writing “SERVICE” (2) appears on the
right display.
In this case contact an APRILIA Official
Dealer, who will carry out the operations indicated in the regular service intervals chart, see p. 60 (REGULAR
SERVICE INTERVALS CHART).
use and maintenance ETV mille Caponord
46
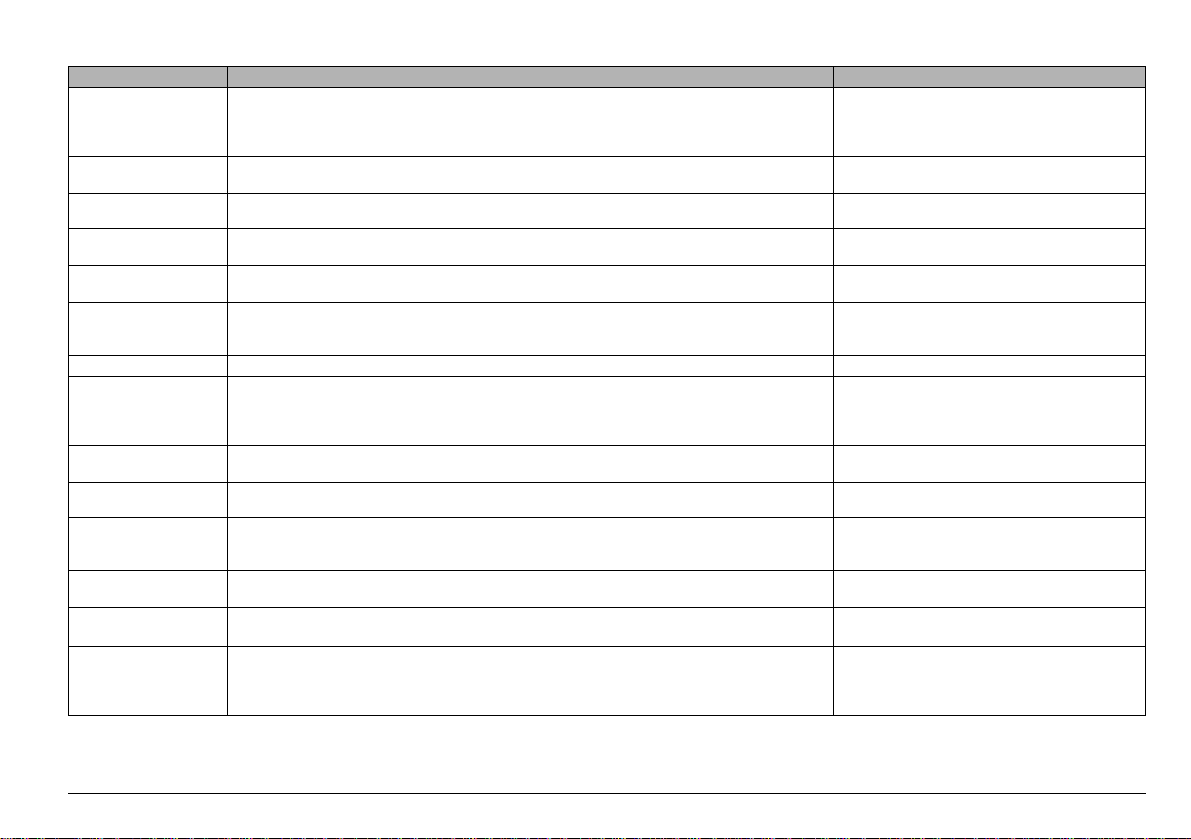
02%,)-).!29#(%#+).'/0%2!4)/.3
Component Check Page
Front and rear disc
brakes
Accelerator
Check the functioning, the idle stroke of the control levers, the fluid level and make
sure there are no leaks.
Check the wear of the pads.
If necessary, top up the fluid tank.
Make sure that it works smoothly and that it is possible to open and close it completely, in all steering positions. If necessary, adjust and/or lubricate it.
Engine oil Check and/or top up if necessary.
Wheel/tyres
Brake levers
Clutch
Check the tyre surface, the inflation pressure, wear and tear and any damage.
Remove any foreign matter that may be stuck in the tread grooves.
Make sure that they work smoothly.
Lubricate the articulations and adjust the stroke if necessary.
Check the operation of the clutch, the idle stroke of the control lever, the fluid level
and any leaks.
If necessary, top up the fluid; the clutch must operate without jerking and/or slipping.
Steering Make sure that the steering rotates smoothly, without any clearance or slackening.
Side stand
Centre stand
m
Fastening elements
Make sure that it operates correctly. Make sure that when the stand is let up or down
there is no friction and that the spring tension brings it back to its normal position.
If necessary, lubricate joints and hinges.
Make sure that the safety switch operates correctly.
Make sure that the fastening elements are not loose. If necessary, adjust or tighten
them.
Drive chain Check the slack.
Check the fuel level and top up, if necessary.
Fuel tank
Coolant
Engine stop switch
(
2 - 1)
Check the circuit for leaks.
Make sure that the fuel cap is correctly closed.
The coolant level in the expansion tank must be inclu ded between the “FULL” and
“LOW” marks.
Make sure that it operates correctly.
Lights, warning lights
LED, horn, rear
brake light switch
end electric devices
Check the proper functioning of the acoustic and visual devices. Change the bulbs or
intervene in case of failure.
30 (BRAKE FLUID - recommendations), 31
(DISC BRAKES), 32 (FRONT BRAKE), 34
(REAR BRAKE), 86 (CHECKING THE
BRAKE PAD WEAR)
87 (ADJUSTING THE ACCELERATOR
41 (ENGINE OIL), 63 (CHECKING THE
ENGINE OIL LEVEL AND TOPPING UP)
42 (ADJUSTING THE REAR BRAKE
CONTROL LEVER CLEARANCE)
35 (CLUTCH FLUID - recommendations), 36
88 (CHECKING THE STAND), 95
(CHECKING THE SWITCHES)
75 (REMOVING THE OIL SUMP GUARD), 81
(CLEANING AND LUBRICATION)
29 (FUEL), 76 (REMOVAL OF THE FUEL
38 (COOLANT), 39 (CHECKING AND
23 (ENGINE STOP SWITCH (2 - 1))
92 (BATTERY) – 102 (CHANGING THE
REAR LIGHT BULB)
CONTROL)
40 (TYRES)
(CLUTCH)
–
–
TANK)
TOPPING UP)
use and maintenance ETV mille Caponord
47

15
3
2
1
34!24).'
aWARNING
This vehicle is considerably powerful
and must be used gradually and with
the greatest care.
Do not position any object inside the
front part of the fairing (between the
handlebar and the dashboard), in ord er
not to hinder the rotation of the handlebar and visibility toward the dash board.
NOTE Before starting the engine, care-
fully read chapter “safe drive”, see p. 5
(SAFE DRIVE).
aWARNING
Exhaust gases contain carbon monoxide, which is extremely noxious if inhaled.
Avoid starting the engine in closed or
badly-ventilated rooms.
use and maintenance ETV mille Caponord
48
The non-observance of this warning
may cause loss of consciousness or
even lead to death by asphyxia.
NOTE With the side stand down, the en-
gine can be started only if the gears are in
neutral; in this case, if you try to engage
the gears, the engine stops.
With the side stand up, it is possible to start
the engine either in neutral gear or with engaged gears and pulled in clutch lever.
U Get on the vehicle in riding position, see
p. 44 (GETTING ON AND OFF THE VEHICLE).
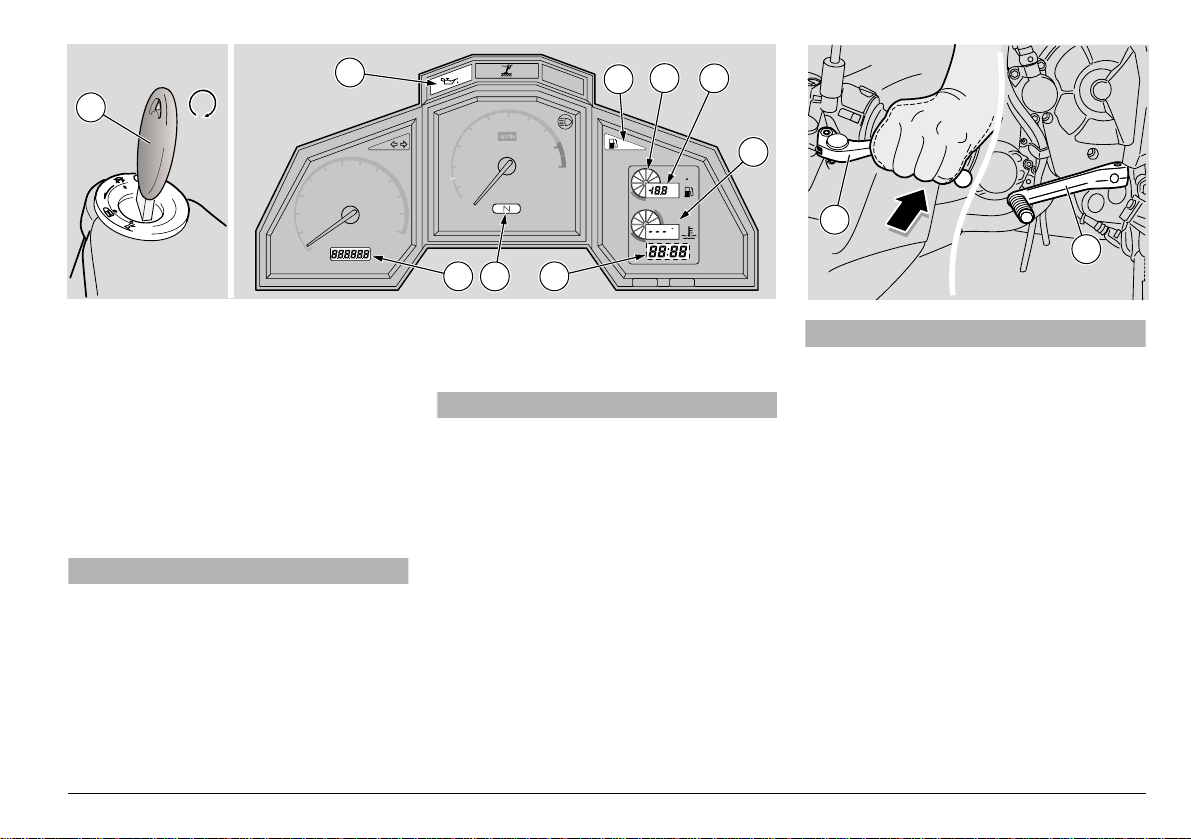
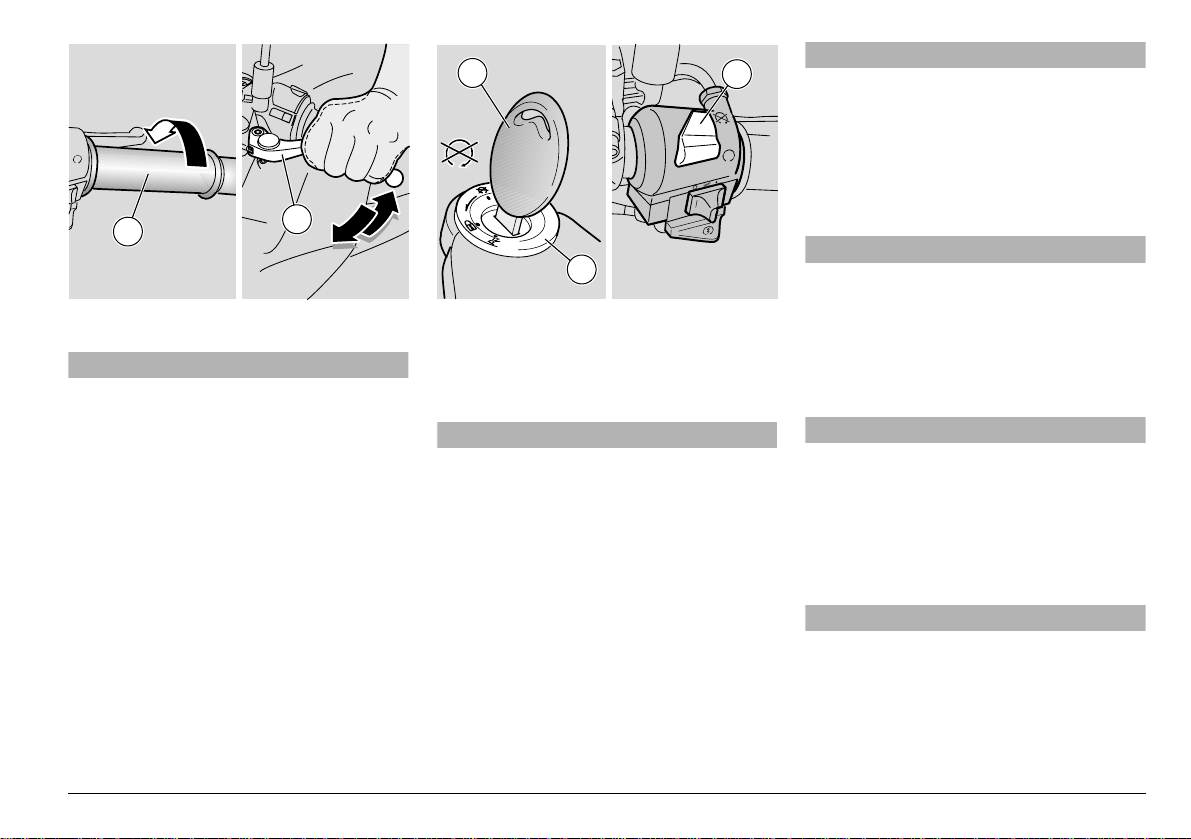
U Make sure that the stand is completely
up.
U Not provided for e. Make sure that
the light switch (1) is in position “
U Make sure that the dimmer switch (2) is
in position “8”.
U Move the engine stop switch (3) to posi-
tion “2”.
”.
•
U Rotate the key (4) and move the ignition
switch to position “2”.
At this point the following lights come on
on the dashboard within three seconds:
– all the warning lights LED;
– all the dashboard lighting LEDs;
– all the segments on the left display;
– all the segments and writings on the
right multifunction display;
– the pointers of the indicators move to the
bottom of the indicator range;
thus testing the operation of LEDs, writings, segments and instruments.
The fuel pump will pressurize the fuel supply circuit, sending out a hum for about
three seconds.
&
PUSH
5
4
120
140
100
H
S
U
P
60
40
20
160
80
0
180
km/h
200
220
240
km
5
4
3
2
1
0
6
14
EFI
6
7
8
9
10
-1
min
x1000
MAGNETI
MARELLI
11
7
8
9
TAIR
&
C
TIME
ENGINE
CONTROL
DIAGNOSIS
SETMODE
12
13
10
After three seconds, the engine oil pressure warning light LED “.” (5) remains
on on the dashboard (and will remain on
until the engine is started) and the following will appear on the displays:
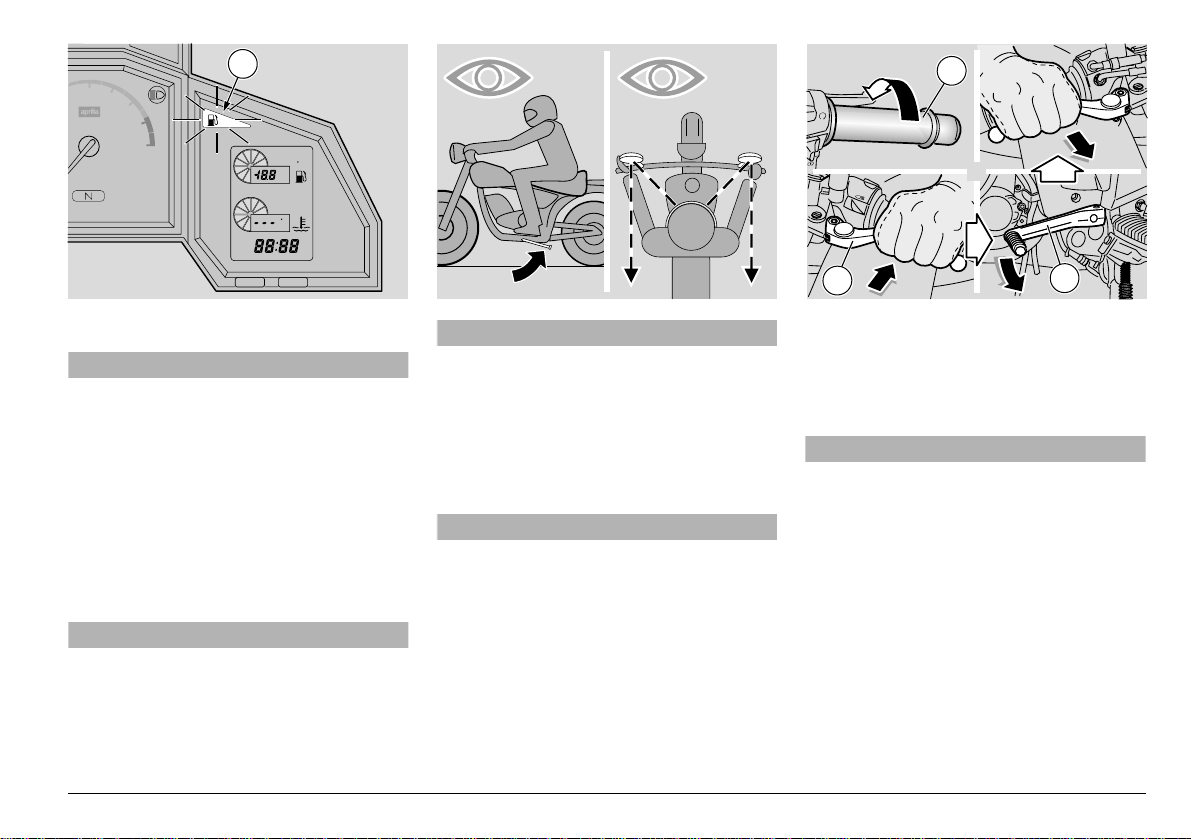
– total number of kilometres covered (6);
– fuel quantity (7);
– air temperature (8);
– coolant tempe rature (9) [up to 35 °C
(95°F) the writing “---” is displayed];
– hour and minutes (10).
aCAUTION
If the low fuel warning light LED “-” (11)
comes on on the dashboard, provide for
topping up as soon as possible, see p.
29 (FUEL).
U Operate the front brake lever completely.
U Pull the clutch lever (12) completely and
shift the gearbox lever (13) into neutral
[green warning light LED “/” (14) on].
NOTE If the room temperature is low
(near to or lower than 0°C – 32°F), see p.
50 (STARTING WITH COLD ENGINE).
aCAUTION
To avoid excessive consumption of the
battery, do not keep the start push button “+” pressed for more than fifteen
seconds.
If the engine does not start in this lapse
of time, wait ten seconds and press the
start push button “+” again.
U Press the start push button “+” (15) with-
out accelerating and release it as soon
as the engine starts.
aCAUTION
Avoid pressing the start push button
“+” (15) when the engine is running,
since you may damage the starter.
If the engine oil pressure warning light
LED “.” (5) remains on, or if it comes
on during the normal operation of the
engine, this means that the oil pressure
in the circuit is insufficient.
In this case, stop the engine immediately and contact an APRILIA Official Dealer.
U Keep at least one brake lever pulled and
do not accelerate until you start.
use and maintenance ETV mille Caponord
49
EFI
6
5
7
4
3
140
160
180
/h
200
220
240
2
1
0
0
8
9
10
-1
min
x1000
MAGNETI
MARELLI
aCAUTION
Never leave abruptly with cold engine.
To reduce the emission of polluting
substances and the consumption of fuel, warm the engine up by proceeding at
low speed for the first miles.
aCAUTION
If the diagnostic warning light LED
“EFI” on the dashboard starts blinking
during the normal operation of the engine, this means that the electronic unit
has detected an anomaly.
In many cases, the engine keeps running with reduced performance levels;
immediately contact an APRILIA Official
Dealer.
use and maintenance ETV mille Caponord
50
STARTING WITH COLD ENGINE
The vehicle is provided with automatic
starter and requires no particular precaution for the cold start procedure.
If the ambient temperature is particularly
low (near to or lower than 0°C / 32°F), the
automatic starter is connected and increases the engine rpm until the engine reaches
the optimal temperature, then it is automatically disconnected.
aCAUTION
The automatic starter cannot be operated manually.
EFI
A
&
1
a
1
6
5
7
8
9
MAGNETI
MARELLI
10
min
x1000
-1
TAIR
C
TIME
ENGINE
CONTROL
DIAGNOSIS
SETMODE
A
&
3
2
a
1
4
$%0!2452%!.$$2)6%
aWARNING
This vehicle is considerably powerful
and must be used gradually and with
the greatest care.
Do not position any object inside the
front part of the fairing (between the handlebar and the dashboard), in order not
to hinder the rotation of the handlebar
and visibility toward the dashboard.
NOTE Before departure, carefully read
the “safe drive” chapter, see p. 5 (SAFE
DRIVE).
aCAUTION
If the low fuel warning light LED “-” (1)
comes on on the dashboard while the
vehicle is running, this means that the
quantity of fuel left in the tank amounts
to 5 ± 1
Provide for topping up as soon as possible, see p. 29 (FUEL).
L.
aWARNING
If you drive without passenger, make
sure that the passenger footrests are
folded.
While riding, keep your hands on the
grips and your feet on the footrests.
NEVER RIDE IN ANY POSITION OTHER
THAN THOSE INDICATED.
aWARNING
If you drive with a passenger, instruct
him/her so that he/she does not create
problems during manouvres.
Before leaving, make sure that the
stand is completely up.
To leave:
U Start the engine, see p. 48 (STARTING).
U Adjust the inclination of the rear-view
mirrors correctly, see p. 79 (REAR-VIEW
MIRRORS).
aCAUTION
With the vehicle at rest, try to get acquainted with the use of the rear-view
mirrors. The reflecting surface is convex, therefore the objects seem to be
farther away than they actually are.
These mirrors offer a “wide-angle” view
and only experience will allow you to
evaluate the distance of the following
vehicles correctly.
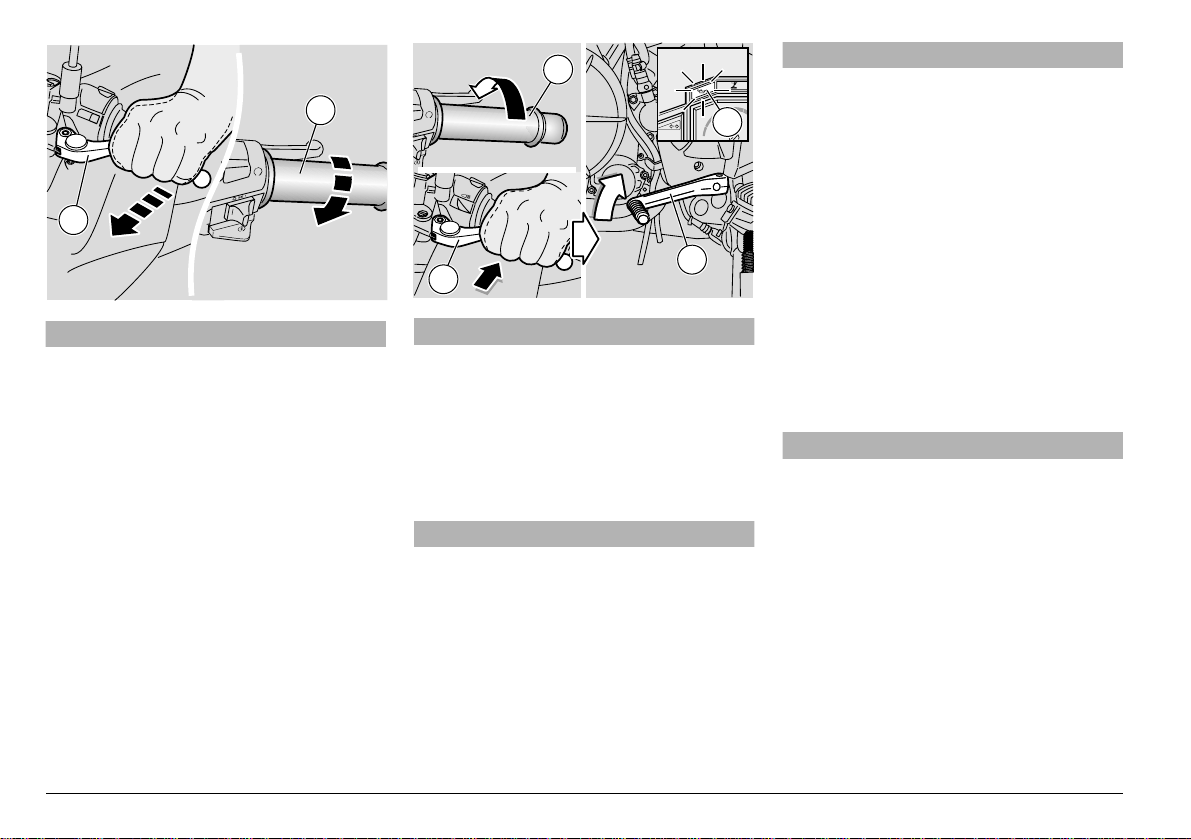
U With released throttle grip (2) (Pos.A)
and engine idling, pull the clutch lever (3)
completely.
U Engage the first gear, by pushing the
gear lever (4) downwards.
U Release the brake lever (pulled on the
starting).
use and maintenance ETV mille Caponord
51
aWARNING
3
BB
&&
2
A
2
a
3
a
4
a
5
a
6
a
&
On departure, the abrupt release of the
clutch lever may cause the engine to
stall or the vehicle to jerk forwards.
Never accelerate abruptly or excessively when releasing the clutch lever, in order to prevent the clutch from “slip-
ping” (slow release) or the front wheel
from raising “rearing up” (quick release).
U Slowly release the clutch lever (3) and at
the same time accelerate by slightly turning the throttle grip (2) (Pos.B).
The vehicle will start moving.
U Ride at reduced speed for the first miles,
in order to warm the engine up.
use and maintenance ETV mille Caponord
52
a
2
3
4
5
6
a
a
a
a
7
6
5
5
4
3
A
2
&
4
3
aCAUTION
Never exceed the recommended rpm,
see p. 54 (RUNNING-IN).
U Increase the speed by gradually rotating
the throttle grip (2) (Pos.B), without exceeding the recommended rpm, see p.
54 (RUNNING-IN).
To engage the second gear:
aCAUTION
Proceed quickly.
Never ride the vehicle at too low rpm.
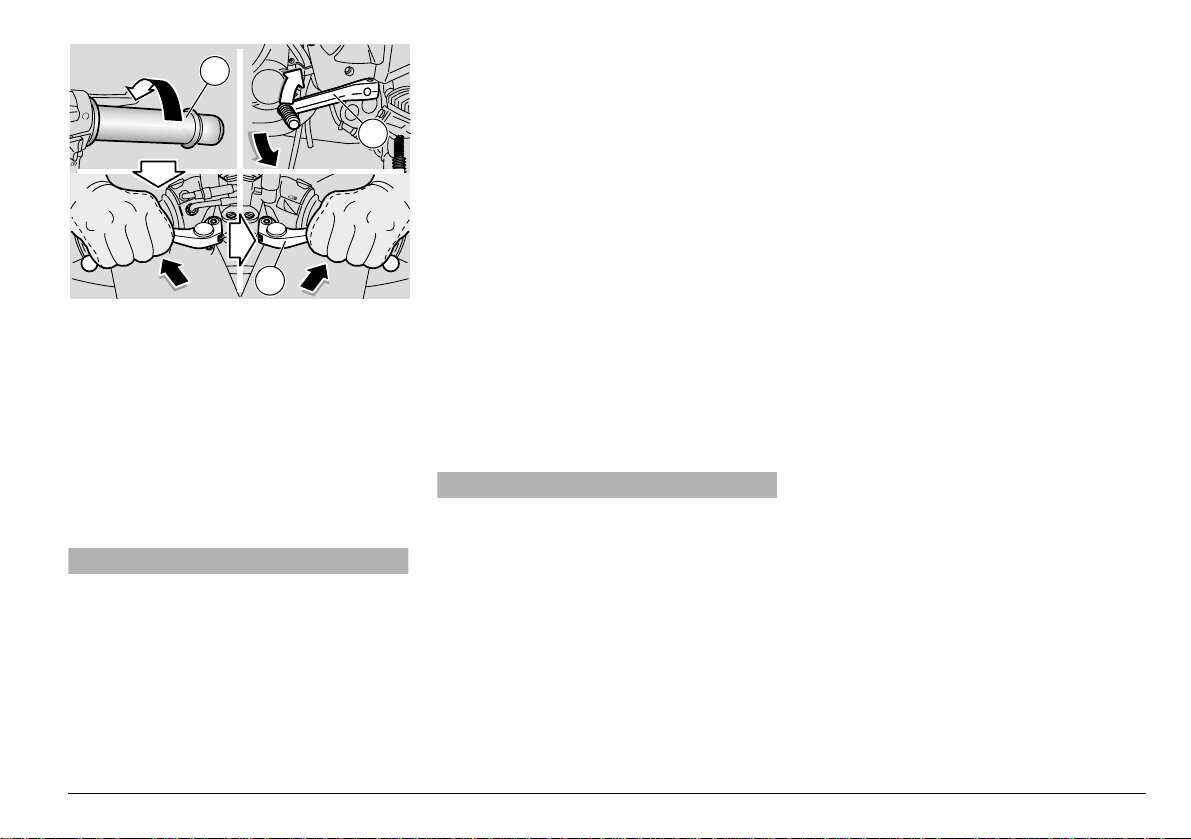
U Release the throttle grip (2) (Pos.A), pull
the clutch lever (3) and lift the shifting lever (4). Release the clutch lever (3) and
accelerate.
U Repeat the last two operations and shift
up.
aCAUTION
If the engine oil pressure warning light
LED “.” (5) comes on during the nor-
8
mal operation of the engine, this means
that the engine oil pressure in the circuit is insufficient.
In this case, stop the engine immediately and contact an APRILIA Official Dealer.
The downshifting should be carried out
in the following situations:
U When riding downhill or when braking, in
order to increase the braking action by
using the compression of the engine.
U When riding uphill, if the gear engaged is
not suitable to the speed (high gear,
moderate speed) and the engine rpm decreases.
aCAUTION
Shift the gears one by one; the simultaneous downshifting of more than one
gear may make you exceed the maximum rpm (red line).
Before and during the downshifting, release the throttle grip and decelerate, in
order to avoid the “red line”.
11
aa
22
aa
33
aa
44
aa
55
aa
66
aa
AA
&&
4
2
3
To shift down, proceed as follows:
U Release the throttle grip (2) (Pos.A).
U If necessary, pull the brake levers mod-
erately and decrease the speed of the
vehicle.
U Pull the clutch lever (3) and lower the
shifting lever (4) to shift down.
U If the brake levers are pulled, release
them.
U Release the clutch lever and accelerate
moderately.
aCAUTION
If a temperature of 126 – 135 °C (259 –
275 °F) is display ed on the right sid e of
the multifunction display and the last
two segments of the indicator range
blink, stop the vehicle and let the engine idle for approximately two minutes,
thus allowing the coolant to circulate
regularly in the system; then, press the
engine stop switch to position “1” and
check the coolant level, see p. 38
(COOLANT).
If the situation on the dashboard re-
mains the same after the coolant level
has been checked, do not start the vehicle and contact an APRILIA Official Dealer.
If the diagnostic warning light LED
“EFI” on the dashboard starts blinking
during the normal operation of the engine, this means that the electronic unit
has detected an anomaly.
In many cases, the engine keeps running with reduced performance levels;
immediately contact an APRILIA Official
Dealer.
To avoid the overheating of the clutch,
keep the engine running with vehicle at
rest, engaged gears and pulled clutch
lever for the shortest possible time.
aWARNING
Avoid opening and closing the throttle
grip repeatedly and continuously, so
that you do not accidentally lose control
of the vehicle. If you have to brake,
close the throttle and put on both
brakes in order to obtain uniform deceleration, properly exerting pressure on
the braking parts.
By putting on the front brake only or the
rear brake only, you reduce the braking
force considerably, thus running the
risk of locking one wheel and consequently losing grip.
If you stop uphill, decelerate completely
and use the brakes only to keep the vehicle steady.
The use of the engine to keep the vehicle steady may cause the overheating of
the clutch.
Before beginning to turn, slow down or
brake driving at moderate and constant
speed or accelerating slightly; avoid
braking at the last moment: it would be
very easy to skid.
If the brakes are operated continuously
on downhill stretches, the friction surfaces may overheat, thus reducing the
braking efficiency. Exploit the engine
compression and shift down by putting
on both brakes intermittently.
Never drive downhill with the engine
off!
When visibility is insufficient, switch on
the low beam even during the day, in order to make your vehicle more visible.
In case of wet ground or scarce wheel
grip (snow, ice, mud, etc.), drive slowly,
avoiding sudden brakings or manoeuvres that could make you lose grip and
fall down.
use and maintenance ETV mille Caponord
53
aWARNING
Pay the utmost attention to any obstacle or variation of the ground.
Uneven roads, rails, manhole covers,
indications painted on the road surface,
building site metal plates become rather
slippery by rain. For this reason all
these obstacles have to be carefully
avoided, driving smoothly and leaning
the vehicle as little as possible.
Always use the turn indicators in time
when you intend to change lane or direction, avoiding sharp and dangerous
movements.
Switch off the direction indicators as
soon as you have changed dire c tion.
Be extremely careful when you overtake
other vehicles or are overtaken.
In case of rain, the water cloud created
by big vehicles reduces visibility; the
air shift may make you lose control of
the vehicle.
25..).').
The running-in of the engine is essential to
ensure its duration and correct functioning.
If possible, drive on hilly roads and/or
roads with many bends, so that the engine,
the suspensions and the brakes undergo a
more effective running-in.
During running-in, change speed.
In this way the components are first “load-
ed” and then “relieved” and the engine
parts can thus cool down.
Even if it is important to stress the engine
components during running-in, take care
not to exceed.
NOTE Only after the first 1500 km (937
mi) of running-in you can expect the best
performance levels from the vehicle.
Keep to the following indications:
U Do not open the throttle completely if the
speed is low, both during and after the
running-in.
U During the first 100 km (62 mi) put on the
brakes with caution, avoiding sharp and
prolonged brakings. This ensures a correct bedding-in of the pads on the brake
disc.
U During the first 1000 km (625 mi) never
exceed 5000 rpm.
aWARNING
After the first 1000 km (625 mi), have an
APRILIA Official Dealer carry out the
checks indicated in the column “After
running-in” of the regular service intervals chart, see p. 60 (REGULAR SERVICE INTERVALS CHART), in order to
avoid hurting yourself or other people
and/or damaging the vehicle.
U Between the first 1000 (625 mi) and
1500 km (937 mi) drive more briskly,
change speed and use the maximum acceleration only for a few seconds, in order to ensure better coupling of the components; never exceed 6250 rpm (see
table).
U After the first 1500 km (937 mi) you can
expect better performance from the engine, however, without exceeding the
maximum allowed (8750 rpm).
Engine maximum rpm recommended
Mileage km (mi) rpm
0 – 1000 (0 – 625) 5000
1000 – 1500 (625 – 937) 6250
over 1500 (937) 8750
use and maintenance ETV mille Caponord
54
A
A
PUSH
1
34/00).'
aWARNING
If possible, avoid stopping abruptly,
slowing down suddenly and braking at
the last moment.
U Release the throttle grip (1) (Pos.A),
gradually put on the brakes and at the
same time shift down in order to decrease the speed, see p. 51 (DEPARTURE AND DRIVE).
Once the speed has decreased, before
stopping the vehicle:
U Pull the clutch lever (2) in order to pre-
vent the stopping of the engine.
When the vehicle has come to rest:
U Shift the gear lever to neutral (green
warning light LED “/” on).
U Release the clutch lever (2).
U In case of a brief stop, keep at least one
brake on.
2
3
H
S
U
P
4
5
0!2+).'
It is very important to choose a suitable
parking area, respecting the road signs and
the indications given below.
aWARNING
Park the vehicle on firm and flat ground,
to prevent it from falling down.
Neither lean the vehicle against walls,
nor lay it on the ground.
Make sure that the vehicle and especially its red-hot parts do not represent a
danger for persons and children. Do not
leave the vehicle unattended when the
engine is on or the key is inserted into
the ignition switch.
Do not get too near the cooling fans
even if they are still, since they may
start moving and suck clothes edges,
hair, etc.
aWARNING
The fall or excessive inclination of the
vehicle may cause the fuel to flow out of
the tank.
The fuel used for internal combustion
engines is extremely inflammable and
in particular conditions it can become
explosive.
aCAUTION
Do not apply the load of your weight or
of the passenger’s weight onto the side
stand.
To park the vehicle:
U Choose a suitable parking area.
U Stop the vehicle, see p. 55 (STOPPING).
aCAUTION
To stop the vehicle, use exclusively the
ignition switch (3).
Leave the engine stop switch (5) in position “2” and use it only in case of
emergency.
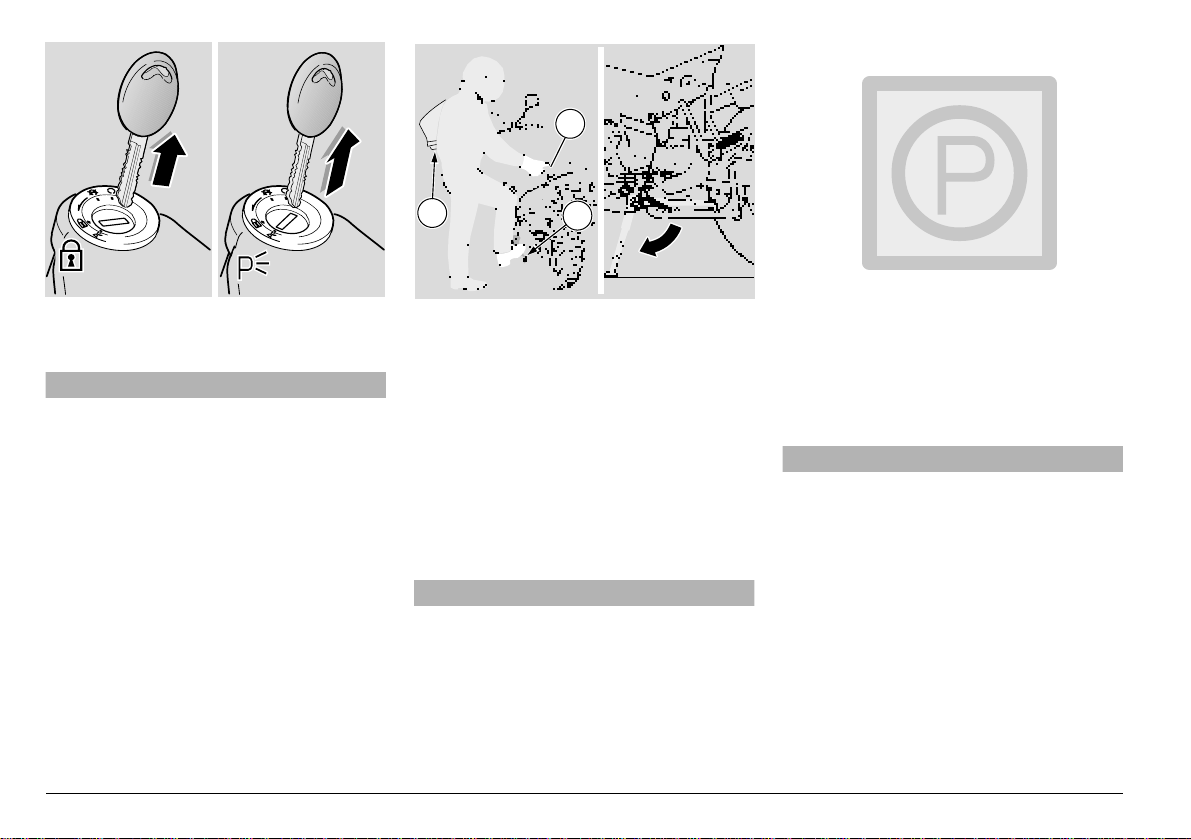
U Rotate the key (3) and move the ignition
switch (4) to position “1”.
aWARNING
When getting on or off the vehicle, keep
to the instructions given, see p. 44
(GETTING ON AND OFF THE VEHICLE).
U Following the indications, wait until the
passenger has got off the vehicle before
dismounting.
use and maintenance ETV mille Caponord
55
PUSH
PUSH
2
H
S
U
P
H
S
U
P
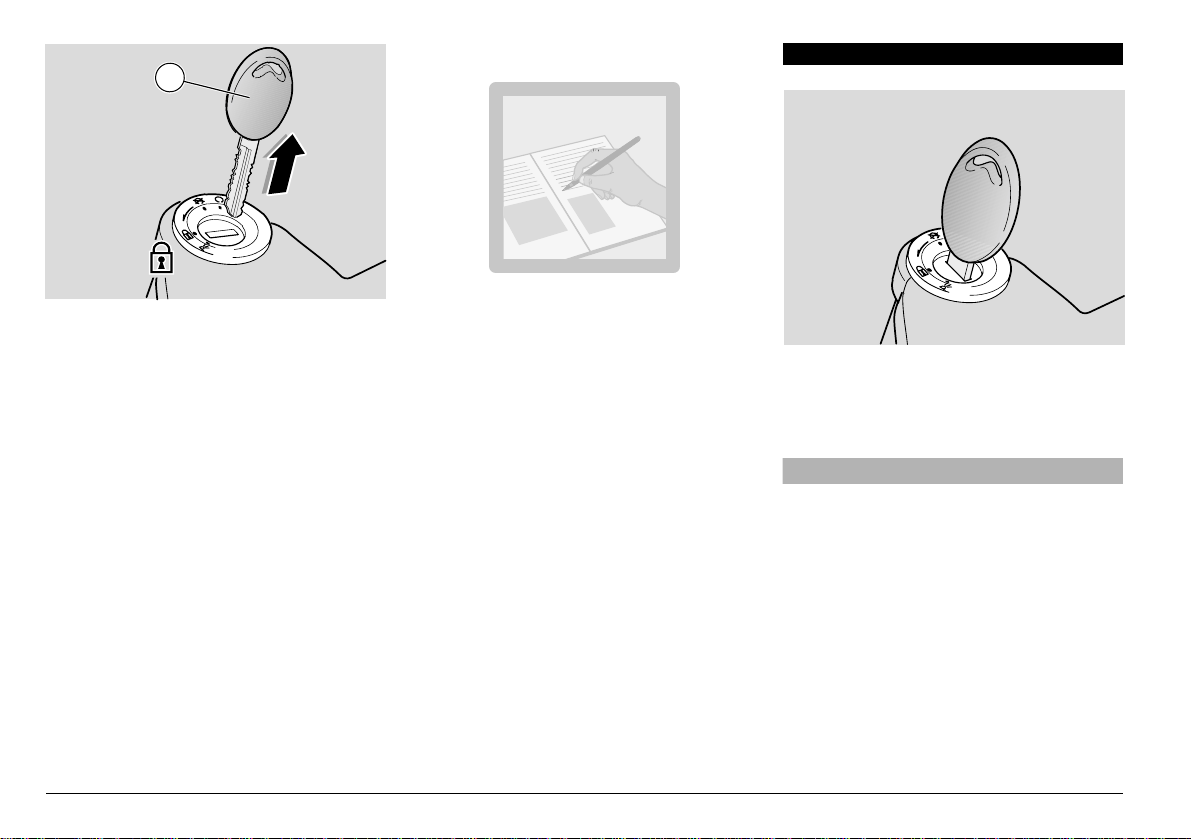
U Lock the steering, see p. 25 (STEERING
LOCK) and extract the key.
aWARNING
Make sure that the vehicle is stable.
The vehicle is provided with front and rear
parking lights. Even if it is always advisable
to park the vehicle in the appropriate parking areas and in any case in illuminated
places, the parking lights are very useful
when it is necessary to park the vehicle in a
dark or badly illuminated area, or in any
case when the vehicle must be visible.
To switch on the parking lights, see p. 25
(PARKING LIGHTS).
1
3
0/3)4)/.).'4(%6%()#,%/.
4(%34!.$
SIDE STAND
To place the vehicle on the side stand
while seated astride the vehicle, see p. 44
(GETTING ON AND OFF THE VEHICLE).
If any manoeuvre (for example, moving the
vehicle) required the lifting of the stand, to
place the vehicle on the stand again, proceed as follows:
aWARNING
Make sure that the parking surface is
free from obstacles, firm and flat.
U Choose a suitable parking area, see p.
55 (PARKING).
U Grasp the left grip (1) and the handle (2).
U Press the side stand with your right foot
and extend it completely (3).
U Incline the vehicle until the stand rests
on the ground.
U Steer the handlebar completely left-
wards.
aWARNING
Make sure that the vehicle is stable.
use and maintenance ETV mille Caponord
56
B
B
C
A
A
2
1
3
A
A
4
C
1
2
B
4
B
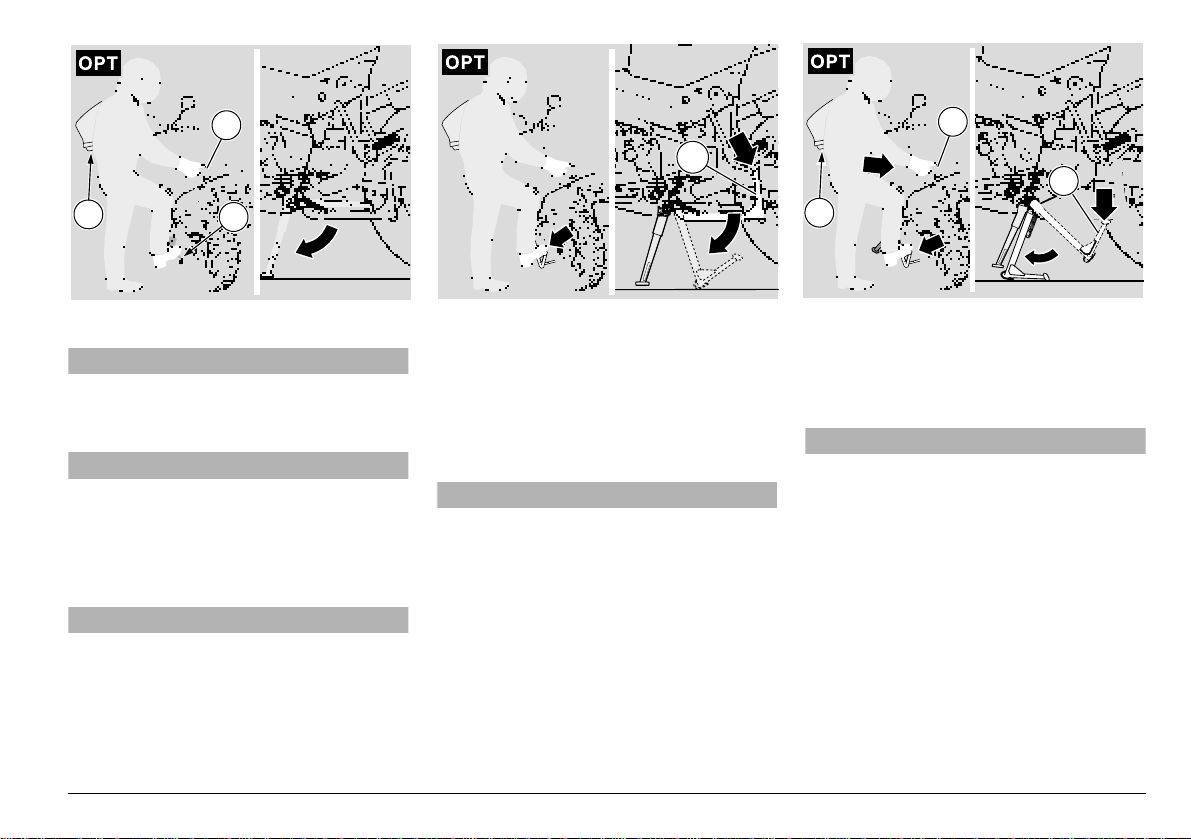
CENTRE STAND m
aWARNING
It is forbidden to position the vehicle on
the centre stand while seated astride
the vehicle in riding position.
aWARNING
Make sure that the parking surface is
free from obstacles, firm and flat.
U Choose a suitable parking area, see p.
55 (PARKING).
U Grasp the left grip (1) and the handle (2).
aCAUTION
The lowering of the side stand is suggested, for safety reasons, in order to
prevent the vehicle from falling down or
overturning in case of unbalance.
NOTE Do not let the side stand touch
the ground. Keep the vehicle in vertical position.
U Press the side stand with your right foot
and extend it completely (3).
U Push down the lever (4) of the centre
stand (Pos.A) and rest it on the ground.
aCAUTION
Proceed with care.
The positioning of the vehicle on the
centre stand may be difficult, since the
vehicle is very heavy. Release the grip
(1) and the handle (2) only after positioning the vehicle on the stand.
U Load your weight on the lever (4)
(Pos.B) of the centre stand and at the
same time move your centre of gravity
towards the rear part of the (Pos.C) vehi-
cle.
aWARNING
Make sure that the vehicle is stable.
U Let the side stand up.
use and maintenance ETV mille Caponord
57
-!).4%.!.#%
PUSH
PUSH
1
H
S
U
P
H
S
U
P
35''%34)/.34/02%6%.4
4(%&4
NEVER leave the ignition key (1) inserted
and always use the steering lock “&”.
Park the vehicle in a safe place, possibly in
a garage or a protected place.
When possible, use an additional anti-theft
device.
Make sure that all documents are in order
and the road tax has been paid.
use and maintenance ETV mille Caponord
58
Write down your personal data and te lephone number in this page, to facilitate the
identification of the owner in case of finding
after theft.
SURNAME: ...............................................
NAME: ......................................................
ADDRESS: ...............................................
...................................................................
TELEPHONE NO.: ...................................
NOTE Very often stolen vehicles are
identified thanks to the data written in the
use/maintenance manual.
Carefully read p. 2 (SAFETY WARNINGS), (TECHNICAL INFORMATION)
and (WARNINGS - PRECAUTIONS GENERAL ADVICE).
aWARNING
Risk of fire.
Keep fuel and other flammable substances away from the electrical components.
Before beginning any maintenance operation or any inspection of the vehicle,
stop the engine, extract the key from
the ignition block, wait until the engine
and the exhaust system have cooled
down and if possible lift the vehicle by
means of the proper equipment, on firm
and flat ground.
aWARNING
Before proceeding, make sure that the
room in which you are working is properly ventilated.
Keep away from the red-hot parts of the
engine and of the exhaust system, in order to avoid burns.
Do not hold any mechanical piece or
other parts of the vehicle with your
mouth: the components are not edible
and some of them are noxious or even
toxic.
aCAUTION
If not expressly indicated otherwise, for
the reassembly of the units repeat the
disassembly operations in reverse order.
In case any maintenance operation
should be required, it is advisable to
use latex gloves.
Routine maintenance operations can usually be carried out by the user, but sometimes specific tools and specific technical
skills may be required.
In case periodic maintenance operations,
assistance or technical advice are needed,
contact an aprilia Official Dealer, who will
ensure you prompt and accurate servicing.
Ask your aprilia Official Dealer to test the
vehicle on the road after a repair or periodic maintenance operation.
1
EFI
6
5
7
4
3
140
160
180
/h
200
220
240
2
1
0
8
9
10
-1
min
x1000
MAGNETI
MARELLI
In any case, personally carry out the “Pre-
liminary checking operations” after any
maintenance operation, see p. 47 (PRELIMINARY CHECKING OPERATIONS).
NOTE This vehicle is set so that any
anomaly can be detected in real time and
stored by the electronic unit.
Whenever the ignition switch is turned to
position “2”, the diagnostic warning light
LED “EFI” (1) comes on on the dashb oard
for approximately three seconds.
aCAUTION
If the diagnostic warning light LED
“EFI” (1) comes on and blinks when the
engine is started or starts blinking during the normal operation of the engine,
this means that the electronic unit has
detected an anomaly.
TIME
MODE
TAIR
SERVICE
C
SET
ENGINE
CONTROL
DIAGNOSIS
2
In many cases, the engine keeps running with reduced performance levels;
immediately contact an APRILIA Official
Dealer.
aCAUTION
After the first 1000 km (625 mi) and successively every 7500 km (4687 mi), the
writing “SERVICE” (2) appears on the
right display.
In this case contact an APRILIA Official
Dealer, who will carry out the operations indicated in the regular service intervals chart, see p. 60 (REGULAR
SERVICE INTERVALS CHART).
use and maintenance ETV mille Caponord
59
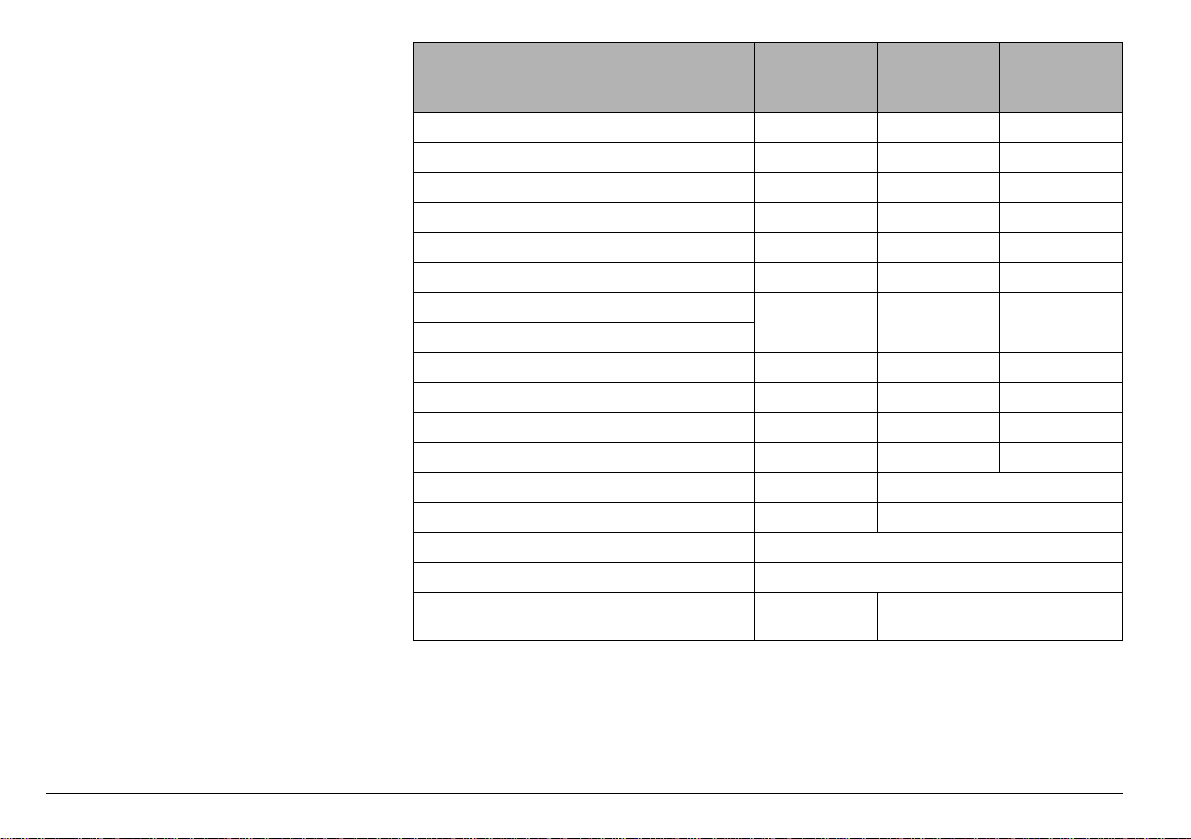
2%'5,!23%26)#%).4%26!,3
#(!24
OPERATIONS TO BE CARRIED OUT BY
THE APRILIA Official Dealer (WHICH
CAN BE CARRIED OUT EVEN BY THE
USER).
Key
= check and clean, adjust, lubricate or
change, if necessary;
= clean;
= change;
= adjust.
NOTE Perform the maintenance opera-
tions with doubled frequency if the vehicle
is used in rainy or dusty areas, on uneven
surfaces or on racetracks.
(**) = Check every two weeks or accord-
ing to the intervals indicated.
Component
After run-
ning-in [1000
km (625 mi)]
Every 7500
km (4687 mi)
or 12 months
Every 15000
km (9375 mi)
or 24 months
Spark plugs –
Air cleaner –
Engine oil filter –
Engine oil filter (on oil tank) –
Fork –
Light operation/direction – –
Light system
Safety switches
–
Clutch fluid – –
Brake fluid – –
Coolant ––
Engine oil –
Tyres every 1000 km (625 mi):
Tyre pressure (**) every 1000 km (625 mi):
Engine oil pressure warning light LED at every start:
Drive chain tension and lubrication every 1000 km (625 mi):
Brake pad wear
before every trip and every
2000 km (1250 mi):
use and maintenance ETV mille Caponord
60
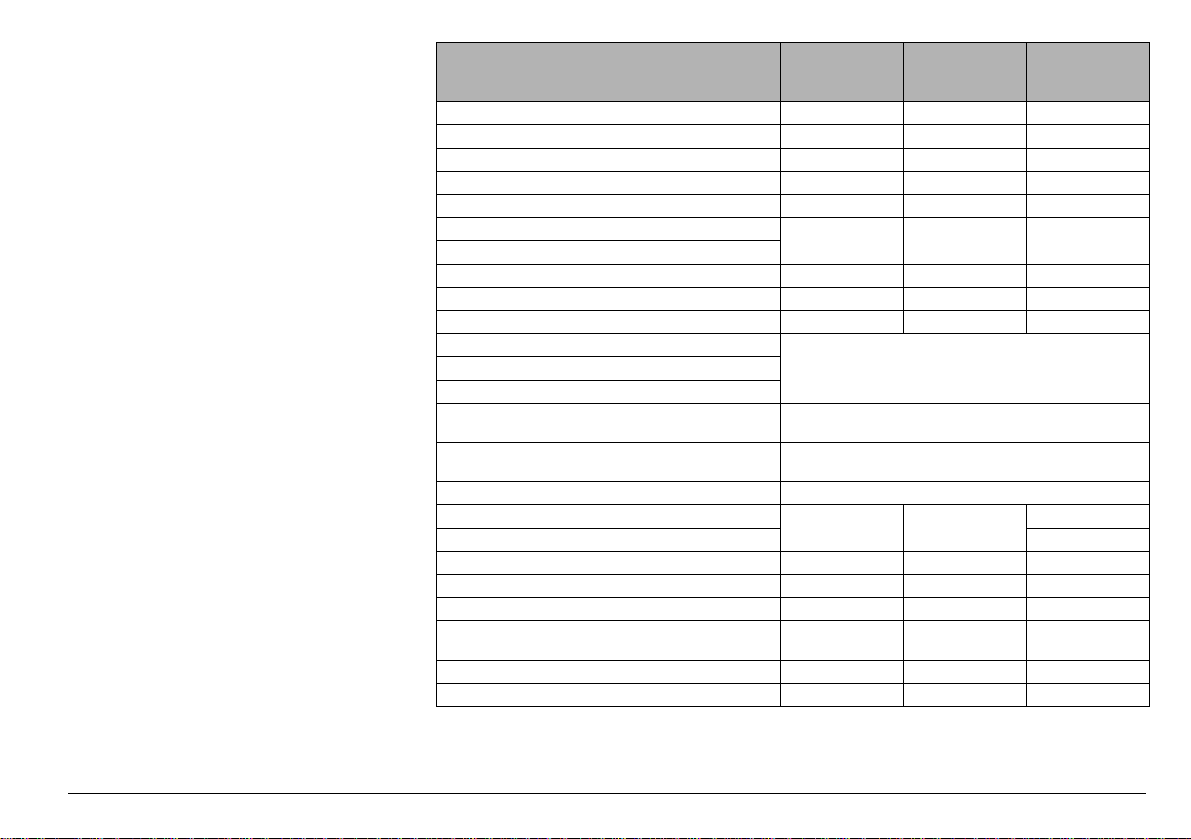
OPERATIONS TO BE CARRIED OUT BY
THE APRILIA Official Dealer
Key
= check and clean, adjust, lubricate or
change, if necessary;
= clean;
= change;
= adjust.
NOTE Perform the maintenance opera-
tions with doubled frequency if the vehicle
is used in rainy or dusty areas, on uneven
surfaces or on racetracks.
After running-
Component
Rear shock absorber ––
Transmission cables and controls –
Rear suspension linkage bearings ––
Steering bearings and steering clearance –
Wheel bearings – –
Brake discs
General running of the vehicle
Adjusting the valve clearance –
Braking systems –
Cooling system – –
Clutch fluid
Coolant
Fork oil
Fork oil seals
Brake pads if worn:
Wheel/Tyres
Nut, bolt, screw tightening –
Cylinder synchronization
Suspensions and attitude –
Final transmission (chain, crown and pinion) – –
Fuel pipes –
Nipple/spoke tightening –
Clutch wear – –
in [1000 km
(625 mi)]
–
after the first 7500 km (4687 mi) and successively
after the first 30000 km (18750 mi) and
successively every 22500 km (14000 mi):
Every 7500 km
(4687 mi) or 12
months
every 2 years: Brake fluid
every 22500 km (14000 mi):
Every 15000
km (9375 mi)
or 24 months
every 4 years:
–
use and maintenance ETV mille Caponord
61
)$%.4)&)#!4)/.$!4!
It is a good rule to write down the frame
and engine numbers in the space provided
in this manual.
The frame number can be used for the purchase of spare parts.
NOTE Do not alter the identification
numbers if you do not want to incur severe
penal and administrative sanctions. In particular, the alteration of the frame number
results in the immediate invalidity of the
guarantee.
use and maintenance ETV mille Caponord
62
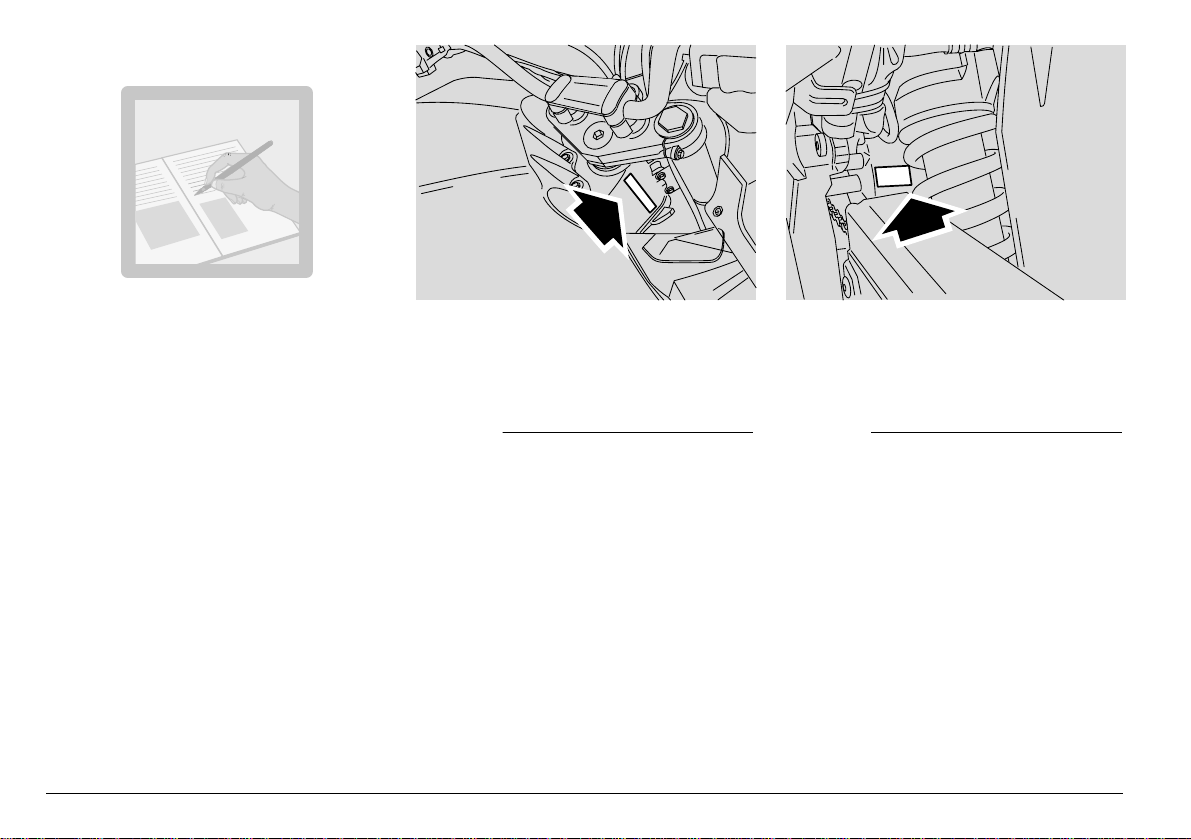
FRAME NUMBER
The frame number is stamped on the right
side of the steering column.
Frame no.
ENGINE NUMBER
The engine number is stamped on the rear
part of the engine, near the pinion.
Engine no.

#(%#+).' 4(% %.').% /),
MAX
MIN
,%6%,!.$4/00).'50
Carefully read p. 41 (ENGINE OIL) and p.
58 (MAINTENANCE).
Periodically check the engine oil level,
change the oil after the first 1000 km (625
mi) and successively every 7500 km (4687
mi) or 12 months, see p. 64 (CHANGING
THE ENGINE OIL AND THE OIL FILTER).
For the check, proceed as follows:
aCAUTION
The engine oil level must be checked
with warm engine.
If the check is carried out with cold engine, the oil level may temporarily lower
below the “MIN” mark.
This is not a problem, provided that the
engine oil pressure warning light LED
“.” does not come on, see p. 16 (INSTRUMENTS AND INDICATORS TABLE).
NOTE To warm the engine and have the
engine oil reach the operating temperature,
do not let the engine idle with the vehicle at
rest. According to the correct procedure, it
is advisable to carry out the check after a
trip of after covering approximately 15 km
(10 mi) on a road outside town (this is sufficient for the engine oil to reach the operating temperature).
1
MAX
MIN
U Stop the engine, see p. 55 (STOPPING).
U Keep the vehicle in vertical position, with
the two wheels resting on the ground.
U Check the oil level on the transparent
pipe (1).
MAX = maximum level
MIN = minimum level.
The difference between “MAX” and “MIN”
amounts to approximately 500 cm#.
U The level is correct when the oil almost
reaches the “MAX” mark.
aCAUTION
Never exceed the “MAX” mark, nor
leave the oil below the “MIN” mark, in
order to avoid serious damage to the
engine.
If necessary, top up the engine oil by proceeding as follows:
U Unscrew and remove the filling cap (2).
2
aCAUTION
Do not put additives or other substances into the oil.
If you use a funnel or other similar
items, make sure that they are perfectly
clean.
NOTE Use high-quality 15W – 50 oil,
see p. 110 (LUBRICANT CHART).
U Top up the tank and restore the correct
level, see p. 110 (LUBRICANT CHART).
use and maintenance ETV mille Caponord
63
#(!.').'4(%%.').%/),!.$
4(%/),&),4%2
aCAUTION
The engine oil and the oil filter change
operations may be difficult for unskilled
operators.
If necessary, contact your APRILIA Official Dealer.
If you want to perform these operations
personally, keep to the following instructions.
Carefully read p. 41 (ENGINE OIL) and p.
58 (MAINTENANCE).
NOTE Perform the maintenance opera-
tions with doubled frequency if the vehicle
is used in rainy or dusty areas, on uneven
surfaces or on racetracks.
Periodically check the engine oil level, see
p. 63 (CHECKING THE ENGINE OIL LEVEL AND TOPPING UP) change the oil after
the first 1000 km (625 mi) and successively
every 7500 km (4687 mi).
aCAUTION
If the vehicle is used in dusty areas,
change the oil more frequently.
To change, proceed as follows:
NOTE The oil flows out completely and
without problems when it is warm and
therefore more fluid: to achieve this condition, the engine should run for approximately twenty minutes.
2
1
aCAUTION
When warmed up, the engine contains
hot oil; therefore, while carrying out the
operations described here below be
particularly careful, in order to avoid
burns.
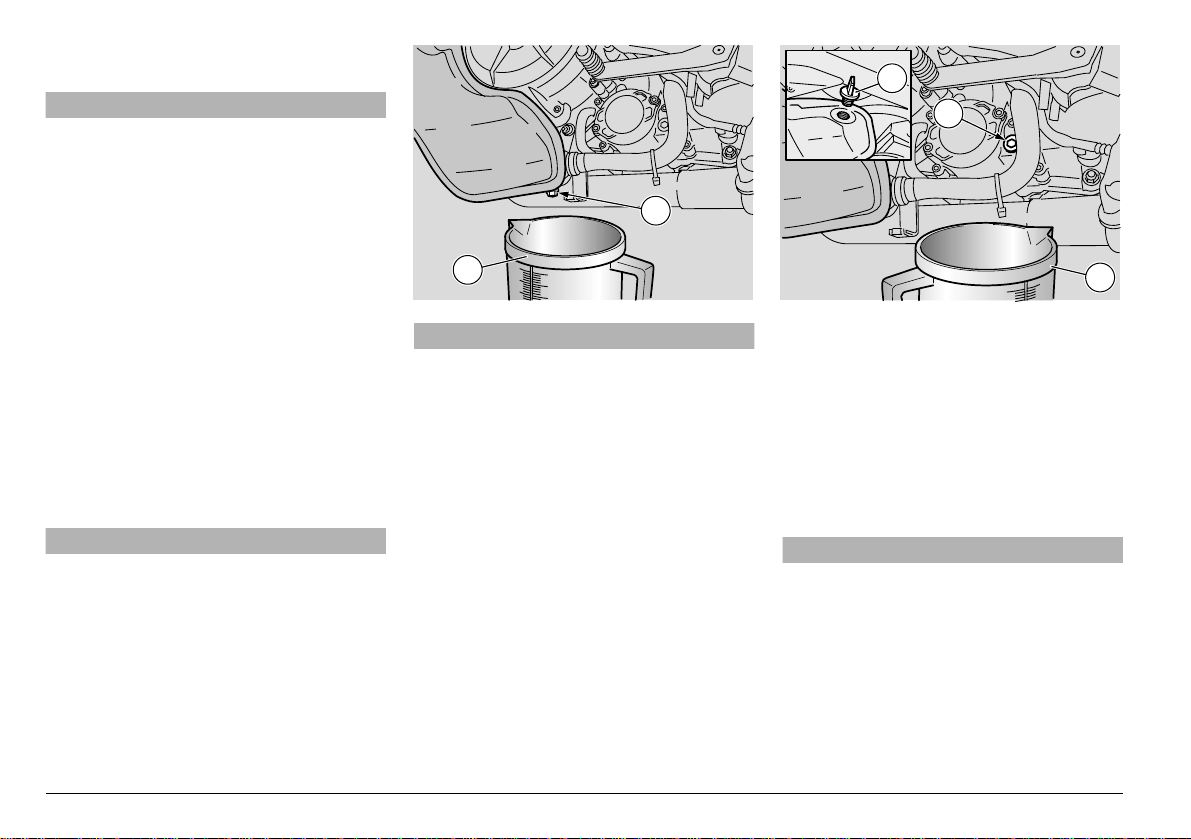
U Remove the oil sump guard, see p. 75
(REMOVING THE OIL SUMP GUARD).
U Position a container (1) with more than
4000 cm# capacity in correspondence
with the drain plug (2) positioned on the
tank.
U Unscrew and remove the drain plug (2)
positioned on the tank.
U Unscrew and remove the filling cap (3).
U Drain the oil and let it drip into the con-
tainer (1) for a few minutes.
U Check and if necessary replace the seal-
ing washer of the drain plug (2) positioned on the tank.
U Screw and tighten the drain plug (2) on
the tank.
3
4
1
Drain plug (2) driving torque: 15 Nm (1.5
Kgm).
U Move the container (1) and position it un-
der the engine base, in correspondence
with the drain plug positioned on the engine (4).
U Unscrew and remove the drain plug posi-
tioned on the engine (4).
U Drain the oil and let it drip into the con-
tainer (1) for a few minutes.
aCAUTION
Do not dispose of the oil in the e nv ir onment. Put it in a sealed container and
take it to the filling station where you
usually buy it or to an oil salvage center.
U Remove the metal residues from the
drain plug (4) magnet.
use and maintenance ETV mille Caponord
64

10
5
8
6
7
11
13
U Unscrew and remove the engine oil filter
(9) positioned on the tank and clean it
with a jet of compressed air.
U Check the seal of the engine oil filter (9)
positioned on the tank; screw and tighten
it.
Engine oil filter (9) driving torque: 30
Nm (3 kgm).
3
U Connect the pipe (12) and tighten the
new clamp (10).
U Screw and tighten the drain plug (4).
Driving torque of the drain plug (4) positioned on the engine: 12 Nm (1.2 kgm).
CHANGING THE ENGINE OIL FILTER
NOTE Perform the maintenance opera-
tions with doubled frequency if the vehicle
is used in rainy or dusty areas, on uneven
surfaces or on racetracks.
Change the engine oil filter after the
first 1000 km (625 mi) and successively
every 7500 km (4687 mi) (or every time
you change the oil).
U Unscrew the two screws (5) and remove
the cover (6).
U Remove the engine oil filter (7).
aCAUTION
Do not use filters that have already
been used.
9
U Spread an oil film on the sealing ring (8)
12
of the new engine oil filter.
U Fit the new engine oil filter.
U Put back the cover (6), screw and tighten
the two screws (5).
CLEANING THE ENGINE OIL FILTER ON
THE TANK
NOTE Perform the maintenance opera -
tions with doubled frequency if the vehicle
is used in rainy or dusty areas, on uneven
surfaces or on racetracks.
Clean the engine oil filter (9) on the tank
after the first 1000 km (625 mi) and successively every 15000 km (9375 mi) (or
every two engine oil changes).
NOTE Prepare a screwdriver-type pipe
clamp (10) to replace the original one (special type).
U Loosen the clamp (11) and disconnect
the pipe (12).
aCAUTION
Do not put additives or other substances into the oil.
If you use a funnel or other similar
items, make sure that they are perfectly
clean.
NOTE Use high-quality 15W – 50 oil,
see p. 110 (LUBRICANT CHART).
U Pour the following quantity of engine oil
into the filling opening (13):
– 4300 cm# (engine oil change only),
– 4500 cm# (changing the engine oil and
the oil filter),
see p. 110 (LUBRICANT CHART).
U Tighten the filling cap (3).
U Start the engine, see p. 48 (STARTING)
and let it idle for about one minute, in order to ensure the filling up of the engine oil
circuit.
U Check the oil level and top up if neces-
sary, see p. 63 (CHECKING THE ENGINE OIL LEVEL AND TOPPING UP).
use and maintenance ETV mille Caponord
65
2
3
1
!)2#,%!.%2
Check the air cleaner every 7500 km (4687
mi) or 12 months, change it every 15000 km
(9375 mi) or more frequently if the vehicle
is used on dusty or wet roads.
It is possible to clean the air cleaner partially after using the vehicle on this kind of
roads.
aCAUTION
The partial cleaning of the filter does not
exclude or postpone the replacement of
the filter itself. Do not start the engine if
the air cleaner has been removed. Do not
clean the filtering element with petrol or
solvents, since they may cause a fire in
the fuel supply system, with serious danger for the persons in the vicinity and for
the vehicle.
DO NOT DISPOSE OF POLLUTING SUBSTANCES OR COMPONENTS IN THE ENVIRONMENT.
use and maintenance ETV mille Caponord
66
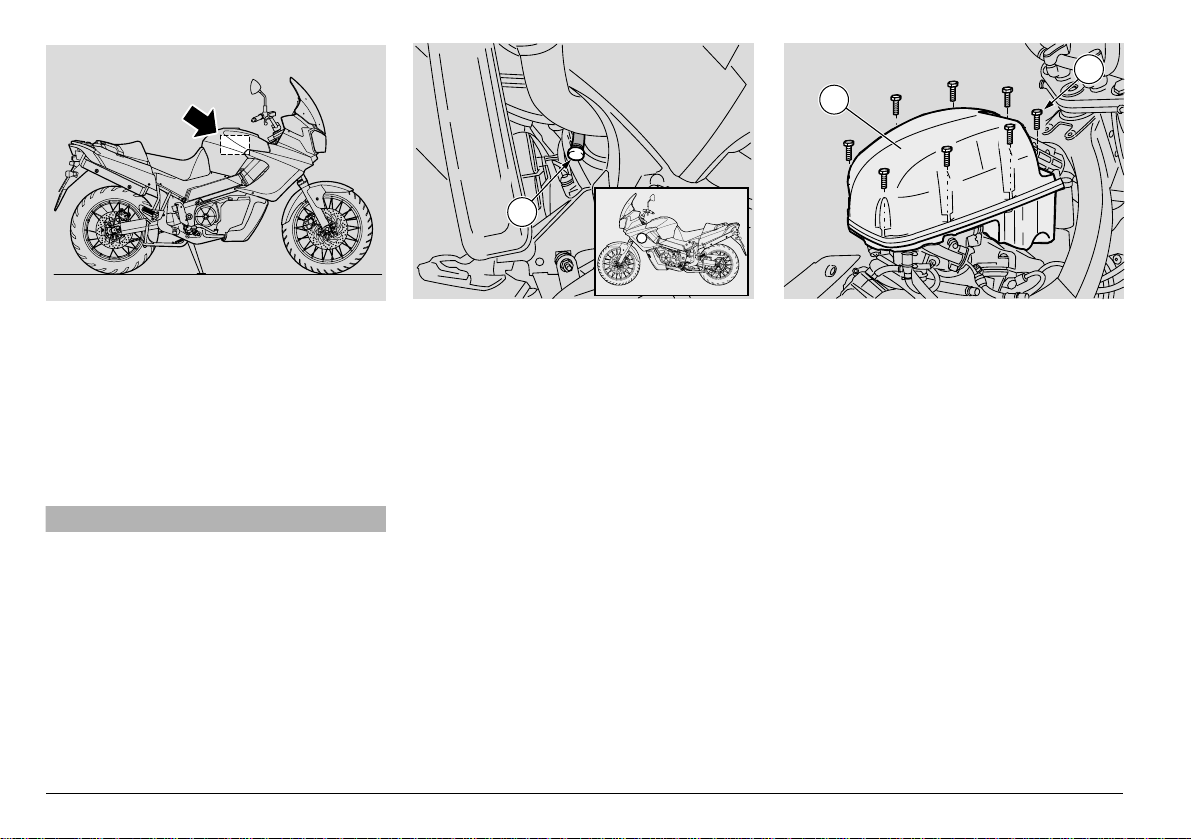
NOTE To reach the plug (1), remove the
left fairing, see p. 75 (REMOVE THE LEFT
FAIRING).
U Every 7500 km (4687 mi), remove the
plug (1), empty its content into a container and deliver it to a salvage centre.
REMOVAL
U Remove the fuel tank, see p. 76 (RE-
MOVAL OF THE FUEL TANK).
U Unscrew and remove the eight screws
(2) that fasten the filter case cover (3) .
U Remove the filter case cover (3).
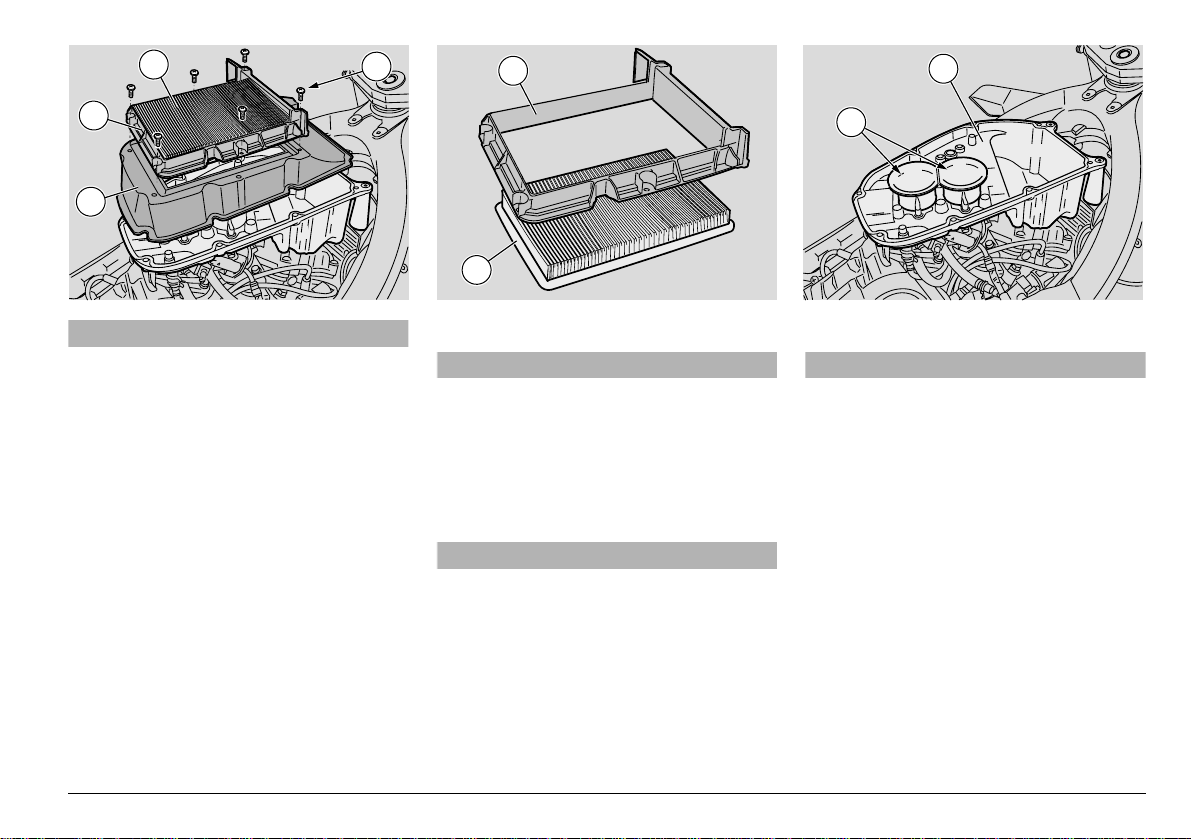
U Unscrew and remove the six screws (4).
U Remove the filter cage (5), together with
the filtering element (6).
U Extract the filtering element (6).
U Remove the air cleaner support (7).
6
4
5
8
5
7
aCAUTION
Plug the opening with a clean cloth, in
order to prevent any foreign matter to
get ito the suction ducts.
Upon reassembly, before positioning
the filter case cover (3), make sure that
you have not left the cloth or other objects inside the filter case (8).
Make sure that the filtering element is
positioned correctly, in such a way as
to prevent non-filtered air from entering.
Remember that the untimely wear of the
piston segments and the cylinder may
be caused by a faulty or uncorrectly positioned filtering element.
6
PARTIAL CLEANING
aCAUTION
Do not use screwdrivers or alike.
U Seize the air cleaner (6) and strike it
more than once on a clean surface.
U If necessary, clean the air cleaner (6)
with a compressed air jet (directing it
from the inside towards the outside of
the filter).
aCAUTION
When cleaning the filtering element,
make sure that there are no tears.
Otherwise, change the filtering element.
U Clean the outer part of the air cleaner (6)
with a clean cloth.
U Clean the inside of the filter case (8) with
a clean cloth.
U Clean the suction ducts (9).
9
CHANGING
aCAUTION
Do not use filters that have already
been used.
U Replace the air cleaner (6) with a new
one of the same type.
use and maintenance ETV mille Caponord
67
 Loading...