


Important Information
Includes safety information, memory installation and battery replacement instructions,
and regulatory agency information for your iMac
Safety Instructions for Setting Up Your Computer
When you set up your computer or device, keep these important safety instructions in mind.
Plugging In the Power Cord
Important Your computer or device has a three-wire grounding plug that will fit only a grounded AC outlet. If you are unable to insert the plug in the outlet, contact a licensed electrician to replace the outlet with a properly grounded outlet.
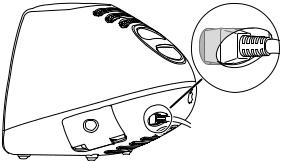
Important The plug on the power cord must be completely inserted into the computer’s power socket and firmly seated for your computer to operate correctly.
Connecting a Phone Line to the Modem Port
Important Make sure you connect the modem to an analog phone line, the kind typically used in homes.
Disconnecting Power
Important The only way to completely disconnect power from the computer is to unplug the power cord from the outlet or from the back of the computer.
General Safety Instructions
For your own safety and that of your equipment, always take the following precautions.
Disconnect the power plug (by pulling the plug, not the cord) if any of the following conditions exists:
myou want to remove any parts (leave the cord disconnected as long as the cover is off )
mthe power cord or plug becomes frayed or otherwise damaged
myou spill something into the case
2

myour computer or device is exposed to rain or any other excess moisture
myour computer or device has been dropped or the case has been otherwise damaged
myou suspect that your computer or device needs service or repair
myou want to clean the case (use only the recommended procedure described later)
Be sure that you always do the following:
mKeep your computer or device away from sources of liquids, such as washbasins, bathtubs, shower stalls, and so on.
mProtect your computer or device from dampness or wet weather, such as rain, snow, and so on.
mRead all the installation instructions carefully before you plug your computer or device into a wall socket.
mKeep these instructions handy for reference by you and others.
mFollow all instructions and warnings dealing with your system.
Warning Electrical equipment may be hazardous if misused. Operation of this product, or similar products, must always be supervised by an adult. Do not allow children access to the interior of any electrical product and do not permit them to handle any cables.
To clean the case, do the following:
1Disconnect the power plug. (Pull the plug, not the cord.)
2Wipe the surfaces lightly with a clean, soft cloth dampened with water.
Important Do not use any substance containing isopropyl alcohol or damage to the plastic will result.
Warning Never push objects of any kind into this product through the openings in the case. Doing so can cause a fire or a dangerous electric shock.
3
Installing Memory and Replacing the Backup Battery
This section provides information about memory and the backup battery and explains how to install them.
Warning Apple Computer recommends that you have an Apple-certified technician install memory. Apple does not provide telephone support for memory upgrades. Consult the service and support information that came with your computer for instructions on how to contact an Apple-authorized service provider or Apple for service. If you install these items yourself, you risk damaging your equipment, and this damage is not covered by the limited warranty on your computer. See an Apple-authorized dealer or service provider for additional information about this or any other warranty question.
About Memory
Your computer contains two types of memory—dynamic random-access memory (DRAM) and video memory. You can add DRAM to your computer in packages called Small Outline Dual Inline Memory Modules, or SO-DIMMs.
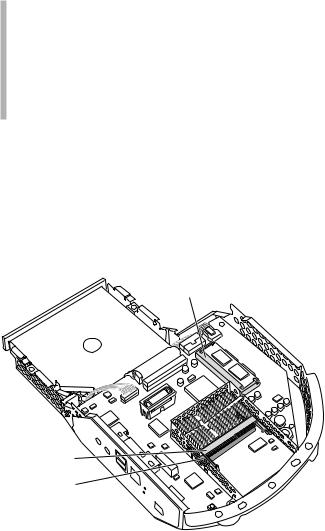
The following illustration shows the locations of memory slots on the logic board. See the sections that follow for important information about DRAM and video memory.
Video memory slot ( your computer has a DIMM already installed in this slot)
Upper DRAM slot
Lower DRAM slot
(hidden under the processor card; your computer has a
DIMM already installed in this slot)
DRAM Configurations
Your computer comes with a 32 megabyte (MB) SO-DIMM pre-installed. You can increase your computer’s DRAM up to 256 megabytes (MB) by adding SO-DIMMs to the two RAM DIMM slots on the main logic board.
4
To increase the memory to the maximum of 256 MB, install a 128 MB DIMM in the user-accessible upper expansion slot. Have a 128 MB DIMM installed in the lower slot. To maintain your Apple warranty, the DIMM in the lower slot must be installed or removed by an Apple-authorized service provider.
For more information about the type of SO-DIMMs you must use, see the technical specifications in your online information, About Your iMac, available via the Help Center in the Help menu.
Important This computer uses Synchronous Dynamic Random-Access Memory (SDRAM) SO-DIMMs. DIMMs from older Macintosh computers are not compatible with your computer and should not be used even though they may fit into the RAM DIMM slots.
Video Memory Configurations
Your computer comes with a total of 6 MB of Synchronous Graphic RAM (SGRAM) video memory; 2 MB are built into the logic board and 4 MB are in the video memory slot.
About the Backup Battery
If you have intermittent problems starting up your computer and the date is reset, you need to replace the lithium backup battery in the computer. Replacing the battery may cause some settings on your computer, such as the desktop patterns, to revert to the factory default settings. You may also have to restore modem settings in any communication programs you are using.
Important Make a note of the settings before you replace the battery.
Installing Memory or Replacing the Battery
Follow these instructions to install additional memory or replace the backup battery.
Important Before installing any of these items, carefully read “About Memory” on page 4 and “About the Backup Battery,” above.
Installing additional memory and replacing the backup battery involves four procedures:
mTurning off the computer
mOpening the computer
mInserting the memory module into a specific slot or replacing the battery
mClosing the computer
5

Turning Off the Computer
1If your computer is turned on, turn it off by choosing Shut Down from the Special menu.
2Unplug all the cables from the computer, including the power cord.
Warning If your internal modem is connected to a telephone line, make sure you disconnect the telephone line from the internal modem port before you open the computer’s cover. This prevents electric shock.
Now go to the next section, “Opening the Computer.”
Opening the Computer
1If the computer is secured, unlock it by removing the security cable from the handle.
For more information, see the online documentation that came with your computer.
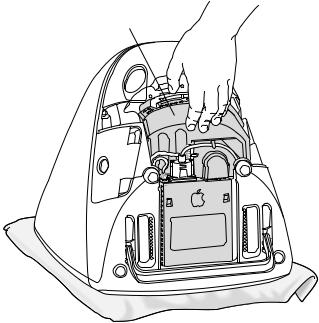
2Place a soft towel or cloth on the desk or surface.
3Holding the handle with one hand and the front of the computer with the other, slowly lift up and turn the computer so the screen is facing down on the cloth.
Remove this screw. |
Use this handle to remove |
|
the plastic cover by pulling |
|
it away from the computer |
|
as shown. |
Place a soft, clean cloth
under the monitor.
4Use a Phillips screwdriver to unscrew the screw on the lower back cover.
Do not use a powered screwdriver. It may damage the screws on your computer.
5Grab the small plastic handle on the cover and pull the cover away from the computer.
6Set the cover aside.
6
7Touch any exposed metal on the logic board/drive assembly.
Touch the metal part of the logic board/drive assembly.
This helps protect the computer from damage caused by electrostatic discharge.
Important Always do this before you touch any parts, or install any components, inside the computer. To avoid generating static electricity, do not walk around the room until you have completed the installation of the memory or replaced the battery and closed the computer.
7

8Remove one of the cables from underneath its clamp, then unscrew the thumbscrews connecting the cable, and disconnect the cable.
Release the cable that is underneath this cable clamp.
Remove this cable by unscrewing these two thumbscrews.
8
 Loading...