


 Loading...
Service Source
iMac G5, 17-inch (Ambient Light
Sensor )
Updated 1 October 2007
© 2005 Apple Computer, Inc. All rights reserved.

iMac G5, 17-inch (Ambient Light Sensor ) |
iMac G5 (17-inch) - 1 |

Service Source
Take Apart
iMac G5, 17-inch, Ambient Light
Sensor
© 2005 Apple Computer, Inc. All rights reserved.

General Information
What’s New
October 2007
Updated Logic Board replacement procedure. A “caution” was added to notify service providers not to twist, flex, or bend the iMac G5 logic as you install to board into the chassis. Flexing the board may jeopardize the thermal interface between the heatsink and the processor. Refer to the iMac logic board inbox notice 073-1158 for additional information.
July 2006
A diecut piece of microfoam (922-7671) is included with all replacement optical drives and display bezels. It should be installed in between the disc drive and the display bezel to prevent optical media from ejecting out of the system and dropping to the desktop. Only one diecut of microfoam should be used per system. Refer to the replacement procedures in Take Apart for either the optical drive, display bezel, or microfoam shim for more information.
Display/Bezel Assembly Elimination
Effective July 24, 2006, the Display and Bezel assembly module will no longer be available as a single service part for the iMac G5 (17and 20-inch models). The Display and Bezel are now available as two separate service parts (see below) to simplify inventory and reduce repair costs.
•922-7275 Front Cover Assy,w/Optical Slot,iMac G5 17"
•661-3626 Panel,Display w/Brackets,iMac G5 17"
May 2005: New Procedures and Service Parts
•Fans, Upper
•Fan, Lower
•Logic board
•Speakers
•Microphone
•AirPort/Bluetooth Combo card
•Soft modem
•Chassis
•Antennas
General Information |
iMac G5, 17-inch, Ambient Light Sensor |

• LED light pipe
2 - iMac G5, 17-inch, Ambient Light Sensor Take Apart |
General Information |

Tools Required
The following tools are required to service the computer:
•Phillips #2 screwdriver
•Phillips #1 screwdriver
•Flat-blade screwdriver
•Torx T6, T8, and T10 screwdriver
•Jeweler’s flat-blade screwdriver
•Nylon probe tool (black stick 922-5065)
•Needlenose pliers
•Soft cloth (to protect removed parts from scratches)
General Information |
iMac G5, 17-inch, Ambient Light Sensor |

Important Things to Know
1.These instructions cover the iMac G5, 17-inch, Ambient Light Sensor model; however, the procedures from the original 17-inch model are very similar. In some steps graphics from the original model may be used.
2.All customer removable screws are brass colored (except for some fan screws on earlier units which use torx screws). Do not remove screws unless they are brass colored, or you will void your warranty.
3.Ground yourself when working on the computer. The procedure will show you how to ground yourself.
4.A magnetized “L”-shaped Phillips screwdriver is included with the replacement part.
5.The midplane is no longer offered as a service part or as a Do-it-Yourself repair. Most parts on the midplane are now available as individual service parts.
6.Additional items are included with these service parts:
Back Cover
–Two blank labels are included with the replacement back cover. Copy the serial number and Ethernet number off the bottom of the computer’s foot and attach the new labels to the bottom of the replacement foot. The back cover take apart procedure will show you where to attach the labels.
7.Do not pull on individual wires when disconnecting a part; pull on the connector.
8.A screw chart is attached at the end of this document. Use the chart to identify screw type and screw locations.
4 - iMac G5, 17-inch, Ambient Light Sensor Take Apart |
General Information |
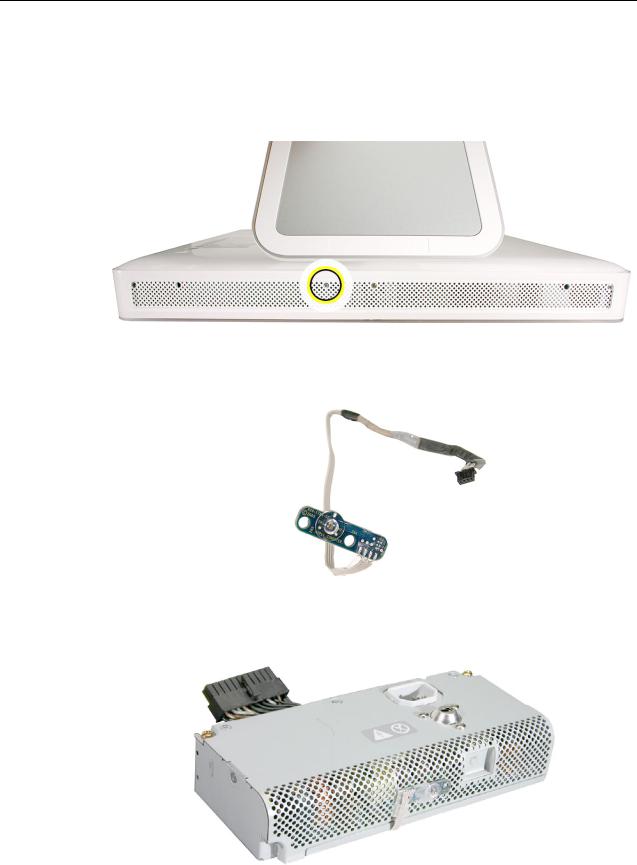
Ambient Light Sensor
The new iMac G5 has an ambient light sensor. It’s located on the bottom of the display bezel, near the case screws. Look at the picture below. Next to the middle screw is a small bump protruding from the case. This is the ambient light sensor.
The ambient light sensor attaches to the power supply with two plastic rivets.
The ambient light sensor cable runs under the power supply and attaches to the logic board.
General Information |
iMac G5, 17-inch, Ambient Light Sensor |
Removing the Back Cover
Tools Required
Use the screwdriver provided, or a Phillips #2 screwdriver
Procedure
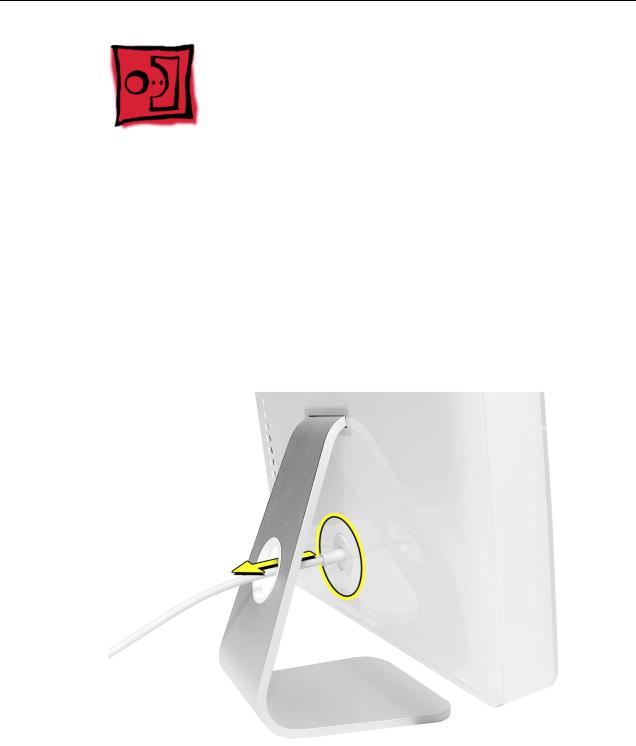
1.Turn your computer off by choosing Shut down from the Apple (K) menu.
2.Disconnect all cables, and unplug the power cord from your computer. Put on your ESD Wrist strap.
6 - iMac G5, 17-inch, Ambient Light Sensor Take Apart |
Removing the Back Cover |

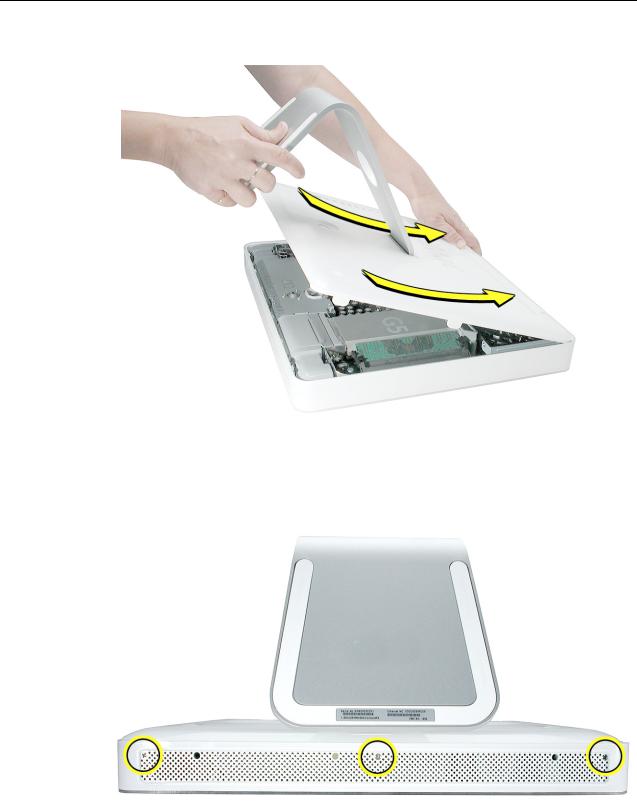
3.Place a soft, clean towel or cloth on the desk or surface. Hold the sides of the computer and slowly lay the computer face down as shown.
4.Locate the three silver case screws circled below. You may have to lift the stand to locate the middle case screw. Note: These screws are captive; they are part of the display/bezel assembly and cannot be removed.
Using the tool provided, or a Phillips #2 screwdriver, loosen the three captive screws. Turn the screws to the left until they stop turning. Don’t force the screws once they stop turning.
Removing the Back Cover |
iMac G5, 17-inch, Ambient Light Sensor |
5.Holding the back cover by the metal stand, tilt the cover up and lift it off the computer. Set the back cover aside.
8 - iMac G5, 17-inch, Ambient Light Sensor Take Apart |
Removing the Back Cover |
Replacing the Back Cover
Tools Required
Use the screwdriver provided, or a Phillips #2 screwdriver
Procedure
1.Remove the replacement back cover and foot from its packaging.
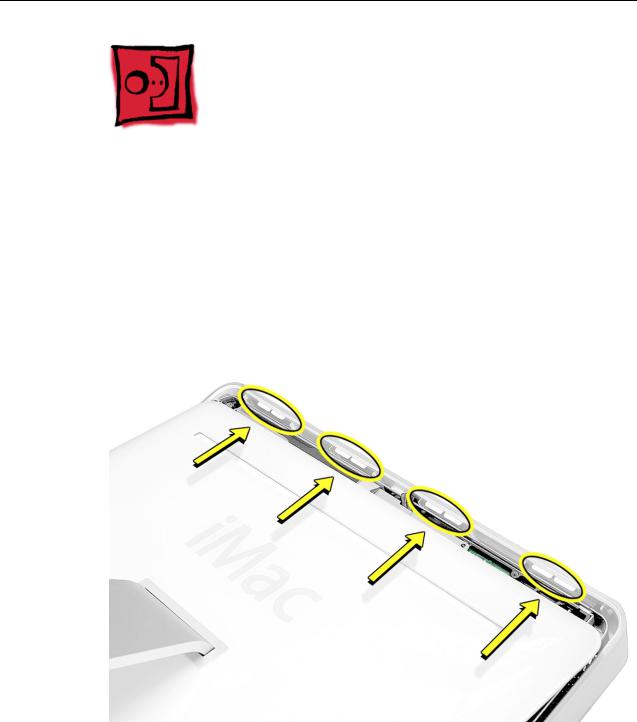
2.Replace the cover so that the slots on the top edge of the back cover mate with the tabs on the display housing.
Replacing the Back Cover |
iMac G5, 17-inch, Ambient Light Sensor |
3. Lower and press the cover into place until it fits snugly on the computer.
4.Tighten the three captive case screws by turning them to the right. Don’t overtighten the screws.
10 - iMac G5, 17-inch, Ambient Light Sensor Take Apart |
Replacing the Back Cover |

5.Make sure the case is not bowing along the bottom or sides. If it is, check that the optical drive and cables are seated properly. There should be no gaps around the edges when the screws are tightened.
6.Position the computer in the upright position. Reconnect the power cord and remaining cables. Turn on the computer.
Replacing the Back Cover |
iMac G5, 17-inch, Ambient Light Sensor |
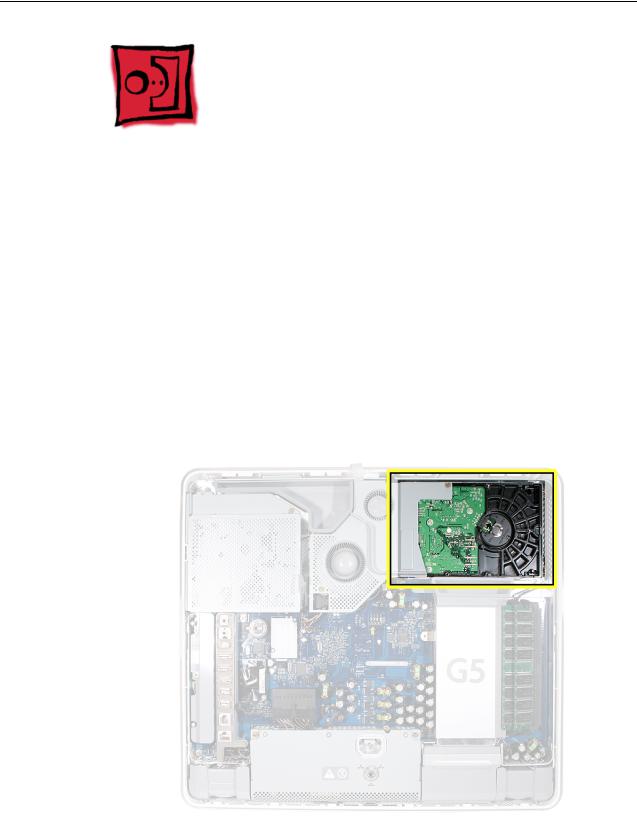
Hard Drive
Tools Required
•Use the screwdriver provided, or a Phillips #2 screwdriver, preferably with a magnetized tip
•Flat-blade screwdriver
•Screw tray or something equivalent to hold the screws
Preliminary Steps
Before you begin, remove the back cover.
Part Location
12 - iMac G5, 17-inch, Ambient Light Sensor Take Apart |
Hard Drive |
Removing the Hard Drive
1.To access the hard drive you must first remove other service modules. This procedure will show you how to remove and replace these modules. Note: As you remove each module, set it aside, along with the screws for that module.
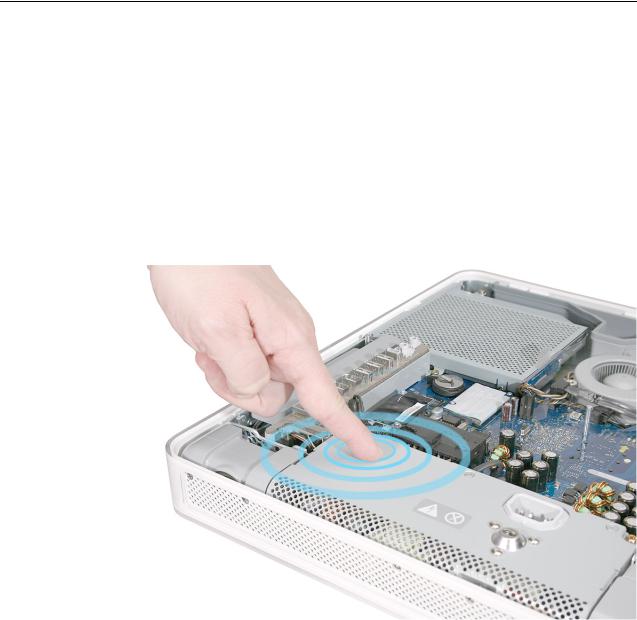
2.Ground yourself. Touch the metal surface (as shown below) on the inside of the computer to discharge any static electricity.
Warning: Always discharge static electricity before you touch any parts or install any components inside the computer. To avoid generating static electricity, do not walk around the room until you have finished installing the part and closed the computer.
Hard Drive |
iMac G5, 17-inch, Ambient Light Sensor |
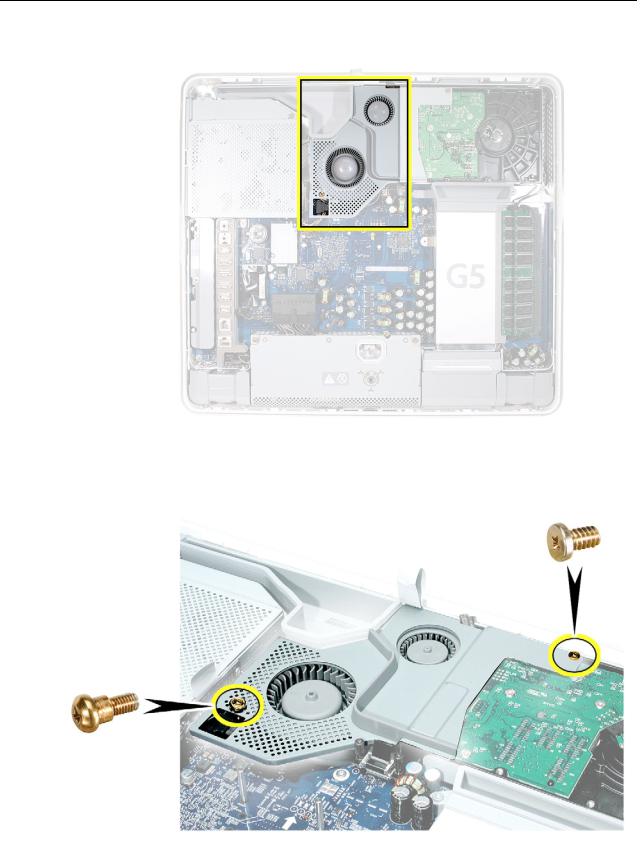
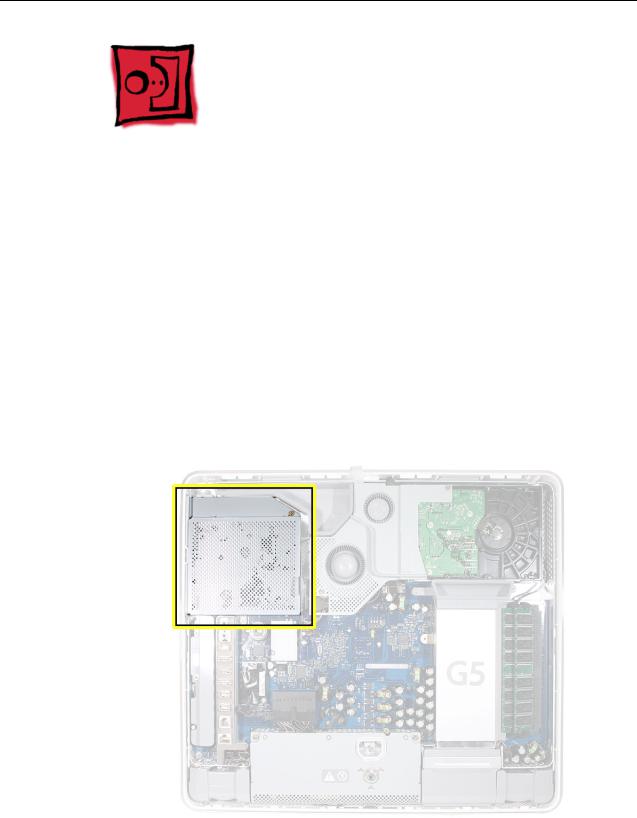
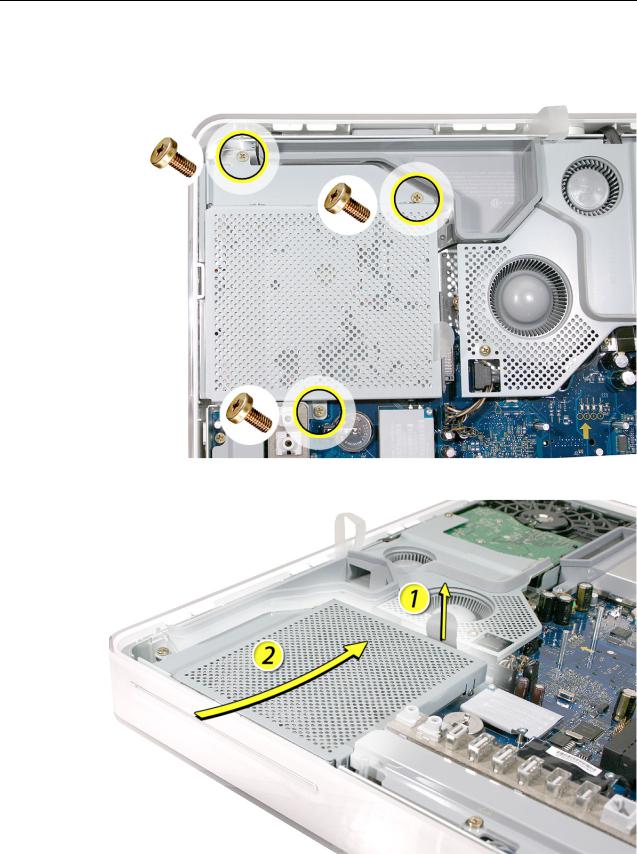
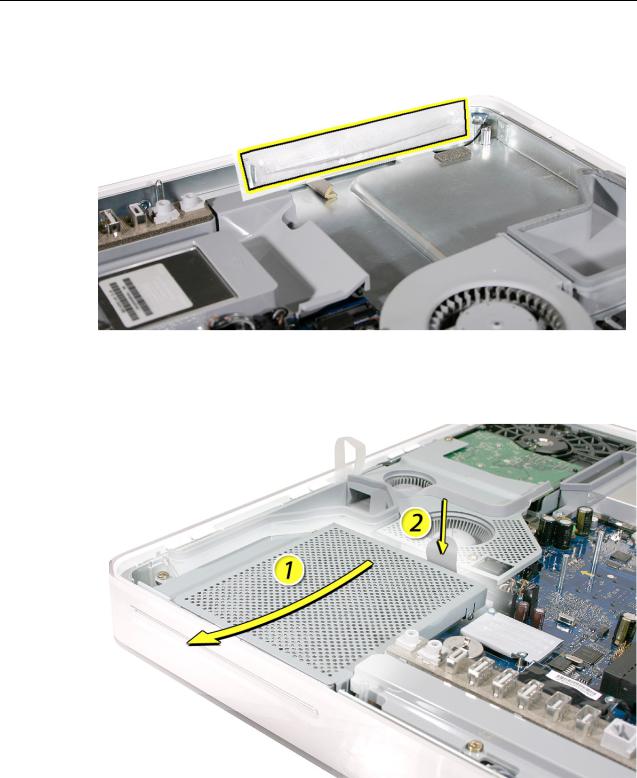
3. Locate the fan cover near the top of the computer.
4.Using the tool provided, or a Phillips #2 screwdriver, remove the two fan cover screws. Lift the fan cover off the computer. Set the screws and fan cover aside.
14 - iMac G5, 17-inch, Ambient Light Sensor Take Apart |
Hard Drive |

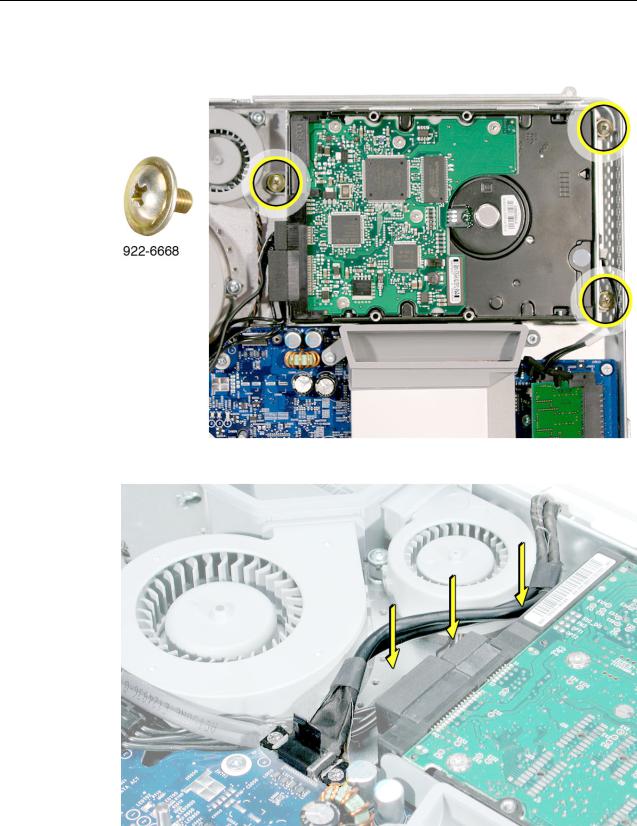
5. Locate the hard drive in the top right corner.
6.Move the black video cable (located to the left of the hard drive) out of the way to access a hard drive screw.
Hard Drive |
iMac G5, 17-inch, Ambient Light Sensor |

4. Remove the three hard drive screws. Set the screws aside.
5.Carefully lift the hard drive straight up, about one inch, and disconnect the black cable from the white connector on the hard drive. Note: Leave the other end of the cable attached to the logic board.
16 - iMac G5, 17-inch, Ambient Light Sensor Take Apart |
Hard Drive |
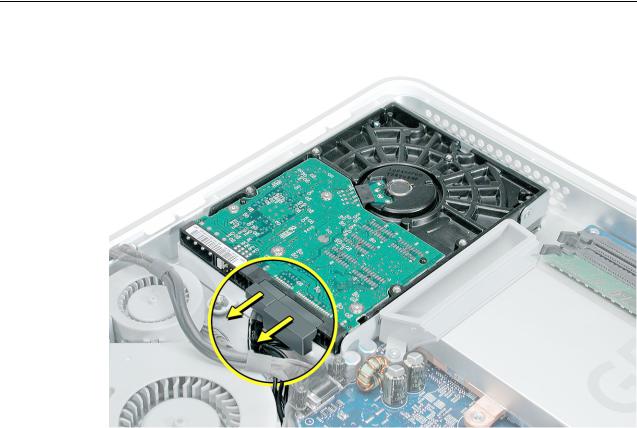
6.Using your fingers, or a flat-blade screwdriver, disconnect the drive data cable and power cable from the hard drive.
7.Lift the hard drive up and out of the midplane assembly.Important: Return this hard drive to Apple in the packaging provided.
Hard Drive |
iMac G5, 17-inch, Ambient Light Sensor |
Replacing the Hard Drive
1.Remove the replacement hard drive from its packaging.
2.Connect the drive data cable and power cable to the hard drive. Lower the hard drive into place on the midplane.
3. Connect the black cable to the white connector on end of the hard drive.
18 - iMac G5, 17-inch, Ambient Light Sensor Take Apart |
Hard Drive |
4. Replace the three hard drive screws.
5. Tuck the black video cable into the area shown by the arrows.
Hard Drive |
iMac G5, 17-inch, Ambient Light Sensor |

6. Press the video cable into the notch on the midplane chassis.
4.Replace the two fan cover screws. The larger screw attaches on the left. Note: Make sure the pull tab is sticking up as shown
20 - iMac G5, 17-inch, Ambient Light Sensor Take Apart |
Hard Drive |
Optical Drive
Tools Required
•Use the screwdriver provided, or a Phillips #2 screwdriver, preferably with a magnetized tip
•Screw tray or equivalent to hold the screws
Preliminary Steps
Before you begin, remove the back cover.
Part Location
Note: The education models do not have an optical drive.
Optical Drive |
iMac G5, 17-inch, Ambient Light Sensor |

Removing the Optical Drive
1.Ground yourself. Touch the metal surface (as shown below) on the inside of the computer to discharge any static electricity.
Warning: Always discharge static electricity before you touch any parts or install any components inside the computer. To avoid generating static electricity, do not walk around the room until you have finished installing the part and closed the computer.
22 - iMac G5, 17-inch, Ambient Light Sensor Take Apart |
Optical Drive |
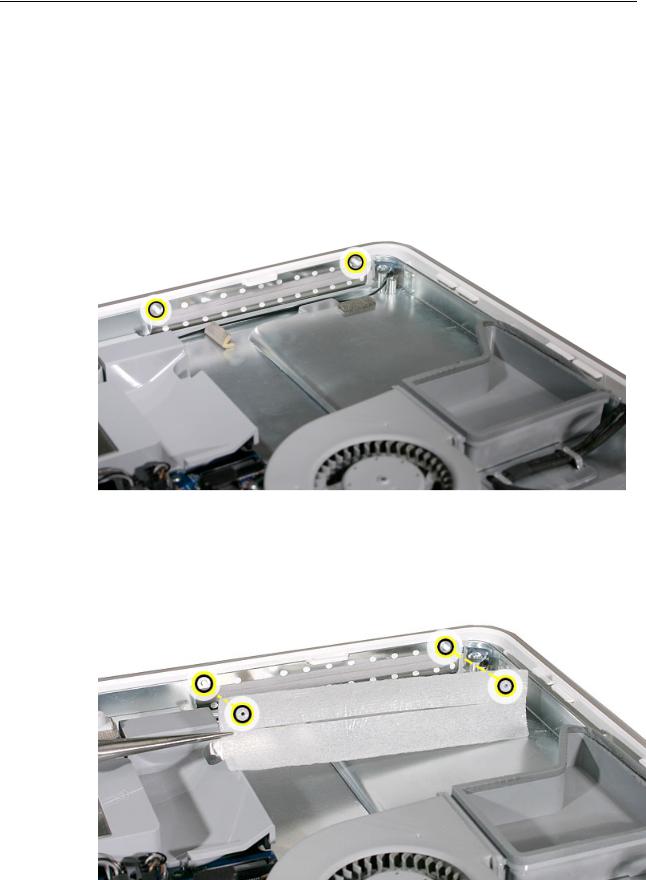
4.Using a Phillips #2 screwdriver, remove the three optical drive screws circled below. Set the screws aside.
5. Pull the optical drive tab straight up and then to the right. Set the optical drive aside.
Optical Drive |
iMac G5, 17-inch, Ambient Light Sensor |
Replacing the Optical Drive
1.Note: A microfoam insert is included with the replacement optical drive and should be installed using the instructions included below. The microfoam insert will prevent optical media from ejecting out of the system and dropping to the desktop. Only one microfoam insert should be used per system
2.Locate the enclosed piece of white microfoam and the two white posts (circled) on the bezel.
3.With the shiny side of the microfoam facing the bezel, slide the holes of the microfoam onto the two white posts on the bezel.
24 - iMac G5, 17-inch, Ambient Light Sensor Take Apart |
Optical Drive |
4. Tuck the mircofoam into place before installing the optical drive.
5.Remove the replacement optical drive from its packaging.
6.Holding the optical drive by the back end (near the tab), insert the drive at an angle to mate the bezel with the optical drive.
Optical Drive |
iMac G5, 17-inch, Ambient Light Sensor |

7. Replace the three optical drive screws.
8.Make sure no microfoam is sticking out of the bezel. Note: Before reassembling the computer, partially insert an optical disc to make sure it inserts smoothly.
26 - iMac G5, 17-inch, Ambient Light Sensor Take Apart |
Optical Drive |

Microfoam Shim
Tools Required
•Use the screwdriver provided, or a Phillips #2 screwdriver, preferably with a magnetized tip
•Screw tray or equivalent to hold the screws
Preliminary Steps
Before you begin, remove the back cover and the optical drive.
Part Location
Note: The education models do not have an optical drive.
Microfoam Shim |
iMac G5, 17-inch, Ambient Light Sensor |
Loading...