


 Loading...
AppleShare IP 6.1
Getting Started
Includes preparation, installation, and setup information
K Apple Computer, Inc.
© 1998 Apple Computer, Inc. All rights reserved.
Under the copyright laws, this manual may not be copied, in whole or in part, without the written consent of Apple. Your rights to the software are governed by the accompanying software license agreement.
The Apple logo is a trademark of Apple Computer, Inc., registered in the U.S. and other countries. Use of the “keyboard” Apple logo (Option-Shift-K) for commercial purposes without the prior written consent of Apple may constitute trademark infringement and unfair competition in violation of federal and state laws.
Every effort has been made to ensure that the information in this manual is accurate. Apple is not responsible for printing or clerical errors.
Apple Computer, Inc. 1 Infinite Loop
Cupertino, CA 95014-2084 408-996-1010 http://www.apple.com
Apple, the Apple logo, AppleShare, AppleTalk, LaserWriter, LocalTalk, Mac, MacDNS, Macintosh, MacTCP, OpenDoc, and Power Macintosh are trademarks of Apple Computer, Inc., registered in the U.S. and other countries.
At Ease, Finder, and The Apple Store are trademarks of Apple Computer, Inc.
Netscape Navigator is a trademark of Netscape Communications Corporation.
NuBus is a trademark of Texas Instruments.
Windows is a registered trademark of Microsoft Corporation.
PostScript is a trademark of Adobe Systems Incorporated or its subsidiaries and may be registered in certain jurisdictions.
PowerPC and the PowerPC logo are trademarks of International Business Machines Corporation, used under license therefrom.
UNIX is a registered trademark in the United States and other countries, licensed exclusively through X/Open Company, Ltd.
Other company and product names mentioned herein are trademarks of their respective companies. Mention of third-party products is for informational purposes only and constitutes neither an endorsement nor a recommendation. Apple assumes no responsibility with regard to the performance or use of these products.
Simultaneously published in the United States and Canada.

Contents
Preface |
|
|
|
|
|
|
|
Welcome to AppleShare IP 6.1 |
5 |
|
|||||
AppleShare IP Software Components |
5 |
|
|
||||
After You Read This Manual |
7 |
|
|
|
|
|
|
Using the Onscreen Help |
7 |
|
|
|
|
|
|
Learning About the Mac OS |
7 |
|
|
|
|
||
Learning About AppleShare IP |
8 |
|
|
|
|||
1 Installing Your Software |
9 |
|
|
|
|||
Planning Your AppleShare IP Services |
9 |
|
|
||||
Preparing Your Computer’s Environment |
10 |
|
|||||
Security 10 |
|
|
|
|
|
|
|
System Requirements |
10 |
|
|
|
|
|
|
If You Are Upgrading Your AppleShare Software 11 |
|||||||
Preparing Your Computer for AppleShare IP |
12 |
||||||
Backing Up Necessary Files |
12 |
|
|
|
|||
Installing Mac OS 8.5 |
13 |
|
|
|
|
|
|
Creating Network Settings |
|
14 |
|
|
|
|
|
Setting Up Energy Saver |
23 |
|
|
|
|
||
Verifying the Computer’s Date, Time, and Time Zone 24 |
|||||||
Installing AppleShare IP Software |
25 |
|
|
|
|||
Installed Files 25 |
|
|
|
|
|
|
|
Performing a Recommended Installation |
27 |
||||||
Performing a Customized Installation |
28 |
|
|||||
3
2 Setting Up AppleShare IP |
31 |
|
|
|
|
|||
Using AppleShare IP Easy Setup |
31 |
|
|
|
|
|
||
Normal Setup |
34 |
|
|
|
|
|
|
|
Custom Setup |
36 |
|
|
|
|
|
|
|
AppleTalk Setup |
42 |
|
|
|
|
|
|
|
Using AppleShare IP for the First Time |
45 |
|
|
|
||||
Registering a User for the First Time |
46 |
|
|
|
||||
Setting Up Share Points for the First Time |
49 |
|
|
|||||
Setting Up Web Service for the First Time |
52 |
|
|
|||||
Setting Up Windows File Sharing for the First Time |
54 |
|||||||
Setting Up Remote Administration for the First Time |
56 |
|||||||
Setting Up the Mail Server for the First Time |
58 |
|
||||||
Setting Up the Print Server for the First Time |
61 |
|
||||||
Getting Users Ready 64 |
|
|
|
|
|
|
|
|
Upgrading Mac OS Clients |
65 |
|
|
|
|
|
||
Mac OS Client Services |
66 |
|
|
|
|
|
|
|
Windows Client Services |
66 |
|
|
|
|
|
||
Appendix |
|
|
|
|
|
|
|
|
Changing the Startup Disk |
69 |
|
|
|
||||
4Contents

P R E F A C E
Welcome to AppleShare IP 6.1
This book explains how to install and set up AppleShare IP 6.1 and Mac OS 8.5 system software. A separate book, Mac OS 8.5 Installation Manual, provides additional information on Mac OS 8.5. See that book if you need more help installing the Mac OS.
AppleShare IP is a general purpose suite of server software that provides a variety of network services. AppleShare IP provides file sharing, World Wide Web, mail, and print services to clients on local area networks (LANs), intranets, and the Internet. With AppleShare IP, your server can handle a large number of clients, and you can control security, define the type of access for clients, and monitor your server’s activity.
New key features in AppleShare IP 6.1 include Mac OS 8.5 compatibility, the ability to administer your server remotely (from any Web browser–capable Macintosh or PC– compatible computer), TCP Filter software for extra security, ability to host multiple Web sites on a server, file sharing performance improvements, ability to log in to a user’s account with the administrator’s password, support for shared mail folders (over IMAP), a First Aid tool for repairing key AppleShare IP data files, and LaserWriter 8.6.1 support (which provides password-protected printing).
AppleShare IP Software Components
Here is a brief description of the AppleShare IP suite of products and where to find help for using them. (To learn how to access Help onscreen, see “Using the Onscreen Help” on page 7.)
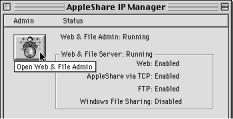
mThe AppleShare IP Web & File Server program allows your computer to host a Web site and provides three types of file sharing services: AppleShare File Sharing (using the Apple Filing Protocol, or AFP) via TCP/IP or AppleTalk networks, Windows File Sharing (using the SMB/CIFS protocol via TCP/IP), and File Transfer Protocol (FTP). You manage Web and file services on your server using the Web & File Admin program.
Help is available onscreen in Tips and AppleShare IP Help.
5
mThe AppleShare IP Mail Server program provides integrated mail storage and mail forwarding services over TCP/IP and AppleTalk networks, including support for Internet Message Access Protocol (IMAPv4), Post Office Protocol (POP), and Simple Mail Transfer Protocol (SMTP). You manage mail services on your server using the Mail Admin program.
Help is available onscreen in Tips and AppleShare IP Help.
mThe AppleShare IP Print Server program manages communication with the printers on your AppleTalk or TCP/IP network by allowing the server to act as a repository for print jobs. You can also set up secure print queues to control who can print. You manage print services on your server using the Print Admin program.
Help is available onscreen in Tips and AppleShare IP Help.
mAppleShare Client 3.8.1, while not required, provides the best AppleShare file sharing performance when installed on Mac OS client computers.
Instructions and system requirements are available in the AppleShare Client 3.8 User’s Manual (inside the AppleShare Client folder) on your AppleShare IP CD-ROM disc.
mAppleShare IP Remote Administration allows you to remotely manage many AppleShare IP services from any computer connected to your network using any standard Web browser.
Help is available onscreen in AppleShare IP Remote Help.
mTCP Filter software allows you to define filters that allow or deny access to an AppleShare IP server from specified IP addresses or domain names. You can apply filters to individual protocols (such as IMAP or FTP) or create global filters that can be applied to all TCP/IP services on your server computer.
Help is available onscreen in Tips and AppleShare IP Help.
mMacDNS software provides Domain Name System (DNS) service for your network. You may need DNS software in order to communicate with the Internet and to allow users to enter names instead of numeric IP addresses when, for example, sending e-mail.
Help is available in the MacDNS Administrator’s Guide file inside the MacDNS folder in the AppleShare IP 6.1 folder on your server’s hard disk after you’ve installed AppleShare IP.
AppleShare IP also comes with additional software to help you run your servers more effectively and efficiently. See the folders and files on your AppleShare IP CD.
6Preface

After You Read This Manual
After you use this book to install and set up AppleShare IP 6.1, see the AppleShare Client 3.8 User’s Manual in the AppleShare Client folder on your AppleShare IP CD (or in the Client Software 3.8.1 folder on your server’s hard disk) for instructions on installing the client software. Once you’ve installed and set up the appropriate software on your server and client computers, you can refer to the onscreen documentation for information about using the software.
Using the Onscreen Help
Learning About the Mac OS
What’s New
After you install your Mac OS 8.5 software, you can learn about new features and changes in the Mac OS in the What’s New in Mac OS file in the Mac OS Read Me Files folder on your hard disk.
Getting Help
The Help menu is your main source of “how to” information about the Mac OS. After you install your Mac OS software, switch to the Finder, then choose Mac OS Help from the Help menu.
If you have questions about compatibility or other late-breaking news about your software, refer to the Read Me documents in the Mac OS Read Me Files folder on your hard disk and the Mac OS CD-ROM disc.
For the latest information about the Mac OS, including troubleshooting and compatibility tips, visit the Mac OS Web site:
http://www.apple.com/macos/
Welcome to AppleShare IP 6.1 7
Learning About AppleShare IP
Your main sources of information about AppleShare IP are Tips, AppleShare IP Help, and AppleShare IP Remote Help.
After you install your AppleShare IP software, you’ll also find Read Me files and other onscreen documents in the AppleShare IP folder. These documents contain late-breaking news on AppleShare IP or instructions on how to use other software that comes with AppleShare IP.
For product updates and other information, visit the AppleShare IP Web site:
http://www.apple.com/appleshareip/
Tips
Tips unobtrusively remind you about the function of the AppleShare IP administration program buttons. To use Tips, position the pointer over a button in the window of an AppleShare IP program. The tip appears below the button.
AppleShare IP Help
AppleShare IP Help provides instructions and troubleshooting information for all of the administration programs except AppleShare IP Remote Administration. To open AppleShare IP Help while you are using an administration program, choose AppleShare IP Help from the Help menu. This opens AppleShare IP Help in your preferred Web browser. You can also open AppleShare IP Help by double-clicking its icon in the AppleShare IP 6.1 folder.
AppleShare IP Remote Help
AppleShare IP Remote Help provides instructions and troubleshooting information for all of the features of AppleShare IP Remote Administration, the application you use to administer your server from another computer. To access Help while you are using the Remote Administration application, click the Help link at the bottom of any Remote Administration page in your Web browser. You can also open AppleShare IP Remote Help by double-clicking its icon in the AppleShare IP 6.1 folder.
8Preface

C H A P T E R
1
Installing Your Software
Whether you are upgrading from a previous version of AppleShare or installing it for the first time, you need to follow the instructions in this chapter.
This chapter tells you how to
mplan your AppleShare IP services
mprepare your computer’s environment and software
minstall Mac OS 8.5 and AppleShare IP
Note: Your server should already be set up and connected to your network. If your server or network is not set up, set it up before continuing with this chapter.
Planning Your AppleShare IP Services
Depending on the services you plan to provide to your users and on how your network is set up, you’ll need to answer the following questions before you install AppleShare IP.
mWill your clients be connecting to the AppleShare IP server via AppleTalk, TCP/IP, or both?
mWhat types of clients are on your network—Mac OS, Windows, UNIX?
mWhat type of physical connection (for example, Ethernet or LocalTalk) does your AppleShare IP server have to your intranet or the Internet?
mWhat is your server’s IP address, subnet mask, router address, and name server address?
mDoes your network have a computer that provides Domain Name System (DNS) service, or will you install this service? (DNS software is provided in your AppleShare IP 6.1 folder.)
Your network administrator should be able to help you answer these questions. If you do not have a network administrator or if you need more assistance, see the TCP/IP Connections Tutorial and the Network Configuration Setup Guide in the Tutorials folder on your AppleShare IP CD. You may also want to consult an Internet service provider (ISP) to help you answer these questions before continuing with your AppleShare IP installation.
9
Preparing Your Computer’s Environment
Before you install your AppleShare IP software, you need to prepare your computer and its environment by considering security issues, system (hardware and software) requirements, and facts about upgrading.
Security
AppleShare IP uses share points, user authentication, and access privileges to protect data from unauthorized access over a network. It also provides TCP Filter software that creates a software-based firewall to block server access from computers with IP addresses you define. However, someone with physical access to your computer can bypass these types of protection. (Access privileges, for example, allow or deny access over the network; they cannot prevent someone from opening a folder directly on the computer running AppleShare IP.)
Note: Not all AppleShare IP services support these security measures to the same extent. For more information, see AppleShare IP Help after you complete the instructions in this manual.
If you have any concerns about physical security—especially if you plan to store highly confidential information—consider putting your computer in a room with controlled access.
System Requirements
System requirements for client computers are listed in the AppleShare Client 3.8 Manual on your AppleShare IP CD.
To install the AppleShare IP software, you need the following hardware and software:
mHardware: Any Power Macintosh computer or Apple Workgroup Server with a G3, 604e, 604, or 601 microprocessor, or a 6500 series computer with a 603e microprocessor.
Your computer should be set up and connected to your network.
To use the AppleTalk multihoming feature of AppleShare IP, your computer must have a Peripheral Component Interface (PCI) expansion slot. Computers with a 601 processor and NuBus™ slots cannot use AppleTalk multihoming. On networks where AppleTalk services are heavily used, AppleTalk multihoming can significantly reduce traffic and increase the speed of the Web & File Server.
The AppleShare IP Print Server works only with AppleTalk-compatible LaserWriter printers, other PostScript™ printers that support the Apple LaserWriter 8 printer driver, and TCP-compatible printers that support the LPD/LPR protocol.
mDisk space: You need approximately 75 megabytes (MB) of disk space to install all of the AppleShare IP software.
10 Chapter 1
mMemory: You need 48 MB of random access memory (RAM) with virtual memory turned on to run all of the AppleShare IP server programs simultaneously. To run all of the AppleShare IP servers without turning on virtual memory, you need a minimum of 64 MB of RAM.
mSystem software: Mac OS 8.5 is recommended and provided with your AppleShare IP software. TCP Filter software requires Mac OS 8.5; all other features require Mac OS 8.1 or later. Installation instructions for Mac OS 8.5 are provided on page 13 of this book, and in the Mac OS 8.5 Installation Manual that came with your software.
If You Are Upgrading Your AppleShare Software
If you are upgrading from AppleShare 3 or later or from Macintosh file sharing, you need to be aware of the following information about preserving files and settings.
Users & Groups
If you are upgrading from AppleShare 3 or later or from Macintosh file sharing, the registered users and groups that you’ve created are retained when you install AppleShare IP.
Share Points and Access Privileges
If you have share points (shared folders) on another computer that you’d like to move to your AppleShare IP server, first follow the instructions in this manual to install and set up AppleShare IP on the new server. Then follow the instructions for moving share points in the Web & File section of AppleShare IP Help.
Some access privileges of share points you move may not exactly match the new access privileges in AppleShare IP. They are converted to the closest match that provides the most security. See the Users & Groups section of AppleShare IP Help.
Print Queues
If you’re upgrading from AppleShare 3 or 4, you need to create new queues after you install AppleShare IP.
File Sharing and Networking Software Settings
If you are upgrading from AppleShare 3 or later, the settings in your File Sharing, AppleTalk, and TCP/IP control panels are retained. You do not need to reconfigure these control panels as described in the section “Creating Network Settings” on page 14. You do need to perform the other tasks in the section “Preparing Your Computer for AppleShare IP” on page 12 however.
Installing Your Software |
11 |
The Mail Database
If you’re upgrading your AppleShare IP 5 Mail Server, make sure your Mail Server users download all their mail before you upgrade. If you don’t empty the database before installing the new Mail Server, you’ll need to use the AppleShare IP Mail Tool 6.0 program (on the AppleShare IP 6.1 CD) to update the previous mail database to the new version after you install the new software.
Preparing Your Computer for AppleShare IP
Once your environment is ready, you need to prepare your computer for running AppleShare IP by installing and configuring the appropriate software as follows:
mback up the necessary files
minstall Mac OS 8.5
mset up your network identity
mset up AppleTalk
mset up TCP/IP
mset up TCP/IP and Remote Access (for modem access only)
mset up Energy Saver
mverify your computer’s date, time, and time zone
Backing Up Necessary Files
Depending on the file sharing program and system software version you’ve been using, you may want to make backup copies of some files or record certain information before proceeding.
mIf you’re upgrading from a previous version of AppleShare or AppleShare IP, back up your System Folder using a backup application that can copy invisible files. This allows you to restore a copy of the previous Users & Groups Data File and the AppleShare PDS file (an invisible file installed on every volume), and makes it possible to switch back to your previous version of AppleShare if you desire.
When you make your backup copy, make sure that the AppleShare IP Web & File Server is running.
mIf you’re upgrading from Macintosh file sharing, you only need to make a backup copy of your Users & Groups Data File, located in the Preferences folder inside the System Folder on your startup disk.
mIf you’re using TCP for network communication, open the TCP/IP control panel or MacTCP control panel and write down your computer’s IP address and the IP addresses of the subnet mask, routers, and name servers. You need to record this information before you upgrade your system software.
12 Chapter 1
Installing Mac OS 8.5
If your computer is using a version of system software earlier than Mac OS 8.1, you need to upgrade to a newer version of Mac OS before you install AppleShare IP. Mac OS 8.5 is provided with your software.
Before you begin the installation, turn off disk-security software that provides password protection and At Ease software. Then follow these steps:
1Insert the Mac OS 8.5 CD-ROM disc (which came with your AppleShare IP software) into your computer’s CD-ROM drive.
2Shut down your computer.
You need to do this to start up from the Mac OS CD.
3Turn on your computer while holding down the C key on your keyboard.
Your computer starts up from the CD-ROM disc. Continue holding down the C key until you see the screen with the smiling face.
If your computer doesn’t start up from the CD, see the section “You can’t start up the computer using the Mac OS CD” in the Troubleshooting part of the Mac OS 8.5 Installation Manual. Then continue with step 4 in this book.
4Double-click the Mac OS Installer icon, then follow the instructions onscreen.
5When you get to the Select Destination screen, click the Options button.
6Select the checkbox next to Perform Clean Installation, then click OK.
7Follow the remainder of the instructions onscreen to install Mac OS 8.5.
Important If you choose to perform a customized installation, make sure you select the Apple Remote Access and Internet Access options. (The Internet Access option is needed to access AppleShare IP Help and Remote Help, as well as connect to the Internet.)
8After the installation is complete, click Restart to restart your computer.
The Mac OS Setup Assistant opens.
9Use the Mac OS Setup Assistant and Internet Setup Assistant to enter system settings for your computer. Or if you prefer, you can enter these settings without the help of the Assistants by following the instructions in “Creating Network Settings” on page 14.
10Because you performed a clean installation, you need to drag any third-party software extensions and fonts from your previous System Folder to your new System Folder, or reinstall the third-party software.
For more information and troubleshooting help, see your Mac OS 8.5 Installation Manual.
Installing Your Software |
13 |
Creating Network Settings
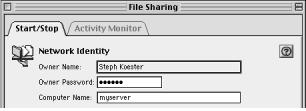
Setting Your Network Identity
You need to set your network identity and password in the File Sharing control panel before you can log on to the servers and make yourself the default owner of shared disks.
Note: If you used the Mac OS Setup Assistant after installing Mac OS 8.5, you can skip ahead to “Setting Up Energy Saver” on page 23.
Important After you’ve installed AppleShare IP, you won’t be able to change your network identity in the File Sharing control panel. You can change these settings in AppleShare IP, or by using the Mac OS Setup Assistant that came with your Mac OS software.
To set up the File Sharing control panel, follow these steps:
1Open the File Sharing control panel.
2Click the Start/Stop tab to see the Network Identity section.
3Type your name in the Owner Name text box and press the Tab key.
You’ll use this name when you log on to administer an AppleShare IP server. It will also be the owner name for any items that you share. The name is not case-sensitive.
4Type your password in the Owner Password text box and press Tab.
The password can be up to eight characters long and is case-sensitive. This is the default password you enter to use the AppleShare IP administration programs.
5Type a name for your server in the Computer Name text box.
The name can be up to 31 characters long and can contain any character except a colon (:), equal sign (=), or Option-x (ª). This name will appear in the Chooser.
6Close the File Sharing control panel.
Your changes are saved and take effect immediately.
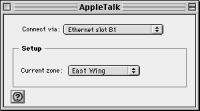
Setting Up AppleTalk
To provide file sharing, print, or mail services over AppleTalk, you need to set your AppleTalk network connection in the AppleTalk control panel.
14 Chapter 1
Note: If you used the Mac OS Setup Assistant after installing Mac OS 8.5, you can skip ahead to “Setting Up Energy Saver” on page 23.
To set up the AppleTalk control panel, follow these steps:
1Open the AppleTalk control panel.
2Choose the network connection type that you want AppleTalk to use from the “Connect via” pop-up menu.
This setting determines the default port that your server will use to connect to your AppleTalk network.
If the default port becomes unavailable (for example, if your Ethernet cable becomes loose), AppleTalk will choose another available network connection type.
3If your network has zones, choose the zone for your AppleShare IP Web & File Server from the “Current zone” pop-up menu.
Zones are groups of devices arranged according to logical categories, such as usage or geography. If your network has a router (a device used to connect networks), then it has zones. Your server will appear in this zone in the Chooser.
If your network does not have a router, all computers connected to the network are in the same zone, and you see “no zones available” instead of the pop-up menu.
4Close the AppleTalk control panel and save your changes. Your changes are saved and take effect immediately.
Setting Up TCP/IP
For users to share files over TCP, visit your Web site, print over TCP, or use TCP-based client mail or FTP applications, and for you to use the TCP Filter software, you need to set your computer’s network connections in the TCP/IP control panel. However, you don’t need to follow the instructions in this section if
myou completed the Internet Setup Assistant after installing Mac OS 8.5. Skip ahead to “Setting Up Energy Saver” on page 23.
myour Internet service provider gave you software that automatically configures your TCP/ IP control panel. Skip ahead to “Setting Up Energy Saver” on page 23.
Installing Your Software |
15 |

myou have already set up your TCP/IP control panel. If you will be running any AppleShare IP services with a modem (or “dial-up”) connection to the Internet, skip ahead to “Setting Up TCP/IP and Remote Access (for Modem Access Only)” on page 17. If you won’t be using a modem connection, skip ahead to “Setting Up Energy Saver” on page 23.
To set up the TCP/IP control panel, follow these steps:
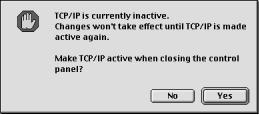
1Open the TCP/IP control panel.
If TCP/IP is inactive, the following message appears.
2Click Yes.
3Choose User Mode from the Edit menu.
4In the User Mode window, click Basic, if it’s not already chosen. Then click OK. The TCP/IP window shows the basic TCP/IP options.
5Choose the network connection you are using to connect over TCP/IP from the “Connect via” pop-up menu.
This setting determines the port that your server will use to connect to your TCP/IP network.
6Choose Manually from the Configure pop-up menu.
16 Chapter 1
7Type the IP address for your AppleShare IP server in the IP Address text box.
An IP (Internet Protocol) address is a set of four numbers from 0 to 255, separated by dots (for example, 172.16.54.2). It identifies your server on the network. Your network administrator or Internet service provider should provide this address. For more information, see the TCP/IP Connections Tutorial in the Tutorials folder on your AppleShare IP CD.
Important Each computer has a unique IP address. Entering an incorrect address or the IP address of another computer can cause problems with your computer and with the network.
8Type your network’s subnet mask in the “Subnet mask” text box.
Like an IP address, a subnet mask is a set of four numbers from 0 to 255, separated by dots (for example, 222.222.222.0). Your network administrator or Internet service provider should provide you with this information. If you leave this box blank, you will be assigned a default subnet mask.
9If your network has a router, type its IP address in the “Router address” text box.
A router is a device that connects two or more networks and directs information along the most efficient or appropriate network path.
10Type the IP address of your network’s DNS server in the “Name server addr” text box.
A DNS server lets users identify computers by name instead of by IP address. If you specify more than one server, press Return after typing each server’s address.
If no other computer on your network provides DNS service, you can install MacDNS, an implementation of DNS for the Mac OS. AppleShare IP Easy Setup (described in Chapter 2) will set up and start MacDNS on your server. If you plan to use MacDNS, type the IP address of the computer on which you will install MacDNS in the “Name Server Address” text box.
Important For users to be able to identify computers by name, and for mail services to work properly, your network must have a domain name server.
11Close the TCP/IP control panel and save the changes you have made. Your changes take effect immediately.
Setting Up TCP/IP and Remote Access (for Modem Access Only)
If you will use this computer to run any of the AppleShare IP services with a modem (or “dialup”) connection to the Internet, you need to set up the TCP/IP control panel and the Remote Access control panel.
Note: If your server uses a modem for TCP/IP connections, only AppleTalk-based services will be available on your local network unless you have an Internet router.
Installing Your Software |
17 |
If you’re using a dial-up connection, you probably have an account with an Internet service provider that assigned you one or more IP addresses. How you set up TCP/IP and Remote Access depends on whether your Internet service provider assigned your server a static or dynamic IP address.
With static addressing, each computer on your network has a unique IP number. With dynamic addressing, an IP address is assigned to each computer each time it connects to your ISP. Using a dynamic IP address for your server has the following effects on the Web & File Server:
mMac OS clients on your network will not be able to use TCP/IP to connect to the AppleShare IP Web & File Server. Instead, they will have to use AppleTalk.
mWindows clients will not be able to connect to the Web & File Server.
mUsers will be unable to visit your Web site.
mUsers will not be able to use FTP to connect to the AppleShare IP Web & File Server.
Because of the disadvantages of using dynamic addresses, it’s recommended that you obtain a static IP address for each computer on which you will install AppleShare IP services.
If your computer uses a modem to connect to your Internet service provider and has a static IP address, follow these steps to set up TCP/IP and Remote Access:
1Open the TCP/IP control panel.
If TCP is inactive, a message appears.
2Click Yes.
3Choose User Mode from the Edit menu.
4In the User Mode window, click Basic, if it’s not already chosen. Then click OK. The TCP/IP window shows the basic TCP/IP options.
18 Chapter 1

5Choose PPP from the “Connect via” pop-up menu.
PPP stands for “Point-to-Point Protocol,” the protocol used for remote access.
6 Choose Manually from the Configure pop-up menu.
7 Type your computer’s IP address in the IP Address text box, and the IP addresses of your ISP’s domain name server in the “Name server addr” text box.
Your ISP will provide the addresses. For information about these settings, see steps 7 and 10 in “Setting Up TCP/IP” on page 15.
8Close the TCP/IP control panel and save the changes you have made.
Your changes take effect immediately. Next you need to set up the Remote Access control panel.
9Open the Remote Access control panel (or the PPP control panel if you are using Mac OS 8.1).
Installing Your Software |
19 |
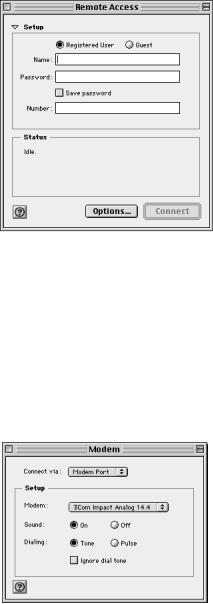
The Remote Access control panel appears.
10Click the Registered User button.
11In the Name text box, type the name your ISP assigned to you.
12In the Password text box, type the password your ISP assigned to you.
13Select the Save Password checkbox.
14In the Number text box, type the phone number of your ISP.
15Choose Modem from the Remote Access menu (or the PPP menu if you’re using Mac OS 8.1).
The Modem control panel appears.
16Choose the port to which your modem is connected from the “Connect via” pop-up menu.
17Choose the name of your modem from the Modem pop-up menu.
20 Chapter 1
If you do not see your modem listed, you need to install your modem software. See the documentation that came with your modem.
18If you want to hear the modem when it dials, click the On button next to Sound.
19If the telephone line that your modem uses supports tone dialing, click Tone. Otherwise, click Pulse.
20If the modem should not wait for a dial tone before it begins dialing, select “Ignore dial tone.”
21Close the Modem window.
22In the Remote Access window (or PPP window in Mac OS 8.1), click the Options button. The Options window appears.
23If you want the modem to redial automatically when it fails to connect, choose “Redial main number only” from the Redial pop-up menu.
Enter the number of times you want the modem to redial and the number of seconds to wait between attempts.
Installing Your Software |
21 |
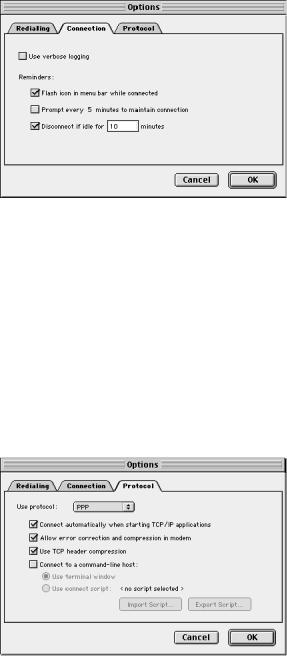
24Click the Connection tab.
The following window appears.
25Select “Disconnect if idle.”
To change the default of 10 minutes, type a different number in the text box.
Note: The Mail Server will disconnect as soon as it has completed checking for or sending mail.
26If you are using Mac OS 8.1, select “Connect automatically when starting TCP/IP applications.” Then skip to step 29. (If you are using Mac OS 8.5, skip to step 27.)
Enabling this feature allows the Mail Server to maintain an open connection with the DNS server so that it can obtain DNS information as needed (to send outgoing mail or check for incoming mail).
27Click the Protocol tab, then choose PPP from the pop-up menu. The following window appears.
22 Chapter 1
Loading...