


Owner's Manual

SPECIAL MESSAGE SECTION
This product utilizes an external power supply (adapter). DO NOT connect this product to any power supply or adapter other than one described in the manual, on the name plate, or specifically recommended by Yamaha.
WARNING: Do not place this product in a position where anyone could walk on, trip over, or roll anything over power or connecting cords of any kind. The use of an extension cord is not recommended! If you must use an extension cord, the minimum wire size for a 25' cord (or less) is 18 AWG. NOTE: The smaller the AWG number, the larger the current handling capacity. For longer extension cords, consult a local electrician.
This product should be used only with the components supplied or; a cart, rack, or stand that is recommended by Yamaha. If a cart, etc., is used, please observe all safety markings and instructions that accompany the accessory product.
SPECIFICATIONS SUBJECT TO CHANGE:
The information contained in this manual is believed to be correct at the time of printing. However, Yamaha reserves the right to change or modify any of the specifications without notice or obligation to update existing units.
Do not attempt to service this product beyond that described in the user-maintenance instructions. All other servicing should be referred to qualified service personnel.
This product, either alone or in combination with an amplifier and headphones or speaker/s, may be capable of producing sound levels that could cause permanent hearing loss. DO NOT operate for long periods of time at a high volume level or at a level that is uncomfortable. If you experience any hearing loss or ringing in the ears, you should consult an audiologist. IMPORTANT: The louder the sound, the shorter the time period before damage occurs.
Some Yamaha products may have benches and/ or accessory mounting fixtures that are either supplied with the product or as optional accessories. Some of these items are designed to be dealer assembled or installed. Please make sure that benches are stable and any optional fixtures (where applicable) are well secured BEFORE using. Benches supplied by Yamaha are designed for seating only. No other uses are recommended.
NOTICE:
Service charges incurred due to a lack of knowledge relating to how a function or effect works (when the unit is operating as designed) are not covered by the manufacturer’s warranty, and are therefore the owners responsibility. Please study this manual carefully and consult your dealer before requesting service.
ENVIRONMENTAL ISSUES:
Yamaha strives to produce products that are both user safe and environmentally friendly. We sincerely believe that our products and the production methods used to produce them, meet these goals. In keeping with both the letter and the spirit of the law, we want you to be aware of the following:
Disposal Notice:
Should this product become damaged beyond repair, or for some reason its useful life is considered to be at an end, please observe all local, state, and federal regulations that relate to the disposal of products that contain lead, batteries, plastics, etc. If your dealer is unable to assist you, please contact Yamaha directly.
NAME PLATE LOCATION:
The name plate is located on the bottom of the product. The model number, serial number, power requirements, etc., are located on this plate. You should record the model number, serial number, and the date of purchase in the spaces provided below and retain this manual as a permanent record of your purchase.
Model
Serial No.
Purchase Date
PLEASE KEEP THIS MANUAL
93-DC
* Please make a note of the model number, the serial number and the purchase date.

PRECAUTIONS
PLEASE READ CAREFULLY BEFORE PROCEEDING
* Please keep this manual in a safe place for future reference.
 WARNING
Always follow the basic precautions listed below to avoid the possibility of serious injury or even death from electrical shock, short-circuiting, damages, fire or other hazards. These precautions include, but are not limited to, the following:
Cables
•Check the USB terminal periodically and remove any dirt or dust which may have accumulated on it.
•Do not place the cable near heat sources such as heaters or radiators, and do not excessively bend or otherwise damage the cable, place heavy objects on it, or place it in a position where anyone could walk on, trip over, or roll anything over it.
Do not open
•Do not open the instrument or attempt to disassemble the internal parts or modify them in any way. The instrument contains no user-serviceable parts. If it should appear to be malfunctioning, discontinue use immediately and have it inspected by qualified Yamaha service personnel.
Water warning
•Do not expose the instrument to rain, use it near water or in damp or wet conditions, or place containers on it containing liquids which might spill into any openings.
•Never insert or remove an electric plug with wet hands.
Fire warning
•Do not put burning items, such as candles, on the unit. A burning item may fall over and cause a fire.
If you notice any abnormality
•If the USB cable becomes frayed or damaged, or if there is a sudden loss of sound during use of the instrument, or if any unusual smells or smoke should appear to be caused by it, disconnect the USB terminal, and have the instrument inspected by qualified Yamaha service personnel.
 CAUTION
Always follow the basic precautions listed below to avoid the possibility of physical injury to you or others, or damage to the instrument or other property. These precautions include, but are not limited to, the following:
Location
•Do not expose the instrument to excessive dust or vibrations, or extreme cold or heat (such as in direct sunlight, near a heater, or in a car during the day) to prevent the possibility of panel disfiguration or damage to the internal components.
•Do not use the instrument in the vicinity of a TV, radio, stereo equipment, mobile phone, or other electric devices. Otherwise, the instrument, TV, or radio may generate noise.
•Do not place the instrument in an unstable position where it might accidentally fall over.
•Before moving the instrument, remove all connected cables.
Connections
•Before connecting the instrument to other electronic components, turn off the power for all components without computer.
Before turning the power on or off for all components, set all volume levels to minimum. Also, be sure to set the volumes of all components at their minimum levels and gradually raise the volume controls while playing the instrument to set the desired listening level.
Maintenance
•When cleaning the instrument, use a soft, dry cloth. Do not use paint thinners, solvents, cleaning fluids, or chemicalimpregnated wiping cloths.
Handling caution
•Do not place vinyl, plastic or rubber objects on the instrument, since this might discolor the panel or keyboard.
•Do not rest your weight on, or place heavy objects on the instrument, and do not use excessive force on the connectors.
Yamaha cannot be held responsible for damage caused by improper use or modifications to the instrument, or data that is lost or destroyed.
Always unplug the UX16 from a computer or turn off the computer to turn off the UX16 when the UX16 is not in use.
(3)-11

Welcome to the UX16
Thank you for choosing the Yamaha UX16 USB-MIDI Interface Cable.
The UX16 is a MIDI interface that features simultaneous playback of up to 16 channels. Connect the UX16 to a computer that has a USB terminal and enjoy the advantages of digital music.
Please read this owner’s manual thoroughly to make the best use of the UX16. After you read this manual, please keep it in a safe place for future reference.
Table of Contents |
|
UX16 Features.................................................................................. |
5 |
Package Contents............................................................................. |
6 |
Parts and Functions .......................................................................... |
7 |
Installing the Driver .......................................................................... |
8 |
Connections................................................................................... |
16 |
Changing the driver setting (MIDI Patch Screen)............................ |
17 |
Uninstalling the USB-MIDI Driver.................................................... |
20 |
System Requirements ..................................................................... |
22 |
Specifications ................................................................................. |
22 |
Troubleshooting (FAQ)................................................................... |
23 |
•The contents of this Owner’s Manual and the copyrights thereof are under exclusive ownership by Yamaha Corporation.
•The screen displays as illustrated in this manual are for instructional purposes, and may appear somewhat different from the screens which appear on your computer.
•Windows is a registered trademark of Microsoft® Corporation in the United States and other countries.
•Apple, Mac and Macintosh are trademarks of Apple Inc., registered in the U.S. and other countries.
The company names and product names in this manual are the trademarks or registered trademarks of their respective companies.
4

UX16 Features
● 16 channel simultaneous playback
Supports your music production system with one MIDI OUT port (16 channels) and one MIDI IN port (16 channels).
● Easy Hot Swap Connection
With a USB connection, you can connect and disconnect the USB cable while the power to the computer is on. The UX16 operates on USB bus power and does not require a power adaptor.
● Indicators show the operating status
The indicators of USB and MIDI IN/OUT make it easy to verify operation.
● Connect multiple units to expand your system
You can easily expand the number of ports by using a USB hub to connect multiple UX16 units.
NOTE A maximum of 16 units can be connected, but this will depend on your system.
● Supports Windows and Macintosh
The UX16 supports Windows 2000/XP/Vista and Mac OS X 10.4 through Mac OS X 10.5.
Notes on USB
When connecting the UX16 to the USB terminal of your computer, you must observe the following points.
If you fail to observe these points, your computer may freeze (hang up), or the UX16 may stop working.
If your computer or the UX16 stops working, power-off your computer and start it up again.
• Before you connect the UX16 to the USB terminal of your computer, you must disable power conservation mode (suspend/sleep/standby, etc.) on your computer.
•You must do the following before you connect or disconnect the USB cable.
→Close all applications.
→Make sure that data is not being transmitted from the UX16.
•You must leave an interval of at least six seconds between plugging and unplugging the USB cable.
5
Package Contents
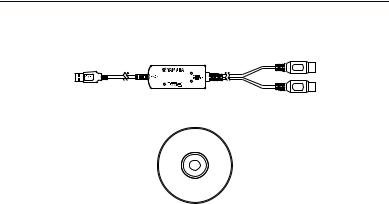
The UX16 package contains the following items. Check the contents for missing items.
• USB-MIDI interface cable (UX16 main unit)
IN
OUT
• CD-ROM (Windows/Macintosh hybrid CD)
About the included software
The included CD-ROM contains the following software (driver).
•USB-MIDI driver (Yamaha USB-MIDI Driver)
This driver is required for operating the UX16. For details on installation, refer to the following.
If you’re using Windows: see page 8
If you’re using Macintosh: see page 13
6

Parts and Functions
31
1USB indicator
This indicator will light when the USB cable is connected and the driver on your computer begins to operate.
2MIDI IN/OUT indicators
These indicators will light when MIDI messages pass through the corresponding cable.
3USB cable
Connect this to the USB terminal of your computer or USB hub.
2 4
IN
OUT
5
4 MIDI IN cable
This cable receives MIDI messages from your keyboard or other MIDI device. Connect it to the MIDI OUT terminal of your MIDI device.
5 MIDI OUT cable
This cable transmits MIDI messages to your tone generator or other MIDI device. Connect it to the MIDI IN terminal of your MIDI device.
7
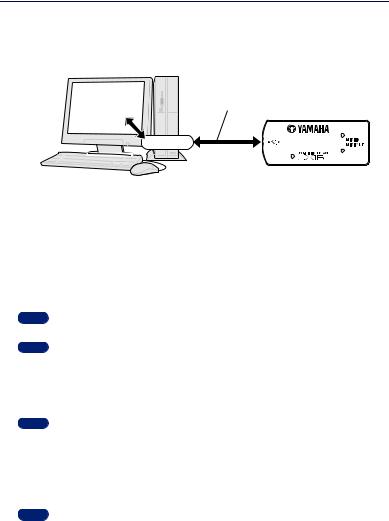
Installing the Driver
To operate the UX16, you need to install the driver on the computer correctly. The USB-MIDI driver is software that transmits MIDI signals back and forth between sequence software and the UX16 via a USB cable.
Computer |
|
Sequence |
USB cable |
software |
UX16 |
|
Driver |
Windows 2000 users → See page 8.
Windows XP users → See page 9.
Windows Vista users → See page 10.
Mac OS X users → See page 13.
Windows users:
● Installing the USB-MIDI Driver on a Windows 2000 Computer
NOTE |
Do not connect the UX16 to your computer until you are instructed to do so in the |
|
following procedure. |
NOTE |
You must log into Windows as the Administrator (using the computer’s administrator |
|
account) to install the USB-MIDI driver. |
1.Insert the CD-ROM included in the package into the CD-ROM drive on your computer.
The system displays the UX16 Driver Installation Utility panel.
NOTE If the system does not display the UX16 Driver Installation Utility panel, double-click “My Computer,” then right-click the CD-ROM drive icon. The system displays a pop-up menu. Select [Open] from the pop-up menu, then double-click the “Start_E.exe” file.
2.Click [Install].
3.Connect the UX16 to the computer.
The system automatically launches the Found New Hardware Wizard.
NOTE Some computers may take a while to display the Wizard window.
Click [Next].
8
 Loading...